When you click on links to various merchants on this site and make a purchase, this can result in this site earning a commission. Affiliate programs and affiliations include, but are not limited to, the eBay Partner Network.
I need to replace 2 front wheel studs on driver's side of my 4wd IFS truck. I've searched for writeups on the required procedure (here and on other forums), but so far have only found them on manual hub removal, and a few posts on frustrated yotatechers stuck at some stage, this or other, of this front wheel stud replacement on IFS trucks, but nothing thorough.
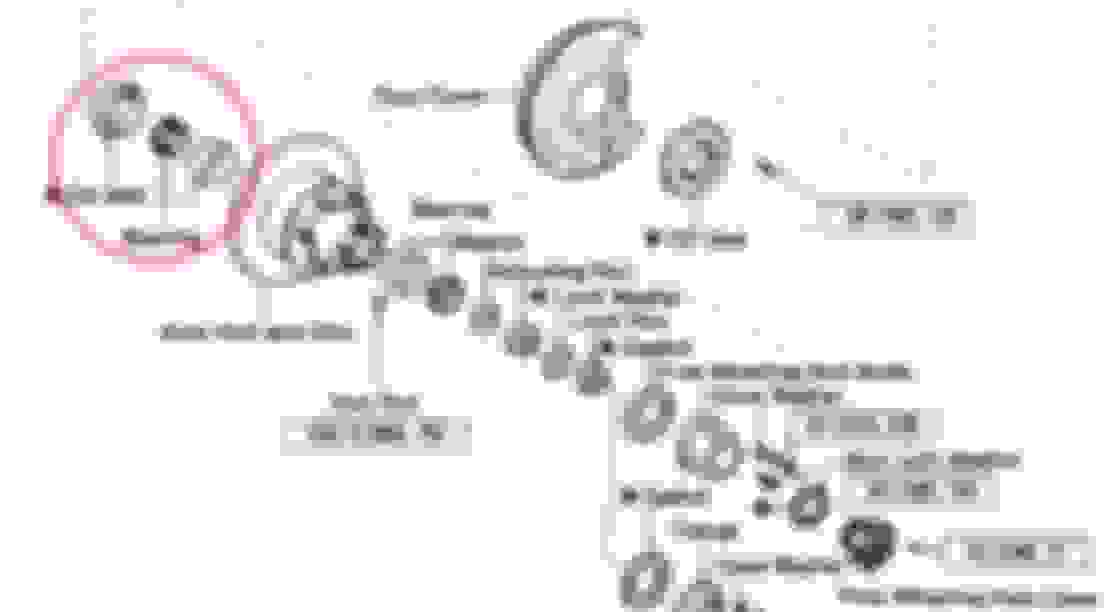
In short, I understand these three main steps must be completed in order to gain access to wheel studs:
1.- Removal of manual hub
2.- Removal of rotor and wheel hub
3.- Separation of rotor and wheel hub
I have no problem understanding the procedure for manual hub removal. What remains somewhat ambiguous to me are the other two steps.
My main question is: MUST OIL SEAL AND BEARINGS BE NECESSARILY REMOVED? (see picture below)
And it follows then, MUST THE OIL SEAL (AND BEARING) BE ALSO NECESSARILY REPLACED FOR A NEW ONE?
In addition to this, I haven't been able to find a 54 mm socket (or its 2' and 1/8 equivalent socket for that matter) anywhere, which is needed to remove both the adjusting and locking nuts inside the wheel hub. I've seen the "screwdriver and hammer" method is useful to accomplish this, but here rises my second question: HOW CAN ONE TORQUE TO SPECS THESE TWO NUTS using this method? And actually, does someone know the torque specs for them? The FSM doesn't state them, and it must be important, as I understand that those two nuts and the locking washer are the only things keeping the wheel hub and rotor from separating from the truck.
Finally, that locking washer one must bend the tabs, is it a replacement part or can its tabs be bent-unbent infinite times without them breaking off?
If anyone could kindly share some feedback on this, I would greatly appreciate it!
My best recollection is that the inside nut is to be torqued to 18fp and then the hub checked for correct preload with a pull-scale. FSM says 6.4 to 12.6fp preload at a wheel stud.
The outer nut may be snugged up a bit tighter
The locking tabs can be reused right up until they can't. If the tabs are not severely cracked, or broken off, you can reuse them.
As to the rear bearing and seal, no, it should not be absolutely necessary to remove them, but good practice and common sense says that the wheel bearings and races should be cleaned, examined and re-greased
whenever a hub is disassembled.
You may be able to replace the wheel studs without removing the rotor and hub assembly.
It has been a very long time since I tried on an IFS Toyota, buy you may be able to remove the caliper and access the back side of the hub just enough.
drive out the old stud and fish it out of the back where the caliper was and feed a new stud in.
put a stack of washers over the stud from the outside and put a sacrificial lug nut on. this will draw the stud into the rotor when you tighten it, but often will damage the nut.
If you tighten it too much it will strip the threads on your new stud, so don't go overboard.
If you have an air hammer and if it will fit in the back side with a long punch attached you can seat the stud from the back side through the same gap where the caliper mounts.
This isn't possible on ALL vehicles and I don't remember if Toyota was one of them.
Further consultation of my '95 4Rnner FSM says to torque the nut to 43fp and rotated the hub a couple times before loosening the nut and retorquing to 18fp and checking preload.
Outer nut to be torqued to 35fp and locking tab set. Printed '95 4Runner FSM page SA-17
Here's the FSM page for adjusting the pre-load of the axle nut. http://web.archive.org/web/201204242.../5frontaxl.pdf You'll need an inexpensive spring scale. Having the right sized socket is a convenience, but the torque you apply to seat the bearing could almost be applied by hand. Using a "screwdriver and hammer" would never be necessary, would always be overkill, and would never be even close to the correct torque.
As you can see from your drawing, the locking tabs aren't "supposed" to be reused. I'm sure millball is correct; as long as two of the tabs are in good shape you could reuse them, but they only cost $2.16 at the dealer so there isn't a lot of reason to. https://parts.lakelandtoyota.com/sho...archString=nut
You'll note that the "regular" axle nut sockets are formed from sheet metal, unlike a much heavier forged socket of the same size. The torque requirements are very small. When I did this job, the cost of having a "sheet metal" socket shipped to me made buying a full-blown 54mm socket from my local Sears cheaper. So shop around.
My best recollection is that the inside nut is to be torqued to 18fp and then the hub checked for correct preload with a pull-scale. FSM says 6.4 to 12.6fp preload at a wheel stud.
Originally Posted by millball
Further consultation of my '95 4Rnner FSM says to torque the nut to 43fp and rotated the hub a couple times before loosening the nut and retorquing to 18fp and checking preload.
Outer nut to be torqued to 35fp and locking tab set. Printed '95 4Runner FSM page SA-17
Thanks millball , nowhere in my FSM (93 Pickup) did I find those torque specs, will be using the ones you provided.
Thanks scope103, hadn't thougth about the pre-load adjustment. Thanks for the reminder.
Originally Posted by akwheeler
Disregard my previous comments, I think I remember now, the rotors are bolted to the back of the hub and cover the back of the studs right?
That's right akwheeler, apparently only later Tacomas allow replacing front wheel studs without so much hassle.
Thanks everyone for your feedback. I'll be reporting back when completing this job. As of now, I managed to fix one of the two damaged studs with a thread file, so I'm considering postponing this job to a later time with more time and patience at hand to tackle it correctly (and possibly including replacing both bearings and oil seals when being at it).
If you don't have a pull scale, wrap some cord and hang something from it that weighs about right, full 5 liter oil canister is about right.
Don't get scared how tight you are making the bearings - you think it's wrong but these need a lot of preload.
Buy the 55 mm special nut - it's so lovely to work with it you will want to repack stuff every weekend. Sort of.
Well, that's exactly what I'd like to get clarified.
Does separating the break rotor from the wheel hub REQUIRES dissassembling the oil seal and outer (or inner, for that matter) bearing in the wheel hub? Must preload be readjusted as a result of only separating rotor from hub, even if one does not even touch bearings?
I'm ONLY in need of replacing a wheel stud, not of having to adjust pre-load, repacking bearings, having to purchase a new oil seal, etc etc, and actually end up worrying anything of that didn't end up correctly done, as I have a long trip coming up just days from now and I'm thinking it's best to drive on 5 studs with everything inside the wheel hub fine as it has been for years, than driving with all 6 studs but maybe with a potentially more dangerous situation as a result of not having done exactly right all this complex procedure as this video and others show.
Just bang on the broken stud from the front. It will fall out. The non broken new one is longer, but on my truck it simple worked at the correct angle.
Reuse the oil seal, no need to take it off / out unless you really want to replace / repack the bearings)
I drove with a broken wheel stud for 10 years because I didn't want to to the whole thing. Now I can do a side in 30 minutes max.
The only challenge is the stupid little cone washers. A nut over the stud and light bangs on that will help move them so you can grip them with something. Twist and turn until they are off.
Yes, you need to remove it to take off the rotor. No need for a new oil seal, but all paper and other seals are what? 20 bucks for everything?
It's really not much of a challenge. HAve a torque wrench? (For the caliper mounting bolts. Steering arm needs to come off too. For both you want a torque wrench. Or you skip that arm and remove the hose from the caliper. Must bleed brakes afterwards though.)
 03-25-2019, 06:40 AM