dakotawho's 1987 Pickup Build-Up Thread
 05-02-2012, 05:29 PM
#1
Registered User
Thread Starter
iTrader: (1)
Join Date: Oct 2011
Location: VA
Posts: 599
Likes: 0
Received 0 Likes
on
0 Posts
dakotawho's 1987 Pickup Build-Up Thread
Well guys, i have finally gotten the truck i drove around in my early teens, first 5 speed i learned to drive. It has swapped hands between my step dad and grandad multiple times but has been in the family for as long as i can remember. So at least the past ten years. It's rough...i know but the truck is sorta sentimental to me i guess.
Can't say this will be the quickest build-up, cash flow isn't super high, not til summertime at least while i work.
Anyways my grandad has finally given up putting money into her. My aware problems are:
*Needs a clutch(already ordered, waiting to receive and get time to put in)
*Has small crack in windshield(think windshield places will fix it? you guys know any home remedies?)
*Needs a carb kit, No gas stays in the little looking glass thing.
*Motor needs to be cleaned up to see if it's still leaking oil, grandad said he had it fixed but his mechanic didn't have enough pride to clean it up. Motor should be fine though, was rebuilt within the last 20k by an A tech at local toyota dealership
*A seat wouldn't hurt, it's like sitting on springs and a pillow:/
*Manual hubs could be rebuilt(maybe?) there sorta hard to lock in.
*Shocks...pretty sure it has the originals on it....there rusted through lol
*Mirrors are starting to fall out of door.
*Carpet wouldn't hurt
*Windows require help going up and down
...sure ill find more
The Good:
*Brakes are fairly new
*SR5 cluster, woo!
*Fresh tires, thanks to me haha, i bought the grandad tires for letting me use it as a DD until i got a vehicle, prob don't have 300 miles on them.
*It's a TOYOTA!!!
*And it's finally mine
Any suggestions as far as the rust goes, are appreciated, i'm leaning towards a flat bed...and maybe trimming the front fenders until i find some to stick on there
Enough with the talk, let's get some pics
Last edited by dakotawho; 05-03-2012 at 06:00 PM.
 05-15-2012, 05:34 PM
#2
Registered User
Thread Starter
iTrader: (1)
Join Date: Oct 2011
Location: VA
Posts: 599
Likes: 0
Received 0 Likes
on
0 Posts
Well clutch and other stuff came in today....ill list all the parts when I get a chance....looking like mid june for the install thanks to school and work.....summer will be when the most progress happens...
Anything you guys reccomend doing while I already am that far?
Having the flywheel resurfaced called and asked and heard it was about 60$, is that high?
All direct from dealer....coulda saved more now that i found toyota parts zone but i got decent prices...

Reman Clutch Cover
Hub, Clutch Release
Disc Assy, Clutch
Bearing, Radial Ball
Seat Sub-Assy, Shift
Bush, Shift Lever
Well I'm off to read more on the clutch installation and get lost in builds....just about done with swimmerboy2112s
Anything you guys reccomend doing while I already am that far?
Having the flywheel resurfaced called and asked and heard it was about 60$, is that high?
All direct from dealer....coulda saved more now that i found toyota parts zone but i got decent prices...
Reman Clutch Cover
Hub, Clutch Release
Disc Assy, Clutch
Bearing, Radial Ball
Seat Sub-Assy, Shift
Bush, Shift Lever
Well I'm off to read more on the clutch installation and get lost in builds....just about done with swimmerboy2112s
Last edited by dakotawho; 05-20-2012 at 05:36 PM. Reason: added parts and reciept
05-15-2012, 06:32 PM
#3
Registered User
Join Date: Mar 2009
Location: (LSD) Lower Slower Delaware
Posts: 1,169
Likes: 0
Received 0 Likes
on
0 Posts
Nice starter vehicle, check the frame for rust, they have problem of rusting out from the inside round the fuel tank, both sides. Good luck......Bill
05-15-2012, 06:48 PM
#4
Registered User
Thread Starter
iTrader: (1)
Join Date: Oct 2011
Location: VA
Posts: 599
Likes: 0
Received 0 Likes
on
0 Posts
Thanks for the advice.....ill have to look....I know when I looked most of it appeared to be just surface rust....I do know the floorboards are developing holes. Plan on fixing that when I carpet it
07-06-2012, 04:26 PM
#5
Registered User
Thread Starter
iTrader: (1)
Join Date: Oct 2011
Location: VA
Posts: 599
Likes: 0
Received 0 Likes
on
0 Posts
Still haven't got the clutch in, been driving it around on it's last leg. Been a busy summer so far:/ and super hot lately. Stinks on the hot part because i'll be doing the clutch outside... hopefully within the next couple weeks, it'll be in.
Anyways i did get some gunk cleaner and hit the motor, WOW it actually looks somewhat nice, gonna hit it again in a couple of days....


Also took the 32s off my DD because there's not much tread and they wear funny, and stuck them on here, they rub a little


Oh and found this thing....think it's a welder.

Anyways i did get some gunk cleaner and hit the motor, WOW it actually looks somewhat nice, gonna hit it again in a couple of days....
Also took the 32s off my DD because there's not much tread and they wear funny, and stuck them on here, they rub a little
Oh and found this thing....think it's a welder.
Last edited by dakotawho; 07-06-2012 at 04:28 PM.
07-09-2012, 04:55 PM
#6
Registered User
Thread Starter
iTrader: (1)
Join Date: Oct 2011
Location: VA
Posts: 599
Likes: 0
Received 0 Likes
on
0 Posts
Dropped the tranny today, wasn't near as bad as i thought....although i didn't think i'd have to jerk on it that much to get it loose....hopefully taking the flywheel off tomorrow to go get it resurfaced......hopefully have a new clutch in her in the next 2 weeks
07-11-2012, 04:22 PM
#7
Super Moderator
Staff
iTrader: (1)
Join Date: Aug 2008
Location: Anderson Missouri
Posts: 11,788
Likes: 0
Received 21 Likes
on
19 Posts
I have a metal building and it is to hot to work inside it. I actually enjoy working out in the shade myself at least you can get some moving air.
Seen you had carpet on the list for your build. You might be surprised at how good it will clean up if you take it out and go to a carwash with it. I just looked into buying some carpet and it isnt to bad price wise for a pickup.
Like the color and graphics on your truck.
Seen you had carpet on the list for your build. You might be surprised at how good it will clean up if you take it out and go to a carwash with it. I just looked into buying some carpet and it isnt to bad price wise for a pickup.
Like the color and graphics on your truck.
Trending Topics
07-20-2012, 04:49 PM
#9
Registered User
Thread Starter
iTrader: (1)
Join Date: Oct 2011
Location: VA
Posts: 599
Likes: 0
Received 0 Likes
on
0 Posts
Got the clutch in, boy does she grab when in gear.... 1st is a little funny engaging....dont remember it being like that ..... Going to change the tranny fluid and finish gunking in a couple days
07-30-2012, 06:07 PM
#11
Registered User
Thread Starter
iTrader: (1)
Join Date: Oct 2011
Location: VA
Posts: 599
Likes: 0
Received 0 Likes
on
0 Posts
Well today was a great day!
Sold my 4runner seats and scored a free tool box....one of the small cheap plastic ones.....but it s free!
Here's the latest project, thinking of swapping the cab.... PO said motor was blew up....but i put in a battery and it sounded like the solenoid in the starter was bad.....so maybe there s hope for this one....if not....prob tear the motor down and learn!
09-01-2012, 03:57 PM
#12
Registered User
Thread Starter
iTrader: (1)
Join Date: Oct 2011
Location: VA
Posts: 599
Likes: 0
Received 0 Likes
on
0 Posts
Haven't been too productive lately just driving the truck 1000+miles on the clutch and no problems had my rotors turned a couple days ago. Still gonna need brakes though..... Takes forever to come to a stop... Almost forgot. My ignitor/coil started going the other day....my truck went from being somewhat hard to start to no start at all. All it would do is crank crank crank. Finally got it started and it had little idle and bogged awfully. Had to give it gas and hold the clutch in while sitting. Did a search on here. Read it might be ignitor, took the one outta my part truck, runs like a jewel again!
1000+miles on the clutch and no problems had my rotors turned a couple days ago. Still gonna need brakes though..... Takes forever to come to a stop... Almost forgot. My ignitor/coil started going the other day....my truck went from being somewhat hard to start to no start at all. All it would do is crank crank crank. Finally got it started and it had little idle and bogged awfully. Had to give it gas and hold the clutch in while sitting. Did a search on here. Read it might be ignitor, took the one outta my part truck, runs like a jewel again!
09-24-2012, 05:18 PM
#14
Registered User
Thread Starter
iTrader: (1)
Join Date: Oct 2011
Location: VA
Posts: 599
Likes: 0
Received 0 Likes
on
0 Posts
My long bed twin!

Wish I had the vent windows!
http://item.mobileweb.ebay.com/viewi...id=43484469767
Wish I had the vent windows!
http://item.mobileweb.ebay.com/viewi...id=43484469767
09-25-2012, 12:34 AM
#15
Super Moderator
Staff
iTrader: (1)
Join Date: Aug 2008
Location: Anderson Missouri
Posts: 11,788
Likes: 0
Received 21 Likes
on
19 Posts
I been slowly catching up on some threads. Glad to hear your swap is going well. I just noticed even though it is a while back that your low beam headlights arent working. That is an easy fix. If you go to my 88 runners build thread below and on the first page it will tell you where to go and (pg 8 post #199) how to fix it. You can rent a steering wheel puller for free and then 4 screws hold it on. I usually just pull the steering wheel off at the parts store and then snug the bolt back on so that it cant come off and then go home and clean the contacts on the switch assembly.
I sent you a PM, and on my 86 Runner build I did post a picture of the rear of the frame with the wireharness showing how it runs along the bed, it is on one of the last 2 pages of the 86 Runner build. You will need to remove the tail lights and pull the harness thru the rear of the bed area and let it hang on the frame til you remove the bed.
I sent you a PM, and on my 86 Runner build I did post a picture of the rear of the frame with the wireharness showing how it runs along the bed, it is on one of the last 2 pages of the 86 Runner build. You will need to remove the tail lights and pull the harness thru the rear of the bed area and let it hang on the frame til you remove the bed.
09-25-2012, 04:56 AM
#16
Registered User
Thread Starter
iTrader: (1)
Join Date: Oct 2011
Location: VA
Posts: 599
Likes: 0
Received 0 Likes
on
0 Posts
Actually my light had just blew, it wasnt a wiring issue, but i still might do the upgraded headlight wiring eventually. I also don't plan on removing the bed if i dont have to. The bed on the parts truck is shot! Looks like someone took a shotgun to it, no joke
12-09-2012, 10:41 AM
#17
Registered User
Thread Starter
iTrader: (1)
Join Date: Oct 2011
Location: VA
Posts: 599
Likes: 0
Received 0 Likes
on
0 Posts
Well guys the cab swap is partily done, have the cab on the frame, now i'm just switching what i want from both the trucks, it's really not that bad, i'm 17 and did it mainly by myself with little to no problem, although i do reccomend having a truck to look at to make sure you hook everything back up right. It was probably a little easier with the 22r too.
We stuck a strap with two loops on the crane. We went in a circle around the cab, like we sent one end of the strap through the other loop to make a circle around the cab. and then took the other loop to the crane hook. It did some minor damage to the little lip that the chrome trim near the windows goes on, but i should be able to fix that no problem
Here's some pics, there are more on my photobucket-dakotawho
12-09-2012, 12:23 PM
#18
Super Moderator
Staff
iTrader: (1)
Join Date: Aug 2008
Location: Anderson Missouri
Posts: 11,788
Likes: 0
Received 21 Likes
on
19 Posts
Congratulations..I knew you could do it. At 17 that is a good challenge for you and should show you that with the right attitude and ambtion, there isnt much you cant do and that isnt just trucks, just life in general. Alot of older people would be intimidated by something like that and you did it. Big Congrats!!!
Not so bad is it?? You will get the rest done, hang in there. Bet you are just itching to get out and drive it and your confidence leve is thru the roof. You never know, but a 1st or 3rd gen truck may come along and you have the abilities to swap those as well. Probably 95% of what you just did applies to them as well.
Not so bad is it?? You will get the rest done, hang in there. Bet you are just itching to get out and drive it and your confidence leve is thru the roof. You never know, but a 1st or 3rd gen truck may come along and you have the abilities to swap those as well. Probably 95% of what you just did applies to them as well.
Last edited by Terrys87; 12-09-2012 at 01:33 PM.
12-09-2012, 01:53 PM
#19
Registered User
Thread Starter
iTrader: (1)
Join Date: Oct 2011
Location: VA
Posts: 599
Likes: 0
Received 0 Likes
on
0 Posts
Yeah now its dash removal and bleeding of all the lines. I'm gonna have to have a rocker panel cut out and welded in and possibly a small part near the driver firewall.
12-10-2012, 07:24 AM
#20
Super Moderator
Staff
iTrader: (1)
Join Date: Aug 2008
Location: Anderson Missouri
Posts: 11,788
Likes: 0
Received 21 Likes
on
19 Posts
Here is some info on pulling the dash. If not all the links work go to post #451>>> https://www.yotatech.com/forums/f199...9/index19.html sometimes all of the links dont transfer over.
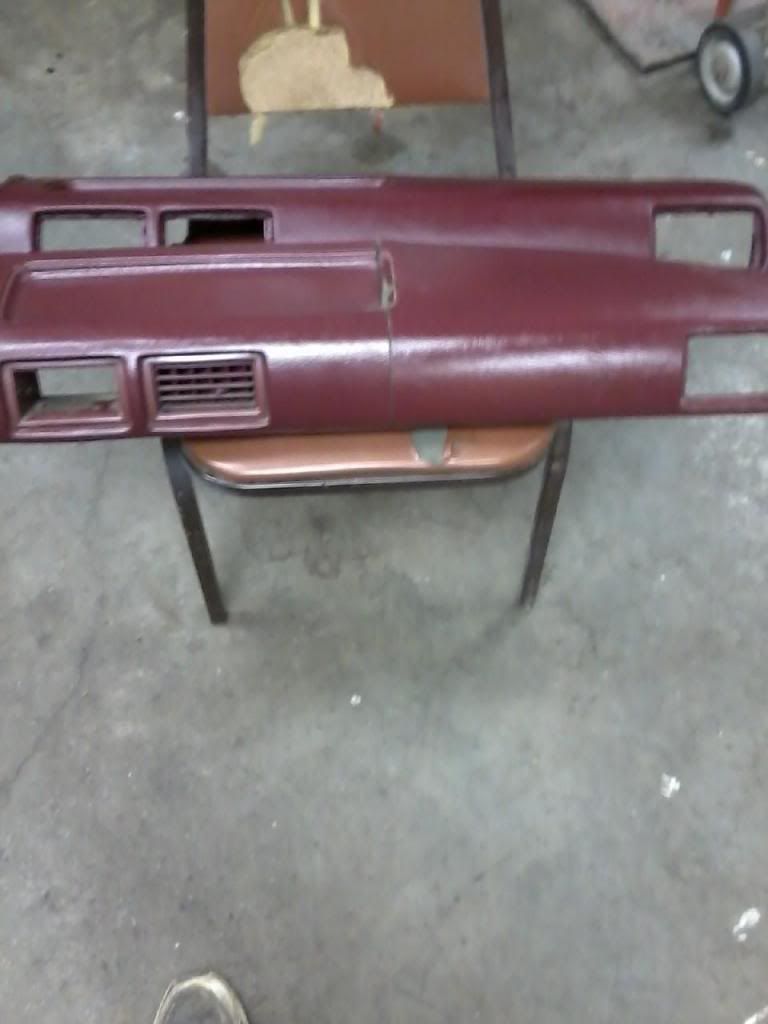
Dash Pad Replacement.
I am currently replacing my dashpad and will update my post on this as I go. It is fairly easy once you know the steps.
1.Remove Speedometer Bezel and there is a 10 mm nut that holds the left side of the dash pad in.
2. Take out the far right vent on passener side. Mine cracked bad as it was brittle.There is another 10mm nut that holds the right side of the dashpad in.
3.Take out the glovebox. 2 screws at the bottom, holds the glovebox in. There is a black strip that has a cover attached to it. Just take a flatblade screwdriver and pop out the little tabs.
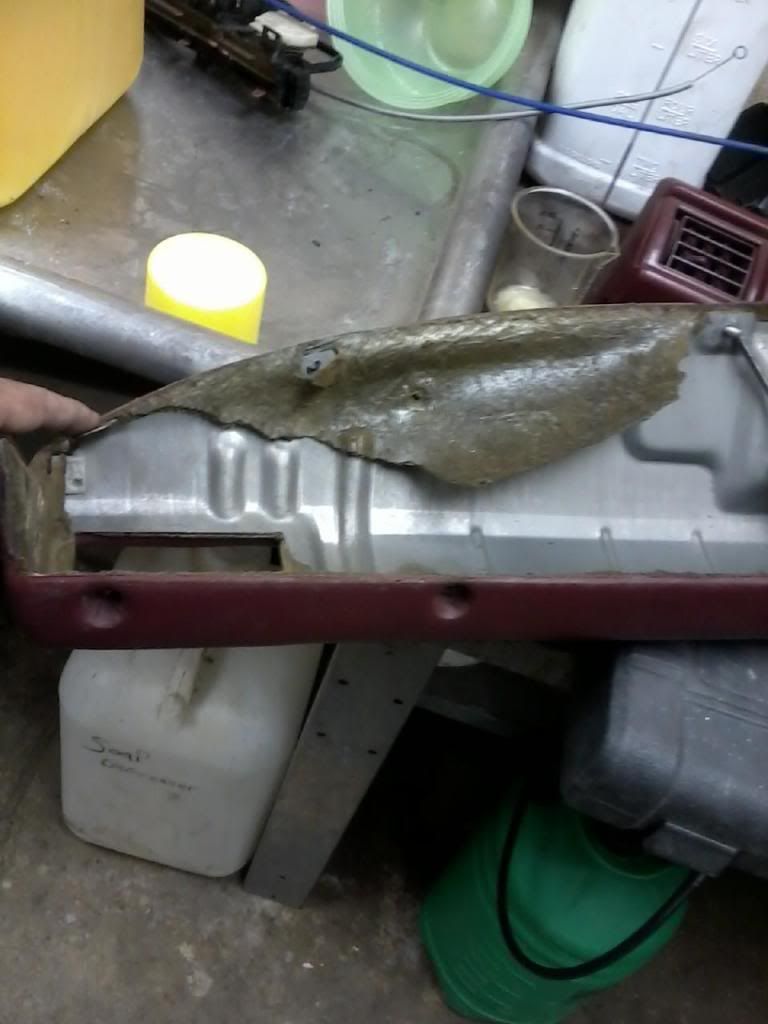
4. I will get a picture below but there is a little screw that holds part of the ventilation pipe in. Take the screw out and slide the 4-5inch vent pipe out of the way(first picture). Straight above it, there is another 10mm nut that has to be removed.
5.You have 5 screws at the bottom of the dashpad that you have to take out and it is done.
Not hard at all, but if you dont know how to do it, I dont think I would of figured it out. Didnt have my manual, and thought I could wing it. YT saved the day. I will post some links that helped me out alot.
The ones that mention dashpad removal are the ones that saved my butt.
With the dashpad out of the way, it makes it easier to work on the heater control assembly. Mine is broken and it is still a pain to get to.
Notes for myself.
Black cable goes below heater core.
White/clear cable goes along top of dash to right side.
Blue cable goes to assembly under hood through firewall.
Great link to dashpad removal. https://www.yotatech.com/forums/f115...emoval-189633/
Duct that needs removed to get the center nut of dash pad. Once you remove it, straight up is the nut.
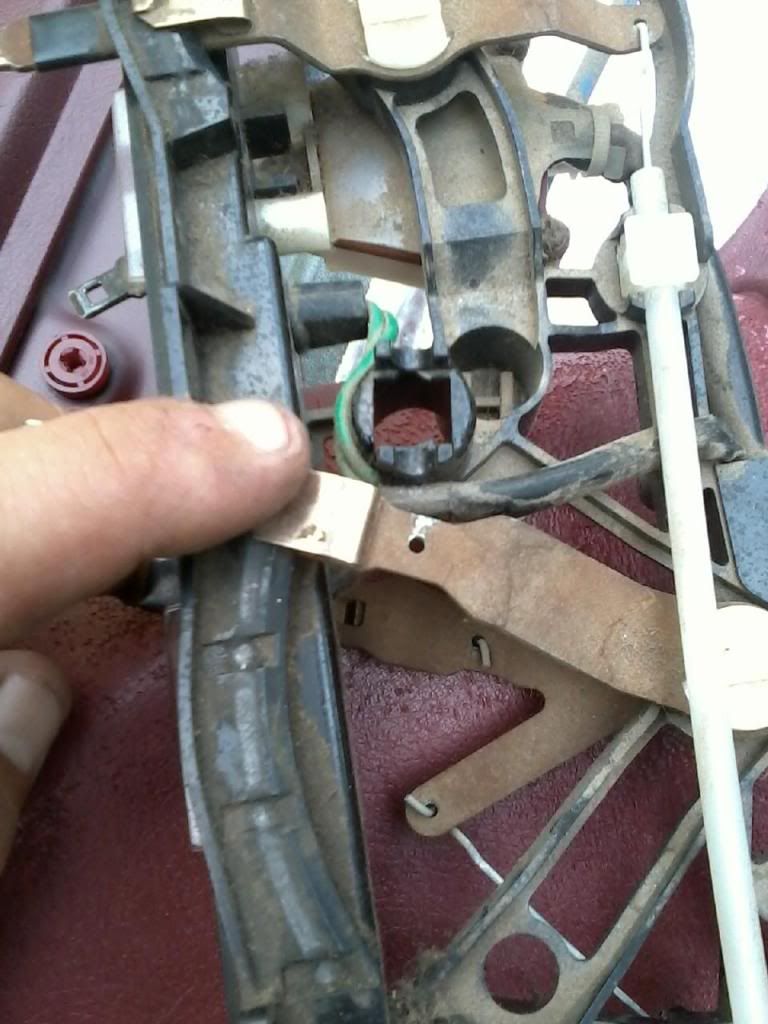
The bolt that holds the passenger side is where my finger is and the nut is for the center of the dashpad. Screwdriver tip is on the stud for where nut needs to go.
Youtube video I found that might help some.
Video I made to get the passenger vent out.
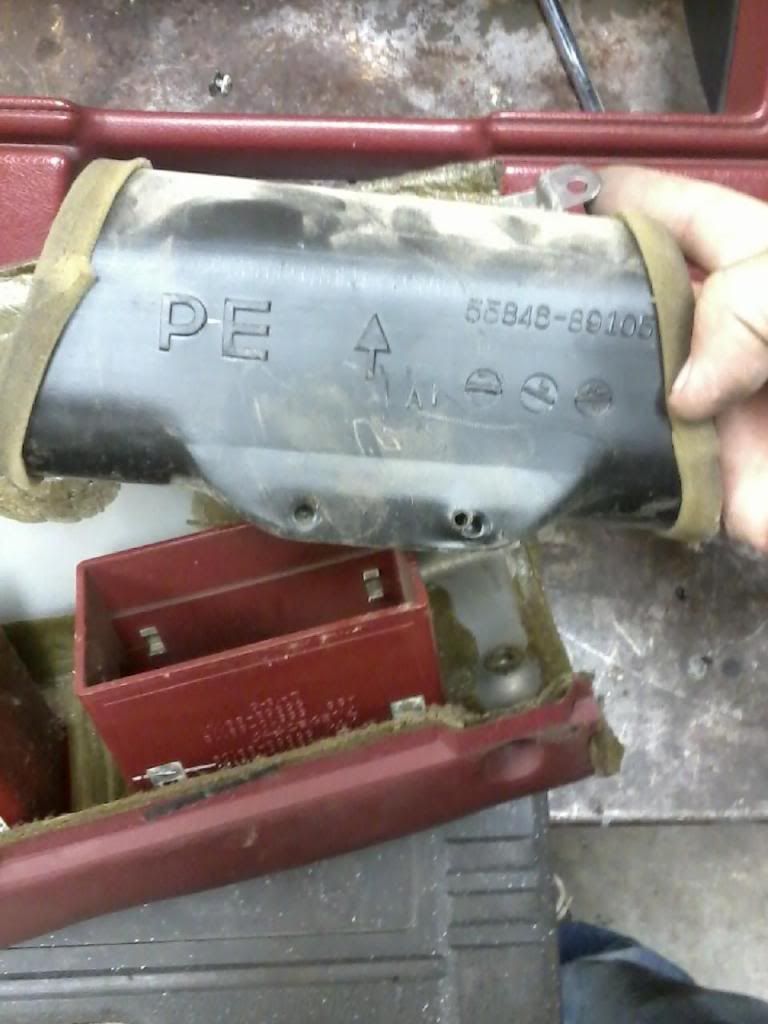
Video to get the PE pipe out and the center dashpad nut.
Most likely broken part on heater control. Once the dash pad is off, there is a single screw that holds the double plastic vent that needs to be removed to make a little more room to get the heater control assembly out. I pulled the whole assembly and cables out together making sure not to get any sharp bends in the cable. I was able to pull the cables from the right side and then the right side of the assembly and the the left side of the assembly and then left cables.
Here is what I am replacing. The cracked one is orginal color. The back one was gray and I used interior paint on it. Both have Armorall on them.
Dash Pad Replacement.
I am currently replacing my dashpad and will update my post on this as I go. It is fairly easy once you know the steps.
1.Remove Speedometer Bezel and there is a 10 mm nut that holds the left side of the dash pad in.
2. Take out the far right vent on passener side. Mine cracked bad as it was brittle.There is another 10mm nut that holds the right side of the dashpad in.
3.Take out the glovebox. 2 screws at the bottom, holds the glovebox in. There is a black strip that has a cover attached to it. Just take a flatblade screwdriver and pop out the little tabs.
4. I will get a picture below but there is a little screw that holds part of the ventilation pipe in. Take the screw out and slide the 4-5inch vent pipe out of the way(first picture). Straight above it, there is another 10mm nut that has to be removed.
5.You have 5 screws at the bottom of the dashpad that you have to take out and it is done.
Not hard at all, but if you dont know how to do it, I dont think I would of figured it out. Didnt have my manual, and thought I could wing it. YT saved the day. I will post some links that helped me out alot.
The ones that mention dashpad removal are the ones that saved my butt.
With the dashpad out of the way, it makes it easier to work on the heater control assembly. Mine is broken and it is still a pain to get to.
Notes for myself.
Black cable goes below heater core.
White/clear cable goes along top of dash to right side.
Blue cable goes to assembly under hood through firewall.
Great link to dashpad removal. https://www.yotatech.com/forums/f115...emoval-189633/
Duct that needs removed to get the center nut of dash pad. Once you remove it, straight up is the nut.
The bolt that holds the passenger side is where my finger is and the nut is for the center of the dashpad. Screwdriver tip is on the stud for where nut needs to go.
Youtube video I found that might help some.
Video I made to get the passenger vent out.
Video to get the PE pipe out and the center dashpad nut.
Most likely broken part on heater control. Once the dash pad is off, there is a single screw that holds the double plastic vent that needs to be removed to make a little more room to get the heater control assembly out. I pulled the whole assembly and cables out together making sure not to get any sharp bends in the cable. I was able to pull the cables from the right side and then the right side of the assembly and the the left side of the assembly and then left cables.
Here is what I am replacing. The cracked one is orginal color. The back one was gray and I used interior paint on it. Both have Armorall on them.


