
 02-09-2016, 09:42 AM
Last edit by: IB Advertising
See related guides and technical advice from our community experts:
Browse all: Exterior Guides
- Toyota 4Runner 1984-1995 How to Repair Rear Window
Step by step instructions for do-it-yourself repairs
Browse all: Exterior Guides

4runner rear window repair walkthrough
06-01-2010, 08:44 PM
#1
Registered User
Thread Starter
4runner rear window repair walkthrough
Universal issue on the old (and new?) 4runners, fixed on the cheap. Recently purchased a '90 and the rear window wouldn't go up at all when bought, would just beep. That issue was a broken door latch, window won't go up if gate isn't shut tight. Rather than fix latch, figured one side was good enough and just disconnected the door ajar plug inside the gate, but window still was ultra sluggish, cockeyed, and wouldn't close all the way.
Tuns out a window support track was so rusted the roller rail wouldn't stay in the groove. While I was in there, decided to replace the motor as well ($55 brand new most everywhere), beats hotwiring it off the battery for those precious extra amps every time the window needs to go up or down...
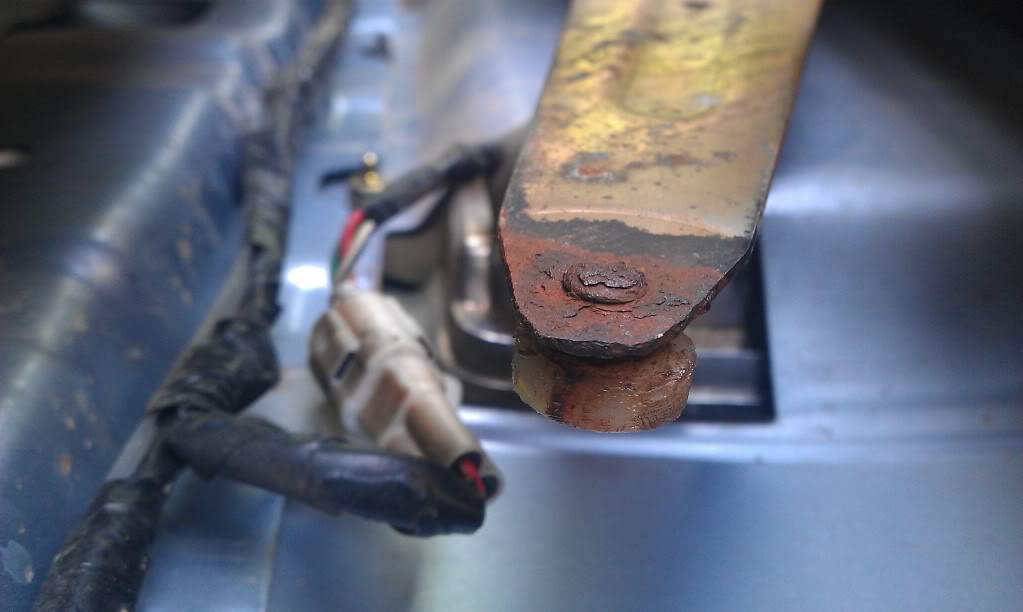
4 clearly visible 10mm bolts hold the regulator in place. Raise window about 1/3 of the way up and remove these bolts (jump motor direct from battery to raise window with the tailgate lowered, hot wire to one of the plug prongs, ground to the other raises it, reverse lowers. Or - raise window first, then with pliers pull up on the pin preventing the lock from being disengaged when the window is up, then unlock and open). Door handle and lock rods are held in place on the regulator and handle end by plastic clips. These rotate, unsnap and rods pull free. Disconnect door latch cables and all wires impeding regulator removal.
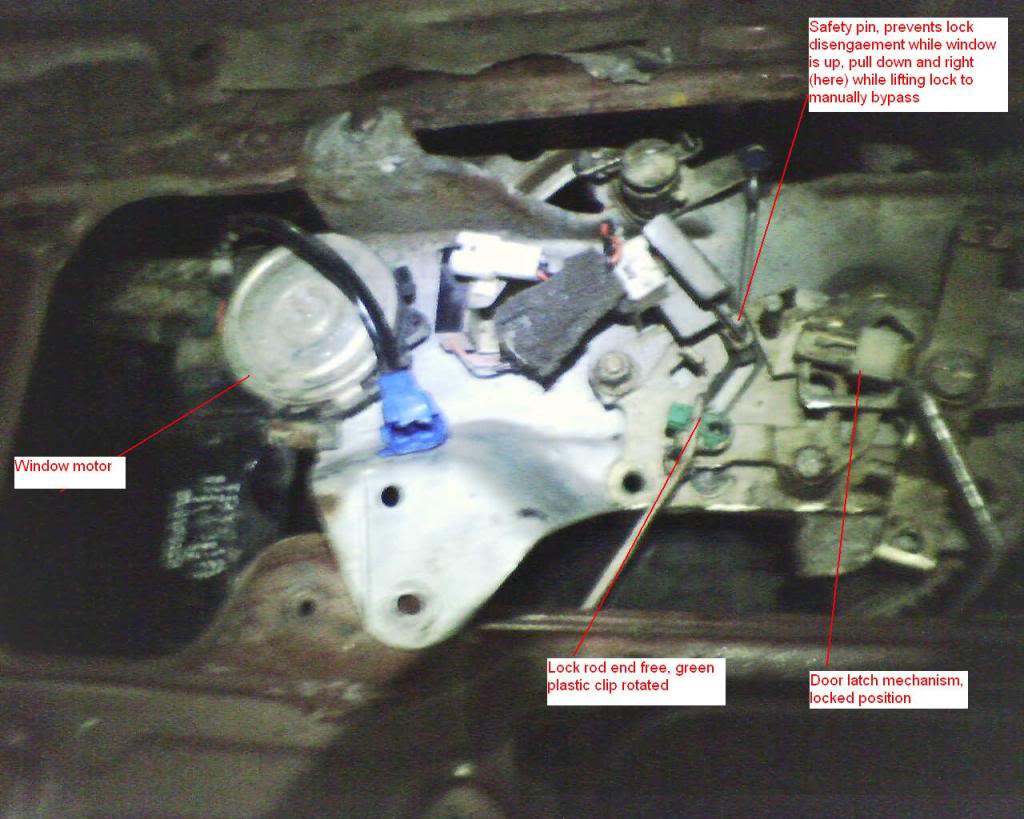
(Photo quality sucks, I know, real camera is on the fritz).
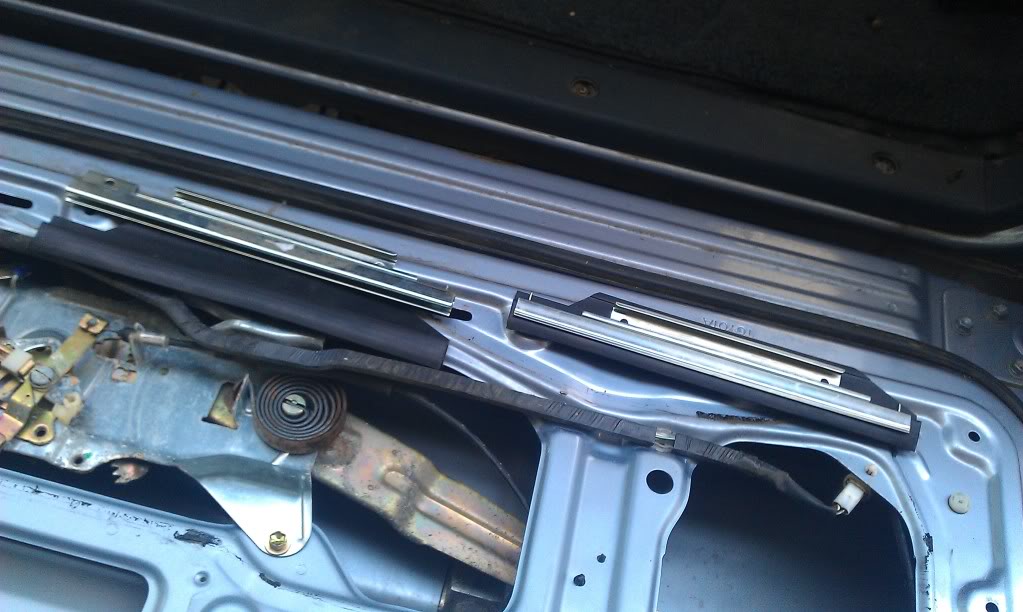
Slide the rollers all the way to the outside of one window track and it comes out, then all the way to the other side for the opposite rail.
Jump window motor to the battery until rails are in the lowermost and narrowest position and remove regulator. Motor is held in with 3 8mm bolts (or flathead/torx depending on year) on the reverse side, remove these.
Rails are under spring tension, when motor is removed they snap closed so watch for pinching. Remove screws holding top gate trim piece on, door handle (two screws under lever) and lock, remove trim and slide window glass out.
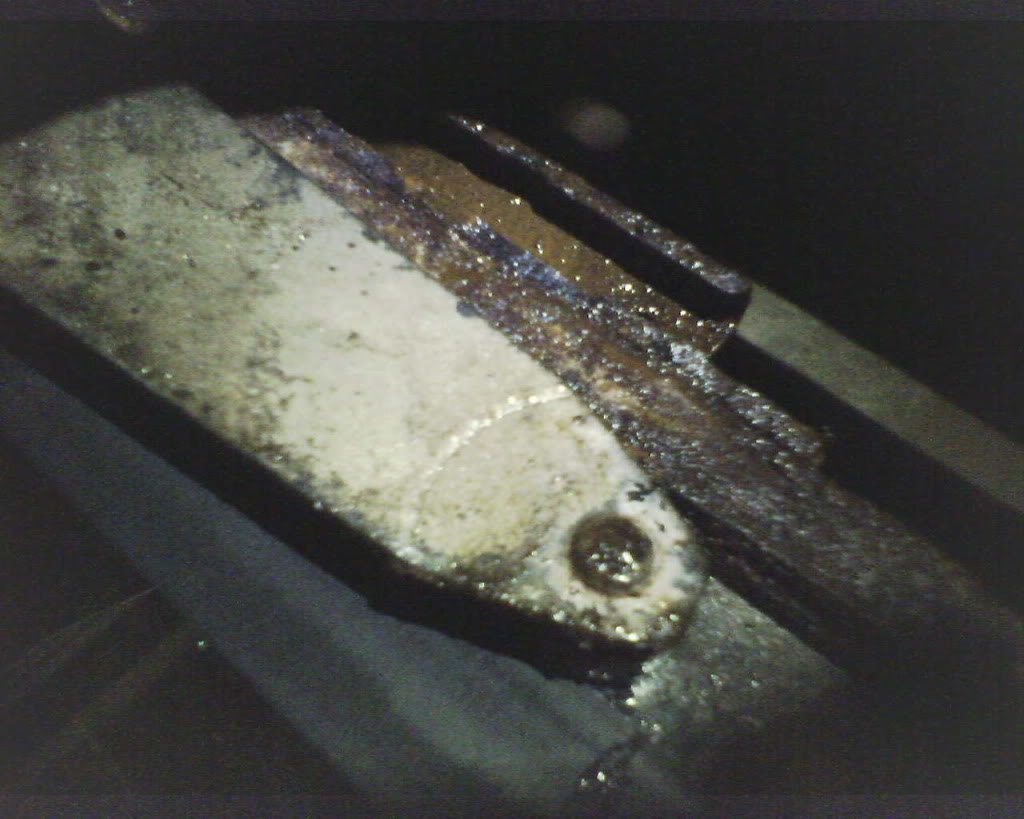
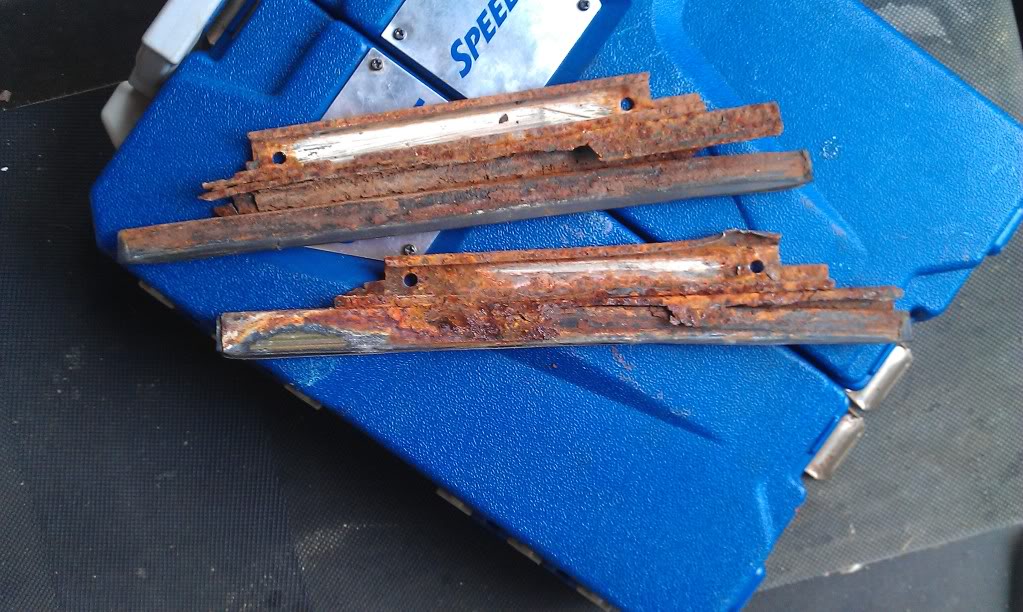
Pass side was OK, chainsaw bar oil to keep it from further rusting.
Driver's side was shot. Ground the entire channel off, and buffed the the "U" channel which grips the glass cleanish for a weld (or epoxy).
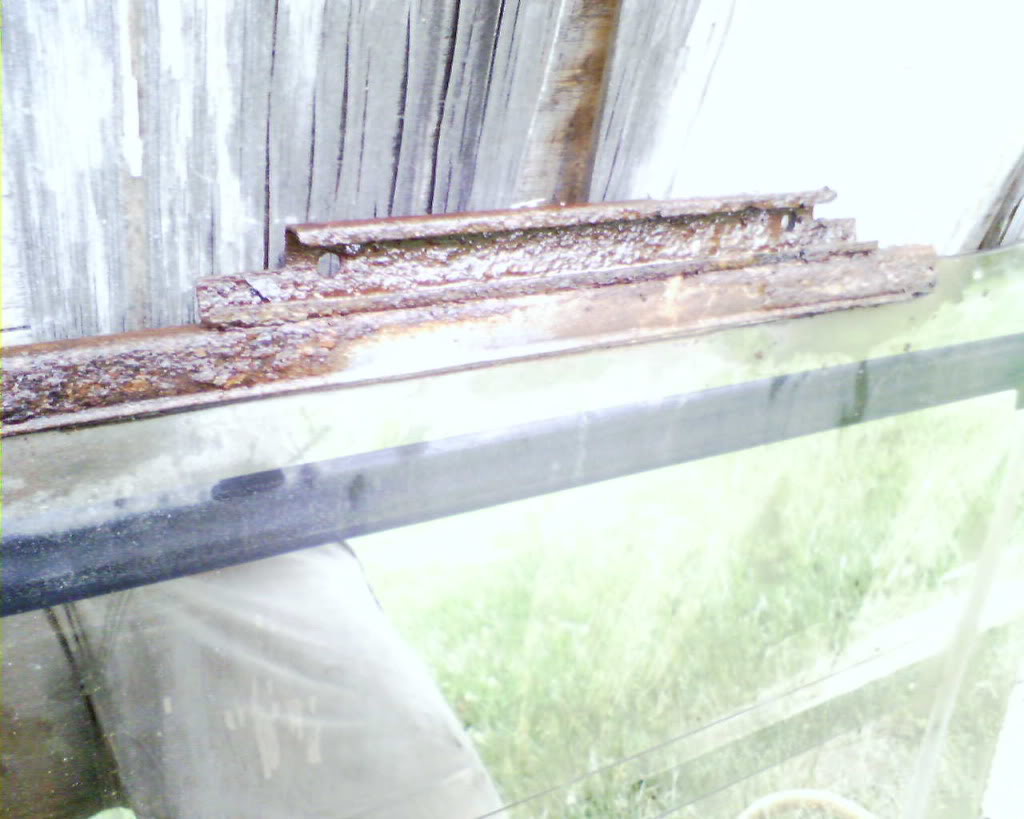
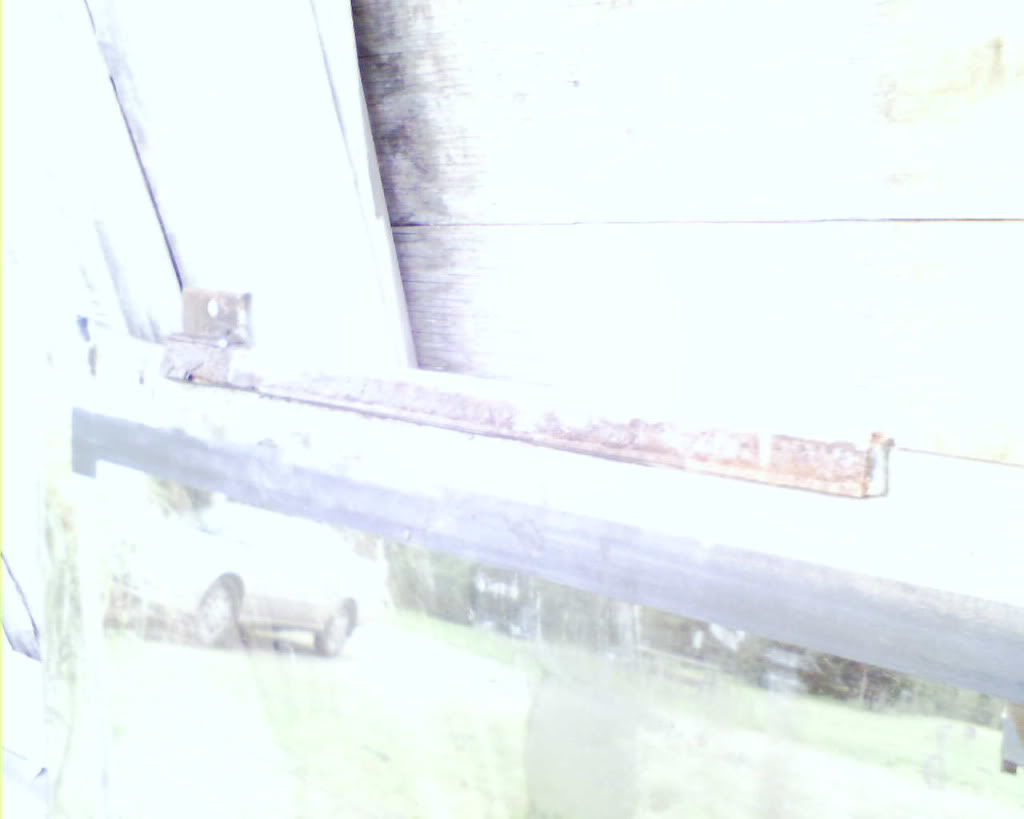
New channel needs to be approx 3/4" x 3/8" interior dimension. I used square stock steel, cost all of $3.50 for 2 feet, only need 8 inches. Cut the steel with a grinder cutoff wheel so it's a "C" shape, 3/8" deep, then cut two more strips of metal at 1/4" to weld to the edges to keep the roller in place. Epoxy would also work for this application. Make sure the new channel will fit through the gate opening if you're making your own!
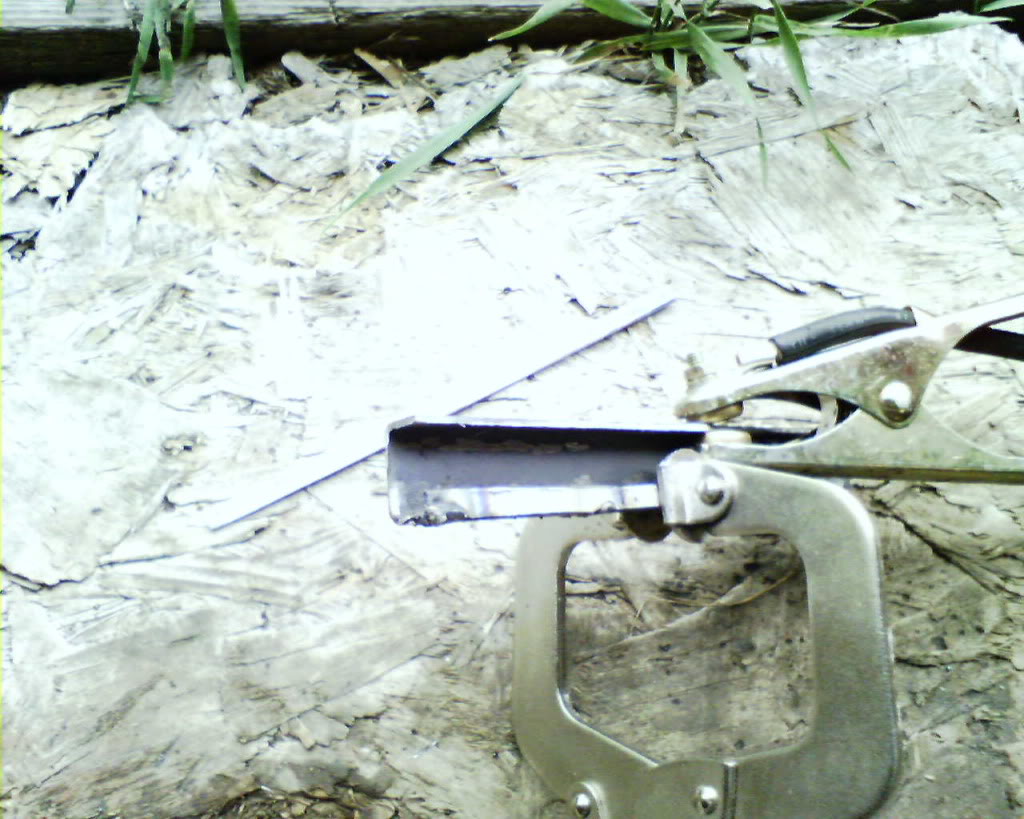
Weld or epoxy this to the existing metal. I learned today that weld spatter will scar glass on contact! So use masking tape or something as a shield if you're welding over the glass...
Back to the regulator, clean it up with parts cleaner, regrease all contact points, realign rails so the teeth are even and install the new motor. Back into the gate, then in with the glass, slide rollers back into tracks. Door handle goes in easiest if you disconnect the rod entirely, install top trim and lever, and then resnap rod when handle and trim are in place. Reconnect everything, and don't worry about rainy weather anymore!
Not the motor? http://www.4crawler.com/4x4/CheapTri...arWindow.shtml
Tuns out a window support track was so rusted the roller rail wouldn't stay in the groove. While I was in there, decided to replace the motor as well ($55 brand new most everywhere), beats hotwiring it off the battery for those precious extra amps every time the window needs to go up or down...
4 clearly visible 10mm bolts hold the regulator in place. Raise window about 1/3 of the way up and remove these bolts (jump motor direct from battery to raise window with the tailgate lowered, hot wire to one of the plug prongs, ground to the other raises it, reverse lowers. Or - raise window first, then with pliers pull up on the pin preventing the lock from being disengaged when the window is up, then unlock and open). Door handle and lock rods are held in place on the regulator and handle end by plastic clips. These rotate, unsnap and rods pull free. Disconnect door latch cables and all wires impeding regulator removal.
(Photo quality sucks, I know, real camera is on the fritz).
Slide the rollers all the way to the outside of one window track and it comes out, then all the way to the other side for the opposite rail.
Jump window motor to the battery until rails are in the lowermost and narrowest position and remove regulator. Motor is held in with 3 8mm bolts (or flathead/torx depending on year) on the reverse side, remove these.
Rails are under spring tension, when motor is removed they snap closed so watch for pinching. Remove screws holding top gate trim piece on, door handle (two screws under lever) and lock, remove trim and slide window glass out.
Pass side was OK, chainsaw bar oil to keep it from further rusting.
Driver's side was shot. Ground the entire channel off, and buffed the the "U" channel which grips the glass cleanish for a weld (or epoxy).
New channel needs to be approx 3/4" x 3/8" interior dimension. I used square stock steel, cost all of $3.50 for 2 feet, only need 8 inches. Cut the steel with a grinder cutoff wheel so it's a "C" shape, 3/8" deep, then cut two more strips of metal at 1/4" to weld to the edges to keep the roller in place. Epoxy would also work for this application. Make sure the new channel will fit through the gate opening if you're making your own!
Weld or epoxy this to the existing metal. I learned today that weld spatter will scar glass on contact! So use masking tape or something as a shield if you're welding over the glass...
Back to the regulator, clean it up with parts cleaner, regrease all contact points, realign rails so the teeth are even and install the new motor. Back into the gate, then in with the glass, slide rollers back into tracks. Door handle goes in easiest if you disconnect the rod entirely, install top trim and lever, and then resnap rod when handle and trim are in place. Reconnect everything, and don't worry about rainy weather anymore!
Not the motor? http://www.4crawler.com/4x4/CheapTri...arWindow.shtml
 05-22-2011, 07:22 PM
#3
Registered User
both rear window channels rusted apart
Nice work with the homemade window channel.
I came across a similar problem on my 94 4runner with both window channels being rusted completely to pot. I however don't have the tools/skills to build my own so I ordered new ones from toyota. Got everything apart with no problem.... However I've been beating my head against the garage wall for almost 2 days now trying to figure out what Chinese contortionist method I need to employ to get the new brackets and rubber onto the window. I've tried both with the rubber in the brackets then to attach the assembly to the window as well as tried first placing the rubber on the window and then pressing the metal channel assy. into place both to no avail. I tried using dish soapy water as a lubricant... got a little better results but nothing functional.
Searched through as many rear window posts as I could find this afternoon on here and it seems that everyone else simply had brackets already attached to windows or made their own. According to the parts guy at my local toyota dealership the rusting out of these brackets is relatively common place so I figure someone has to have run across a similar issue and overcome it without paying a dealer or window repair shop to put these two annoying little channel brackets on the window. ANY tips, hints, proven methods, or additional rants on the topic are well appreciated.

Why does it seem the simplest little fixes always cause the greatest headache?
I came across a similar problem on my 94 4runner with both window channels being rusted completely to pot. I however don't have the tools/skills to build my own so I ordered new ones from toyota. Got everything apart with no problem.... However I've been beating my head against the garage wall for almost 2 days now trying to figure out what Chinese contortionist method I need to employ to get the new brackets and rubber onto the window. I've tried both with the rubber in the brackets then to attach the assembly to the window as well as tried first placing the rubber on the window and then pressing the metal channel assy. into place both to no avail. I tried using dish soapy water as a lubricant... got a little better results but nothing functional.
Searched through as many rear window posts as I could find this afternoon on here and it seems that everyone else simply had brackets already attached to windows or made their own. According to the parts guy at my local toyota dealership the rusting out of these brackets is relatively common place so I figure someone has to have run across a similar issue and overcome it without paying a dealer or window repair shop to put these two annoying little channel brackets on the window. ANY tips, hints, proven methods, or additional rants on the topic are well appreciated.
Why does it seem the simplest little fixes always cause the greatest headache?
05-23-2011, 04:16 AM
#4
Registered User
Thread Starter
So it sounds like the rubber is a bit too thick? Didn't get into that part, but it's just a pressure fit and no barbs or anything on the metal/adhesive on the rubber? Pics are always helpful.
From the sofa here, I'd say to try putting the rubber in the bracket, heat a 12-18 gauge piece of metal red hot, run it down the channel to slightly melt one or both sides of the rubber quickly, and then jam it on the glass.
The molten rubber should act like a lube, as well as widening the dimension a bit, and hopefully locking it on the glass when it cools. If that fails the first time or two, I'd continue to melt it back until it slides on easily and lock it on with some liquid nails.
05-23-2011, 06:17 AM
#5
Registered User

Join Date: Dec 2010
Posts: 72
Likes: 0
Received 0 Likes
on
0 Posts
I'm having trouble with my rear window. I've rewired it and checked everything out. It will work fine for a short period of time but then quit. If I disconnect and reconnect it works fine for a bit then repeats... Any ideas?
05-23-2011, 07:11 AM
#6
Registered User
Thread Starter
Might be good to rule out the motor itself first. Swapping it out with the driver's side window motor (hopefully you have power ones already, or don't mind being without a rear window motor for a time) is a pretty easy way to check that. If the rear continues to malfunction, you know it's elsewhere in the circuit; if the problem moves to the driver's window it's the motor.
Did you replace or clean the relays when rewiring? I'm no expert on these, but they can easily direct current in ways it's not supposed to go, or not direct it at all, if they malfunction.
Unrelated to the plug disconnecting, but if that's coincidental, maybe check into the switch under the cap bolt hole? Some people are unaware of that part of the circuit, think it's second from the back on driver's side.
Other than that, read through 4crawler's page if you haven't already.

Trending Topics
05-23-2011, 03:17 PM
#8
Registered User
Well, on my way home from work today I decided to stop by the local auto glass shop and see if they would either point me in the right direction or just put the brackets on for a small fee. To my surprise the response I got broke down to basically "You didn't hit it hard enough with a big enough hammer". So as instructed I returned home slid the rubber inserts onto the glass, broke out the biggest rubber mallet I own and reluctantly wailed the bejeebus out of the metal brackets until they pounded nicely into place.
Thanks for the input and ideas jbtvt.
As for pics, here are a few of the whole shebang (most pics are a little wide, i was rather frustrated by the time i took most of em)
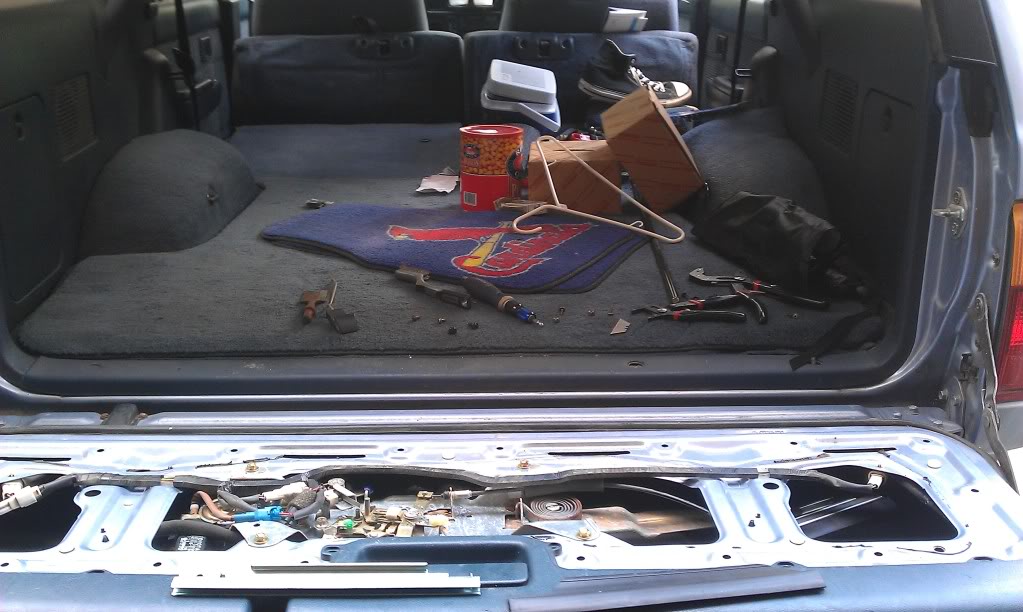
Inner trim panels removed (as well as a view of my disheveled cargo area)
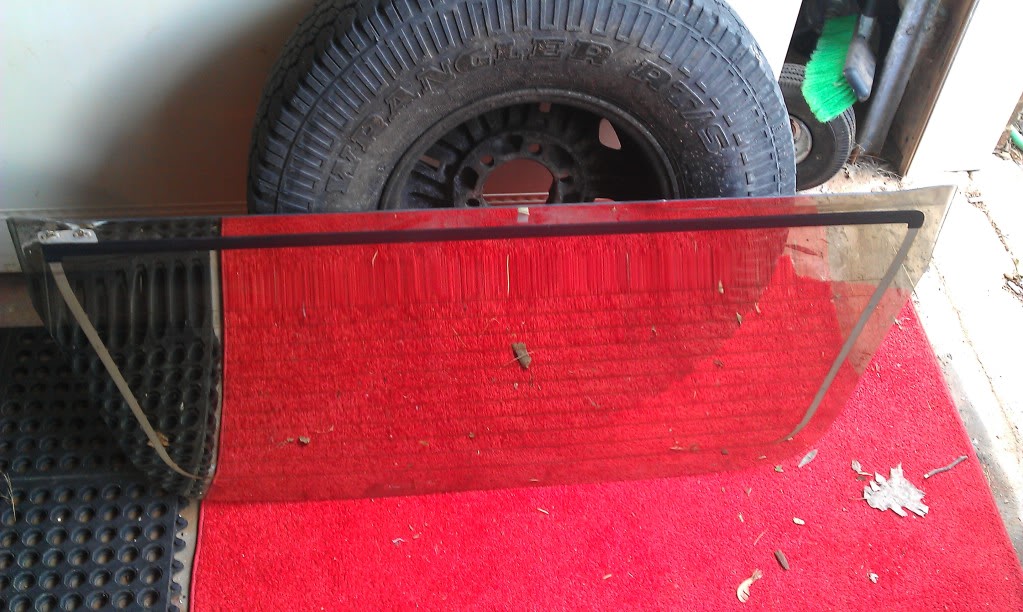
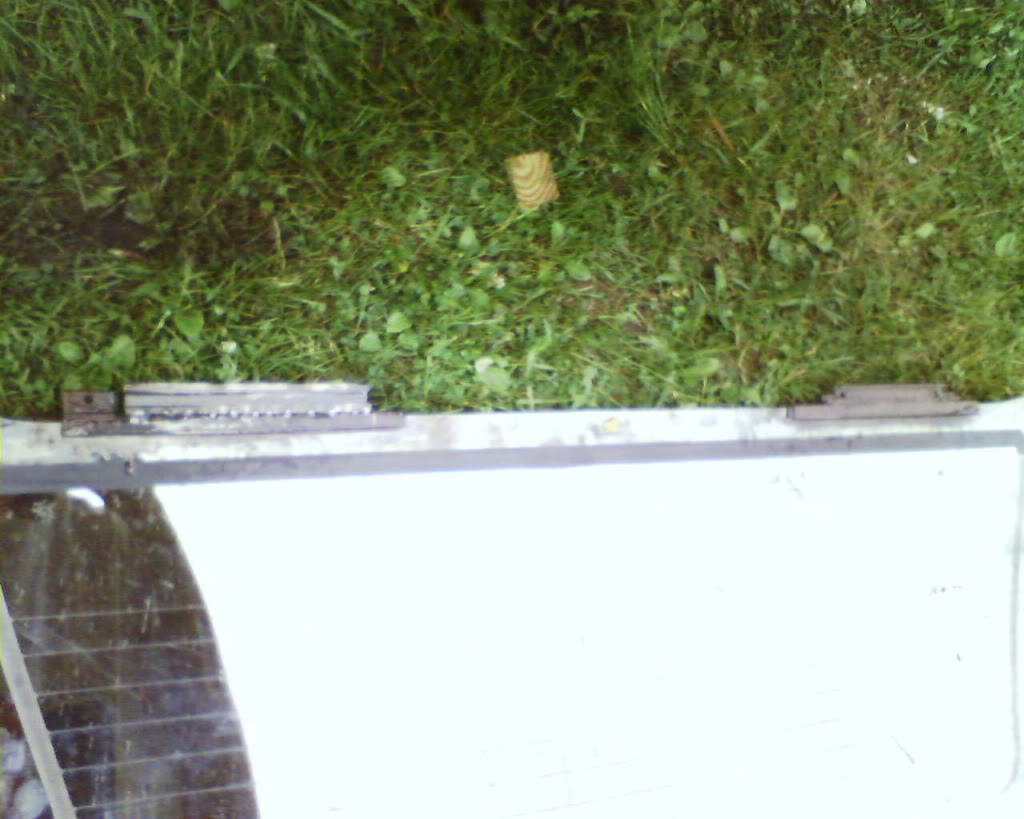
glass removed (still in one piece, thats good) and old brackets off
Old brackets, not sure how the passenger side one was still holding onto the window. The drivers' side bracket was laying in the bottom of the tailgate when i opened it up.
New brackets and rubber
the end of the passenger side motor arm... suppose those will need replacing in the future but don't have the extra cash to mess with it atm.
And again, after trying everything I could come up with and deciding to follow the advice of the guy at the local auto glass shop....
THE SOLUTION
Would like to credit the guys at Mark's Mobile Glass for being very stand-up and sending me home to do it right instead of taking my money .
.
Thanks for the input and ideas jbtvt.
As for pics, here are a few of the whole shebang (most pics are a little wide, i was rather frustrated by the time i took most of em)
Inner trim panels removed (as well as a view of my disheveled cargo area)
glass removed (still in one piece, thats good) and old brackets off
Old brackets, not sure how the passenger side one was still holding onto the window. The drivers' side bracket was laying in the bottom of the tailgate when i opened it up.
New brackets and rubber
the end of the passenger side motor arm... suppose those will need replacing in the future but don't have the extra cash to mess with it atm.
And again, after trying everything I could come up with and deciding to follow the advice of the guy at the local auto glass shop....
THE SOLUTION
Would like to credit the guys at Mark's Mobile Glass for being very stand-up and sending me home to do it right instead of taking my money
.
The following users liked this post:
Nof60 (01-16-2021)
02-11-2012, 09:36 AM
#9
Registered User
Got a couple questions... My window isnt going up or down and I know the window needs to be far enough down in order to open the tailgate... here's my problem, window is stuck... How can I get it down far enough to disable the locking mechanism so I can pop the tailgate open to do the neccesary repairs?
02-11-2012, 02:22 PM
#10
Registered User
Thread Starter
If you pull the liner and metal cover off the inside of your gate you can jump the motor directly. Hook up 2 wires to your battery (length of 12 or 14 ga electrical wire work well, less resistance than stock wire) and touch them to the terminals in your motor plug. One way is up, reverse lowers. If the motor is completely seized I guess the best bet would be to pull the bolts holding the regulator and lower the whole assembly into the door. Can also access the locking mech if that's the only issue.
02-14-2012, 05:47 AM
#11
Registered User
just to get the tailgate open all you need to do is take off the inner trim panel and metal plate underneath and manually trip the lock mechanism ( its pretty obvious how it pulls) then once it thinks its unlocked you can open the gate and address the rest of your issue easier than laying in the back of the runner trying to fiddle with it.
06-24-2012, 10:48 AM
#12
Registered User

Join Date: Jun 2012
Posts: 1
Likes: 0
Received 0 Likes
on
0 Posts
hey bud, how did you remove those rusted glass channels off the glass. i have tried everything and cant get them off!!! I am scared that i will break the glass in the process.
09-23-2012, 01:34 PM
#13
Registered User

Awesome thread. Very helpful!
Do you remember the part number from toyota for both brackets and the cost of them?
Also, if you roll down the catches on both side of the tailgate (should be two positions you'll feel click), the door thinks it is closed and you can operate the window with the key from underneath! To close the tailgate though, you need to pull the lock up, and then open the handle as if it were in the upright position.
09-28-2012, 07:59 PM
#14
"Do you remember the part number from toyota for both brackets and the cost of them?"
I am doing this repair now and will post my thoughts/pics etc. when I am done. I had a spare window with almost new channels on it. I can't answer how much but I can show the part number on them. Here you go...The one on the left is the left one and the right is, well the right. Hope this helps.
I am doing this repair now and will post my thoughts/pics etc. when I am done. I had a spare window with almost new channels on it. I can't answer how much but I can show the part number on them. Here you go...The one on the left is the left one and the right is, well the right. Hope this helps.
10-02-2012, 03:17 PM
#15
Registered User
As far as the part number goes, I know the above post does reference them, but, from what I gathered from my experience with the dealer, all Toyota parts counter employees should be rather familiar with them. My local guys knew exactly what I was talking about when I simply said "rear window brackets are rusted". Rather common occurrence I gather.
12-21-2012, 12:33 PM
#16
Registered User
Got New brackets and Rubber From Toyota.
The Driver side has the mounting point for the rear defroster harness.
With the glass out, I took a screwdriver and a hammer and tapped (not so gently at times, don't be scared to hit it) the old rubber and brackets off.
I used some windex type cleaner to spray on the rubber and the new brackets, hit them with hammer and they went on nice and easy.
The parts were 60$ Brand new from toyota.
Driver Side Bracket: 69907-35020
Passenger Side Bracket: 69907-35010
While I was inside I re-greased all of the gears and arms.
Thanks for the helpful thread, and I hope it works out for everyone!
Last edited by ohoktimmyg; 12-21-2012 at 12:38 PM.
12-22-2012, 10:56 AM
#17
I just did mine with the spare rear window with the new brackets on it (see my pic from my previous post) and the defrost doesn't work on this window. I haven't checked it since I put it in which I have to do....but the old window will go back in if need be, but it's a little of a PITA to get the motor/arms back in so I am putting it off a little.
04-17-2014, 11:46 AM
#18
Registered User
Join Date: Apr 2014
Posts: 1
Likes: 0
Received 0 Likes
on
0 Posts
2nd gen - cheap rear window solution
My 93 4runner was $500CDN so I try to keep the repairs on the cheaper side. My rear window was slightly open, a bit cockeyed and stuck when I bought it. My son removed the window motor assembly and retracted the glass and got the tailgate to open. This is how we keep the glass in the correct position. In the summer I am going to leave the glass out, and in the winter I loaded any cargo through the rear passenger door although I can remove the glass in a couple minutes if I need to load a longer item.
05-09-2014, 05:09 AM
#19
Registered User

Join Date: Apr 2014
Posts: 2
Likes: 0
Received 0 Likes
on
0 Posts
tailgate window regulator gears misaligned. how to adjust?
I have a 94 4Runner SR5 V6 and am replacing the tailgate window regulator because one of the plastic rollers at the end of the lift arm broke off. I fished out the two pieces of the roller and super glued them back together on the pin and that worked for awhile but it broke again. Since these rollers are not replaceable, I purchased a used regulator out of a 91 4Runner off of ebay. I installed it and when I roll up the window one side is noticeably lower than the other side and doesn't seal good on that side. (I think the roller broke because I might have cracked it when I replaced the rubber and metal channel that clamp to the bottom of the window a few months ago when one of them came off due to age/rust.)
On the used regulator, I noticed that the alignment marks on the gears where the lift arms mesh are one notch off as compared to my original regulator where the alignment marks are matching and I believe this is why one side is lower than the other with the replacement regulator.
So, the question (finally) - Is there any way to adjust this misalignment? For the life of me I can't see how to make any adjustment as everything seems to be solidly riveted together. Or how they could even get out of alignment in the first place, except from the factory. The ebay seller says there was no problem in the 91 4Runner this regulator came out of.
Thanks in advance for any advice/help.
Regards
Last edited by edells; 05-09-2014 at 05:12 AM. Reason: message didn't appear
05-09-2014, 05:55 AM
#20
Registered User
Thread Starter
I can't remember if the gears completely unmesh when the motor is removed, but it seems like that would be the only way they could get out of alignment. If you haven't already, I would start by pulling that and seeing what kind of adjustment you can get. Some better closeup pics than mine at top may refresh my memory, I haven't looked at any rear window regs for a few years.
For the future, you're generally better off heat welding small parts with a cheap soldering gun, or MAP gas/sculpting tools/black PET water pipe, some epoxies work alright also.
For the future, you're generally better off heat welding small parts with a cheap soldering gun, or MAP gas/sculpting tools/black PET water pipe, some epoxies work alright also.


