
 03-30-2016, 10:29 AM
Last edit by: IB Advertising
See related guides and technical advice from our community experts:
- Toyota Tacoma Aftermarket Bumpers<br>Review and comparison of top products.

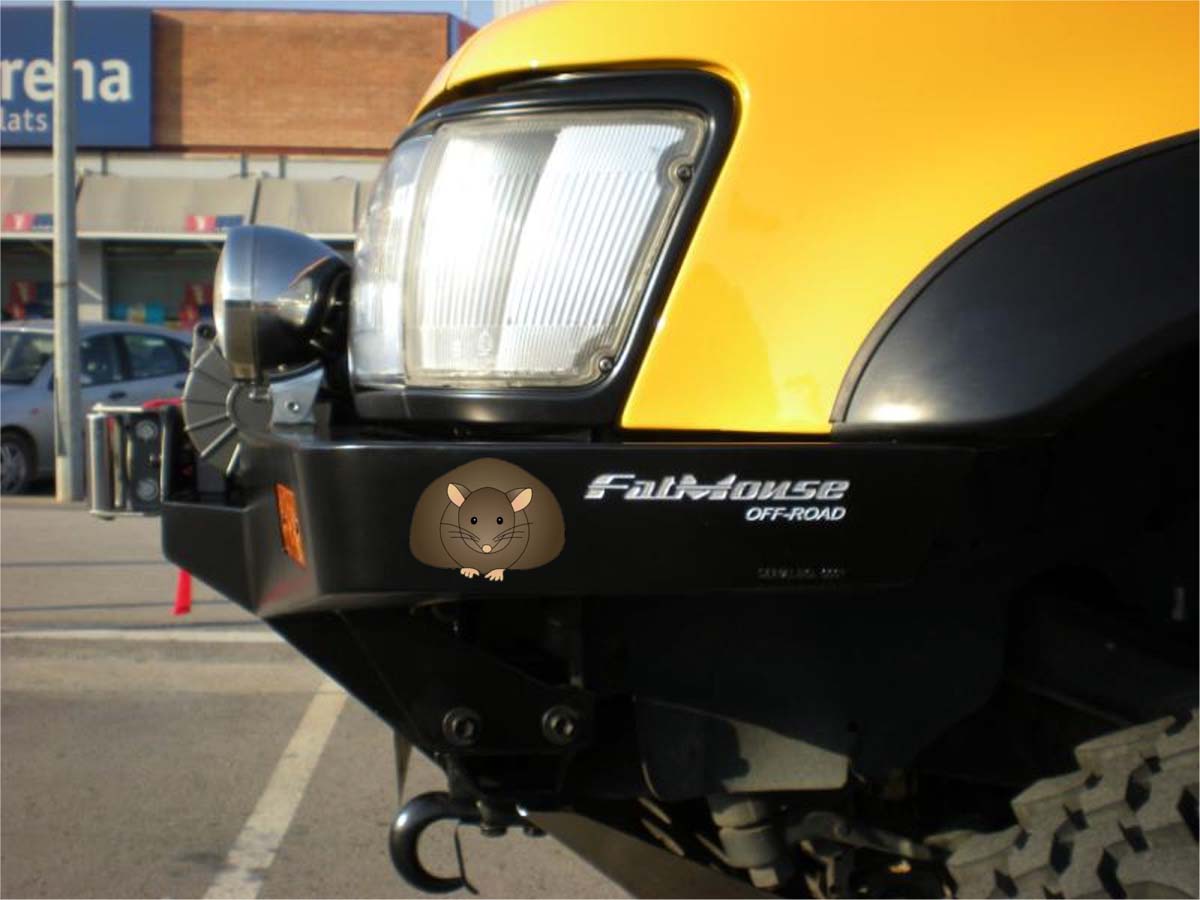
FatMouse Off-Road bumpers !!!
09-16-2008, 01:39 PM
#1
Registered User
Thread Starter
FatMouse Off-Road bumpers !!!
It was a hot July afternoon, during one of our weekend trips. My buddy Cesc and me were having a cold beer, admiring the mountains, when suddenly this conversation came out:
.-Me: You know buddy, I would like so much to learn to weld...
.-Cesc: Well I know a little bit, but if we have to learn seriously, let�s go for it !!!
We continued drinking our beers quietly, also admiring our Toys, and I had no better idea than saying... :
I would also like very much to have a new front bumper, but there is nothing exactly what I want here in Spain. I have it all on my mind. It also must have a winch, off course...
Suddenly, without saying any word, we had a deep eye contact (not a gay one...), so we realized that both of us were thinking the same.
.-Cesc : And what about if we fab them ???
The next weekend we sat in front of Cesc�s PC and started drawing some ideas ( unfortunatelly, we have more for the future ...;-)
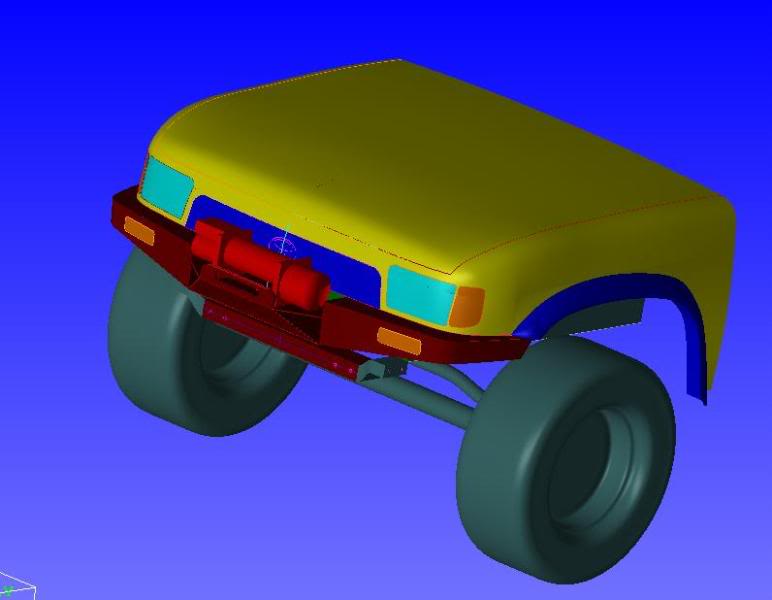
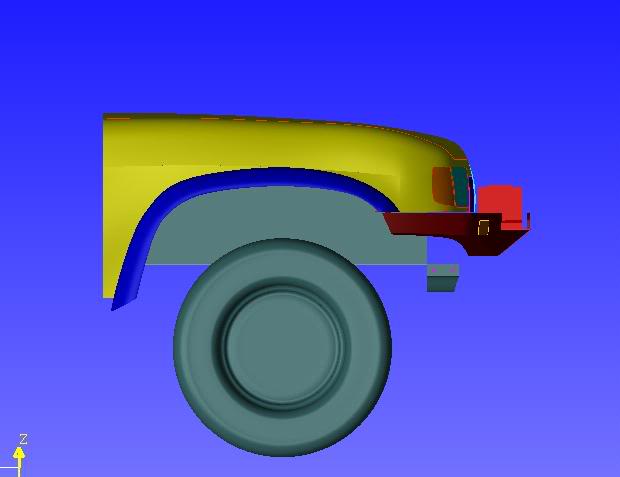
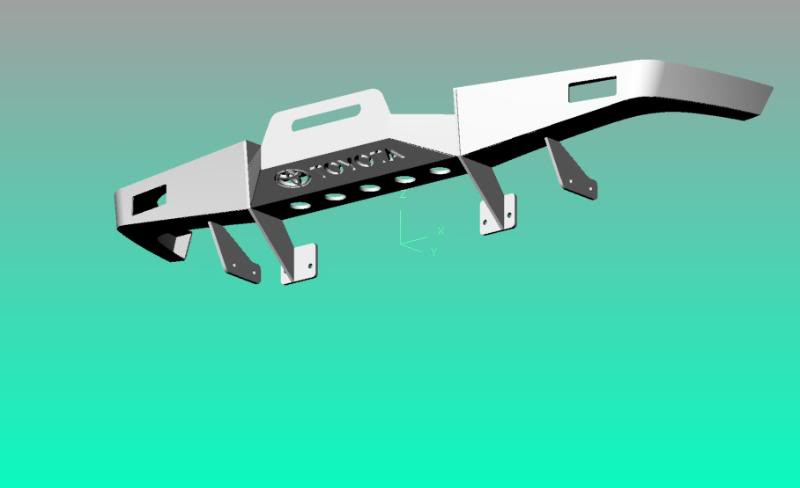
For me, it was very clear that the bumper had to start inspired on Front Range Off Road bumpers style (unfortunately not sold in Spain and very expensive to import...).
We took of the original front bumper and started taking measurements and putting them into the pc.
After many, many, many hours, and when I say many, means that we sat many ours in front of the pc, finally we had the final design.
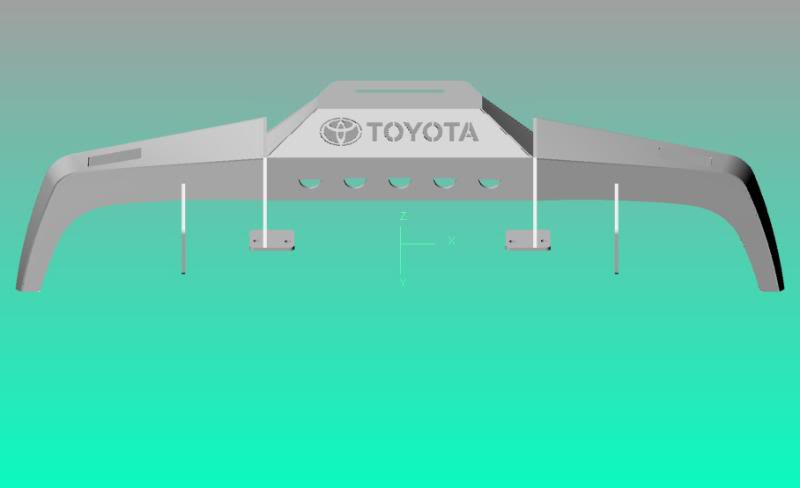

Cesc take care of the technical part, calculous, structures, drawing, etc...
Meanwhile I sat next to him, with my stupid face, looking how this guy worked with CAD.
From time to time I opened my mouth just to say:
.-Me: Can we round this edge ???
.-Me: Can we move the hole ???
.-Me: Are you sure this is going to fit in our rigs ??? Sometimes computers make mistakes... (I was wrong...).
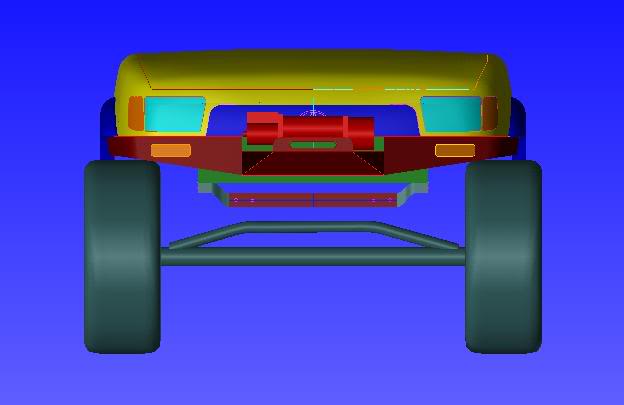
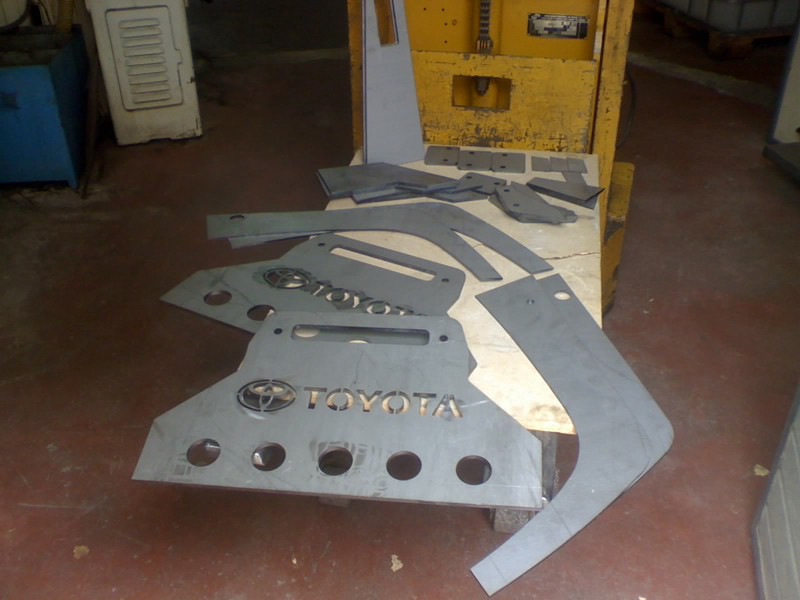
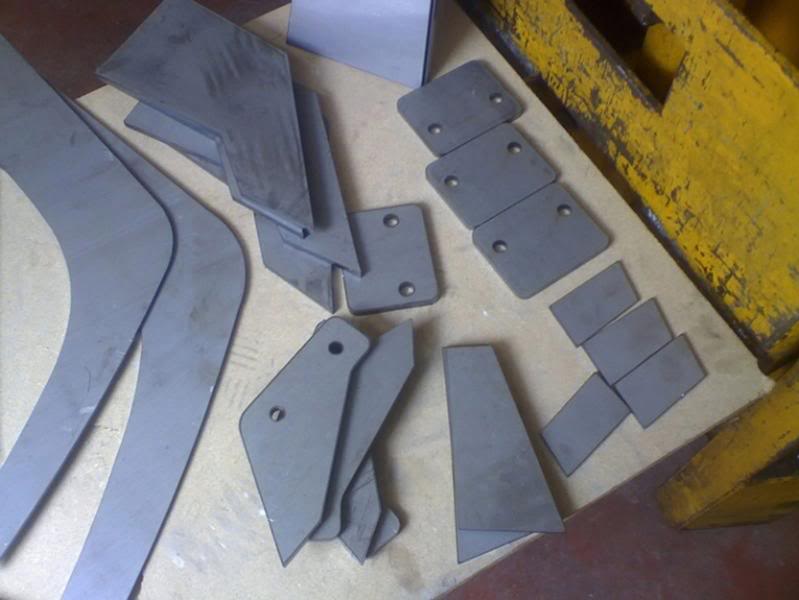
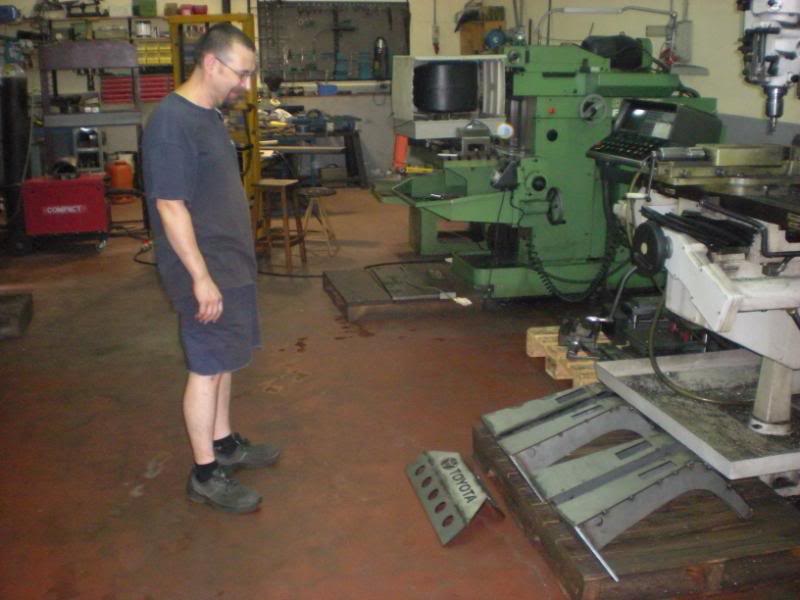
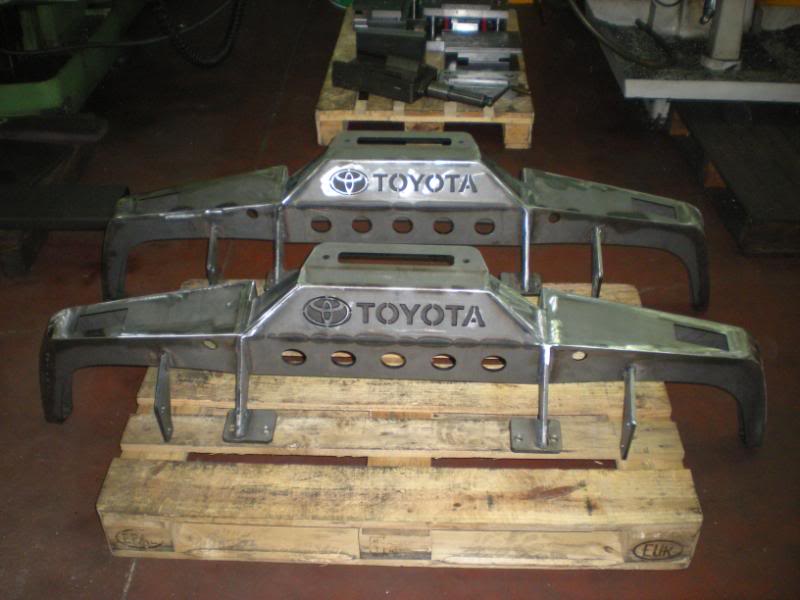
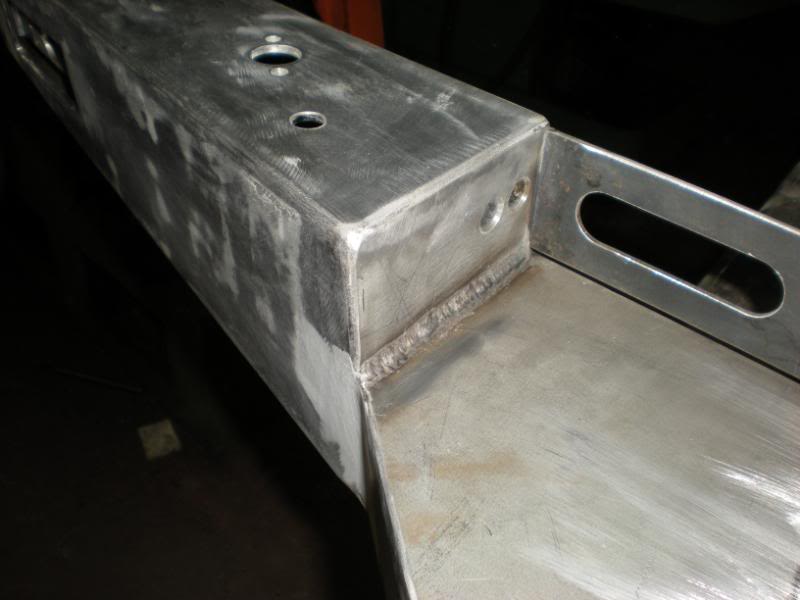
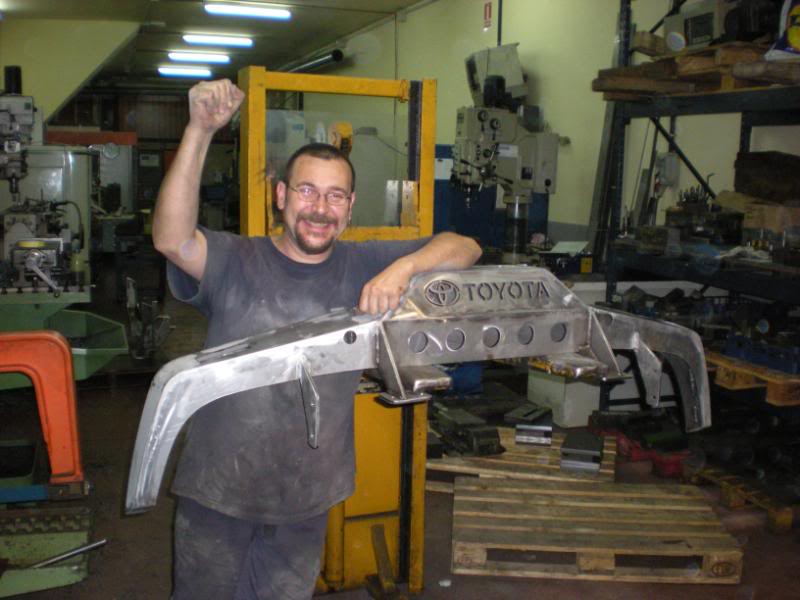
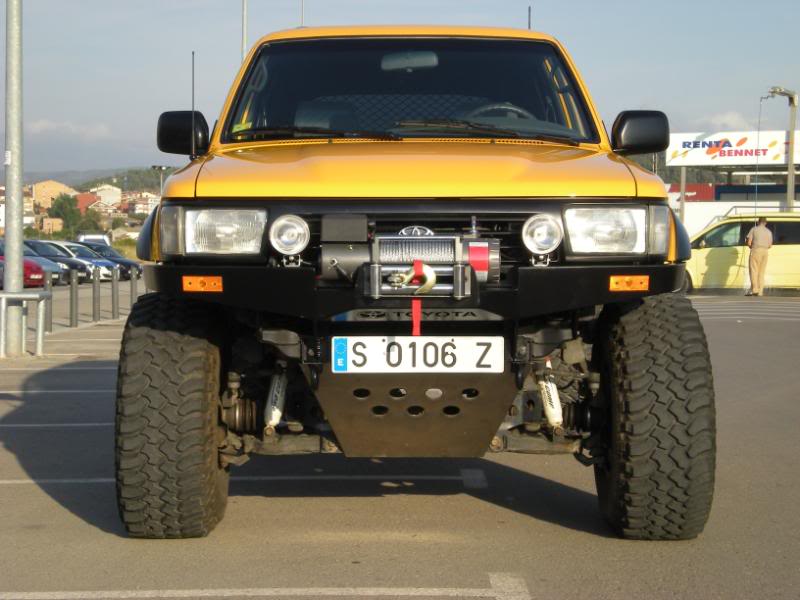
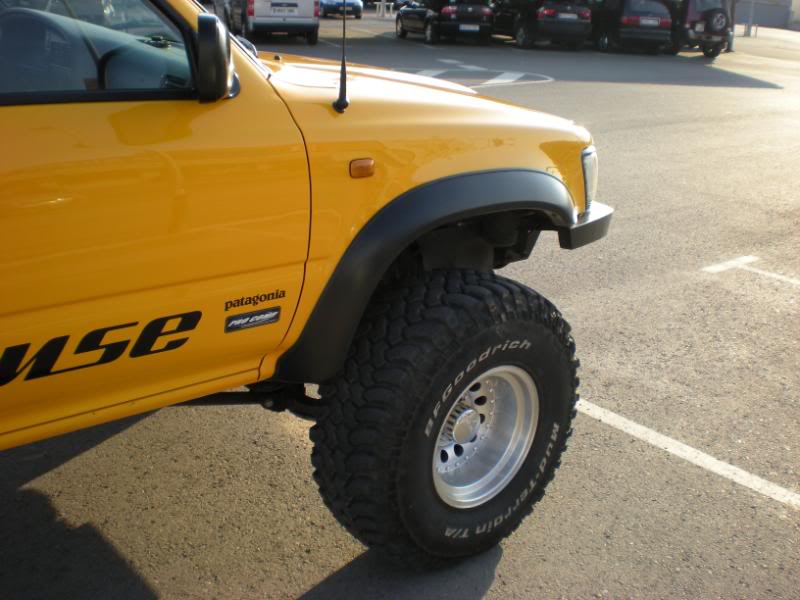
On the next step we got all metal pieces cut by laser. 8 mm thick for the center box, and 4 mm thick for the wings of the bumper. (Total weight of the bumper 36kg, and 31kgs the winch)
After we got all the pieces of the puzzle, the funny part of the project started.
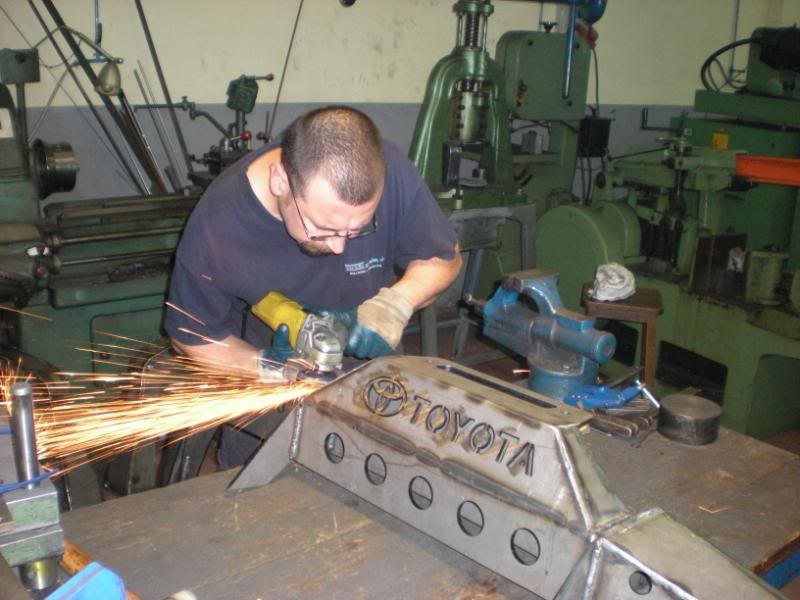
Here was, where I got to support my buddy with something more than ideas. So, lets start to weld.
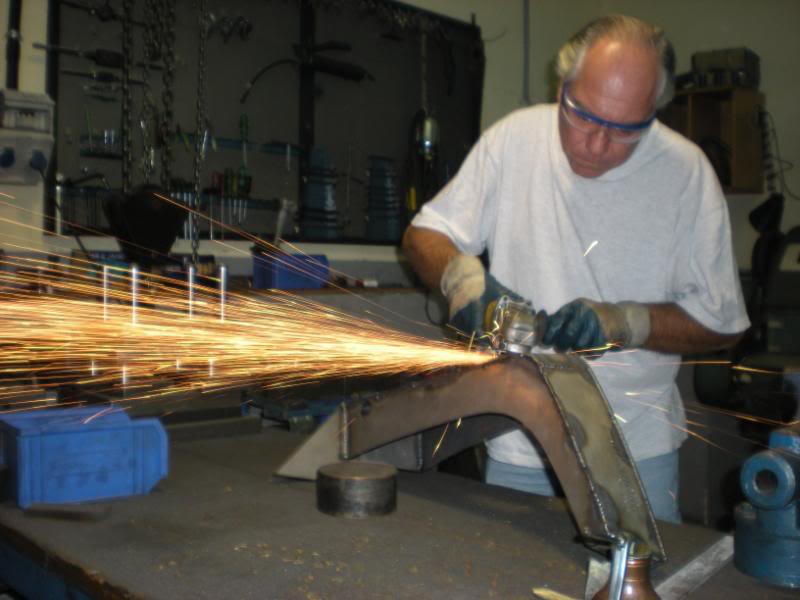
My brother Willy came to give us some advices (he is an expert welder).
On date and at the exact hour I was prepared to start my adventure.
I spent the previous night, watching weld tutorial videos. This was like watching porn movies, without having any real sex experience yet... ;-)
After first indications, my brother gave to me some pieces of metal to feel the welder.
Seems to be that they liked the welds, cause they directly gave me part of the bumper to weld.
So after that, I was officially baptized as the welder of the team ;-)
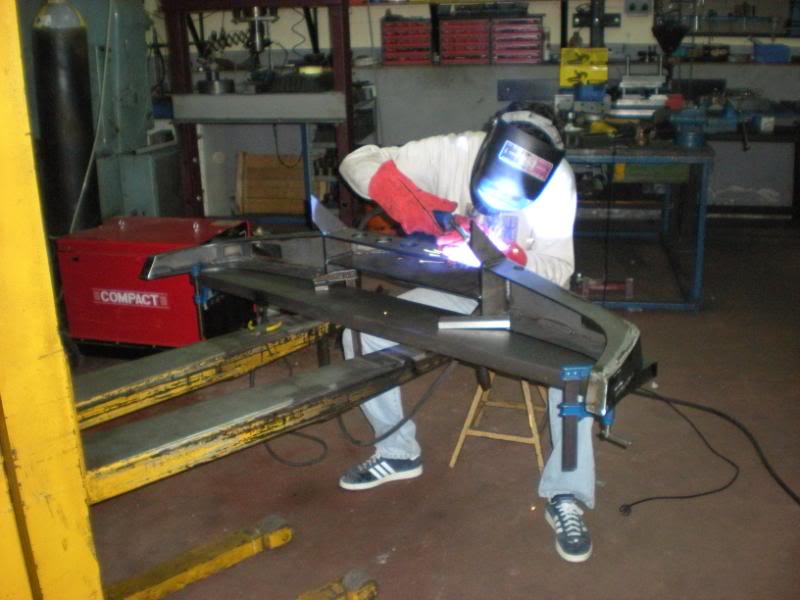
Professional welders, please don�t puke !!! Hope they are not so bad for a newbee ...
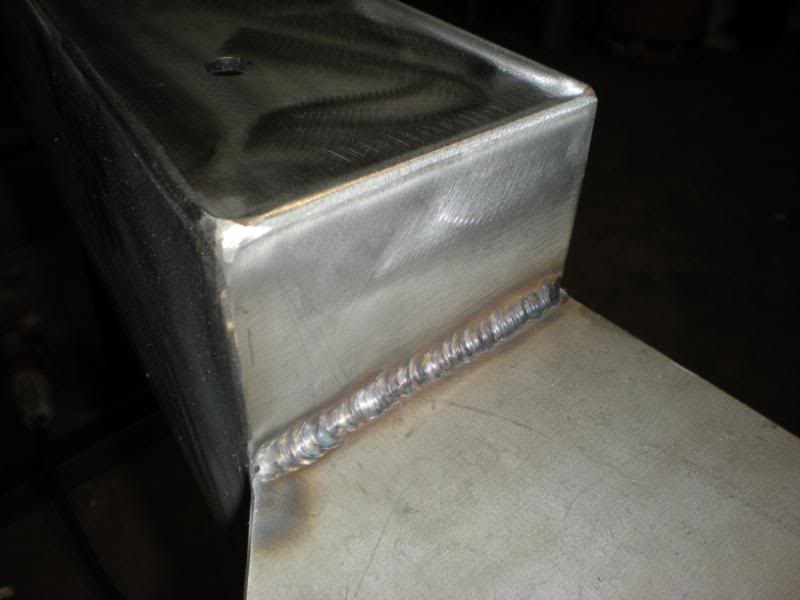
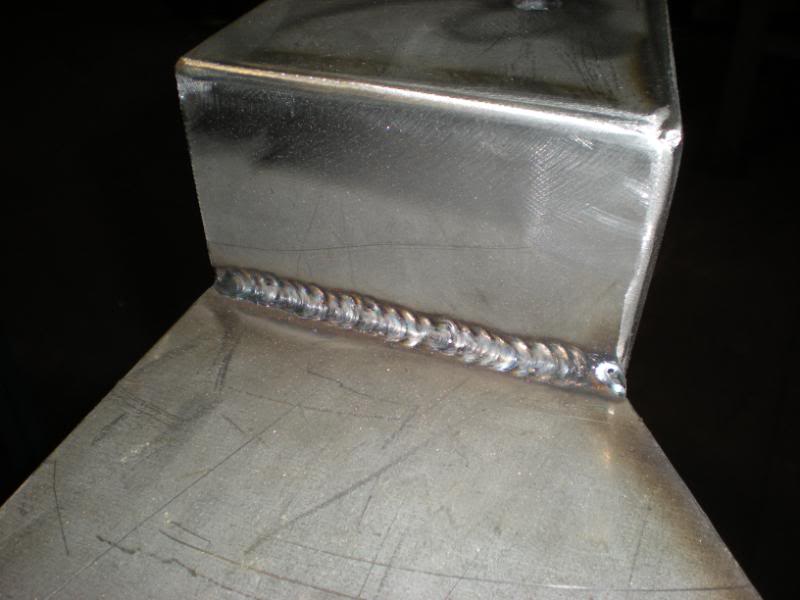
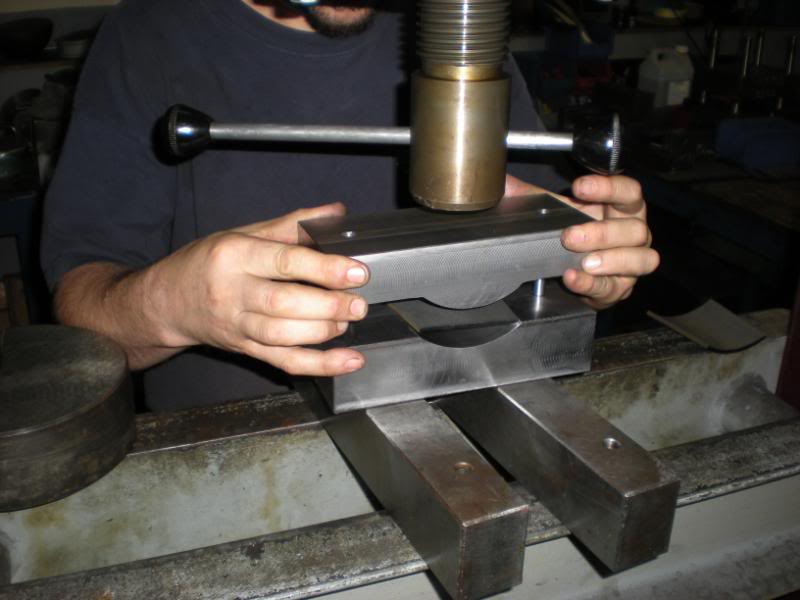
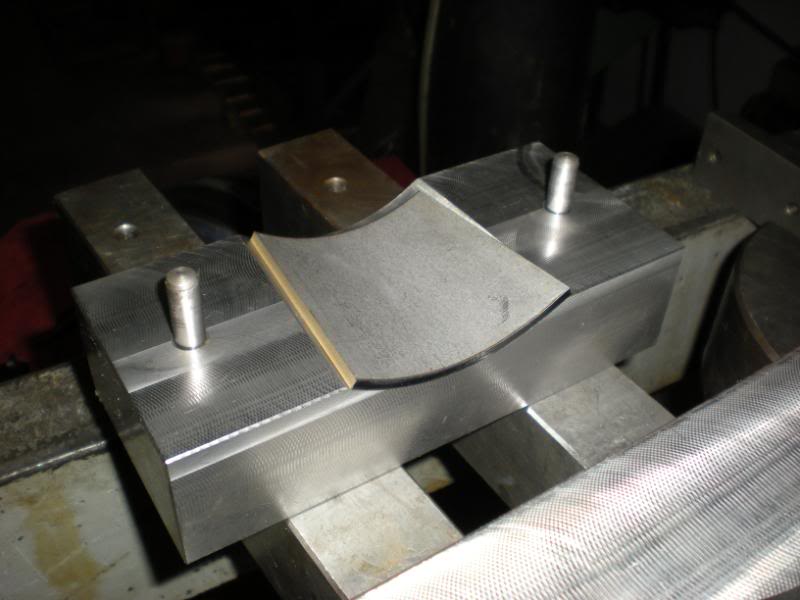
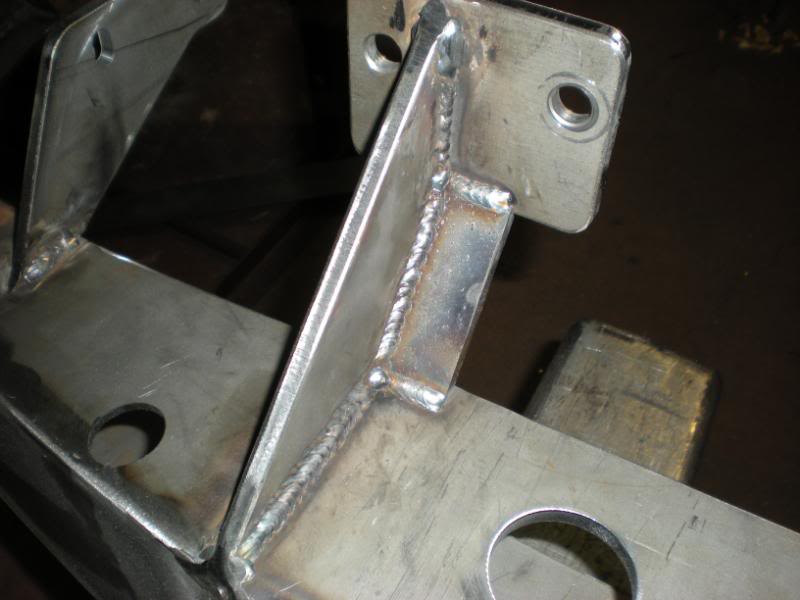
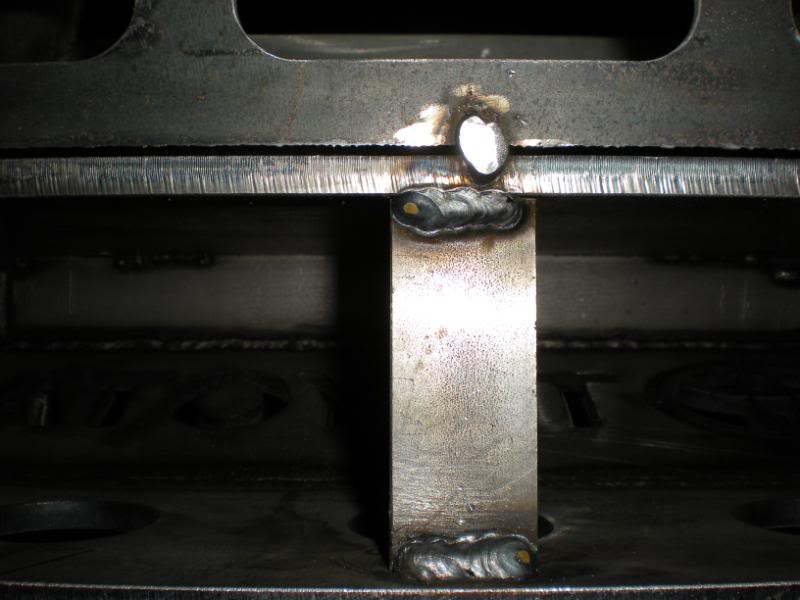
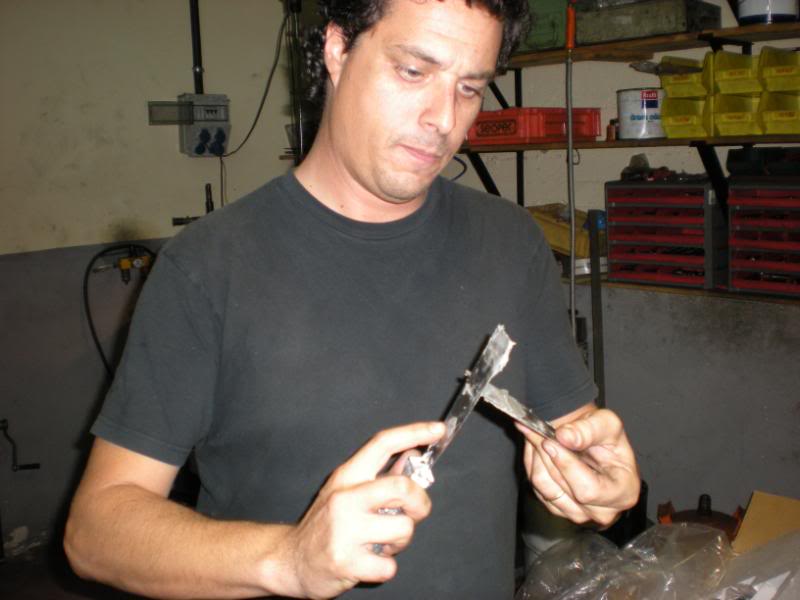
Some pieces were pre-curved before positioning them, as for example the corner plates of the bumper.
Cesc, fabbed a stamp for those pieces. (He is a proffesional matrixer ).
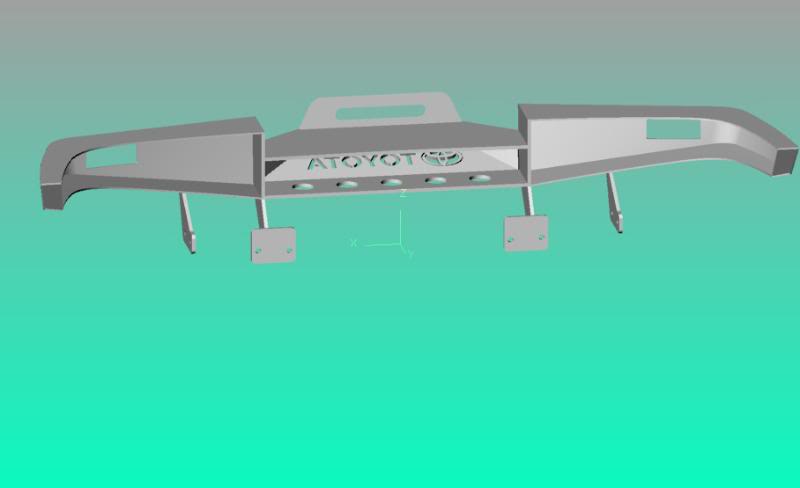
I�m going to explain the funny story about our brand (we are not pros, and this is just a hobby for us).
While we were designing the bumper, we had the strong feeling, that we liked so much what we were drawing.
And Cesc commented: Man !!! this will look like a pro bumper, we should have a brand, hahahahahahahaha !!!!
Me.- You are not going to believe me, but I have the name.... FatMouse !!! A few days before while I was smoking a tunning cigarette, at night , watching the stars; I had a vision...
If I sometime create a company (don�t missunderstand me, I am a surgeon, way to far related to the off road industry) it wil be called FatMouse.
.-Cesc: Man I like the name...FatMouse Off-Road !!! From today and on every thing we fab for our trucks, will have our own brand. We were just kidding ...
Five minutes later Cesc gave the order to the pc to draw the Fatmouse brand on our bumpers, hahahahahahahahahahaha.
And this is the story about our brand.
So, kids... Don�t smoke !!!! ;-)
Slowly, pieces were forming the bumper, and somebody was loosing to much saliva ....
Cesc and Willy working on the bumper...
Finally this started, to seem a bumper...
Serial production !!!

Thanks to Cesc, we had all machinery and tools we needed.
Watch video:
http://es.youtube.com/watch?v=KZCc5qRaOy0
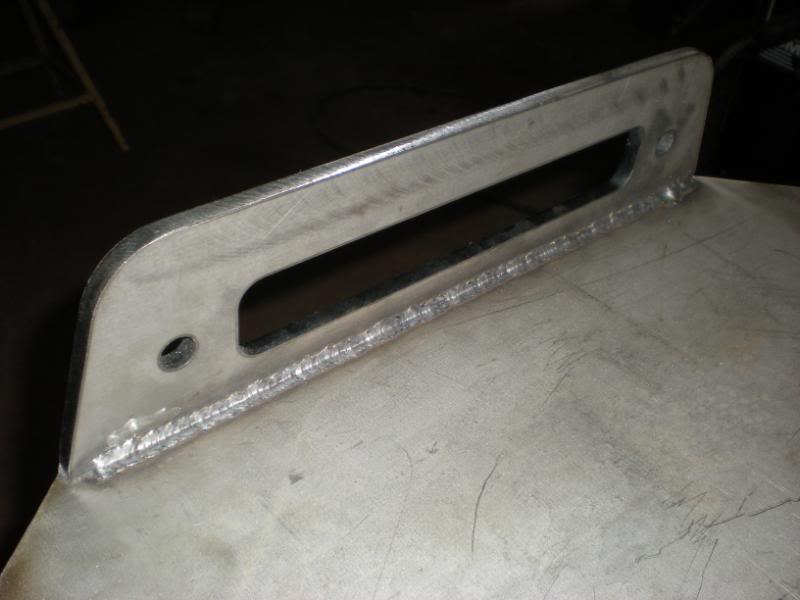
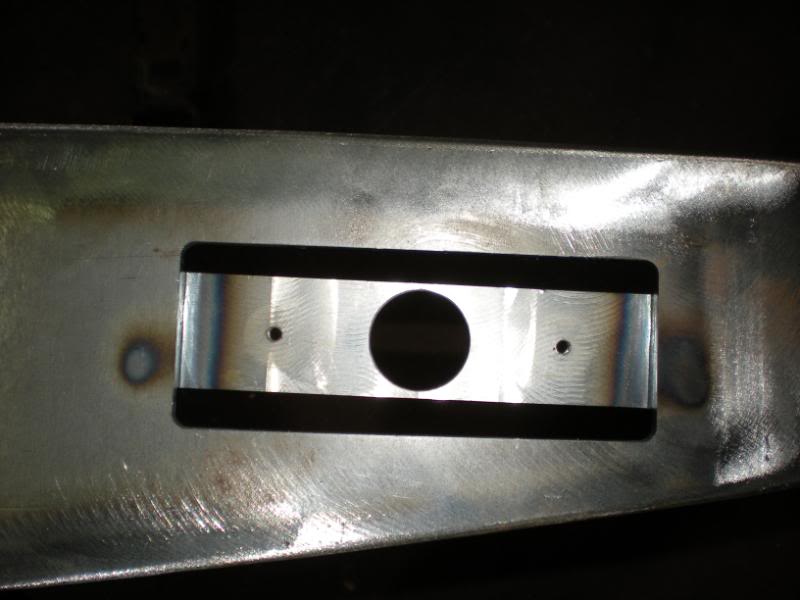
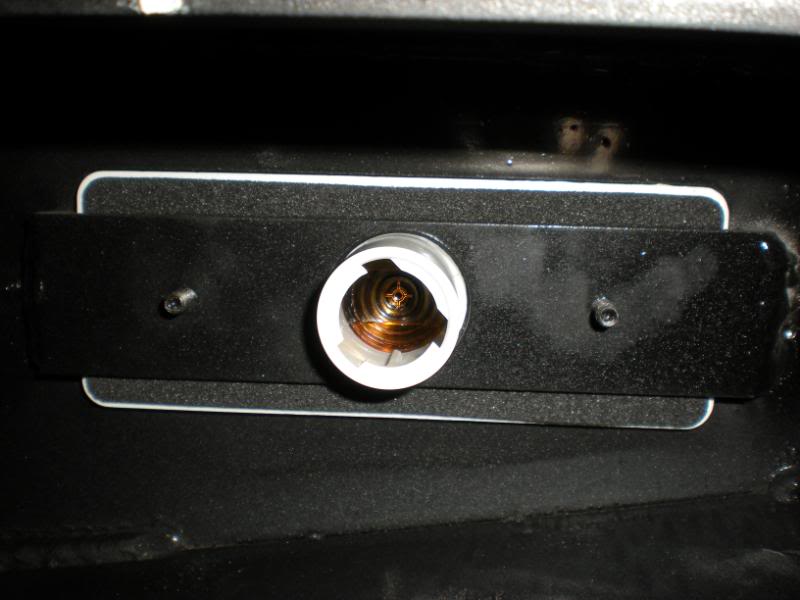
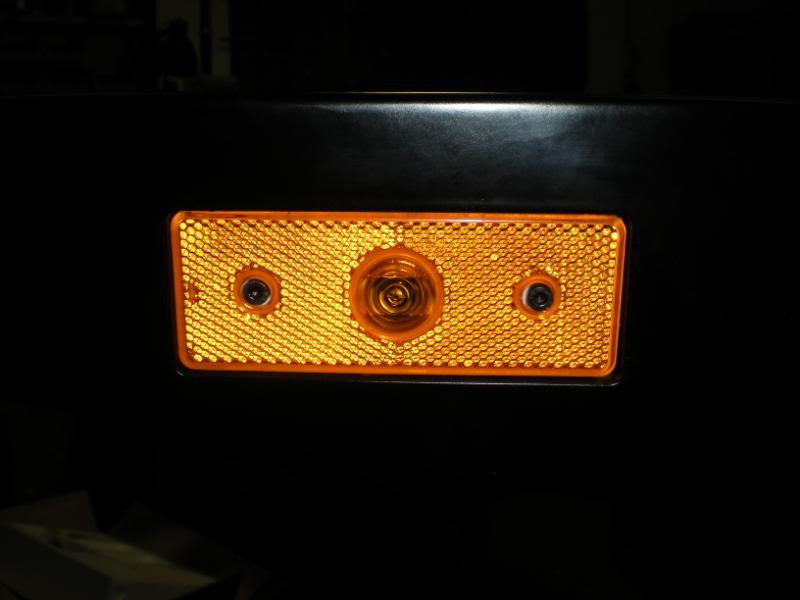
Detail of the corner light support.
We decided to do some mods, during the fabrication. We put this piece of perforated metal sheet to hide the radiator and lines...
We added reinforcements to the bumper, cause we had nothing better to do , hahahaahahahahahahaha !!!!!!
Final adjustments !!!
We went out to the street to admire it with day light !!!

Will it resist ??????
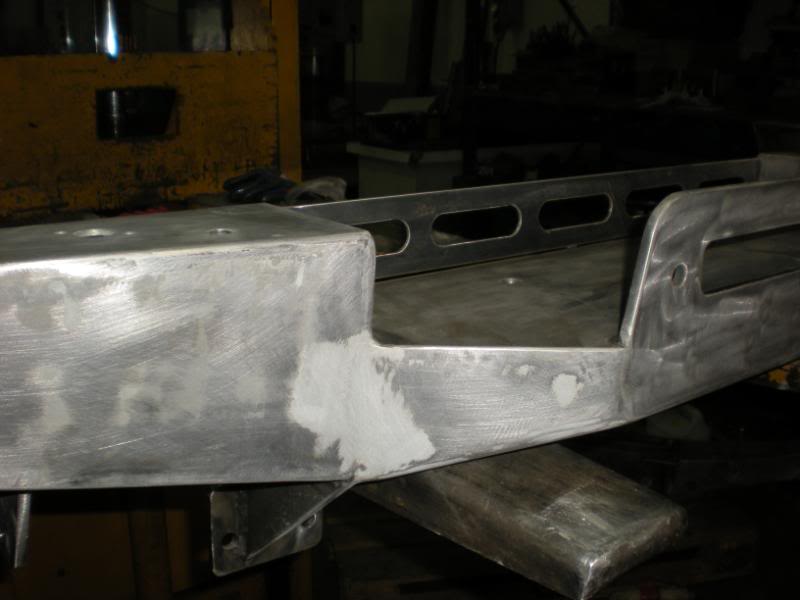
We rounded edges.

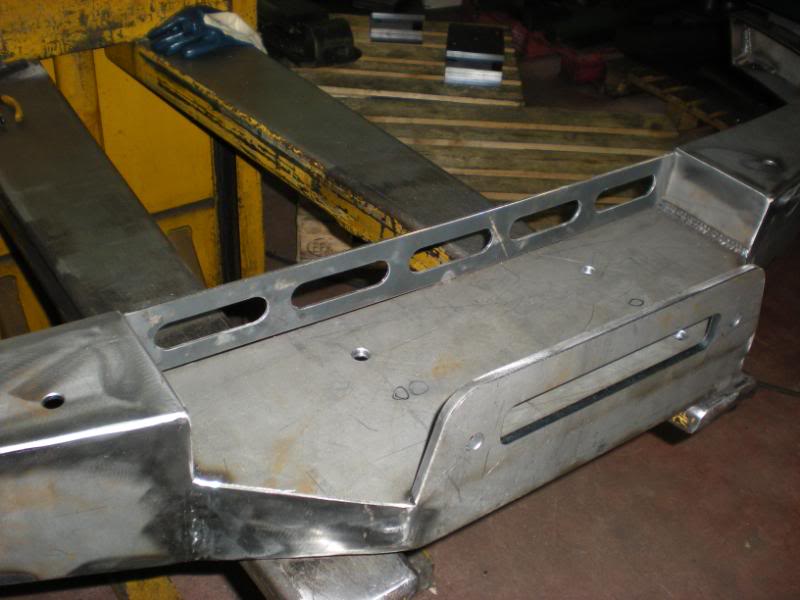
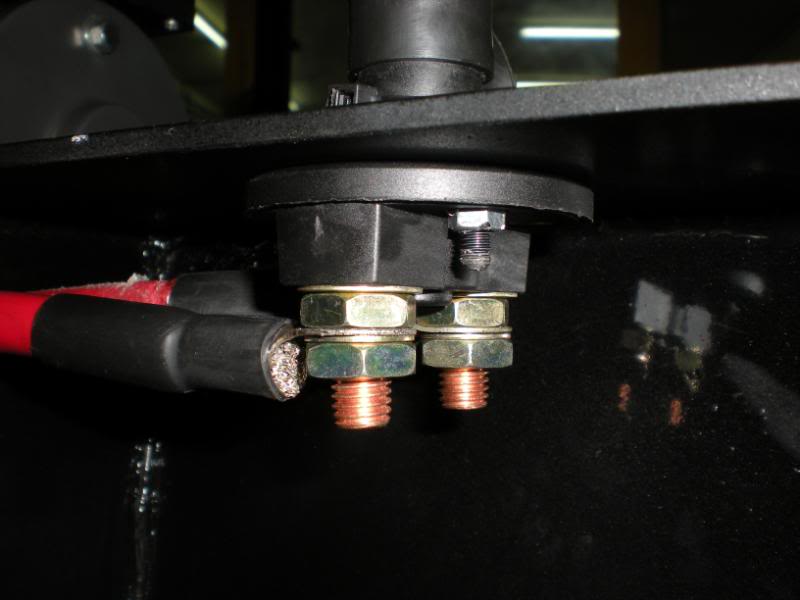
This is a detailed picture of the holes we made, to fit a cut-off for the positive of the winch.
After we polished all the details on the metal, we applied epoxy putty with little alloy fragments in it, to correct imperfections.
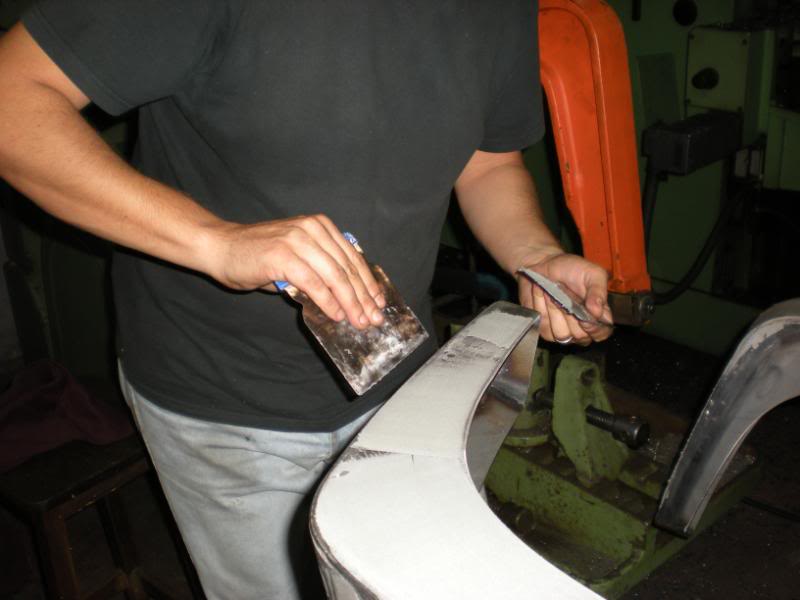
After, I learned that I don�t have to apply so much putty on the bumper... Gosh Damn it !!! This putty became so hard !!!! Hahahahahahahaha !!!!
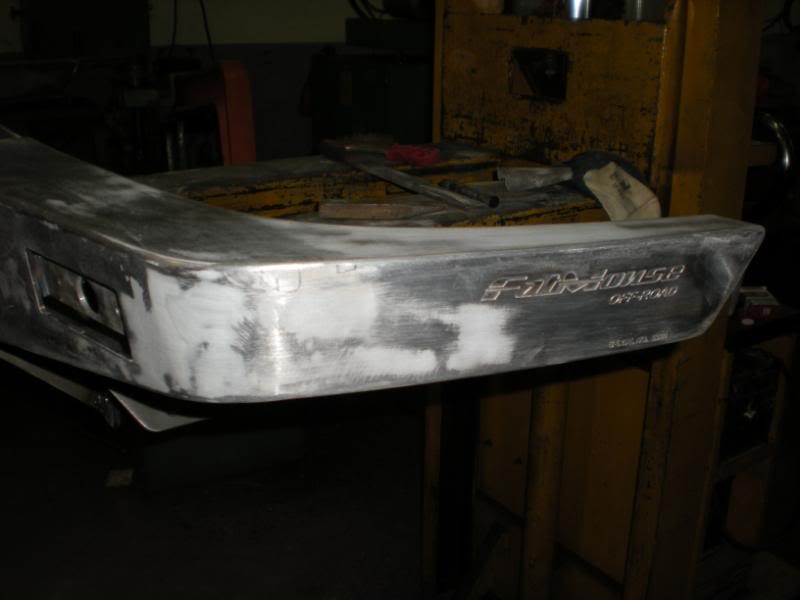
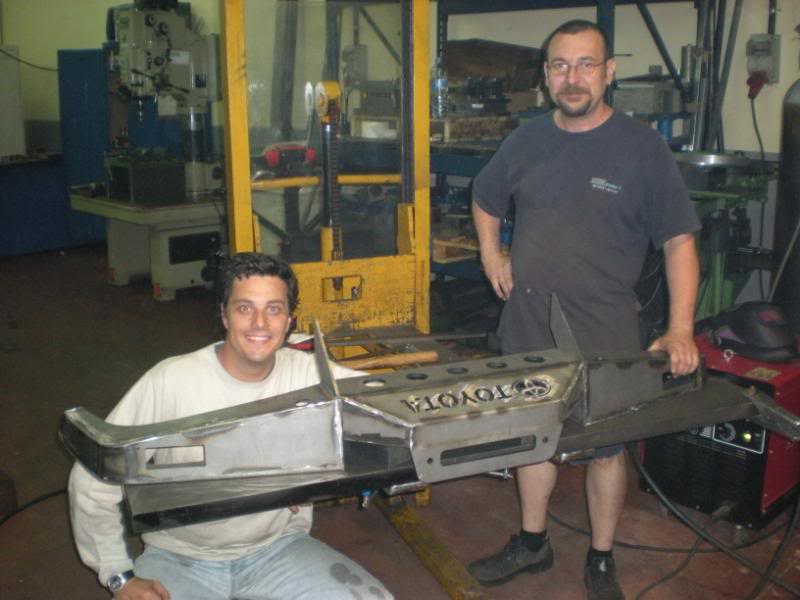
We finished !!!!
Now to the painter ...
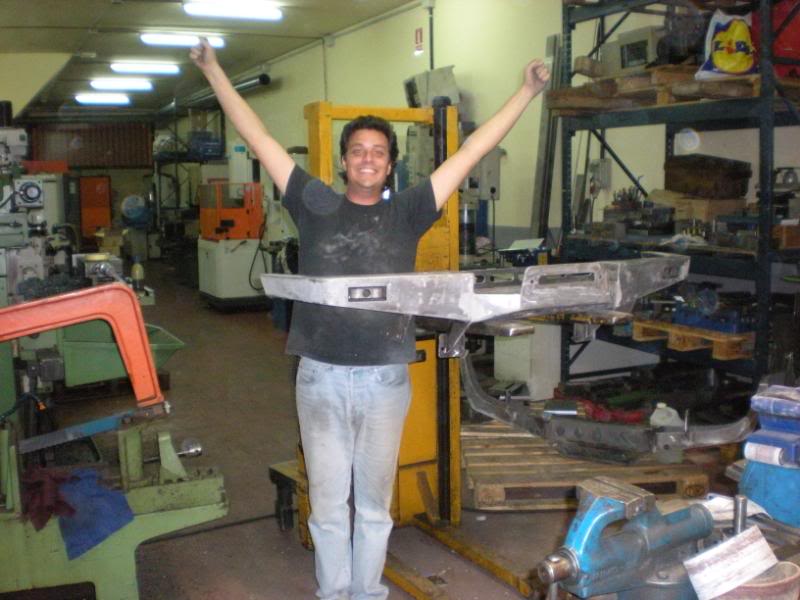
Satisfaction faces !!! Nothing like creating with your own hands, while spending a grate time !!!
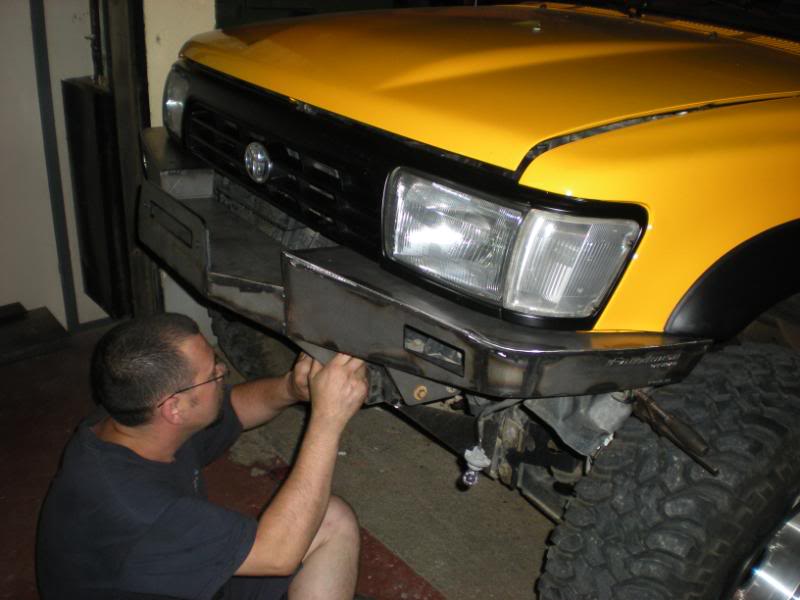
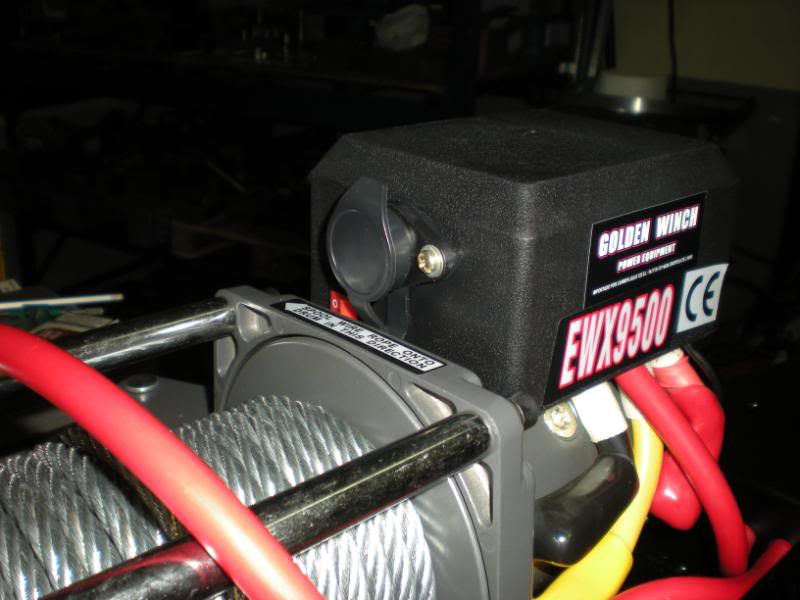
After we got the bumpers from the painter, we mounted the winch to the bumper, corner lights and cut-off.
We turned the solenoid box 180�, to let the winch plugg free (we thought the connector was on top of the box, but model was changed) not a big problem at all.
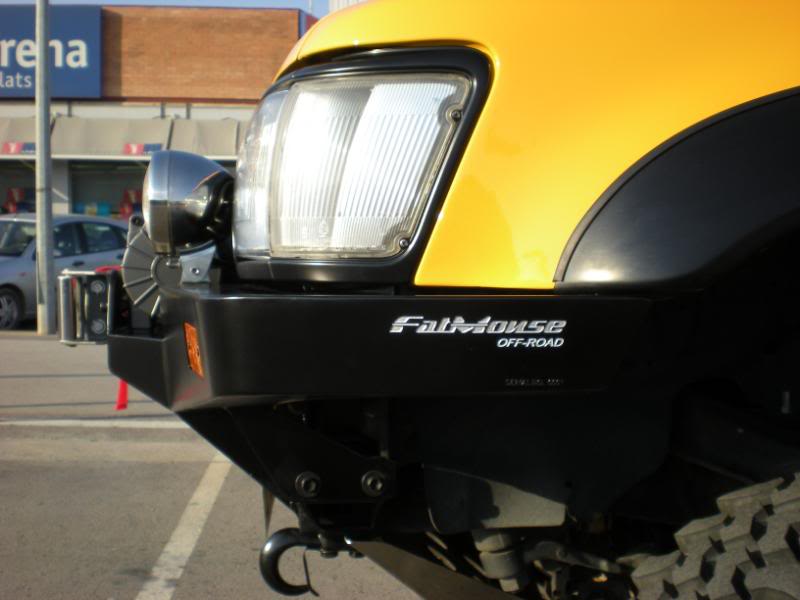
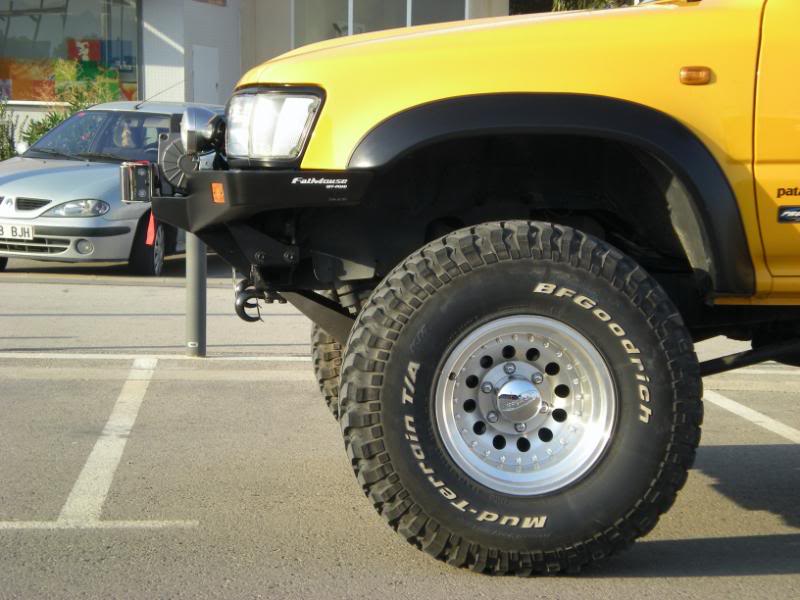
Detail of the corner light mount.
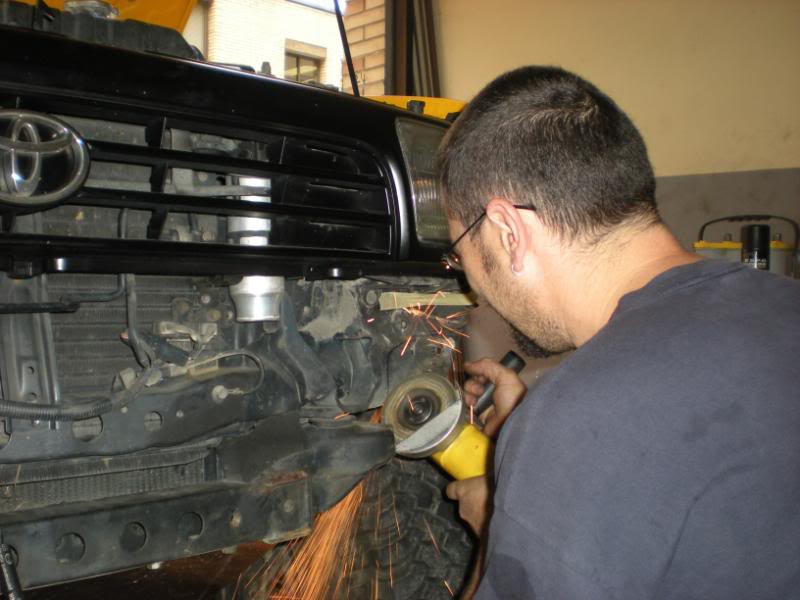
Before fitting the bumper, we cut part of the inner plastic fenders, and trimmed the metal sheet under the lights.
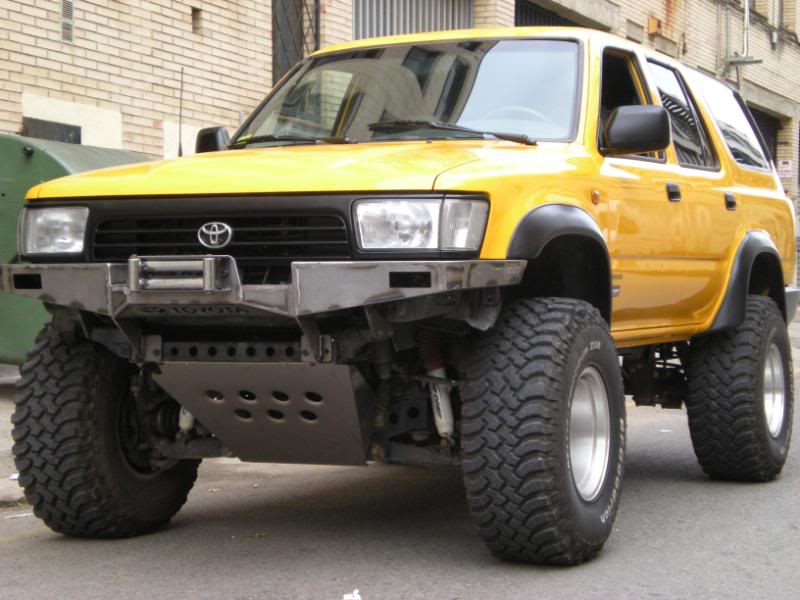
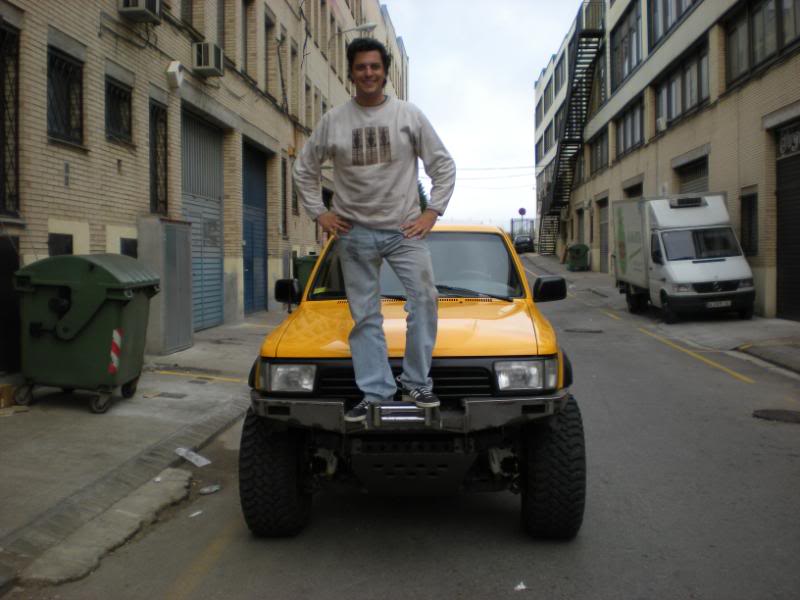
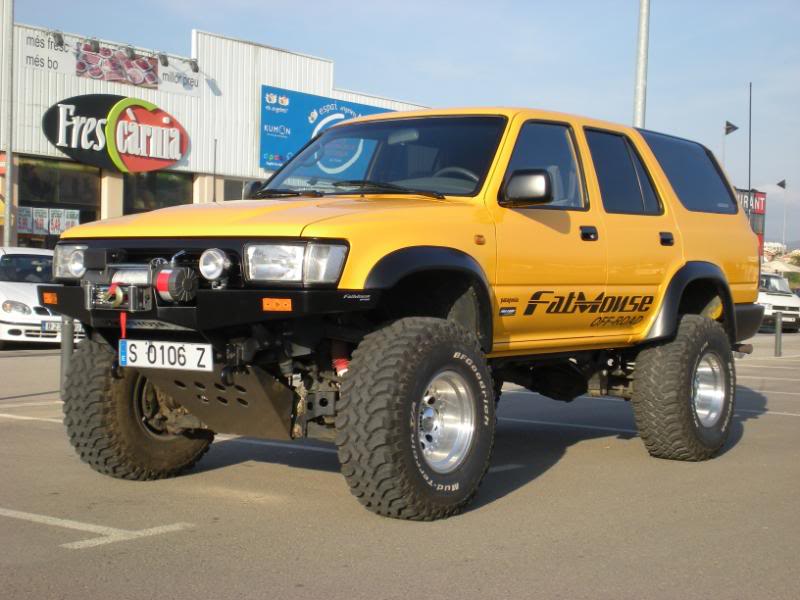
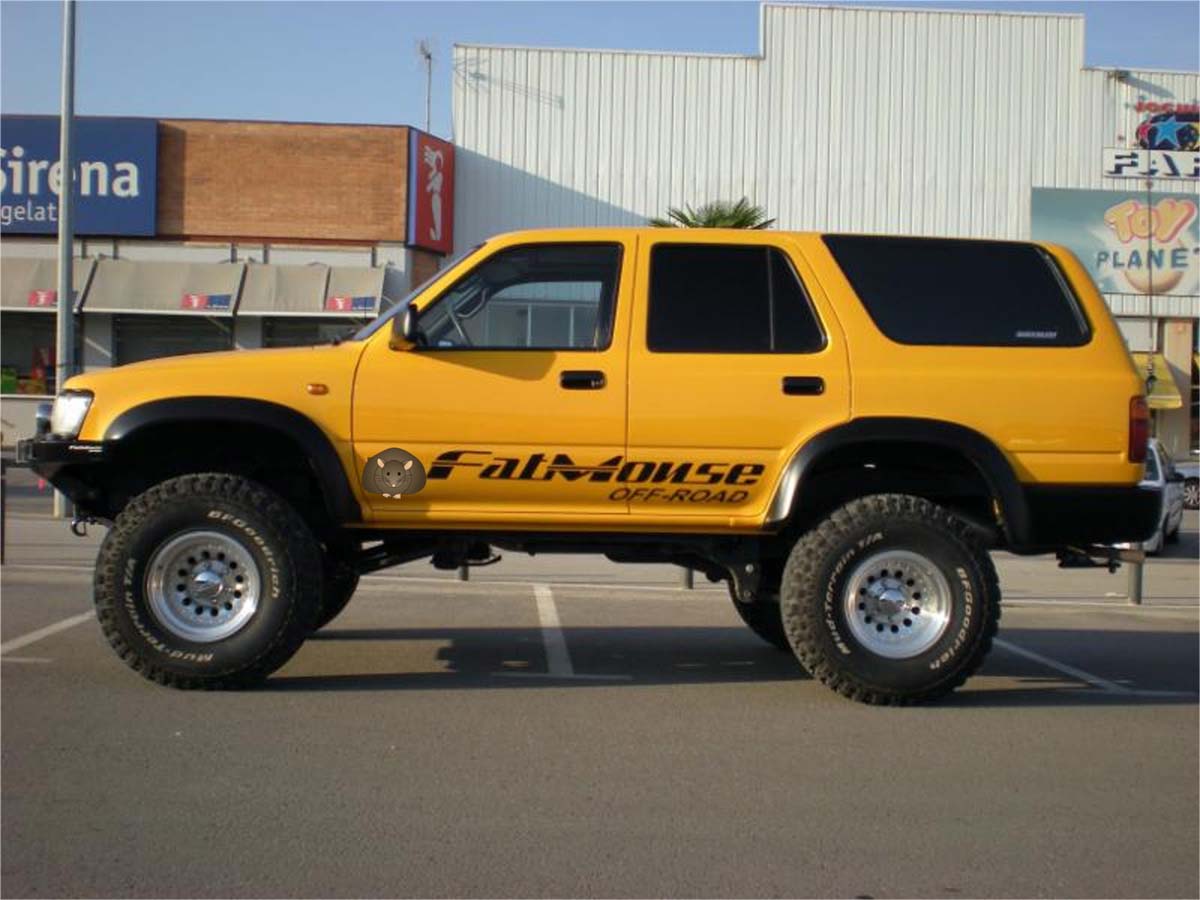
And this is the final result !!!

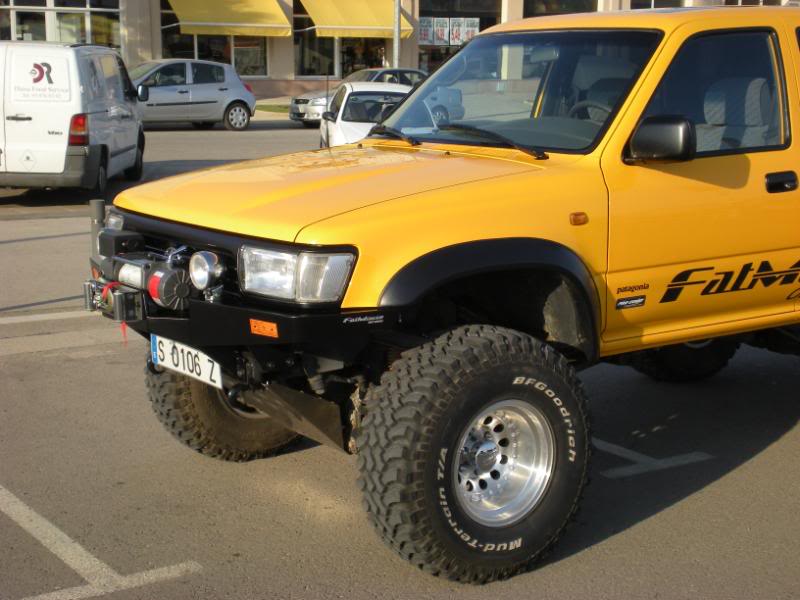

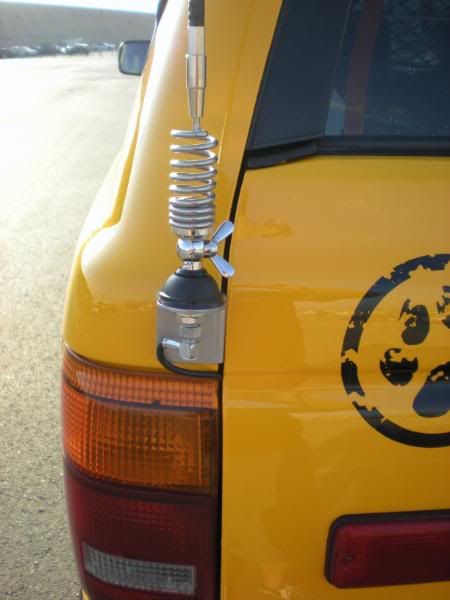
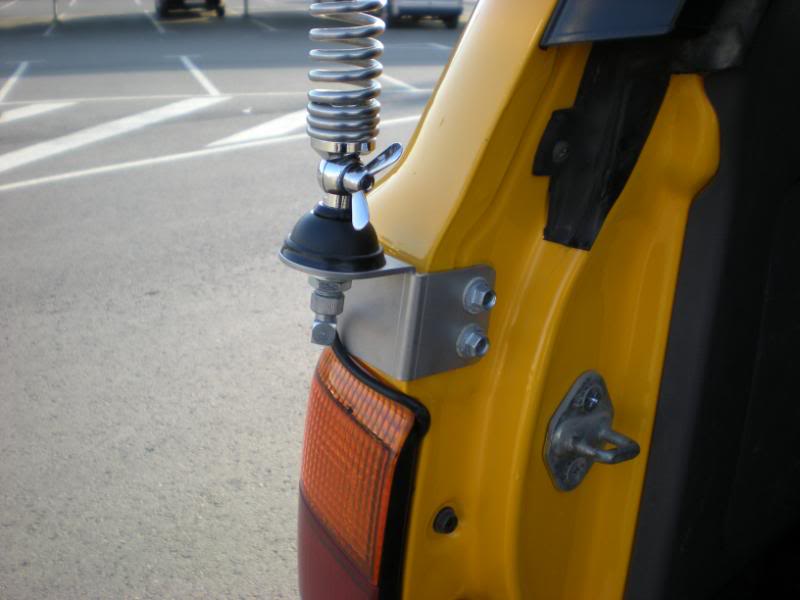
We also fabbed a new cb antenna mount.
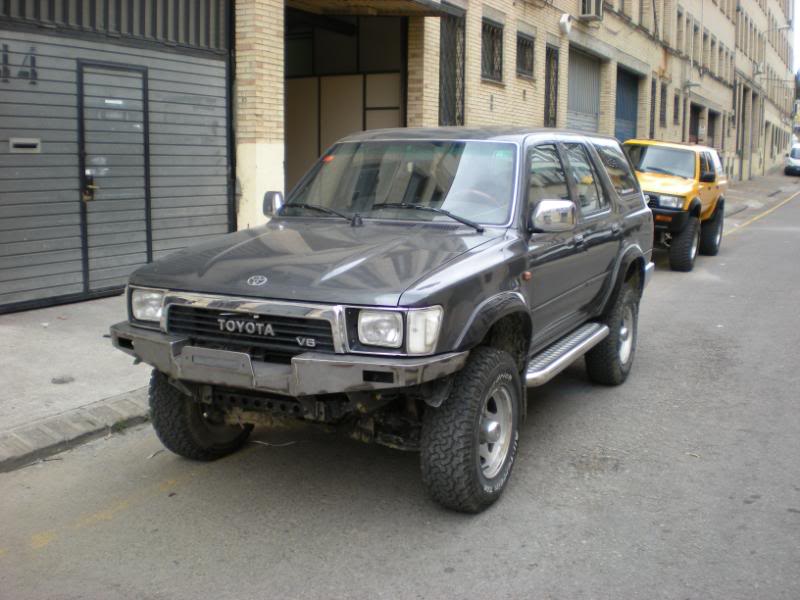
Soon I will put more pictures of Cesc�s Toy. It was dark for him and pictures were crap...
Hope you like it.
Feel free to criticize !!!
This is not he end... soon we will fab something new hehehehehehehehehee !!!!
To be continued ...
Thanks for reading.(Sorry for my english...)
Cheers !!!
Facu
;-)
.-Me: You know buddy, I would like so much to learn to weld...
.-Cesc: Well I know a little bit, but if we have to learn seriously, let�s go for it !!!
We continued drinking our beers quietly, also admiring our Toys, and I had no better idea than saying... :
I would also like very much to have a new front bumper, but there is nothing exactly what I want here in Spain. I have it all on my mind. It also must have a winch, off course...
Suddenly, without saying any word, we had a deep eye contact (not a gay one...), so we realized that both of us were thinking the same.
.-Cesc : And what about if we fab them ???
The next weekend we sat in front of Cesc�s PC and started drawing some ideas ( unfortunatelly, we have more for the future ...;-)
For me, it was very clear that the bumper had to start inspired on Front Range Off Road bumpers style (unfortunately not sold in Spain and very expensive to import...).
We took of the original front bumper and started taking measurements and putting them into the pc.
After many, many, many hours, and when I say many, means that we sat many ours in front of the pc, finally we had the final design.
Cesc take care of the technical part, calculous, structures, drawing, etc...
Meanwhile I sat next to him, with my stupid face, looking how this guy worked with CAD.
From time to time I opened my mouth just to say:
.-Me: Can we round this edge ???
.-Me: Can we move the hole ???
.-Me: Are you sure this is going to fit in our rigs ??? Sometimes computers make mistakes... (I was wrong...).
On the next step we got all metal pieces cut by laser. 8 mm thick for the center box, and 4 mm thick for the wings of the bumper. (Total weight of the bumper 36kg, and 31kgs the winch)
After we got all the pieces of the puzzle, the funny part of the project started.
Here was, where I got to support my buddy with something more than ideas. So, lets start to weld.
My brother Willy came to give us some advices (he is an expert welder).
On date and at the exact hour I was prepared to start my adventure.
I spent the previous night, watching weld tutorial videos. This was like watching porn movies, without having any real sex experience yet... ;-)
After first indications, my brother gave to me some pieces of metal to feel the welder.
Seems to be that they liked the welds, cause they directly gave me part of the bumper to weld.
So after that, I was officially baptized as the welder of the team ;-)
Professional welders, please don�t puke !!! Hope they are not so bad for a newbee ...
Some pieces were pre-curved before positioning them, as for example the corner plates of the bumper.
Cesc, fabbed a stamp for those pieces. (He is a proffesional matrixer ).
I�m going to explain the funny story about our brand (we are not pros, and this is just a hobby for us).
While we were designing the bumper, we had the strong feeling, that we liked so much what we were drawing.
And Cesc commented: Man !!! this will look like a pro bumper, we should have a brand, hahahahahahahaha !!!!
Me.- You are not going to believe me, but I have the name.... FatMouse !!! A few days before while I was smoking a tunning cigarette, at night , watching the stars; I had a vision...
If I sometime create a company (don�t missunderstand me, I am a surgeon, way to far related to the off road industry) it wil be called FatMouse.
.-Cesc: Man I like the name...FatMouse Off-Road !!! From today and on every thing we fab for our trucks, will have our own brand. We were just kidding ...
Five minutes later Cesc gave the order to the pc to draw the Fatmouse brand on our bumpers, hahahahahahahahahahaha.
And this is the story about our brand.
So, kids... Don�t smoke !!!! ;-)
Slowly, pieces were forming the bumper, and somebody was loosing to much saliva ....
Cesc and Willy working on the bumper...
Finally this started, to seem a bumper...
Serial production !!!
Thanks to Cesc, we had all machinery and tools we needed.
Watch video:
http://es.youtube.com/watch?v=KZCc5qRaOy0
Detail of the corner light support.
We decided to do some mods, during the fabrication. We put this piece of perforated metal sheet to hide the radiator and lines...
We added reinforcements to the bumper, cause we had nothing better to do , hahahaahahahahahahaha !!!!!!
Final adjustments !!!
We went out to the street to admire it with day light !!!
Will it resist ??????
We rounded edges.
This is a detailed picture of the holes we made, to fit a cut-off for the positive of the winch.
After we polished all the details on the metal, we applied epoxy putty with little alloy fragments in it, to correct imperfections.
After, I learned that I don�t have to apply so much putty on the bumper... Gosh Damn it !!! This putty became so hard !!!! Hahahahahahahaha !!!!
We finished !!!!
Now to the painter ...
Satisfaction faces !!! Nothing like creating with your own hands, while spending a grate time !!!
After we got the bumpers from the painter, we mounted the winch to the bumper, corner lights and cut-off.
We turned the solenoid box 180�, to let the winch plugg free (we thought the connector was on top of the box, but model was changed) not a big problem at all.
Detail of the corner light mount.
Before fitting the bumper, we cut part of the inner plastic fenders, and trimmed the metal sheet under the lights.
And this is the final result !!!
We also fabbed a new cb antenna mount.
Soon I will put more pictures of Cesc�s Toy. It was dark for him and pictures were crap...
Hope you like it.
Feel free to criticize !!!
This is not he end... soon we will fab something new hehehehehehehehehee !!!!
To be continued ...
Thanks for reading.(Sorry for my english...)
Cheers !!!
Facu
;-)
Last edited by Fink; 09-29-2008 at 05:10 PM.


Trending Topics
09-16-2008, 02:09 PM
#9
Registered User
Join Date: Jul 2006
Location: Minneapolis MN
Posts: 241
Likes: 0
Received 0 Likes
on
0 Posts
that is the coolest looking bumper out there. pretty sweet guys awesome work. What is your forcasted selling cost? and any chance you will be making one for a 1st gen or 3rd gen!?

 09-16-2008, 02:22 PM
#11
Contributing Member
Join Date: Mar 2003
Location: COTKU,Ontario,Canada
Posts: 11,334
Likes: 0
Received 0 Likes
on
0 Posts
Wow!... just Wow! That is a great bumper. I'm no welder but the welds looked perfectly good to me. There's nothing at all wrong with your english either, it was better then a lot of posts we have here lol...
It looks like you have the start of a great business there, from what I've seen there is a demand for that kind of product in the EU and a "domestic" manufacturer would have definite market access advantages. If you wanted to go that route I would suggest developing a version of the bumper with a grill guard hoop similar to an ARB.
Congratulations again on a job very well done.
and welcome to the family
Aviator
09-16-2008, 02:27 PM
#13
Contributing Member
Join Date: Mar 2003
Location: COTKU,Ontario,Canada
Posts: 11,334
Likes: 0
Received 0 Likes
on
0 Posts
but I'd take a small rectangular sticker in black with the pearl gray script and put it some place on my truck...
maybe jimmy dean can come up with something?
Last edited by aviator; 09-16-2008 at 02:43 PM.
09-16-2008, 02:51 PM
#14
Nice bumper. Looks like you guys had fun. 
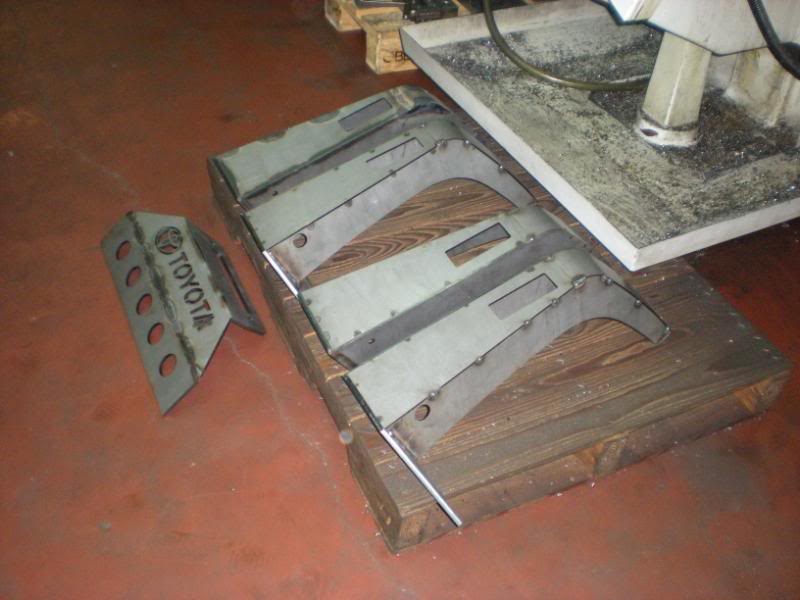
The Toyota logo and name might get you into some legal issues if you market those.
Normal eye wear is no substitute for safety glasses when grinding.
The Toyota logo and name might get you into some legal issues if you market those.
Normal eye wear is no substitute for safety glasses when grinding.
09-16-2008, 02:51 PM
#15
Registered User
Join Date: Nov 2007
Location: chippawa niagara falls ontario
Posts: 3,278
Likes: 0
Received 2 Likes
on
2 Posts
WOW
i would love to do a weld a bumper kit it would be so fun and you end up with a killer bumper...
what program did you use??
i know some machine shops so i could get the parts cnced
i would love to do a weld a bumper kit it would be so fun and you end up with a killer bumper...
what program did you use??
i know some machine shops so i could get the parts cnced
09-16-2008, 03:19 PM
#17
Registered User
Thread Starter
Wow!... just Wow! That is a great bumper. I'm no welder but the welds looked perfectly good to me. There's nothing at all wrong with your english either, it was better then a lot of posts we have here lol...
It looks like you have the start of a great business there, from what I've seen there is a demand for that kind of product in the EU and a "domestic" manufacturer would have definite market access advantages. If you wanted to go that route I would suggest developing a version of the bumper with a grill guard hoop similar to an ARB.
Congratulations again on a job very well done.
and welcome to the family
Aviator
It looks like you have the start of a great business there, from what I've seen there is a demand for that kind of product in the EU and a "domestic" manufacturer would have definite market access advantages. If you wanted to go that route I would suggest developing a version of the bumper with a grill guard hoop similar to an ARB.
Congratulations again on a job very well done.
and welcome to the family
Aviator
Delivered !!! hahahahahahaha . Euro is way too expensive now ...
That�s what I always say. Use safty gear always !!! In fact I use protective eye wear, just to hang around my buddies garage, hahahahaha (no kidding).
I�m so glad you like it ... Your opinion has a lot of value for us.
Think that for us, Yotatech is like Disneyworld for grown-up 4x4 enthusiasts !!!

Last edited by drfakoo; 09-16-2008 at 03:30 PM.
09-16-2008, 03:27 PM
#19
Registered User
Thread Starter
I think that mouse is a little too fat IMO Corey. I think something standing up on two legs might look better... sort of a mouse version of Remy's brother from Ratatouie [sp] or else a fat Jerry mouse...
but I'd take a small rectangular sticker in black with the pearl gray script and put it some place on my truck...
maybe jimmy dean can come up with something?
but I'd take a small rectangular sticker in black with the pearl gray script and put it some place on my truck...
maybe jimmy dean can come up with something?


