Frontier 4x4's 94 Tough Truck Toyota
 07-20-2011, 07:16 PM
#1
Registered User
Thread Starter
Join Date: Feb 2007
Posts: 127
Likes: 0
Received 0 Likes
on
0 Posts
Frontier 4x4's 94 Tough Truck Toyota
There isn't going to be much for tech until I'm done destroying the suspension at the races but some of what is going on now (cage, sliders, etc.) can be applied to anything so I'm starting the build thread early. If you interested in the basic stuff, read it. Otherwise skip ahead to the more interesting stuff. I'm putting everything on here either way.
I haven't done a thread since my green weekend warrier 4Runner build and it's been sold for a few years now.
We've been in the process of moving the shop and I haven't built much for myself and just been wheeling the budget beater Samurai to get me by while all the moving and getting setup is going on. We got into the new place where we now have a bunch of land to build some crazy trails on but it's still really hectic around here trying to get everything going again. I'm currently using one 220 plug, one 110 outlet and a workbench consisting of a piece of steel on top of a couple saw horses. :laughing: I really need to get the shop finished up but I also want to race. And I can't race the way I want without a cage so I'm getting started early.
I got this truck for cheap thinking I would just resell it but it ended up sticking around. The seller thought since the power steering quit working it needed a new timing belt and parked it for 6 months until he decided to either sell it or scrap it. So I find it and check it out. The power steering belt is missing because the idler pulley seized up. He takes my offer and I pick it up the next day, drive it a block and swap on a good pulley and belt. Did a tune up and been using it for my parts runner ever since.
We get moved to our ranch and that same night it gets rolled after my buddy yanks it sideways with the Slamurai trying to get it back out of a big ravine the front end was stuck in. Thanks Brian, Dan, and Cole :shaking:
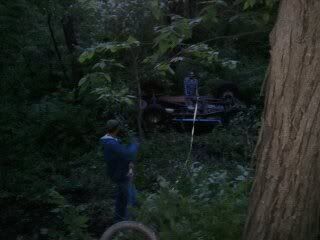
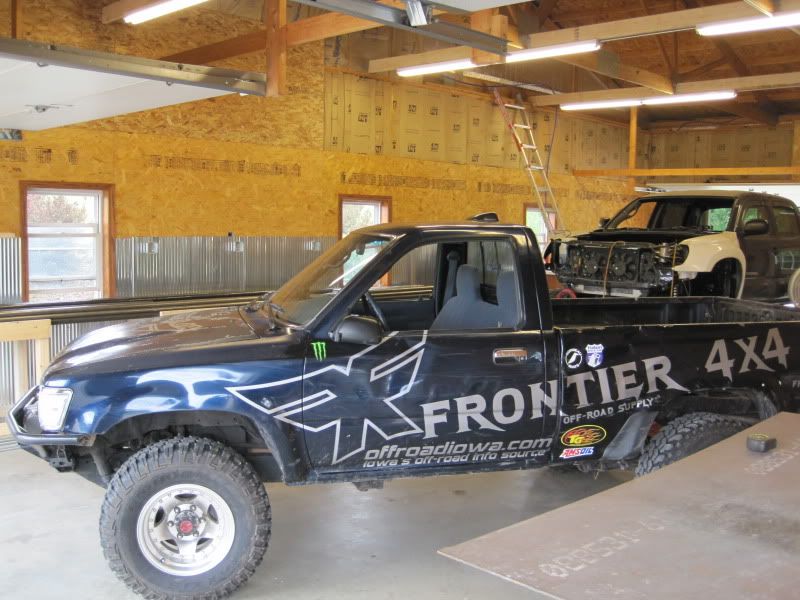
So a new trail rig was born. Not much happened to it, didn't even break a mirror or any glass. The top passenger corner by the windshield got a few small dents and the driver side door and a few that popped back out. The hood got worked over some and the grill broke. The driver bed right behind the cab got the worst of it.
This is after the roll and all cleaned up again so i can swap the shocks and throw some stickers on it before the first race.
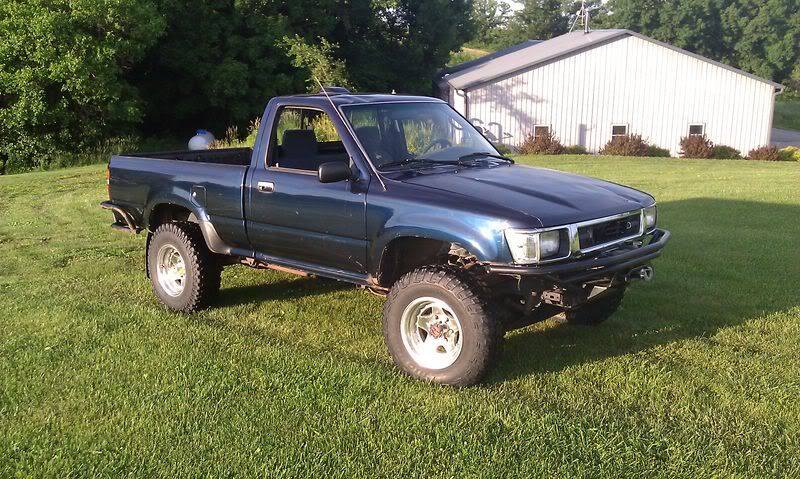
Threw on some stock replacement Rancho RS9000's so I could dial them in for big air. Some of the rules for racing around here require the shocks to be in the stock location.

Found and did a temp fix on the broken rear springs. Which is probably a result from my high speed bashing on the new main trails we cut.

Got some vinyl on it and headed out to it's first tough truck race.
I haven't done a thread since my green weekend warrier 4Runner build and it's been sold for a few years now.
We've been in the process of moving the shop and I haven't built much for myself and just been wheeling the budget beater Samurai to get me by while all the moving and getting setup is going on. We got into the new place where we now have a bunch of land to build some crazy trails on but it's still really hectic around here trying to get everything going again. I'm currently using one 220 plug, one 110 outlet and a workbench consisting of a piece of steel on top of a couple saw horses. :laughing: I really need to get the shop finished up but I also want to race. And I can't race the way I want without a cage so I'm getting started early.
I got this truck for cheap thinking I would just resell it but it ended up sticking around. The seller thought since the power steering quit working it needed a new timing belt and parked it for 6 months until he decided to either sell it or scrap it. So I find it and check it out. The power steering belt is missing because the idler pulley seized up. He takes my offer and I pick it up the next day, drive it a block and swap on a good pulley and belt. Did a tune up and been using it for my parts runner ever since.
We get moved to our ranch and that same night it gets rolled after my buddy yanks it sideways with the Slamurai trying to get it back out of a big ravine the front end was stuck in. Thanks Brian, Dan, and Cole :shaking:
So a new trail rig was born. Not much happened to it, didn't even break a mirror or any glass. The top passenger corner by the windshield got a few small dents and the driver side door and a few that popped back out. The hood got worked over some and the grill broke. The driver bed right behind the cab got the worst of it.
This is after the roll and all cleaned up again so i can swap the shocks and throw some stickers on it before the first race.
Threw on some stock replacement Rancho RS9000's so I could dial them in for big air. Some of the rules for racing around here require the shocks to be in the stock location.
Found and did a temp fix on the broken rear springs. Which is probably a result from my high speed bashing on the new main trails we cut.
Got some vinyl on it and headed out to it's first tough truck race.
 07-20-2011, 07:17 PM
#2
Registered User
Thread Starter
Join Date: Feb 2007
Posts: 127
Likes: 0
Received 0 Likes
on
0 Posts
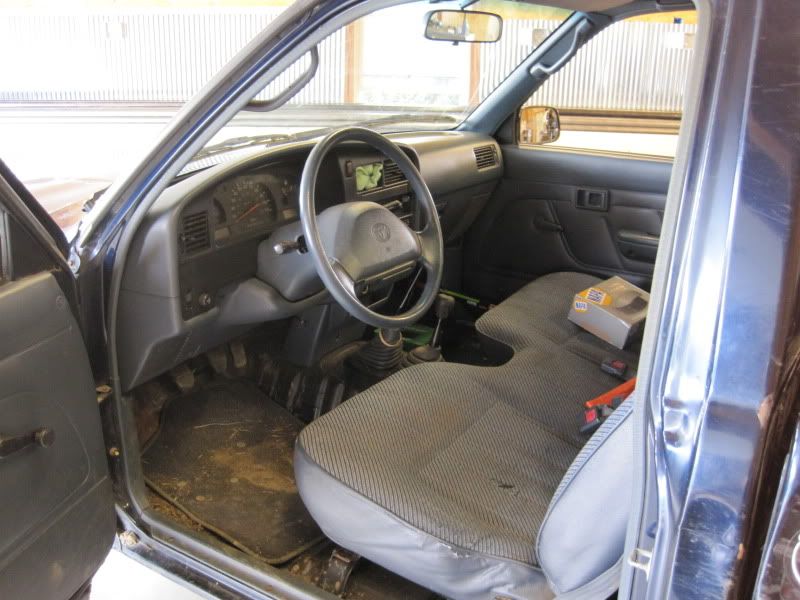
1st race went good, came back with a 2nd. The bench seat really sucked because around the turns it would let my knee lay over enough to get in the way when downshifting to 2nd.
Seat problem will be fixed with these. I went with the low backs so I could fit the seat farther back in the regular cab.

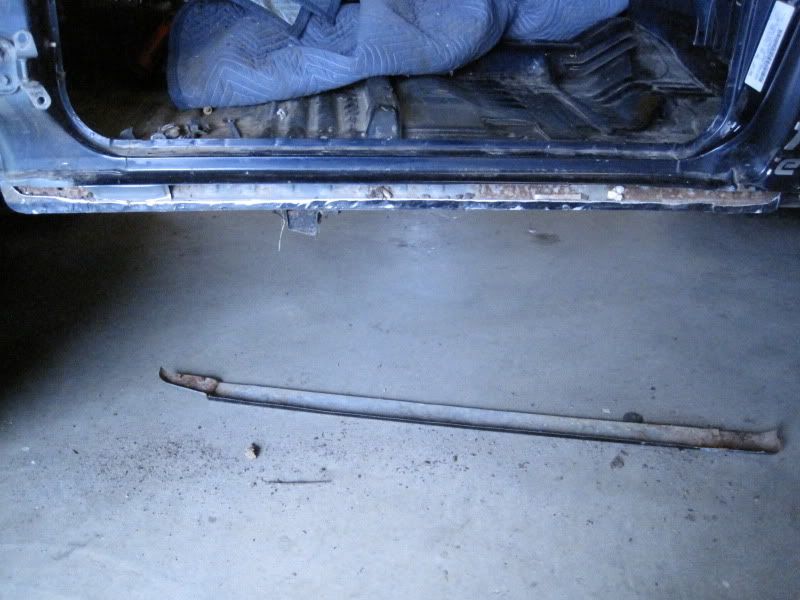
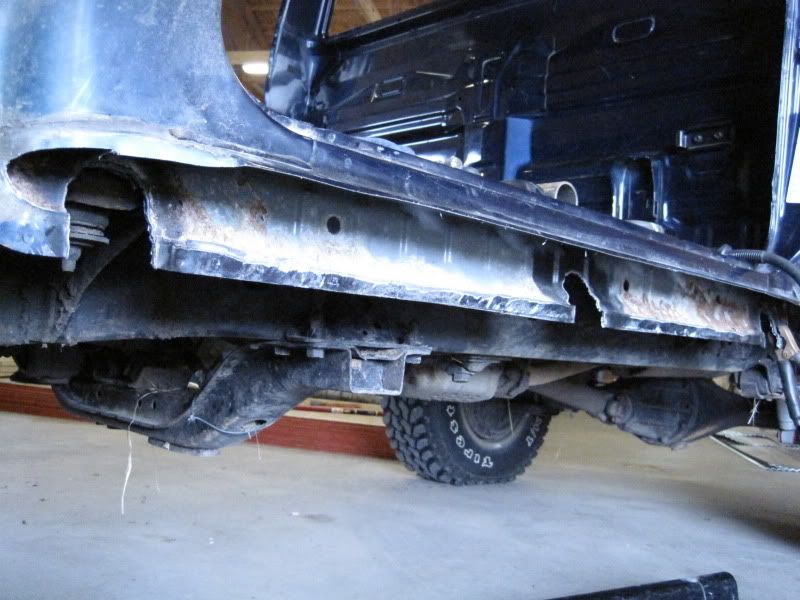
They're going to need something to mount to so now it's time to get started on the cage. I want to start with a good foundation so rocker replacement sliders come first. I've done them this way on a bunch of rigs and it's always worked great.
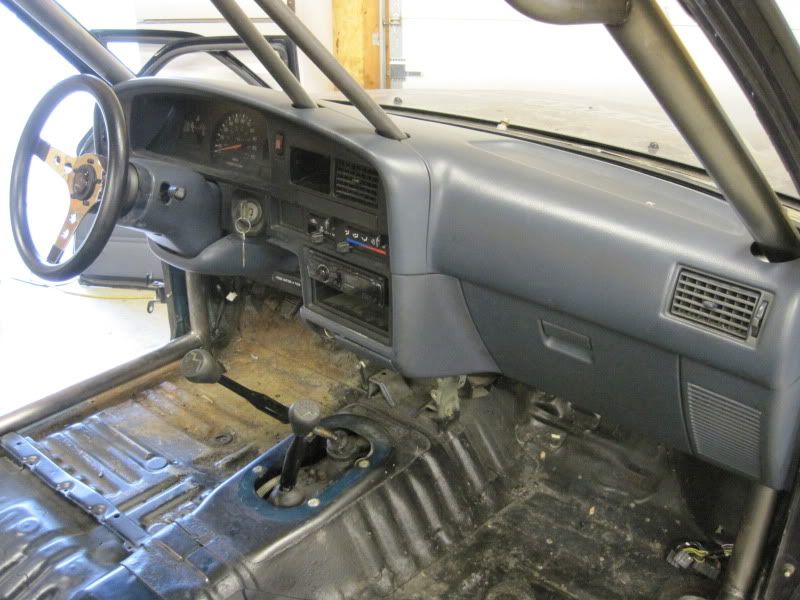
Before tear down
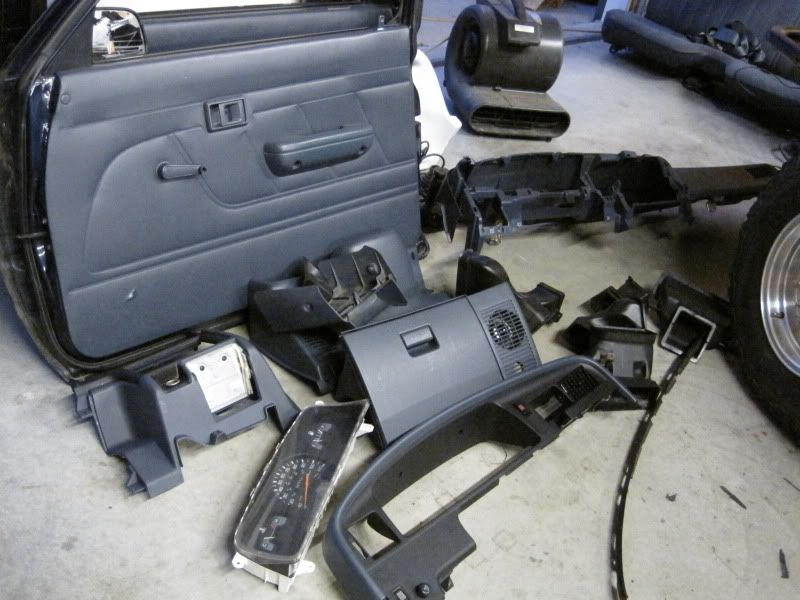
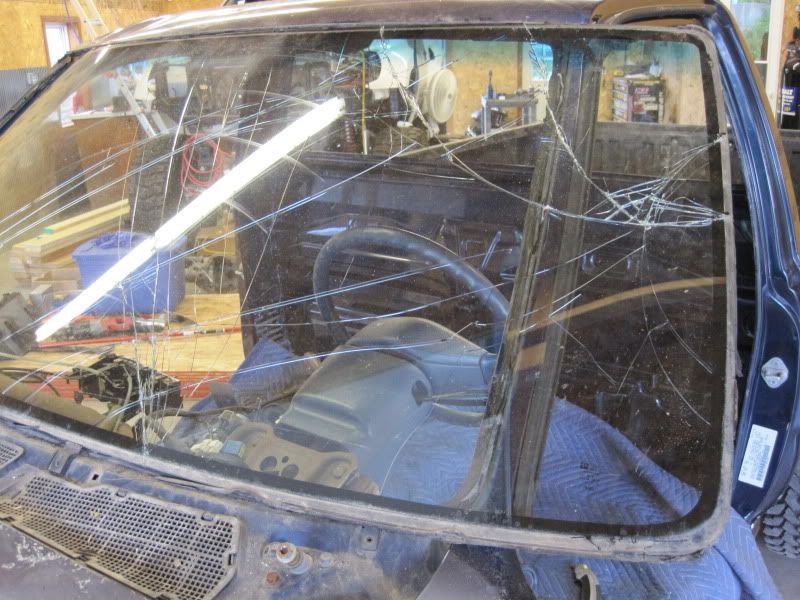
The cage is going behind the dash because it will be a lot stronger and look better. So everything has to go for now.
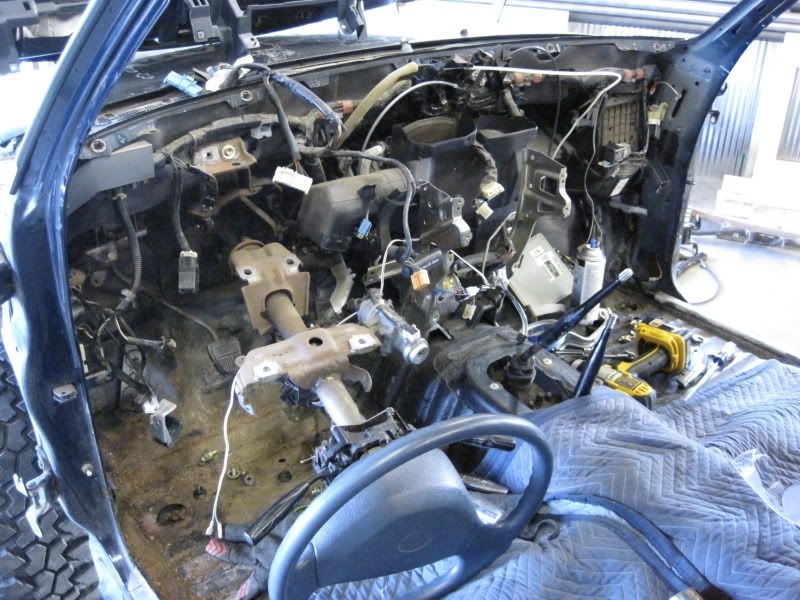
The glass didn't feel like cooperating
Seat problem will be fixed with these. I went with the low backs so I could fit the seat farther back in the regular cab.
They're going to need something to mount to so now it's time to get started on the cage. I want to start with a good foundation so rocker replacement sliders come first. I've done them this way on a bunch of rigs and it's always worked great.
Before tear down
The cage is going behind the dash because it will be a lot stronger and look better. So everything has to go for now.
The glass didn't feel like cooperating
07-20-2011, 07:18 PM
#3
Registered User
Thread Starter
Join Date: Feb 2007
Posts: 127
Likes: 0
Received 0 Likes
on
0 Posts
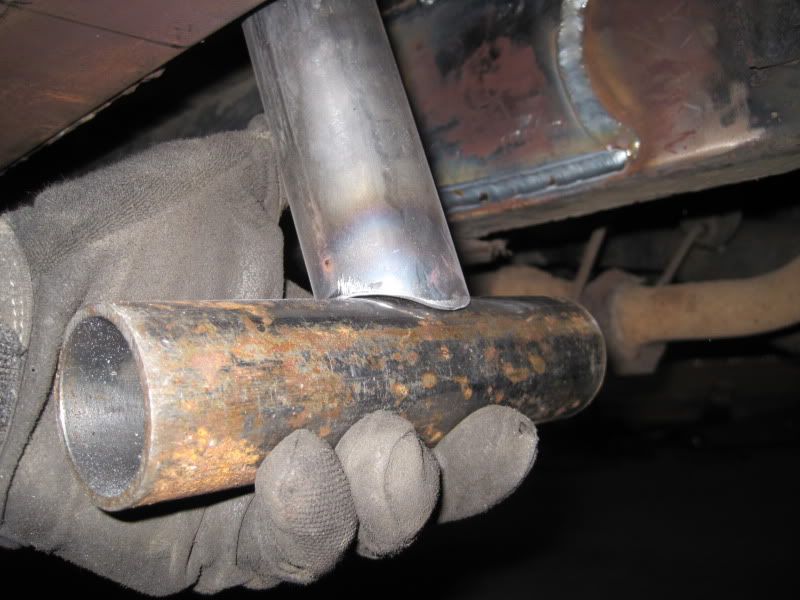
Start cutting. I'm using 3x3x3/16". This will tuck up inside the door so I can cut the rocker right at the corner by the bottom door edge. If you use something wider you will want to make sure your door clears it. The other cut will be just outside of the pinch seem. Cutoff wheel works good to get started enough to get the sawzall blade in.
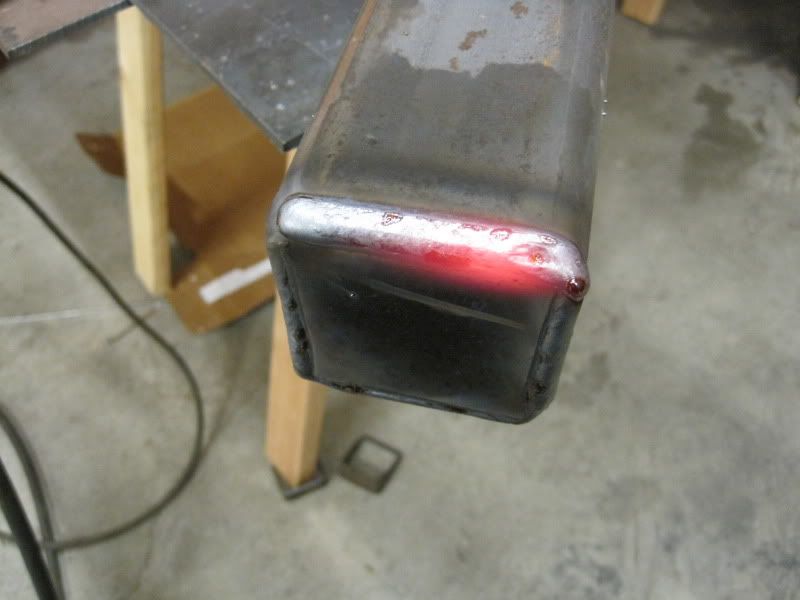
Measure your new slider steel and get it capped so it can cool while you cut the rockers out.

I'm replacing the body mounts so I made a template to use as a guide for cutting out notches where the tube will be. Spray paint works great to show where to cut.
Start fitting the new rocker and grinding where necessary to get a really close fit. A flap disc works good. It pays off to spend some extra time getting it to fit good with no gaps. Welding later will turn out better.

Measure your new slider steel and get it capped so it can cool while you cut the rockers out.
I'm replacing the body mounts so I made a template to use as a guide for cutting out notches where the tube will be. Spray paint works great to show where to cut.
Start fitting the new rocker and grinding where necessary to get a really close fit. A flap disc works good. It pays off to spend some extra time getting it to fit good with no gaps. Welding later will turn out better.
07-20-2011, 07:19 PM
#4
Registered User
Thread Starter
Join Date: Feb 2007
Posts: 127
Likes: 0
Received 0 Likes
on
0 Posts
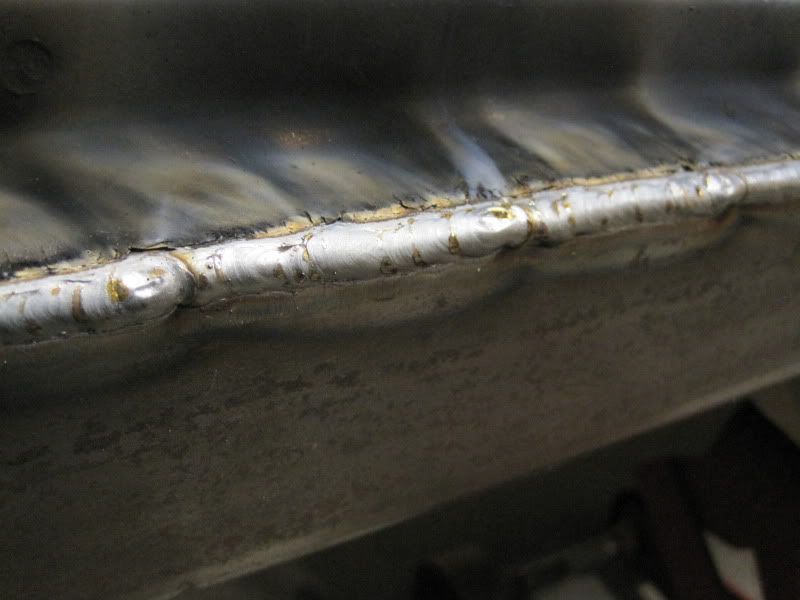
Once you get it all lined up start putting some good tacks on it to keep it where you want it.

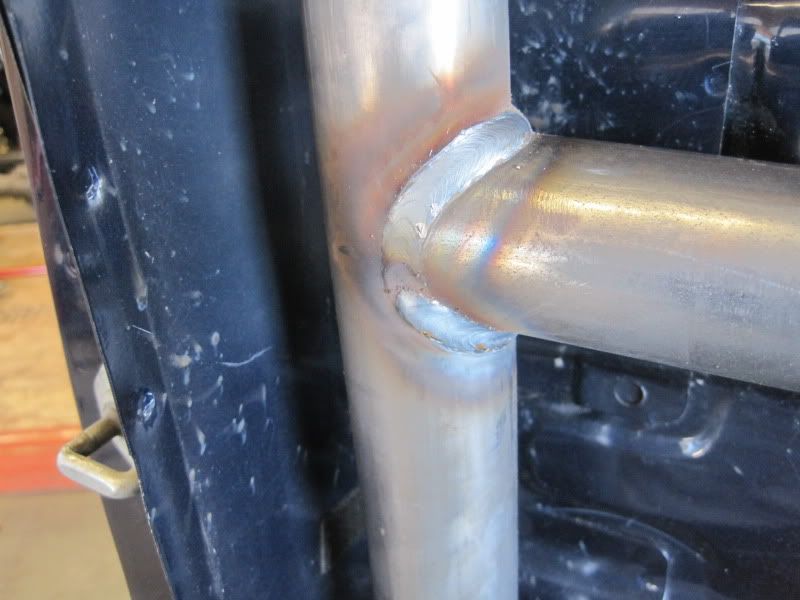
Weld it up. Stay on the slider and let the puddle flow into the thin sheet metal. Starting on the right of the slider moving left and welding a couple inches moving right back into your previous weld works great. I haven't had any problems with warping the sheet metal.
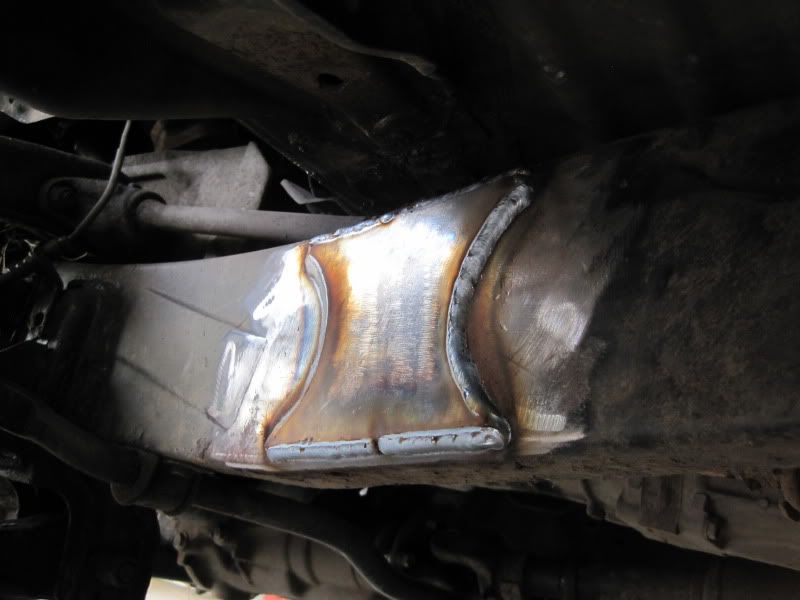
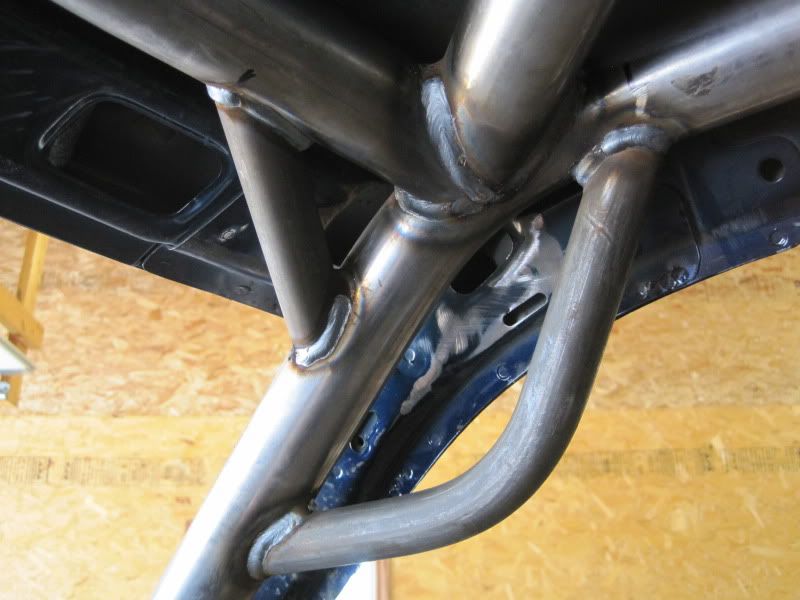
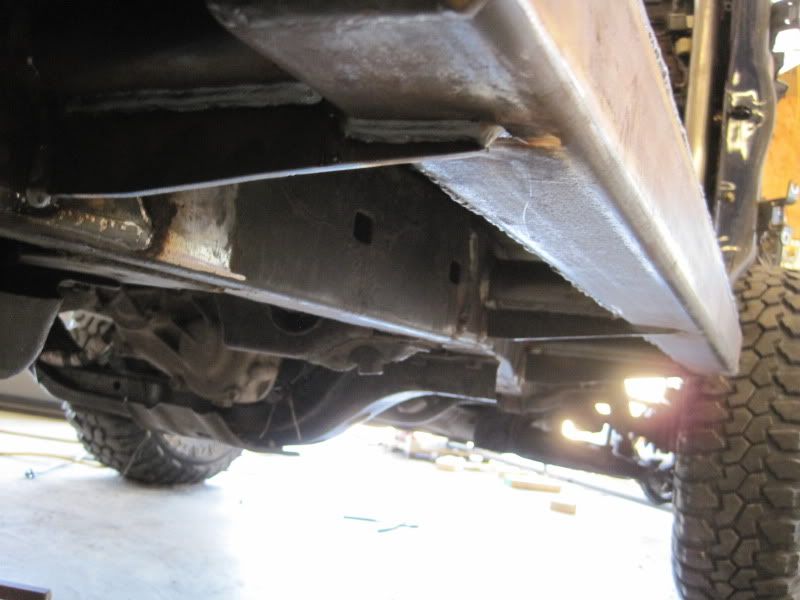
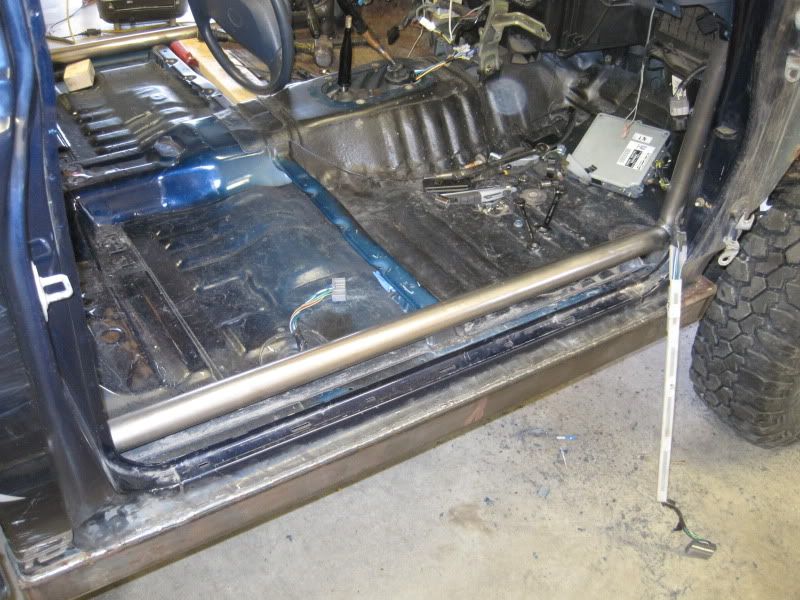
Time to get the frame plates on and mount the middle tube. The front and rear body mounts will get cut off after the middle one is fully welded and supporting the cab.
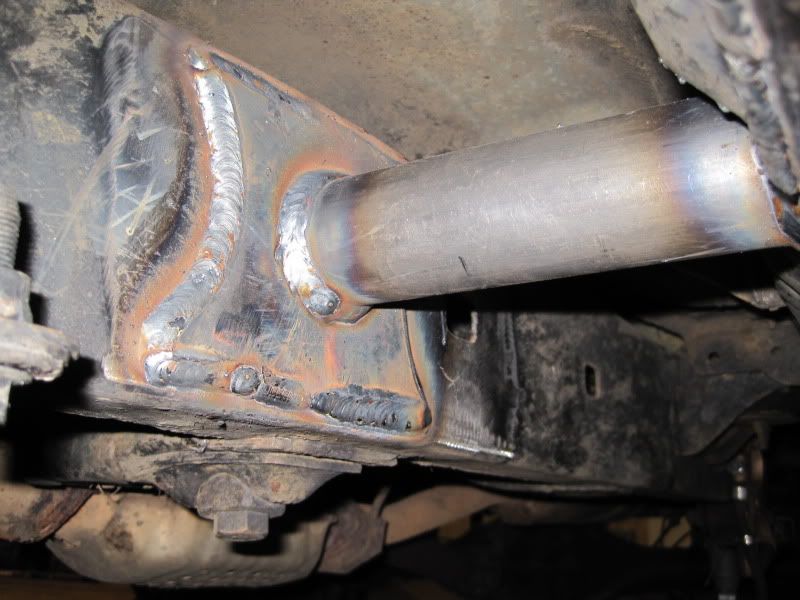
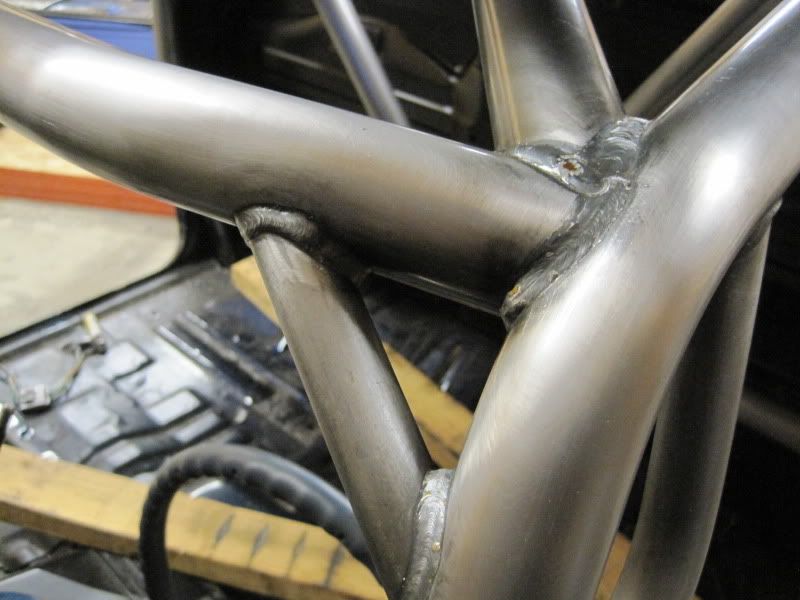
I'm adding gussets to all of them for more strength.
Weld it up. Stay on the slider and let the puddle flow into the thin sheet metal. Starting on the right of the slider moving left and welding a couple inches moving right back into your previous weld works great. I haven't had any problems with warping the sheet metal.
Time to get the frame plates on and mount the middle tube. The front and rear body mounts will get cut off after the middle one is fully welded and supporting the cab.
I'm adding gussets to all of them for more strength.
07-20-2011, 07:20 PM
#5
Registered User
Thread Starter
Join Date: Feb 2007
Posts: 127
Likes: 0
Received 0 Likes
on
0 Posts
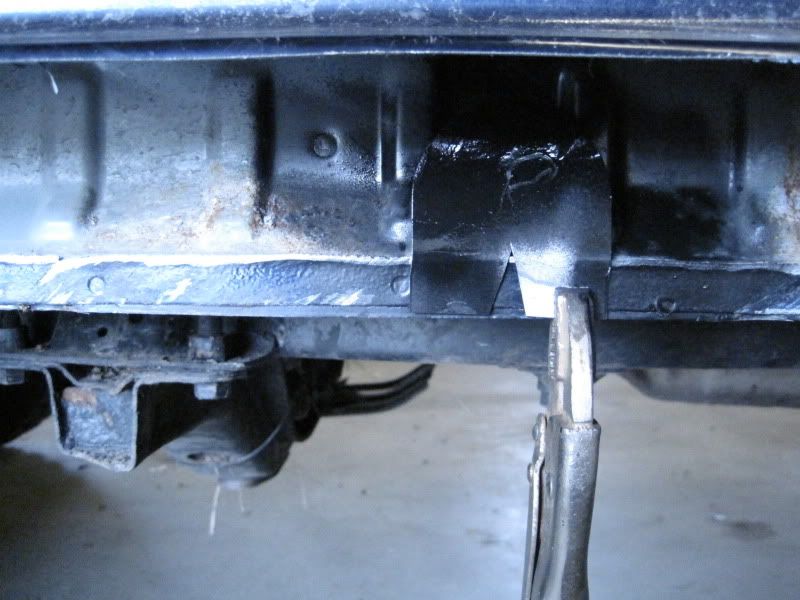
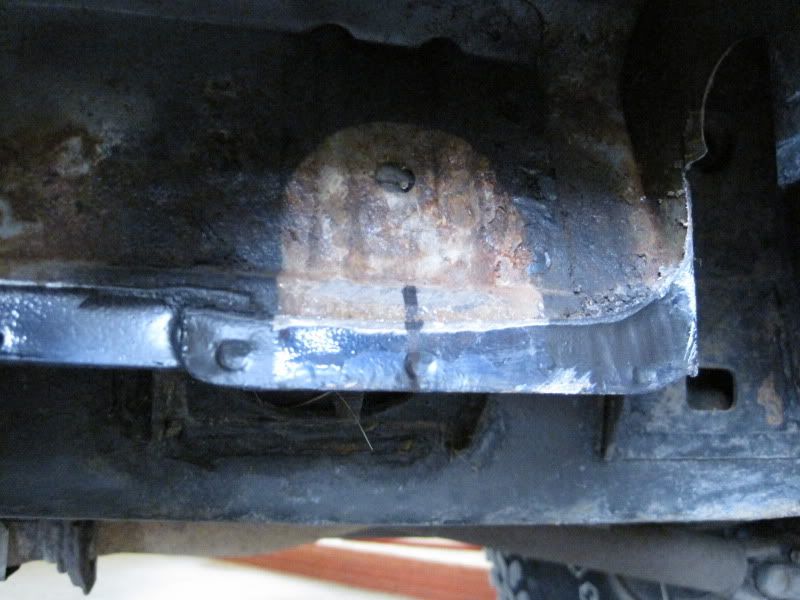
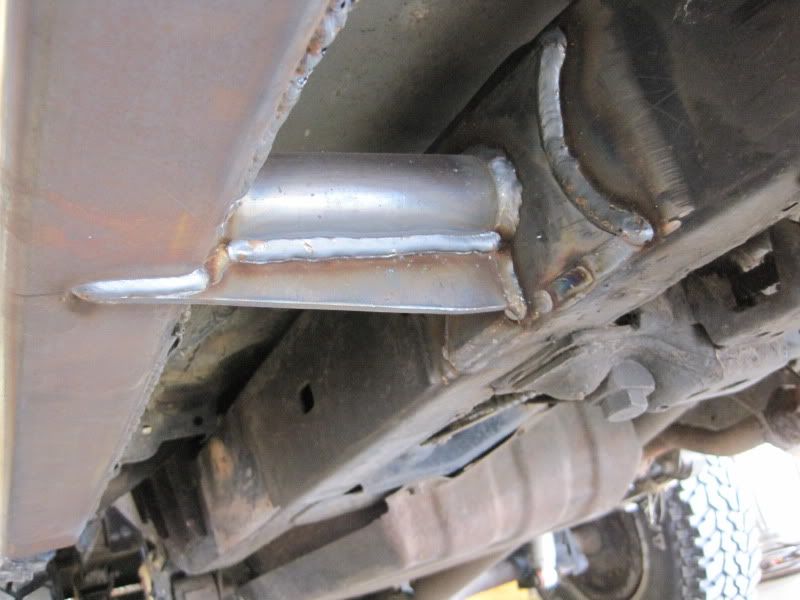
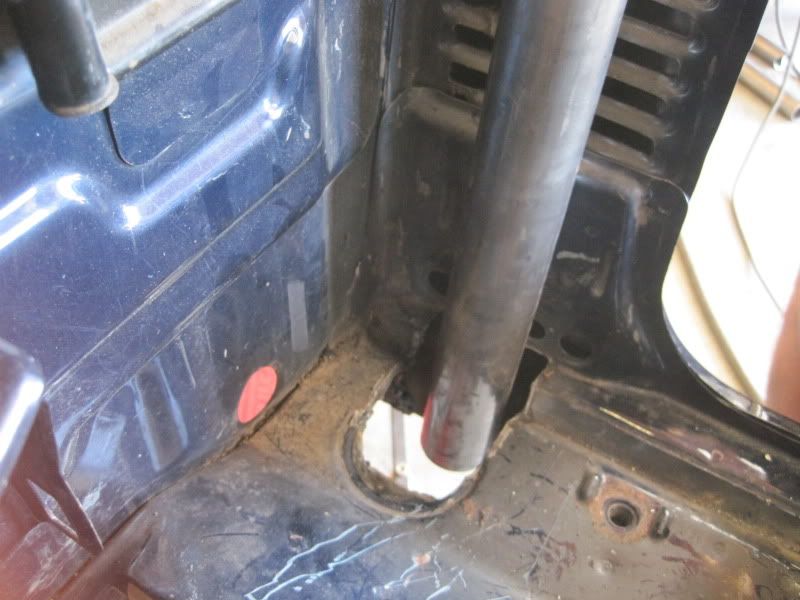
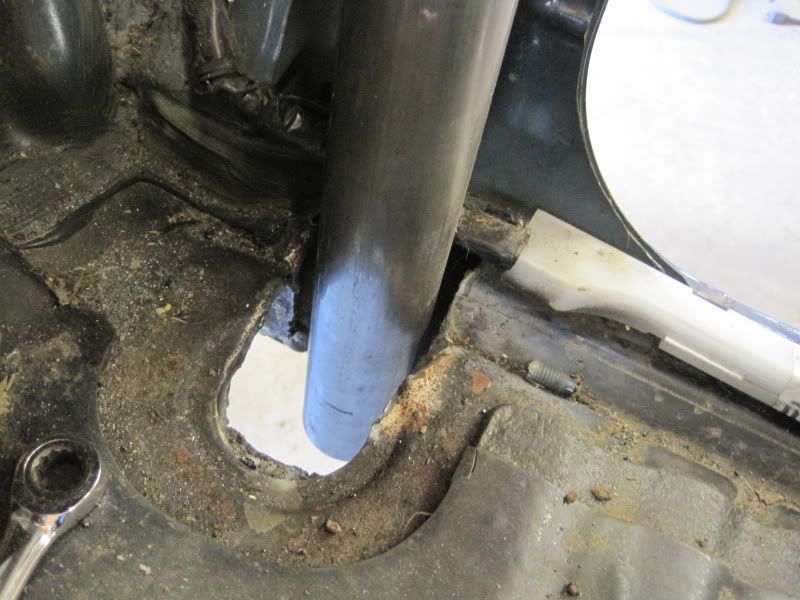
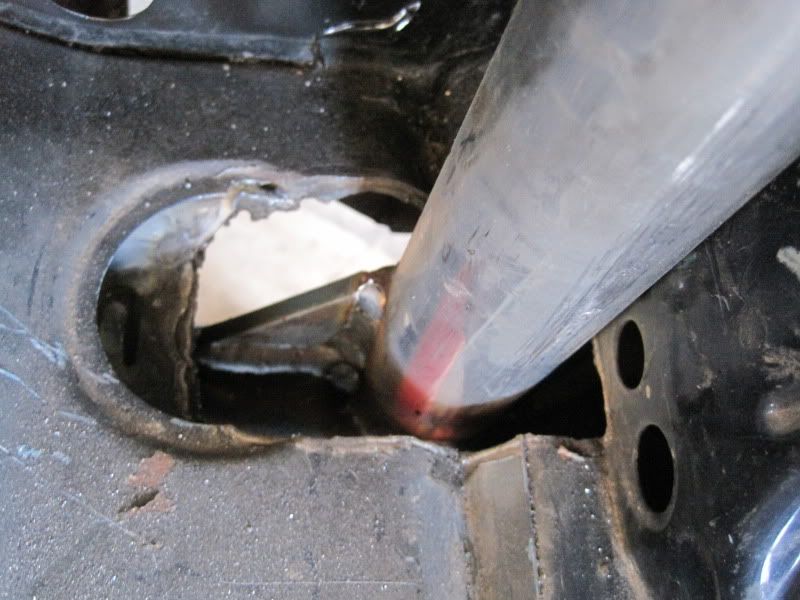
Now that cab is supported the body mounts can get chopped off and the frame plated.
The cab was cut where the body mounts are to let the tube go through. These will be covered up and sealed with a plate later after the cage is mounted.
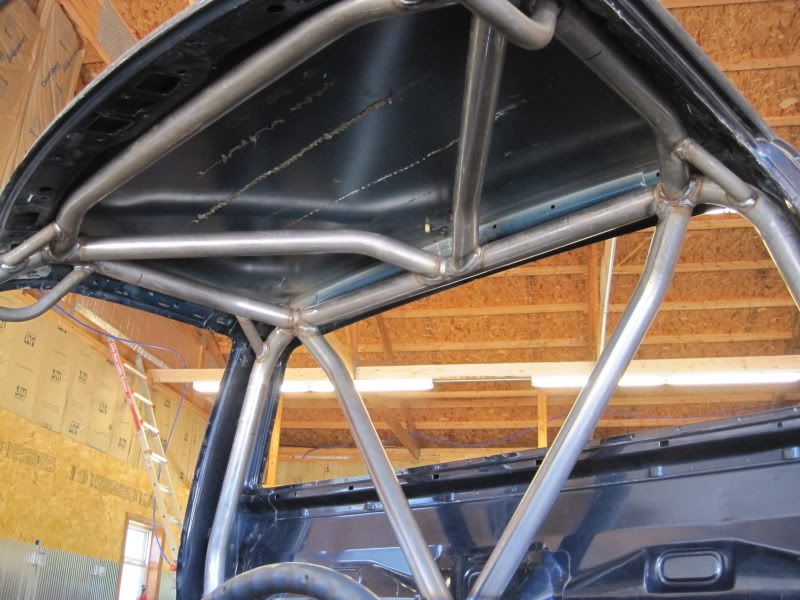
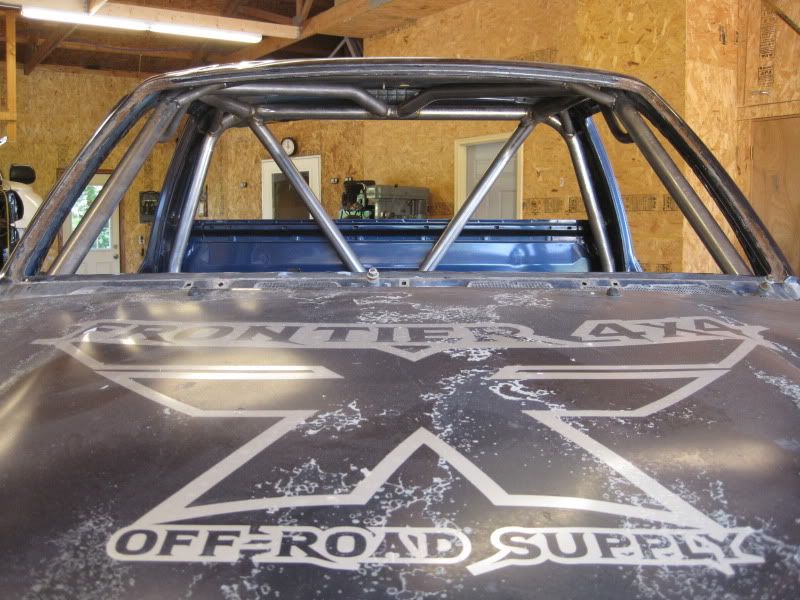
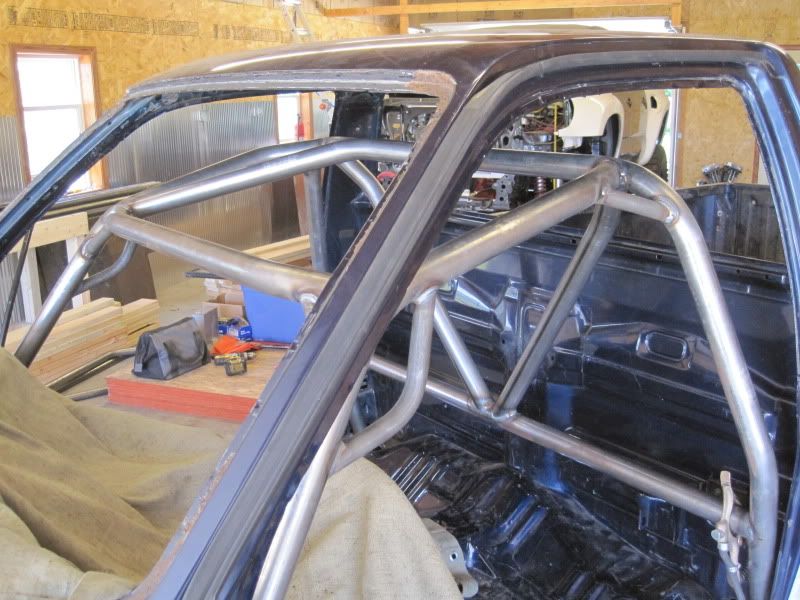
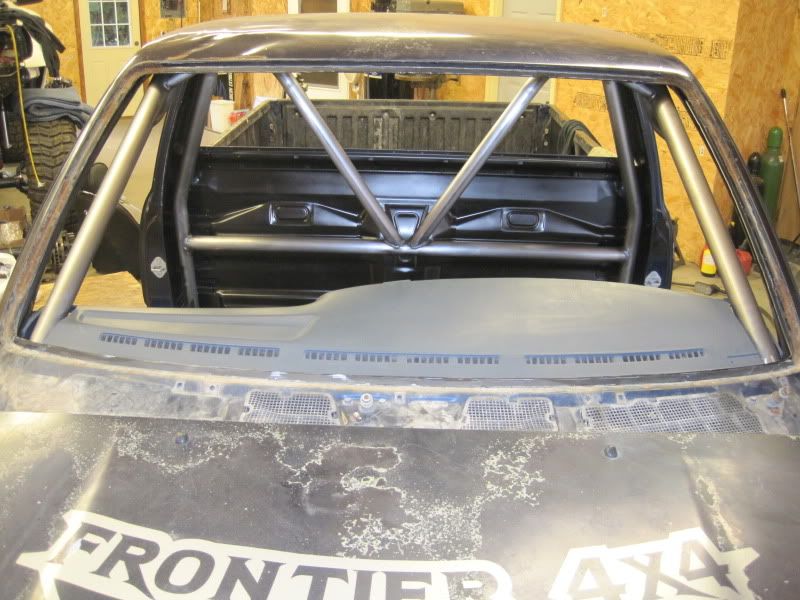
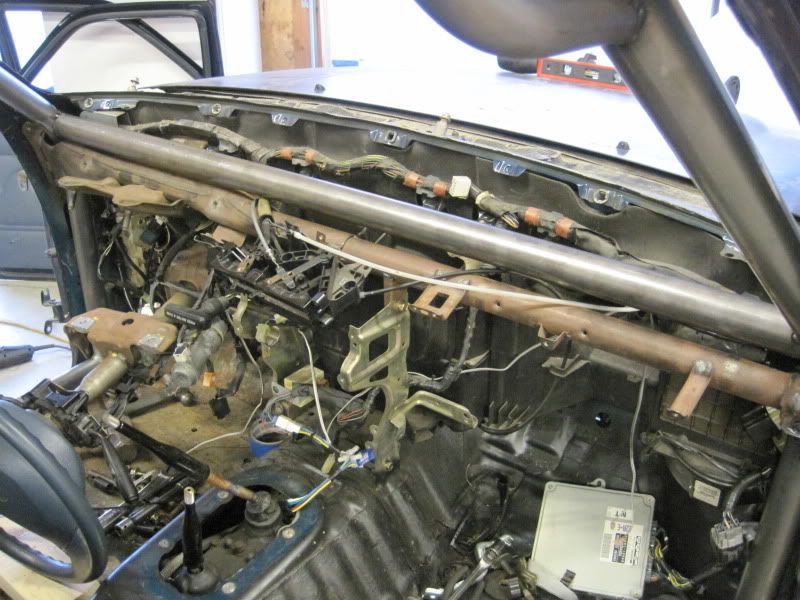
Started out with the main hoop. I'm going with an interior cage because I want this truck to look like a Score truck and they don't have exo's. It's getting fitted pretty tight to the body so when it does get rolled the cab will hopefully still stay about the same shape. And I'm going to need all the headroom I can get.
The cab was cut where the body mounts are to let the tube go through. These will be covered up and sealed with a plate later after the cage is mounted.
Started out with the main hoop. I'm going with an interior cage because I want this truck to look like a Score truck and they don't have exo's. It's getting fitted pretty tight to the body so when it does get rolled the cab will hopefully still stay about the same shape. And I'm going to need all the headroom I can get.
07-20-2011, 07:21 PM
#6
Registered User
Thread Starter
Join Date: Feb 2007
Posts: 127
Likes: 0
Received 0 Likes
on
0 Posts
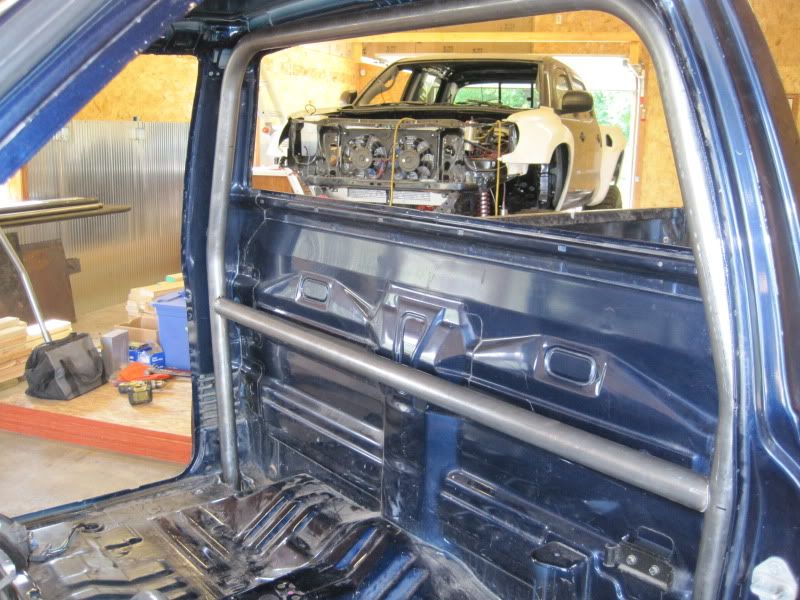
Fast forward, cage is in and ready to be dropped down so I can weld the top up.
Tube is all 1.75x.120 DOM with the rear tubes behind the seat and under them HREW. DOM has doubled in price within the last year but I still want it for anything that may touch the rocks and at some point this cab top may end up getting cut off like the 83 did. But I'm hoping I can keep it from getting that screwed up.
I like real grab handles so I bent up some 1"x.120 DOM and made some. Also welded in some 1" tube gussets at the corners.
07-20-2011, 07:21 PM
#7
Registered User
Thread Starter
Join Date: Feb 2007
Posts: 127
Likes: 0
Received 0 Likes
on
0 Posts
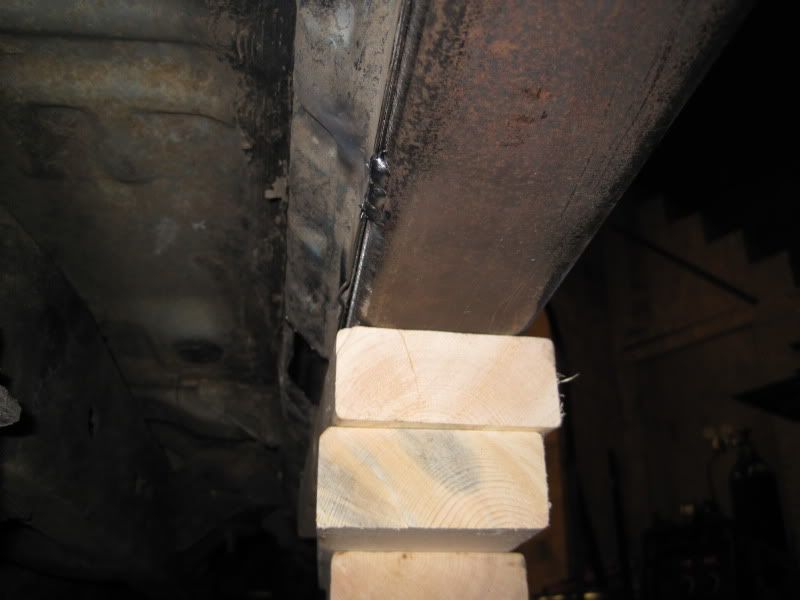
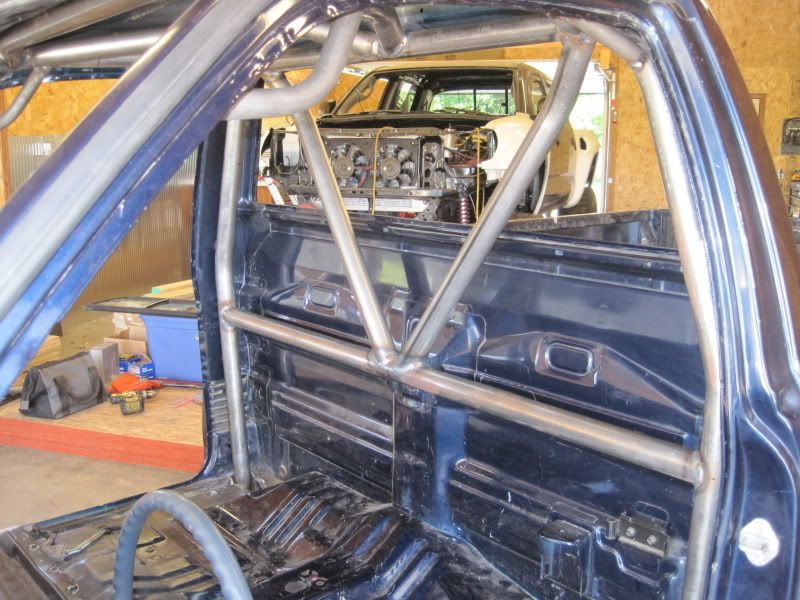
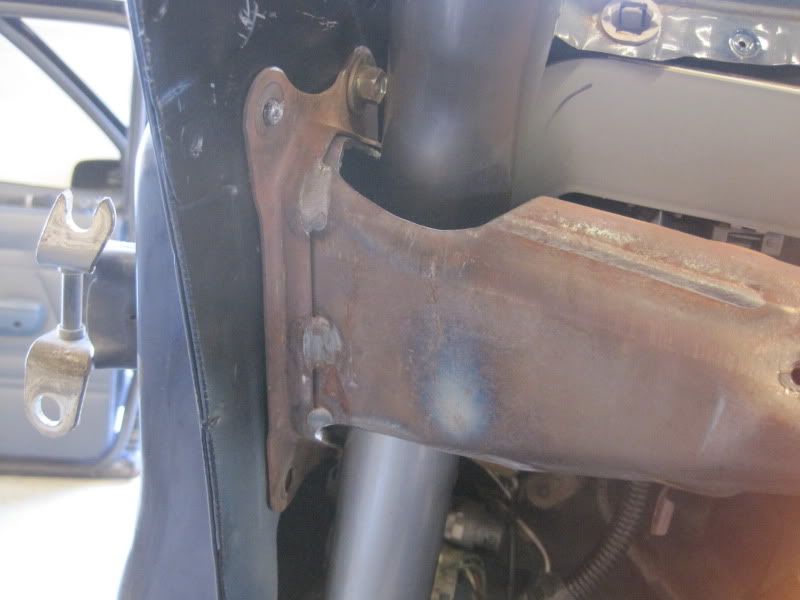
The bottom cage legs were tacked onto the sliders to keep them in place while the rest of the cage was built. I needed to drop it to weld the top so first made some supports so I would be able to cut them without it falling and also make it easier to get back into place later.
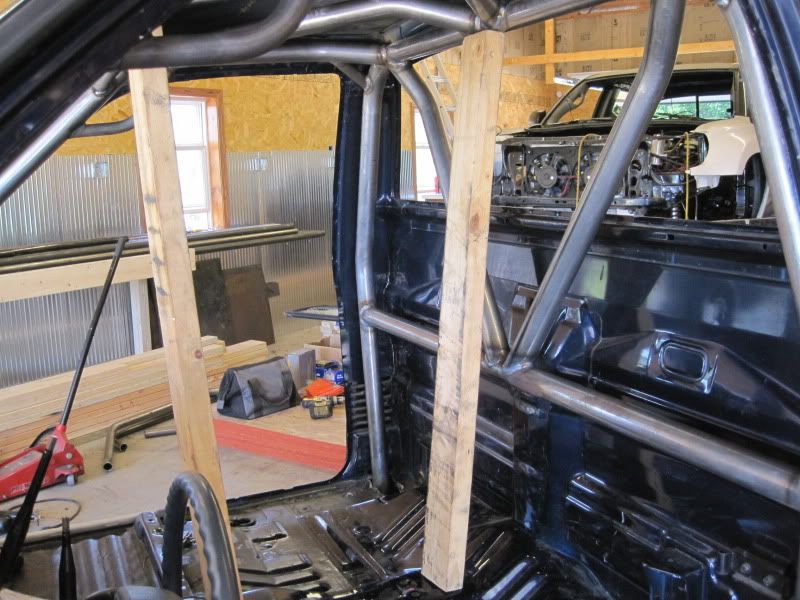
The welds were cut and the cage dropped down in order to fully weld the top. Before I cut them I measured out where they would need to be notched for the tube that runs between the sliders and frame. They will be notched while the cage is lowered.

As of now, that's where I'm at. I decided to start this thread while I let the welds cool. And it's 99* outside, humid, and the A/C and a cold beer was much needed.
But there's another race tomorrow and I want to get it done so more updates coming soon.
The welds were cut and the cage dropped down in order to fully weld the top. Before I cut them I measured out where they would need to be notched for the tube that runs between the sliders and frame. They will be notched while the cage is lowered.
As of now, that's where I'm at. I decided to start this thread while I let the welds cool. And it's 99* outside, humid, and the A/C and a cold beer was much needed.
But there's another race tomorrow and I want to get it done so more updates coming soon.
Trending Topics
07-20-2011, 07:23 PM
#8
Registered User
Thread Starter
Join Date: Feb 2007
Posts: 127
Likes: 0
Received 0 Likes
on
0 Posts
The toyota was supposed to make the race last Sunday but didn't get done in time. So the slamurai went and I ended up with another 2nd in racing and 1st in freestyle. Broken shock and t-case housing after jumping it like this a dozen or so times.

‪Slamurai Run 3‬‏ - YouTube
‪Slamurai Run 3‬‏ - YouTube
 07-21-2011, 06:46 PM
#11
Registered User
Thread Starter
Join Date: Feb 2007
Posts: 127
Likes: 0
Received 0 Likes
on
0 Posts
Keep checking. I usually work on my own stuff in crazy time crunching spurts, lol.
Thanks. It's nice doing some work on my own rigs again. We've been working on getting moved since January so everything has been put on hold.
Thanks. It's nice doing some work on my own rigs again. We've been working on getting moved since January so everything has been put on hold.
07-21-2011, 06:46 PM
#12
Registered User
Thread Starter
Join Date: Feb 2007
Posts: 127
Likes: 0
Received 0 Likes
on
0 Posts
While the cage was lowered I cut some holes.
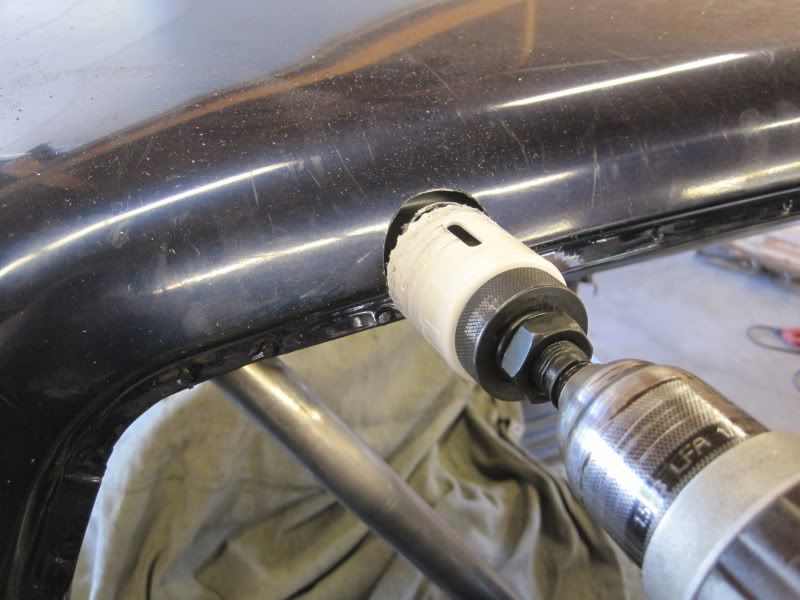
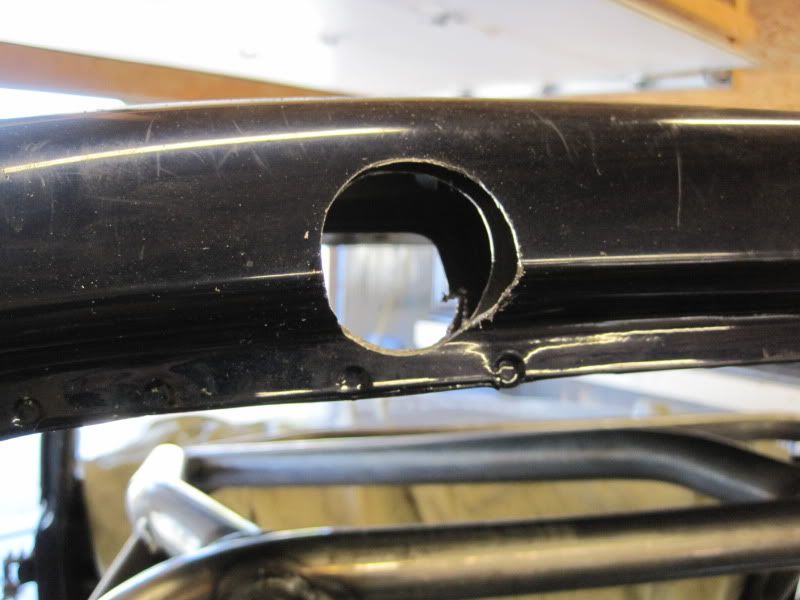
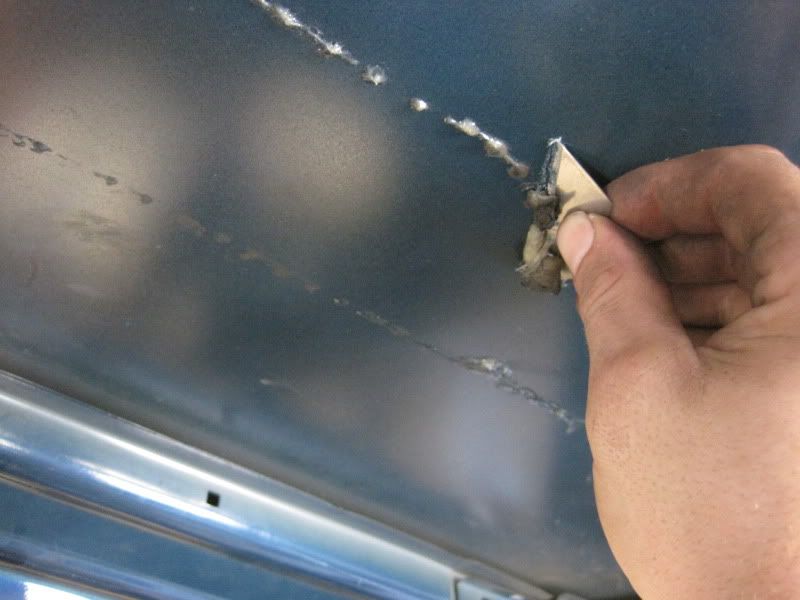
And removed the factory boogers. Nice and gooey when it's this hot out. I also roughed up the roof and back cab with a scotch brite pad and painted them satin black.
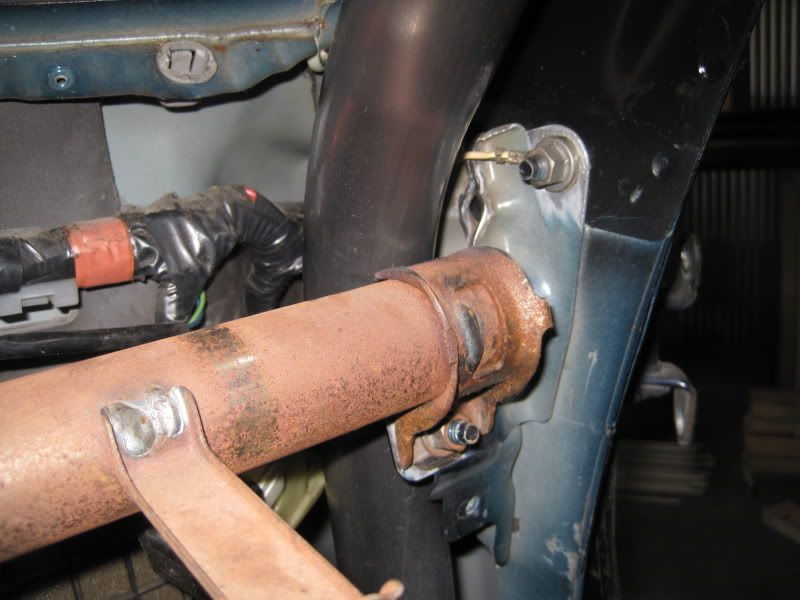
Before I dropped the cage I measured where I needed the notch to be. I was able to notch the front two with the notcher.
But the back legs had to be done with grinder because the cage couldn't drop down far enough. This is because the rear legs get wider as they go up. It's really easy to notch with a grinder if you understand chop saw notching. You basically just grind a straight surface at an angle. Way easier and cleaner than trying to grind the curve by eye.
And removed the factory boogers. Nice and gooey when it's this hot out. I also roughed up the roof and back cab with a scotch brite pad and painted them satin black.
Before I dropped the cage I measured where I needed the notch to be. I was able to notch the front two with the notcher.
But the back legs had to be done with grinder because the cage couldn't drop down far enough. This is because the rear legs get wider as they go up. It's really easy to notch with a grinder if you understand chop saw notching. You basically just grind a straight surface at an angle. Way easier and cleaner than trying to grind the curve by eye.
07-21-2011, 06:47 PM
#13
Registered User
Thread Starter
Join Date: Feb 2007
Posts: 127
Likes: 0
Received 0 Likes
on
0 Posts
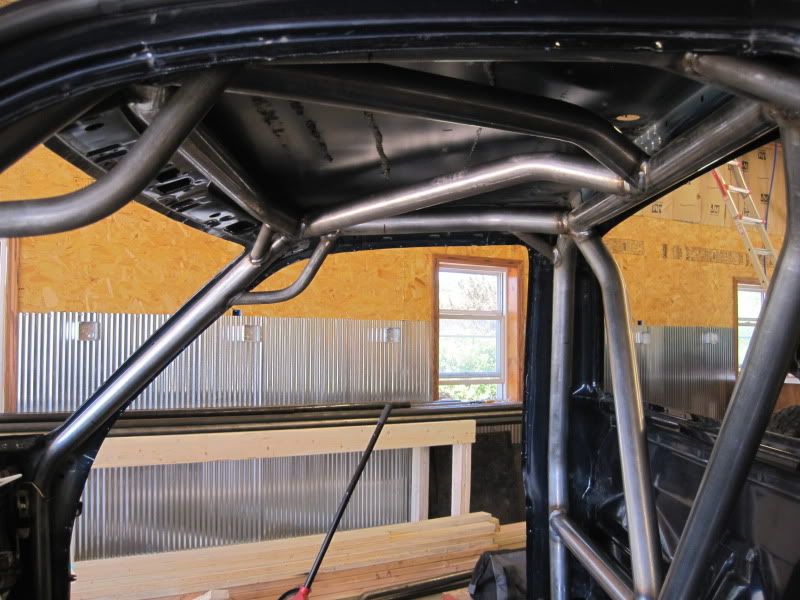
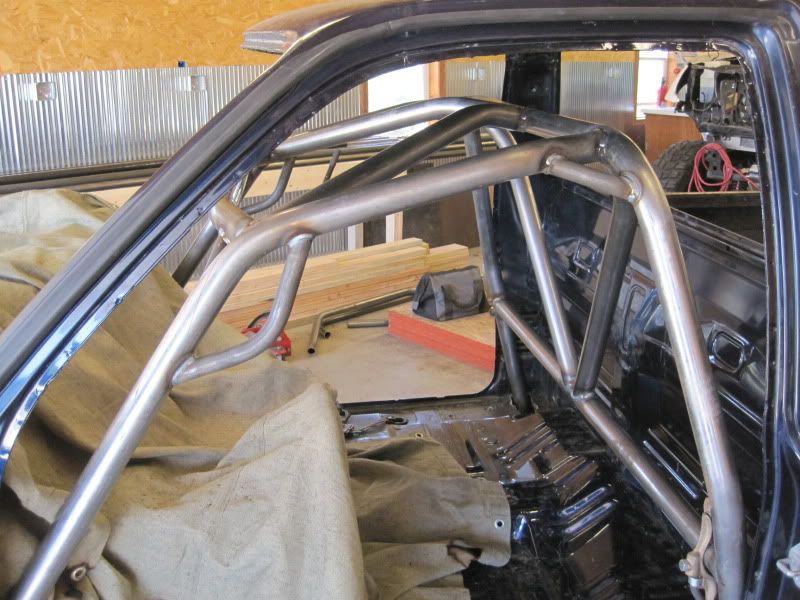
I'm trying something I haven't done before but have always wondered if it would work or not. I really like the look of bare metal so I scotched brite all the tube and wiped it down with some Amsoil HD MP metal protector. Another plus is no masking and over spray or scratches.
I lifted the cage back up and propped it with my 2x4's from earlier. Then using c-clamps I got it all dialed in to where i wanted it before tacking the tubes in place.

More tube and gussets. I also gusseted the cage to the support tubes.
I added this tube, it will be the base of the seat mounts.
I lifted the cage back up and propped it with my 2x4's from earlier. Then using c-clamps I got it all dialed in to where i wanted it before tacking the tubes in place.
More tube and gussets. I also gusseted the cage to the support tubes.
I added this tube, it will be the base of the seat mounts.
Last edited by Frontier4x4; 07-21-2011 at 06:50 PM.
07-21-2011, 06:51 PM
#14
Registered User
Thread Starter
Join Date: Feb 2007
Posts: 127
Likes: 0
Received 0 Likes
on
0 Posts
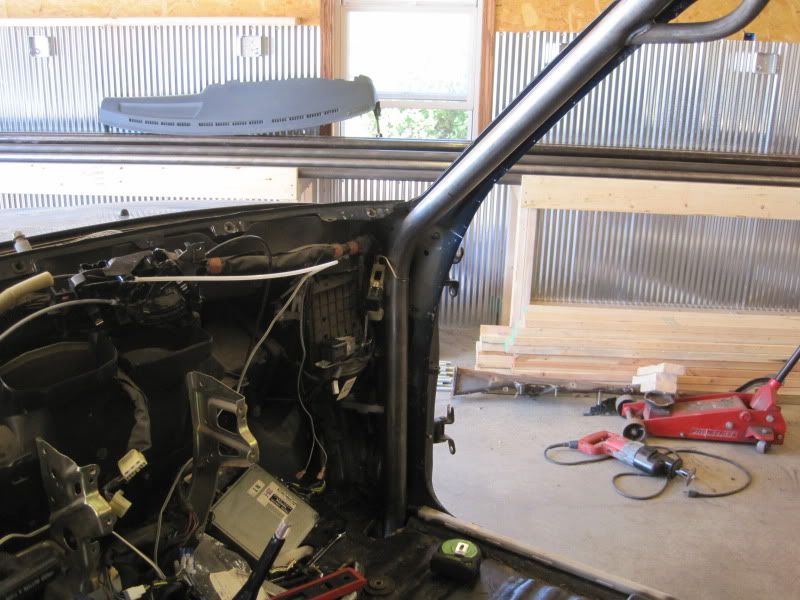
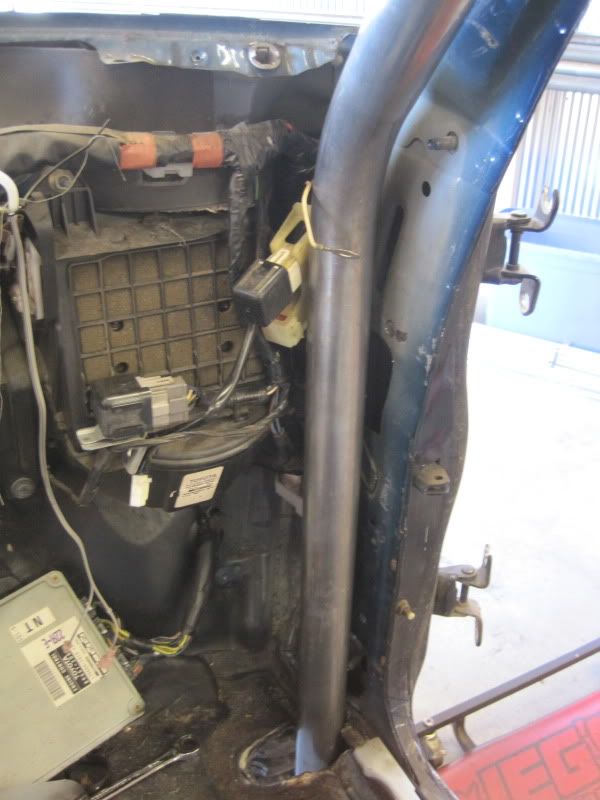
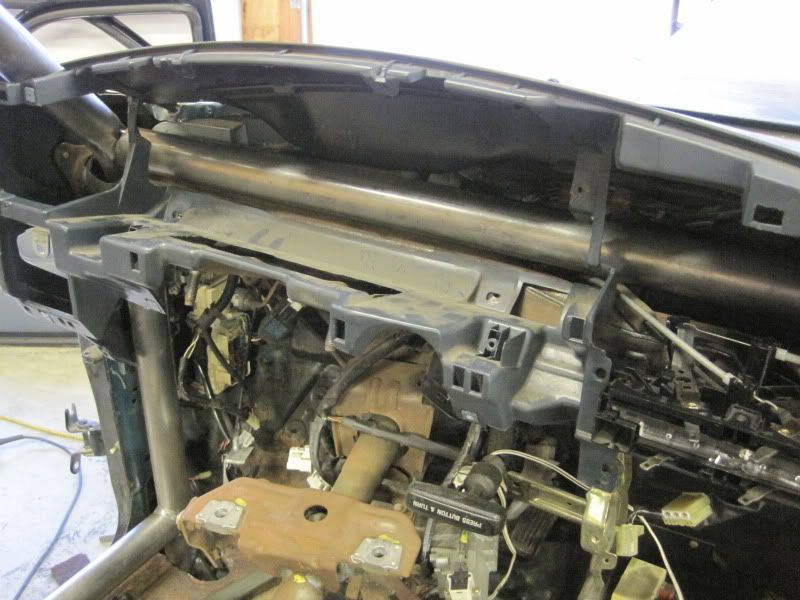
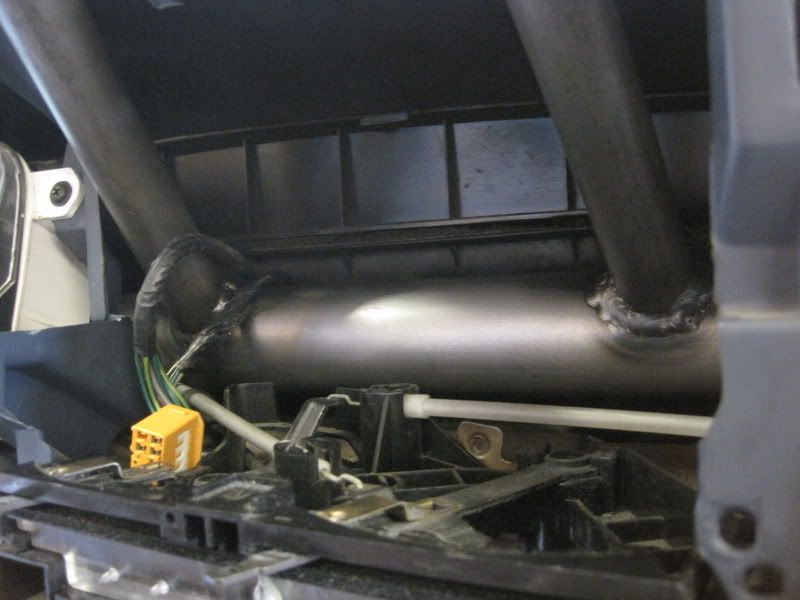
The factory tube with all the column and dash mounts needed trimmed up. I tried getting the studs out and using a bolt instead but they just broke off. They must be welded on the other side. It's still solid with the rear two holding it on.
I had to cut the top mount off this part and moved the ground wire to the side.
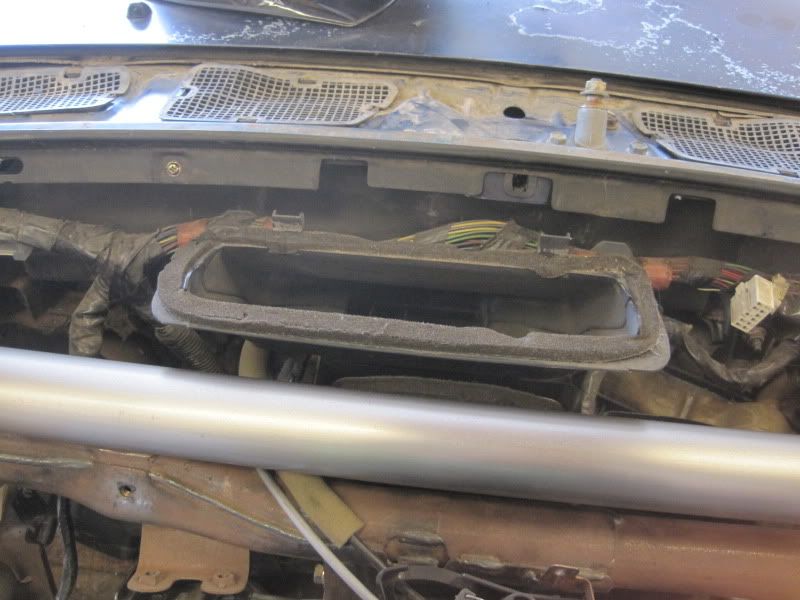
Cutting the dash took way to long but it has to turn out right other wise it will drive me nuts. I had to leave more gap on the inside than I would like but I had to do in order to install/remove the dash with the way the A-pillar tubes bend in.
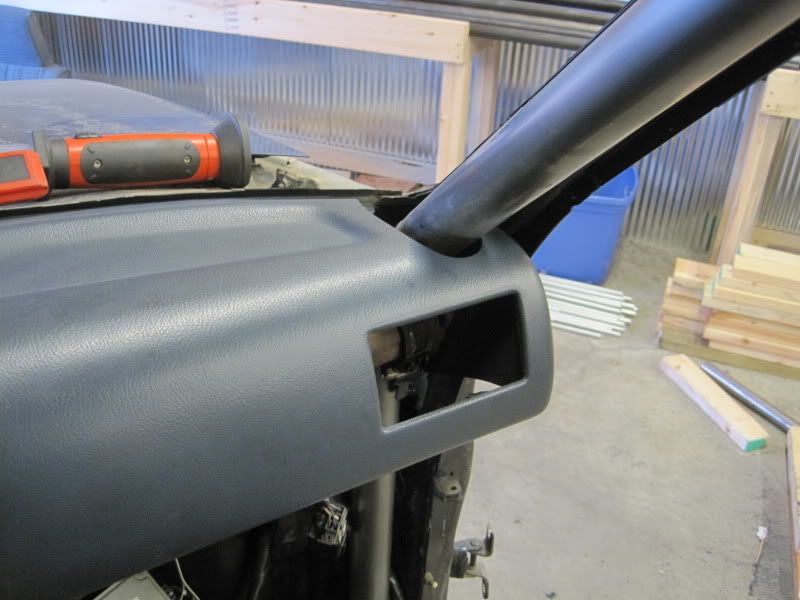
Straight cross tube, no bends and I can still keep my defrost and instrument cluster.
I had to cut the top mount off this part and moved the ground wire to the side.
Cutting the dash took way to long but it has to turn out right other wise it will drive me nuts. I had to leave more gap on the inside than I would like but I had to do in order to install/remove the dash with the way the A-pillar tubes bend in.
Straight cross tube, no bends and I can still keep my defrost and instrument cluster.
 07-22-2011, 07:38 AM
#19
Registered User
Thread Starter
Join Date: Feb 2007
Posts: 127
Likes: 0
Received 0 Likes
on
0 Posts
07-23-2011, 06:55 PM
#20
Registered User
Thread Starter
Join Date: Feb 2007
Posts: 127
Likes: 0
Received 0 Likes
on
0 Posts
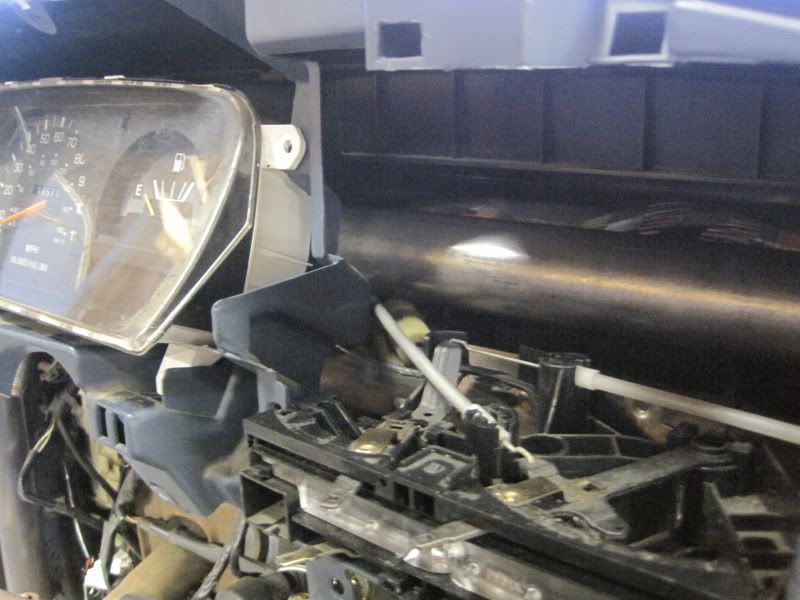
The dash is all finished up and installed now. I added a couple more 1" tubes that I was able to fit in. And a steering wheel that is 13" diameter instead of the stock 15". No tilt on this column so it will be easier to get in and out. It should also make it quicker to turn.

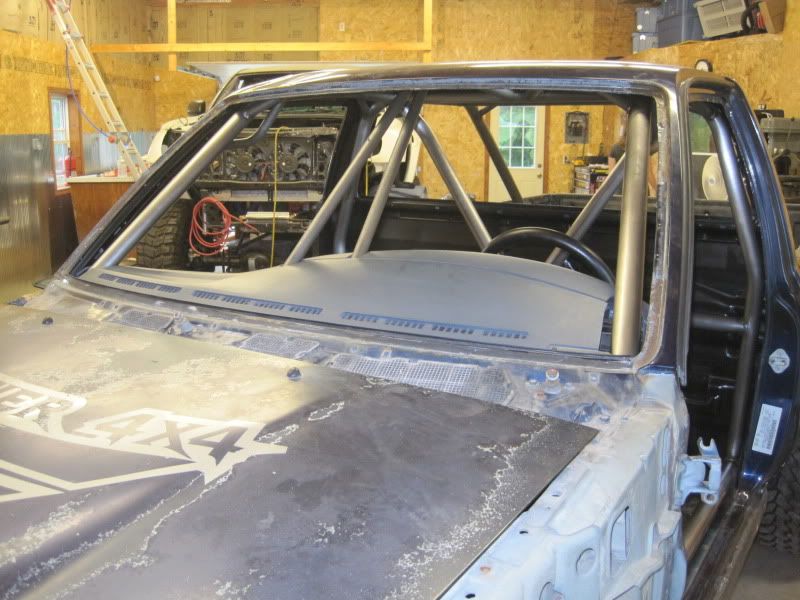
The defrost stayed hooked up like factory and I ditched the dash vents. I don't need them.
The defrost stayed hooked up like factory and I ditched the dash vents. I don't need them.


