Corey's 2007 FJ Cruiser Build-Up Thread

 10-23-2017, 06:44 AM
#464
11-18-2017, 11:29 AM
#465
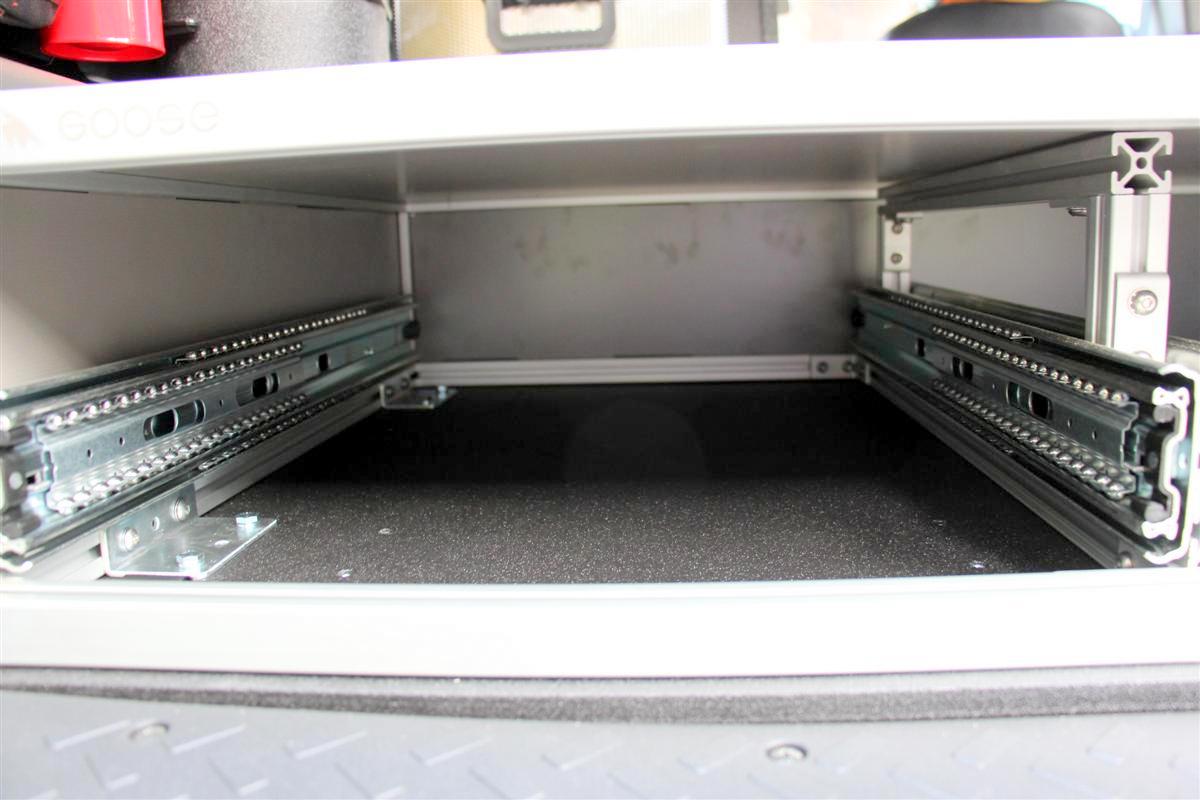
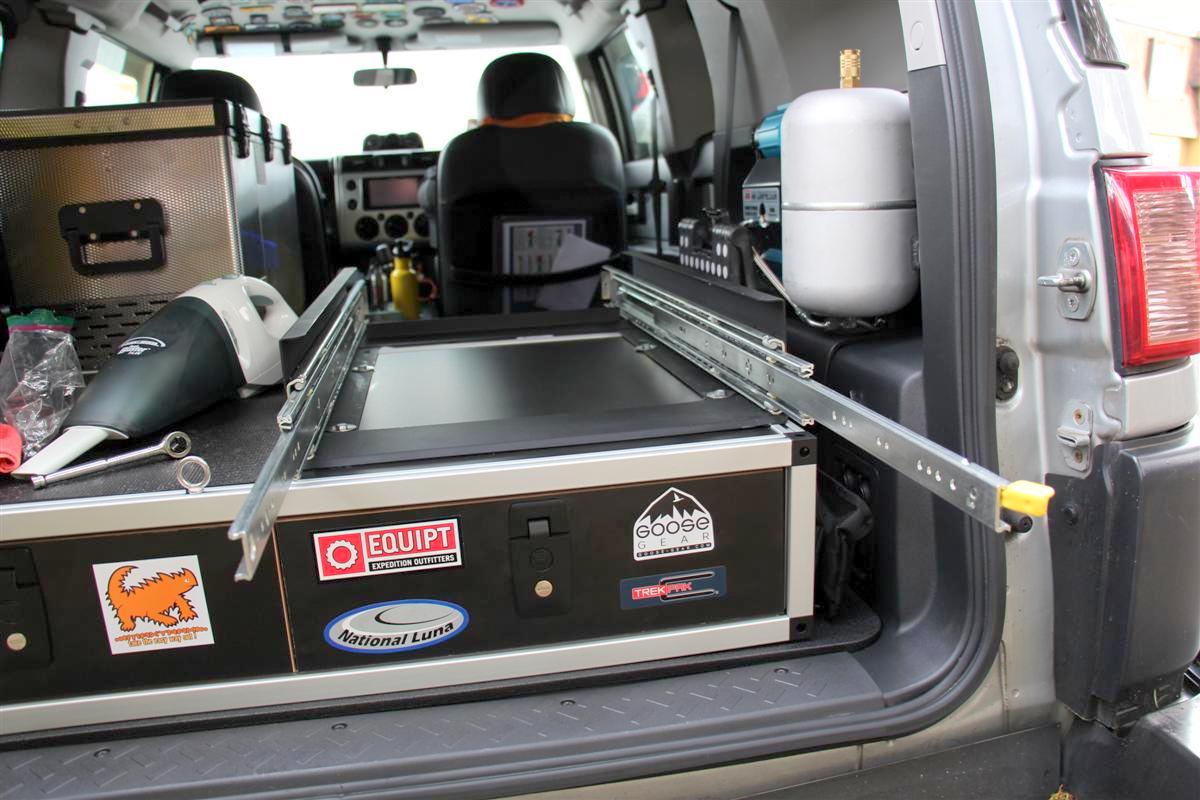
Goose Gear Phase II FJC Plate Installed 11-18-2017
The Goose Gear FJC Plate System attaches to the floor of the FJC, and the cargobox or any other modules you get from Goose Gear to it to prevent them from sliding around.
We have had tons of rain here, and yesterday when I got home from work I had a break in the rain, so I pulled the cargobox out.
Steps:
(1) This morning I took off the four D rings on the stock rubber/plastic floor in cargo area.
Also pull off the forward threshold, the one that was underneath the rear of the fridge.
You will not be reusing it again.
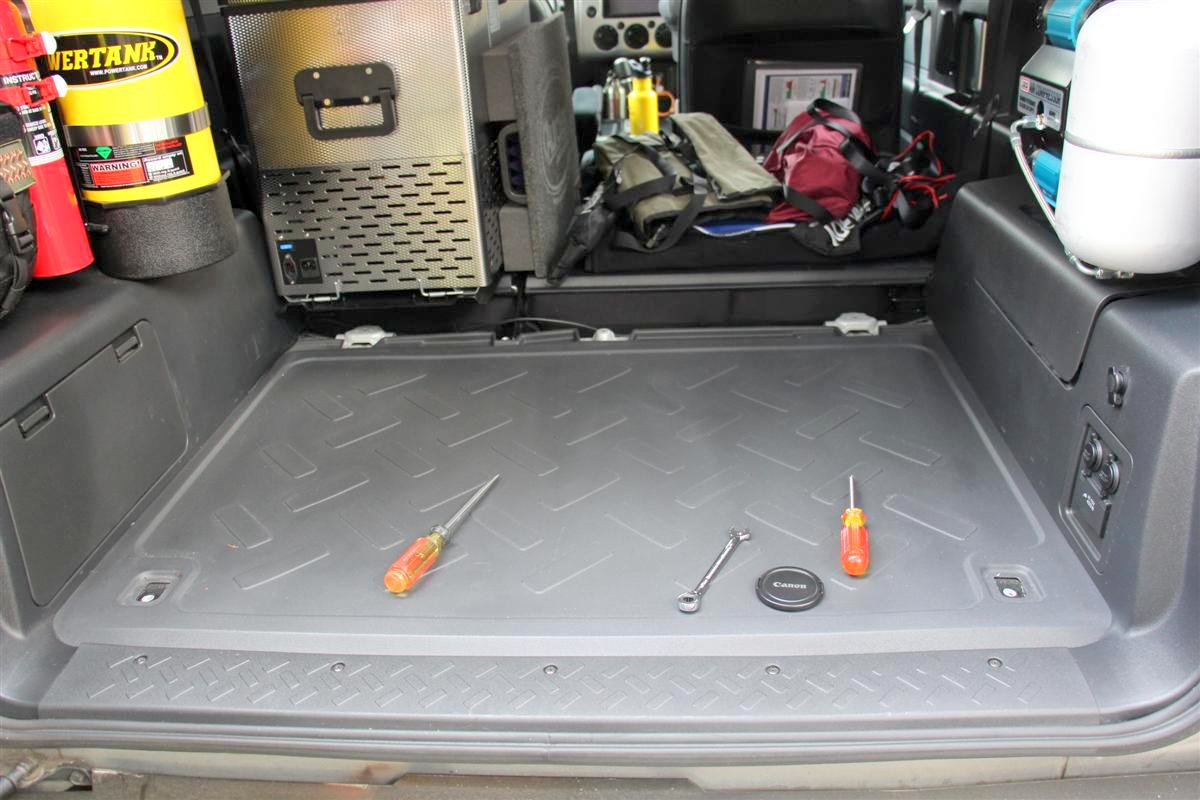
(2) Unscrew the rear threshold and set it aside, you will reuse this piece.
After removing it, take off the rubber/plastic flooring, you will not reuse it.
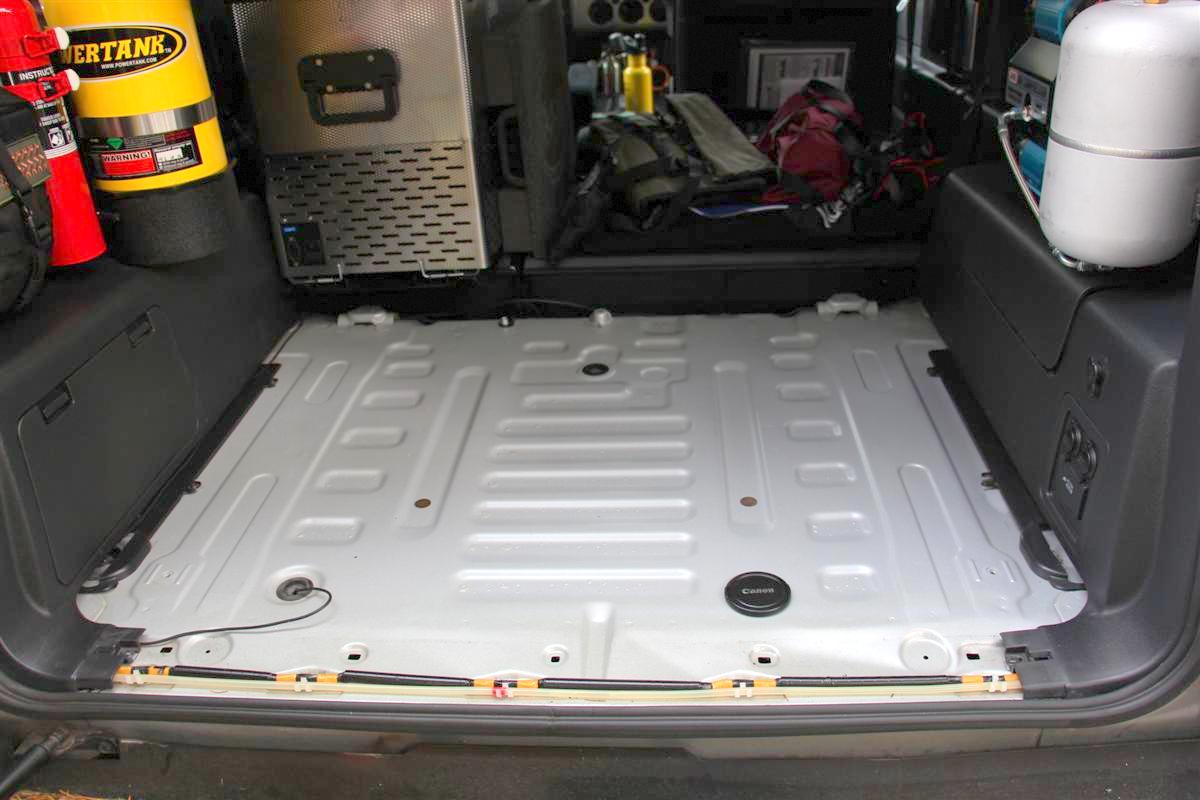
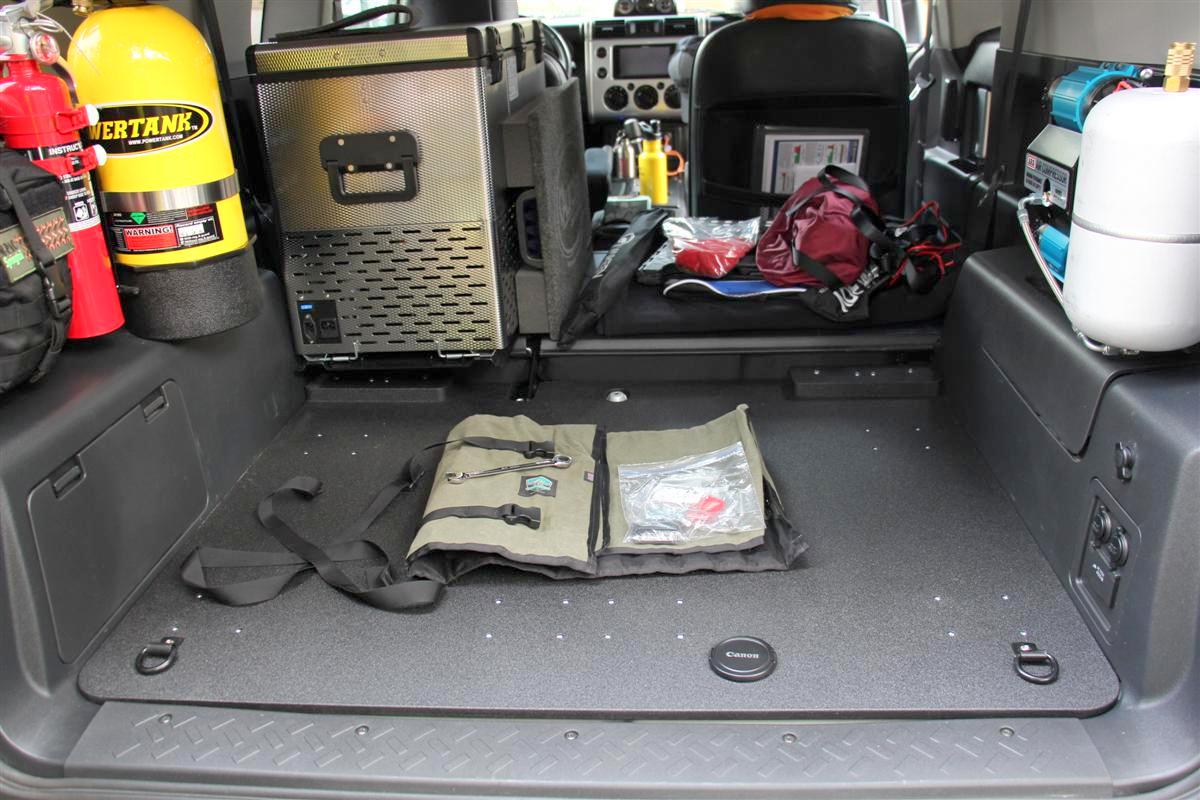
(3) Slide in the FJC plate, and position the rear D rings and use the two long bolts and lock washers that take a 5/32" allen wrench.
You may need to slide these around a bit once you put in the cargobox.
The four short 5/32" bolts and lock washers and insert them into the two front risers on the plate.
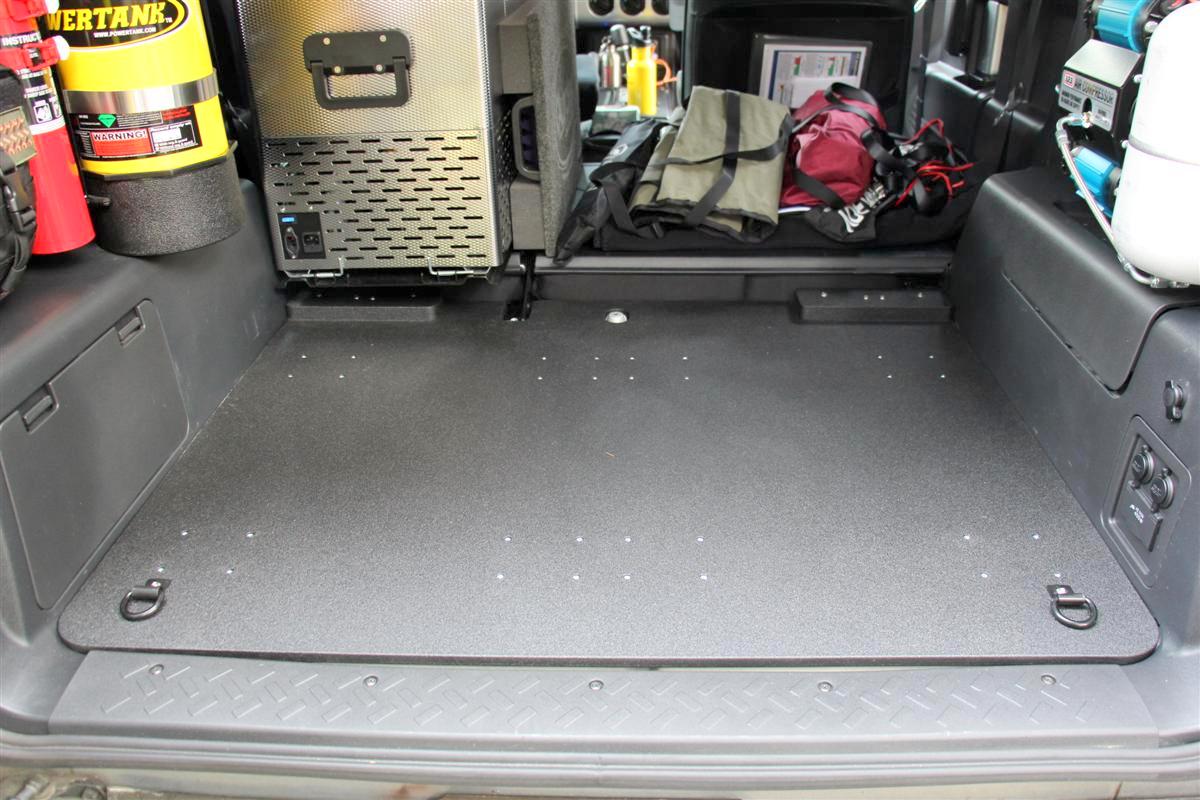
After tightening all six of the bolts, the plate is now secure.
Make sure you put back on the rear threshold again with the screws.
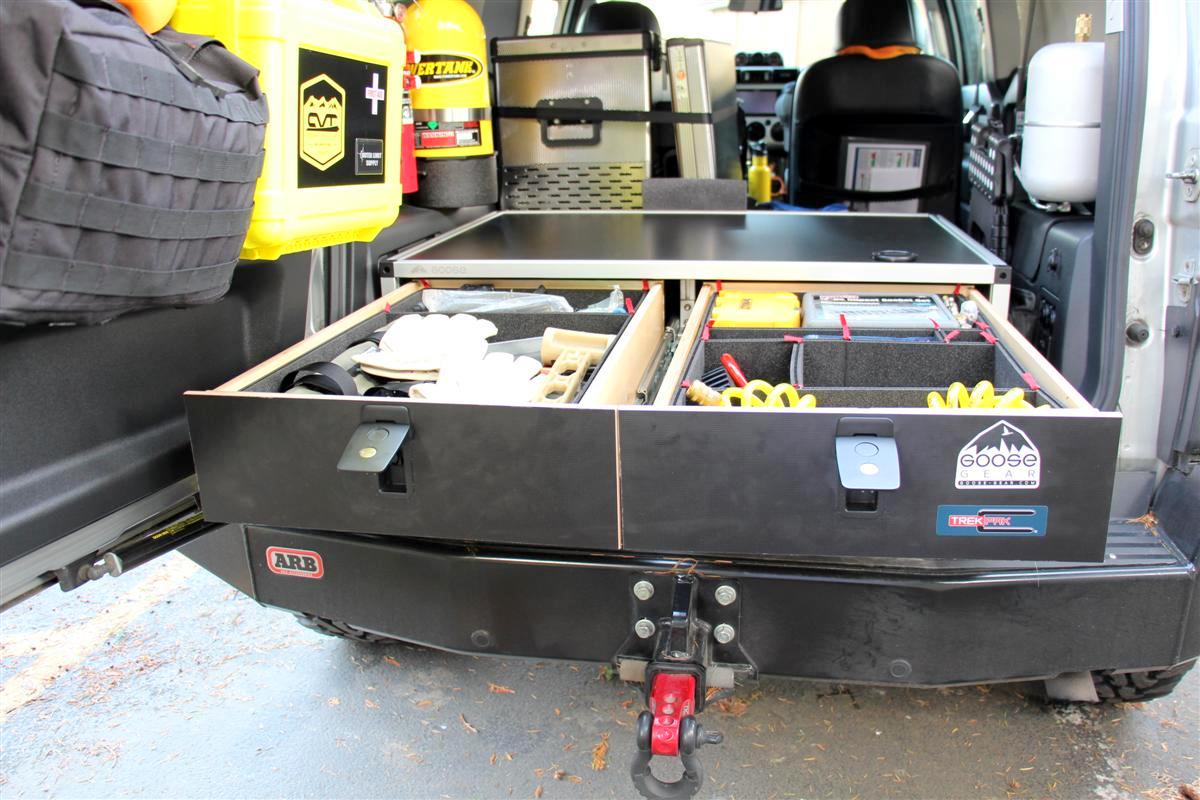
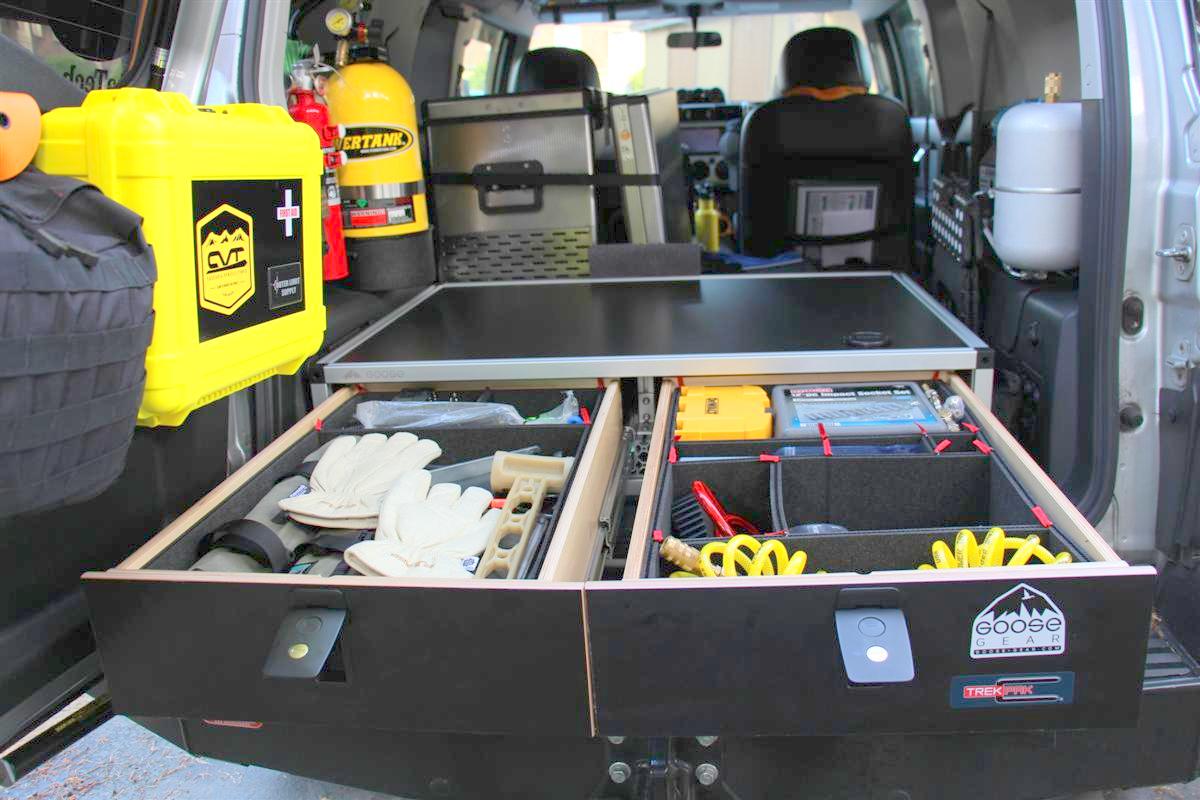
I have three of those Adventure Tool Company tool rolls, they sure come in handy for organizing your tools, and all three of them fit into the left drawer.
(4) Put in the cargobox without the drawers, and loosen the L shaped brackets inside of the cargobox with the 5/32" allen wrench.
Position the cargobox where you would like it.
I pushed it forward to within about 1" of the 12v plug on the back of the fridge, this will give me room enough if I have to unplug the cable from it.
Once the cargobox is in position slide the L shaped brackets to align up with the holes on the FJC plate.
Tighten up the bolts and lock washers with a 7/16" ratchet wrench of socket, and then tighten all four of the 5/32" screws to secure the L brackets to the sides of the cargobox.
Almost done...
(5) Put the two drawers back in, and you are done.
Since the cargobox is positioned to the far left, I had to take the screw jack and handle out of the left side storage.
I will find a place in the rig to keep them, but I do not think I will have room in the cargobox for them.
I also bought a pack of four tie down module anchors that I can place around the top of my cargobox to secure gear on top with.
They make two sizes.
1/4" for the top of module systems, and 3/4" to insert into the tops of their plate systems.
The latter would be useful if you only have half of your plate system filled with a module, and the other half is open, but you want to secure gear to the top of the plate by tying it down.
Links:
FJ Cruiser Plate System
Module Anchor Pack 1/4" size for the top of cargoboxes or modules
Phase III will consist of the Tembo Tusk standard front pull fridge slide, and it will be used to mount the new Camp Kitchens chuckbox to it.
This way I can use the chuckbox in the rig and cook on top of it if I do not feel like setting up a table outside of the rig.
We have had tons of rain here, and yesterday when I got home from work I had a break in the rain, so I pulled the cargobox out.
Steps:
(1) This morning I took off the four D rings on the stock rubber/plastic floor in cargo area.
Also pull off the forward threshold, the one that was underneath the rear of the fridge.
You will not be reusing it again.
(2) Unscrew the rear threshold and set it aside, you will reuse this piece.
After removing it, take off the rubber/plastic flooring, you will not reuse it.
(3) Slide in the FJC plate, and position the rear D rings and use the two long bolts and lock washers that take a 5/32" allen wrench.
You may need to slide these around a bit once you put in the cargobox.
The four short 5/32" bolts and lock washers and insert them into the two front risers on the plate.
After tightening all six of the bolts, the plate is now secure.
Make sure you put back on the rear threshold again with the screws.
I have three of those Adventure Tool Company tool rolls, they sure come in handy for organizing your tools, and all three of them fit into the left drawer.
(4) Put in the cargobox without the drawers, and loosen the L shaped brackets inside of the cargobox with the 5/32" allen wrench.
Position the cargobox where you would like it.
I pushed it forward to within about 1" of the 12v plug on the back of the fridge, this will give me room enough if I have to unplug the cable from it.
Once the cargobox is in position slide the L shaped brackets to align up with the holes on the FJC plate.
Tighten up the bolts and lock washers with a 7/16" ratchet wrench of socket, and then tighten all four of the 5/32" screws to secure the L brackets to the sides of the cargobox.
Almost done...
(5) Put the two drawers back in, and you are done.
Since the cargobox is positioned to the far left, I had to take the screw jack and handle out of the left side storage.
I will find a place in the rig to keep them, but I do not think I will have room in the cargobox for them.
I also bought a pack of four tie down module anchors that I can place around the top of my cargobox to secure gear on top with.
They make two sizes.
1/4" for the top of module systems, and 3/4" to insert into the tops of their plate systems.
The latter would be useful if you only have half of your plate system filled with a module, and the other half is open, but you want to secure gear to the top of the plate by tying it down.
Links:
FJ Cruiser Plate System
Module Anchor Pack 1/4" size for the top of cargoboxes or modules
Phase III will consist of the Tembo Tusk standard front pull fridge slide, and it will be used to mount the new Camp Kitchens chuckbox to it.
This way I can use the chuckbox in the rig and cook on top of it if I do not feel like setting up a table outside of the rig.
12-03-2017, 09:14 AM
#466
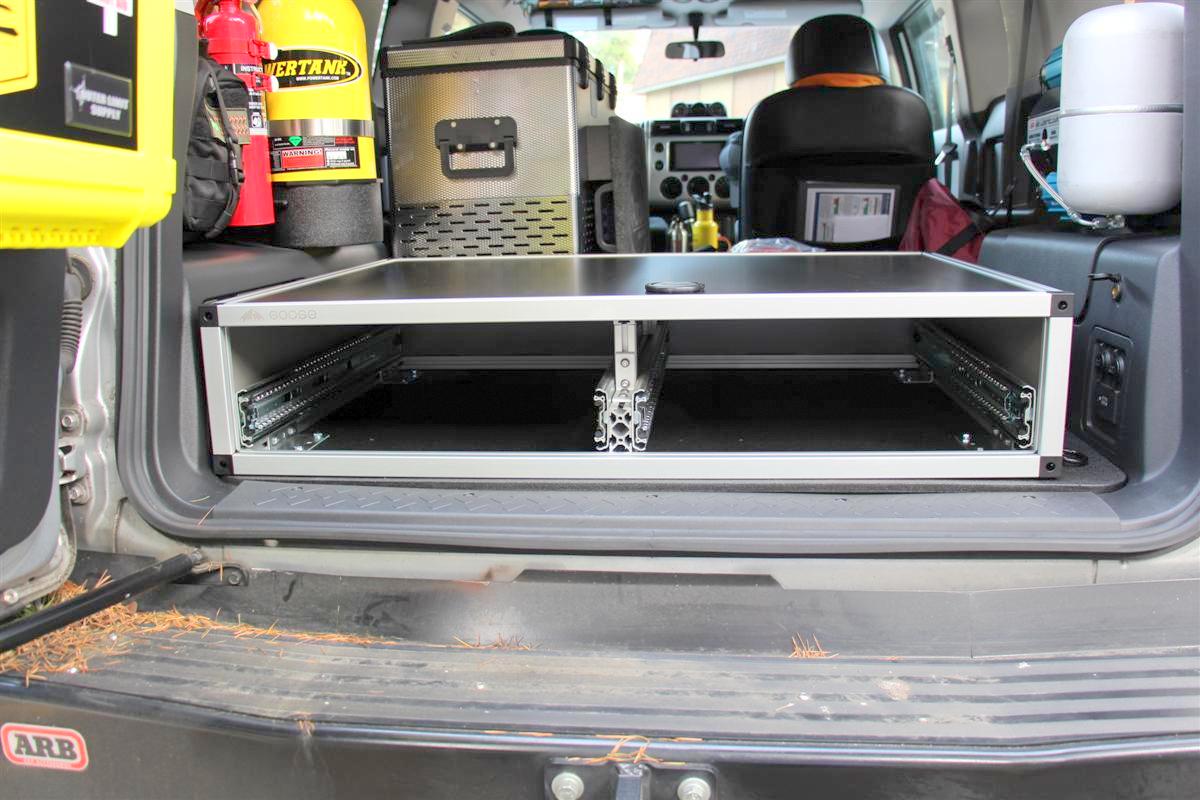
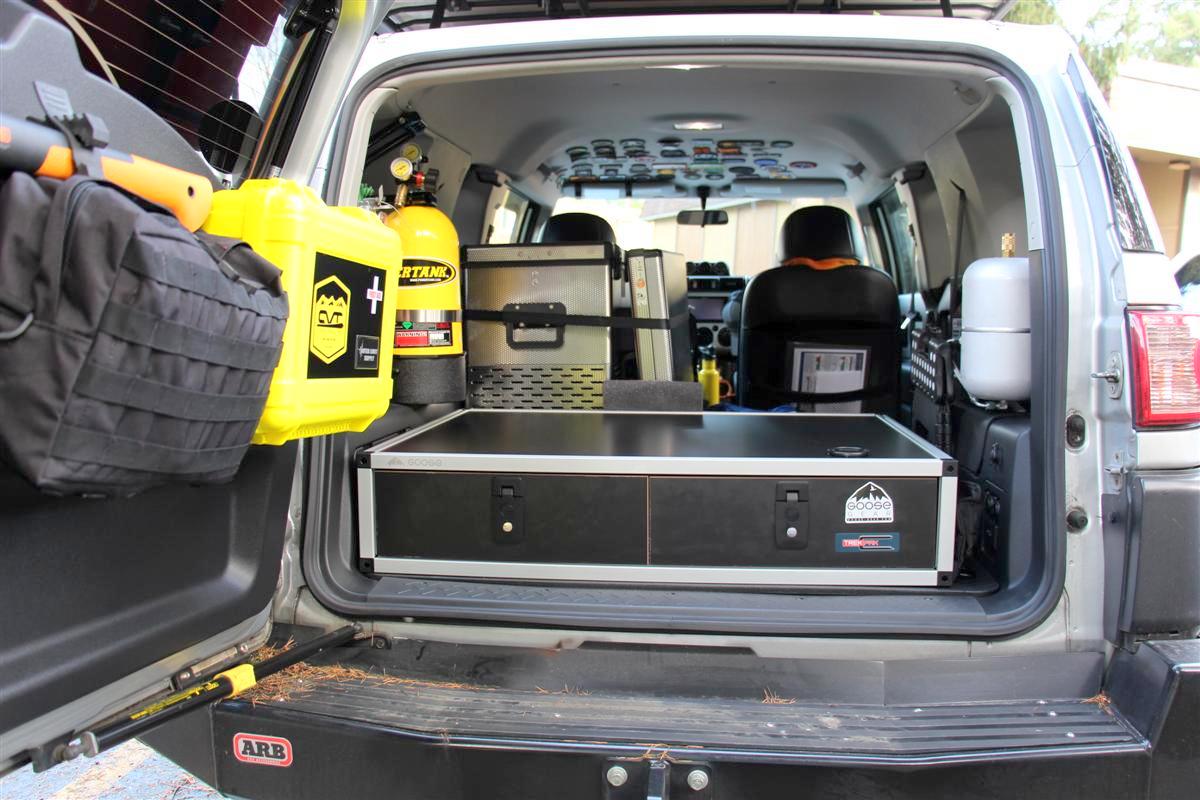
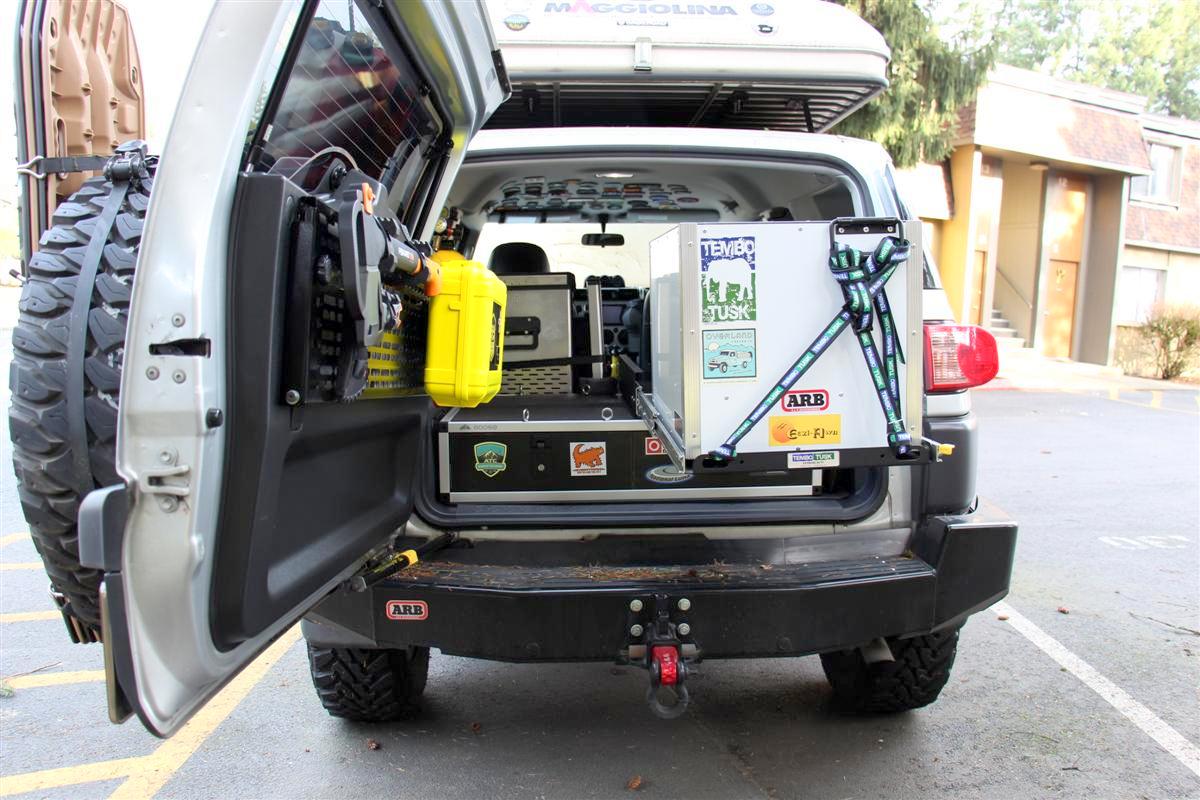
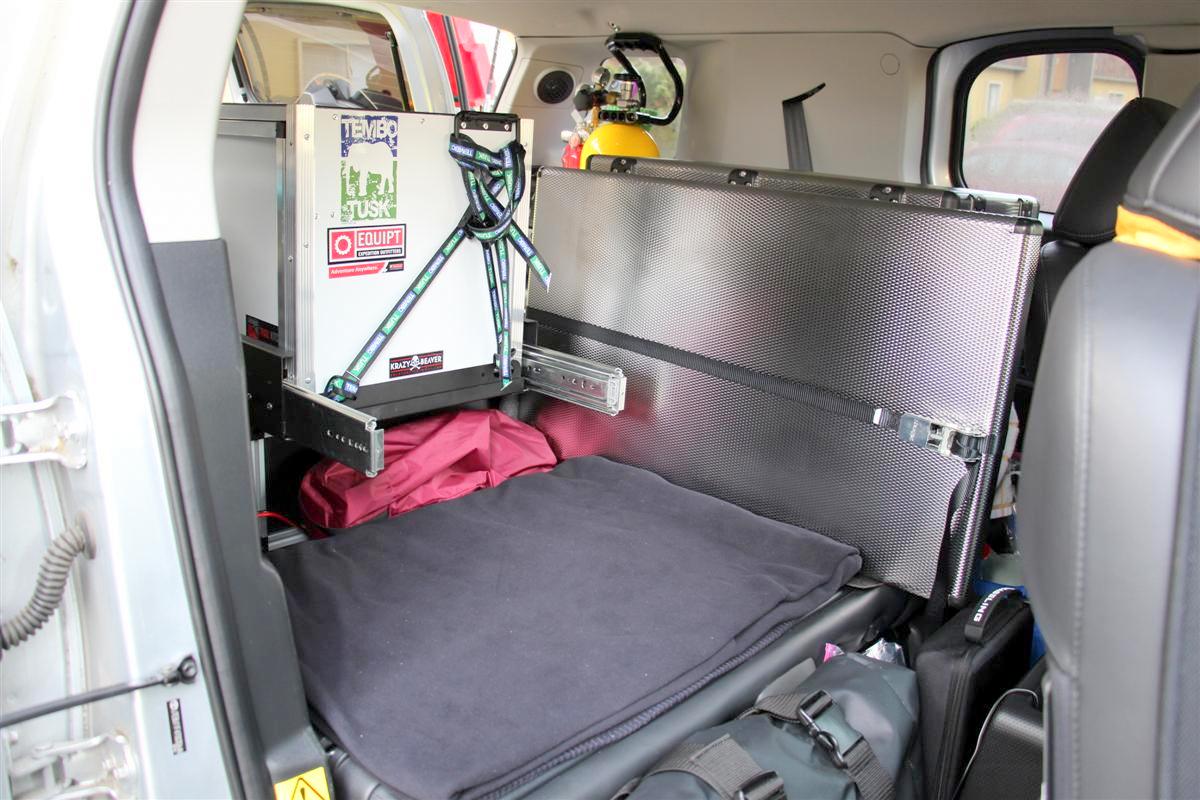
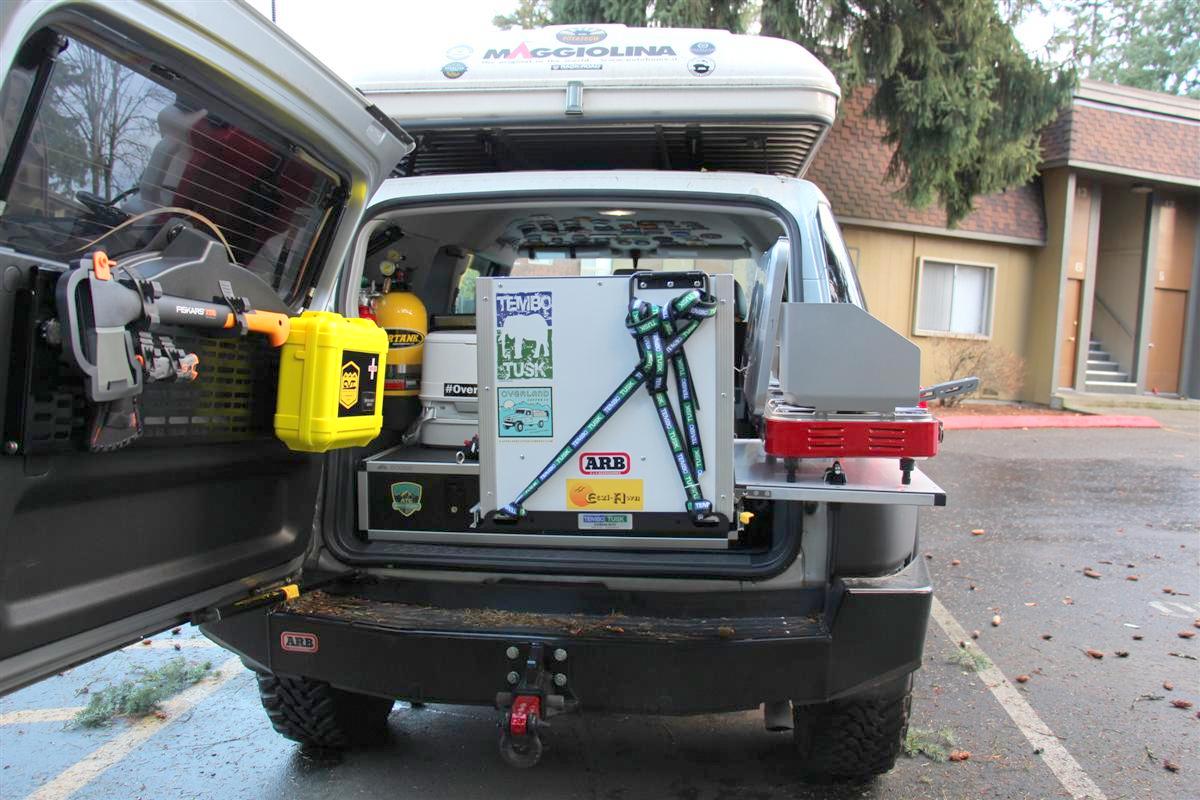
Goose Gear Phase III, Tembo Tusk Fridge Slide Installed 12-3-2017
Getting near done with the Goose Gear cargobox/drawer setup.
I see other peoples rigs and it gives me ideas, kudos to those who hath given me inspiration.
I have seen kitchen setups in the back of rigs before on a pull out, and a fridge next to it.
I am happy where my fridge is now behind the drivers seat, but I thought it would be practical to have my new Trail Kitchens chuckbox on a fridge slide on the right side of the new cargobox.
This way if I do not feel like setting up my chuckbox on one of the Eezi-Awn K9 medium tables, I can prep food and cook right out of the back of my FJ Cruiser.
Turns out this slide and the chuckbox were made for each other, as the fit the long way side to side there is no gap.
Front to rear there is a few inches, and that can be useful if you want to lay something down in that area.
The instructions called for 5/16" bolts, but Brain from Goose Gear told me to pick up the 1/4" stuff that I bought below.
Jerry from Tembo Tusk said the 1/4" would be fine, but to use a flat washer on top too under the head of the bolts.
You also use a flat washer on the inner bottom side inside of the cargobox along with the Nylock nut.
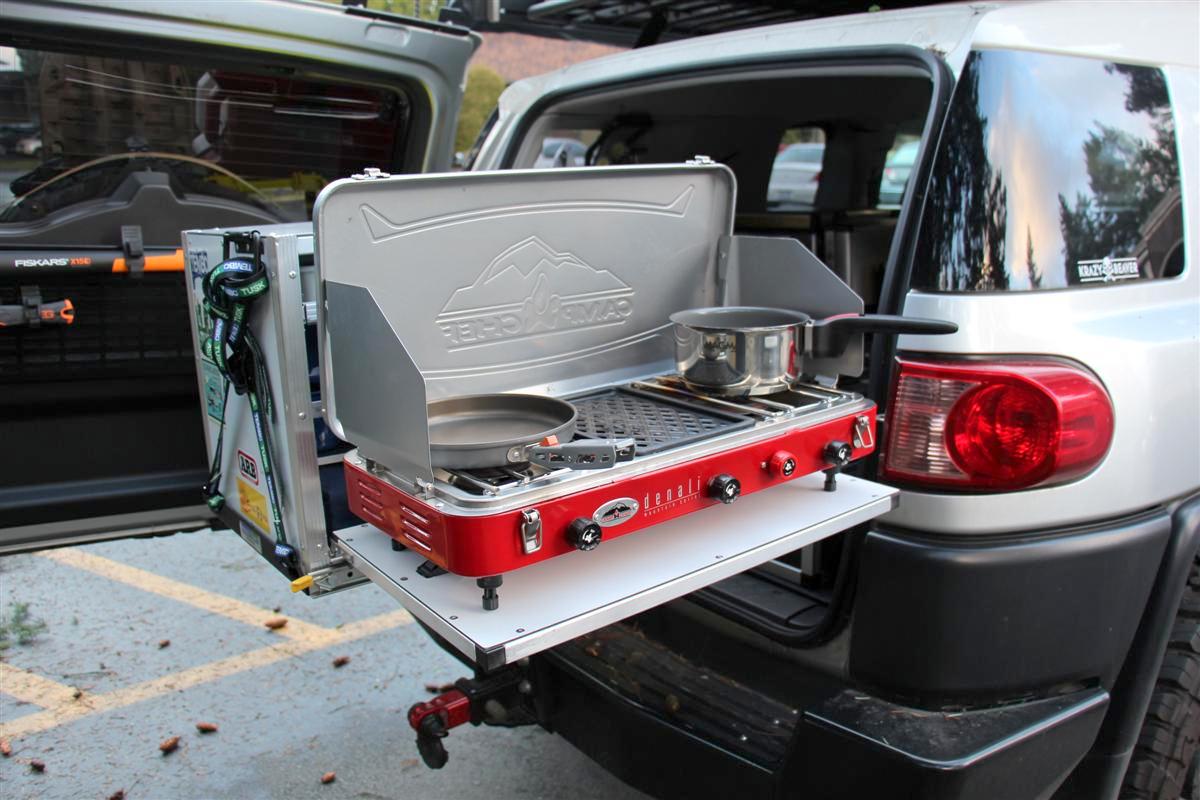
Very happy with the way this turned out, and I can either strap the Camp Chef stove to the top of the chuckbox in transit, or have it off to the side.
I had picked up a Blue Ridge Overlanding Gear stove bag awhile back they make for the Camp Chef Everest stove, but it fits my Camp Chef Denali perfectly.
With the old wood chuckbox the stove was stored inside, but this chuckbox is smaller to save weight and space in the rig.
The stove could fit inside, but I would lose the space on the bottom of the chuckbox where I store stuff.
Also installed the Goose Gear Anchor Pack, Module 1/4" Thread I had bought awhile back that is linked in a previous post in this thread to the top of the cargobox so I have tie-down points for lashing camping gear to the top of the cargobox.
Yes, I am pretty stoked overall of how the Goose Gear cargobox turned out, and also the Tembo Tusk fridge slide.
Links:
Standard Front Pull Fridge Slide
Extreme Duty Fridge & Cargo Tie Down System
Also known as Buffalo straps
Obviously I did not need 100 of each item below, but I wanted to build up my supply since I did not have any laying around.
Pics:
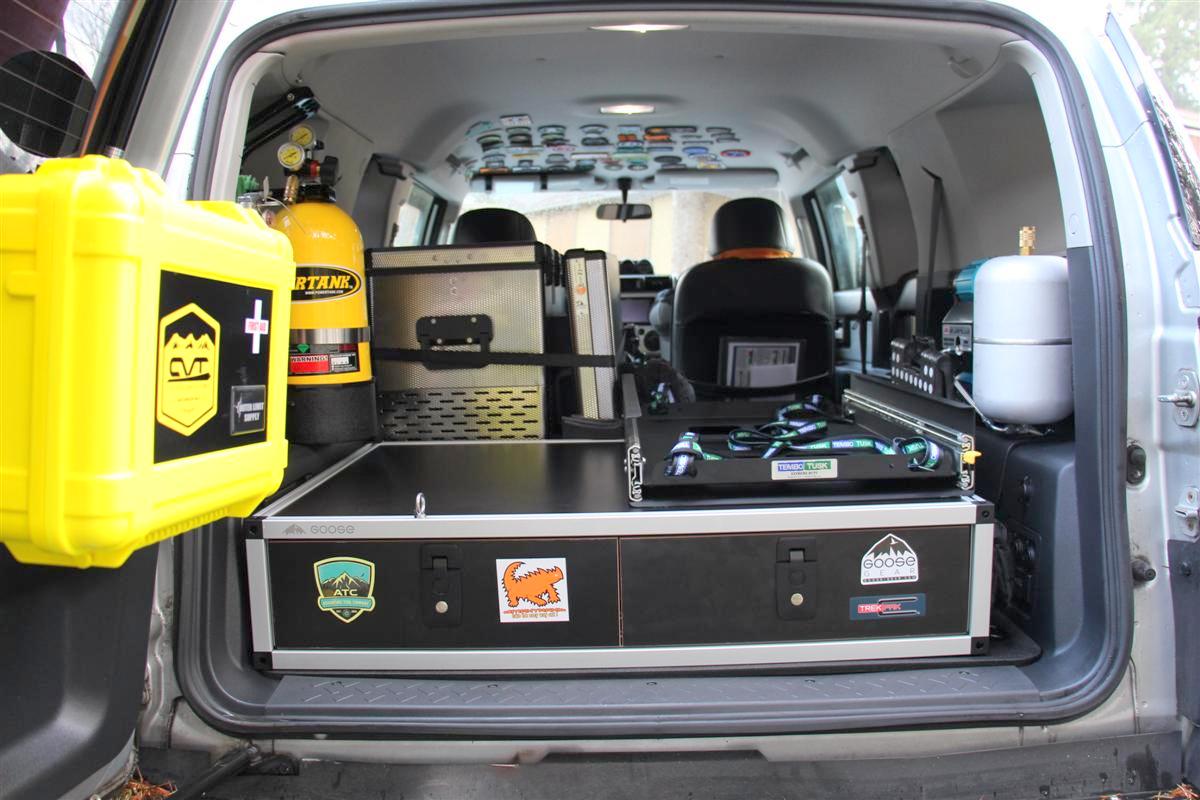
Fridge slide in place and bolted down
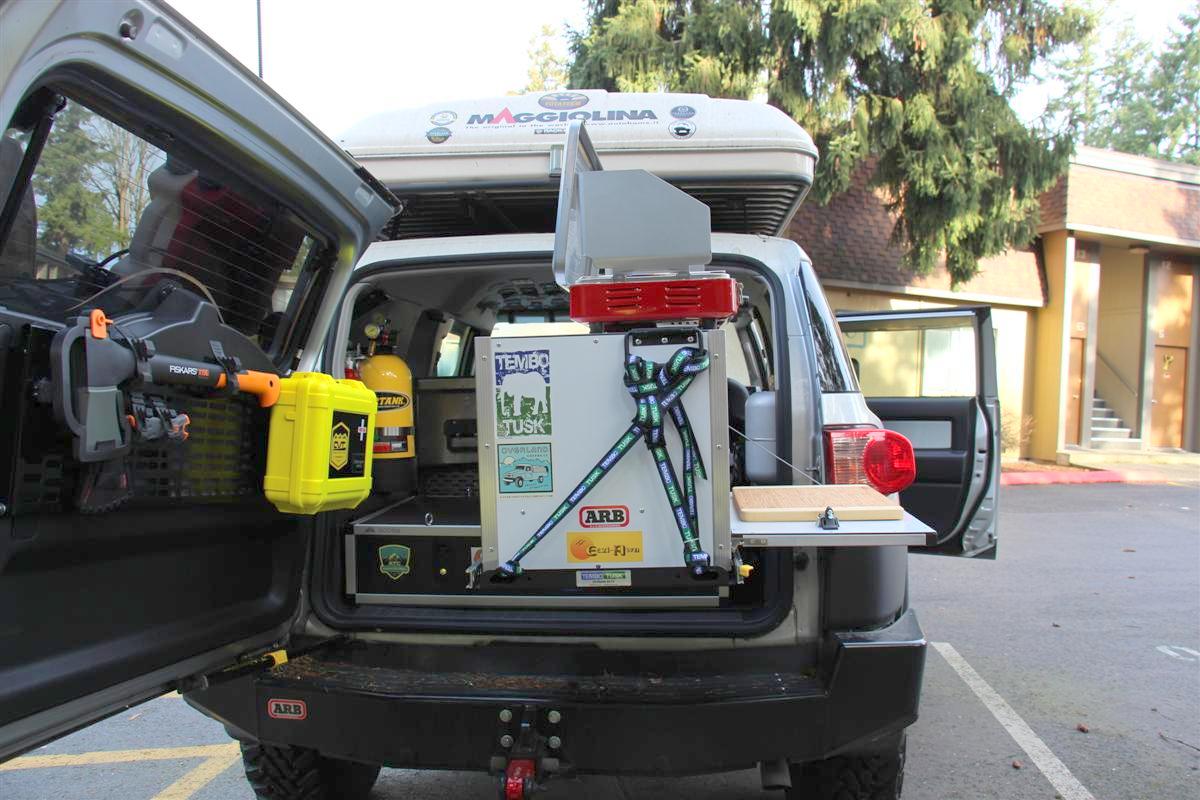
Trail Kitchens chuckbox strapped in and sitting pretty
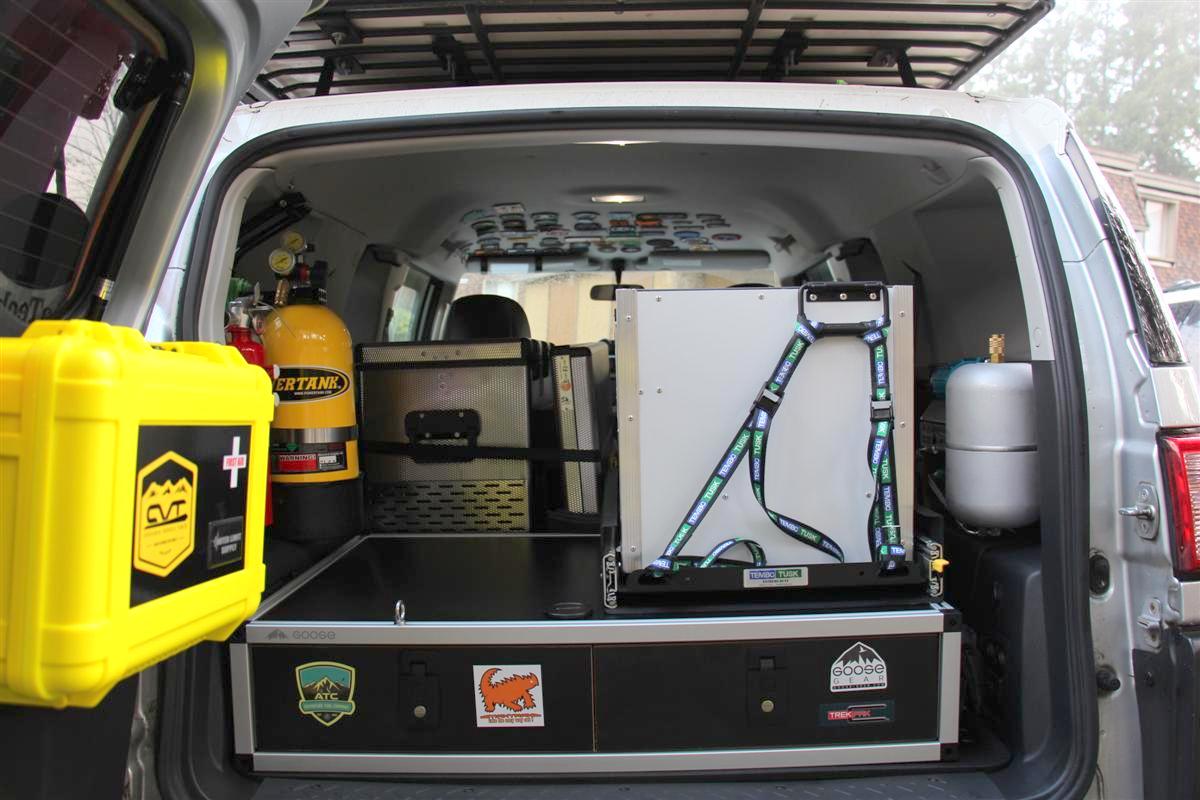
Slide extended with chuckbox closed
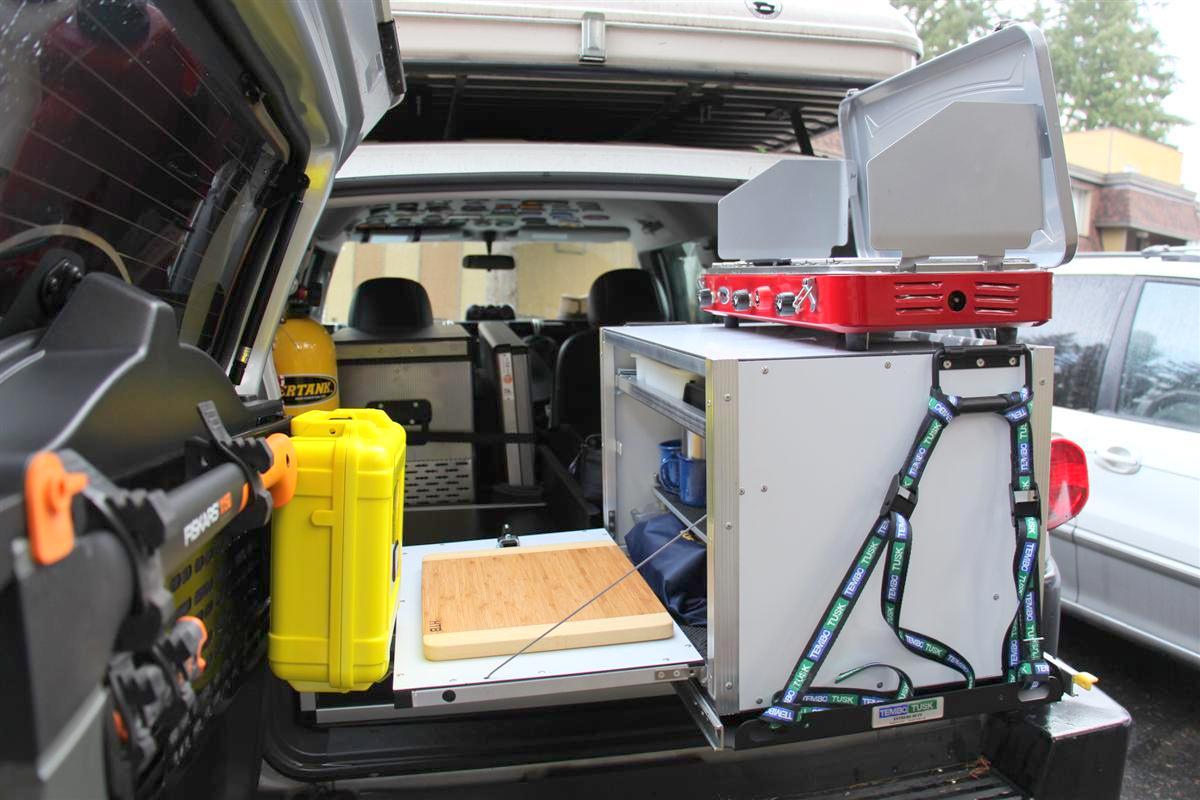
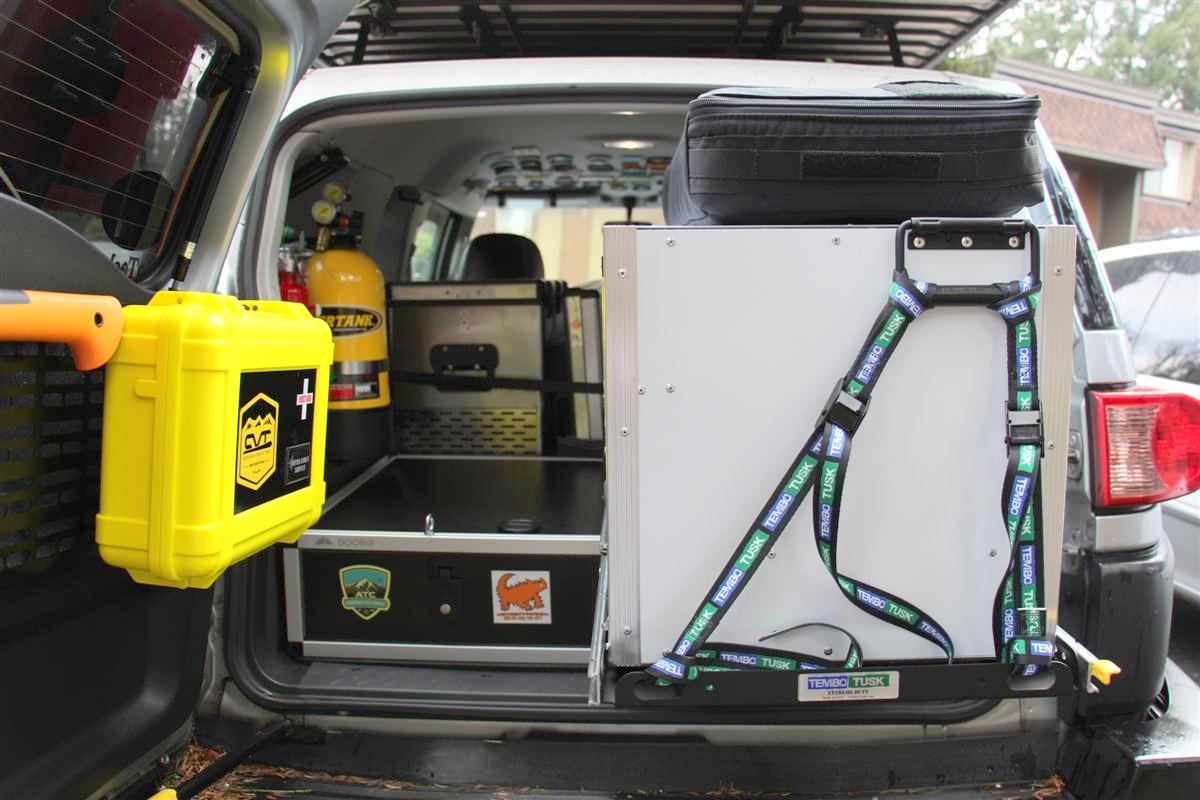
Slide extended with chuckbox open, and with the stove setup on top
Video:
I see other peoples rigs and it gives me ideas, kudos to those who hath given me inspiration.
I have seen kitchen setups in the back of rigs before on a pull out, and a fridge next to it.
I am happy where my fridge is now behind the drivers seat, but I thought it would be practical to have my new Trail Kitchens chuckbox on a fridge slide on the right side of the new cargobox.
This way if I do not feel like setting up my chuckbox on one of the Eezi-Awn K9 medium tables, I can prep food and cook right out of the back of my FJ Cruiser.
Turns out this slide and the chuckbox were made for each other, as the fit the long way side to side there is no gap.
Front to rear there is a few inches, and that can be useful if you want to lay something down in that area.
The instructions called for 5/16" bolts, but Brain from Goose Gear told me to pick up the 1/4" stuff that I bought below.
Jerry from Tembo Tusk said the 1/4" would be fine, but to use a flat washer on top too under the head of the bolts.
You also use a flat washer on the inner bottom side inside of the cargobox along with the Nylock nut.
Very happy with the way this turned out, and I can either strap the Camp Chef stove to the top of the chuckbox in transit, or have it off to the side.
I had picked up a Blue Ridge Overlanding Gear stove bag awhile back they make for the Camp Chef Everest stove, but it fits my Camp Chef Denali perfectly.
With the old wood chuckbox the stove was stored inside, but this chuckbox is smaller to save weight and space in the rig.
The stove could fit inside, but I would lose the space on the bottom of the chuckbox where I store stuff.
Also installed the Goose Gear Anchor Pack, Module 1/4" Thread I had bought awhile back that is linked in a previous post in this thread to the top of the cargobox so I have tie-down points for lashing camping gear to the top of the cargobox.
Yes, I am pretty stoked overall of how the Goose Gear cargobox turned out, and also the Tembo Tusk fridge slide.
Links:
Standard Front Pull Fridge Slide
Extreme Duty Fridge & Cargo Tie Down System
Also known as Buffalo straps
Obviously I did not need 100 of each item below, but I wanted to build up my supply since I did not have any laying around.
Pics:
Fridge slide in place and bolted down
Trail Kitchens chuckbox strapped in and sitting pretty
Slide extended with chuckbox closed
Slide extended with chuckbox open, and with the stove setup on top
Video:
12-03-2017, 12:04 PM
#468
You mean flipped 180 degrees so the door/table of the chuckbox faces the passenger side?
Tried, but the box would have to be two feet out further to clear the tail light.
I am stuck where it is now.
I can access it pretty good by unclipping the first aid kit.
12-16-2017, 11:27 AM
#471
ATC Tool Pouch & Mesh Organizer Inserts 12-16-2017
I added an SAE socket set to my right the other day to go along with my metric set, and instead of carrying two plastic cases in my new Goose Gear cargobox, I bought another medium sized tool pouch and insert from Paul and Amy at Adventure Tool Company.
Their gear is great to organize your tools, as I already own three of their products for organizing my tools in the rig.
This keeps all sockets and their handles in two separate bags.
One for the metric set, and one for the SAE set.
And since they are made out of waxed canvas, they smell very nice!
Links:
Adventure Tool Company
Tool Pouches Medium Lined With Blazed Orange Cordura, And "Sockets" Name Tag Insignia
Mesh Organizer Inserts, aka See-Ums (Set of 4)
Pics:
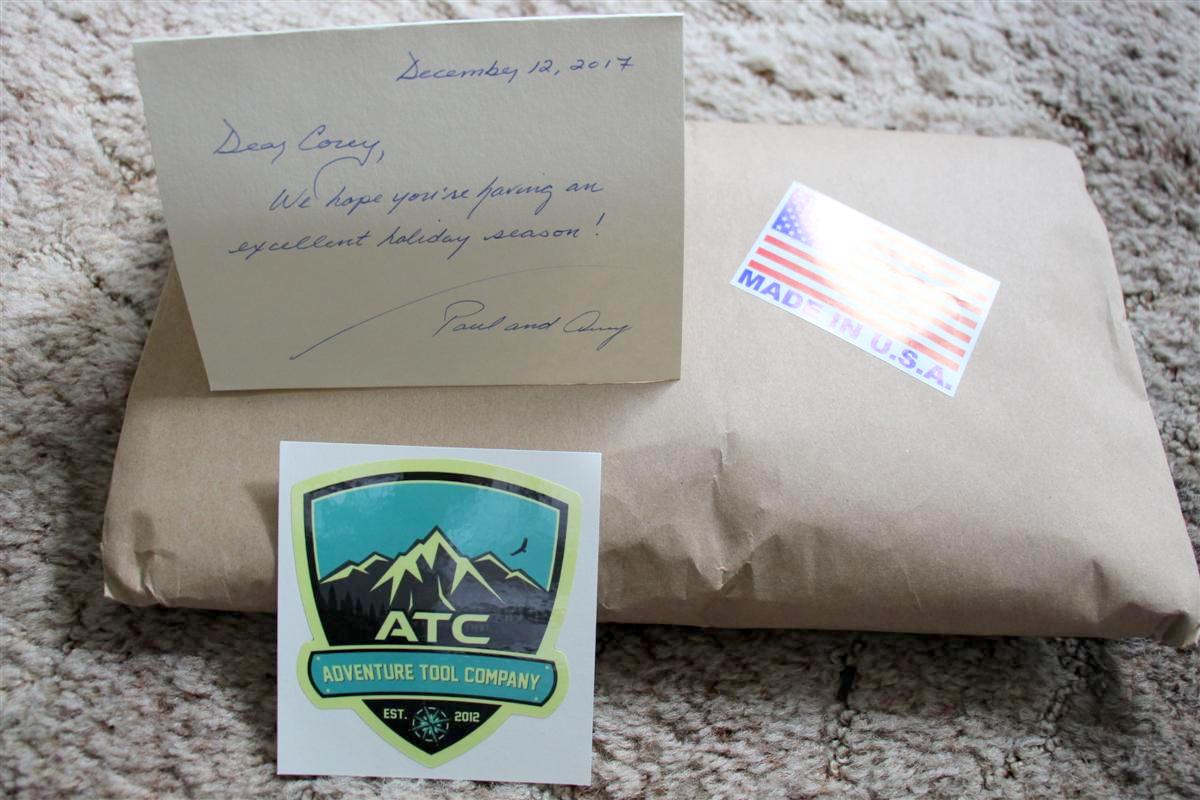
Always a pleasure to receive a package form Paul and Amy, as they go the extra distance to make it personal for you

All the booty laid out
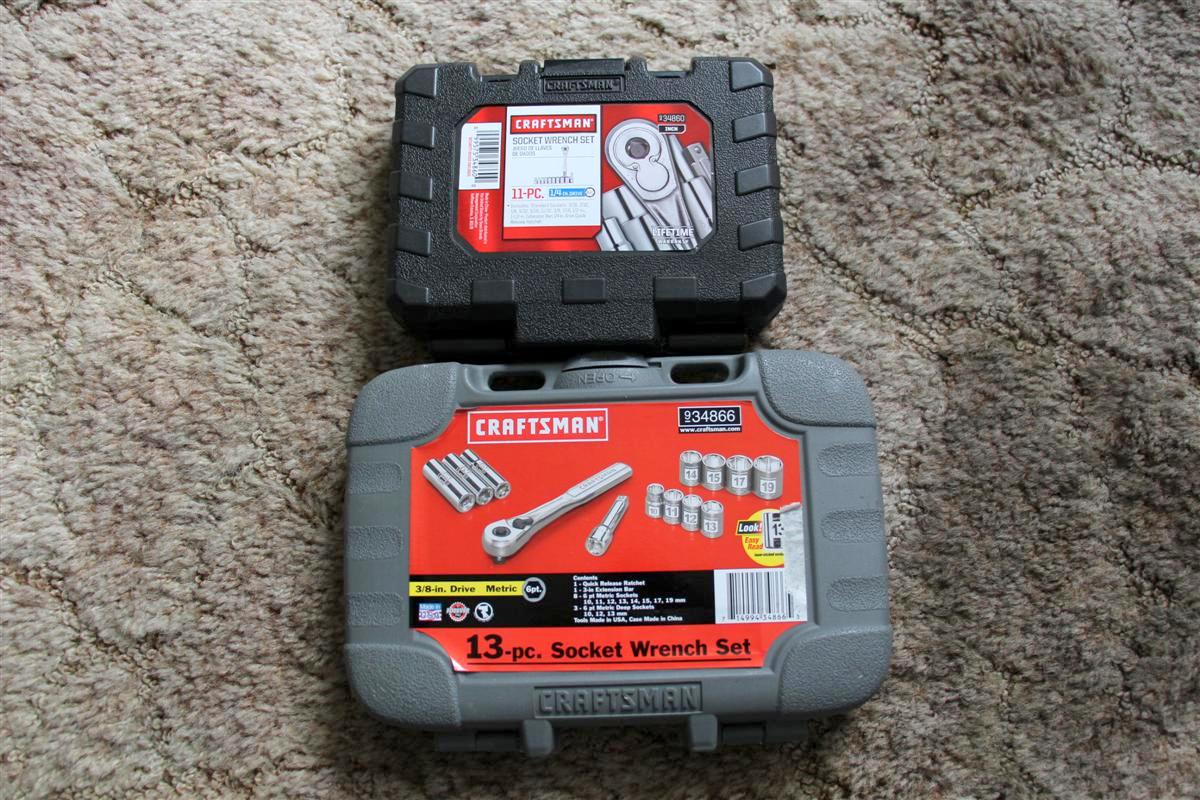
The two cases the sockets came in
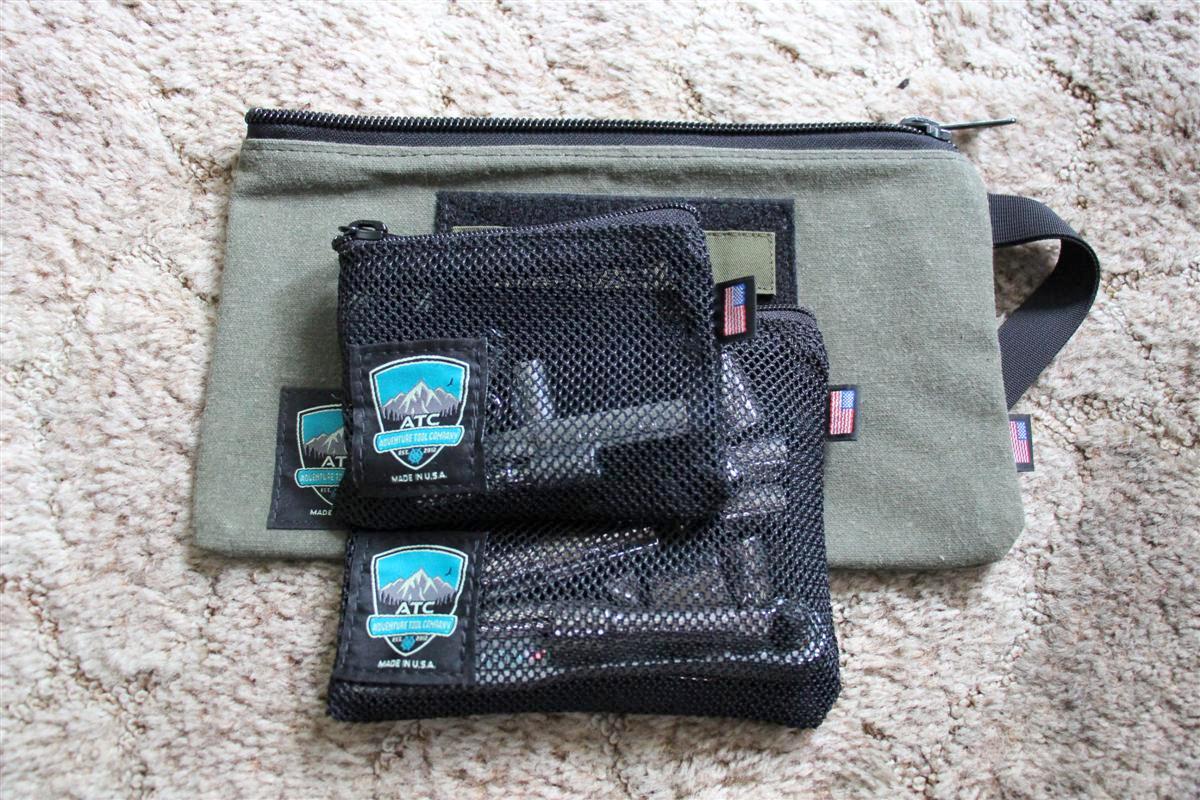
Two of the four mesh bags loaded up, hmmmm, what to do with the extra two
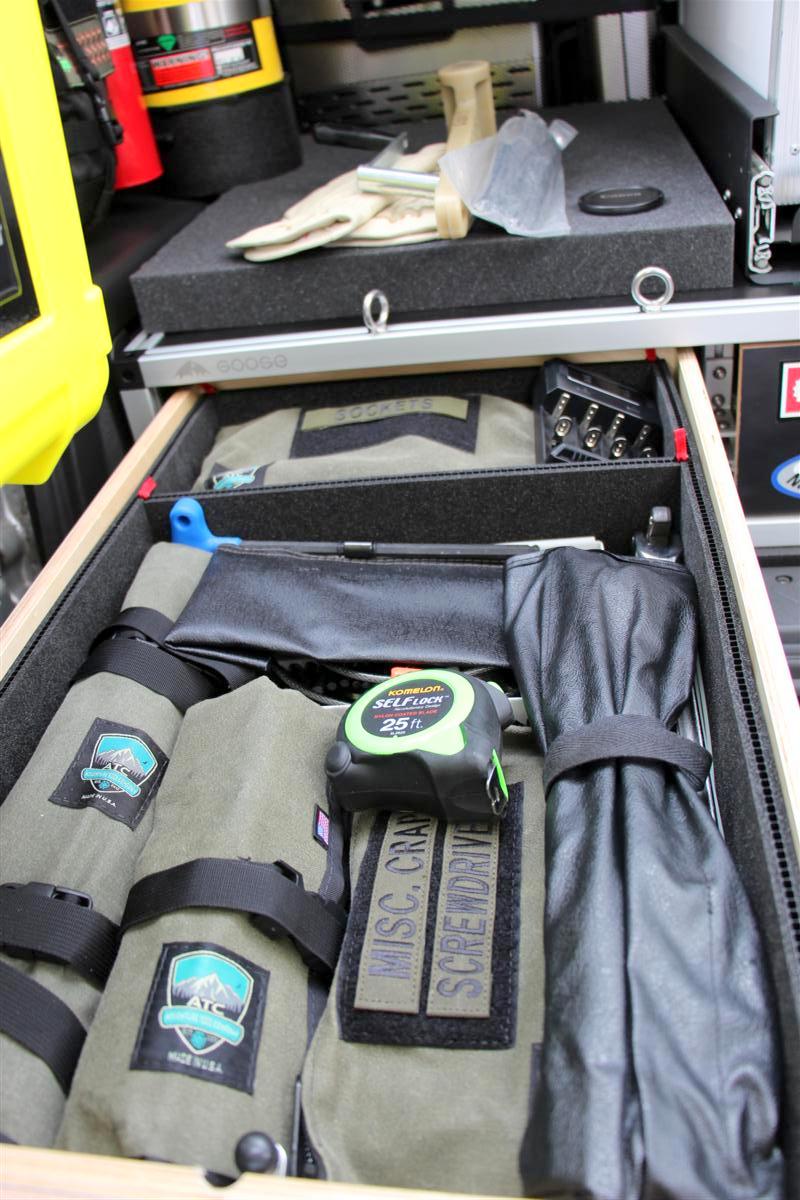
The new bag is at the top of the cargobox
Next mod is the longer fridge slides for the Tembo Tusk so my chuckbox will come out further.
They arrive today...
Their gear is great to organize your tools, as I already own three of their products for organizing my tools in the rig.
This keeps all sockets and their handles in two separate bags.
One for the metric set, and one for the SAE set.
And since they are made out of waxed canvas, they smell very nice!
Links:
Adventure Tool Company
Tool Pouches Medium Lined With Blazed Orange Cordura, And "Sockets" Name Tag Insignia
Mesh Organizer Inserts, aka See-Ums (Set of 4)
Pics:
Always a pleasure to receive a package form Paul and Amy, as they go the extra distance to make it personal for you
All the booty laid out
The two cases the sockets came in
Two of the four mesh bags loaded up, hmmmm, what to do with the extra two
The new bag is at the top of the cargobox
Next mod is the longer fridge slides for the Tembo Tusk so my chuckbox will come out further.
They arrive today...
12-21-2017, 10:54 AM
#472
Phase IV Goose Gear/Tembo Tusk Updated 12-21-2017
Phase IV you say?
As you could see from the previous pictures, when the chuckbox was pulled out there was not much room to stand when its door/table was in the down position.
I would have had to dis-mount the Outer Limits Weekender first aid kit to stand there, and it would still be tight.
Rotating the chuckbox 180 degrees so it opens on the passenger side the door would not drop down due to it hitting the rig inside by the tail light area.
I got a hold of Jerry at Tembo Tusk and asked if they had longer Accuride slide tracks, and why yes they do.
He had to order in a pair of 35" ones for me, drill a few new locating holes. and ship them out to me.
He had detailed instructions for removing the original ones, and mounting up the new ones, so it was a very easy job.
Now when I pull the chuckbox out, I have room to drop down the door and use it as a prep table facing it from the passenger side, very nice.
I started removing the stock rails yesterday, and they are around 28" long, and the new ones are 36" long.
Ooooops, I thought they might have to hang out the back, and that would require me not having a rear door
I got a hold of Jerry, and the extended length actually comes into the cab, I was unaware as I thought these were tripped stacked rails instead of double like the stock ones, but Jerry informed me on the phone triples would reduce the weight handling capability of them.
This would mean loosing some cargo space inside, but I can work with that.
Remember, I am on a reduction diet of the gear I take, and I have already cut back to two Alu-boxes instead of the three I have now
It turned out very nice, and it was below 30� this morning, but very sunny.
Usually not doing work on the rig when it is cold out there.
I did have to cut the tray on each side with a hacksaw, as the ends of the rails butt up against a lip, and the longer length of the new rails would not work, unless I wanted to use the upper mounting holes, but that would raise the tray the chuckbox sits on about 1/5" higher, so I opted to notch the lip.
Pics:
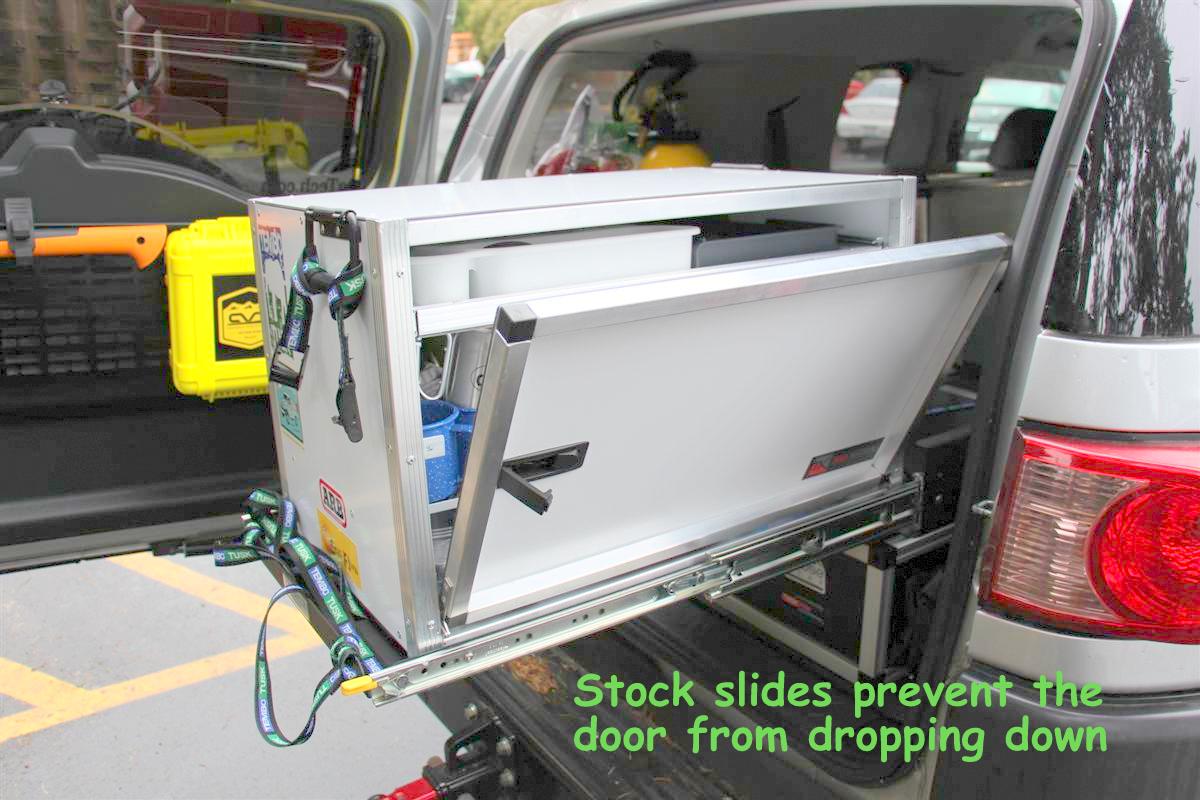
Showing the door/table not being able to drop down all the way due to the stock shorter slide rails
New 36" rails in place

Shot of the chuckbox tucked away, same as before
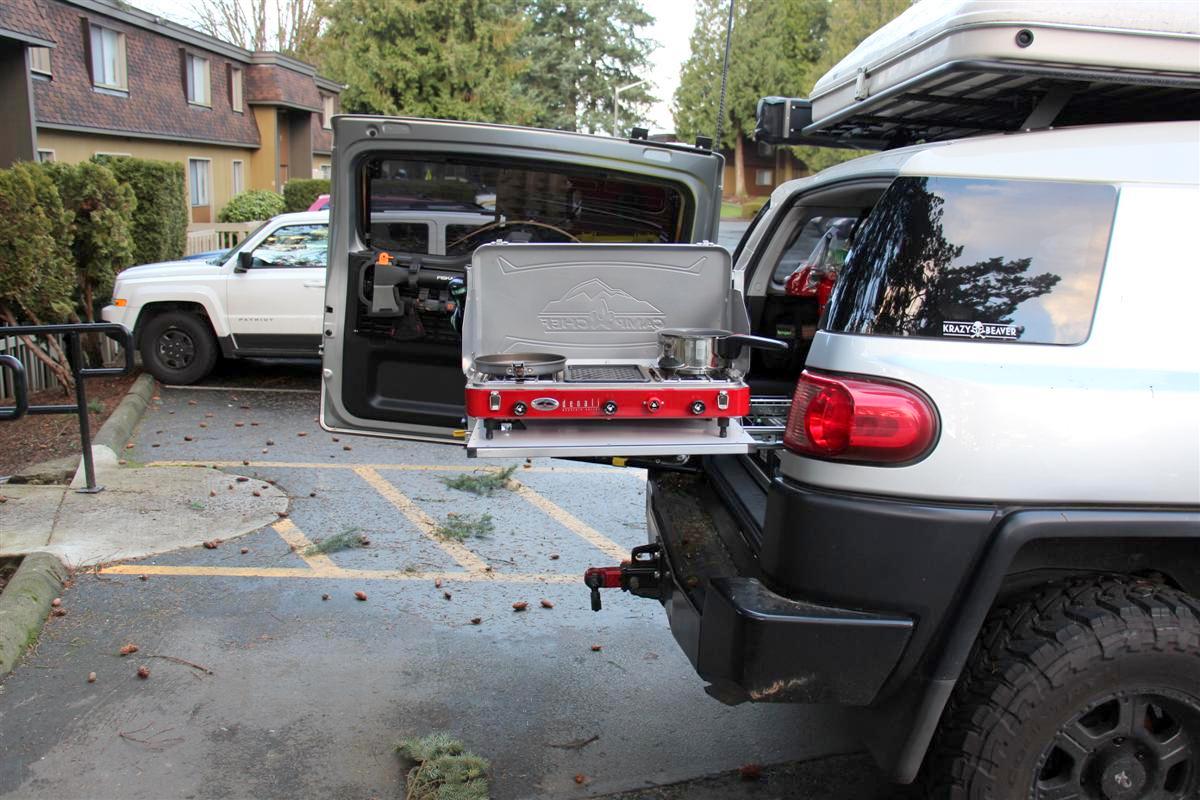
Shot of it from the rear closed, it comes out about 8" more than before
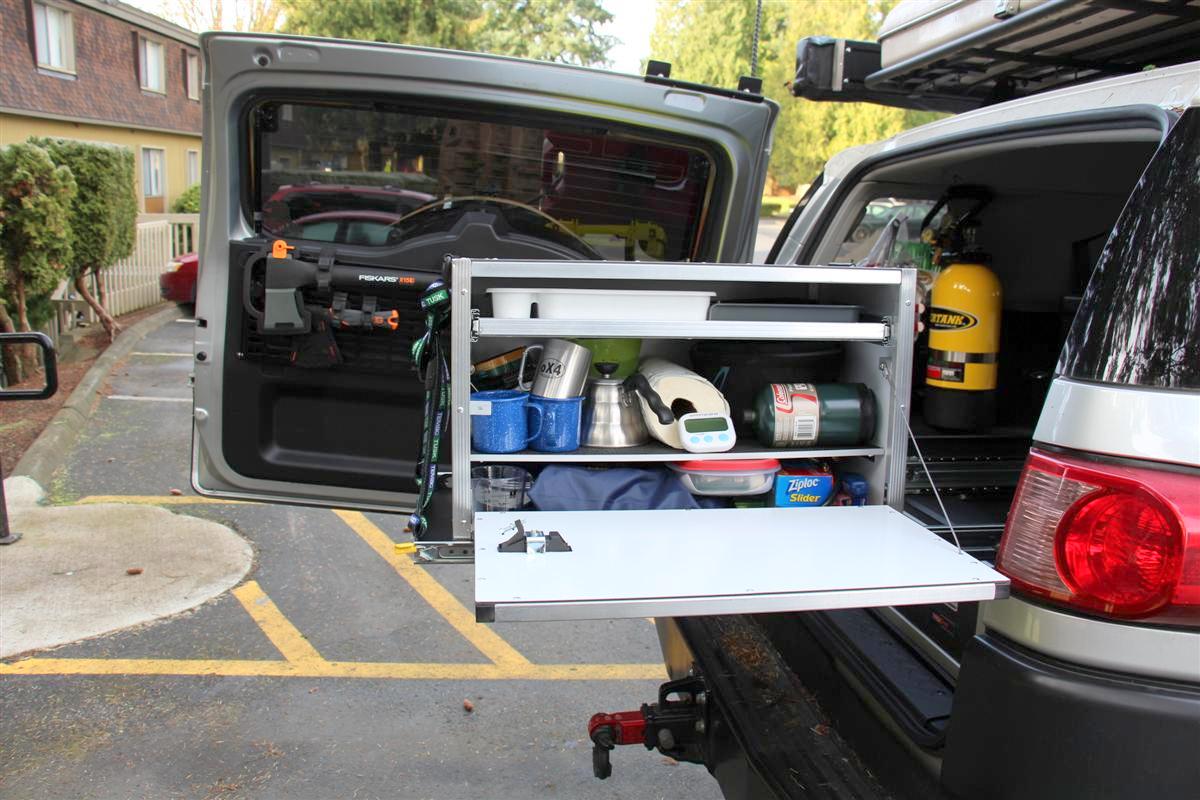
With the door/table in the down position
Rear shot with the Camp Chef Denali stove on top
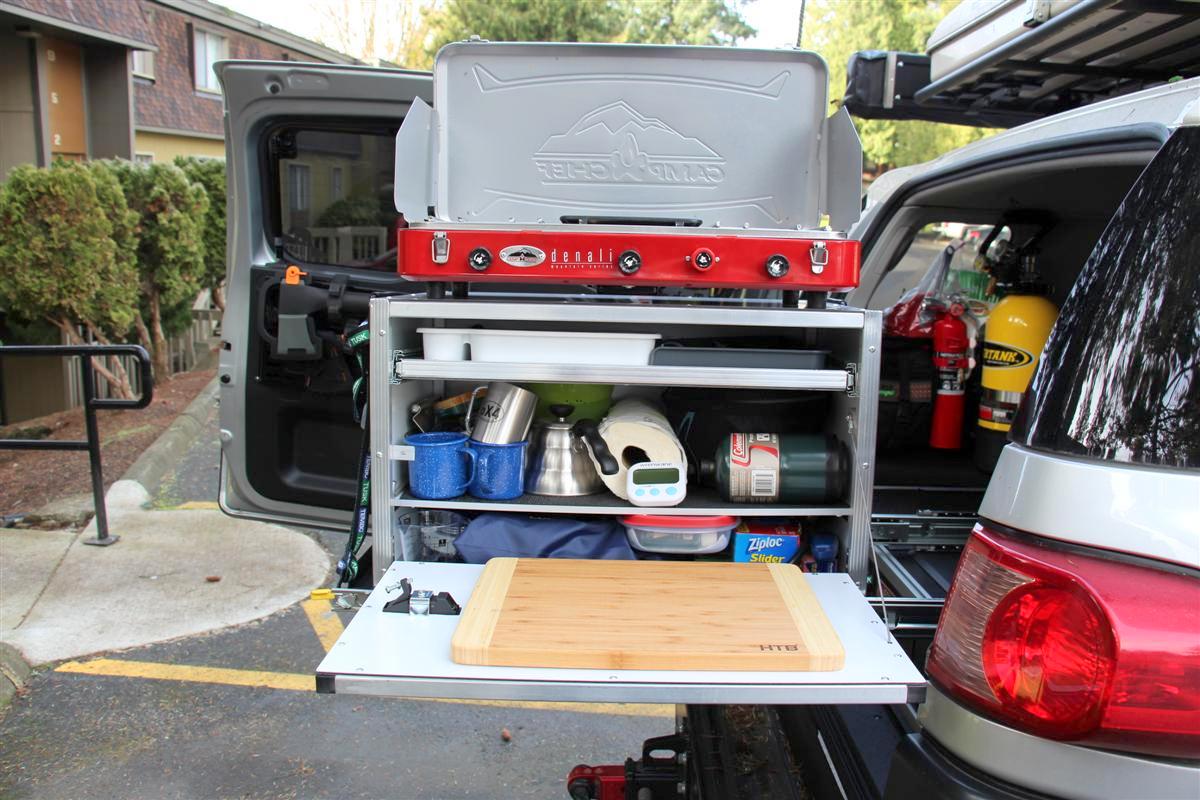
Side shot with the stove setup
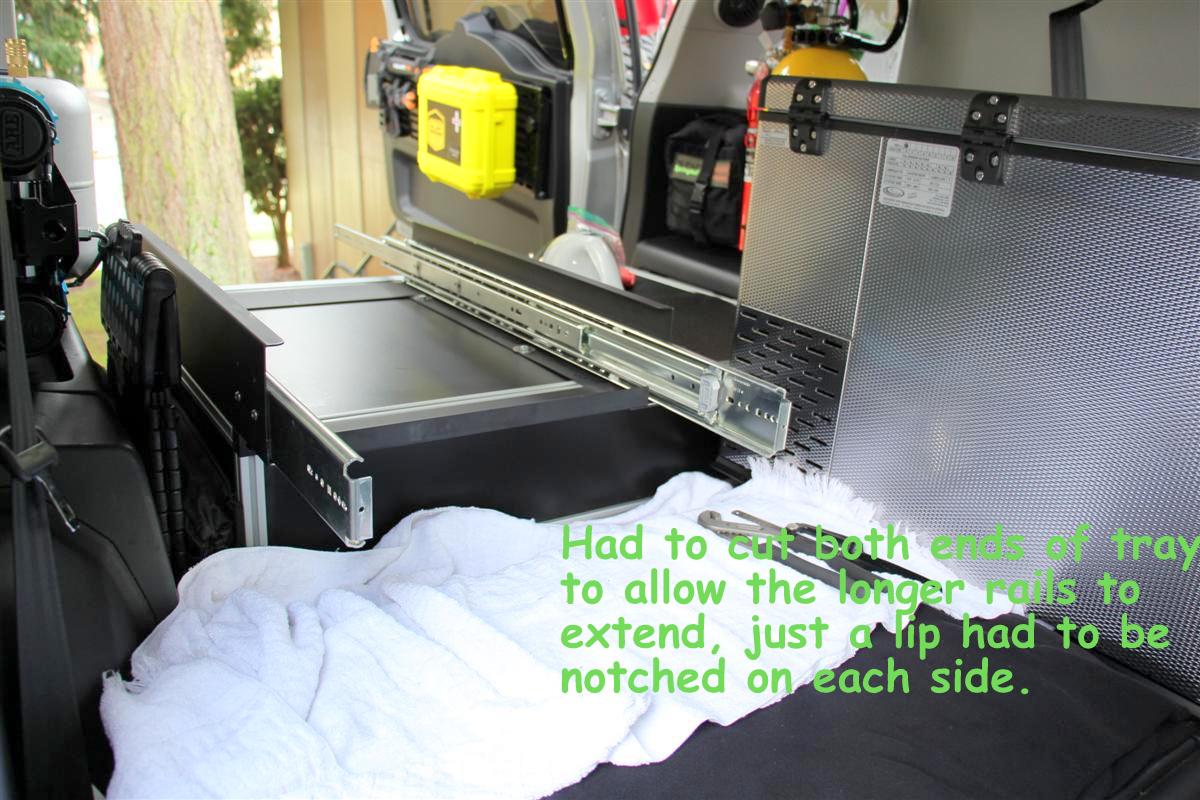
Inside shot showing how the rails protrude into the cargo area, and you can see the two notches I had to cut in the lip
Down to just one Eezi-Awn K9 table now, with the rails extending into the cargo area, the rail was hitting a second table
I may have a solution to rectify that at a later date
Now I need a food truck license
As you could see from the previous pictures, when the chuckbox was pulled out there was not much room to stand when its door/table was in the down position.
I would have had to dis-mount the Outer Limits Weekender first aid kit to stand there, and it would still be tight.
Rotating the chuckbox 180 degrees so it opens on the passenger side the door would not drop down due to it hitting the rig inside by the tail light area.
I got a hold of Jerry at Tembo Tusk and asked if they had longer Accuride slide tracks, and why yes they do.
He had to order in a pair of 35" ones for me, drill a few new locating holes. and ship them out to me.
He had detailed instructions for removing the original ones, and mounting up the new ones, so it was a very easy job.
Now when I pull the chuckbox out, I have room to drop down the door and use it as a prep table facing it from the passenger side, very nice.
I started removing the stock rails yesterday, and they are around 28" long, and the new ones are 36" long.
Ooooops, I thought they might have to hang out the back, and that would require me not having a rear door
I got a hold of Jerry, and the extended length actually comes into the cab, I was unaware as I thought these were tripped stacked rails instead of double like the stock ones, but Jerry informed me on the phone triples would reduce the weight handling capability of them.
This would mean loosing some cargo space inside, but I can work with that.
Remember, I am on a reduction diet of the gear I take, and I have already cut back to two Alu-boxes instead of the three I have now
It turned out very nice, and it was below 30� this morning, but very sunny.
Usually not doing work on the rig when it is cold out there.
I did have to cut the tray on each side with a hacksaw, as the ends of the rails butt up against a lip, and the longer length of the new rails would not work, unless I wanted to use the upper mounting holes, but that would raise the tray the chuckbox sits on about 1/5" higher, so I opted to notch the lip.
Pics:
Showing the door/table not being able to drop down all the way due to the stock shorter slide rails
New 36" rails in place
Shot of the chuckbox tucked away, same as before
Shot of it from the rear closed, it comes out about 8" more than before
With the door/table in the down position
Rear shot with the Camp Chef Denali stove on top
Side shot with the stove setup
Inside shot showing how the rails protrude into the cargo area, and you can see the two notches I had to cut in the lip
Down to just one Eezi-Awn K9 table now, with the rails extending into the cargo area, the rail was hitting a second table
I may have a solution to rectify that at a later date
Now I need a food truck license
12-21-2017, 11:29 AM
#473
Registered User
Looks good Corey! Your camping/storage gear is awesome and how you have mounted everything to work to your liking is pretty sweet! 
When I go camping, I just have my camping gear in a few large plastic bins and tattered cardboard boxes.......... yeah, I think it is time for me to upgrade. Your thread has given me many ideas for the future.

When I go camping, I just have my camping gear in a few large plastic bins and tattered cardboard boxes.......... yeah, I think it is time for me to upgrade. Your thread has given me many ideas for the future.
 12-21-2017, 01:18 PM
#475
Looks good Corey! Your camping/storage gear is awesome and how you have mounted everything to work to your liking is pretty sweet!
When I go camping, I just have my camping gear in a few large plastic bins and tattered cardboard boxes.......... yeah, I think it is time for me to upgrade. Your thread has given me many ideas for the future.
When I go camping, I just have my camping gear in a few large plastic bins and tattered cardboard boxes.......... yeah, I think it is time for me to upgrade. Your thread has given me many ideas for the future.
I use to use the red & black bins, but there was so much wasted space in them.
Then I switched to some military ones made down in Oregon that stack/interlock like Legos, but again, wasted space.
I finally bit the bullet last year and sprung for the Alu-box ones.
Dang expensive, but absolutely zero wasted space inside of them.
Glad my thread can give you some ideas.
Yes, even if I got down to 100 lbs, I would not have been able to squeeze in there with the way I had it before, even after removing the first aid kit.
Ahhh, Mexican food, 'tis what is for dinner tonight.
Well kind of...
Nalleys vegi chili, blue corn chips crushed on plate, one avocado, one Roma tomato cut up, Tillamook Farm cut 4 cheese Mexican cheese.
No sour cream here though, forgot to buy it earlier
 12-30-2017, 08:49 AM
#476
Update To The Stove Height/Chuckbox In The Rig 12-30-2017
So as seen in the last set of pictures, the stove sat too high on top of the chuckbox, so high I would have to stand on a step stool, and risk falling off.
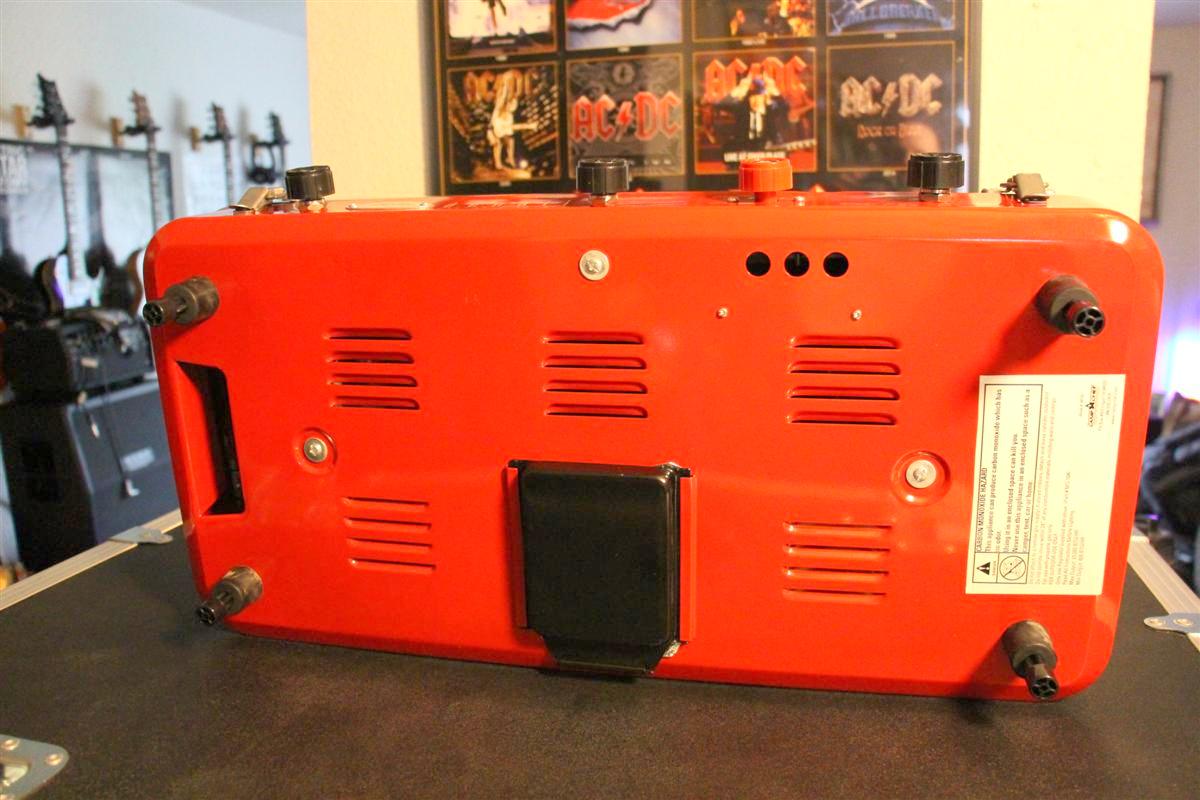
The solution would be to just move the stove down to the chuckboxes door/table, but the backside of the latch prevented the stove from sitting flush and level.
I had some of these plastic plugs leftover from some extensions for some studio monitor speakers that just happen to go into the holes on the bottoms of the stoves rubber feet.
They raise the stove up high enough that I can now place the stove on the door/table and use it.
Problem solved!
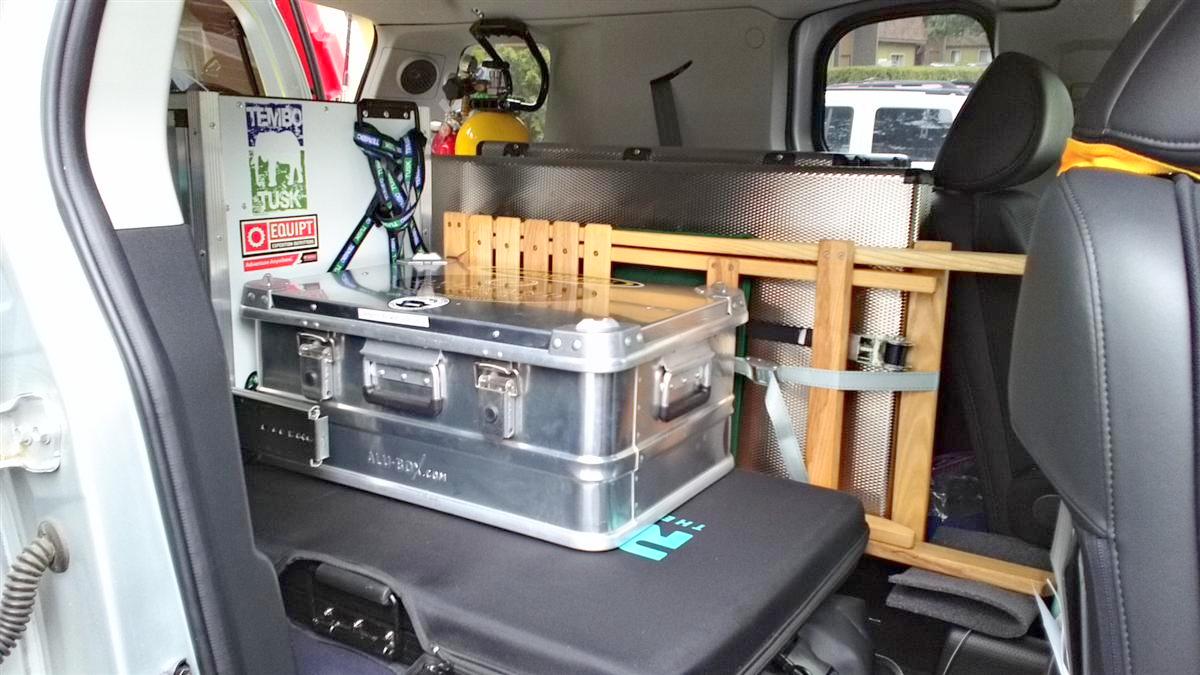
First up though is a picture I took a few days ago with my tablet showing how Alu-Boxes are going to fit perfectly in between the extended rails for the fridge slide.
Even the Blue Ridge Chair Works chair fits withing the rail too to snuggle up against the Alu-Box.
This is just the 42 liter one which I will not be using, as I will be taking the 60 liter one for dry food, and the 73 liter one which houses miscellaneous gear.
They will double stack in this space perfectly.
I will move the solar panel though and stand it up on its side, as I think the weight of the two Alu-Boxes will compromise the padded case and might break the solar panel glass, not good.
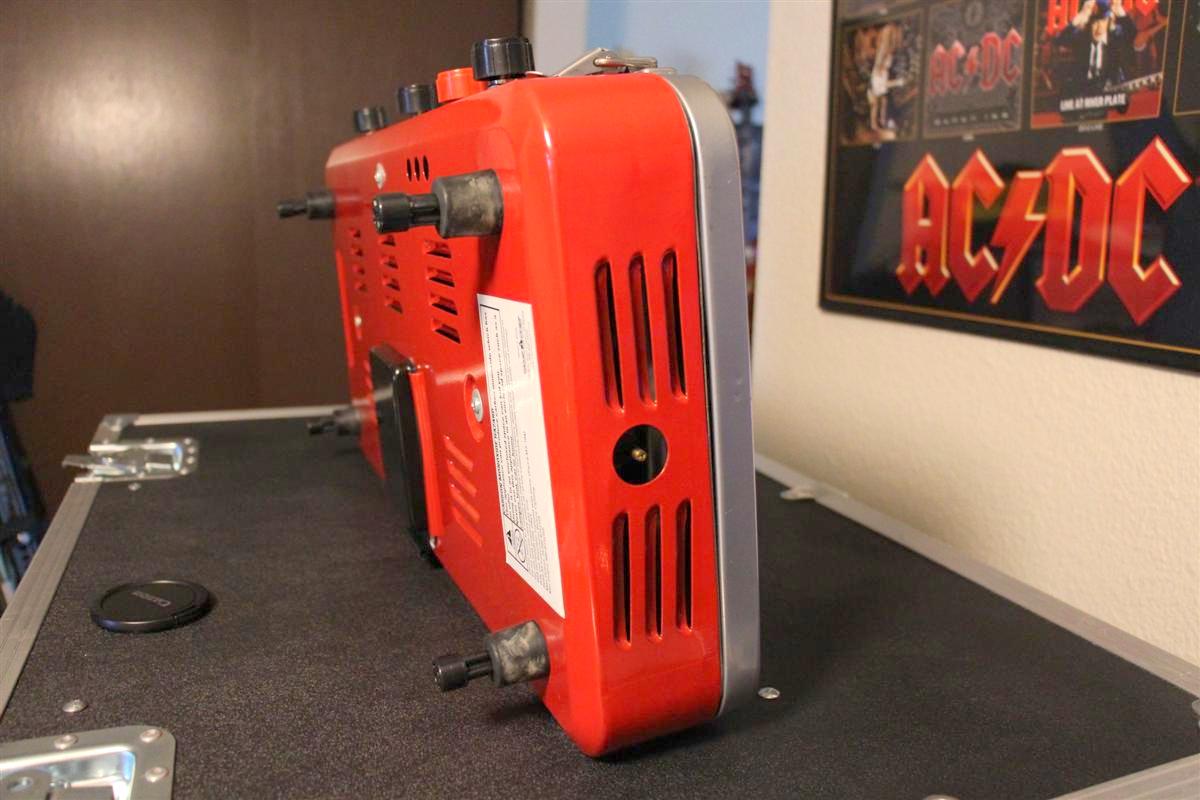
Here are a few shots of the bottom of the stove showing the plastic extensions inserted into the stoves rubber feet.
And finally the stove sitting on the door/table of the chuckbox, thus lowering it to a more suitable height in which to cook food.
I always have the option though to just move the stove to one of my camp tables.
The solution would be to just move the stove down to the chuckboxes door/table, but the backside of the latch prevented the stove from sitting flush and level.
I had some of these plastic plugs leftover from some extensions for some studio monitor speakers that just happen to go into the holes on the bottoms of the stoves rubber feet.
They raise the stove up high enough that I can now place the stove on the door/table and use it.
Problem solved!
First up though is a picture I took a few days ago with my tablet showing how Alu-Boxes are going to fit perfectly in between the extended rails for the fridge slide.
Even the Blue Ridge Chair Works chair fits withing the rail too to snuggle up against the Alu-Box.
This is just the 42 liter one which I will not be using, as I will be taking the 60 liter one for dry food, and the 73 liter one which houses miscellaneous gear.
They will double stack in this space perfectly.
I will move the solar panel though and stand it up on its side, as I think the weight of the two Alu-Boxes will compromise the padded case and might break the solar panel glass, not good.
Here are a few shots of the bottom of the stove showing the plastic extensions inserted into the stoves rubber feet.
And finally the stove sitting on the door/table of the chuckbox, thus lowering it to a more suitable height in which to cook food.
I always have the option though to just move the stove to one of my camp tables.
01-13-2018, 11:40 AM
#477
Its Hammer Time! 1-13-2018
First day in awhile with it being fairly nice outside, and no rain.
I cleaned out my interior which needed it badly, and was organizing my cargobox a bit, and I spied the plastic tent stake hammer in there that I have been wanting to move to the rear door fold down rack/table.
I had some more of those mini Quick Fists like I used for the small hatchet, but they were too small.
I also had two more pair of the bigger ones like that hold my Fiskars axe to the rack.
Perfect size, and now I do not have to dig through the cargobox when it is hammer time for pounding in stakes for various camping accessories.
This hammer also pulls out stakes too.
I have had the hammer since the late 80s when I use to backpack around Mount Rainier.
Light weight, and it does a great job, even on bigger heavier stakes.
I had bought it at REI, but Amazon carries these too.
Links:
Pics:

Used the new 1/4" bolts, Nylock nuts, and flat washers that I had bought for the installation of the Tembo Tusk fridge slide to the top of the Goose Gear cargobox
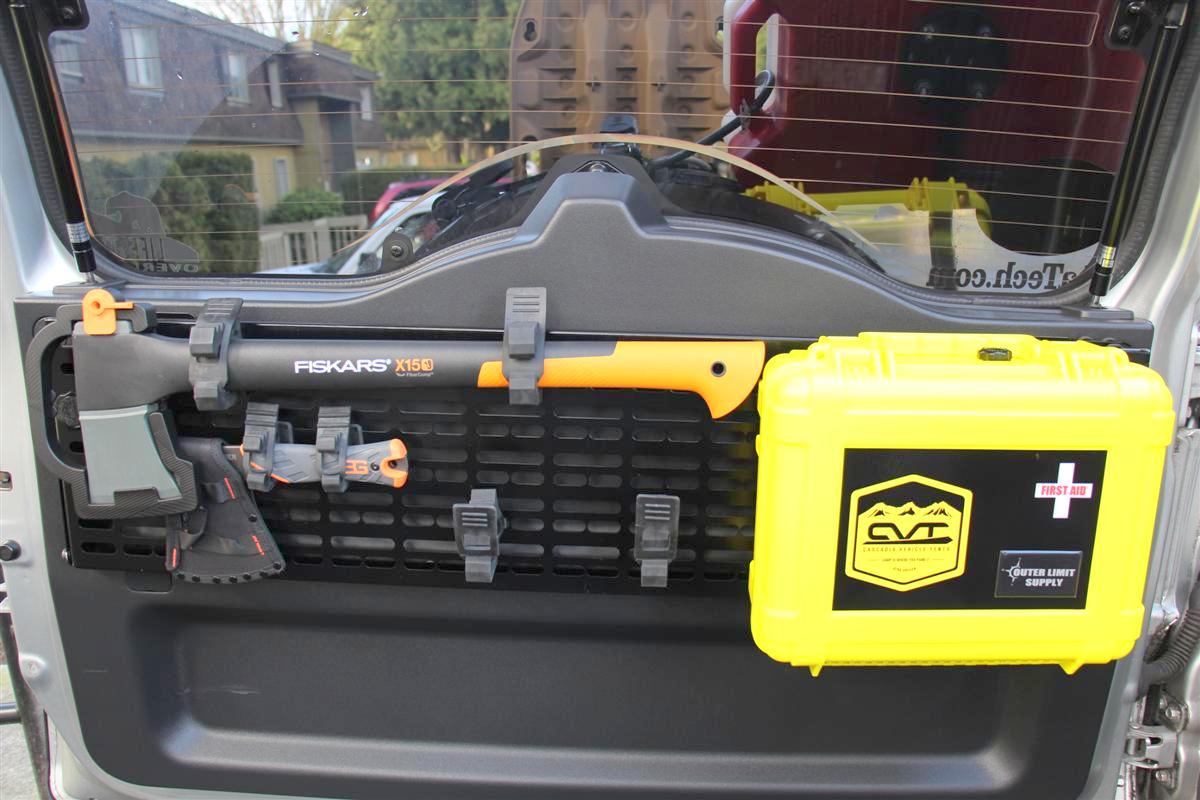
Quick Fists rule
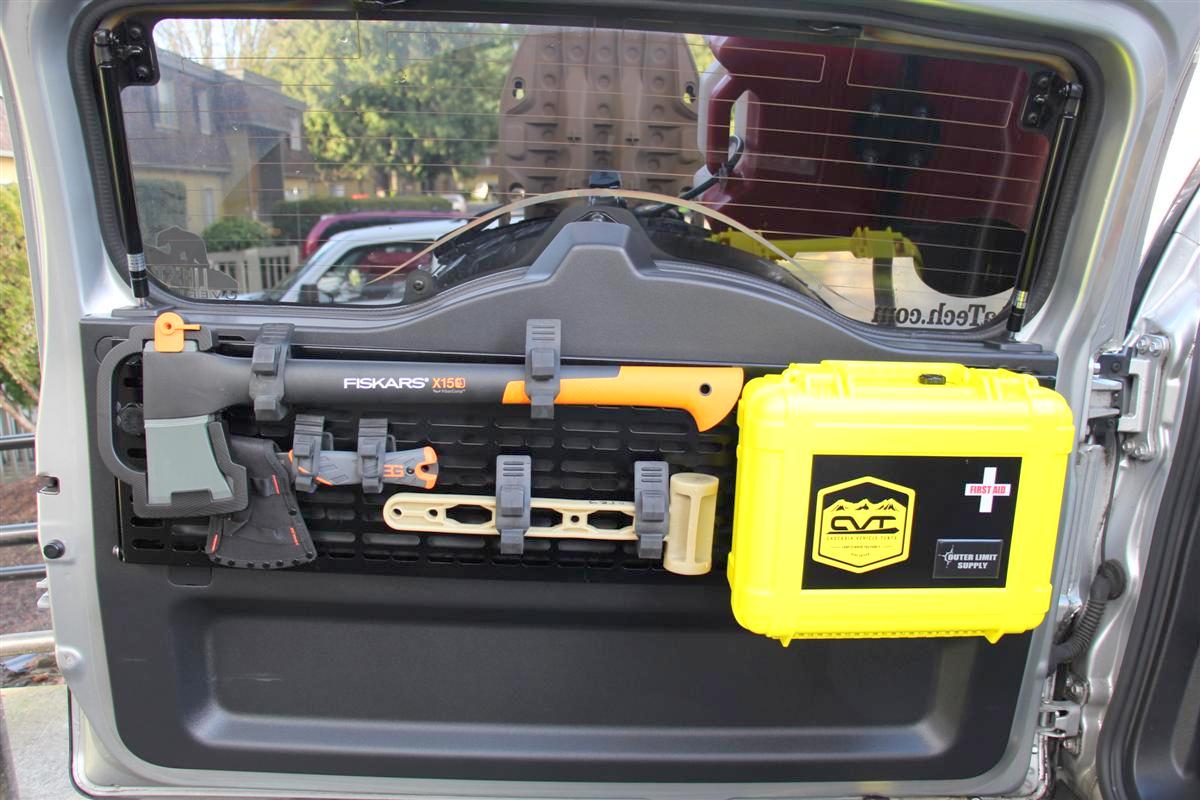
It is a great fit indeed, and much more easy to get to now
I cleaned out my interior which needed it badly, and was organizing my cargobox a bit, and I spied the plastic tent stake hammer in there that I have been wanting to move to the rear door fold down rack/table.
I had some more of those mini Quick Fists like I used for the small hatchet, but they were too small.
I also had two more pair of the bigger ones like that hold my Fiskars axe to the rack.
Perfect size, and now I do not have to dig through the cargobox when it is hammer time for pounding in stakes for various camping accessories.
This hammer also pulls out stakes too.
I have had the hammer since the late 80s when I use to backpack around Mount Rainier.
Light weight, and it does a great job, even on bigger heavier stakes.
I had bought it at REI, but Amazon carries these too.
Links:
Pics:
Used the new 1/4" bolts, Nylock nuts, and flat washers that I had bought for the installation of the Tembo Tusk fridge slide to the top of the Goose Gear cargobox
Quick Fists rule
It is a great fit indeed, and much more easy to get to now
02-24-2018, 09:30 AM
#478
Spec-D Tuning 3.5" Inlet Snorkel Off-Road 4X4 Installed 2-24-2018
I saw a post in Instagram from a guy I follow with an FJ Cruiser that head one of those round dust collectors that when the air comes into the head, it spins and any dirt that enters gets trapped into a receptacle you can empty out by removing the lid.
I am not sure if this breathes as well as the stock Safari snorkel head, but I will test it out for a few days.
I mainly got this for when I explore the old growth logging roads in the Greenwater vicinity.
They can be very dusty during the summer time, and this will help from any dirt reaching the Toyota air filter, thus keeping it from getting clogged.
They are pricey enough
It took less than five minutes to make the swap, just had to loosen a clamp, and take some 409 cleaner to the snorkel and wipe down the outside a bit.
Pics, one video:

Stock Safari head
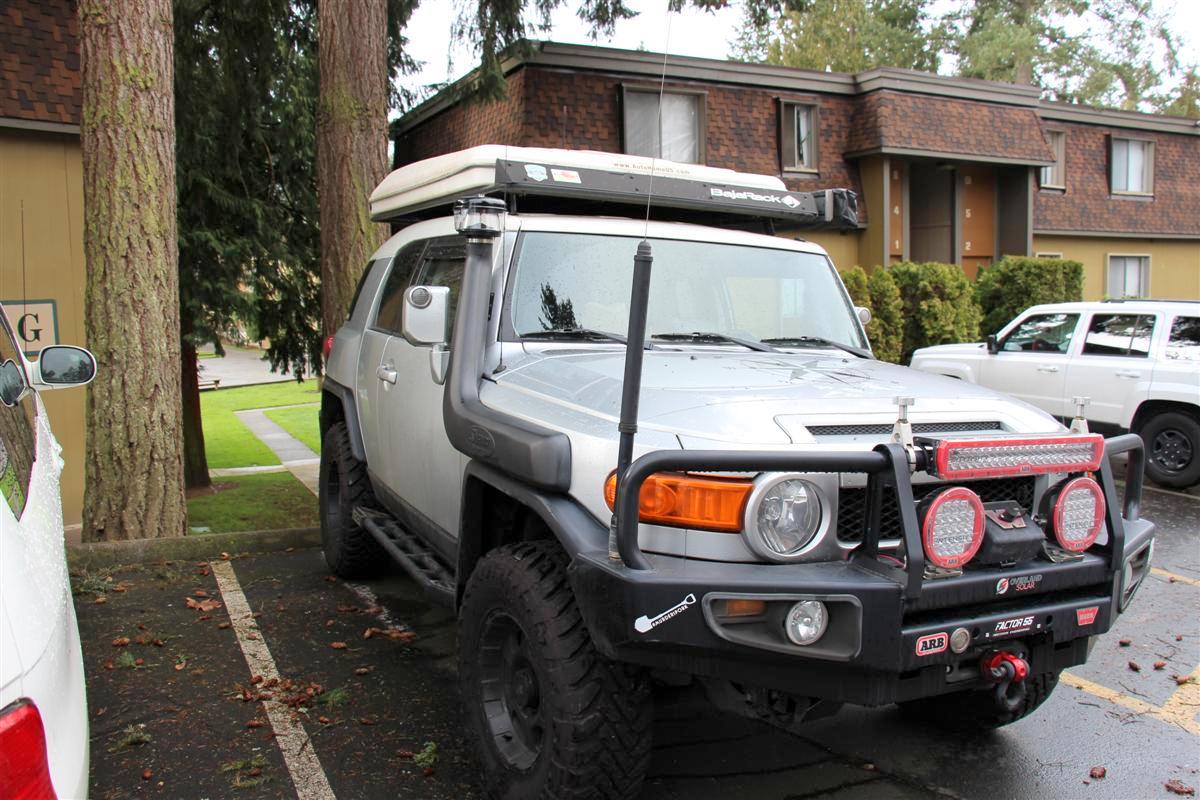
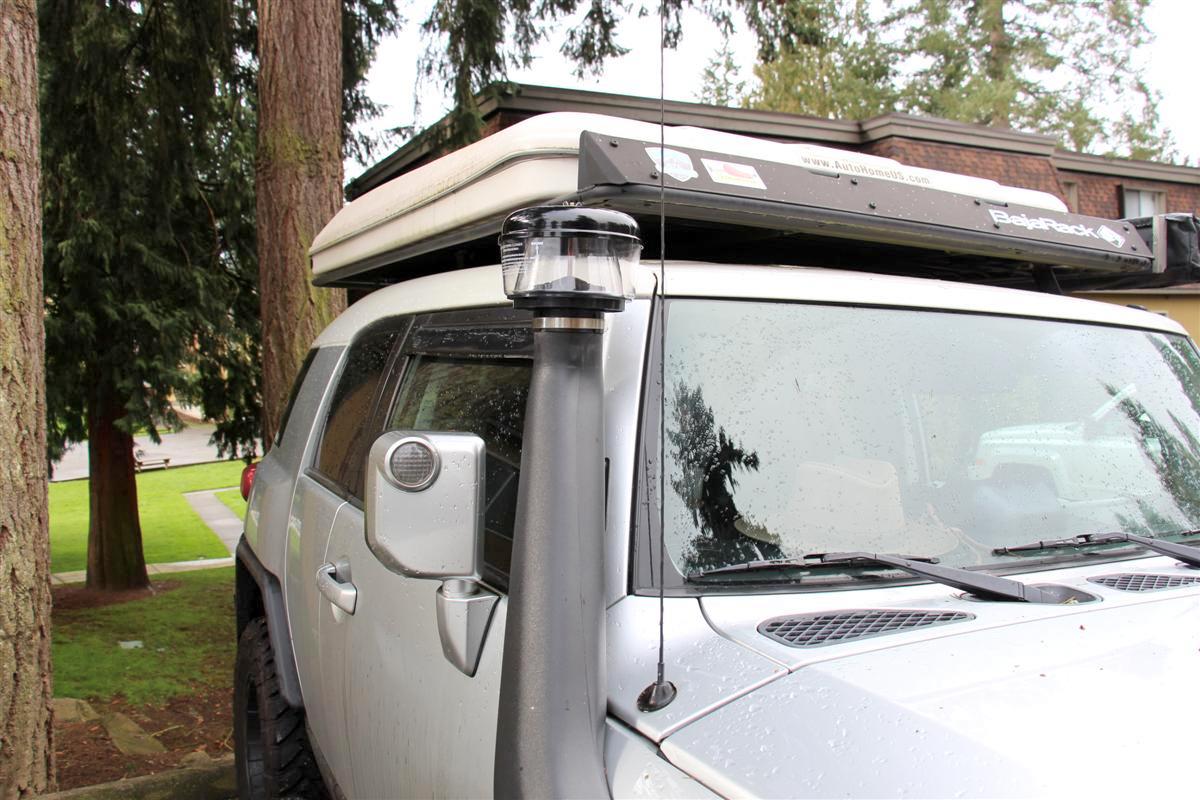
New Spec D cyclonic head
Link:
I am not sure if this breathes as well as the stock Safari snorkel head, but I will test it out for a few days.
I mainly got this for when I explore the old growth logging roads in the Greenwater vicinity.
They can be very dusty during the summer time, and this will help from any dirt reaching the Toyota air filter, thus keeping it from getting clogged.
They are pricey enough
It took less than five minutes to make the swap, just had to loosen a clamp, and take some 409 cleaner to the snorkel and wipe down the outside a bit.
Pics, one video:
Stock Safari head
New Spec D cyclonic head
Link:
03-01-2018, 01:53 AM
#479
I think many industrial/commercial vehicles / big-rigs use intake with similar concept. Please keep us posted of results.
03-01-2018, 04:08 AM
#480
My Linde forklift at Boeing has one, but the intake tube is more like 2" or so, not the 3.5" size like the Safari snorkel uses.
I also noticed the next day when it was not raining, and I had my window down some, when I accelerate, I can hear a cool "whooooooosh" sound
It sounds pretty cool when it is sucking in air.
I fuel up on Fridays, so when I get home I will see if the MPG went down or up too.
It may be down a bit from me wanting to hear the noise


