Corey's 2007 FJ Cruiser Build-Up Thread
 03-04-2017, 11:46 AM
#441
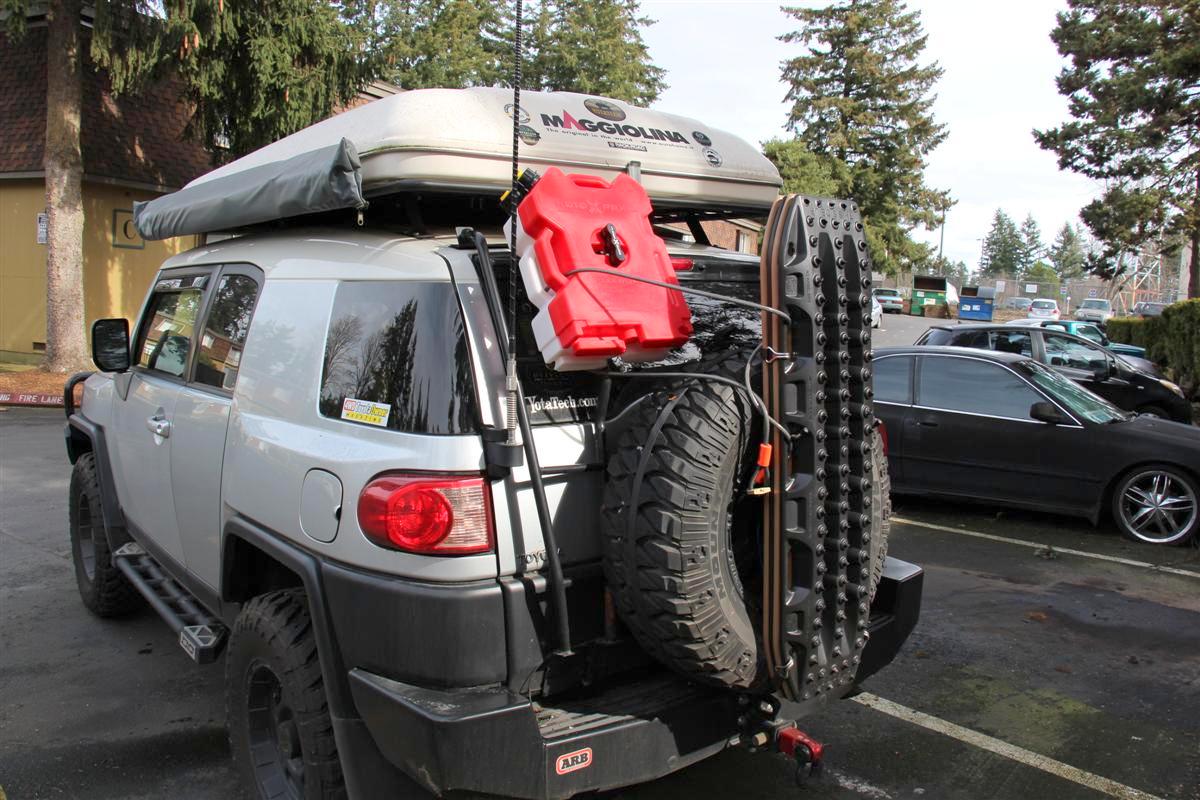
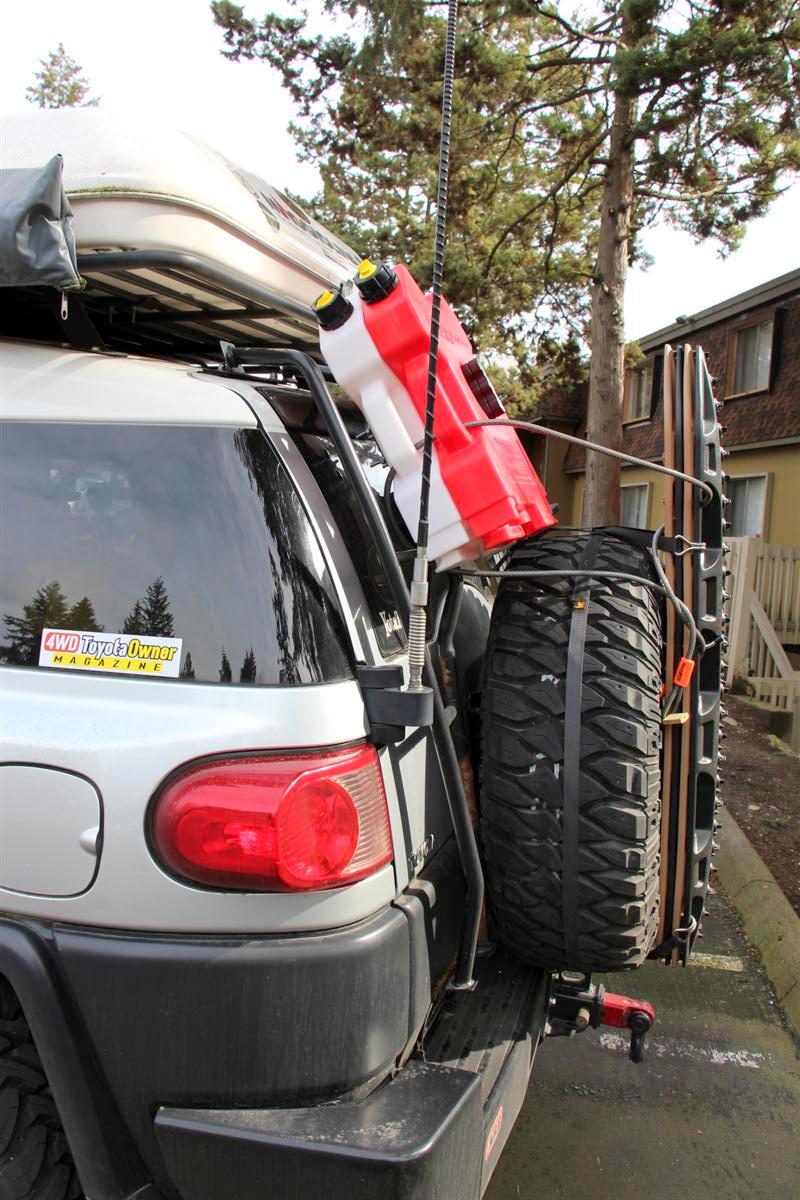
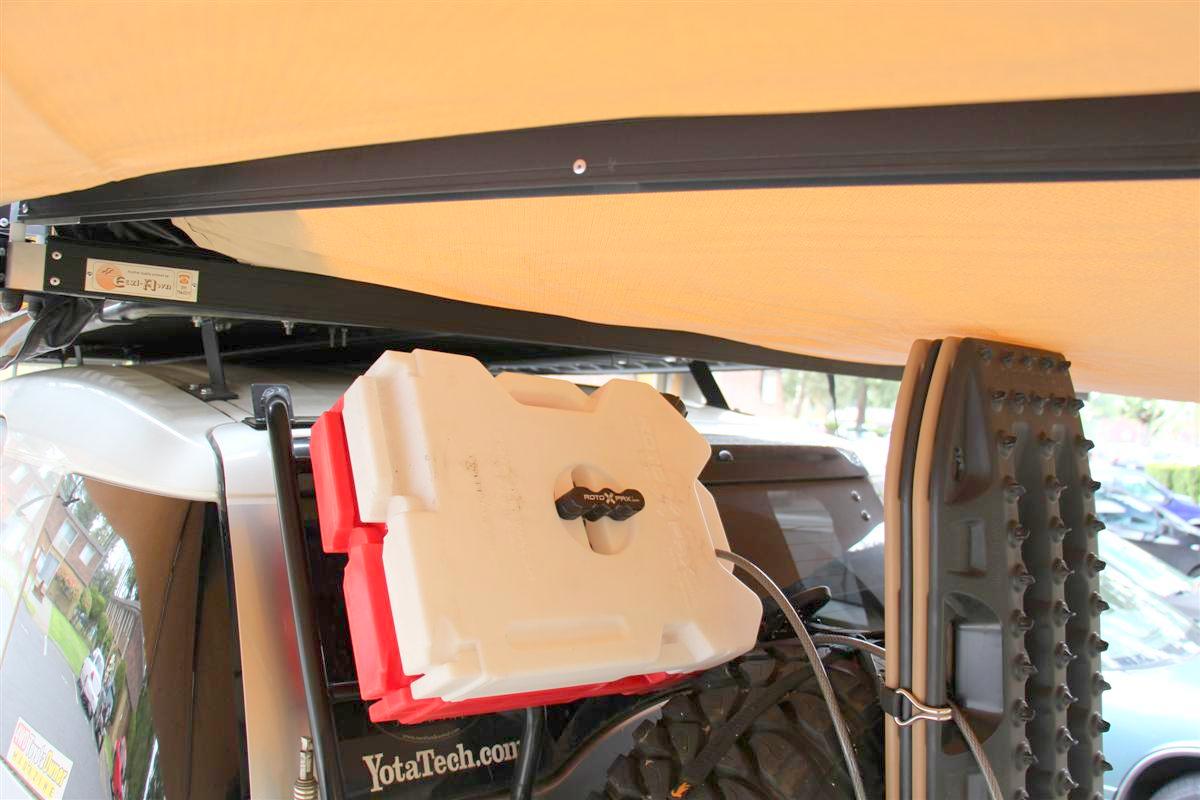
Added Rotopax Fuel Can 3-4-2017
Took off one of my 2 gallon Rotopax water jerry cans, and swapped in a 2 gallon fuel can.
Having the two water ones would be nice, but still not enough H2O for a long camping trip, so I will still have to carry water inside the rig.
I figure it might not be a bad idea to carry a little extra fuel, that is about 32 miles worth of fuel if I get low.
Link:
2 Gallon Gasoline
Pictures:
Having the two water ones would be nice, but still not enough H2O for a long camping trip, so I will still have to carry water inside the rig.
I figure it might not be a bad idea to carry a little extra fuel, that is about 32 miles worth of fuel if I get low.
Link:
2 Gallon Gasoline
Pictures:
 03-19-2017, 11:16 AM
#442
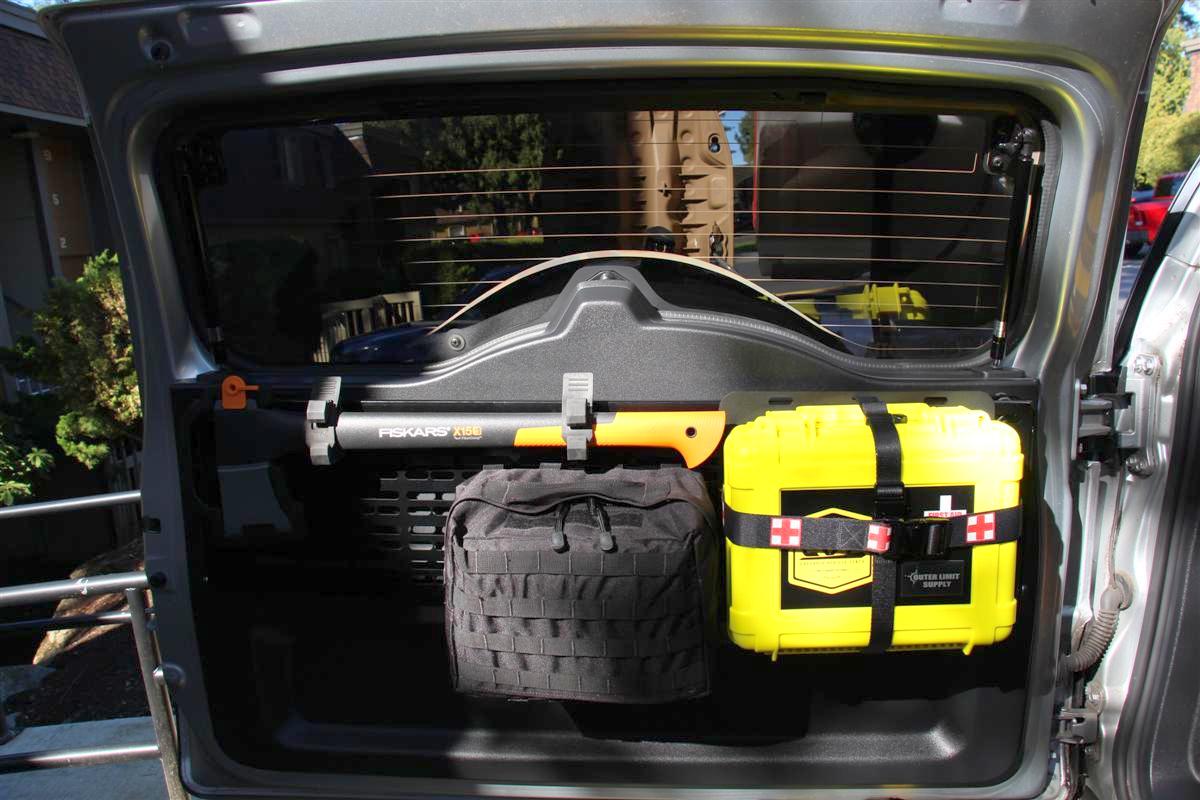
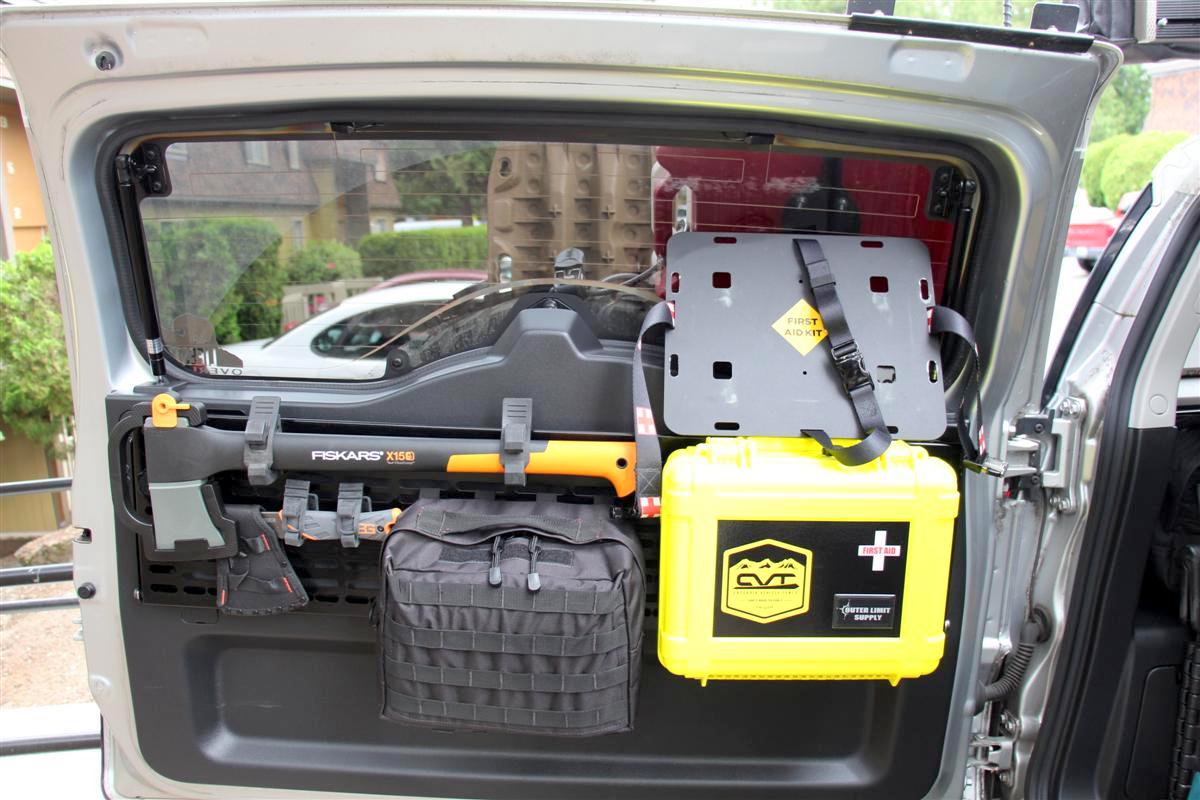
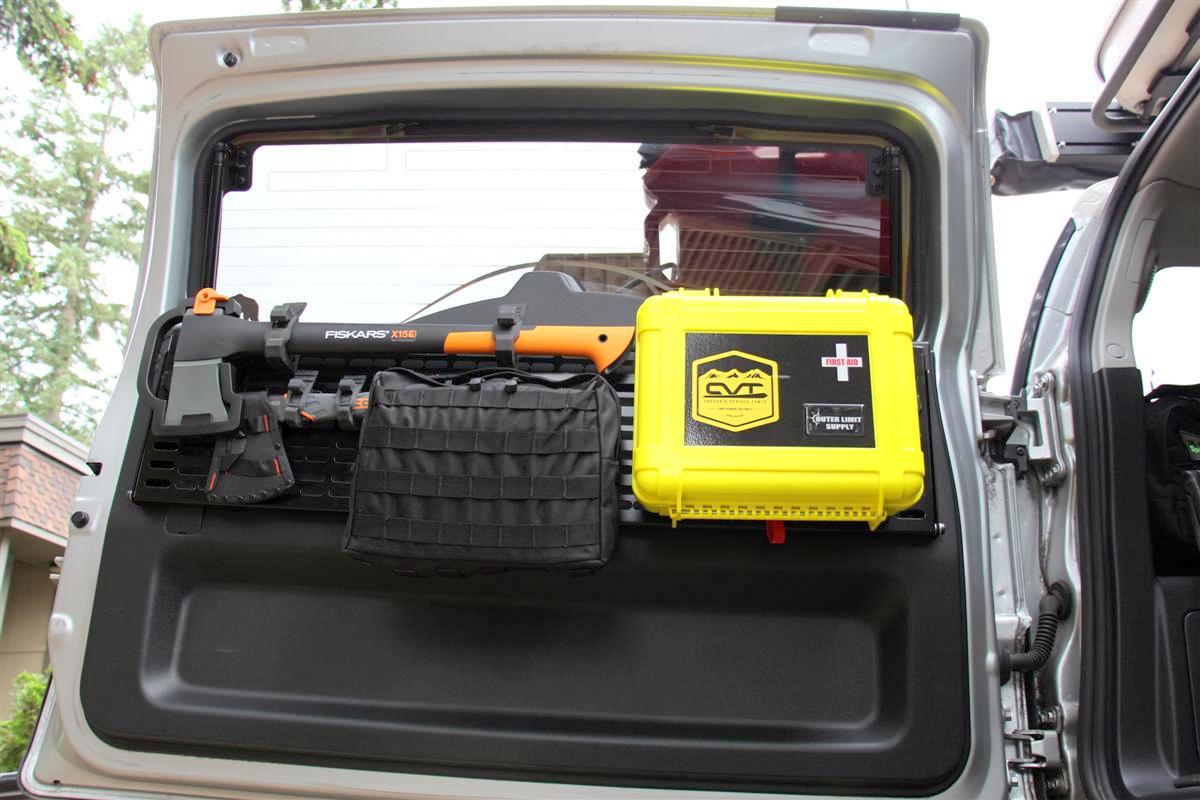
Relocated Fire Extinguisher And Mounted Fiskars Axe 3-19-2017
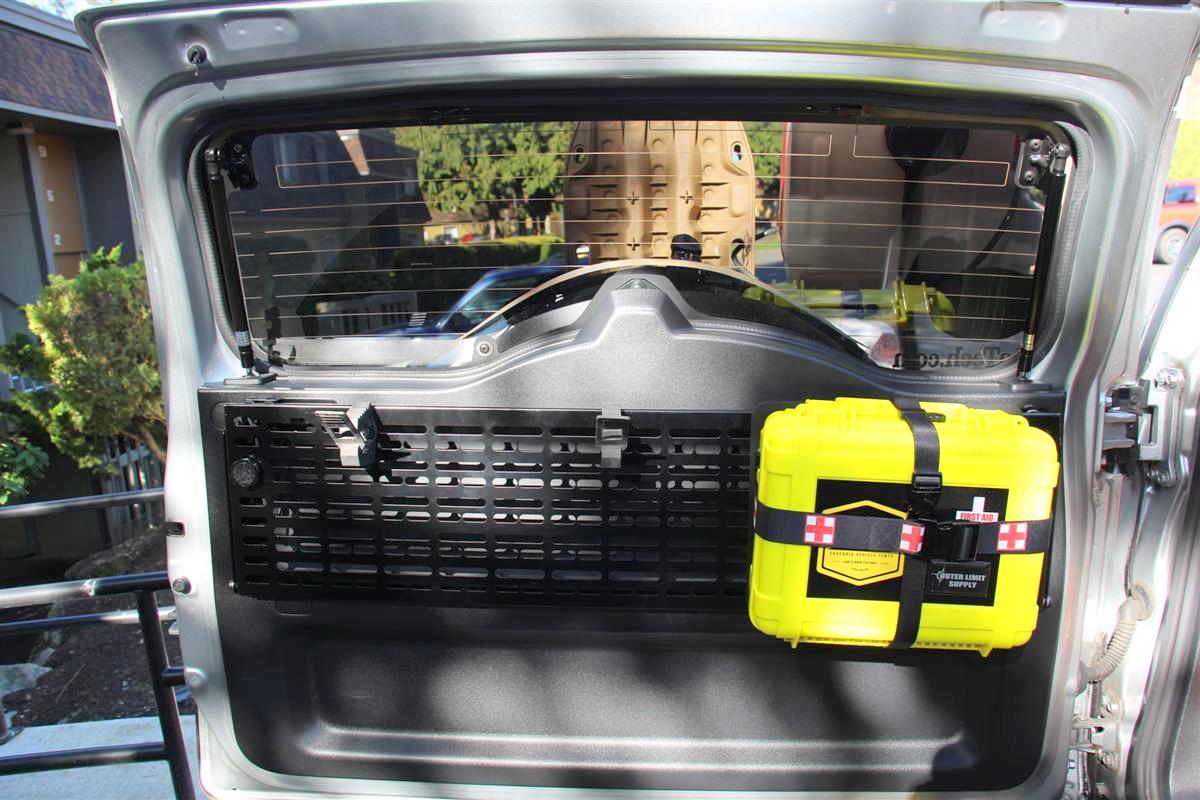
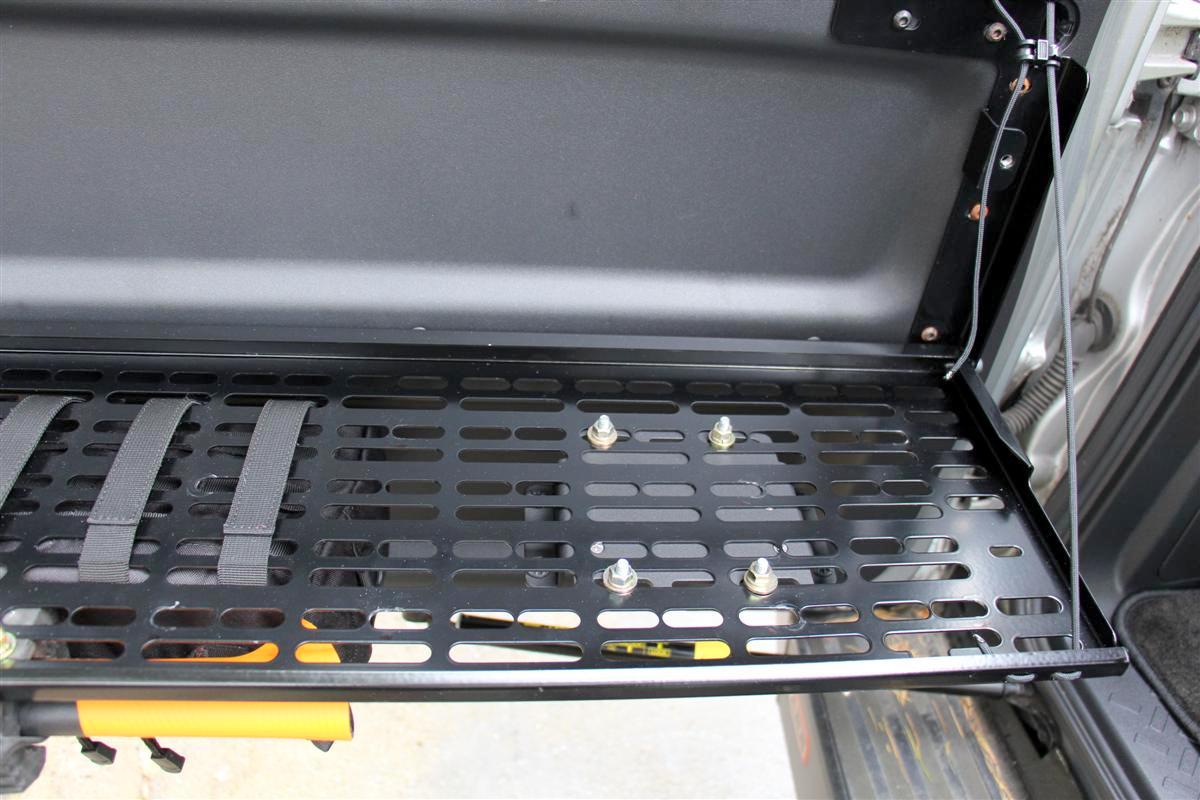
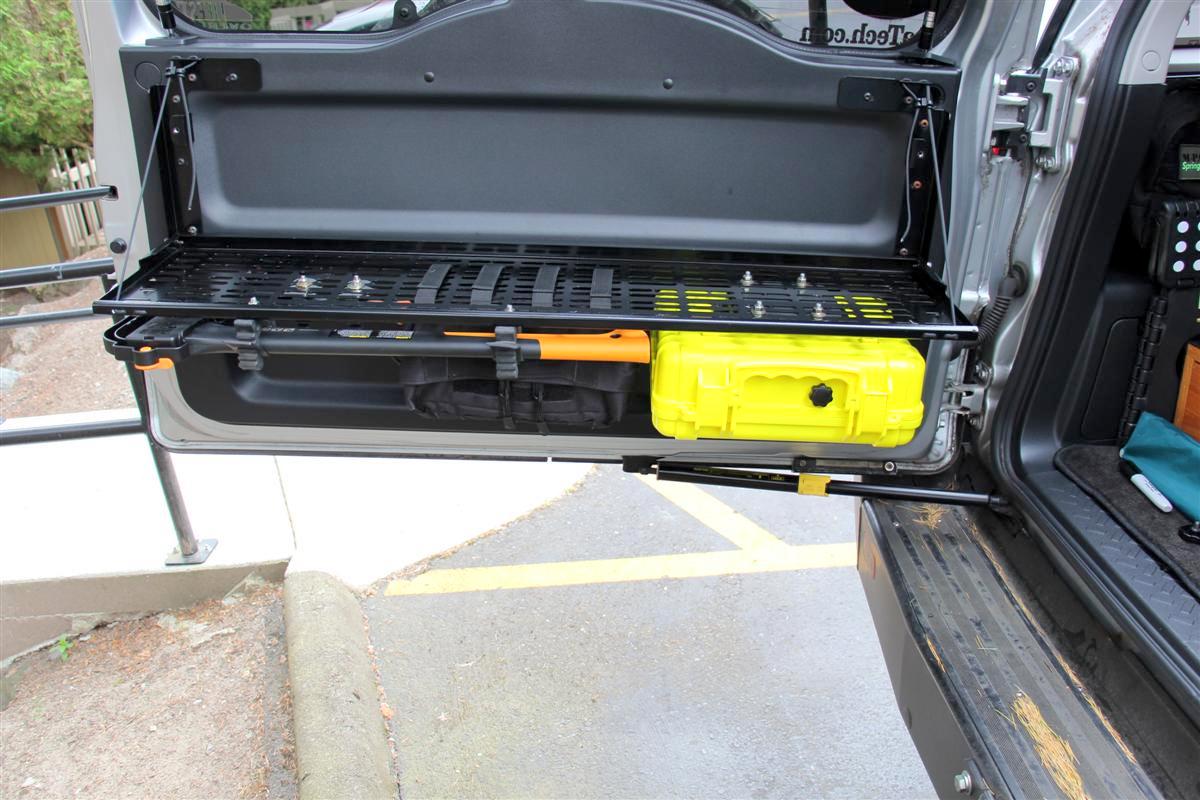
Took the fire extinguisher off of my Springtail Solutions rack/table from my rear door, and relocated it to the Springtail Mpac Siderack next to the Powertank.
With it in the other location, I had to take it out of its holder whenever I wanted to put the table down to do any cooking on the rear table.
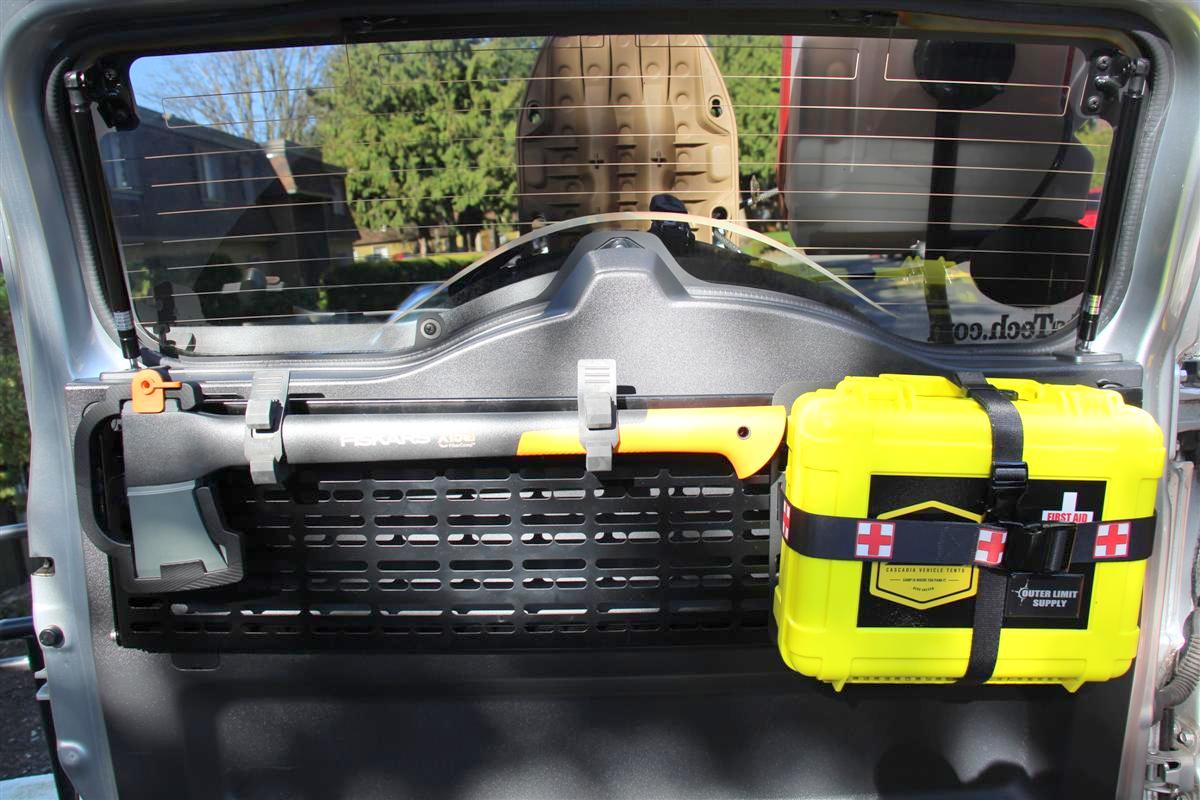
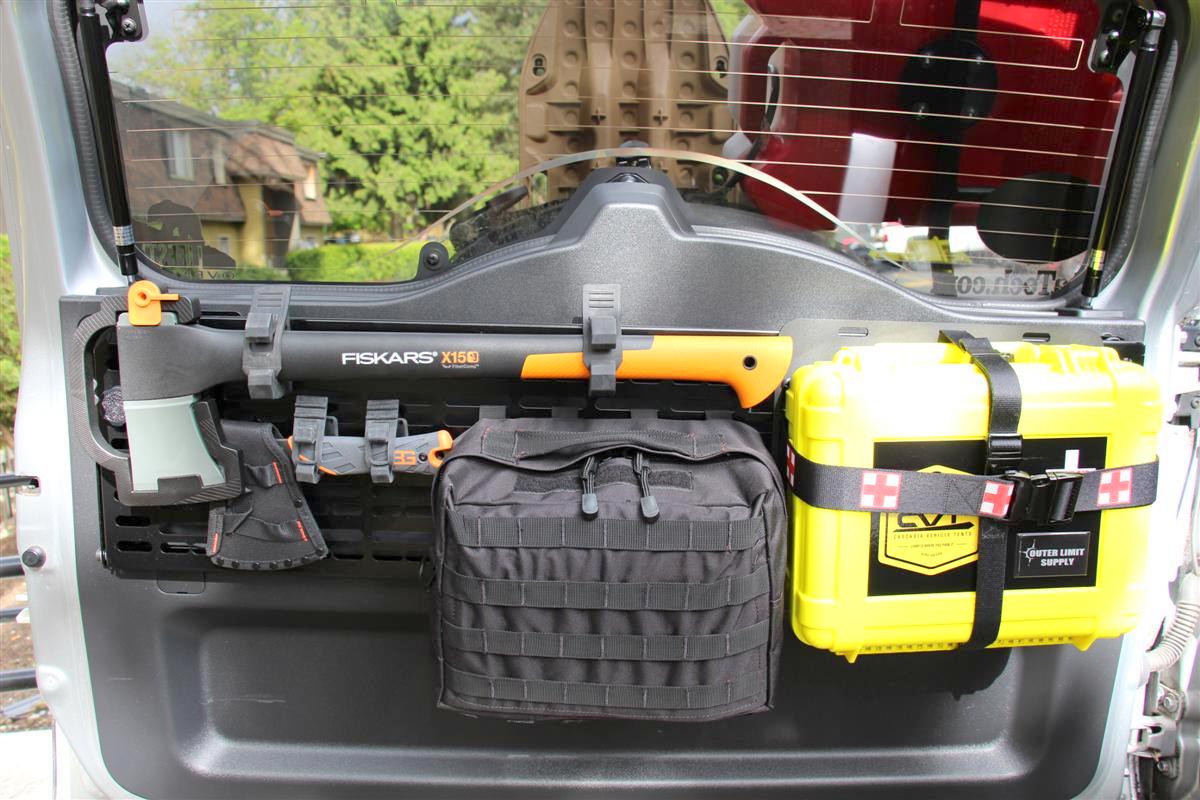
Also picked up a Fiskars X15 chopping axe at 23.5" long.
I like the axe after watching videos and seeing reviews on it, as it has a wedge shape in the head which helps with splitting firewood.
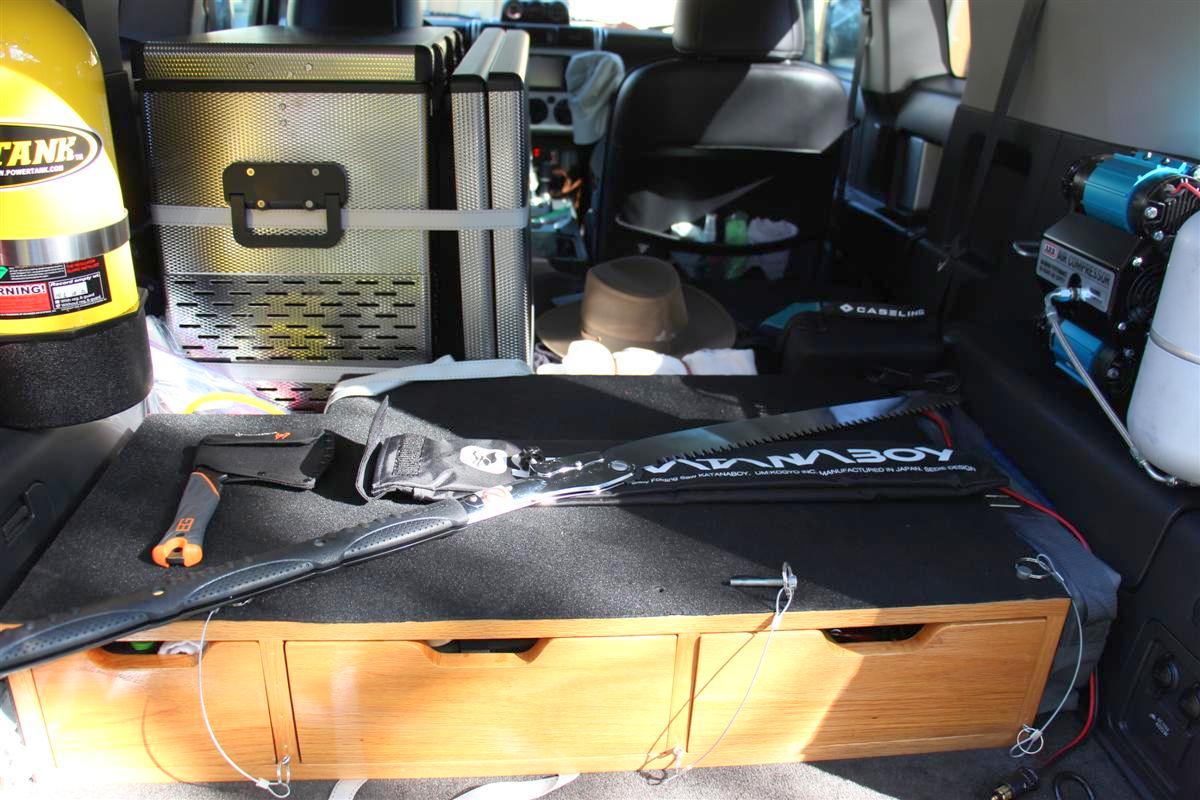
All set now for campfire wood duties with the small Gerber Bear Grylls hatchet I picked up over the winter for kindling, and the Katanaboy folding saw for sawing up downed limbs/logs.
I had some Quick-Fist mounts from some Four Trek mounts I use to use on the stock roof rack when I had an axe and shovel mounted up there oh so long ago.
I did move the first aid kit to the far right, it was over to the left some before, but I had to move it so the axe would clear.
I was also able to keep the Molle bag on the rear door that holds the two new small backpacking type stoves I just got, a couple of fuel bottles, a small MSR cookpot, and plastic silverware.
The table folds down now with no problems with having to remove anything first like I did before with the fire extinguisher.
Links:
Fiskars X15 Chopping Axe, 23.5-Inch
GERBER Bear Grylls Survival Hatchet
Silky KatanaBoy Professional Series, 500mm XL Teeth
Pictures:
Quickfist mounts bolted to the rack
Fiskar axe all mounted up
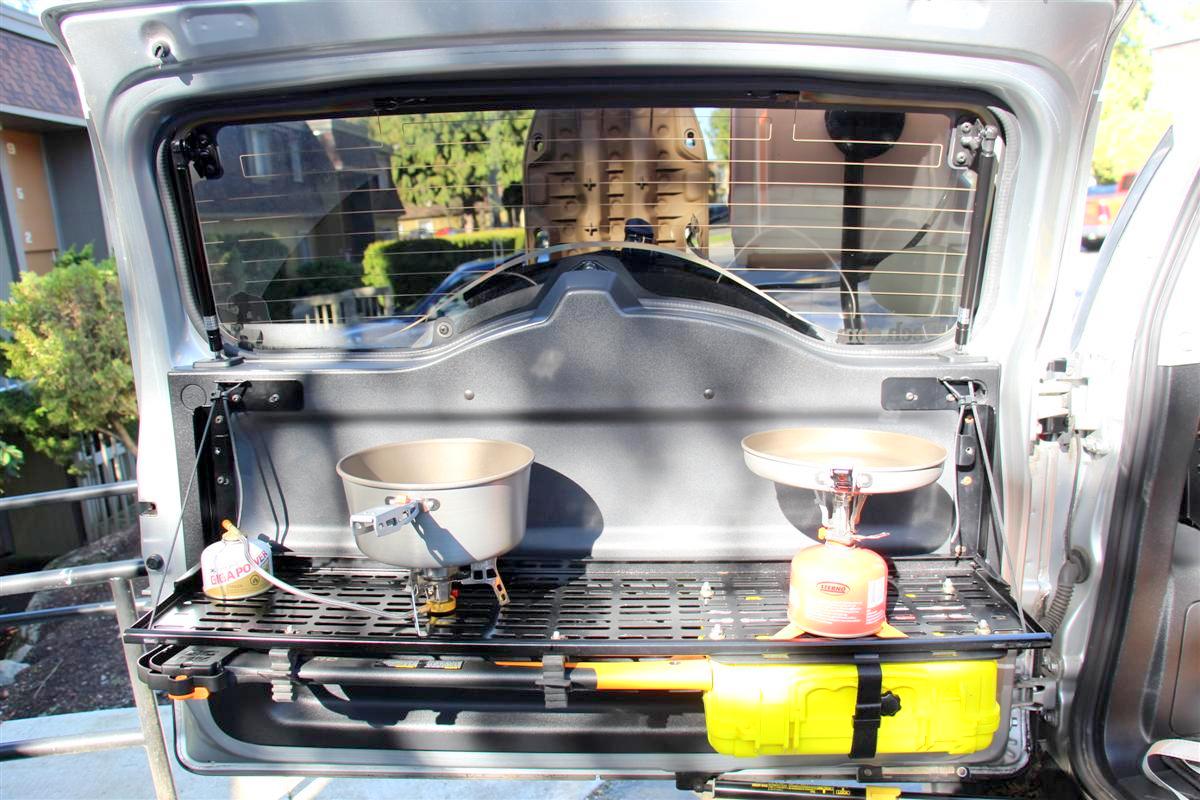
Table down with the two stoves, and a few pots on them I picked up over the winter
I often use those inside my home as they are non stick, and very light weight.
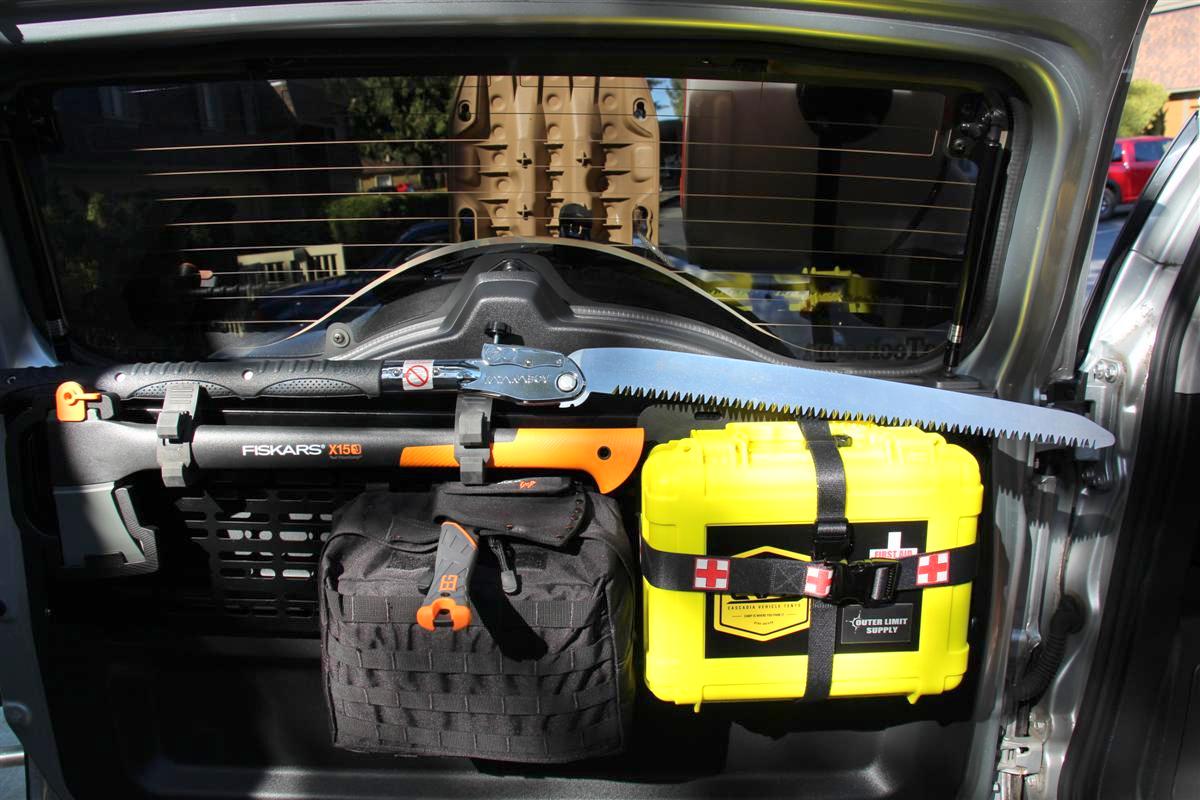
Shot with the Gerber hatchet and Katanaboy 500 saw
Another shot of the hatchet and Katanaboy
The Adventure Tool Company Toolroll sure came in handy today
With the Molle bag back in place again on the rack
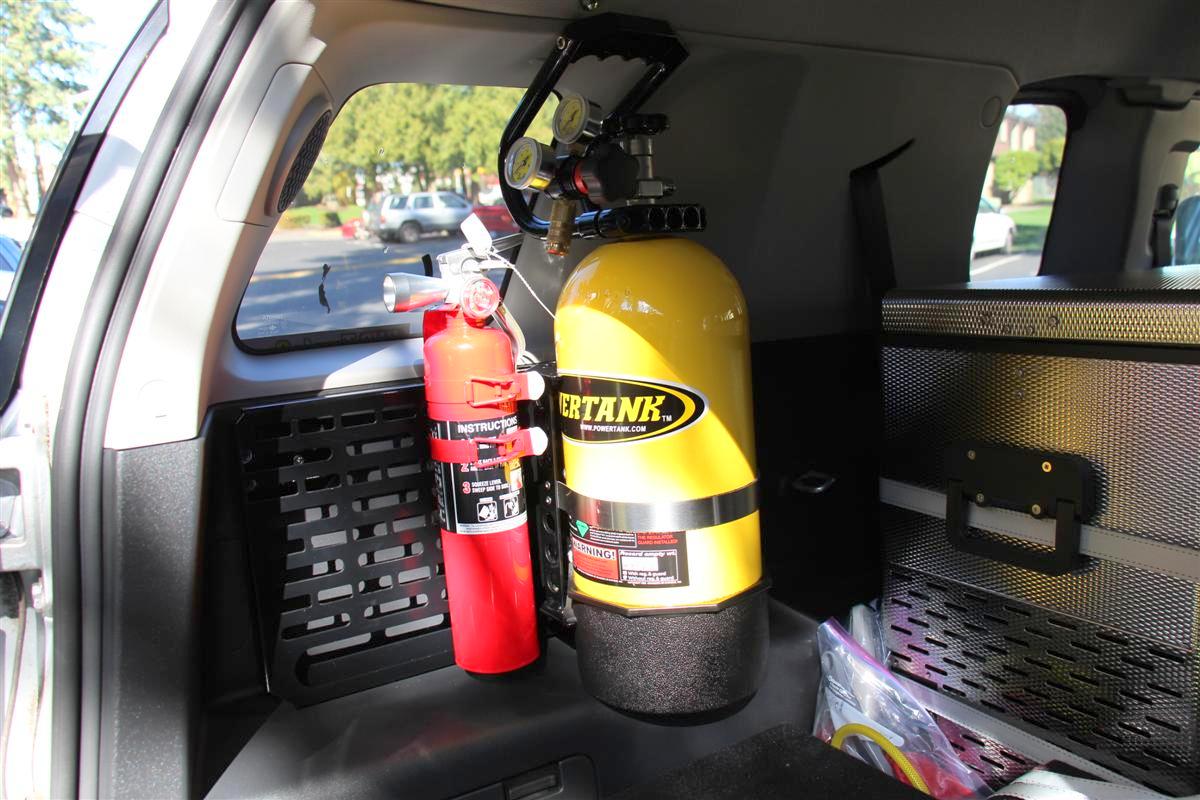
Fire extinguisher in its new home, only the 4th time it has been relocated, and hopefully the last
With it in the other location, I had to take it out of its holder whenever I wanted to put the table down to do any cooking on the rear table.
Also picked up a Fiskars X15 chopping axe at 23.5" long.
I like the axe after watching videos and seeing reviews on it, as it has a wedge shape in the head which helps with splitting firewood.
All set now for campfire wood duties with the small Gerber Bear Grylls hatchet I picked up over the winter for kindling, and the Katanaboy folding saw for sawing up downed limbs/logs.
I had some Quick-Fist mounts from some Four Trek mounts I use to use on the stock roof rack when I had an axe and shovel mounted up there oh so long ago.
I did move the first aid kit to the far right, it was over to the left some before, but I had to move it so the axe would clear.
I was also able to keep the Molle bag on the rear door that holds the two new small backpacking type stoves I just got, a couple of fuel bottles, a small MSR cookpot, and plastic silverware.
The table folds down now with no problems with having to remove anything first like I did before with the fire extinguisher.
Links:
Fiskars X15 Chopping Axe, 23.5-Inch
GERBER Bear Grylls Survival Hatchet
Silky KatanaBoy Professional Series, 500mm XL Teeth
Pictures:
Quickfist mounts bolted to the rack
Fiskar axe all mounted up
Table down with the two stoves, and a few pots on them I picked up over the winter
I often use those inside my home as they are non stick, and very light weight.
Shot with the Gerber hatchet and Katanaboy 500 saw
Another shot of the hatchet and Katanaboy
The Adventure Tool Company Toolroll sure came in handy today
With the Molle bag back in place again on the rack
Fire extinguisher in its new home, only the 4th time it has been relocated, and hopefully the last
04-21-2017, 03:21 PM
#443
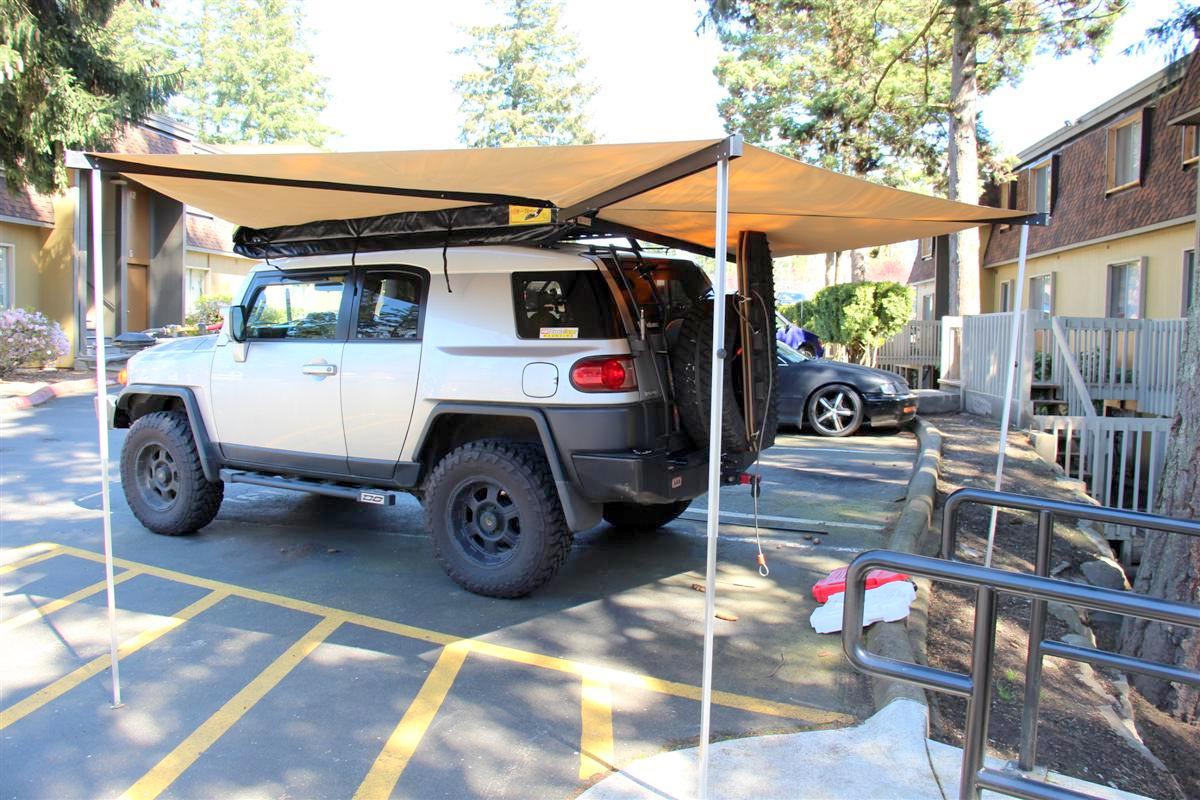
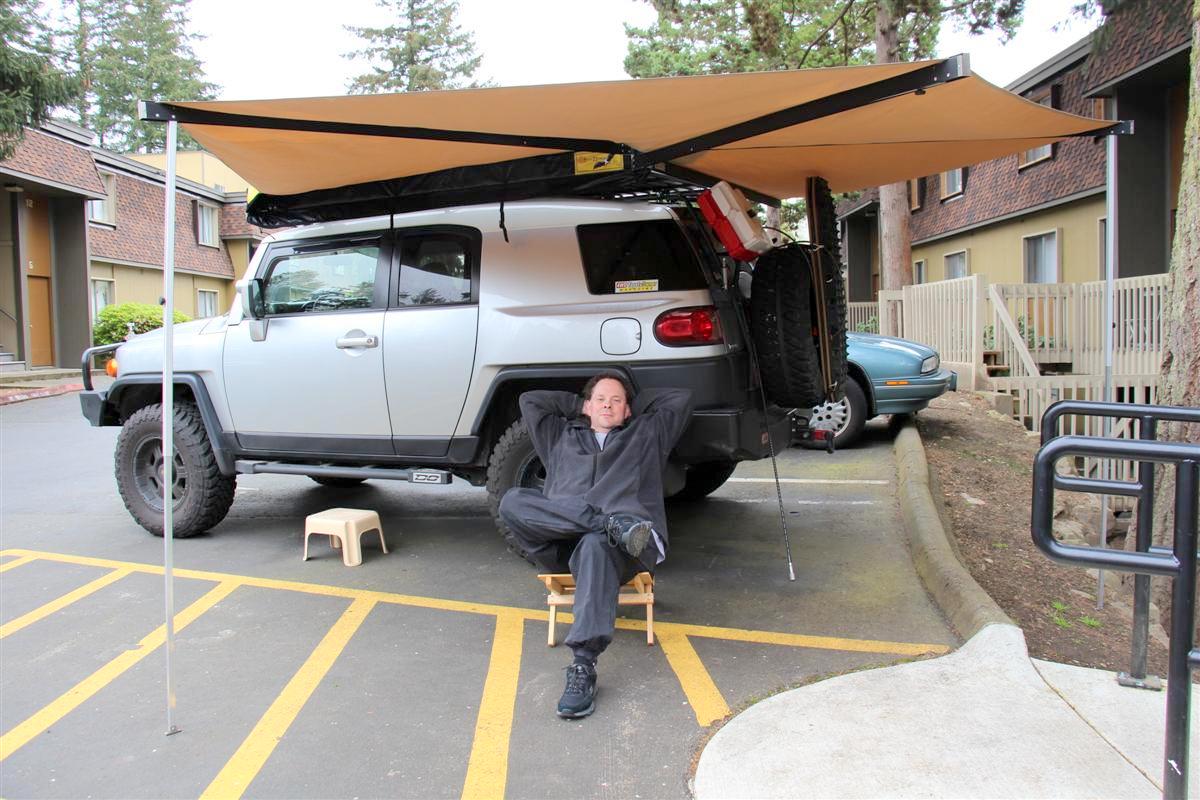
Eezi-Awn Bat 270 Awning Installed 4-21-2017
Been a month since the last mod.
I have had the Campinglabs awning on my rig since spring of 2008 shortly after I got my Autohome Maggiolina Airlander roof top tent installed.
The awning has been very nice to have, but kind of a PITA to setup on some of the solo trips I have gone on.
Within the past year of so I have seen these 270 degree awnings pop up on forums, and there are a few brands out there.
I am already a fan of Eezi-Awn gear as I have two of their tables I keep in the rig full time which I use one for the chuckbox, the other for dining at.
I bought the awning from Paul May of Equipt Expeditions in Utah, and it had been stored on my living room floor for three plus weeks.
I attempted to install it a few weeks back with the help of a couple that lives next door, but we could not get it aligned up, and quite frankly I am glad we had a snag.
The awning is much heavier than the Campinglabs one, and Paul and BajaRacks had warned me it might bend the BajaRacks awning mounts outwards with the additional weight of this new awning.
Jason the tech at Auburn Off-Road put it on, and indeed it was a little heavy.
But not to worry, him and John the owner of the shop said they could either weld a gusset in there much like you see on a pair of rock sliders, or tie a flat piece of metal stock in there and tie the Eezi-Awn bracket to the horizontal part of the BajaRacks awning bracket together, same as gusseting it.
And it worked!
If I need more stability, I still have the middle BajaRacks awning bracket on the roof rack, but the Eezi-Awn awnings only utilize two positions.
Paul sells the brackets, and if needed, Jason could make up a third piece and tie it in, but we really do not think that will need to be done at this time.
I will keep my eye on it and see how it is holding up.
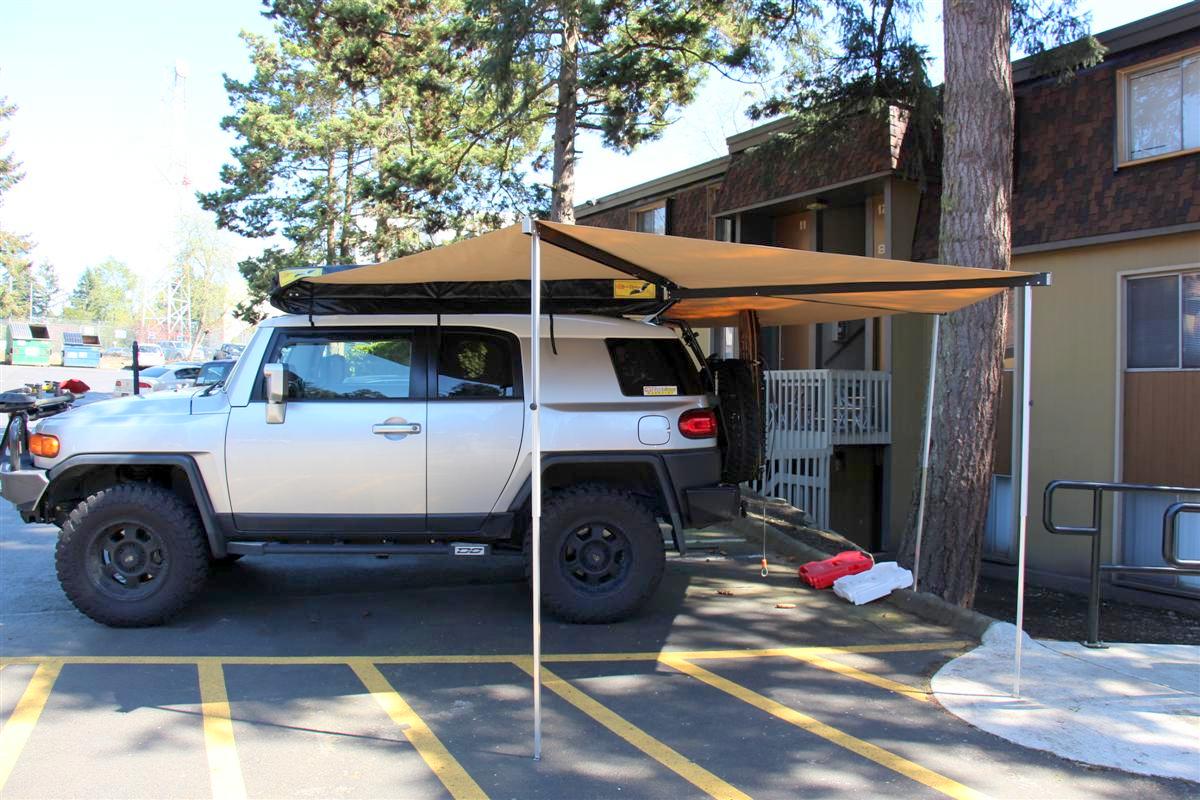
This awning is such a joy to deploy, as you just walk around the rig with the strap and the awning unfolds for you.
This is a free standing awning, but if rain or wind is expected, it has built in legs you can extend and stake to the ground to make it more stable.
Instead of me making a video of it opening (I may if I get time later) here is a video of Paul May opening the same awning, but his is installed on the right side of the rig instead of the left like mine is.
The make both a left and right hand version, they are not interchangeable from side to side.
Links:
Eezi-Awn Bat 270 Awning Left Hand Side (Driver)
Auburn Car Repair & Offroad
Pictures:
Stock BajaRacks awning bracket in the middle, and the Eezi-Awn bracket bolted to the one on the left
Closeup of the Eezi-Awn bracket
Modified bracket so it would mate to the BajaRack bracket
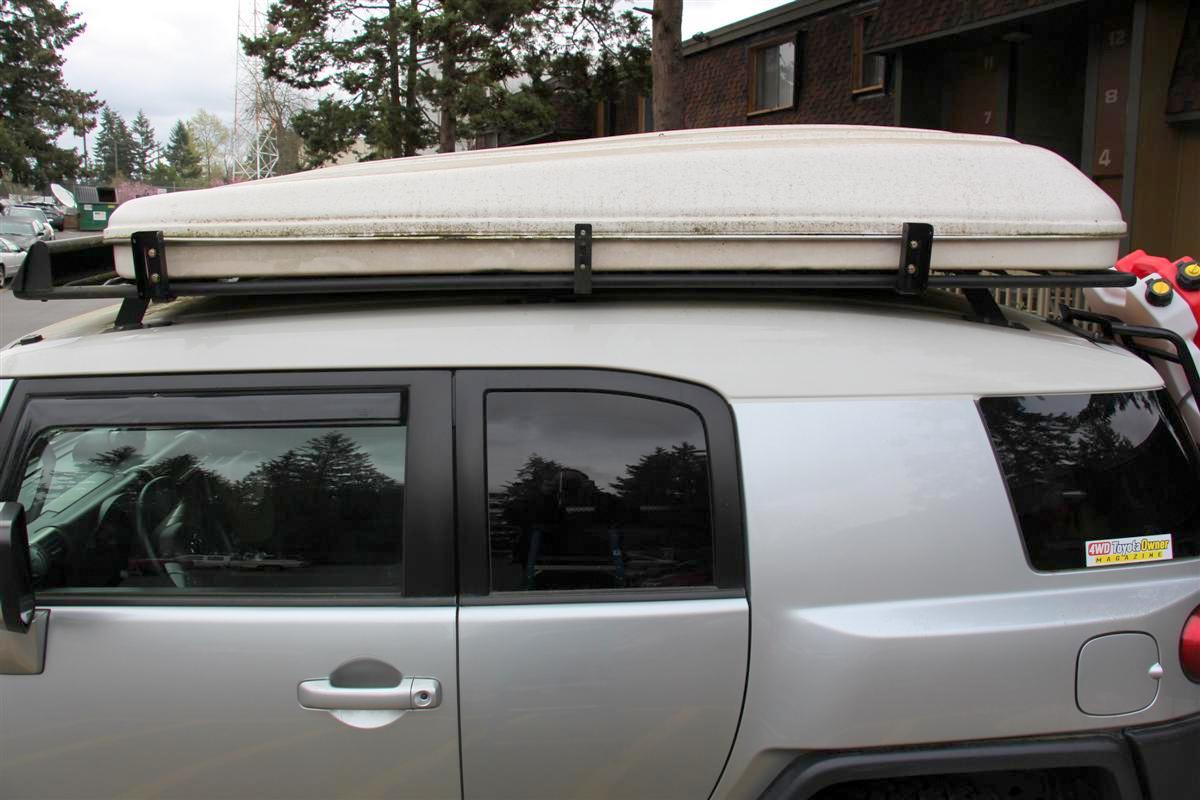
Both Eezi-Awn brackets bolted up
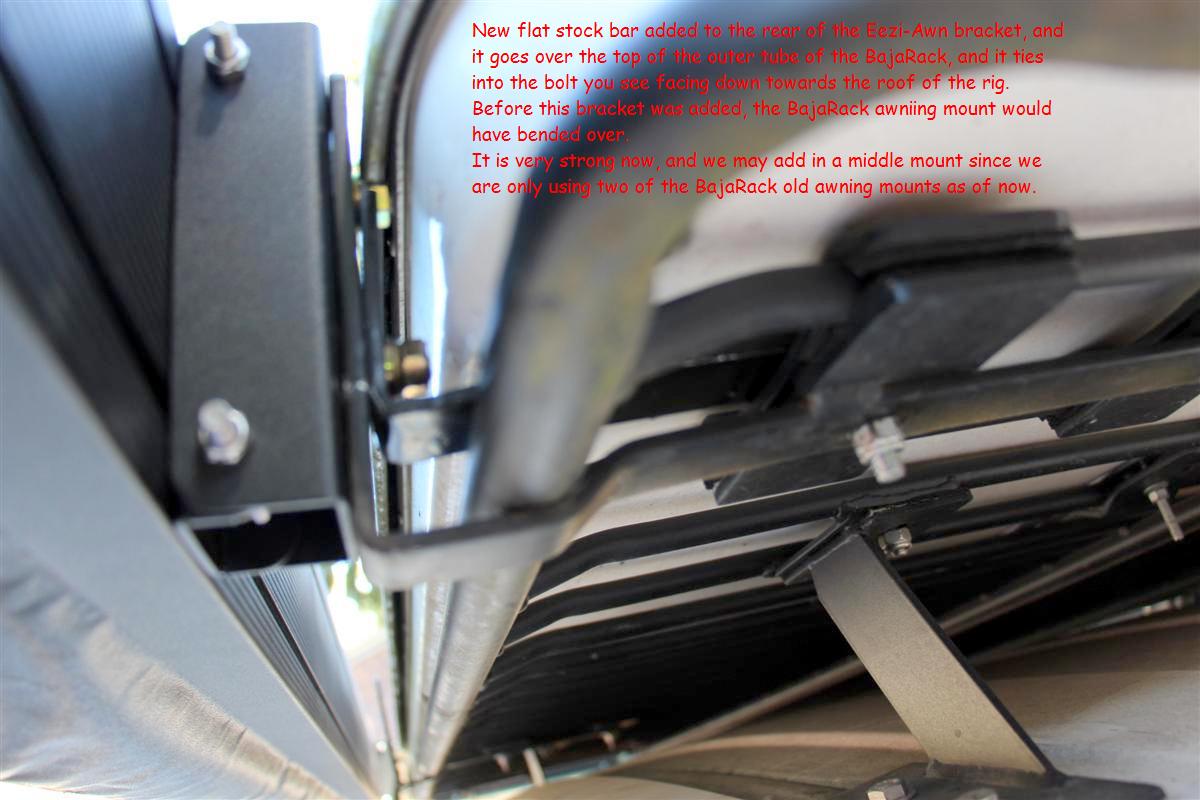
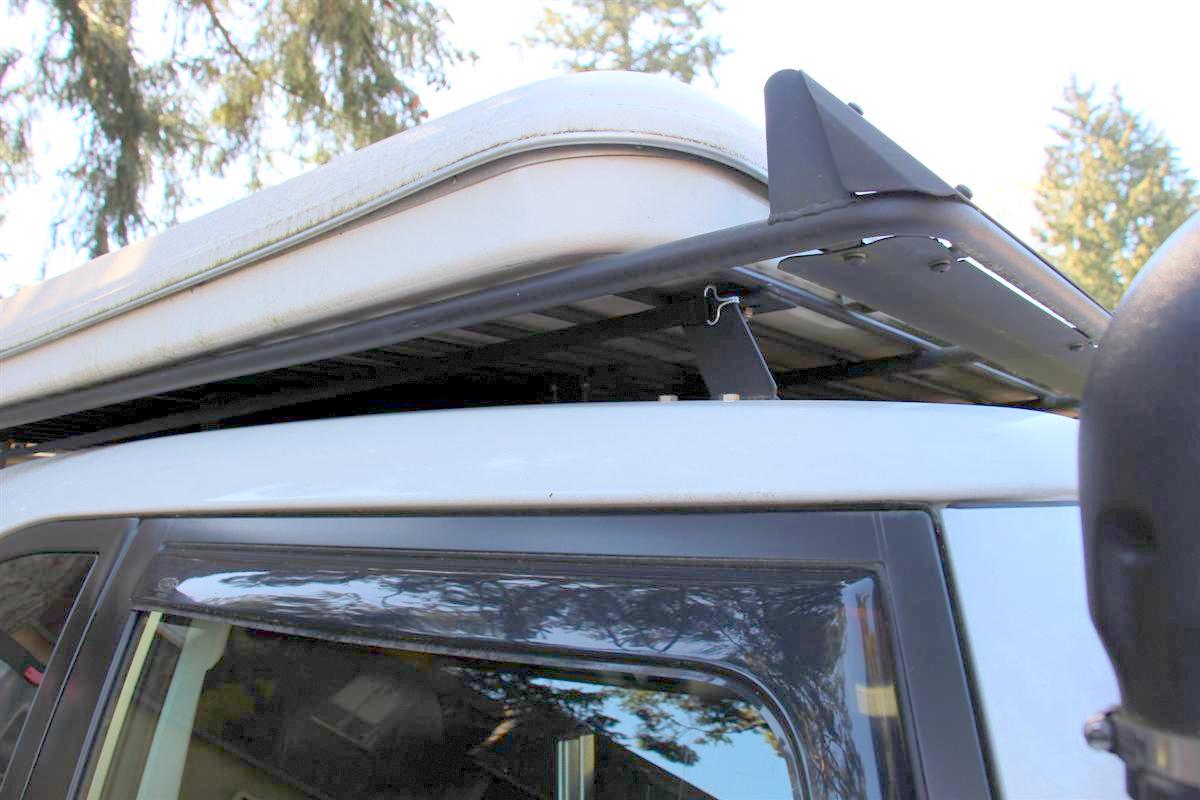
You can see the extra metal piece Jason fabbed up that ties the back of the Eezi-Awn bracket, and it goes over the long outer tube of the BajaRack that holds the tent, and it ties into the top and bolts though the BajaRack awning mount
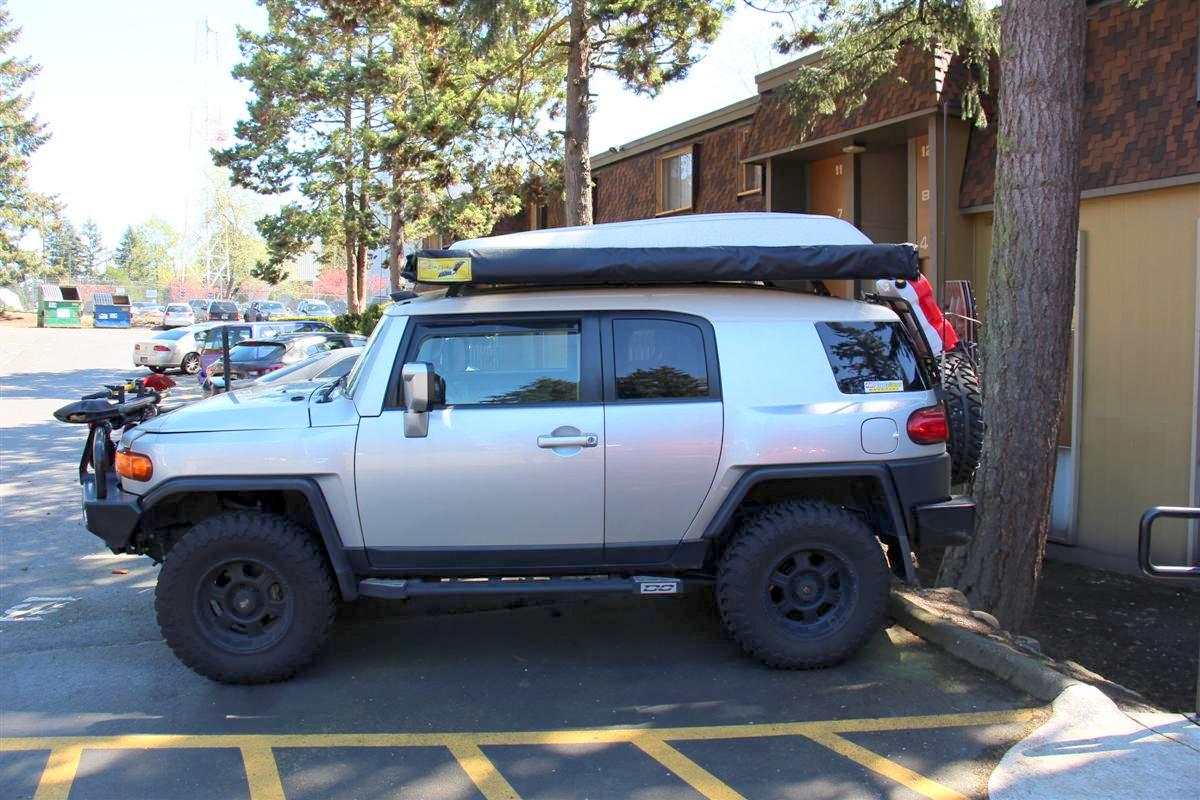
Side shot of the very dirty rig with the new awning all zipped up
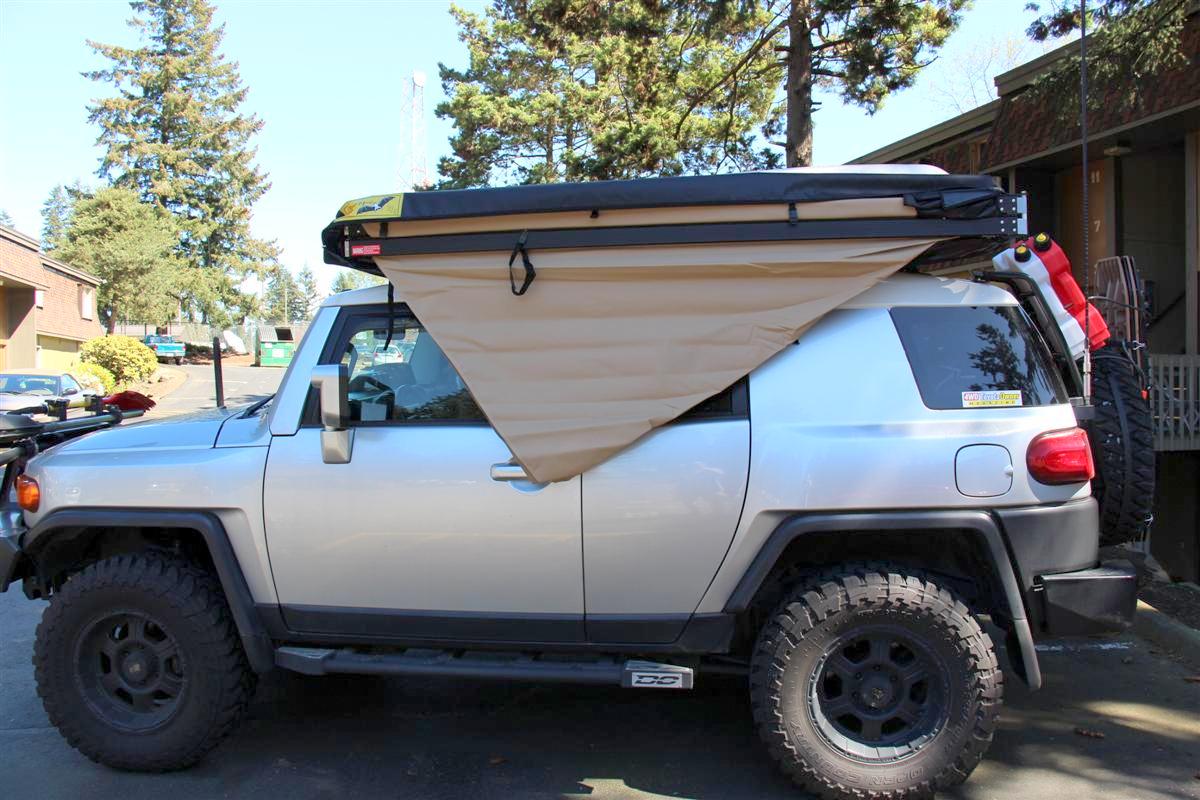
Case unzipped, and the canvas hanging down before you grab the strap and go for a walk around the rig to open it up
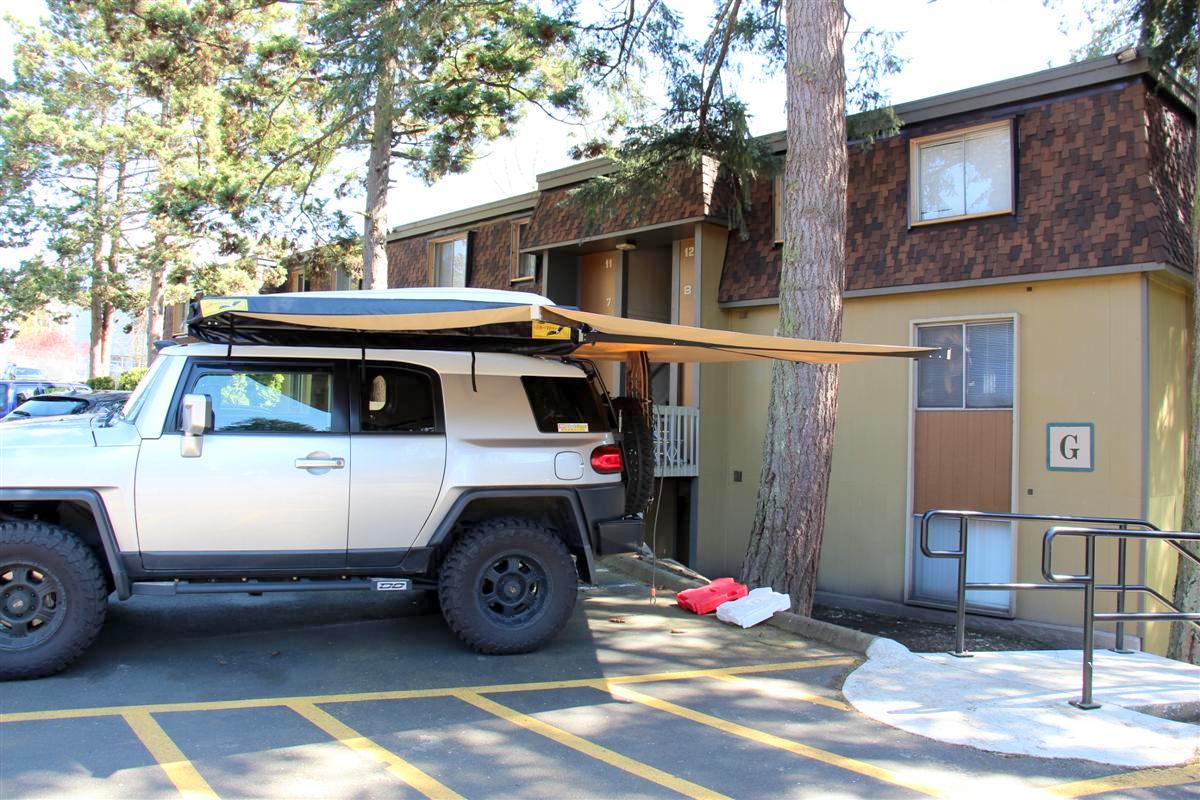
Awning deployed, no legs down yet, and it seemed pretty stable with a light breeze
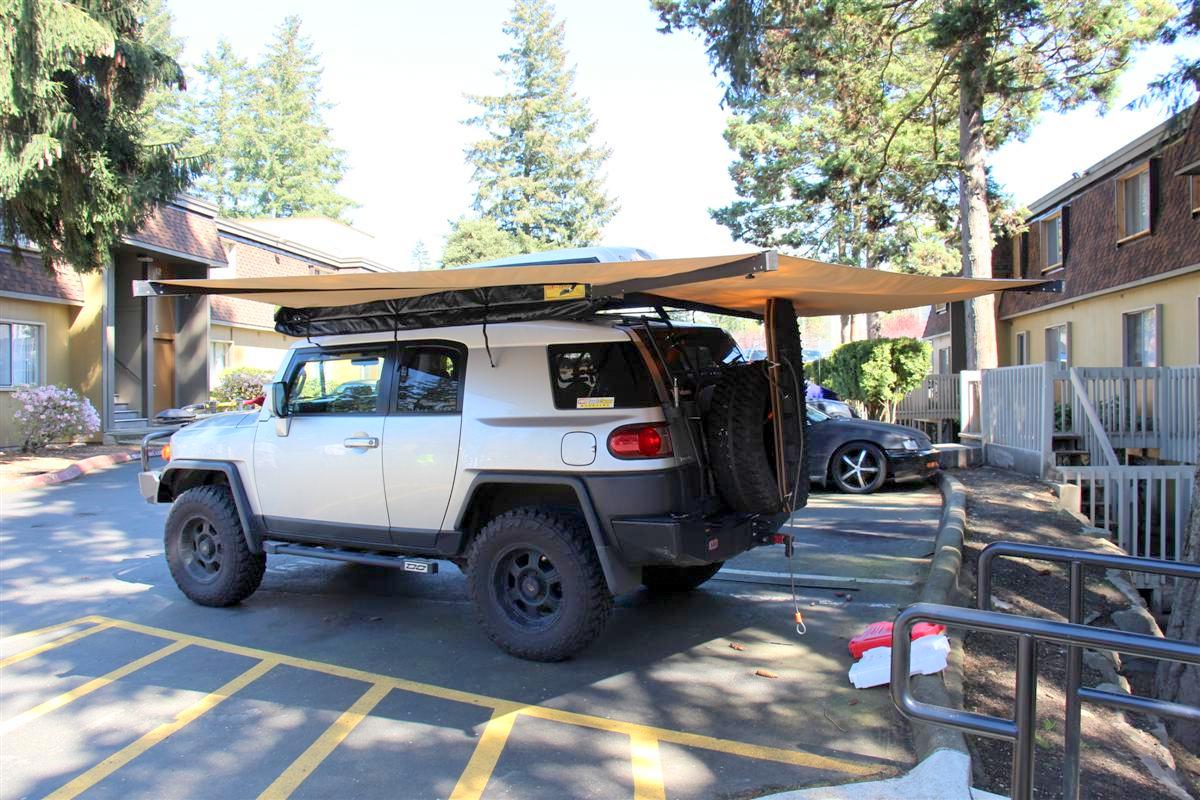
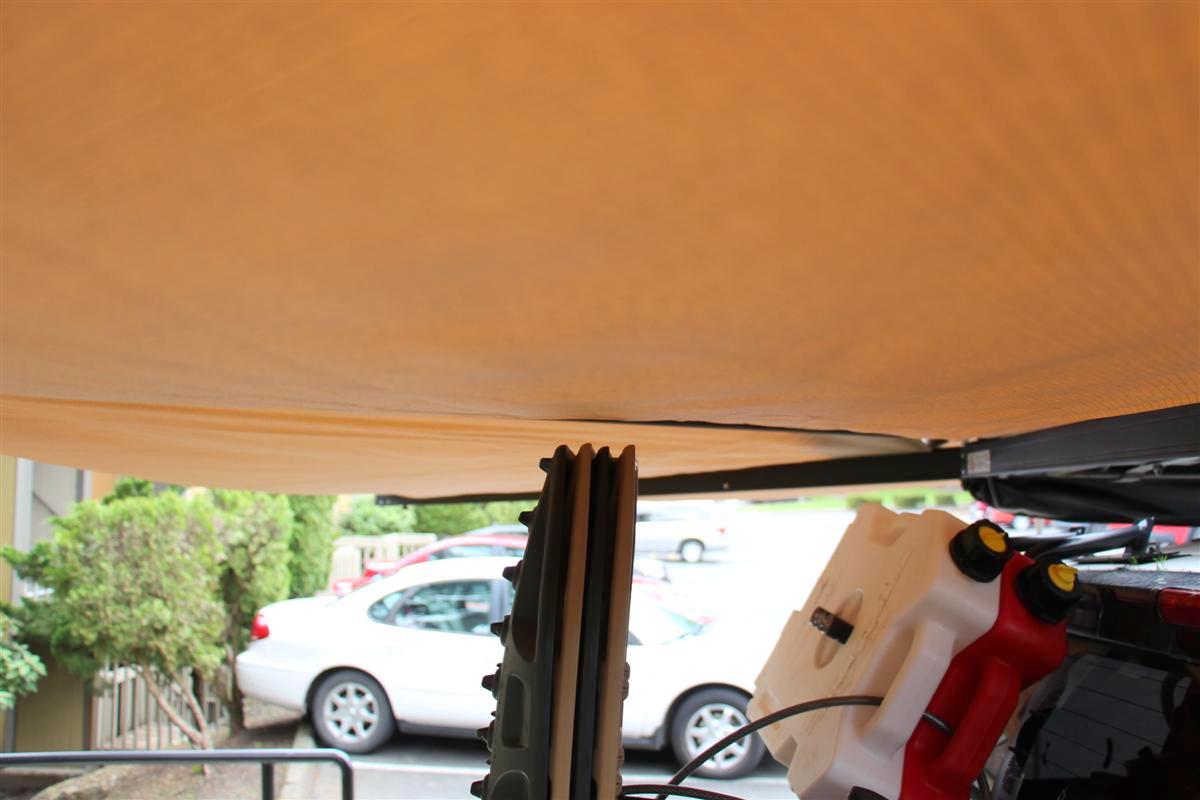
I had to remove the Rotopax cans, but the aluminum support arm that goes to the right side cleared the Maxtrax just fine
Look at those nice legs
Another shot from the back side
The strap you grab when you go for a walk around the rig to deploy it has a hook on the end, and it fits just perfect around the BajaRacks right side front leg support that bolts to the roof
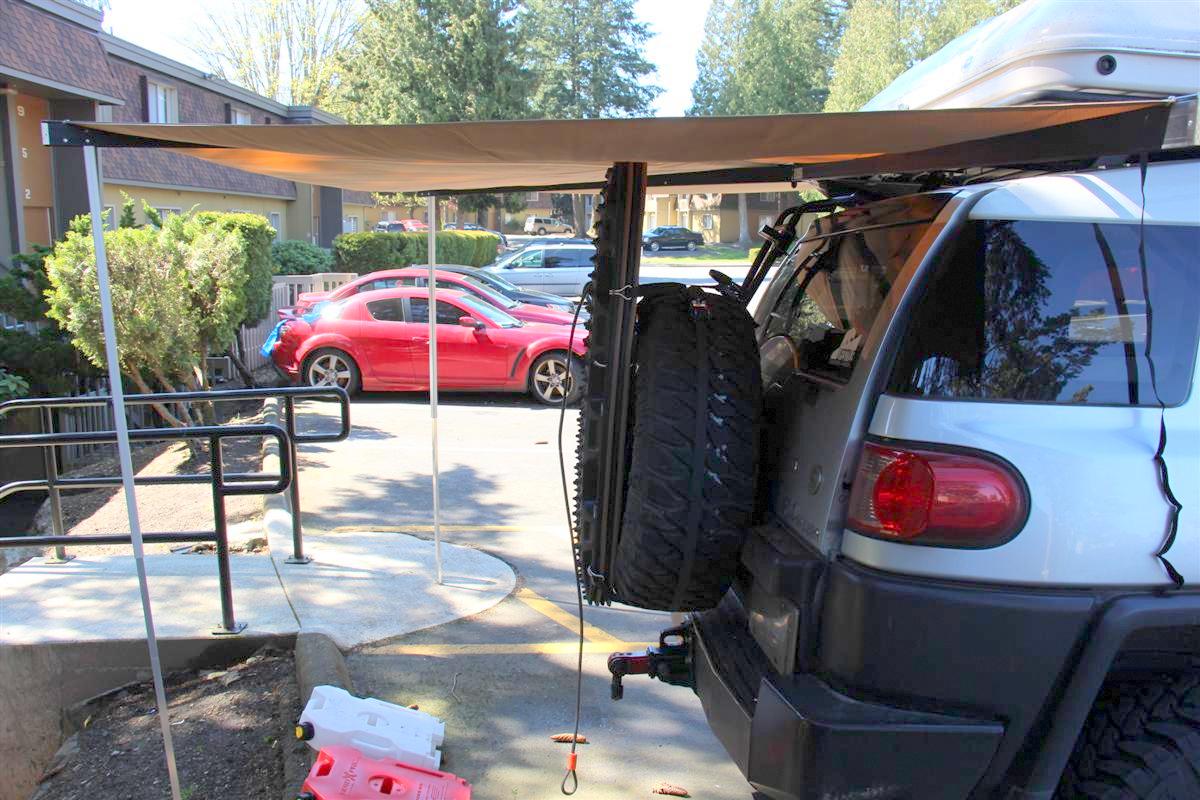
Side shot showing the Maxtrax, they rub a bit, I will have to find out if they will wear on the canvas, if so, I will come up with a solution
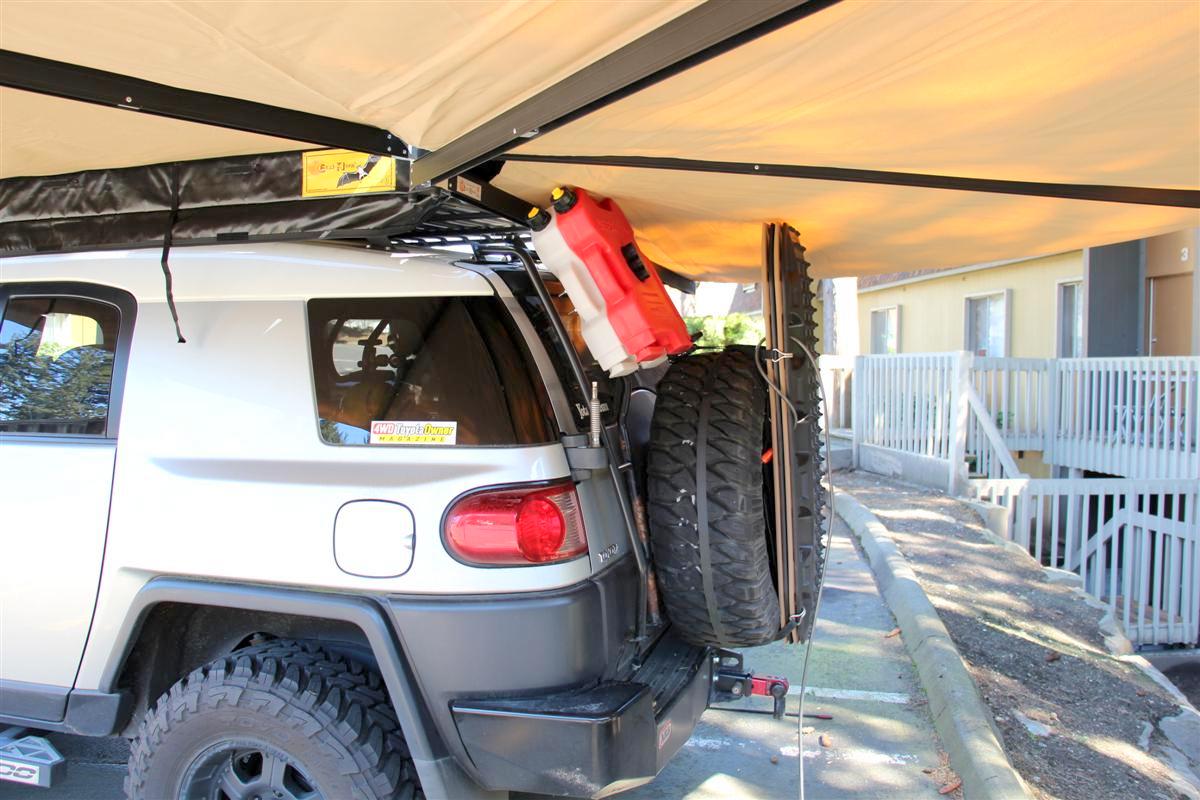
Rotopax back on, and they clear the canvas

Closeup of the aluminum arm with the name Eezi-Awn on it, and you can see it is much lower than the high point on the Rotopax, and this is why they must come off to deploy the awning
What I am going to do when I get time it to turn the Rotopax mounting plate that is on the ladder 90� and lower it some, and the cans will sit sideways, and a little lower, and I think that will solve the problem so I do not have to remove the cans each time.
I do have to remove the CB antenna, but that is on a quick disconnect mount, and very easy to take off in less than two seconds.
Overall I am very pleased with this new awning.
One thing you have to do is make sure you get the three top strap parts out that help tighten up the canvas when it is rolled up.
Not bad though for my first time deploying it and putting it away.
Stand by for tomorrow, as I have another mod that was done today, and it is for the Renogy 100 watt solar panel that keeps the auxiliary battery charged up since that runs the new National Luna Weekender 50 Twin fridge/freezer.
I have had the Campinglabs awning on my rig since spring of 2008 shortly after I got my Autohome Maggiolina Airlander roof top tent installed.
The awning has been very nice to have, but kind of a PITA to setup on some of the solo trips I have gone on.
Within the past year of so I have seen these 270 degree awnings pop up on forums, and there are a few brands out there.
I am already a fan of Eezi-Awn gear as I have two of their tables I keep in the rig full time which I use one for the chuckbox, the other for dining at.
I bought the awning from Paul May of Equipt Expeditions in Utah, and it had been stored on my living room floor for three plus weeks.
I attempted to install it a few weeks back with the help of a couple that lives next door, but we could not get it aligned up, and quite frankly I am glad we had a snag.
The awning is much heavier than the Campinglabs one, and Paul and BajaRacks had warned me it might bend the BajaRacks awning mounts outwards with the additional weight of this new awning.
Jason the tech at Auburn Off-Road put it on, and indeed it was a little heavy.
But not to worry, him and John the owner of the shop said they could either weld a gusset in there much like you see on a pair of rock sliders, or tie a flat piece of metal stock in there and tie the Eezi-Awn bracket to the horizontal part of the BajaRacks awning bracket together, same as gusseting it.
And it worked!
If I need more stability, I still have the middle BajaRacks awning bracket on the roof rack, but the Eezi-Awn awnings only utilize two positions.
Paul sells the brackets, and if needed, Jason could make up a third piece and tie it in, but we really do not think that will need to be done at this time.
I will keep my eye on it and see how it is holding up.
This awning is such a joy to deploy, as you just walk around the rig with the strap and the awning unfolds for you.
This is a free standing awning, but if rain or wind is expected, it has built in legs you can extend and stake to the ground to make it more stable.
Instead of me making a video of it opening (I may if I get time later) here is a video of Paul May opening the same awning, but his is installed on the right side of the rig instead of the left like mine is.
The make both a left and right hand version, they are not interchangeable from side to side.
Links:
Eezi-Awn Bat 270 Awning Left Hand Side (Driver)
Auburn Car Repair & Offroad
Pictures:
Stock BajaRacks awning bracket in the middle, and the Eezi-Awn bracket bolted to the one on the left
Closeup of the Eezi-Awn bracket
Modified bracket so it would mate to the BajaRack bracket
Both Eezi-Awn brackets bolted up
You can see the extra metal piece Jason fabbed up that ties the back of the Eezi-Awn bracket, and it goes over the long outer tube of the BajaRack that holds the tent, and it ties into the top and bolts though the BajaRack awning mount
Side shot of the very dirty rig with the new awning all zipped up
Case unzipped, and the canvas hanging down before you grab the strap and go for a walk around the rig to open it up
Awning deployed, no legs down yet, and it seemed pretty stable with a light breeze
I had to remove the Rotopax cans, but the aluminum support arm that goes to the right side cleared the Maxtrax just fine
Look at those nice legs
Another shot from the back side
The strap you grab when you go for a walk around the rig to deploy it has a hook on the end, and it fits just perfect around the BajaRacks right side front leg support that bolts to the roof
Side shot showing the Maxtrax, they rub a bit, I will have to find out if they will wear on the canvas, if so, I will come up with a solution
Rotopax back on, and they clear the canvas
Closeup of the aluminum arm with the name Eezi-Awn on it, and you can see it is much lower than the high point on the Rotopax, and this is why they must come off to deploy the awning
What I am going to do when I get time it to turn the Rotopax mounting plate that is on the ladder 90� and lower it some, and the cans will sit sideways, and a little lower, and I think that will solve the problem so I do not have to remove the cans each time.
I do have to remove the CB antenna, but that is on a quick disconnect mount, and very easy to take off in less than two seconds.
Overall I am very pleased with this new awning.
One thing you have to do is make sure you get the three top strap parts out that help tighten up the canvas when it is rolled up.
Not bad though for my first time deploying it and putting it away.
Stand by for tomorrow, as I have another mod that was done today, and it is for the Renogy 100 watt solar panel that keeps the auxiliary battery charged up since that runs the new National Luna Weekender 50 Twin fridge/freezer.
04-23-2017, 08:29 AM
#444
Anderson SB50 Plug & Cable Added To Aux. Battery For Solar Panel Installed 4-21-2017
This was done Friday, but I just got pictures and hooked up the solar panel an hour ago.
The auxiliary battery under the hood is primarily used just to power the new National Luna Weekender 50 Twin fridge/freezer I picked up last fall.
It also supplies power to the comm units in my rig, both CB and ham.
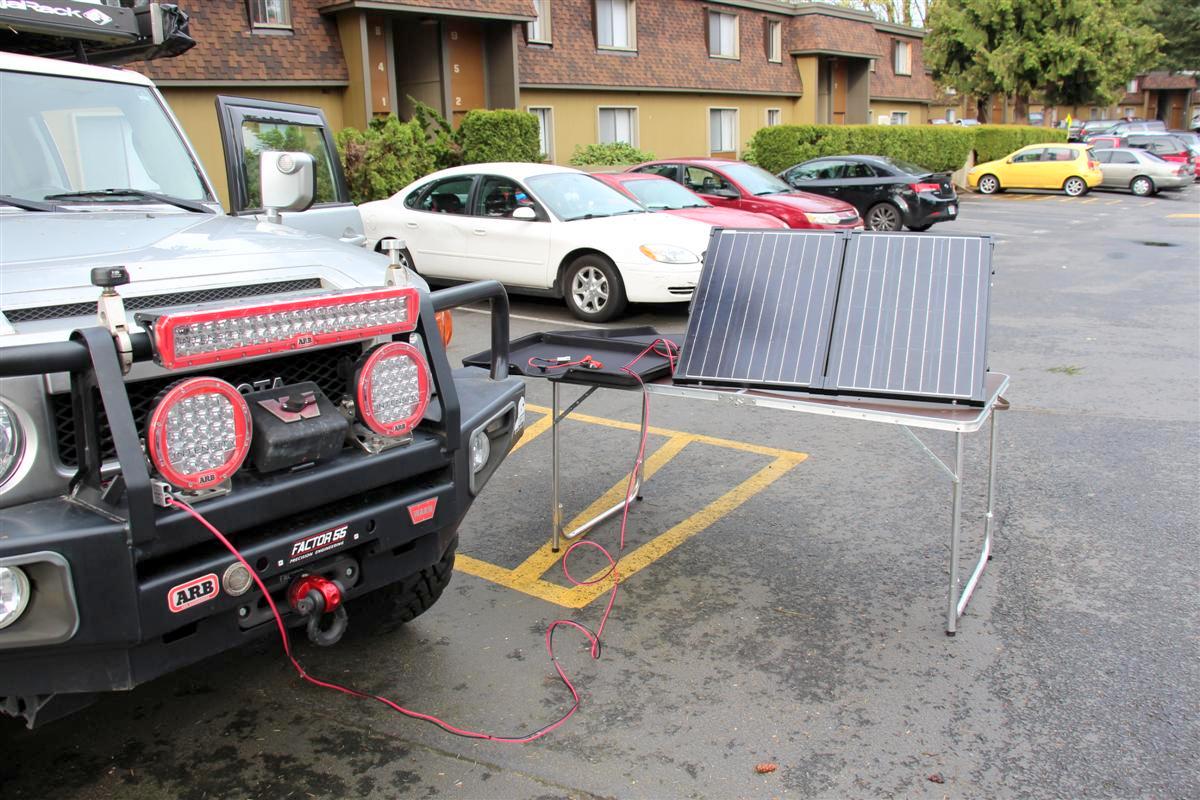
For my Renogy folding solar panel the way I hooked it up before to the auxiliary battery was with the supplied battery clamps like you see on jumper cables which you will see in a few pictures below.
Had to pop the hood for this each time, and I wanted a better setup.
The Renogy kit already came with and Anderson SB50 plug, so I had Battery Stuff make me up a short cable that would go to the battery, and the other end would go to an Anderson plug and be on the outside of the rig so I did not have to pop the hood open.
I also had them make me up an extension cable that would extend the range by about 20'.
They did not however install a 15 amp fuse on the shorter cable, I had to do that myself.
However as I was waiting in the waiting room at Auburn Off-Road getting my new awning installed, I was looking through a copy of 4WD Toyota Owner Magazine from last summer (I had read the article before) I saw a solar panel company called Overland Solar that has the same cable and extensions that come fused.
Wish I had known about them, I would have bought the shorter cable from them already fused, and just got the non fused extension from them too.
The external Anderson SB50 plugged is attached to the side of the ARB Intensity LED light bracket.
It makes for a pretty stealth installation, and is way better than drilling into the bumper.
From testing the setup today in very overcast conditions, I was very impressed how fast it brought up the voltage from 12.3 to 13.4 volts.
When I fire up my rig to drive it, both voltage displays go to about 14 volts, then back down to 13.4 volts when cruising, so I am impressed, I already said that right
Links:
Renogy 100 Watt 12 Volt Monocrystalline Foldable Solar Suitcase
This one has a newer charge controller than the one I have one mine, and they got away from the Anderson plugs, not good in my opinion, as I prefer the Anderson SB50 A plugs.
Custom Cable 4' 10 Gauge with Rings & SB50 10ga4ringSB
They also made the 20' 10 gauge cable for me with the Anderson SB50A plugs on each end, but you will have to call them to custom order it.
On with some pictures:

The Renogy kit comes with a new semi-hardshell case
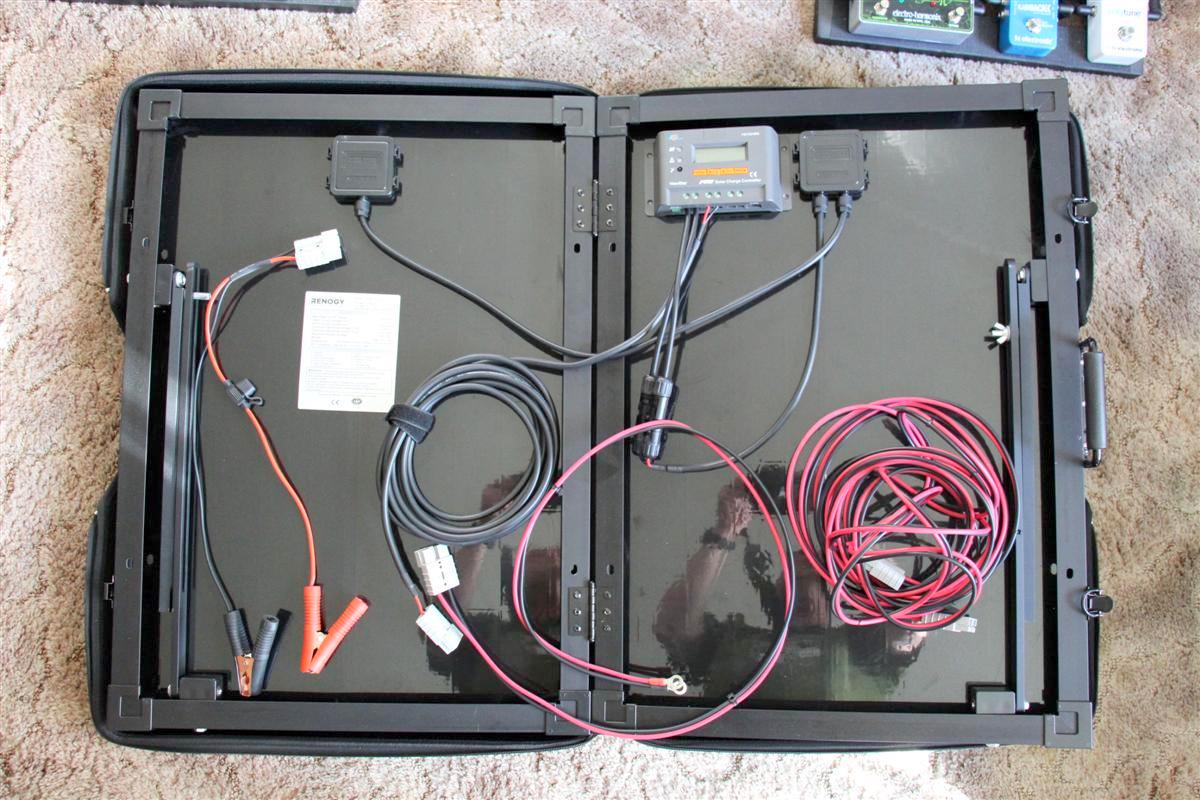
The old battery clamp cable on the far left I use to use, the new Anderson plug equipped one that connects to the battery in the middle, and the 20' extension on the far right
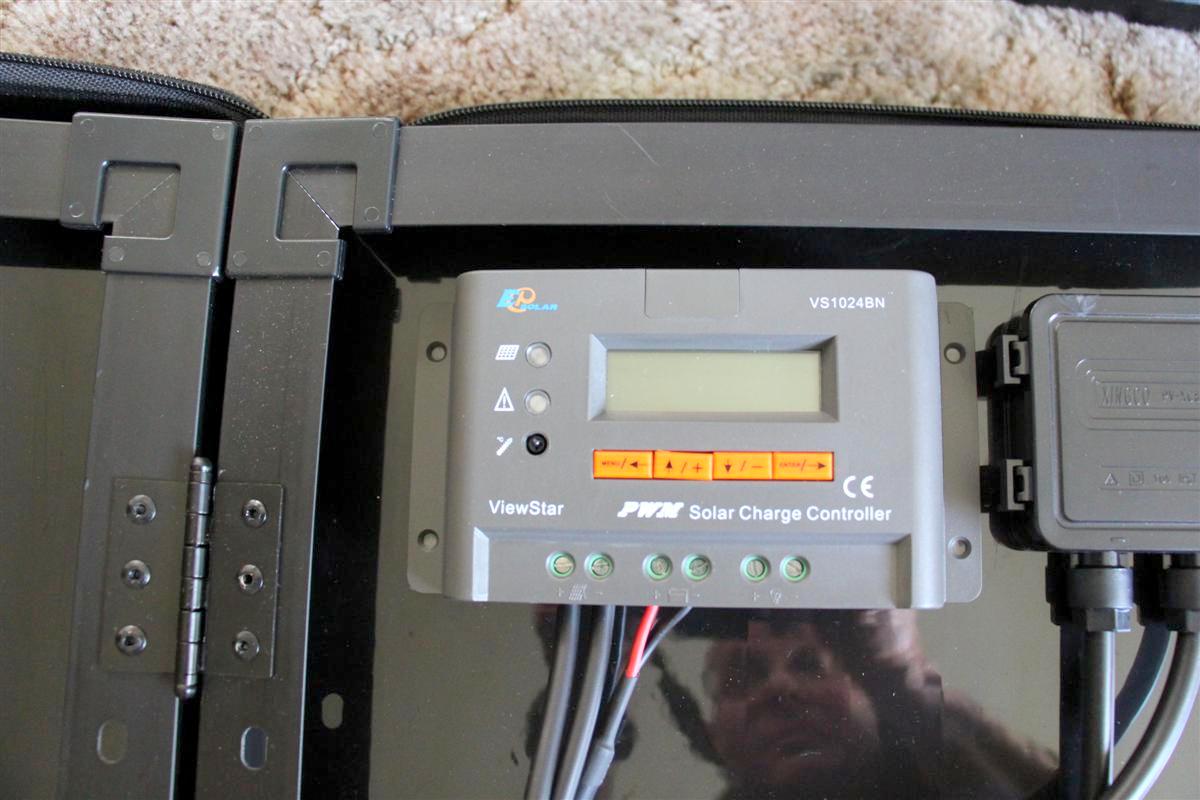
The charge controller on the rear of the solar panel, and a mugshot of me got in there somehow
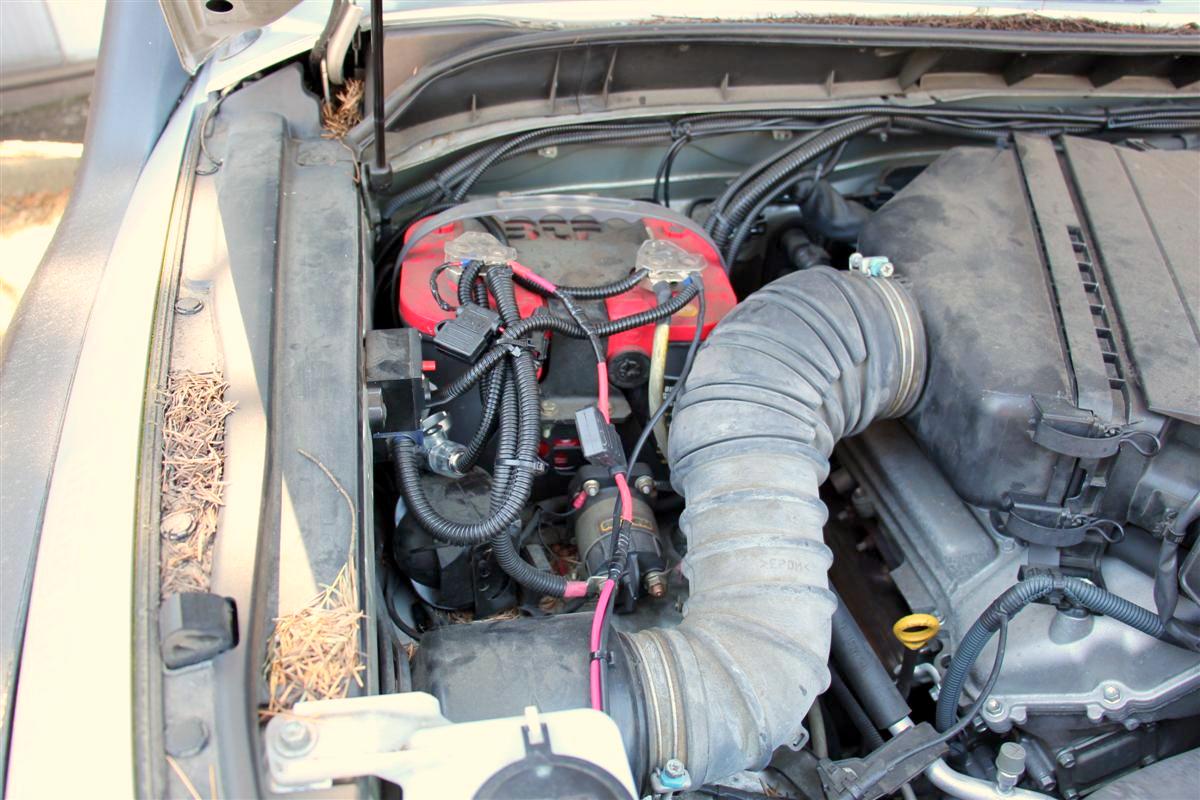
Cable attached to the auxiliary battery, and yes, it is a mess of pine needles under there, as I park under trees at home and at work
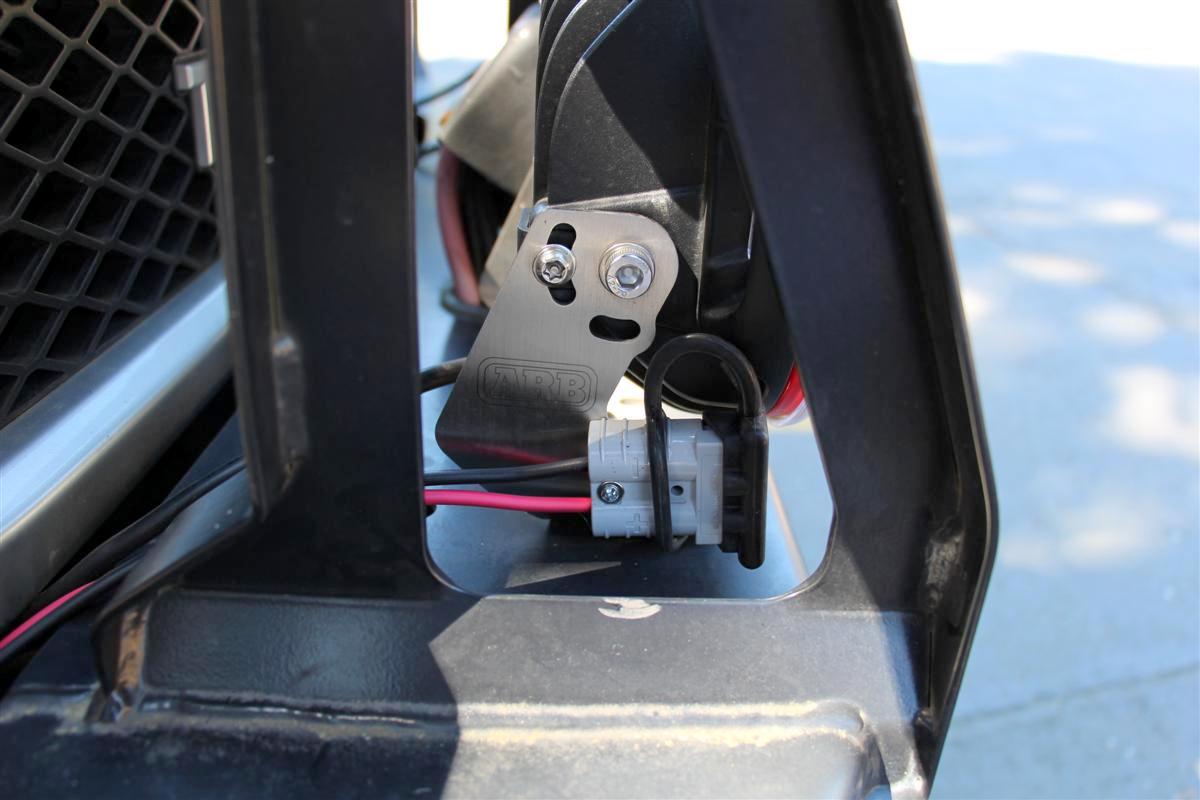
Anderson SB50 plug attached to the side of the ARB Intensity LED light bracket
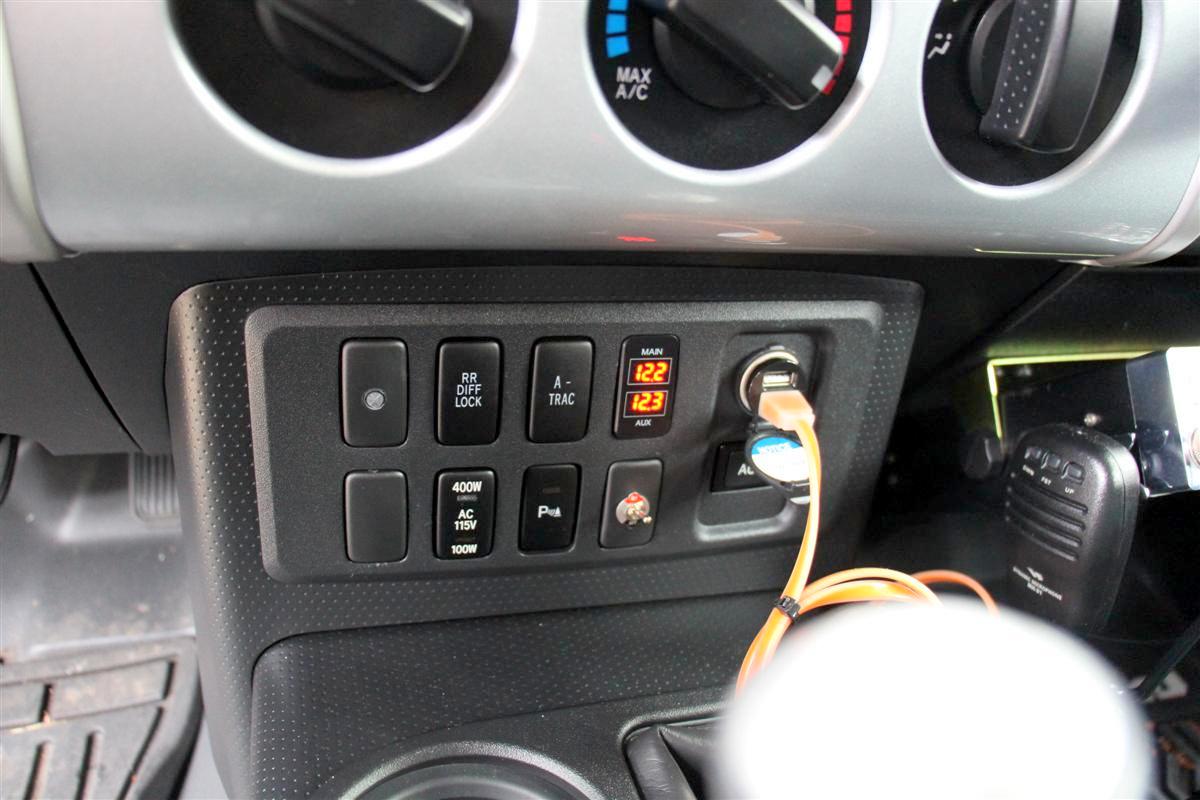
Beginning voltage on the auxiliary batter is 12.3 volts
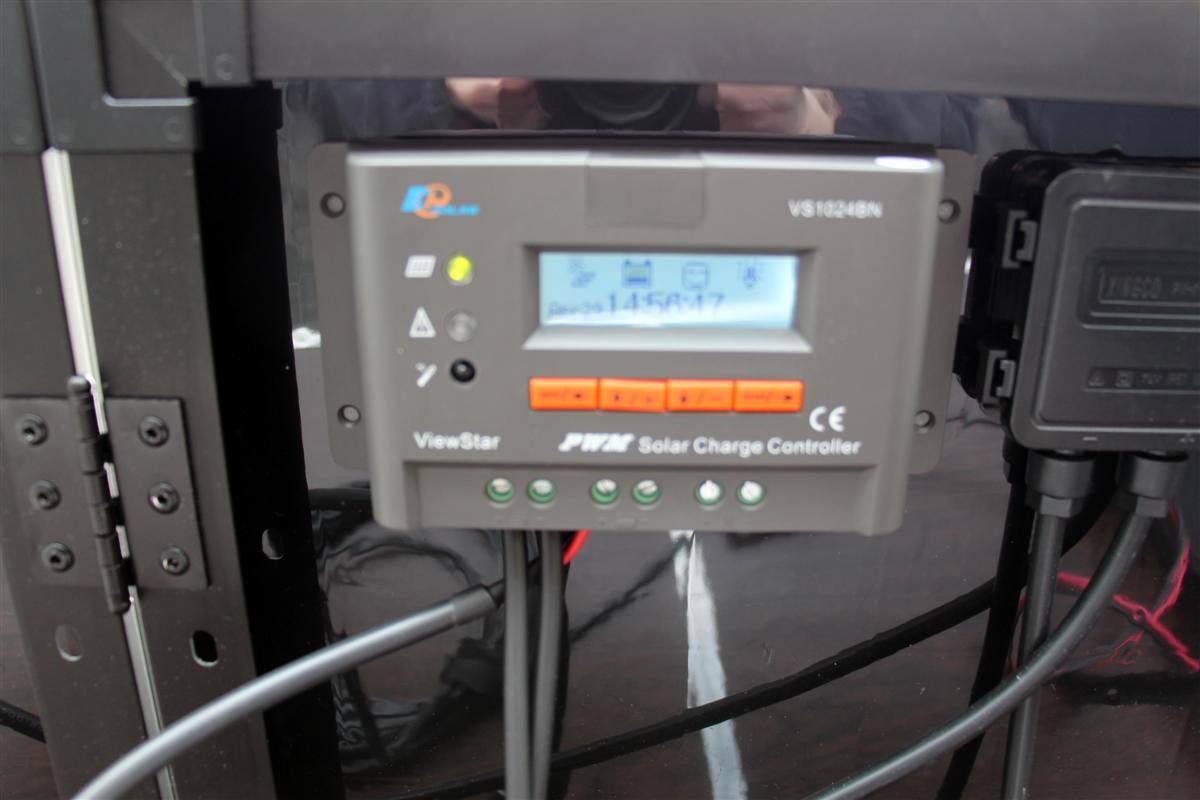
The charge controller needs the date and time set, but it lights up as soon as it detects the auxiliary battery attached, and you can also see a smiley face in the display, all if good, plus the green light for working
Sorry, I could not get a good focus on the display.
Cable plugged into the Anderson SB50 plug on the rig
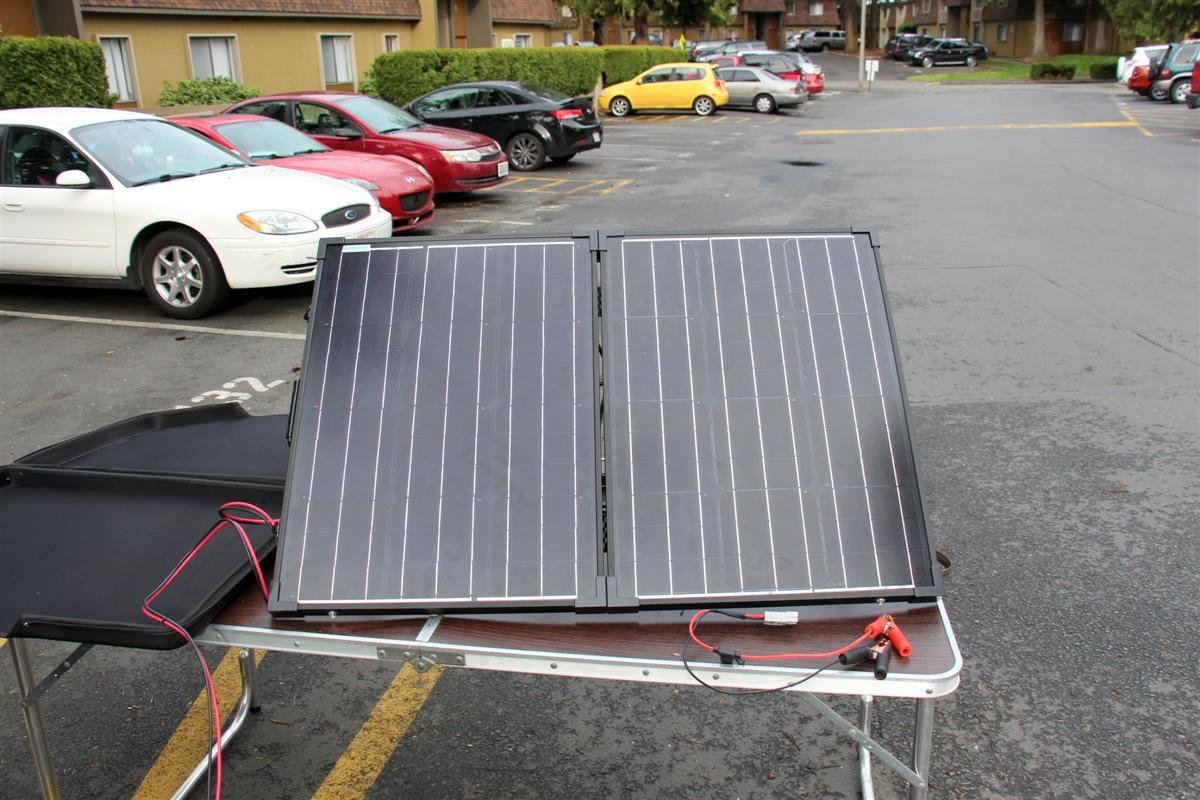
Solar panel soaking up the rays, and it is highly overcast here this morning, very impressed as you will see in the other voltage picture
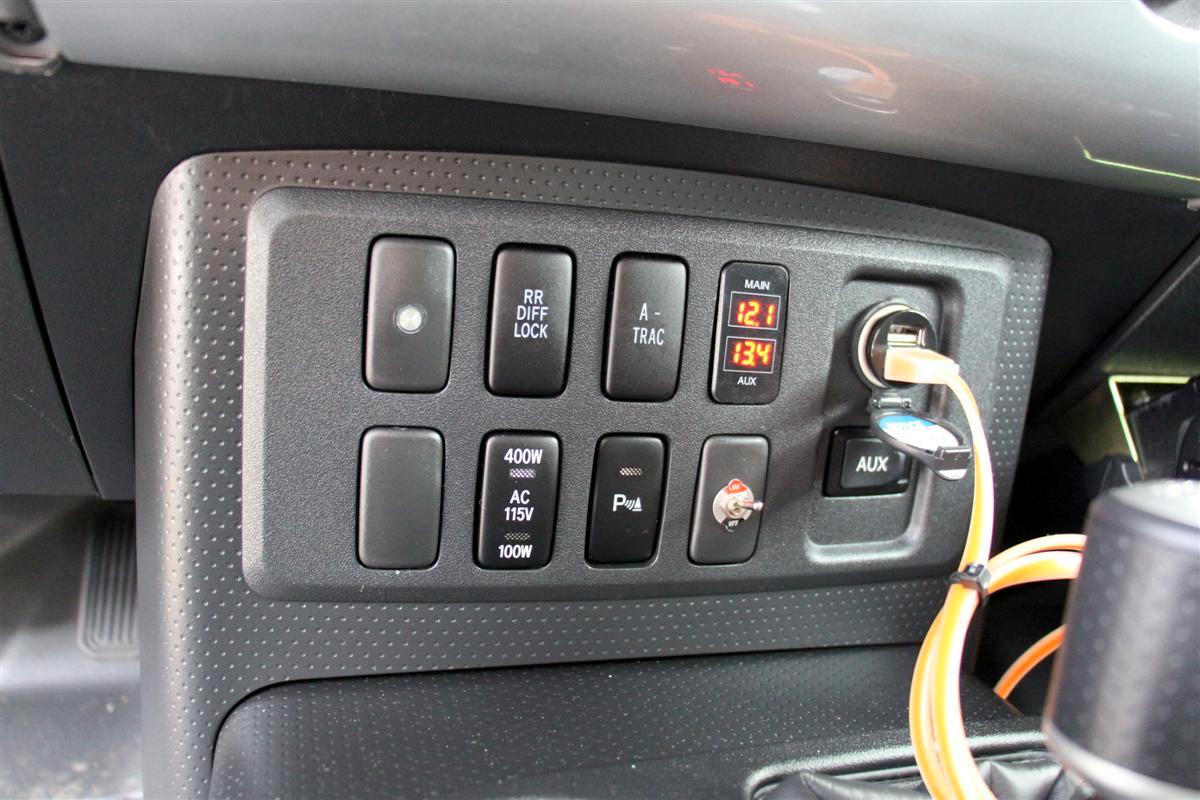
About fifteen minutes or so later, the 12.3 volts jumped to 13.4 volts, about the same as when I am driving down the road with the alternator charging up both batteries, I am impressed
The auxiliary battery under the hood is primarily used just to power the new National Luna Weekender 50 Twin fridge/freezer I picked up last fall.
It also supplies power to the comm units in my rig, both CB and ham.
For my Renogy folding solar panel the way I hooked it up before to the auxiliary battery was with the supplied battery clamps like you see on jumper cables which you will see in a few pictures below.
Had to pop the hood for this each time, and I wanted a better setup.
The Renogy kit already came with and Anderson SB50 plug, so I had Battery Stuff make me up a short cable that would go to the battery, and the other end would go to an Anderson plug and be on the outside of the rig so I did not have to pop the hood open.
I also had them make me up an extension cable that would extend the range by about 20'.
They did not however install a 15 amp fuse on the shorter cable, I had to do that myself.
However as I was waiting in the waiting room at Auburn Off-Road getting my new awning installed, I was looking through a copy of 4WD Toyota Owner Magazine from last summer (I had read the article before) I saw a solar panel company called Overland Solar that has the same cable and extensions that come fused.
Wish I had known about them, I would have bought the shorter cable from them already fused, and just got the non fused extension from them too.
The external Anderson SB50 plugged is attached to the side of the ARB Intensity LED light bracket.
It makes for a pretty stealth installation, and is way better than drilling into the bumper.
From testing the setup today in very overcast conditions, I was very impressed how fast it brought up the voltage from 12.3 to 13.4 volts.
When I fire up my rig to drive it, both voltage displays go to about 14 volts, then back down to 13.4 volts when cruising, so I am impressed, I already said that right
Links:
Renogy 100 Watt 12 Volt Monocrystalline Foldable Solar Suitcase
This one has a newer charge controller than the one I have one mine, and they got away from the Anderson plugs, not good in my opinion, as I prefer the Anderson SB50 A plugs.
Custom Cable 4' 10 Gauge with Rings & SB50 10ga4ringSB
They also made the 20' 10 gauge cable for me with the Anderson SB50A plugs on each end, but you will have to call them to custom order it.
On with some pictures:
The Renogy kit comes with a new semi-hardshell case
The old battery clamp cable on the far left I use to use, the new Anderson plug equipped one that connects to the battery in the middle, and the 20' extension on the far right
The charge controller on the rear of the solar panel, and a mugshot of me got in there somehow
Cable attached to the auxiliary battery, and yes, it is a mess of pine needles under there, as I park under trees at home and at work
Anderson SB50 plug attached to the side of the ARB Intensity LED light bracket
Beginning voltage on the auxiliary batter is 12.3 volts
The charge controller needs the date and time set, but it lights up as soon as it detects the auxiliary battery attached, and you can also see a smiley face in the display, all if good, plus the green light for working
Sorry, I could not get a good focus on the display.
Cable plugged into the Anderson SB50 plug on the rig
Solar panel soaking up the rays, and it is highly overcast here this morning, very impressed as you will see in the other voltage picture
About fifteen minutes or so later, the 12.3 volts jumped to 13.4 volts, about the same as when I am driving down the road with the alternator charging up both batteries, I am impressed
04-23-2017, 09:38 AM
#446

Yes, I run dual batteries.
The main starting battery is only tapped by a few 12v plugs in the rear which I use for the 12v light in my roof top tent, and for some Goal Zero LED lanterns I can hang from an awning, and over to the shower/crapper tent.
But I think I will be powering the lanterns from the 12v ArkPak battery I have in the home for blackouts, or I may use my old Goal Zero Extreme 350 battery.
I would really like to get the new Goal Zero Yetti 400 Lithium, very sweet external battery for camping.
The second battery is only used for the comms and the Fridge.
04-29-2017, 09:36 AM
#447
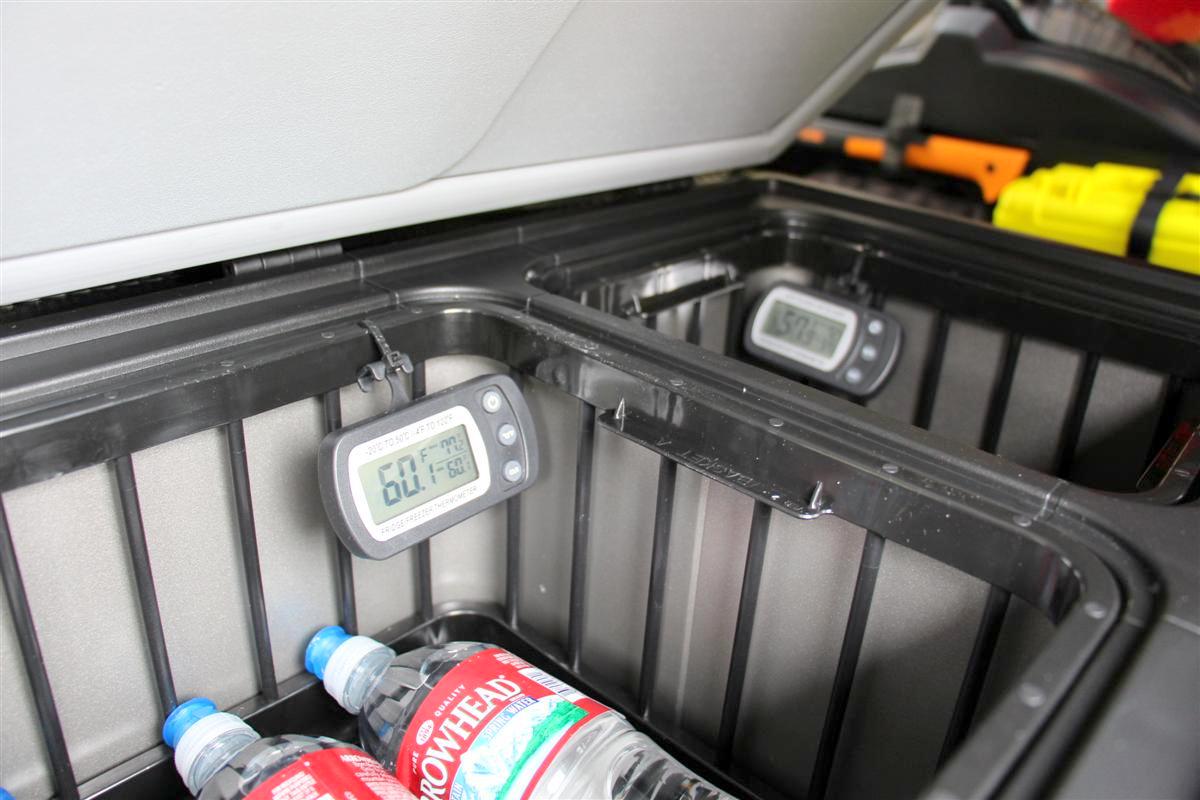
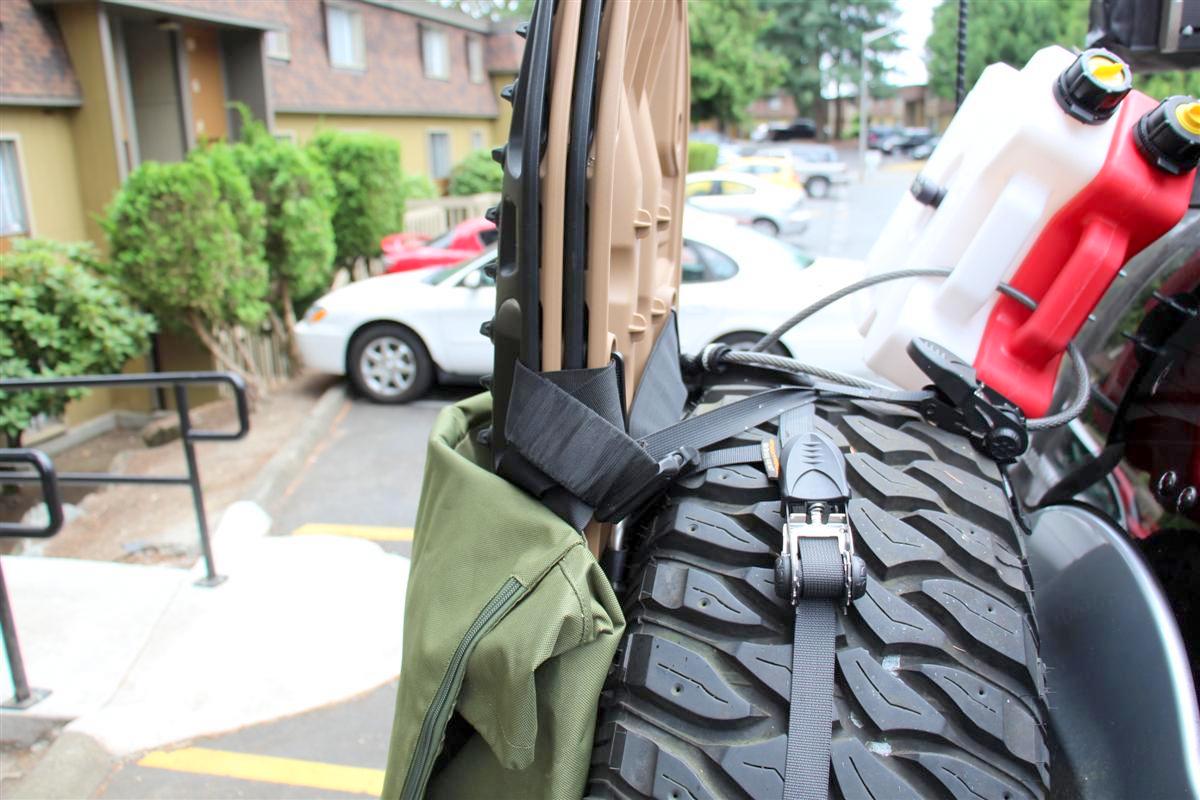
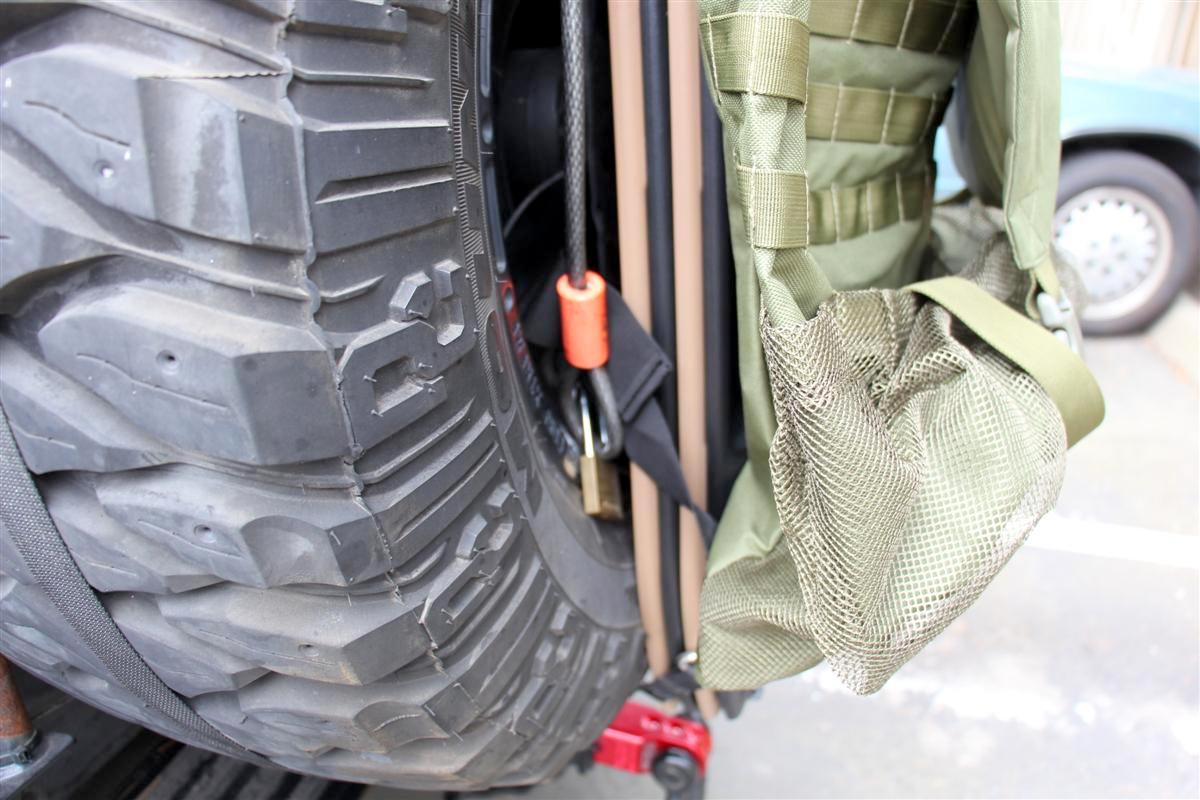
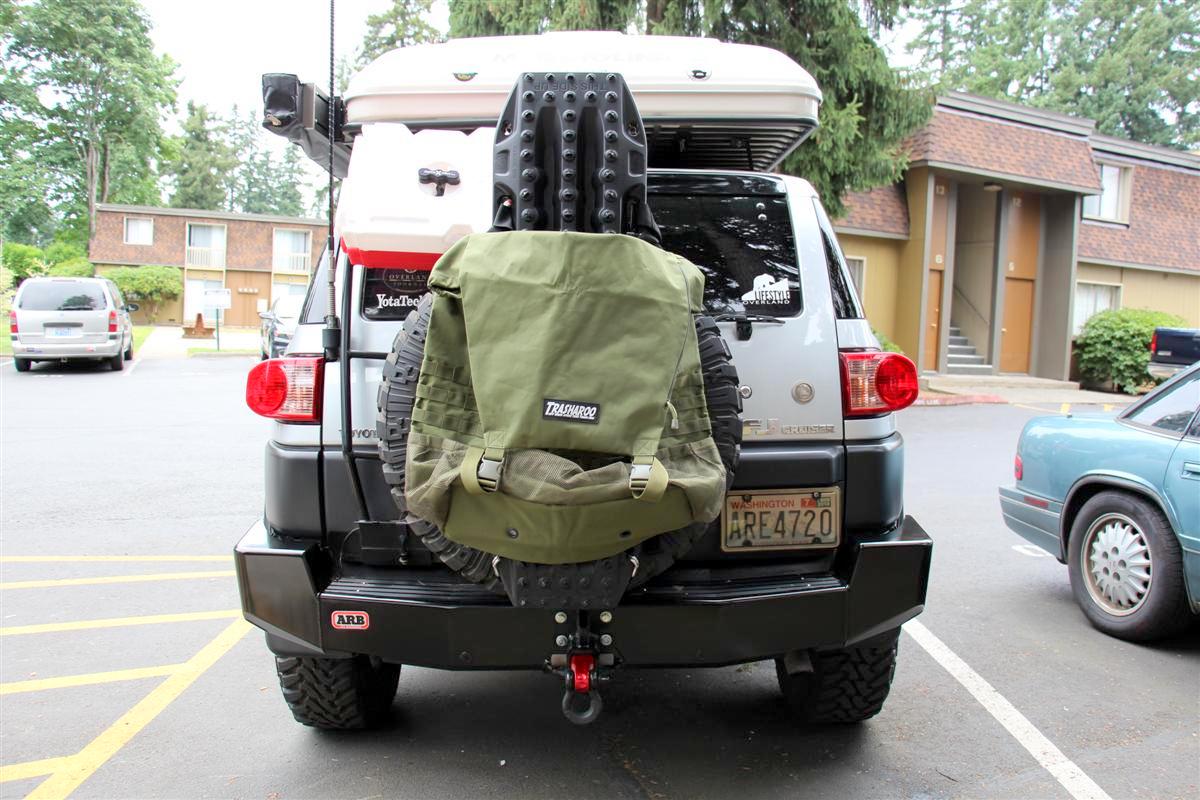
Fridge Monitors, Rotopax, & Awning 4-29-2017
Added two digital fridge monitors to my National Luna Weekender 50 Twin fridge/freezer this morning.
The Engel wireless one I have been using since 2008 is not working properly anymore, and I got away from wireless.
I found these on Amazon a few weeks back, and you can set it for Fahrenheit or Celsius.
Although the fridge has an LED readout on it, I wanted a temp monitor in each section to get a better reading on my temps.
Link:
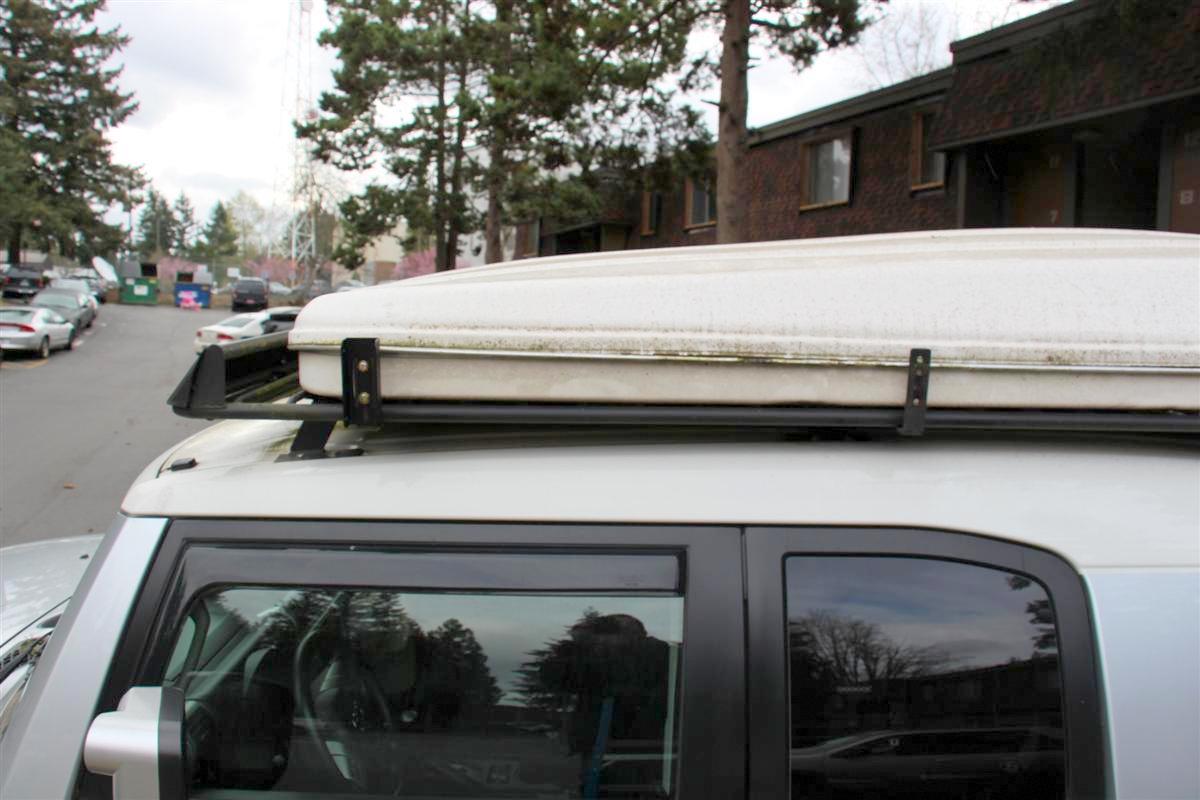
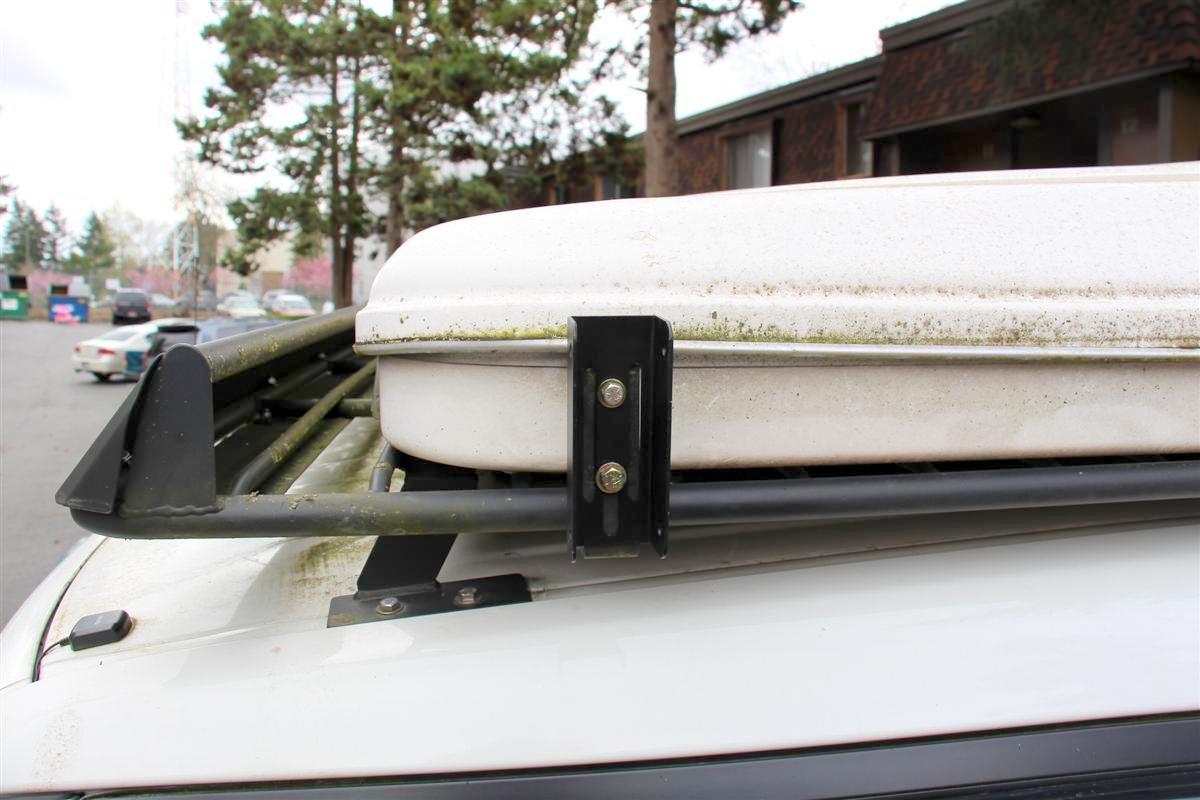
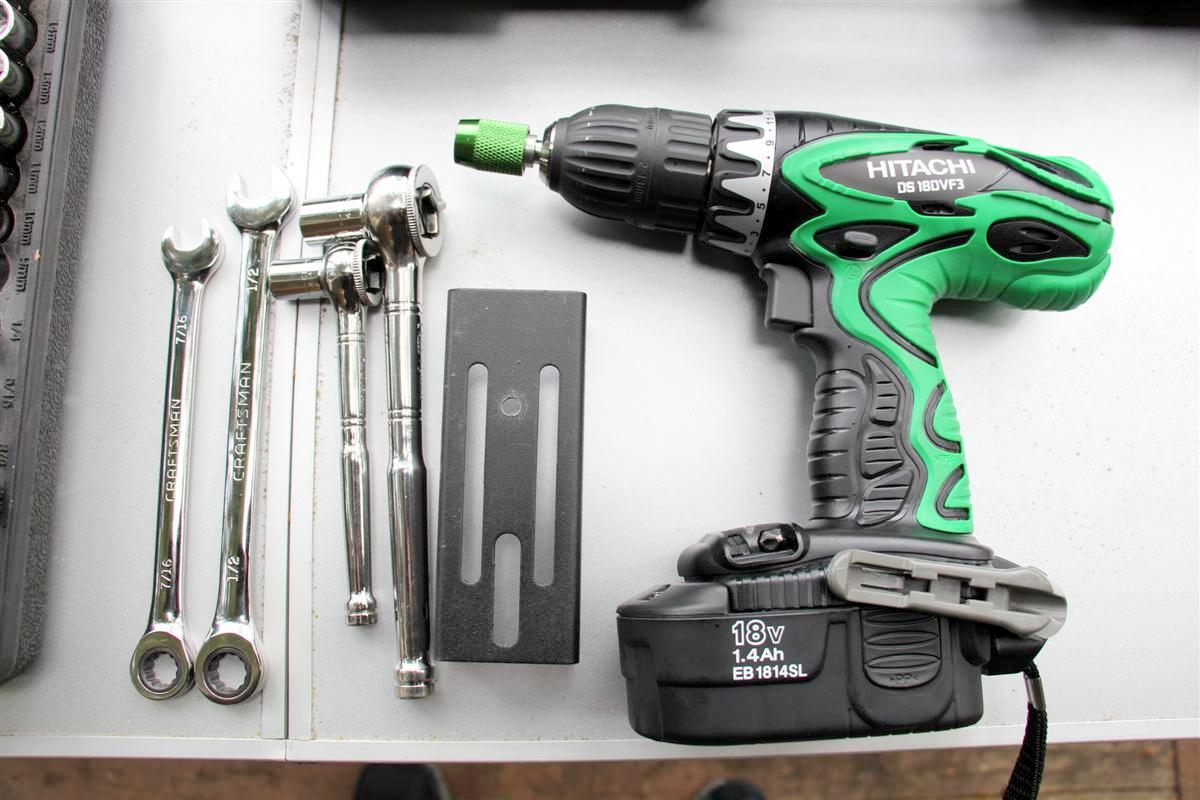
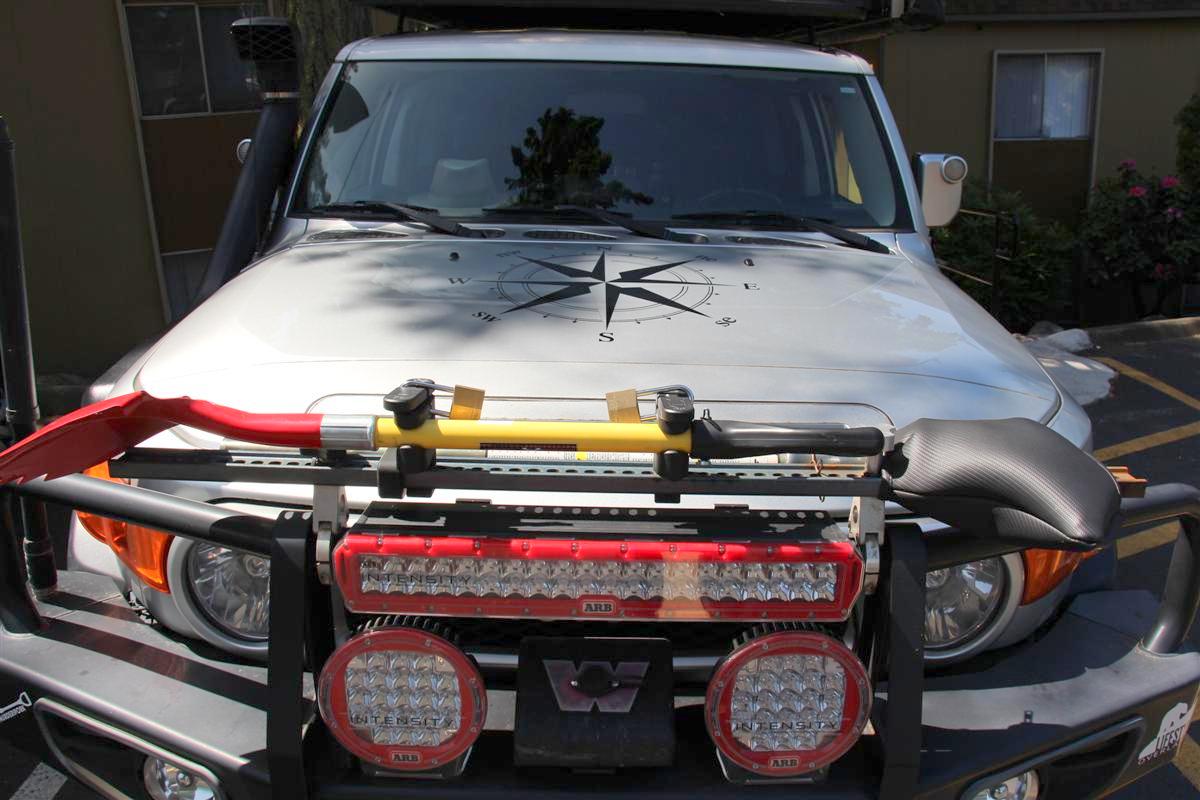
I lowered and turned the mount 90 degrees for the two Rotopax cans I carry as I could not deploy my new awning without taking them off.
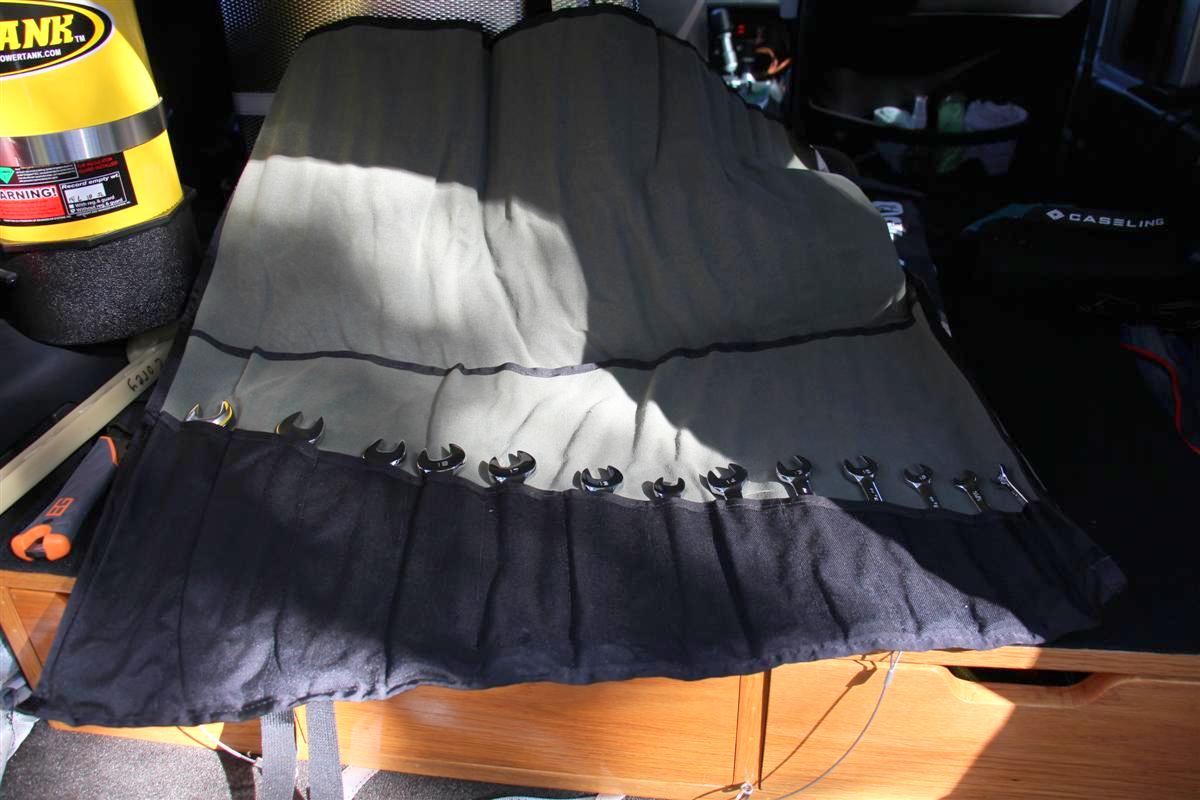
And the Adventure Tool Company Tool Roll is so handy to have wrenches available to work on the mount.


Compare below in the first picture when the Rotopax were upright, you can clearly see the Eezi-Awn swing arm is lower than the cans, thus why I had to remove the cans to deploy the awning.
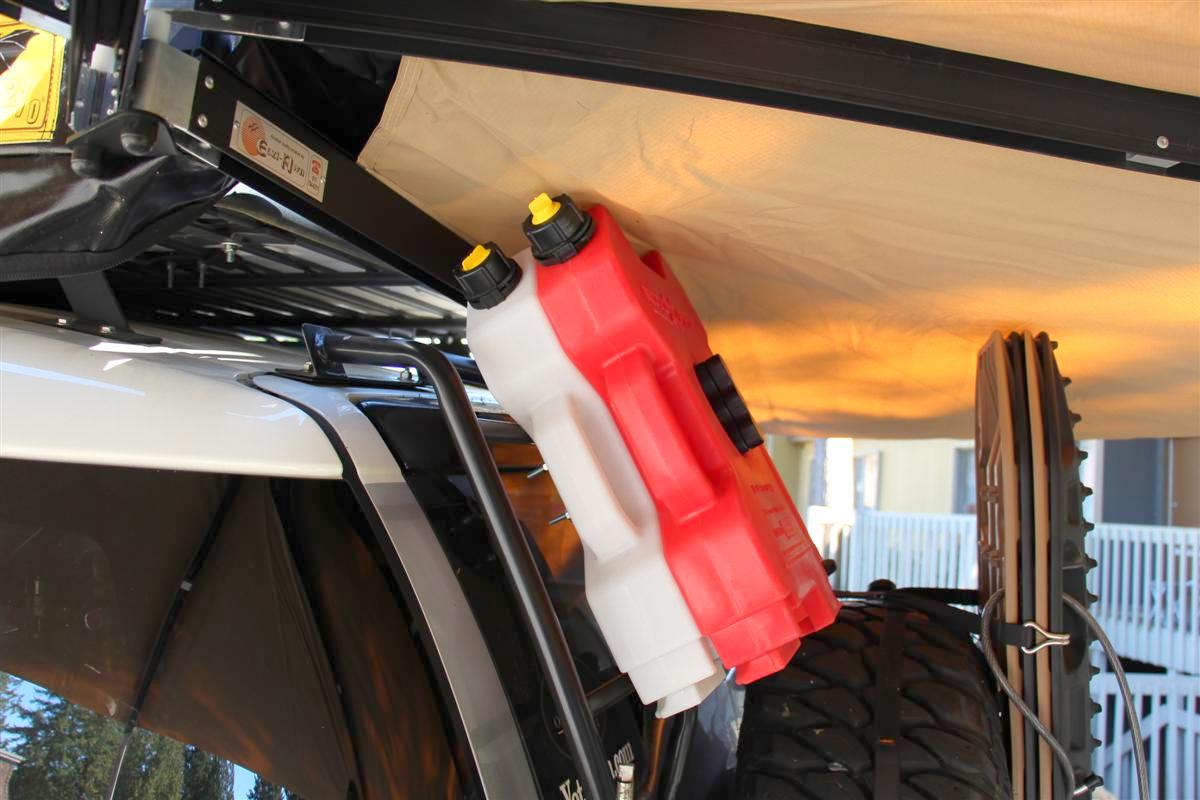
Now look at the arm with the Eezi-Awn name on it and see how it sits higher than the Rotopax, thus allowing me to deploy the awning without removing them.
I do have to lift that arm up slightly to clear the top of the Maxtrax, but there is a little flex in the arm, but not enough to have cleared the Rotopax when they were up higher.
In the picture below I have two of the awning legs down, and the rear one is pushing up the canvas enough to clear the top of the Maxtrax when opening the rear door, or just sitting.
This clears the top of them from rubbing on the awnings canvas in case it is windy.
The Alu-Cab 270 awnings actually have a small arm you flip up to lift the canvas higher, but not really needed in my case.
In the final pic is me just relaxing in my new Blue Ridge Chair Works called "The Blue Ridge Chair".
I picked it up about a month back, very comfortable after I was done working for a few hours earlier on the rig.
The Engel wireless one I have been using since 2008 is not working properly anymore, and I got away from wireless.
I found these on Amazon a few weeks back, and you can set it for Fahrenheit or Celsius.
Although the fridge has an LED readout on it, I wanted a temp monitor in each section to get a better reading on my temps.
Link:
I lowered and turned the mount 90 degrees for the two Rotopax cans I carry as I could not deploy my new awning without taking them off.
And the Adventure Tool Company Tool Roll is so handy to have wrenches available to work on the mount.
Compare below in the first picture when the Rotopax were upright, you can clearly see the Eezi-Awn swing arm is lower than the cans, thus why I had to remove the cans to deploy the awning.
Now look at the arm with the Eezi-Awn name on it and see how it sits higher than the Rotopax, thus allowing me to deploy the awning without removing them.
I do have to lift that arm up slightly to clear the top of the Maxtrax, but there is a little flex in the arm, but not enough to have cleared the Rotopax when they were up higher.
In the picture below I have two of the awning legs down, and the rear one is pushing up the canvas enough to clear the top of the Maxtrax when opening the rear door, or just sitting.
This clears the top of them from rubbing on the awnings canvas in case it is windy.
The Alu-Cab 270 awnings actually have a small arm you flip up to lift the canvas higher, but not really needed in my case.
In the final pic is me just relaxing in my new Blue Ridge Chair Works called "The Blue Ridge Chair".
I picked it up about a month back, very comfortable after I was done working for a few hours earlier on the rig.
05-13-2017, 08:51 AM
#448
Mini Quick Fists & Gerber BG Hatchet Mounted 5-13-2017
I use to keep my Gerber Bear Grylls Survival Hatchet in one of the drawers of my cargobox.
After mounting the Fiskars axe awhile back, I thought it would be a good idea to free up some space in the cargobox and mount the little BG hatchet by the Fiskar axe using some Mini Quick Fists.
It turned out pretty good, and now I have easier access to it while camping, or fending off rouge zombies
I have a lot more projects to work on such as installing a new 12v LED light in the roof top tent, mounting up a Trasheroo trash bag on the spare tire, but it looks like rain is before too long.
Next weekend it looks like better weather may make an appearance.
Trying to get a lot of these little things out of the way before camping season is upon us.
Also the owner of Outer Limits Supply announced last week on Instagram that he has a new holder setup for his first aid kits like I have on my rear doors table/rack.
It eliminates having to use the straps that are on it now, and it will not move around as much.
Will be looking into that for sure.
He is showing them at the Overland Expo West this weekend to the lucky people who could make this annual event in Arizona.
Links:
05-25-2017, 04:45 PM
#450
Hopefully putting in a new LED lamp and housing in the tent tomorrow to replace the stock light that is in it now.
And testing to see if I can hang my Goal Zero LED lanterns from the awnings arms.
05-28-2017, 09:28 AM
#451
Goal Zero Lanterns, Yeti 400 Lithium, & Compass Hood Decal
I have several Goal Zero LED lanterns I used on my old Campinglab awning.
I was not sure how I was going to "string" them on the new Eezi-Awn Bat 270 awning I picked up recently, so I deployed the awning this morning to see how it could be done.
Low and behold the awning has these nice little aluminum rods at the end of the awning support bars with the exception of the very last one that wraps around the passenger side, and I just ran a zip-tie through a hold on that one to hang the lantern from.
The Goal Zero Light A Life lanterns can be daisy chained together, and they also have a built in hook/clasp which makes it easy to hang it to attachments such as the rods and the zip-tie on the awnings support arms.
Depending on where I put my new Nemo crapper/shower tent I picked up for this new season, I can probably have enough length in the lanterns cable to run a 5th one to the Nemo.
How am I powering these lanterns?
Yesterweek I picked up the new Goal Zero Yeti 400 Lithium solar generator.
Some of you may remember I picked up the ArkPak a few years back, and it is very nice for powering stuff at home during a power outage, and for camping.
But...it weighs in at close to 100 lb, and the Yeti is only 17 lbs.
The ArkPak will be retired to home duty only since the Yeti 400 is so light.
It has both an 8mm 12v output, and also a cigg12v outlet.
Also two 110v outlets.
I also picked up a cool folding stool awhile back to stand on when packing the awning away from Amazon, and it will also be used for setting the Yeti 400 on.
For charging it it has a 110v 8mm input, and that is also how you plug in a Goal Zero solar panel.
I ordered the Boulder 100 watt Brief Case model with built ion charge controllers, and that will arrive probably by this coming Friday.
So now I will be running three solar panels:
1. Powerfilm foldable 60 watt for the starting battery
2. Renogy 100 watt suitcase style for the aux battery that powers the National Luna Weekender 50 fridge/freezer
3 Goal Zero Boulder 100 watt Brief Case for just the Yeti 400 Lithium solar generator
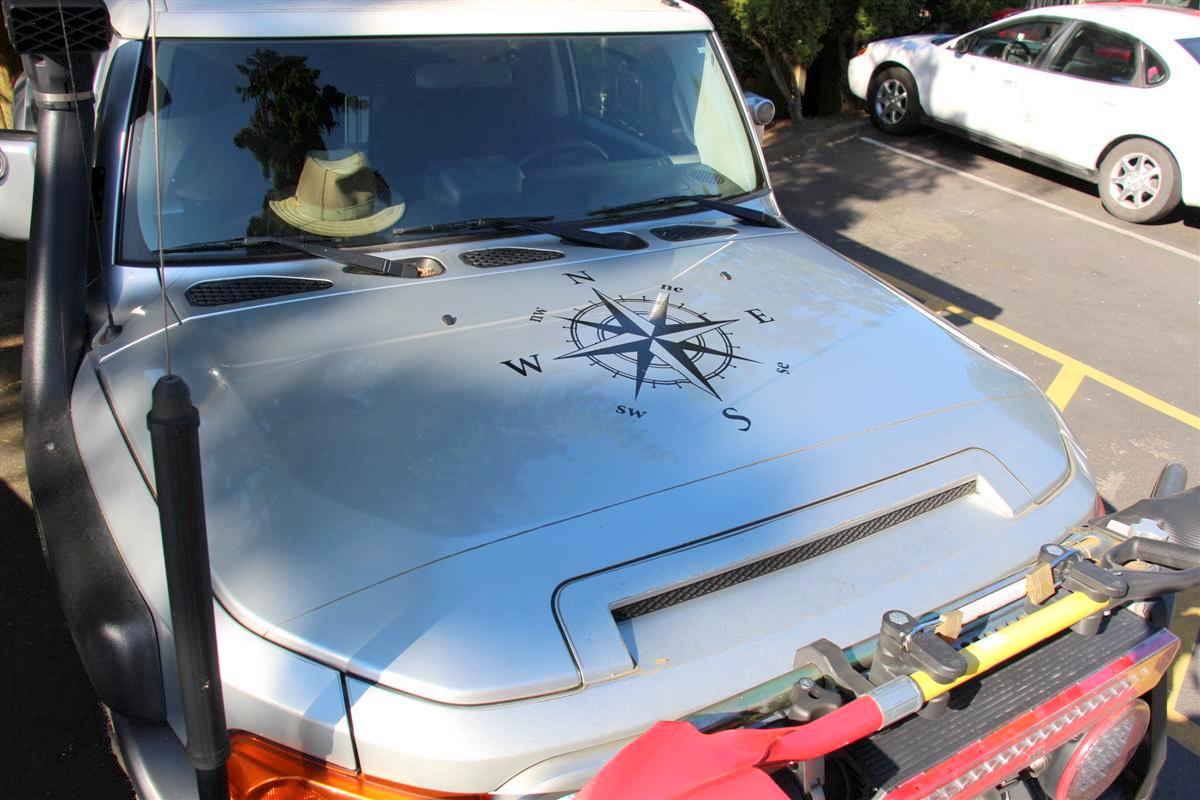
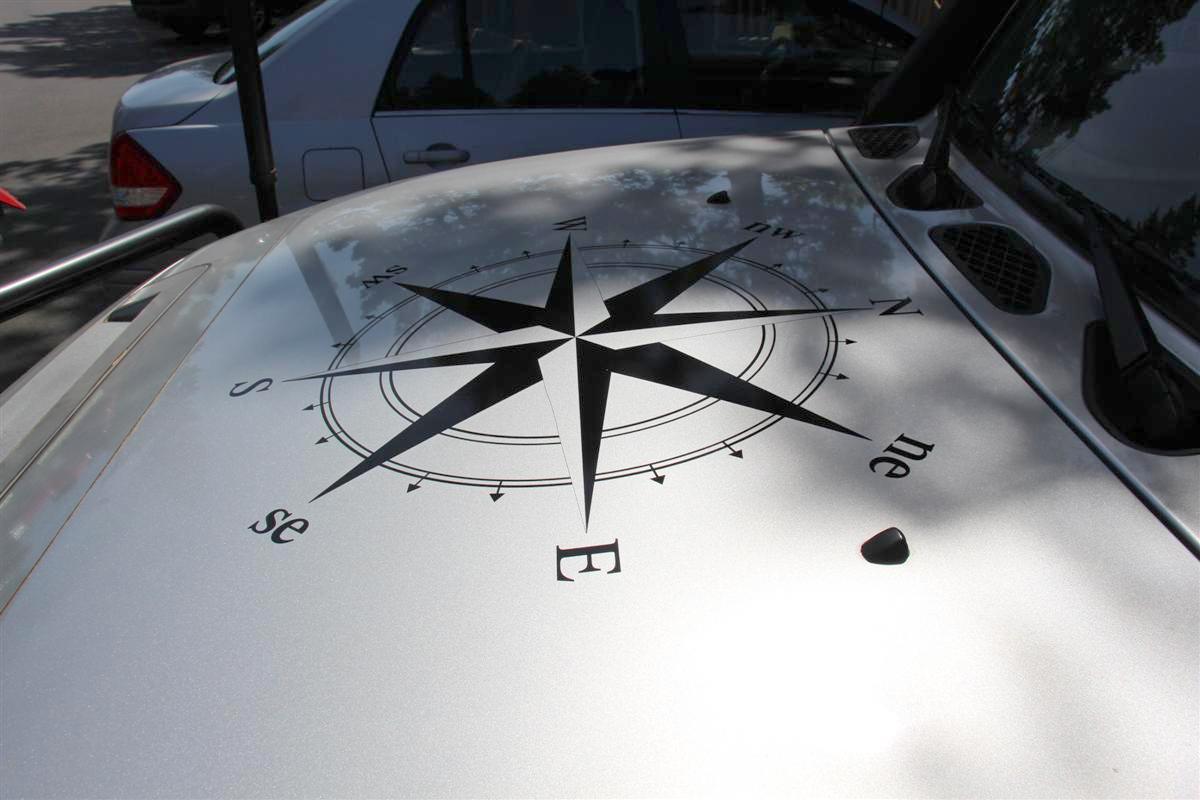
I also ordered a nice compass decal via Amazon, and installed it this morning to the hood.
The compass decal is high quality, but unfortunately my die-cut decal installation procedure is not.
I messed up up and got some of the black parts that adhere to the hood misaligned, and it looks like crap if you look at it closely.
I already have another one on order, and I am going to see if a local body shop or vehicle decal place can do the installation for me.
Also these come in many different colors, and when you order it, it defaults to black unless you contact them after placing your order to select another color.
I am wondering if I should stick with black, or get a white one.
What do you think???
Links:
Goal Zero Yeti 400 Lithium Portable Power Station
Boulder 100 Briefcase
Pictures:
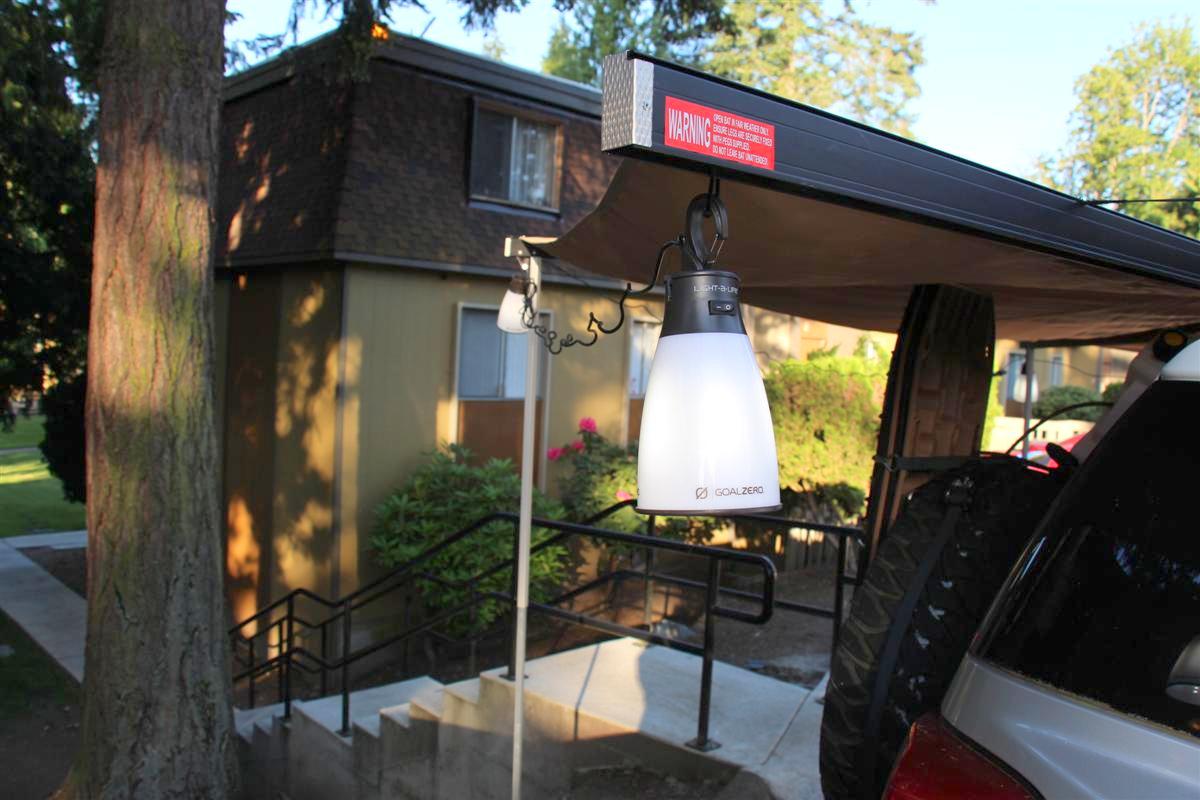
Passenger side light, the only one that needed a zip-tie to hang from
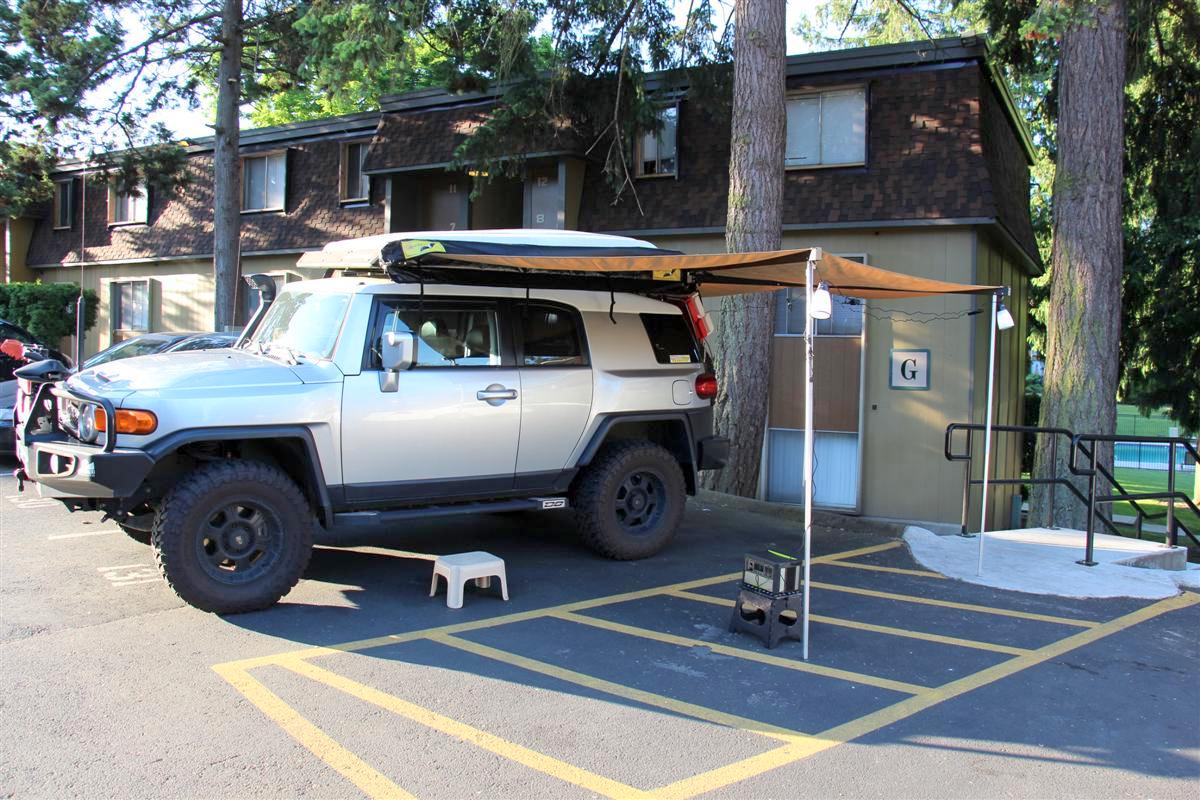
Lanterns lit up, I wish I had some pics in the dark, but it gets light out now around 5:20 am
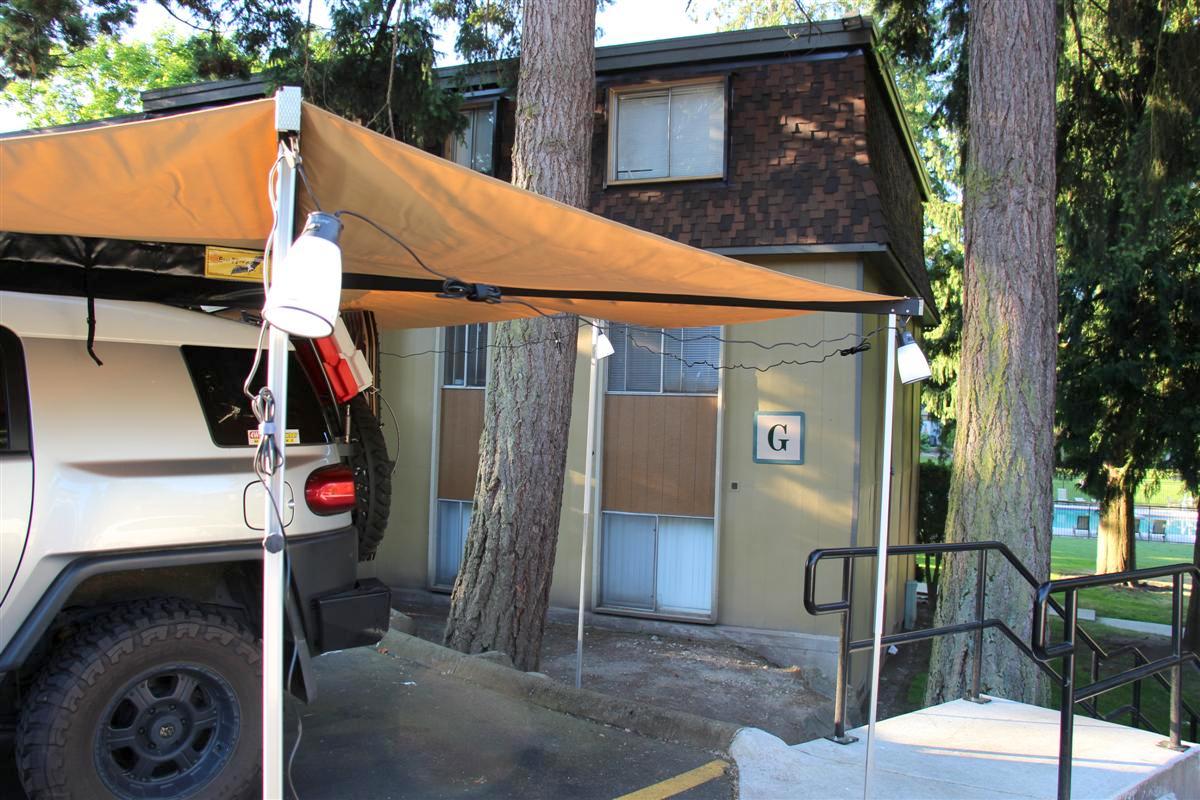
These put out quite a bit of light when it is dark out
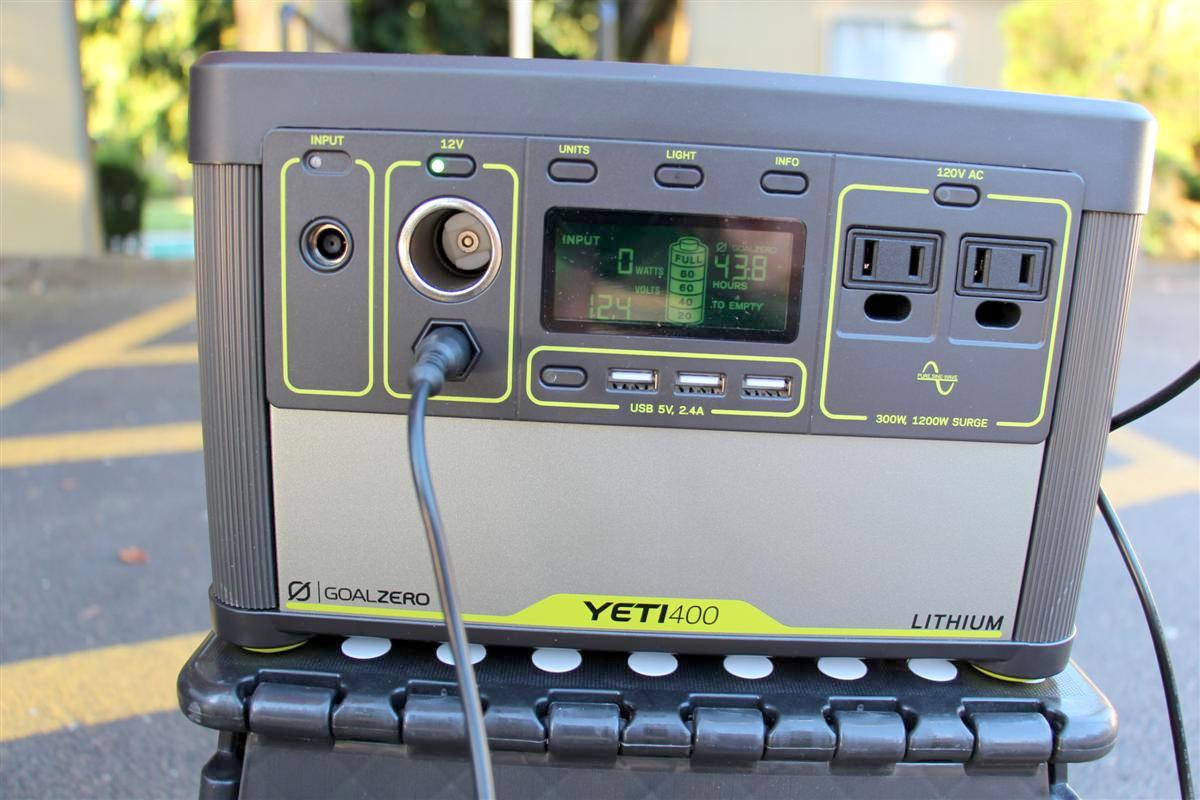
The Yeti's control panel showing how much charge in hours is left if all four lanterns are running, turn off half the lanterns, the run time doubles
On the new stool
Closeup showing the lanterns hook/clasp attached to the awnings rod in the support arm
The 42 liter Alu-box I keep my Goal Zero lanterns, two propane lanterns, and the Powerfilm 60 watt solar panel in
From a distance it does not look too bad
But when you get closer, you can see line that points to the S is crooked, and the lower circle part to the left of the line
I also have a few bubbles in it.
Maybe a shop can fix it, but just in case, I have a new one coming if they have to scrap this one.
I was not sure how I was going to "string" them on the new Eezi-Awn Bat 270 awning I picked up recently, so I deployed the awning this morning to see how it could be done.
Low and behold the awning has these nice little aluminum rods at the end of the awning support bars with the exception of the very last one that wraps around the passenger side, and I just ran a zip-tie through a hold on that one to hang the lantern from.
The Goal Zero Light A Life lanterns can be daisy chained together, and they also have a built in hook/clasp which makes it easy to hang it to attachments such as the rods and the zip-tie on the awnings support arms.
Depending on where I put my new Nemo crapper/shower tent I picked up for this new season, I can probably have enough length in the lanterns cable to run a 5th one to the Nemo.
How am I powering these lanterns?
Yesterweek I picked up the new Goal Zero Yeti 400 Lithium solar generator.
Some of you may remember I picked up the ArkPak a few years back, and it is very nice for powering stuff at home during a power outage, and for camping.
But...it weighs in at close to 100 lb, and the Yeti is only 17 lbs.
The ArkPak will be retired to home duty only since the Yeti 400 is so light.
It has both an 8mm 12v output, and also a cigg12v outlet.
Also two 110v outlets.
I also picked up a cool folding stool awhile back to stand on when packing the awning away from Amazon, and it will also be used for setting the Yeti 400 on.
For charging it it has a 110v 8mm input, and that is also how you plug in a Goal Zero solar panel.
I ordered the Boulder 100 watt Brief Case model with built ion charge controllers, and that will arrive probably by this coming Friday.
So now I will be running three solar panels:
1. Powerfilm foldable 60 watt for the starting battery
2. Renogy 100 watt suitcase style for the aux battery that powers the National Luna Weekender 50 fridge/freezer
3 Goal Zero Boulder 100 watt Brief Case for just the Yeti 400 Lithium solar generator
I also ordered a nice compass decal via Amazon, and installed it this morning to the hood.
The compass decal is high quality, but unfortunately my die-cut decal installation procedure is not.
I messed up up and got some of the black parts that adhere to the hood misaligned, and it looks like crap if you look at it closely.
I already have another one on order, and I am going to see if a local body shop or vehicle decal place can do the installation for me.
Also these come in many different colors, and when you order it, it defaults to black unless you contact them after placing your order to select another color.
I am wondering if I should stick with black, or get a white one.
What do you think???
Links:
Goal Zero Yeti 400 Lithium Portable Power Station
Boulder 100 Briefcase
Pictures:
Passenger side light, the only one that needed a zip-tie to hang from
Lanterns lit up, I wish I had some pics in the dark, but it gets light out now around 5:20 am
These put out quite a bit of light when it is dark out
The Yeti's control panel showing how much charge in hours is left if all four lanterns are running, turn off half the lanterns, the run time doubles
On the new stool
Closeup showing the lanterns hook/clasp attached to the awnings rod in the support arm
The 42 liter Alu-box I keep my Goal Zero lanterns, two propane lanterns, and the Powerfilm 60 watt solar panel in
From a distance it does not look too bad
But when you get closer, you can see line that points to the S is crooked, and the lower circle part to the left of the line
I also have a few bubbles in it.
Maybe a shop can fix it, but just in case, I have a new one coming if they have to scrap this one.
06-03-2017, 09:15 AM
#452
Outer Limit Supply Quick Release Bracket Installed 6-3-2017
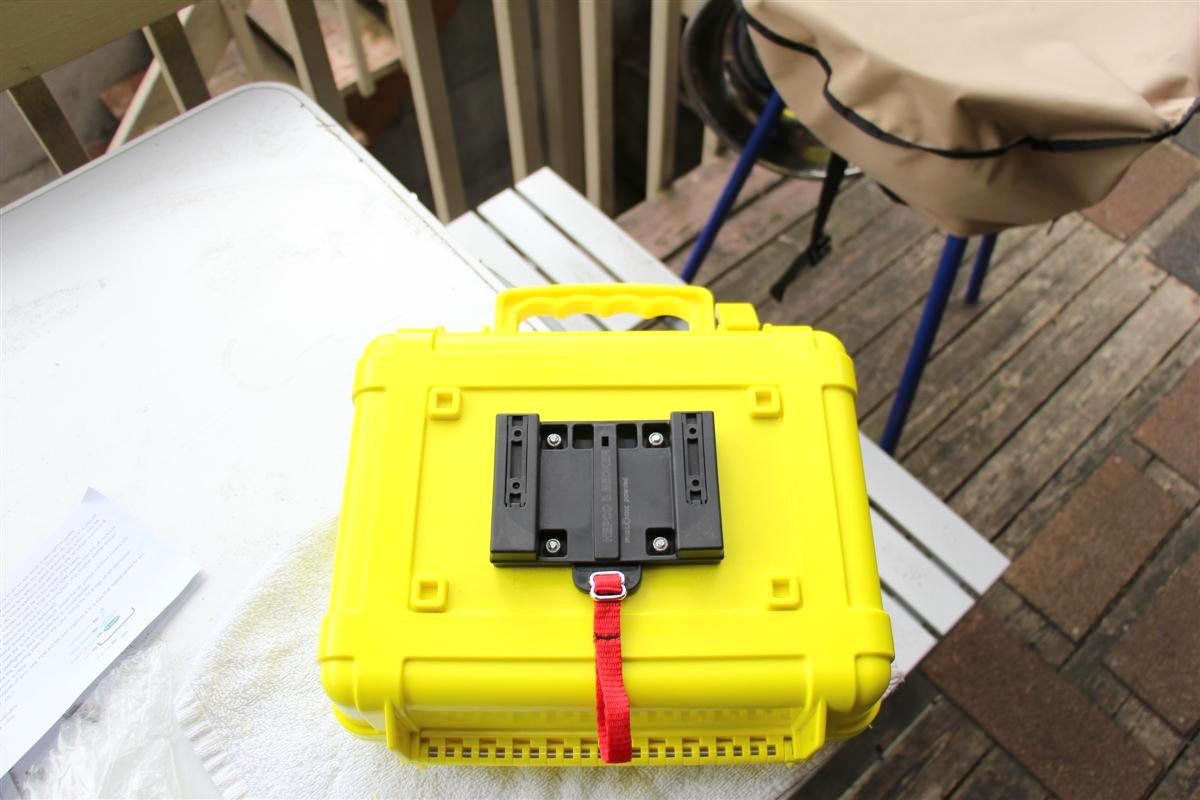
I have had my Outer Limit Supply Weekend Warrior first aid kit for awhile now mounted to the Springtail Solutions table/rack setup on the back door of my FJ Cruiser.
This is a top notch kit designed by Travis owner of Outer Limit Supply.
The way the kit mounted before was a two strap setup, and his new mount he unveiled at Overland Expo West 2017 is a much better setup IMO, and so much easier than having to release the two straps.
The first aid kit could move around a little with the straps, not so with this new setup!
It is held in with magnets, and they will not release until you pull down a red straps.
You can mount the strap at the top or bottom, I chose the latter.
The included instructions and template you tape to the rear of your kit make the installation a breeze.
This is way faster to get to your kit if needed, and much more secure.
If you want to upgrade to the new setup, get a hold of Travis, I am very excited about the new kit for sure!
Links:
My first aid kit, Weekend Warrior Series
Quick Release Mount
Pictures and one video:
Please excuse me for not looking into the lens, I was looking at the LCD screen which I had flipped towards me on my Canon Rebel T5i camera.
Tape the included template to the rear of the kit to drill four holes for the quick release bracket
Make sure to empty your kit first, which Travis mentions in the instructions.
Push the four bolts with the flat washers and rubber washers through the holes
Then attach the QR bracket to the rear of the case, and tighten up with the included nuts for the bolts

Screw the mounting plate to the quick release bracket through the magents with the four counter sunk screws
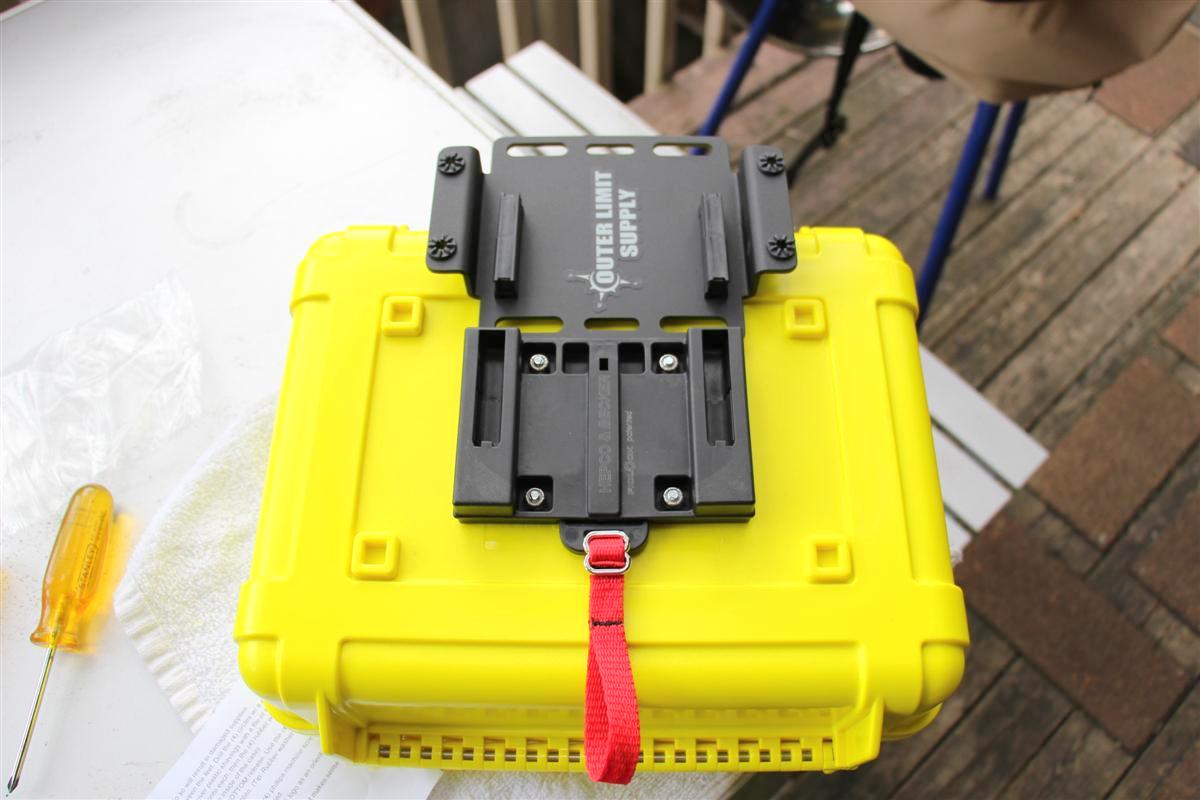
Mounting plate and QR bracket
Skottle is feeling lonely not getting any attention until tonights dinner.
Bracket mounted to the rack/table
Plenty of room for the rack/table to be in the down position, and not have the kit interfere with the plastic surface of the FJ
Showing the old mounting plate above that used the two strap system, not sorry to see it go
You really do not see the red strap hanging down unless you look from underneath

See, the strap kind of disappears when you look at it from straight on
Outer Limit Supply Quick Release Bracket
This is a top notch kit designed by Travis owner of Outer Limit Supply.
The way the kit mounted before was a two strap setup, and his new mount he unveiled at Overland Expo West 2017 is a much better setup IMO, and so much easier than having to release the two straps.
The first aid kit could move around a little with the straps, not so with this new setup!
It is held in with magnets, and they will not release until you pull down a red straps.
You can mount the strap at the top or bottom, I chose the latter.
The included instructions and template you tape to the rear of your kit make the installation a breeze.
This is way faster to get to your kit if needed, and much more secure.
If you want to upgrade to the new setup, get a hold of Travis, I am very excited about the new kit for sure!
Links:
My first aid kit, Weekend Warrior Series
Quick Release Mount
Pictures and one video:
Please excuse me for not looking into the lens, I was looking at the LCD screen which I had flipped towards me on my Canon Rebel T5i camera.
Tape the included template to the rear of the kit to drill four holes for the quick release bracket
Make sure to empty your kit first, which Travis mentions in the instructions.
Push the four bolts with the flat washers and rubber washers through the holes
Then attach the QR bracket to the rear of the case, and tighten up with the included nuts for the bolts
Screw the mounting plate to the quick release bracket through the magents with the four counter sunk screws
Mounting plate and QR bracket
Skottle is feeling lonely not getting any attention until tonights dinner.
Bracket mounted to the rack/table
Plenty of room for the rack/table to be in the down position, and not have the kit interfere with the plastic surface of the FJ
Showing the old mounting plate above that used the two strap system, not sorry to see it go
You really do not see the red strap hanging down unless you look from underneath
See, the strap kind of disappears when you look at it from straight on
Outer Limit Supply Quick Release Bracket
06-04-2017, 09:46 AM
#453
Goal Zero 100 Watt Solar Panel For The Yeti 400 6-4-2017
I may post these two videos to the camping section later too, but the Goal Zero Boulder 100 watt solar panel and the Goal Zero Yeti 400 lithium generator will be used with the rig.
Powering up the old school Goal Zero 3 watt LED lanterns which will be hung on the Eezi-Awn Bat 270 awning, and also for charging up items such as the Goal Zero Lighthouse 400 lumen lantern, charging flashlight batteries, and also charging up the batteries for my Canon Rebel T5i camera.
I am a little disappointed in the Goal Zero canvas case the solar panel ships with, as there is zero padding.
However the Renogy solar panel I use to charge up the aux battery that powers the National Luna Weekender 50 Twin fridge/freezer ships with a nice padded case that works with the Goal Zero solar panel just fine.
For what you pay for Goal Zero gear, they should include a padded case as well.
One more thing, the Goal Zero solar panel does not include a charge controller, but one is not needed since the Yeti 400 has one built in.
If you want to use this solar panel to keep a rigs battery topped off while camping, you will have to wire one in, or you could get the plug & play Goal Zero Guardian 12V Plus Charge Controller.
I have two of them (never used them yet), and they connect to the 8mm plugs that Goal Zero uses.
You could also cut off the battery clips and hard-wire it to your battery.
Goal Zero Boulder 100 Watt Test Part 1
Goal Zero Boulder 100 Watt Test Part 2
06-06-2017, 11:07 AM
#454
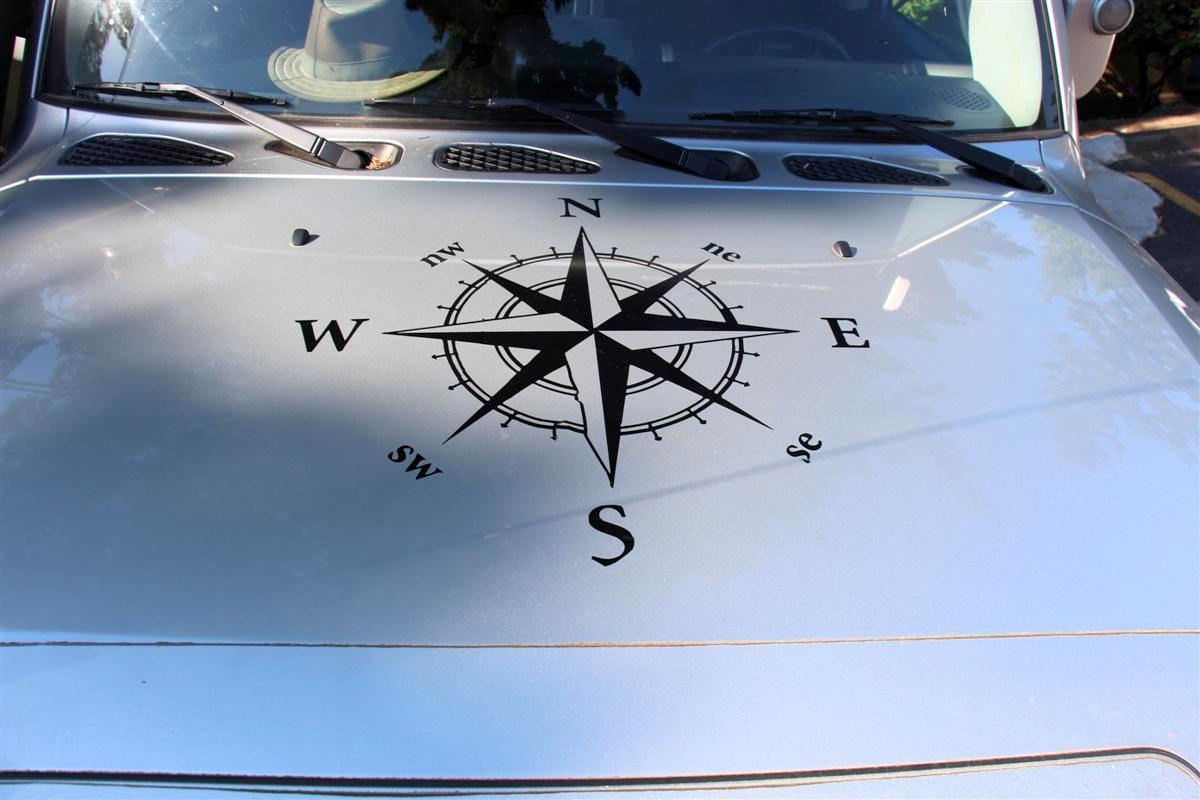
New Hood Compass Graphic 6-6-2017
Mucho better!
I talked with a local graphics/sign/vehicle wrap company last week, and I stopped in Friday to show them my butchered job I did on the Amazon compass decal.
He said they could not really fix it, and while it was OK quality, it is not as good as the 3M and laminated material they use.
The one I had on there was not laminated with a protective coating.
He took a picture of mine, and his graphics artist duplicated the one I had, but made it 24"x24" instead of 22"x22", I like it.
I will keep an eye on it to see how it does, but this stuff is made to be outdoors.
So far I am very happy with it.
If anyone local or not local is interested in the design, you can get a hold of the shop and see it they can send the file since I had to pay a digitizing fee, and get one of these for your rig.
Links:
Fast Signs Main Site
Fast Signs Of Auburn, WA
Pictures:

Closeup shot, an exact duplicate of the other one
Yeah...
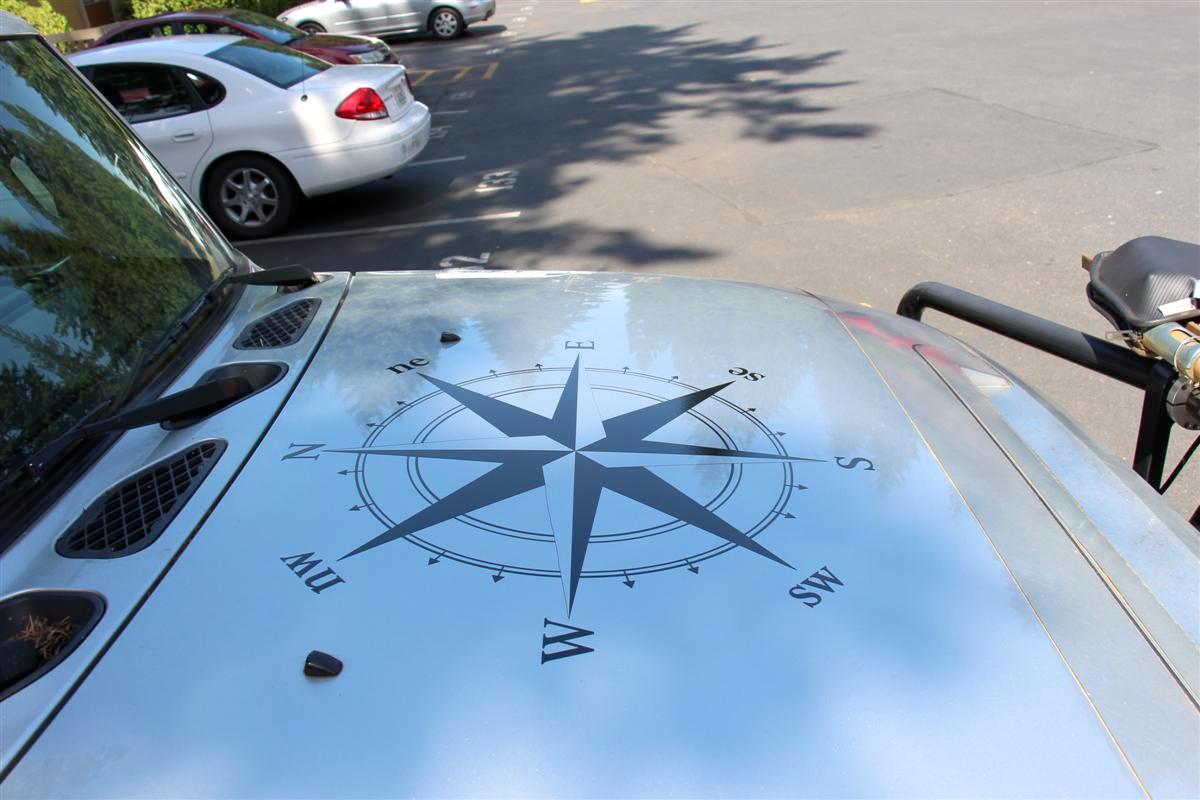
Side shot, takes up more of the hood than the 22" one
Another side shot, kind of hard to get more detail, my rig is in the full sun right now
I talked with a local graphics/sign/vehicle wrap company last week, and I stopped in Friday to show them my butchered job I did on the Amazon compass decal.
He said they could not really fix it, and while it was OK quality, it is not as good as the 3M and laminated material they use.
The one I had on there was not laminated with a protective coating.
He took a picture of mine, and his graphics artist duplicated the one I had, but made it 24"x24" instead of 22"x22", I like it.
I will keep an eye on it to see how it does, but this stuff is made to be outdoors.
So far I am very happy with it.
If anyone local or not local is interested in the design, you can get a hold of the shop and see it they can send the file since I had to pay a digitizing fee, and get one of these for your rig.
Links:
Fast Signs Main Site
Fast Signs Of Auburn, WA
Pictures:
Closeup shot, an exact duplicate of the other one
Yeah...
Side shot, takes up more of the hood than the 22" one
Another side shot, kind of hard to get more detail, my rig is in the full sun right now
07-01-2017, 06:03 AM
#455
Adventure Tool Company Atlas Map Case 7-1-2017
I needed a nice case to keep my atlas in to protect it, and I remember seeing a nice one on Adventure Tool Companies website, so I ordered one, and it showed up this past Thursday.
As with anything from Adventure Tool Company, this Atlas Map Case is made in the USA in Colorado of heavy waxed canvas and MILSPEC components.
This is the fourth item now I have bought from Paul and Amy from their company.
All of their products ships with heavy wrapping paper and string around it, and a thank you card, a very nice personal touch!
I had another Atlas, but was due to for an upgrade to a newer addition when I did a little research on Amazon, and found that a lot of people prefer the Washington Benchmark one better, so I went with it.
I remember from surfing Adventure Tool Companies site before that they had a case for these type of atlases to protect them, so I ordered one up earlier this week.
This is a great way to keep it nice looking.
In addition to using GPS and Gaia Maps on my Android NVIDIA Shield tablet I bought earlier to map out and set waypoints for futures visits of campsites, the Atlas is a great tool to use as it shows most of the logging roads, lakes, and trails I want to find to check out new campsites.
If you are looking for a great way to keep your atlas nice, pick up one of these from Paul and Amy.
It smells nice too
Every time I open up the cargobox, I can smell the canvas of my three tool rolls I bought from them, simply intoxicating.
Links:
Atlas Map Case
Pictures:
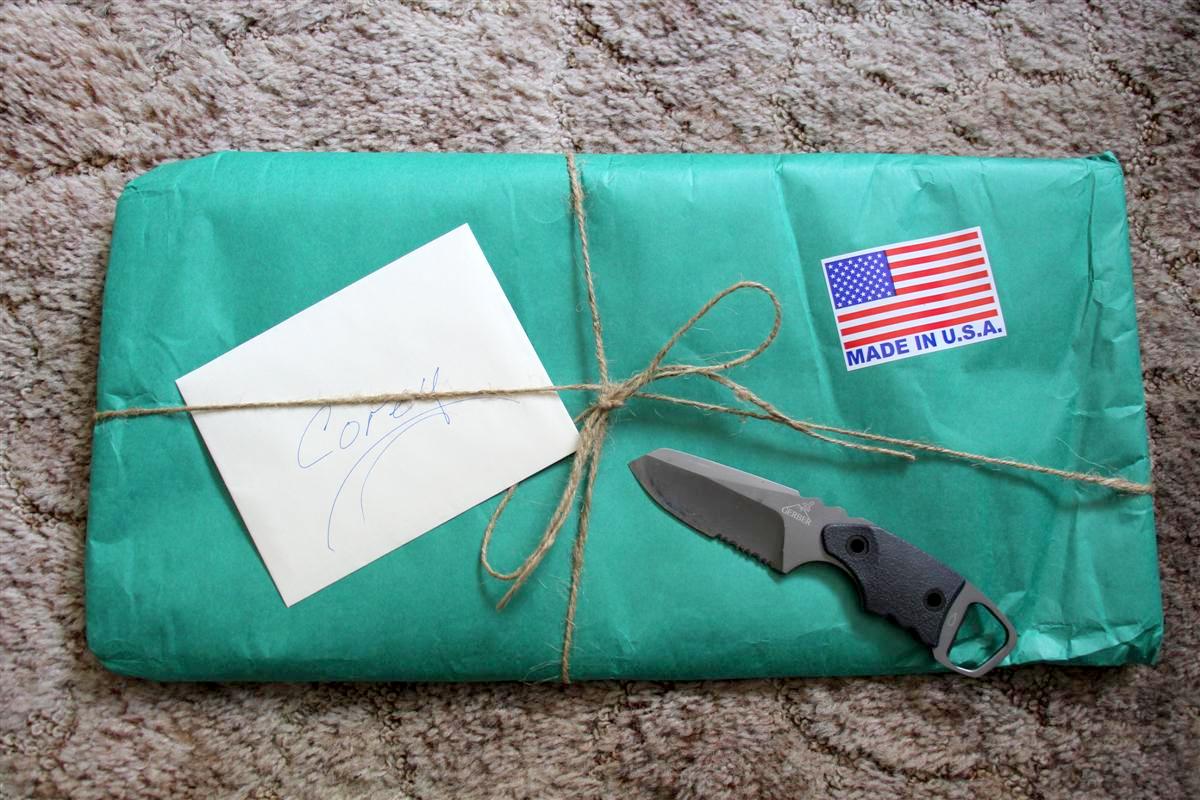
This is always how their products arrive after you take it out of the shipping envelope

A thank you card, and a sticker
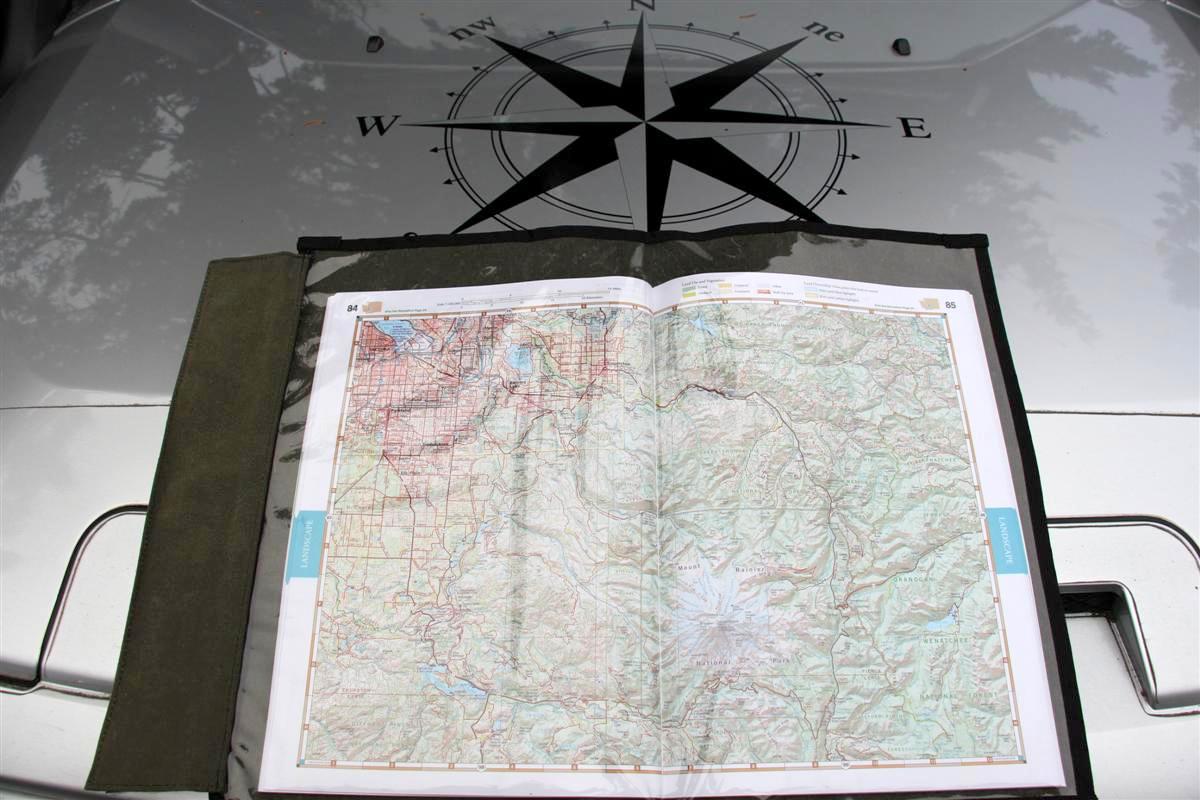
Atlas case opened up on my hood, and the flap on the left side is Velcro in the open position, it folds over on the opposite side
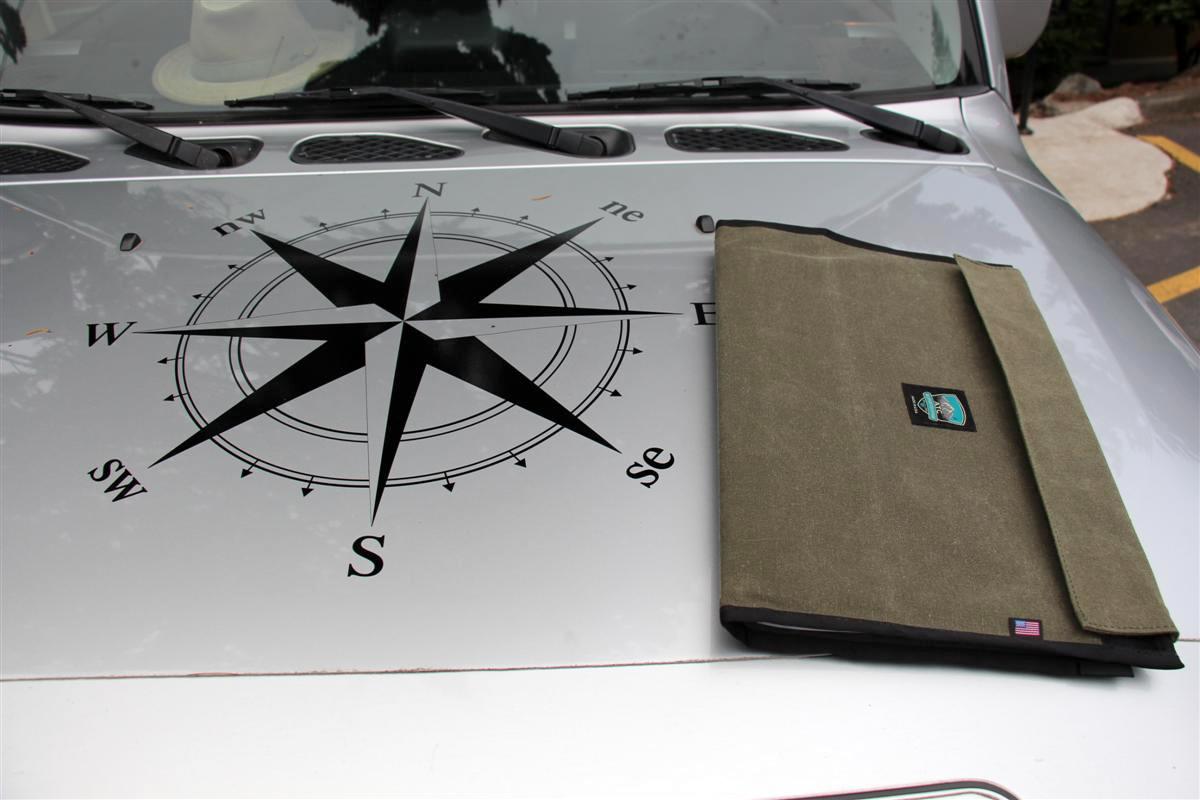
Case and atlas folded, and the Velcro flap you open to gain access to the atlas is now closed
As with anything from Adventure Tool Company, this Atlas Map Case is made in the USA in Colorado of heavy waxed canvas and MILSPEC components.
This is the fourth item now I have bought from Paul and Amy from their company.
All of their products ships with heavy wrapping paper and string around it, and a thank you card, a very nice personal touch!
I had another Atlas, but was due to for an upgrade to a newer addition when I did a little research on Amazon, and found that a lot of people prefer the Washington Benchmark one better, so I went with it.
I remember from surfing Adventure Tool Companies site before that they had a case for these type of atlases to protect them, so I ordered one up earlier this week.
This is a great way to keep it nice looking.
In addition to using GPS and Gaia Maps on my Android NVIDIA Shield tablet I bought earlier to map out and set waypoints for futures visits of campsites, the Atlas is a great tool to use as it shows most of the logging roads, lakes, and trails I want to find to check out new campsites.
If you are looking for a great way to keep your atlas nice, pick up one of these from Paul and Amy.
It smells nice too
Every time I open up the cargobox, I can smell the canvas of my three tool rolls I bought from them, simply intoxicating.
Links:
Atlas Map Case
Pictures:
This is always how their products arrive after you take it out of the shipping envelope
A thank you card, and a sticker
Atlas case opened up on my hood, and the flap on the left side is Velcro in the open position, it folds over on the opposite side
Case and atlas folded, and the Velcro flap you open to gain access to the atlas is now closed
07-22-2017, 08:10 AM
#456
Trasheroo Installed 7-22-2017
Bought this years ago, but never got around to putting it on.
I have trued unsuccessfully for the past few weekends with no luck.
I know they say on the FJ Cruiser to cross the straps at the top of the tire, but I could not get it to work.
Plus I have two sets of Maxtrax on the Maxtrax hanger on my tire, and that takes up some room.
If you have a swingout spare tire carrier on your bumper, it is a lot easier to install from from I have read.
Also a woman I follow on Instagram who has an FJ Cruiser opened up her rear window to get to the straps.
Since I have a rear ladder, my window will not open far enough to try that trick.
The way the Trasheroo comes is the top and bottom straps are made to hook together, but what I did was take off the buckles and made it so the top straps would connect with each other, and same for the bottom.
And instead of going over the spare tire, I ran the buckles on the top through the big slots on the Maxtrax and connected them and took out as much slack as possible and reran the right strap through the Maxtrax again so it would be tight.
For the bottom two straps I ran the left side behind the Maxtrax, and the right side buckle through one of the Maxtrax slots again.
The bag is nice and tight, and it not going anywhere, unless a thief decides he wants it.
Stuffed some tall kitchen drawstring trash bags in the upper zippered flap, and according to their site, it can take a 30 gallon trash bag in the main compartment which I will pick up tomorrow during a grocery run.
That will keep the main compartment clean from liquids and other nasty trash.
Besides using this for trash accumulated during camping trips, it will be used for carrying a firewood bundle.
Links:
Trasheroo, Off Road Spare Tire Trash Bag
Specs
Pics:
Top straps run through the Maxtrax
Bottom straps ran behind the Maxtrax
Trasheroo ready for work
07-28-2017, 01:45 PM
#457
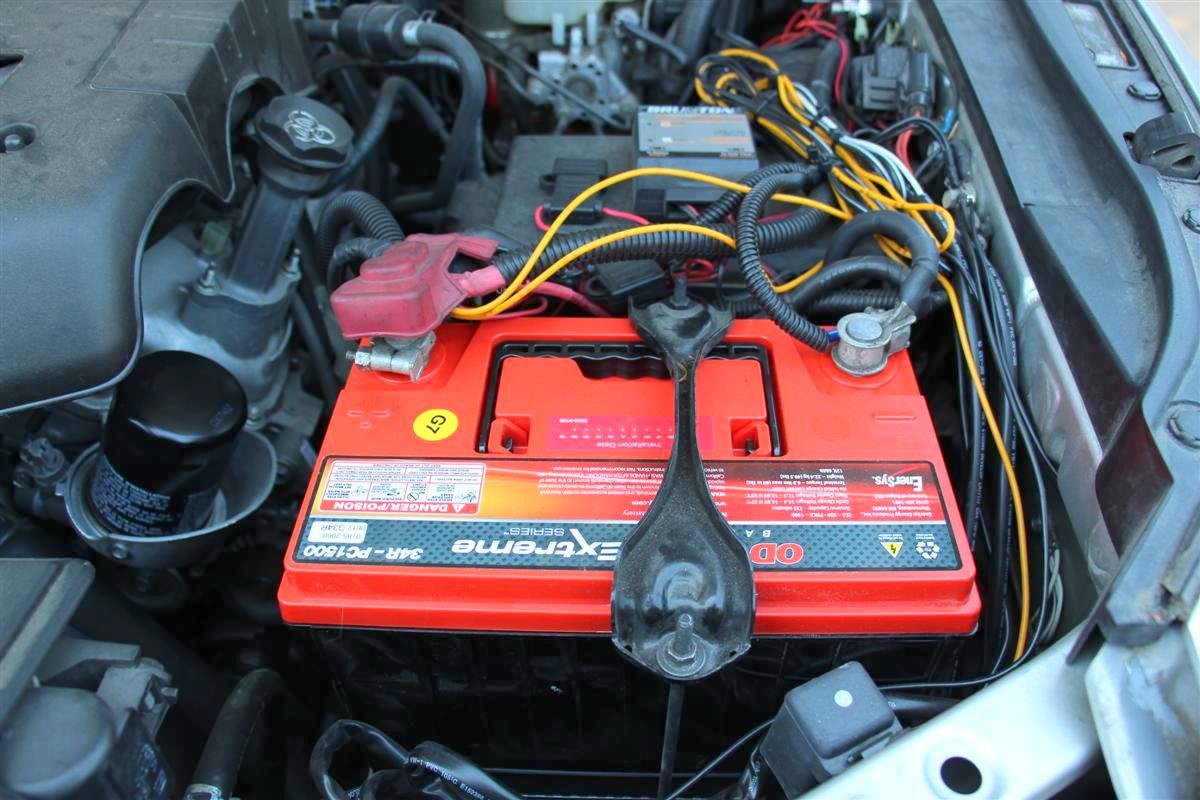
Odyssey 34R-PC1500 Extreme Battery Installed 7-28-2017
I was on my second Toyota battery, and it recently started to get weak.
The original Panasonic one from July of 2006 ran for seven years, and kept the ARB fridge going too on camping trips, as the fridge was not wired to the aux battery.
Now the second Toyota battery lasted around four years also running the old ARB fridge at times.
My new fridge, the National Luna Weekender 50 Fridge/Freezer is wired directly to the auxiliary battery, and I think that is was ended the Redtop that was in there, as that was also a starting battery.
The new fridge is doing much better on the Optima Yellowtop since it is a deep cycle one.
Back on topic...after mucho research of what Toyota owners were running for a starting battery, I went with the Odyssey 34R-PC1500 AGM.
The battery to get years back was the Sears Diehard Platinum, but that went by the wayside, and is no longer available.
The off-road shop I deal with the owner has a 4Runner, and he is running the same Odyssey they put in my rig today.
The Toyota battery was showing around 12.2v when the engine was off, while the new Optima was showing 12.9 to 13v at rest.
The new Odyssey is resting right now after the engine being off for two+ hours is 12.8v, and I am sure it will be better once it is fully charged up from driving more.
The only accessories that will be powered by it will be the two 12v outlets in the rear of the FJ, and the CB, so not really much of a drain on it.
And the winch is wired to the starting battery too.
Yes, it is a jungle under the hood with the two sets of ARB Intensity LED lights, the Rigid rock lights, the Blue Sea auxiliary fuse box in the passenger footwell side panel (it powers the CB and twin 12v outlets back in the stern), the wires for the solar charge controller for the Powerfilm 60 watt solar panel for the starting battery, and maybe a few other things such as the alarm, dual 12v gauge in the cab, etc.
Later in the near future the shop will be installing another Blue Sea box or if there is something better and wire it to the new battery, and then run most of the accessories off of it, thus clearing up so many wires going to the positive terminal now.
I thought about one of those Source controllers where all of your accessories switches are built into it, but I already have the light switches hard wired and mounted to the rig inside, and I want to keep it that way for now.
Once the new box gets installed, it will look a lot tidier under there for sure.
Links:
ODYSSEY Auto/LTV Battery Model 34R-PC1500T
(Group 34 with tin-plated brass SAE automotive posts - reversed terminals)
Auburn Car Repair & Offroad
Pics:
Closeup of the new battery
Showing both batteries, and yes Virginia, it is a mess on the new battery which will be rectified before too long.
In fact after I post this I am going to call up John the shop owner and ask which would be the best box to go with.
The Blue Sea auxiliary box mentioned earlier that is in my footwell kick panel
10-22-2017, 09:06 AM
#458
Goose Gear Cargo Drawers Installed 10-22-2017
The cargobox I have had in my FJ Cruiser since day one was actually made for my '91 4Runner by a carpenter at Boeing.
It is heavy, very thick, and not a lot of room inside of it, but it has done the job since July of 2006 for the FJ.
Lately I have been thinking of a new drawer setup that is light weight, durable, bigger inside, and good looking
The Goose Gear stuff caught my attention, but it is not cheap, but it is very well made, and a lot of folk's are running their stuff in their rigs.
I contacted Brain there, and began a dialogue of what size we could come up with to work best in my FJ Cruiser.
At a future date I will get the FJC plate system that bolts down in the back of the FJ utilizing the cargo hold down bolts.
The cargobox will tie in with it, and also bolt to it making it much safer.
At first I was thinking of getting two of the taller drawer modules you can see listed on their site, but for them to work being so tall, you cannot have anything on the rear door like I do, as then the door would not close.
With the shorter cargobox, but still taller than my old one, the stuff on the rear door will not interfere with the door hitting the new box.
The new box is 38 3/8" wide by 27" deep, and 8" tall.
It also sits back further giving me longer drawers than the old box.
The old box is 37" wide by 21" deep (only 16" deep on the left side) by 7" tall as seen in the rear of the old 4Runner.
Being made out of thicker wood, a lot of wasted space compared to the new Goose Gear unit.
I also bought the Trekpak at 4" high to create specific sized storage areas within the drawers, and also some heavy duty toolbox drawer liner to put down first to protect the bottom of the drawers, and also to keep gear from sliding around.
At a future date I may add in a Tembo Tusk fridge 28" slide for the right side so I can put the Trail Kitchens chuckbox on it.
This way I can cook on it and use it if I do not want to setup the chuckbox on a camping/picnic table.
Very happy with the way the box turned out, and it sure is nice having a little more room for gear in it.
I will be ordering the FJ Cruiser plate soon to keep the box secure, and also from tipping back when you have both drawers out.
You can see how it tips back in the video below the pictures.
Links:
Goose Gear
Side x Side Drawer Module
FJ Cruiser Plate System
TrekPak 4" x 46" Strip
TrekPak Cut Tool
TrekPak Pins and Tabs
Pics:

'Tis a good fit the new Goose Gear cargobox
The TrekPak drawer dividers is very cool to work with, as you can customize individual compartments with it to fit your gear/tools
Picture of the old cargobox above
It is heavy, very thick, and not a lot of room inside of it, but it has done the job since July of 2006 for the FJ.
Lately I have been thinking of a new drawer setup that is light weight, durable, bigger inside, and good looking
The Goose Gear stuff caught my attention, but it is not cheap, but it is very well made, and a lot of folk's are running their stuff in their rigs.
I contacted Brain there, and began a dialogue of what size we could come up with to work best in my FJ Cruiser.
At a future date I will get the FJC plate system that bolts down in the back of the FJ utilizing the cargo hold down bolts.
The cargobox will tie in with it, and also bolt to it making it much safer.
At first I was thinking of getting two of the taller drawer modules you can see listed on their site, but for them to work being so tall, you cannot have anything on the rear door like I do, as then the door would not close.
With the shorter cargobox, but still taller than my old one, the stuff on the rear door will not interfere with the door hitting the new box.
The new box is 38 3/8" wide by 27" deep, and 8" tall.
It also sits back further giving me longer drawers than the old box.
The old box is 37" wide by 21" deep (only 16" deep on the left side) by 7" tall as seen in the rear of the old 4Runner.
Being made out of thicker wood, a lot of wasted space compared to the new Goose Gear unit.
I also bought the Trekpak at 4" high to create specific sized storage areas within the drawers, and also some heavy duty toolbox drawer liner to put down first to protect the bottom of the drawers, and also to keep gear from sliding around.
At a future date I may add in a Tembo Tusk fridge 28" slide for the right side so I can put the Trail Kitchens chuckbox on it.
This way I can cook on it and use it if I do not want to setup the chuckbox on a camping/picnic table.
Very happy with the way the box turned out, and it sure is nice having a little more room for gear in it.
I will be ordering the FJ Cruiser plate soon to keep the box secure, and also from tipping back when you have both drawers out.
You can see how it tips back in the video below the pictures.
Links:
Goose Gear
Side x Side Drawer Module
FJ Cruiser Plate System
TrekPak 4" x 46" Strip
TrekPak Cut Tool
TrekPak Pins and Tabs
Pics:
'Tis a good fit the new Goose Gear cargobox
The TrekPak drawer dividers is very cool to work with, as you can customize individual compartments with it to fit your gear/tools
Picture of the old cargobox above
10-22-2017, 10:55 AM
#459
that is a pretty sweet box. Allows much better organization than what you had befoe. I would love to get one but a little too much for my budget. Plus I am still torn between having the convience of the drawer but losing head room since I plan on sleeping in the back.
The main material they build it out of, 80-20 extruded aluminum strut gets scapped like crazy at work, I wish i could snag a bunch.
they do have kits on a guy could use as a base.
The main material they build it out of, 80-20 extruded aluminum strut gets scapped like crazy at work, I wish i could snag a bunch.
they do have kits on a guy could use as a base.
10-22-2017, 11:06 AM
#460
Thanks Robb.
Yeah, Goose’s stuff is not cheap, even the TrekPak stuff is pricey.
And that steel plate I am going to get?
$400, ouch, just for a steel plate, but it is made to bolt into the FJ with the FJ tie down loop area, and the plate is predrilled as is teh box to connect to each other.
Could you install a cargobox and have a risen area in front of it to match the height to make a sleeping platform?
Take a look on Goose’s page for an idea of platforms, they have them for the 4Runners I think.


