What should have been a simple brake job = brake job from hell.
 06-26-2009, 05:28 AM
#1
Registered User
Thread Starter
Join Date: May 2009
Posts: 100
Likes: 0
Received 0 Likes
on
0 Posts
What should have been a simple brake job = brake job from hell.
On my days off thought I would put on new rotors up front and new pads. Went ahead and put on a new Master Cylinder as well. Once I got into the job I found out I had a frozen piston on one of my calipers so off to Checker for two new calipers. Get the new calipers on, the pads in, bench bleed the MC and get that installed. Bleed each wheel (pass rear, driver rear, pass front, driver front & LSPV) and have clean, steady stream of fluid.
This is the LSPV bleeder right?
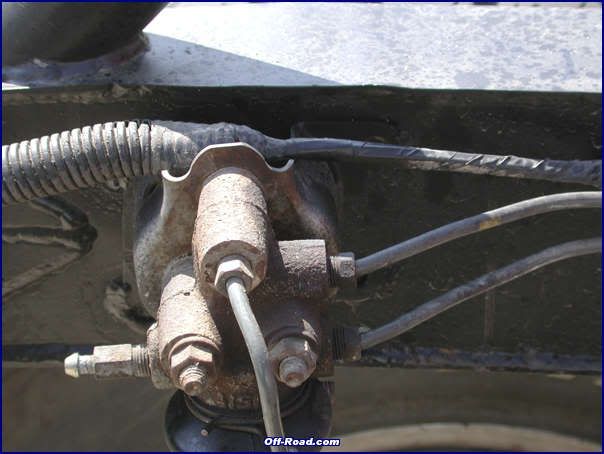
Here's the problem...I have no pedal pressure. Are there any other bleeder valves I'm missing? With the truck off I have mild pressure but pedal goes to the floor. With truck running it's a dead pedal. My instincts tell me it's air in the system but....I can't get any more air out of the bleeder screws and steady, clear stream of new fluid is coming out.
So now what? I have stared at the problem for too long and have lost my perspective!!!
I should add that I did the pump, pump, pump....bleed method with a buddy and I also used my motive bleeder...nothing working. I will try to gravity bleed them later on but looking for any other ideas.
This is the LSPV bleeder right?
Here's the problem...I have no pedal pressure. Are there any other bleeder valves I'm missing? With the truck off I have mild pressure but pedal goes to the floor. With truck running it's a dead pedal. My instincts tell me it's air in the system but....I can't get any more air out of the bleeder screws and steady, clear stream of new fluid is coming out.
So now what? I have stared at the problem for too long and have lost my perspective!!!
I should add that I did the pump, pump, pump....bleed method with a buddy and I also used my motive bleeder...nothing working. I will try to gravity bleed them later on but looking for any other ideas.
Last edited by Uisge Beathe; 06-26-2009 at 05:34 AM.
 06-26-2009, 07:36 AM
#2
Registered User
Join Date: Dec 2008
Location: San Diego
Posts: 1,145
Likes: 0
Received 0 Likes
on
0 Posts
Just a thought. Try again without the pump pump method. Instead open the bleeder before any pedal pressure is applied, tell your helper to push down slowly all the way to the bottom, then close the bleeder before he can let up. After he has let the pedal return to the top, repeat. Do not pump at all with this method. We do not want a possible bubble from getting agitated and only want fluid flow going one way. Out.
Expect to use a lot of brake fluid doing this. Do each wheel 5 or 6 times before moving to another wheel. Hopefully you are getting a good stream without bubbles before moving to another wheel. Start with the bleeder farthest from the master cyl and work forward.
Let us know what happens.
Expect to use a lot of brake fluid doing this. Do each wheel 5 or 6 times before moving to another wheel. Hopefully you are getting a good stream without bubbles before moving to another wheel. Start with the bleeder farthest from the master cyl and work forward.
Let us know what happens.
06-26-2009, 07:42 AM
#3
Registered User
Thread Starter
Join Date: May 2009
Posts: 100
Likes: 0
Received 0 Likes
on
0 Posts
That's a pretty good suggestion, thanks!!! Yeah...I have a couple of the large bottles of brake fluid on hand and have already gone through enough to have, in theory, flushed the brakes 2.5 times over.
06-26-2009, 07:55 AM
#6
Registered User
Thread Starter
Join Date: May 2009
Posts: 100
Likes: 0
Received 0 Likes
on
0 Posts
I try to also, it's just with originally bleeding I was capturing existing, old, contaminated fluid into the recovery bottle and kept thinking to myself...any minute now it's gonna work. So I was mixing new and contaminated and just kept topping off.
Trending Topics
06-26-2009, 08:05 AM
#10
Registered User
Thread Starter
Join Date: May 2009
Posts: 100
Likes: 0
Received 0 Likes
on
0 Posts
Another possibility is maybe some of the plastic threads on the bleeder kit stripped off and blocking the master cylinder and hydraulic hard line.
I guess it's possible too, that the "new"/reman calipers are bad instead/also.
I don't see any leaks anywhere but I have been bleeding over and over so my screws and calipers are dribbled with brake fluid so I can't say with absolute certainty that I don't have a leak somewhere but with just pumping and not opening the screws the fluid level stays constant...granted it would be nominal if it's a small leak but I have tried pumping for a while to see if I have a leak and can't find one or lose any fluid out of the reservoir.
Last edited by Uisge Beathe; 06-26-2009 at 08:10 AM.
06-26-2009, 08:15 AM
#12
Registered User
Why did you replace the master in the first place?
I'd rebuild the OEM master before I replaced it with a crappy parts store one. No parts are better than Toyota OEM parts.
I'd rebuild the OEM master before I replaced it with a crappy parts store one. No parts are better than Toyota OEM parts.
06-26-2009, 08:38 AM
#13
Registered User
Thread Starter
Join Date: May 2009
Posts: 100
Likes: 0
Received 0 Likes
on
0 Posts
I had planned on putting on steel braided lines, new rotors and new pads. A new master cylinder just made sense to do as well. After looking at the flare nuts on the hard lines connecting to the rubber lines I didn't dare risk rounding those rusted b@st@rds off so I left the rubber lines alone.
Didn't plan on changing the calipers but had a frozen piston.
Guess if I can't figure it out I can return the reman MC and get one from the Stealer. None of the auto parts places around here seem to carry rebuild kits anymore. I went to Checker/Kragen/O'Reilly, Pep Boys, AutoZone they still show it in their computer but nobody carried them.
06-26-2009, 05:38 PM
#14
Registered User
Thread Starter
Join Date: May 2009
Posts: 100
Likes: 0
Received 0 Likes
on
0 Posts
I tried all variations of bleeding again...engine on, engine off, pumping, just one press and hold, etc. After no improvement I figured it has to be the equipment and started swapping any "known good" pieces back on.
Since the old calipers were toast with the frozen piston that really just left the old master cylinder. I took the "new" one off and bench bled the old one and put it back on and voila!!! It was a bad "New" master cylinder.
I was thinking it might be a bad "new" caliper because it looked like it was weaping fluid from the threads of the bleeder screw when I would crack it open...so this saga may be continued but for now it's good to go.
The brakes are a little "chatty" but both the rotors and the calipers are brand new and I'm trying to take it slow and bed them in appropriately. Actually...the only real chatter comes from braking when baking up. The slots in the new rotors probably have something to do with that though.
Thanks to everyone for their input, they were all good suggestions.
I will chalk this one up to experience. I read somewhere, I think on here, that experience is a cruel teacher because she gives the test first and the lesson later.
07-26-2009, 03:02 PM
#15
Registered User
Join Date: Oct 2008
Location: Kansas
Posts: 126
Likes: 0
Received 0 Likes
on
0 Posts


Thread
Thread Starter
Forum
Replies
Last Post
kgcwb44
86-95 Trucks & 4Runners (Build-Up Section)
4
01-29-2023 10:02 AM
jasonty
Pre 84 Trucks (Build-Up Section)
41
12-23-2018 01:00 PM


