Finally got OME Lift - 881/890 - Pics to come!
 07-09-2010, 05:59 AM
#1
Finally got OME Lift - 881/890 - UPDATED (Pic Heavy!) Power inverter and Strobes Too!
I finally pulled the trigger on the OME lift last night after saving for a long while. I'm pumped to be getting the lift. After reading about 5 different websites for months, I settled on the OME 881/890 with 04/27 shocks. Got the top plate spacer too, for the full 3".
I'm going to try to take tons of pictures throughout the install process and will definitely post when finished.
I'm not sure when I'll get the time/help to complete the install with school and work in the way of things. Most likely within the next couple of weeks. Just wanted to share the great news and mark my spot for my own "just lifted my rig" thread.
Also, from what I've read, it seems that the differential drop/adjustable panhard are borderline necessary with the 3" lift. What are your thoughts on this? (especially if you have the same lift)
I'd like to get whatever I really need now and get it installed in one swoop, but if I don't need it, then I don't really want to spend the money right now. Without knowing more about these components and their functionality, it's hard to make that determination personally.
EDIT:
Waiting for diff. drop and panhard drop to install. But here's the pile of junk:
I'll probably end up getting it all in and aligned and whatnot next weekend and Monday.

EDIT:
Here's the lift pics! I know it's taken me nearly a month to get these posted. School has just started back and I've had to move at the last minute and deal with an a-hole landlord, so life has gotten in the way of the 4runner, but here's the pics post lift.
I know this isn't a great before pic, but time was limited and all I had was the cell phone.


We had to really work with the pry bar and some wedges to get the first front assembly in. It took us about 30 minutes just to get the first front bolt in.


I didn't think we'd need the compressor to get the fronts in because I bought them assembled, but it definitely helped alot.

Fronts all in and assembled. After the first front assembly went in, the second one only took about 10 or 15 minutes.

This is a pic with the fronts finished, about to pull out and turn around to do the rears.

Now for the rears:
Got it jacked up and the tire off. As you can see, I didn't remove the rear wheels/tires when I painted my rims about 6 months ago.

Another shot about to start taking out the old stuff.

We fought with the old shocks, and eventually resorted to using a hack saw to just cut them out.

Another shot of the hacksaw action. We wrangled with them for about 20 minutes each back and forth all over the place and they just wouldn't budge. So, the hacksaw it was. I wanted to save all the stock parts in case I ever wanted to revert to stock, but there was just no way to remove the shocks cleanly.

A shot with the new stuff installed. The installation on the rear took about 30 minutes total for both sides. But it did take about an hour to get the old shocks/springs out.

This is a shot right after it was installed. The front looks a little high here, but it's just the unlevel ground and need for alignment.

This is another shot shortly after the lift, after I got alignment done.

This is how she sits today. I took off the crappy excuse for nerf bars/running boards that I had on there.

Rear shot.

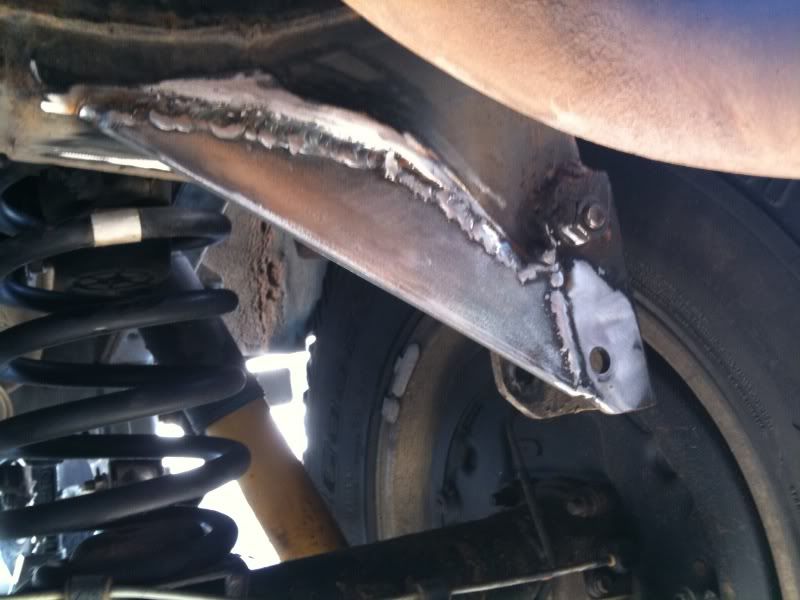
Front underneath shot with installed fronts.

I also took the time while I was doing some work to install a power inverter that I've wanted to install for a long time.
It's a 750w constant inverter. I opened it up and extended all of the lines, resoldered all of the outlets and new leds.
Ran the wires and mounted the outlets and switches. When it's off, it draws no power from the battery. It's already come in handy a couple of times!

Also got one of the Pro-Fit vehicle specific mounts and installed my new GPS (after old one was stolen when my car was broken into).
At this time I also installed a 12v outlet extender in place of the ashtray. This one fit right in perfectly and I even used the predrilled holes for the ashtray to mount the expansion slots. It also has a USB charger slot (far right, blocked by the shifter) which has been great for the mp3 player and cell phone.

Now I can drive through the "lakes" that form downtown when it rains without any fear of getting swallowed up.

So far I've been really happy with the lift. I instantly was impressed with the tightness of the steering and handling and have just now gotten used to the higher stance and different feeling when getting in/out. Overall, it cost me about $1200 for the lift, differential drop, panhard bar drop, and installation.
I have a buddy that works for Michelin that can get me 30% off any Michelin or BF Goodrich tires, so that's the next thing as soon as I can save up some funds!
THANK YOU to the many great people on here that helped me to make the long-awaited decision to buy this lift and that gave me the encouragement to go at installing it. I wouldn't and couldn't have done it without the great advice and time given by the members here. Again, THANK YOU !!!
Just for fun I thought I'd upload these videos of my strobes. I installed these because I used to work for a courier company (who paid for them), and they are fun to play with, off-road of course. They are installed in the front corners and rear backup lights.
Just click on the videos to play them in another window. The flashes look uneven/distorted because the camera can't keep up with them, but they flash 3 pulses on each side back and forth.
Front view: (click on the video to play)
I'm going to try to take tons of pictures throughout the install process and will definitely post when finished.
I'm not sure when I'll get the time/help to complete the install with school and work in the way of things. Most likely within the next couple of weeks. Just wanted to share the great news and mark my spot for my own "just lifted my rig" thread.
Also, from what I've read, it seems that the differential drop/adjustable panhard are borderline necessary with the 3" lift. What are your thoughts on this? (especially if you have the same lift)
I'd like to get whatever I really need now and get it installed in one swoop, but if I don't need it, then I don't really want to spend the money right now. Without knowing more about these components and their functionality, it's hard to make that determination personally.
EDIT:
Waiting for diff. drop and panhard drop to install. But here's the pile of junk:
I'll probably end up getting it all in and aligned and whatnot next weekend and Monday.

EDIT:
Here's the lift pics! I know it's taken me nearly a month to get these posted. School has just started back and I've had to move at the last minute and deal with an a-hole landlord, so life has gotten in the way of the 4runner, but here's the pics post lift.
I know this isn't a great before pic, but time was limited and all I had was the cell phone.


We had to really work with the pry bar and some wedges to get the first front assembly in. It took us about 30 minutes just to get the first front bolt in.


I didn't think we'd need the compressor to get the fronts in because I bought them assembled, but it definitely helped alot.

Fronts all in and assembled. After the first front assembly went in, the second one only took about 10 or 15 minutes.

This is a pic with the fronts finished, about to pull out and turn around to do the rears.

Now for the rears:
Got it jacked up and the tire off. As you can see, I didn't remove the rear wheels/tires when I painted my rims about 6 months ago.

Another shot about to start taking out the old stuff.

We fought with the old shocks, and eventually resorted to using a hack saw to just cut them out.

Another shot of the hacksaw action. We wrangled with them for about 20 minutes each back and forth all over the place and they just wouldn't budge. So, the hacksaw it was. I wanted to save all the stock parts in case I ever wanted to revert to stock, but there was just no way to remove the shocks cleanly.

A shot with the new stuff installed. The installation on the rear took about 30 minutes total for both sides. But it did take about an hour to get the old shocks/springs out.

This is a shot right after it was installed. The front looks a little high here, but it's just the unlevel ground and need for alignment.

This is another shot shortly after the lift, after I got alignment done.

This is how she sits today. I took off the crappy excuse for nerf bars/running boards that I had on there.

Rear shot.

Front underneath shot with installed fronts.

I also took the time while I was doing some work to install a power inverter that I've wanted to install for a long time.
It's a 750w constant inverter. I opened it up and extended all of the lines, resoldered all of the outlets and new leds.
Ran the wires and mounted the outlets and switches. When it's off, it draws no power from the battery. It's already come in handy a couple of times!

Also got one of the Pro-Fit vehicle specific mounts and installed my new GPS (after old one was stolen when my car was broken into).
At this time I also installed a 12v outlet extender in place of the ashtray. This one fit right in perfectly and I even used the predrilled holes for the ashtray to mount the expansion slots. It also has a USB charger slot (far right, blocked by the shifter) which has been great for the mp3 player and cell phone.

Now I can drive through the "lakes" that form downtown when it rains without any fear of getting swallowed up.

So far I've been really happy with the lift. I instantly was impressed with the tightness of the steering and handling and have just now gotten used to the higher stance and different feeling when getting in/out. Overall, it cost me about $1200 for the lift, differential drop, panhard bar drop, and installation.
I have a buddy that works for Michelin that can get me 30% off any Michelin or BF Goodrich tires, so that's the next thing as soon as I can save up some funds!
THANK YOU to the many great people on here that helped me to make the long-awaited decision to buy this lift and that gave me the encouragement to go at installing it. I wouldn't and couldn't have done it without the great advice and time given by the members here. Again, THANK YOU !!!
Just for fun I thought I'd upload these videos of my strobes. I installed these because I used to work for a courier company (who paid for them), and they are fun to play with, off-road of course. They are installed in the front corners and rear backup lights.
Just click on the videos to play them in another window. The flashes look uneven/distorted because the camera can't keep up with them, but they flash 3 pulses on each side back and forth.
Front view: (click on the video to play)
Last edited by 98SR54RUNNER; 11-22-2010 at 07:10 AM. Reason: updated with pics
 07-09-2010, 06:30 AM
#2
Registered User
Join Date: Aug 2002
Location: Phoenix, AZ
Posts: 1,532
Likes: 0
Received 0 Likes
on
0 Posts
I installed my OME lift last month and very pleased with the whole set-up. I also added a 1" BL. Still debating whether or not to add a panhard drop bracket. Here is my posting w/pics if you haven't seen it:
https://www.yotatech.com/forums/f2/d...w-pics-213517/
https://www.yotatech.com/forums/f2/d...w-pics-213517/
07-09-2010, 06:44 AM
#3
Contributing Member
Join Date: Jul 2003
Location: Orlando, FL
Posts: 9,076
Likes: 0
Received 0 Likes
on
0 Posts
Congrats! You will LOVE that lift.
I ran basically that same setup on my '99 - I had the Tundra coils up front though.
You will definitely want the diff drop - the Panhard drop bar/bracket is "optional" but I would go ahead and do it.
Might as well do it right the first time and make everything as close to stock alignment-wise as you can.
That's just my $.02,
Fink
07-09-2010, 06:48 AM
#4
Contributing Member
Join Date: Jul 2003
Location: Orlando, FL
Posts: 9,076
Likes: 0
Received 0 Likes
on
0 Posts
07-09-2010, 07:23 AM
#5
And I will definitely make a build-up thread.
I'm going to do an electrical overhaul as soon as I get the lift on, so I will be posting tons of pics/info on that as well.
I have a long list of stuff to do, but I can't wait! I have a new seat to put in, new VSM and GPS to hardwire, 12v outlets to fix, inverter to wire in, rewiring the strobes/siren/PA, and on and on and on. I'm super pumped about getting started on this stuff!
Last edited by 98SR54RUNNER; 07-09-2010 at 07:34 AM.
07-09-2010, 07:27 AM
#6
Contributing Member
Join Date: Jul 2003
Location: Orlando, FL
Posts: 9,076
Likes: 0
Received 0 Likes
on
0 Posts
Thanks for the input! I will probably at least get the diff. drop for the "cheap insurance" as others have put it.
And I will definitely make a build-up thread.
I'm going to do an electrical overhaul as soon as I get the lift on, so I will be posting tons of pics/info on that as well.
I have a long list of stuff to do, but I can't wait! I have a new seat to put in, new VSM and GPS to hardwire, 12v outlets to fix, inverter to wire in, rewiring the strobes/siren, and on and on and on. I'm super pumped about getting started on this stuff!
Fink
07-09-2010, 07:34 AM
#7
Registered User
Diff drops don't do anything but rotate the differential. In other words, they're useless.
You might want to get 3/2 trim packers (drivers/passenger, respectively) if you want a full 3". I have 881s and after sag I had maybe 1.25/1.75" of lift on my single cab 2.7 Taco. Think about how much heavier your junk is.

You might want to get 3/2 trim packers (drivers/passenger, respectively) if you want a full 3". I have 881s and after sag I had maybe 1.25/1.75" of lift on my single cab 2.7 Taco. Think about how much heavier your junk is.
Trending Topics
07-09-2010, 07:37 AM
#8
Contributing Member
Join Date: Jul 2003
Location: Orlando, FL
Posts: 9,076
Likes: 0
Received 0 Likes
on
0 Posts
Diff drops don't do anything but rotate the differential. In other words, they're useless.
You might want to get 3/2 trim packers (drivers/passenger, respectively) if you want a full 3". I have 881s and after sag I had maybe 1.25/1.75" of lift on my single cab 2.7 Taco. Think about how much heavier your junk is.
You might want to get 3/2 trim packers (drivers/passenger, respectively) if you want a full 3". I have 881s and after sag I had maybe 1.25/1.75" of lift on my single cab 2.7 Taco. Think about how much heavier your junk is.
Could he go without one? Sure.
Should he? I wouldn't.
Fink
07-09-2010, 08:00 AM
#9
Registered User
Oh. The diff drop spacer debate. 
If your wearing through CV boots, lower your lift.
You could also do the boot slide mod.
You ever taken out the diff on a 3rd gen? Seen how it's mounted, Fink?
If your wearing through CV boots, lower your lift.
You could also do the boot slide mod.
You ever taken out the diff on a 3rd gen? Seen how it's mounted, Fink?
07-09-2010, 08:14 AM
#10
Contributing Member
Join Date: Jul 2003
Location: Orlando, FL
Posts: 9,076
Likes: 0
Received 0 Likes
on
0 Posts
Nobody is saying you're wrong scuba, all I said is that I would not run without one.
Why? Because I blew several CV's after lifting my 3rd gen and after the diff drop my problems seem to go away.
Weird how that works.
Fink
Last edited by Fink; 07-09-2010 at 08:16 AM.
07-09-2010, 08:46 AM
#12
Contributing Member
Join Date: Jul 2003
Location: Orlando, FL
Posts: 9,076
Likes: 0
Received 0 Likes
on
0 Posts
If you want to err on the side of your rig/CV's then go for it, if not you can always add it later.
Fink
07-09-2010, 05:23 PM
#13
Registered User
Join Date: Nov 2005
Location: SouthWest Littleton, Colorado
Posts: 1,205
Likes: 0
Received 1 Like
on
1 Post
The diff drop/rotate debate.
True a 1" drop does rotate the diff but it does lower the intermediate shafts if the diff by .462" (~15/32") Just under 1/2"
Read this https://www.yotatech.com/forums/f2/d...angles-137503/ my post (#21) explains the diff rotation/drop measurements
True a 1" drop does rotate the diff but it does lower the intermediate shafts if the diff by .462" (~15/32") Just under 1/2"
Read this https://www.yotatech.com/forums/f2/d...angles-137503/ my post (#21) explains the diff rotation/drop measurements
07-09-2010, 10:30 PM
#14
Registered User
Join Date: May 2007
Location: Denver metro area-CO
Posts: 2,175
Likes: 0
Received 2 Likes
on
2 Posts
I run the 881s with 890s and purchased the diff drop.
Honestly I never saw the need to install it and sold it to another forum member. I will accept the train of thought however that it is cheap insurance "just in case". Given the relatively low cost of a diff drop I may still add it. Toytec is local to me.
just to throw this out there-Sonoran Steel had a page showing how to replace the stock CV joint clamps with plain old worm gear clamps. To me that is also easy preventative measure to lube them up and keep them intact and not slinging grease around the undercarriage.
Gerdo I had never seen a definitive measurement like that and thank you for putting it in here.
98SR5 congrats on ponying up the cash to get this done and we're awaiting the photos. I myself just got the 1" 4 crawler body lift and the poly body mounts so I am giddy with the excitement of getting them on. IRBIS/Quality Auto here I come...
mod on!
Last edited by Ron Helmuth; 07-09-2010 at 10:32 PM.
07-10-2010, 08:17 AM
#15
Contributing Member
Join Date: Jul 2003
Location: Orlando, FL
Posts: 9,076
Likes: 0
Received 0 Likes
on
0 Posts
The diff drop/rotate debate.
True a 1" drop does rotate the diff but it does lower the intermediate shafts if the diff by .462" (~15/32") Just under 1/2"
Read this https://www.yotatech.com/forums/f2/d...angles-137503/ my post (#21) explains the diff rotation/drop measurements
True a 1" drop does rotate the diff but it does lower the intermediate shafts if the diff by .462" (~15/32") Just under 1/2"
Read this https://www.yotatech.com/forums/f2/d...angles-137503/ my post (#21) explains the diff rotation/drop measurements
I run the 881s with 890s and purchased the diff drop.
Honestly I never saw the need to install it and sold it to another forum member. I will accept the train of thought however that it is cheap insurance "just in case". Given the relatively low cost of a diff drop I may still add it. Toytec is local to me.
just to throw this out there-Sonoran Steel had a page showing how to replace the stock CV joint clamps with plain old worm gear clamps. To me that is also easy preventative measure to lube them up and keep them intact and not slinging grease around the undercarriage.
Gerdo I had never seen a definitive measurement like that and thank you for putting it in here.
98SR5 congrats on ponying up the cash to get this done and we're awaiting the photos. I myself just got the 1" 4 crawler body lift and the poly body mounts so I am giddy with the excitement of getting them on. IRBIS/Quality Auto here I come...
mod on!
Honestly I never saw the need to install it and sold it to another forum member. I will accept the train of thought however that it is cheap insurance "just in case". Given the relatively low cost of a diff drop I may still add it. Toytec is local to me.
just to throw this out there-Sonoran Steel had a page showing how to replace the stock CV joint clamps with plain old worm gear clamps. To me that is also easy preventative measure to lube them up and keep them intact and not slinging grease around the undercarriage.
Gerdo I had never seen a definitive measurement like that and thank you for putting it in here.
98SR5 congrats on ponying up the cash to get this done and we're awaiting the photos. I myself just got the 1" 4 crawler body lift and the poly body mounts so I am giddy with the excitement of getting them on. IRBIS/Quality Auto here I come...
mod on!
I'd rather spend $40 now than have to spend that and then some to fix the CV's later.
Fink
07-10-2010, 08:53 AM
#16
Registered User
Join Date: Aug 2002
Location: Phoenix, AZ
Posts: 1,532
Likes: 0
Received 0 Likes
on
0 Posts
On the subject of the panhard drop. The one ToyTec sells is bolt-on, but I see people welding it on. Is welding mostly for stability for off-road so it doesn't break? Since I drive mostly on-road and light trails, could I get away with just bolting it?
07-10-2010, 09:20 AM
#17
Registered User
Join Date: Nov 2005
Location: SouthWest Littleton, Colorado
Posts: 1,205
Likes: 0
Received 1 Like
on
1 Post


Most people can get away without the brace but I know of a few that are breaking welds/metal.
07-10-2010, 09:36 AM
#18
Registered User
Join Date: Aug 2002
Location: Phoenix, AZ
Posts: 1,532
Likes: 0
Received 0 Likes
on
0 Posts
Did you notice any difference when adding the drop?

Last edited by pfdaxe; 07-10-2010 at 09:38 AM.
07-10-2010, 10:05 AM
#19
Contributing Member
Join Date: Jul 2003
Location: Orlando, FL
Posts: 9,076
Likes: 0
Received 0 Likes
on
0 Posts
It's not something that you really notice, at least in my experience.
It's more to keep everything as close to stock as possible.
I didn't notice it at all on my 3rd gen but it was easier for them to align, I do remember that.
Fink
It's more to keep everything as close to stock as possible.
I didn't notice it at all on my 3rd gen but it was easier for them to align, I do remember that.
Fink
07-10-2010, 10:20 AM
#20
Registered User
Join Date: Aug 2002
Location: Phoenix, AZ
Posts: 1,532
Likes: 0
Received 0 Likes
on
0 Posts
Gotcha. Thanks. I'll prob get one and bolt it and see how that works. I really don't hit anything hard to snap it.


