When you click on links to various merchants on this site and make a purchase, this can result in this site earning a commission. Affiliate programs and affiliations include, but are not limited to, the eBay Partner Network.
Hey Everyone,
Well, better latter than never! I finally decided to put my project up for sale but before I do, I want to document some of what I have put into the 4Runner, hopefully to help the next owner prioritize what needs to be done next.
I picked up this 1990 3VZ-E Automatic 4runner off of craigs lists back in late March 2014. It had a bad rod knock so I only drove it around the parking lot to make sure the major systems were all functional. We settled on $800 for the 4runner, too much in hind sight Had her trailer-ed back to the condo and started getting ready to pull the engine:
It had some body damage from where the P.O. attempted to go off road and ended up finding ... something, not sure if it was a tree or a rock or what.
The list of things I wanted to correct or change was already growing. I wasn't happy with the oversize BFG's on crappy steel no-name wheels, Too much poke, too much weight, too much noise. Plenty of time to address those things after I get her running and smoged.
Engine Rebuild
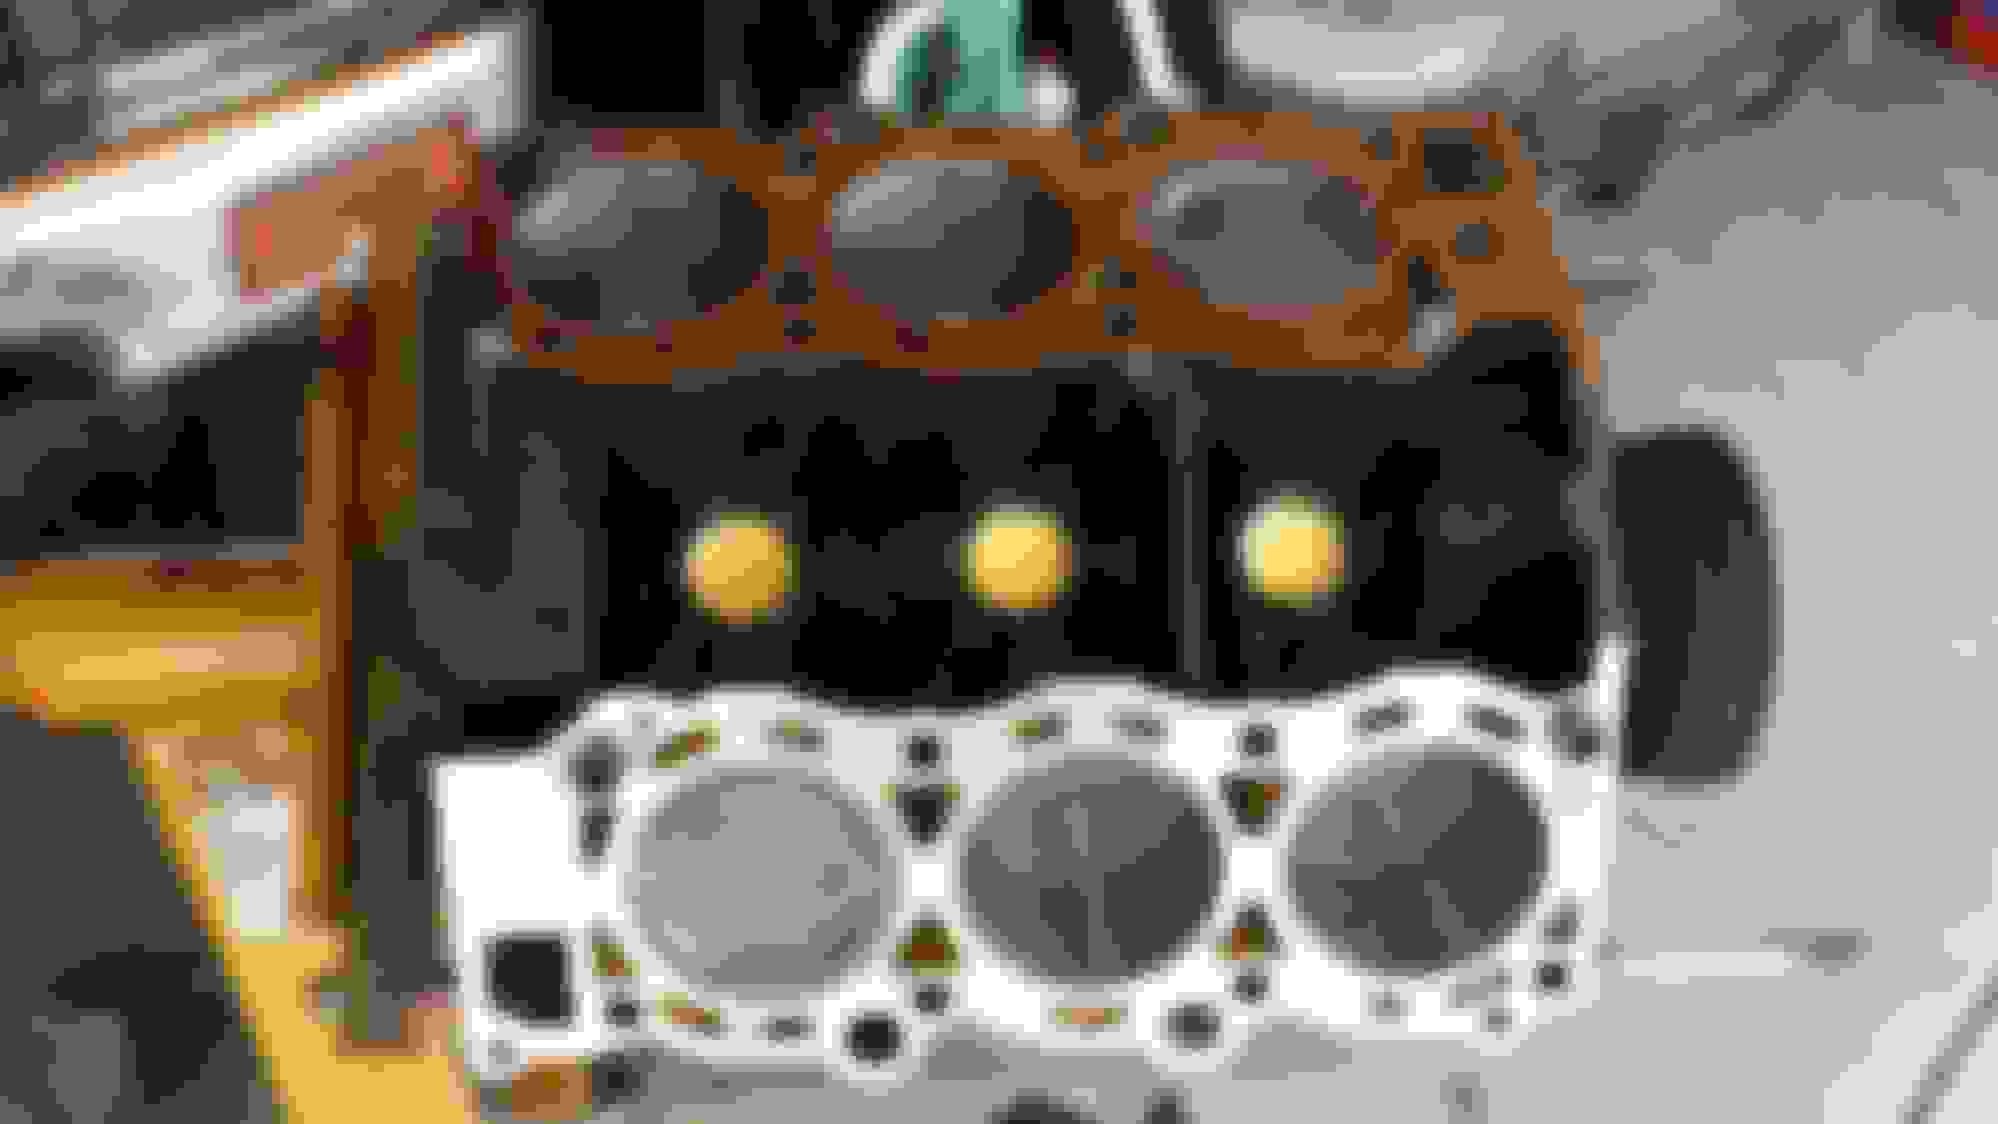
I didn't waste any time getting the engine out and torn down:
Yup, it was rod knock! 4 spun rod bearing... hence why i gave her the nickname 4spunner!
The block, heads, and rotating assembly went off to ECM in Santa Ana (Engine Components & Machine) for machining, cleaning, and reassebly of the heads. My neighbor and I put the rotating assembly together ourselves so we could double check clearances etc. They ended up boring and honing the block, surfacing the deck, sourcing and grinding a replacement crank, resurfacing the heads, replacing a couple valves etc.
While I was waiting on the machine shop I started ordering parts. Lots and Lots of parts including:
Flame thrower injectors
Doug Thorley Headers
Pistons, rings, bearing, 2 rods, crank, gaskets, head bolts, under manifold water pipes, oilpump, water pump, Timing set, oil pump, belts, hoses, thermostat etc etc. The next couple months were a steady stream of packages from Rock-Auto, Village Toyota, summit, etc.
Once we got all the parts back from the machine shop, we started building the motor back up.
As you can see, I had to be creative with some of the connectors on the waterblock sensors... I tried to get a replacement engine harness but the only one I could find was from the wrong year and was not plug compatible. I used weather pack and metripack connectors on both sides of the repairs.
Almost ready to go back in...
Fuel System Overhaul
No Sense running a brand new motor and injectors on an old fuel system so while the motor was out, I decided to redo the fuel system just to avoid potential issues.
New pump and sock went into the tank (which was clean and in good condition inside and out), new filter in the line, and a new flex-line that supplies the rail.
New FPR was added shortly after firing up the new motor, i diagnosed it bad while doing some initial tuning.
Got the motor back in and ready to fire up by the end of May 2014. At this point I was in probably 4,000 thousand (including misc summit order, fluids, some of the suspension
stuff mention latter).. we used my neighbors jobber discount at the machine shop
and I did most of the labor. Machine shop bill was around $1500 including the crank and 2 new rods. Figure another $500 for misc gasket kits, head bolts, coolant hoses,
fluids, permatex, etc and another Couple hundred for Pistons, rings, bearings, etc. I'll add up the receipts and update latter.
Engine Management
Ohh and add another $1,000 for the Perfect Power SMT8 piggyback ecu and the thorley headers... So... 4K in at this point..
Got her fired up, seated the rings, topped off the fluids and started driving it to put some break-in miles on before going for my first smog.
In order to dial in the injectors and keep an eye on how the new engine was doing, I picked up an AEM wide-band O2 sensor. I also got a new oem sensor and intercepted the singal out with the SMT8 so that I could offset the narrow band target if I wanted or needed too do so. I installed the gauge under the ashtray, I'll find a picture at some point to post up.
Brakes Part 1:
So.. It turns out the brakes simply didn't work well enough to drive the 4runner with any amount of traffic and the alignment was horrible. I started with front rotors and brake pads (performance friction were the only ungraded pads they had in stock that weekend), fluid flush, and new front lines. A little improvement, but not much.
Front Wheel Bearings, Suspension and Steering Part 1:
I forgot that while the motor was out, I replaced all 4 shocks with a set of Rancho 5,000's. I took her in for an alignment and the wallet started bleeding again.... All the ball joints were shot, The front wheel bearings were loose and worn, etc etc..... The alignment shop (Big O off 4th street in tustin) quoted me over $1,000 to replace the ball joints and do an alignment. I opted to spend the money on parts rather than labor and overhaul the whole front suspension. I could have saved a couple hundred dollars waiting on parts from Rock Auto rather then ordering through Oriley, but I was in a time crunch since I had gotten a 30 day pass from the DMV to put miles on before my first smog was due... I replaced the upper and lower ball joints, the steering damper, the front wheel bearings, one axle (torn cv boot), and both steering arms (the idler arm and the arm connected to the steering box. Steering was still sloppy so I replaced the tie rods and rod ends then finally went to the goodyear on 4th street for a driveable alignment.
Now I had a fresh motor, refreshed suspension, tight steering (thought the alignment still needed work)... Now I needed to get the smog sorted.
First Smog:
I got my first official smog on 6/25/2014. It was a PITA... so many lazy smog techs that don't understand engine management at all. I got turned away more than once because of the wideband 02 sensor. I finally found a legit shell station on 17th street with a by the book tech. He looked up all my E.O. numbers, checked the factory wiring diagram to make sure it was a single sensor car etc etc. It passed, but the nox was high. It looked to me like he ran the test after letting the 4runner sit and cool off a while as the low speed HC's were high as well. More on that topic latter when it was time for my second smog.
The resutls:
Now I had a fresh motor, refreshed suspension, tight steering (thought the alignment still needed work), legal plates... time to drive it and have some fun with the little things along the way.
I made a few trips to LKQ here and there.
Body and Interior:
Replaced the sunroof casset with a fully functioning unit from LKQ, While I was in there I cleaned the drain lines, put a few squares of ra-mat on the roof pannels, added a layer of closed cell foam, cleaned the nasty head liner and put it all back together:
I did a color change on the interior, from blue to gray, I put down som ra-mat in the back, then covered that with a coating of spray bedliner.
Over the next year or so I put about 7,000 miles on the 4runner. Combination of trips up and down the 5 to Doheny from Irvine, running around town, back and forth to work etc. I got rid of the steel wheels and oversize BFG's. I opted to refinish the factory aluminum wheels the PO threw in. I used aircraft stripper and black engine enamel. I went with the OEM size 31x10.5 General Grabber AT2's:
Made a HUGE difference in the ride quality and road manners. Sticky, fairly quiet (compaired to the BFG's anyway) better gearing, about 8 lbs per corner reduction in rotating mass.
Along the way I got out the slide hammer, took a trip to one of the mini truck parts yards for an OEM bumper (cost WAY too much so i never went back) and ordered some clips, the front grill and light surrounds, corner markers, and a fender off ebay:
Not bad for a few hours and a few hundred bucks.
I also ordered a full carpet kit off the internet along with a full set of caltrend seat covers to clean up the interior some more.
Ohh, also picked up a set of q-form speaker pods shortly after I installed the head unit, just have cheap kenwoods in them right now.
ISR & 7MGE AFM
I also put together an intake using lots of info from this forum. 7MGE meter and airbox from ebay (paid too much since it did not have a K&N filter in it ), some prefab intake kit from Oriely, some couplers from silicone hoses etc... finished up the road tune... running really good at this point... for a 3.0... it would pull on most of the tired 3.4's around irvine
Brakes Part 2:
As mentioned earlier, the brakes still did not work very well, especially when cold. At some point I pulled one of the wheels and checked the front pads. After 7,000 miles the rotors barely showed any wear at all. Rather than rebuilding the calipers, I opted for a set of remans. Not much improvement so next I replaced the master cylinder, still not much improvement. On a hunch I decided to try a different set of pads, HAWK LTS this time around. Bingo... it was the pads all along. Given the age of the system, I didn't feel too bad about replacing the tired old master cylinder and putting fresh caliper on. They still need a stop or two to get up to temp but you can stand it on it's nose once warm now.
Air Conditioning Overhaul:
In March of 2015 I decided to address the Air Conditioning system. The compressor was toast when I picked up the 4runner as was the condenser. As usual, I decided to replace everything and spent $480 and change at rock auto ordering a complete kit with:
New R134a Compressor
New Condenser
New Receiver, Dryer, Accumulator
New flex lines (high and low pressure)
R-134a seal kit
While I was waiting on the parts I pulled the Evaporator box out, disassembled everything, cleaned the crap out of the evaporator and box,
straightened all the fins on the evap core with small zip ties, and put it all back together.
Cooling Fan & Alternator:
Since I was going to be pulling the nose apart to work on the AC, I decided to replace the factory fan and shroud with a temperature controlled Flex-a-lite fan and shroud (FLX-674 on summit). Parts were ordered at the same time as the AC Ovehaul Kit (March 2015). The fan kit was $350 plus another $50 or so for Misc wiring upgrade, heat shrink etc.
I had read a few horror stories on the forums here about the factory fans coming apart and taking out the hoses and belts..... That was the primary motivation. Never had a single cooling issue since the rebuild including a few trips to San Diego and back in the middle of the summer in the heat of the day (without AC, yuk).
I opted to go ahead and upgrade the alternator first to avoid any potential battery drain issues from running the fan at idle with the AC on. I pulled out what I thought was the factory unit and sent it off to Boyle Future Tech. He called me with good an bad news... Bad news was he did not have the winding in stock he needed, good news is it was already an upgraded alternator. Apparently it came from a 7mge supra or an MR2. I had him go ahead and re work it any way. The results:
Boyle Future Tech Upgraded 7mge Supra Alternator
76 amps at idle
137 amps max
14.2 volt regulator.
I added an extra 8 gauge power lead (with fuse of course) and installed the fan assembly once i got the alternator back.
Starter and Starter Relay Installation:
Shortly after buttoning up the AC and Cooling system mods I started having trouble starting the 4runner. It would do the all too common click on key turn. I went through a number of itterations on the starter. First, having headers makes working on the starter a PITA but I finally figured out the trick is to pull the motor mount allowing you to get the starter in and out with the headers in place.
I started by replacing the contacts, which seemed to work for a month or so before it would refuse to start when the engine was warm / hot. You would just get the click of doom until it the engine cooled all the way down. Then I replaced the plunger with an OEM toyota part, no change, it would fire right up when cold then refuse to turn over when warm. I ordered a denso starter from Rock auto in May 2015 and threw that in. Fired right up and then stranded me at the gas station for 15 minutes before it finally fired up after lots of cussing and banging on the solenoid. I was still thinking it was a problem with the plunger / contacts at this point. I never could find the starter relay and just assumed the manual / diagram I had was wrong for my year and build date.
I then ordered a factory reman from tustin toyota and threw that in. Stranded me again. I bench tested all the combinations of parts i had and could not find a problem. That's when I took a serious look at the wiring diagram, thinking there was a current supply issue. After lots of searching and reading I finally discovered that Automatics never used a starter relay from the factory, instead they ran all the current through the ignition switch. I found a great link somewhere on here to 4 crawlers starter info. I did a few tests with my neighbor and decided to install my own starter relay, using the factory ignition switch wiring to trigger the relay (rather than running all the current for the starter solenoid through the worn ignition circuit).
That was it, never had an issue since. Anyone with an automatic and starter issues after replacing the contacts should seriously consider doing this mod. It only costs a few bucks and will keep you from getting stranded or spending a bunch of money on starters like I did
New Job:
I had started a new position Mid March 2015 with a Hyundai Affiliate. The benefits package included a use it or loose it car allowance for leasing a hyundai or kia vehicle. I sold the FRS and picked up a Kia Sportage SX on the company dime. I took delivery of the sportage late May / Early June. This gave me more time to work on the 4runner. It had started to run like poop when cold and had a fairly consistent misfire when cold.
Cold Misfire Part 1:
As mentioned above, between March and June of 2015 the 4runner had started running poorly when cold with a noticeable misfire until warmed up. I reset the TPS (did I mention that I replaced the TPS right after the rebuild?) put in a new distributor and wires. No change. I pulled the plugs and a couple on the passenger side bank #1 and #5, were black and fouled. At the time I assumed I had just used the wrong plugs (I used NGK Iridium plugs during the rebuild) with too much gap for the stock system. I replaced the plugs with NGK coppers gaped to factory spec. This seemed to clena up the cold miss and I chalked the rest of the poor cold running up to needing to fine tune the 7mge air flow meter.
Finishing the Exhaust:
The factory / cheap aftermarket catback had slowly died over the past yer or so as determined by the loose baffles inside the can rattling around and driving me crazy. I did some googling and found a reputable shop in Santa Anna that had a review from another 2nd gen 3vze owner that had gotten a custom catback done there, A-1 Muffler. I dropped off the 4runner and asked him to make a few tweaks for me, explaining i wanted to stay CARB legal but get the most flow i could. He opened up with the inlet and outlet of the cat, did some work on the factory 02 section of the Thorley Y-Pipe (replaced the narrow section and kept the factory bung in stock location), and built a new catback using a flow master.
I didn't really like the sound of the flowmaster coming from an import background, especially turbo imports, magnaflow was more my style. The workmanship was really good as was the price though. ~$400.
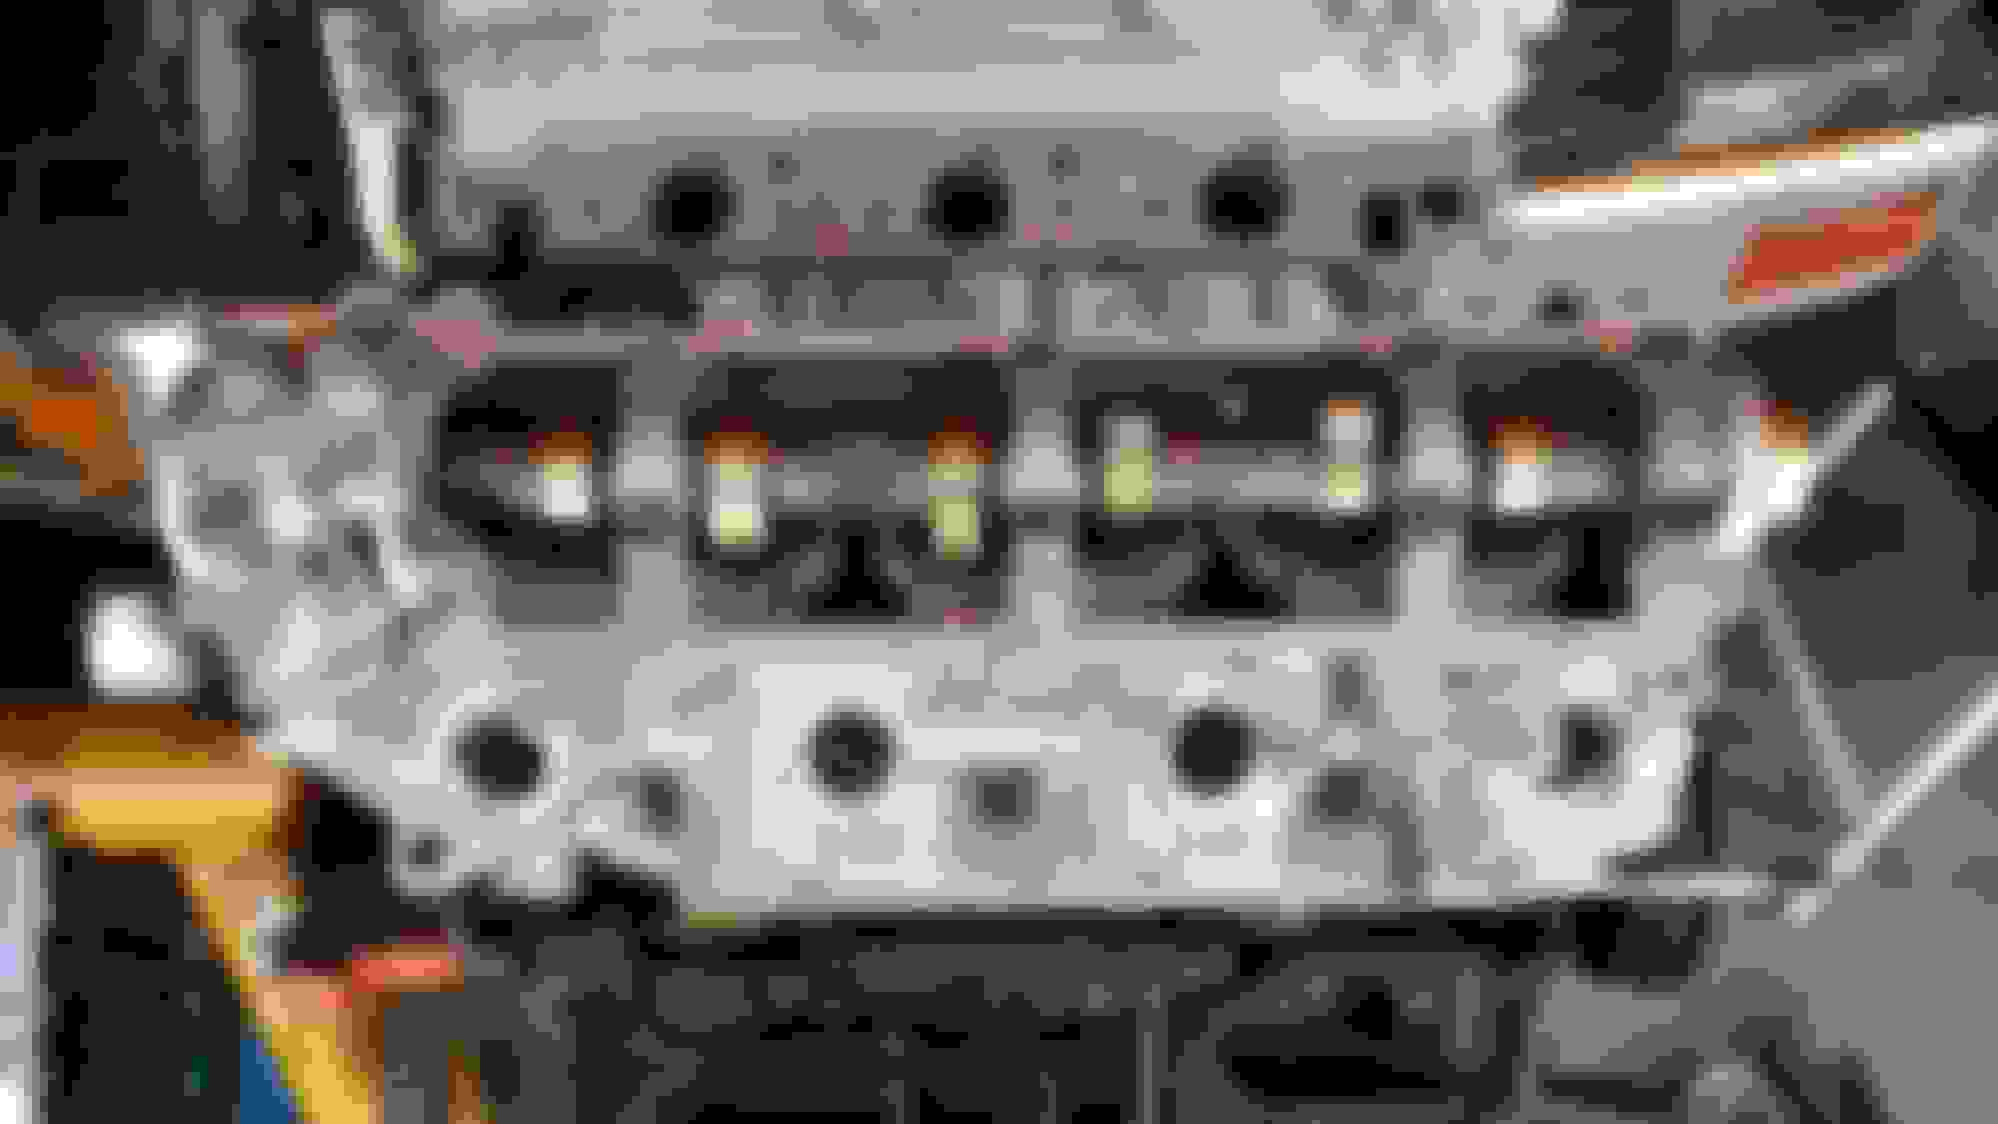
Cold Misfire Part 2 (Colt Cams and New Heads):
After driving the 4runner a couple times with the new exhaust, the missfire had returned. The new plugs were fowled already so I decided the heads would likely need to come off. Before pulling the heads, my neighbor and I did a compression test, #1 was low so i ordered the gasket set, dropped the coolant, pulled the upper and lower manifolds and the exhaust manifolds. With the manifolds off, we did a little solvent test on the back of the valves for #1, valves were leaking for sure.
During the initial rebuild I had EMC just do a clean up on the heads that were on the motor at the time of purchase. I assumed the factory springs had gotten tired, or the lash was not set correctly etc.
Heads cam off and thankfully the bottom end was perfect still. Since the heads were off, I decided to lookup Colt Cams and see if they still had the weazy / sea2sky cam specs. Score, I sent them my cams. $400 and a few weeks latter I had a fresh set of cams. To compliment the cams I ordered LCE street performer valve springs, retainers, and keepers.
I sent my leaky heads and all the parts to L&R Machine in SantaFe Springs. I had planned on having the full port and polish + 3 angle valve job, but after they inspected the heads I sent them, they were determined to be paper weights. One side was cut .030 past the factory minimum, the other side was cut .050 past.
I opted for a brand new set of DNJ heads, prepped by L&R, new set of valves etc. So, after another couple thousand dollars here is where I ended up:
New DNJ Heads
Colt 'weasy / Sea2Sky' cams
LCE Street performer springs, retainers, keepers
L&R 3 angle valve job
L&R Prep and assembly
It all went back together with new head bolts, slipper gaskets, new main bearing / water housing, new plugs, etc etc. Since It was time to smog again, I put it back together with the factory intake and airbox. Fired right up and ran really good, no more missfire
Second Smog:
I got it running again just in time for my second smog. I touched up the stock airflow meter tuning maps a little to account for the cams and new heads then took her in for smog. I went to Jim's 76 again over by 17th street and the 55. I gave the smog tech the run down on the vehicle, showed him were all the CARB EO numbers were and told him about the history since I purchased it. He looked it over and said he could tell I had put a lot of time into the rebuild. I handed him the keys and went around the corner for a nervous coffee while he went to work. I came back 30 minutes latter to some really good news. This time around It passed with flying colors. Turns out the original heads were not sealing well when they came back from ECM during the initial rebuild.
Here is the smog report:
And the comparison between the first smog after the engine rebuild and this smog with new heads, cams, etc.:
Whew, that's a serious improvement. The smog tech gave me some more compliments on my work and said that was the cleanest smog he has seen on one of these.
Finishing the Exhaust.. Again
Getting the smog out of the way was a big relief! I had decided to move closer to the beach to support my surfing habit and I got it all buttoned up a week before the move. I decided to take it back over to A-1 to have the flow master swapped out for a dynomax. Still not the best sound but much more tolerable than the flow master, which was my main concern since my new place is a town house in a condo complex and I did't want to wake the neighbors while heading out for dawn patrol at 5AM.
Well, that about wraps it up. I was getting ready to put the 4runner up for sale shortly after I moved to Dana Point in late October 2015. Right as I was documenting this build process to put the runner up for sale, I got rear ended in the Sportage. It was a big hit that resulted in the Sportage being in the body shop for 4 months. Thankfully i still had the 4runner to get me and my long boards back and forth to the beach!
I have been driving a company loaner back and forth to work and just using the 4runner for beach trips several times a week. I finally got the sportage back last week and now it's time to find a new home for the 4runner.
The transmission needs to be rebuilt soon. Right now everything works (I replaced the shift solenoids and filter shortly after the engine rebuild) including all the 4wd system but 2nd gear slips around 4,000 rpm and the seals are leaking on the output shafts. With the fresh engine and performance heads, it really needs a solid transmission. I have the full rebuild kit including the steals and friction material that will be included with the sale.
Given the parking situation here (single car garage, no reserved spaces) and that surfing has become my primary hobby these days, I have decided to let my project go so someone else can finish it up.
Here is the list of things I would do If I kept it for the future owner to consider:
rebuild trans
new aluminum radiator
power steering gearbox (leaking at the shaft seal)
 01-26-2016, 06:58 AM
 Had her trailer-ed back to the condo and started getting ready to pull the engine:


 ), some prefab intake kit from Oriely, some couplers from silicone hoses etc... finished up the road tune... running really good at this point... for a 3.0... it would pull on most of the tired 3.4's around irvine