chukarhunt's 1992 "Jake" Pickup Build-up Thread
 03-01-2014, 06:10 PM
#1
Registered User
Thread Starter
iTrader: (1)
Join Date: Nov 2012
Location: Elko NV, at the foot of the Rubys
Posts: 358
Likes: 0
Received 0 Likes
on
0 Posts
chukarhunt's 1992 "Jake" Pickup Build-up Thread
Hey everybody! I decided to start my own build thread. It will be a slow go, but I hope to eventually bring out some new ideas. Been doing a lot of research on the mods people are doing to these trucks, and I will be doing most of them myself, although I will taking a few of them a step further, which I hope will bring some new tech to the site.
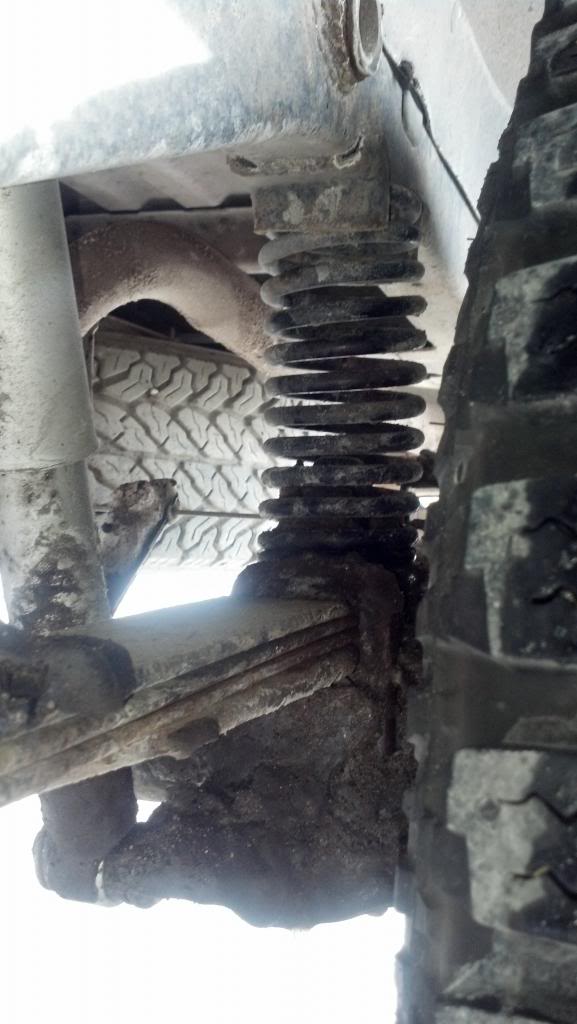
To begin, truck already had the zuk mod on it when I purchased it. Didn't know that is what it was called at the time, but eventually found out on here! Below you can see what a ton of pellets does to it, been very helpful. I have a photo album on here with more pics of it.
So the engine has a new water pump, fan pulley bracket, timing kit, and power steering pump. Only thing I am worried about now is the head gasket, which I will address later in this thread.
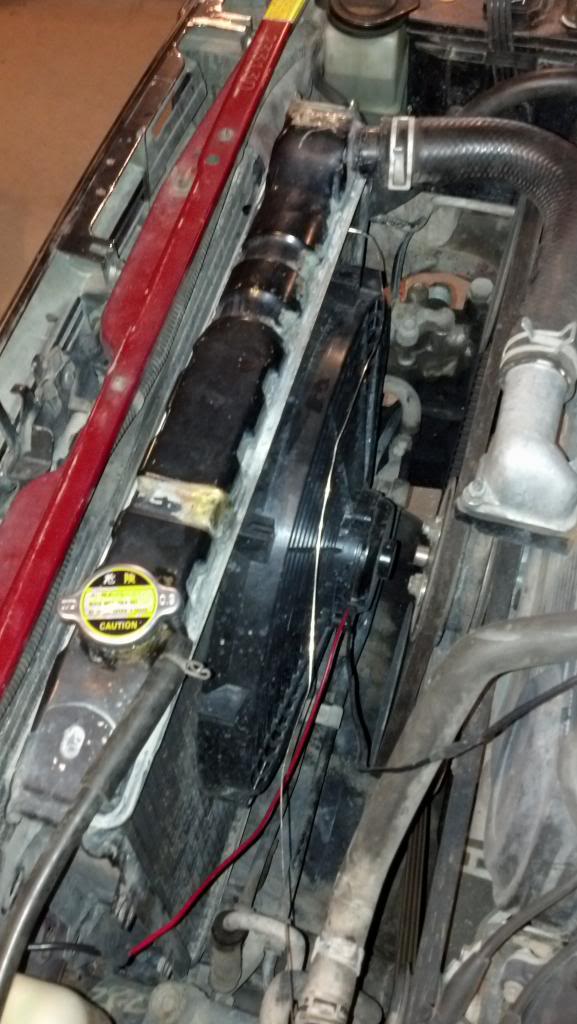
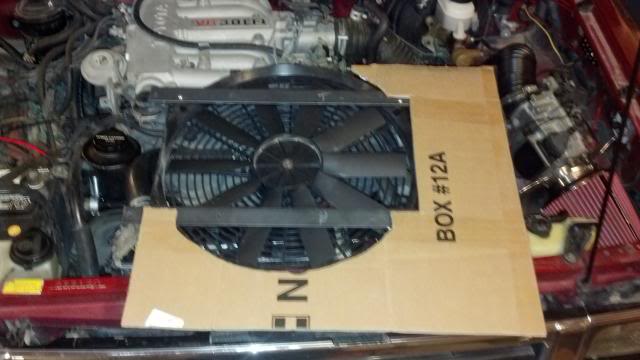
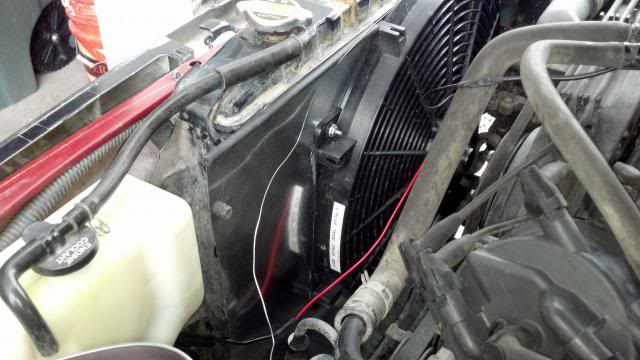
Earlier I switched to an electric fan after the plastic stock fan busted. Couldn't find a new one anywhere, so I just converted. Unfortunately, the flex a lite doesn't cover the whole radiator:
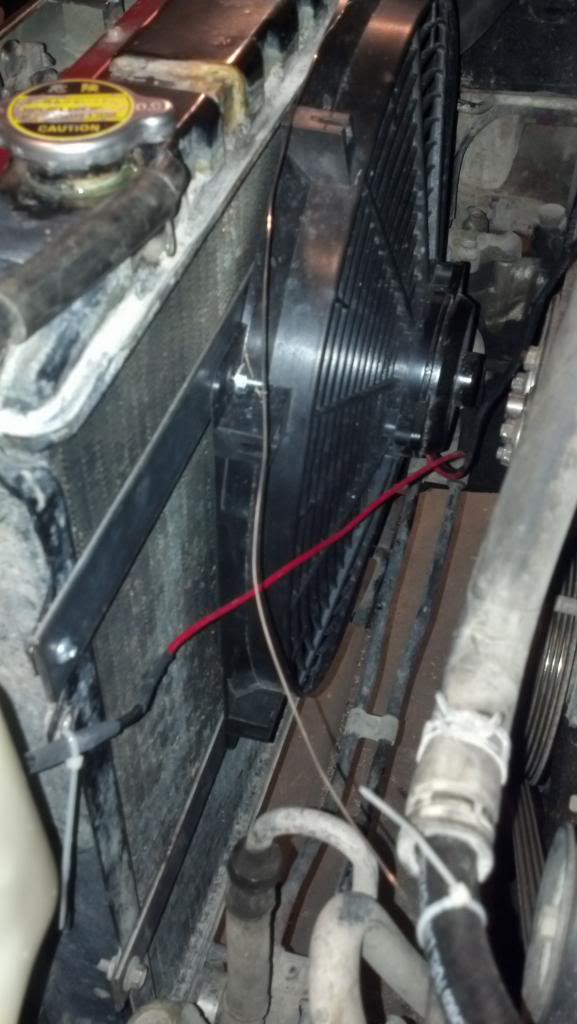
So today I built two brackets to hold the fan away from the radiator so I can fit in a custom shroud to draw more air across the radiator:
Turns out that the mounting location for the fan were the same distance as the stock shroud mounting holes, so it was pretty easy to line up. I would like to hear some of your guys input on whether you think the shroud is a good idea or not. Truck tends to overheat over summits and off-roading, not sure if the shroud will hurt or help unless I get a good seal around it.
Tomorrow, I will finish the ISR mod:
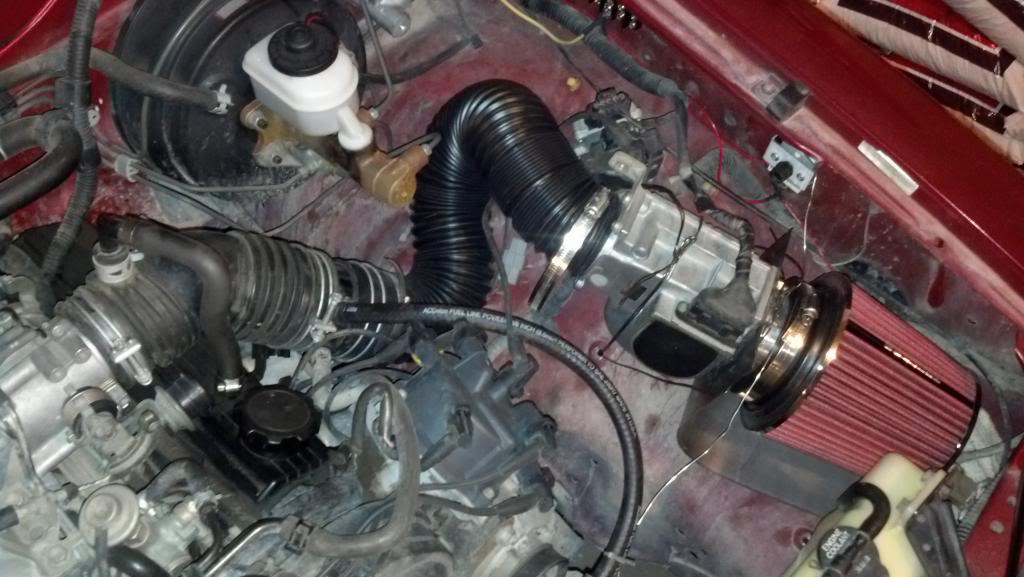
Spectre makes some decent stuff, it is definitely cheaper than buying an ISR kit. Total: $80. I will post a video of the new sound here in a bit. It sounds WAY better.
To begin, truck already had the zuk mod on it when I purchased it. Didn't know that is what it was called at the time, but eventually found out on here! Below you can see what a ton of pellets does to it, been very helpful. I have a photo album on here with more pics of it.

So the engine has a new water pump, fan pulley bracket, timing kit, and power steering pump. Only thing I am worried about now is the head gasket, which I will address later in this thread.
Earlier I switched to an electric fan after the plastic stock fan busted. Couldn't find a new one anywhere, so I just converted. Unfortunately, the flex a lite doesn't cover the whole radiator:

So today I built two brackets to hold the fan away from the radiator so I can fit in a custom shroud to draw more air across the radiator:

Turns out that the mounting location for the fan were the same distance as the stock shroud mounting holes, so it was pretty easy to line up. I would like to hear some of your guys input on whether you think the shroud is a good idea or not. Truck tends to overheat over summits and off-roading, not sure if the shroud will hurt or help unless I get a good seal around it.
Tomorrow, I will finish the ISR mod:

Spectre makes some decent stuff, it is definitely cheaper than buying an ISR kit. Total: $80. I will post a video of the new sound here in a bit. It sounds WAY better.
Last edited by chukarhunt; 03-03-2014 at 10:23 AM.
 03-01-2014, 06:15 PM
#2
Registered User
Thread Starter
iTrader: (1)
Join Date: Nov 2012
Location: Elko NV, at the foot of the Rubys
Posts: 358
Likes: 0
Received 0 Likes
on
0 Posts
Ummm, if the pictures above don't work, let me know and I will try again. I used photobucket address in the image "button", so if there is a different way I will try that too. Thanks.
03-01-2014, 08:02 PM
#4
Registered User
Thread Starter
iTrader: (1)
Join Date: Nov 2012
Location: Elko NV, at the foot of the Rubys
Posts: 358
Likes: 0
Received 0 Likes
on
0 Posts
"Pics not working."
Thanks for the heads up Gizler.
They seem to be working now, I will try to make them work within the site vs going to photobucket from now on.
Thanks for the heads up Gizler.
They seem to be working now, I will try to make them work within the site vs going to photobucket from now on.
Last edited by chukarhunt; 03-03-2014 at 10:25 AM.
03-01-2014, 08:43 PM
#5
Registered User
Thread Starter
iTrader: (1)
Join Date: Nov 2012
Location: Elko NV, at the foot of the Rubys
Posts: 358
Likes: 0
Received 0 Likes
on
0 Posts
Intake sound
[YOUTUBE]
[YOUTUBE]
I like the new sound, although I need a muffler. Looking to get a Flowmaster Outlaw. The old muffler rotted out and sounded horrible, so right now it is the stock system that ends before the axle. Sorry for the bad angles and low sound, if you have excellent speakers it helps.
Thanks.
I like the new sound, although I need a muffler. Looking to get a Flowmaster Outlaw. The old muffler rotted out and sounded horrible, so right now it is the stock system that ends before the axle. Sorry for the bad angles and low sound, if you have excellent speakers it helps.
Thanks.
03-03-2014, 02:10 PM
#6
Registered User
Thread Starter
iTrader: (1)
Join Date: Nov 2012
Location: Elko NV, at the foot of the Rubys
Posts: 358
Likes: 0
Received 0 Likes
on
0 Posts
Electric fan and ISR
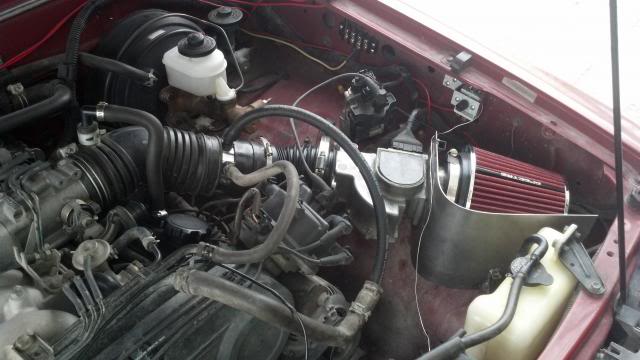
So I "finished" my conversions for the most part, just need to touch them up and paint. I am not sure that the fan shroud helps. Driving around town I didn't notice a difference but when I started romping on it the engine heated up more than usual. True test will be when I hit the summit, but a wierd noise under the truck is keeping me from driving it too far. You can hear it in the beginning of my video ^^^^, sounds like a bearing when I rev up the engine, but I am hoping it is just a squeaky exhaust. Will find out more tonight. In the mean time:
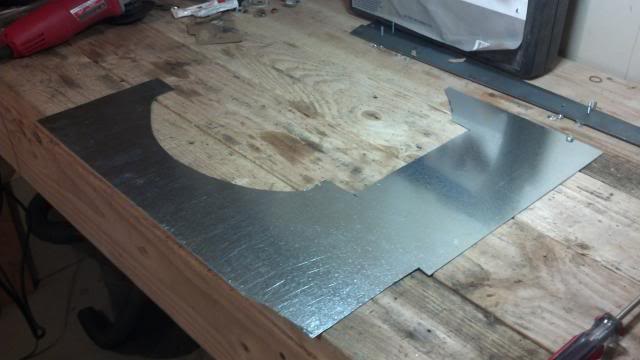
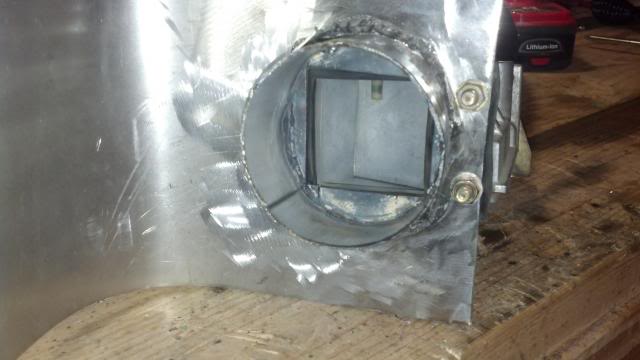
Used an angle grinder to cut 26 gauge steel. I don't neccesarily have all the right tools. :/
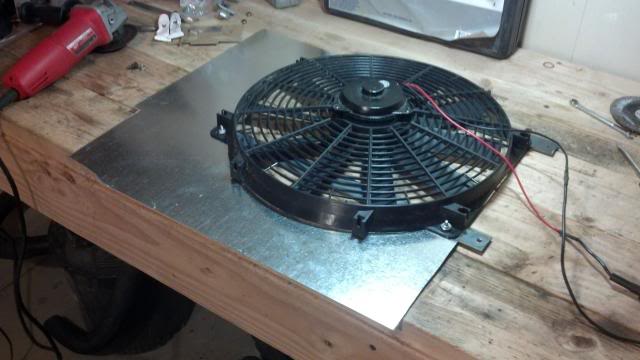
Drilled a bunch of holes in the supports to help draw air over the entire area.
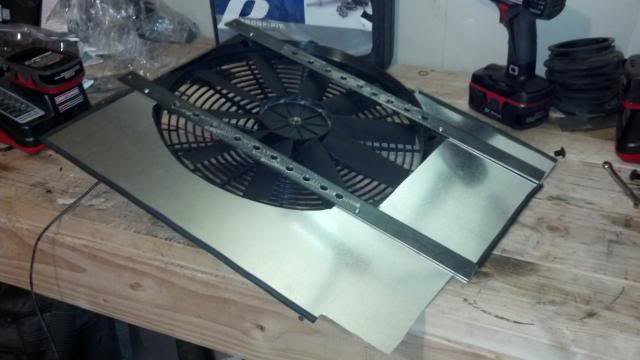
Final product, covers the entire radiator. Hopefully it helps. If not it easily bolts off.
I know, crappy weld job lol... First time with flux core on really thin steel. Want to use gas just can't afford a $240 tank right now.
Bolted up quite nicely
Going to clean up the vacuum lines later.
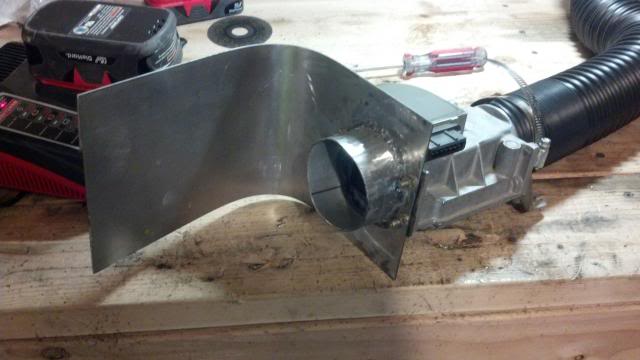
Pretty decent fit, not truly protected from water but I want to do a true hood scoop installment down the road to feed the air filter.
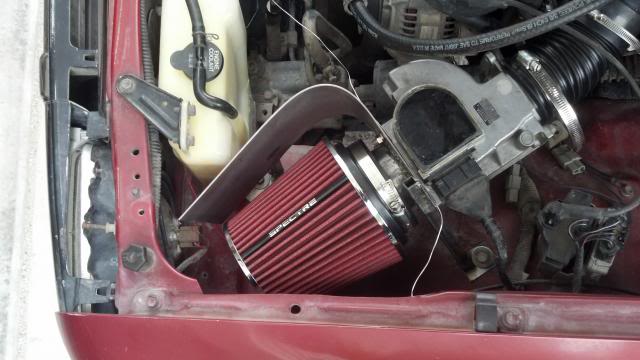
Over all it cleans a few things up. I have the timing set to 18 degrees advanced and with these mods definitely increases the low end torque. It is not substantial but it makes driving easier. I used spectre 3" intake flexible hose and air filter for the mod, seems to work ok for now.
Enjoy! Thanks.


Used an angle grinder to cut 26 gauge steel. I don't neccesarily have all the right tools. :/

Drilled a bunch of holes in the supports to help draw air over the entire area.

Final product, covers the entire radiator. Hopefully it helps. If not it easily bolts off.

I know, crappy weld job lol... First time with flux core on really thin steel. Want to use gas just can't afford a $240 tank right now.

Bolted up quite nicely

Going to clean up the vacuum lines later.

Pretty decent fit, not truly protected from water but I want to do a true hood scoop installment down the road to feed the air filter.

Over all it cleans a few things up. I have the timing set to 18 degrees advanced and with these mods definitely increases the low end torque. It is not substantial but it makes driving easier. I used spectre 3" intake flexible hose and air filter for the mod, seems to work ok for now.
Enjoy! Thanks.
Last edited by chukarhunt; 04-08-2014 at 12:38 PM.
03-03-2014, 06:00 PM
#7
Registered User
Thread Starter
iTrader: (1)
Join Date: Nov 2012
Location: Elko NV, at the foot of the Rubys
Posts: 358
Likes: 0
Received 0 Likes
on
0 Posts
Excellent news! The squeak/ screeching noise I was hearing was but a broken bracket underneath vibrating on metal. 'Tis an easy fix, tomorrow or Wednesday... we hit the summit!
Trending Topics
03-05-2014, 07:38 PM
#8
Registered User
Thread Starter
iTrader: (1)
Join Date: Nov 2012
Location: Elko NV, at the foot of the Rubys
Posts: 358
Likes: 0
Received 0 Likes
on
0 Posts
Well, I can't say that the shroud is helping. Engine didn't heat up more than usual over the summit, but in the flats for some reason it was getting hot. I am going to try to move the fan away from the radiator some more this weekend, hopefully that is the ticket.
03-05-2014, 11:18 PM
#9
Super Moderator
Staff
iTrader: (1)
Join Date: Aug 2008
Location: Anderson Missouri
Posts: 11,788
Likes: 0
Received 21 Likes
on
19 Posts
My wife had a 91 nearly identical to your truck and regrets selling it ever since. She cant believe how hard they are to find now. It was a great truck. Looking forward to your build and upgrades.
03-06-2014, 06:16 AM
#11
Registered User
Thread Starter
iTrader: (1)
Join Date: Nov 2012
Location: Elko NV, at the foot of the Rubys
Posts: 358
Likes: 0
Received 0 Likes
on
0 Posts
Hey Terry! I agree, this generation was a great truck, and I love it. I was reading your 4Runner buildup and I gotta say WOW! That is a lot of work to do in a couple of years, but excellent work none the less. You have inspired me to clean up this old truck too. 
Gizler! Thanks for the props. Just wish the shroud worked better than it did. If you look at the stock shroud, it is just as close to the radiator, very little space to draw air.
We will see what the weekend brings though! It has been a warm enough winter to take the bikes out, and the harley is looking sad just sitting there in the garage.
03-07-2014, 07:34 PM
#12
Registered User
Thread Starter
iTrader: (1)
Join Date: Nov 2012
Location: Elko NV, at the foot of the Rubys
Posts: 358
Likes: 0
Received 0 Likes
on
0 Posts
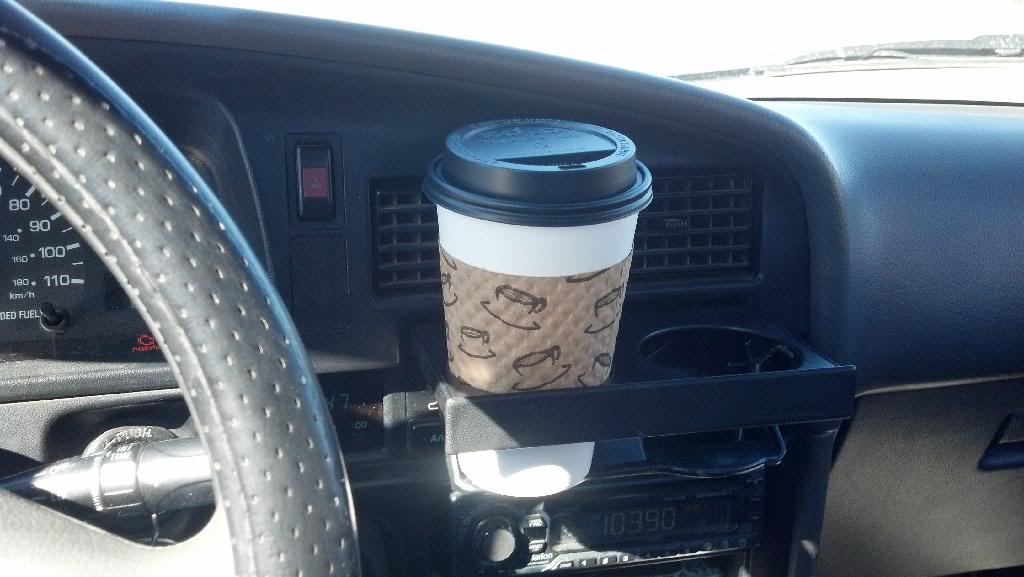
Well I fixed my cup holder today so I feel accomplished , and figured out I need a new horn. Besides that haven't gotten to the electric fan yet. I did check in with a local machine shop. Asked what it would take to port the heads, intake and throttle body. Does any one think that $45 a port is too much? I haven't had this type of work done before and was hoping someone might have some figures? Just looking to port the intake portion of the heads and lower intake. Thanks in advance for any advice.
, and figured out I need a new horn. Besides that haven't gotten to the electric fan yet. I did check in with a local machine shop. Asked what it would take to port the heads, intake and throttle body. Does any one think that $45 a port is too much? I haven't had this type of work done before and was hoping someone might have some figures? Just looking to port the intake portion of the heads and lower intake. Thanks in advance for any advice.
03-10-2014, 11:53 AM
#13
Registered User
Thread Starter
iTrader: (1)
Join Date: Nov 2012
Location: Elko NV, at the foot of the Rubys
Posts: 358
Likes: 0
Received 0 Likes
on
0 Posts
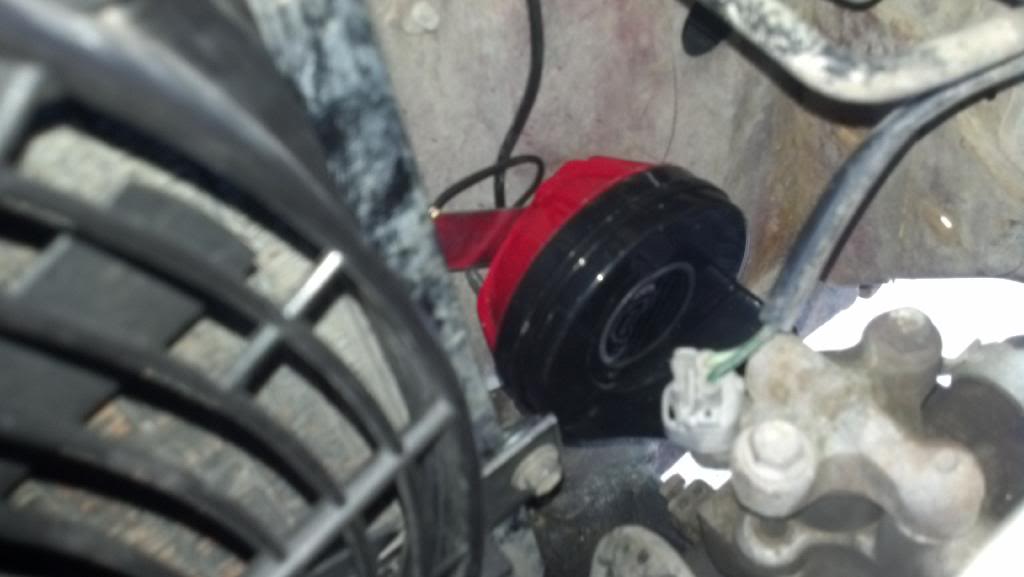
New Horn
Still no electric fan diagnosis, it seems to be doing ok for now. But until then, I got the chance to use this:!!!
It makes me happy. Thanks goes out to KERTWOOD!
So I purchased a $20 dual tone horn setup from O'Reillys and installed it. I love the new sound of the dual tone. It is extremely loud and it sounds way better!
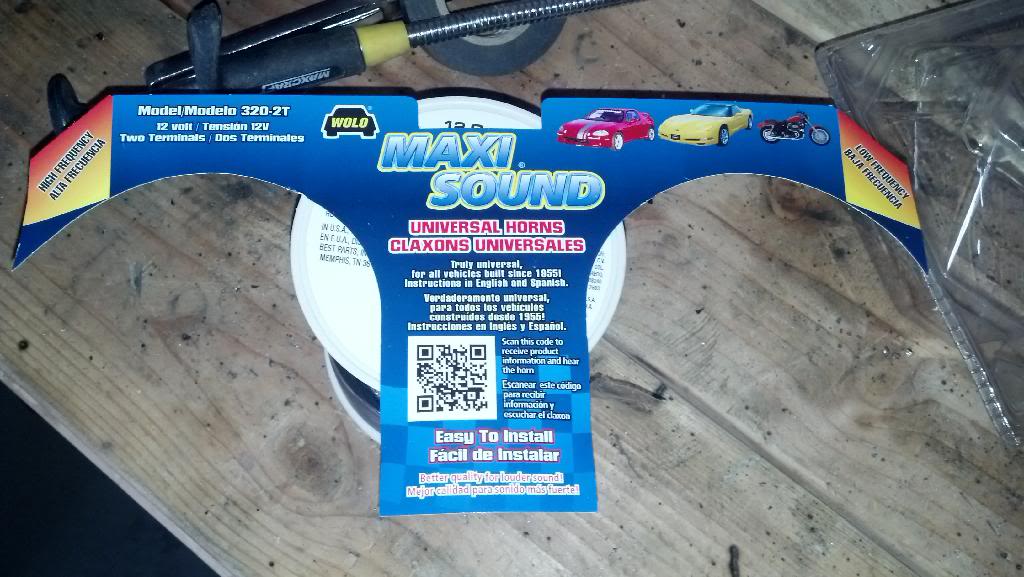
Horn came with necessary mounting brackets and some hardware. Had to create a split coming from the factory single wire to power both horns. They also come with the ground wire to go to the frame. Mounted one horn in the stock location:
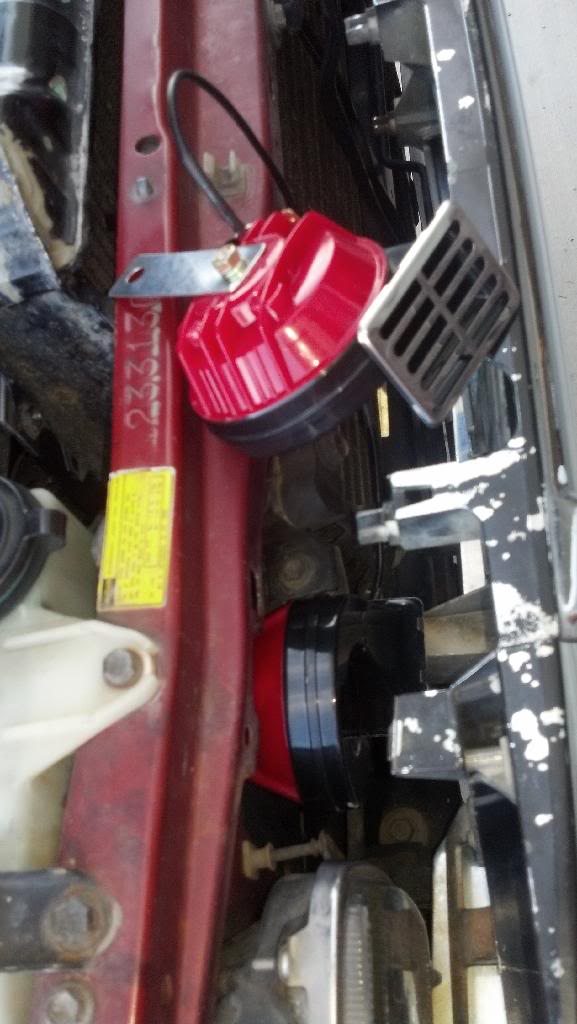
And the other on the lower passenger side radiator bolt:
More tech to come.

It makes me happy.
Thanks goes out to KERTWOOD!So I purchased a $20 dual tone horn setup from O'Reillys and installed it. I love the new sound of the dual tone. It is extremely loud and it sounds way better!

Horn came with necessary mounting brackets and some hardware. Had to create a split coming from the factory single wire to power both horns. They also come with the ground wire to go to the frame. Mounted one horn in the stock location:

And the other on the lower passenger side radiator bolt:

More tech to come.
03-11-2014, 05:53 AM
#14
Registered User
Thread Starter
iTrader: (1)
Join Date: Nov 2012
Location: Elko NV, at the foot of the Rubys
Posts: 358
Likes: 0
Received 0 Likes
on
0 Posts
WOOHOO! The master of the house (happy wife happy life) just gave me the green light to rebuild my engine. So what does that mean? It means the quest for more horsepower is about to begin... but I should probably do this the right way...
Going to order some glowshift gauges in the next week or so to keep track of what my engine is currently doing. An AFR and vacuum gauge are definitely in order for proper tuning.
While I wait for funds to populate, I am looking at prices for head porting. As mentioned earlier, I found a shop that will port heads at $45 a port, which includes balancing. Does anyone have any clue to how competitive that is?
03-13-2014, 09:11 AM
#16
Registered User
Thread Starter
iTrader: (1)
Join Date: Nov 2012
Location: Elko NV, at the foot of the Rubys
Posts: 358
Likes: 0
Received 0 Likes
on
0 Posts
GM 3.8L V6 swap
Thanks for the heads up rattlewagon, but I think I will reveal what I am currently going to do instead....
Hold tight, this might be long winded...
When I first joined Yotatech, I saw KiwiPushrod swap in a N/A GM 3800 v6 into his pickup, and it inspired me to do my swap as well, but with a supercharged 3800. Well, the supercharged v6 won't fit unless you move the entire drivetrain forward, which I did not want to do, and in the end I would probably have had to move the radiator forward as well, yadda yadda...
So I scrapped that idea, being as it would be a bit more expensive then I liked. So I looked at my 3.0 and thought, I am a mechanical engineer, I got this. My plan was to redesign the upper intake plenum for more efficient flow, along with opening up the lower intake, throttle body and heads. I was also going to purchase a toyota previa supercharger from a junkyard and play around with it, to see what the 3.0 was capable of. I thought it would be a fun project just to do it because, especially since my hp gains were figuring to be about 100hp, giving me about 230 hp to the rear wheels, equivalent to a 3.4 with a supercharger about. I was even going to take the truck to the dyno for all the chages I made for all of ya 3.0 owners, BUT...
A dyno is 4 hours away from me, a bit out of the way. So earlier this week, when the wifey said I could soup up the truck, I remembered my poor buick lesabre sitting by the house. I spun a rod bearing a few months back and was going to scrap the car, but it has the N/A 3.8L in it, and it has some new parts already. In the end, it is actually WAY more cost effective to fix and swap in the 3.8 I already own, as my initial 3.0 build costs just happen to be the same as the 3.8 swap. , and that includes performance parts for the 3.8! My new hp figures will be about 220hp at the wheels N/A, and it is way more fuel economic. And the beauty of the 3.8? I can turbo it without any issues in the future. ZZP sells supercharger and turbo kits for this engine, along with everything else you would ever need to make 500+ horsepower.
So, my point? I will be swapping in a Naturally aspirated GM 3.8 V6. I will be able to do it for cheaper than a 3.4 (let's hope my figures are right) and the aftermarket support is bigger and cheaper. So, I will posts pics soon as funds arise and I can borrow a cherry picker and engine stand. I have already pulled the 3.8 out of that car 3 times, so it should be a breeze.
Let's hope plans don't change again!! lol
Hold tight, this might be long winded...
When I first joined Yotatech, I saw KiwiPushrod swap in a N/A GM 3800 v6 into his pickup, and it inspired me to do my swap as well, but with a supercharged 3800. Well, the supercharged v6 won't fit unless you move the entire drivetrain forward, which I did not want to do, and in the end I would probably have had to move the radiator forward as well, yadda yadda...
So I scrapped that idea, being as it would be a bit more expensive then I liked. So I looked at my 3.0 and thought, I am a mechanical engineer, I got this. My plan was to redesign the upper intake plenum for more efficient flow, along with opening up the lower intake, throttle body and heads. I was also going to purchase a toyota previa supercharger from a junkyard and play around with it, to see what the 3.0 was capable of. I thought it would be a fun project just to do it because, especially since my hp gains were figuring to be about 100hp, giving me about 230 hp to the rear wheels, equivalent to a 3.4 with a supercharger about. I was even going to take the truck to the dyno for all the chages I made for all of ya 3.0 owners, BUT...
A dyno is 4 hours away from me, a bit out of the way. So earlier this week, when the wifey said I could soup up the truck, I remembered my poor buick lesabre sitting by the house. I spun a rod bearing a few months back and was going to scrap the car, but it has the N/A 3.8L in it, and it has some new parts already. In the end, it is actually WAY more cost effective to fix and swap in the 3.8 I already own, as my initial 3.0 build costs just happen to be the same as the 3.8 swap.
, and that includes performance parts for the 3.8! My new hp figures will be about 220hp at the wheels N/A, and it is way more fuel economic. And the beauty of the 3.8? I can turbo it without any issues in the future. ZZP sells supercharger and turbo kits for this engine, along with everything else you would ever need to make 500+ horsepower. So, my point? I will be swapping in a Naturally aspirated GM 3.8 V6. I will be able to do it for cheaper than a 3.4 (let's hope my figures are right) and the aftermarket support is bigger and cheaper. So, I will posts pics soon as funds arise and I can borrow a cherry picker and engine stand. I have already pulled the 3.8 out of that car 3 times, so it should be a breeze.
Let's hope plans don't change again!! lol
03-21-2014, 09:23 PM
#18
Registered User
Thread Starter
iTrader: (1)
Join Date: Nov 2012
Location: Elko NV, at the foot of the Rubys
Posts: 358
Likes: 0
Received 0 Likes
on
0 Posts
Bed Utility Rack
While I wait for engine funds to arise, I figured I would put my fabrication skills to the test.  I have been seeing a lot of custom bumpers and roll bars and cages lately, so I kinda got jealous...
I started out with this... It came with the truck when I bought it. Nothing wrong with free steel:
[IMG]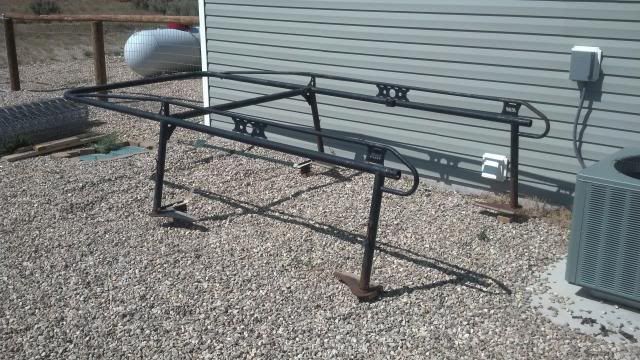 [/IMG]
And ended up here:
[IMG]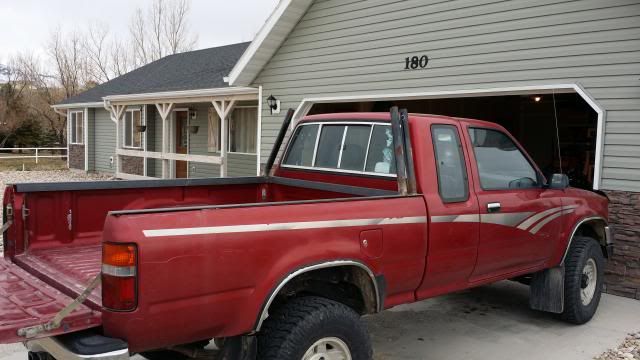 [/IMG]
The guys at the steel recycler hooked me up with the angle iron. I wanted 2 x 1/8"x 20', but they gave me 3/8" for only $28! score...
Now the only thing I can't figure out is which way to go from here. Been drawing up some plans but just not sure what I want. Thought of making it a canvas back as well, but I don't believe our sewing machine will be up for the challenge. Guess we will see what tomorrow brings! I am thinking of going with this though:
[IMG]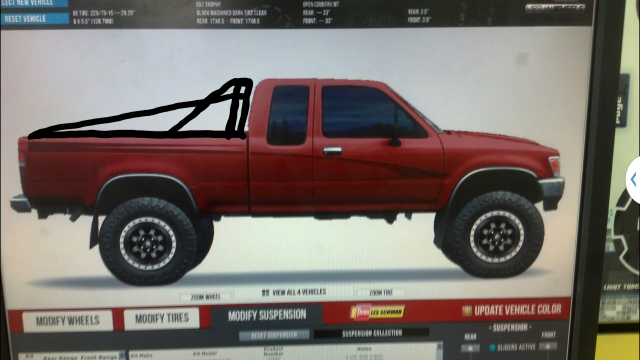 [/IMG]

I have been seeing a lot of custom bumpers and roll bars and cages lately, so I kinda got jealous... I started out with this... It came with the truck when I bought it. Nothing wrong with free steel:
[IMG]
 [/IMG]
And ended up here:
[IMG]
 [/IMG]
The guys at the steel recycler hooked me up with the angle iron. I wanted 2 x 1/8"x 20', but they gave me 3/8" for only $28! score...
Now the only thing I can't figure out is which way to go from here. Been drawing up some plans but just not sure what I want. Thought of making it a canvas back as well, but I don't believe our sewing machine will be up for the challenge. Guess we will see what tomorrow brings! I am thinking of going with this though:
[IMG]
 [/IMG]
Last edited by chukarhunt; 03-21-2014 at 09:27 PM. Reason: pics
03-24-2014, 10:45 AM
#19
Registered User
Thread Starter
iTrader: (1)
Join Date: Nov 2012
Location: Elko NV, at the foot of the Rubys
Posts: 358
Likes: 0
Received 0 Likes
on
0 Posts
Utility Bed Roll Bar
Well, it is finished! It has been a long time since I did metal work, and man am I sore! Sitting at a desk job makes you realize what you are missing when you get into projects like this! Anyway, some photos:
Before
[IMG]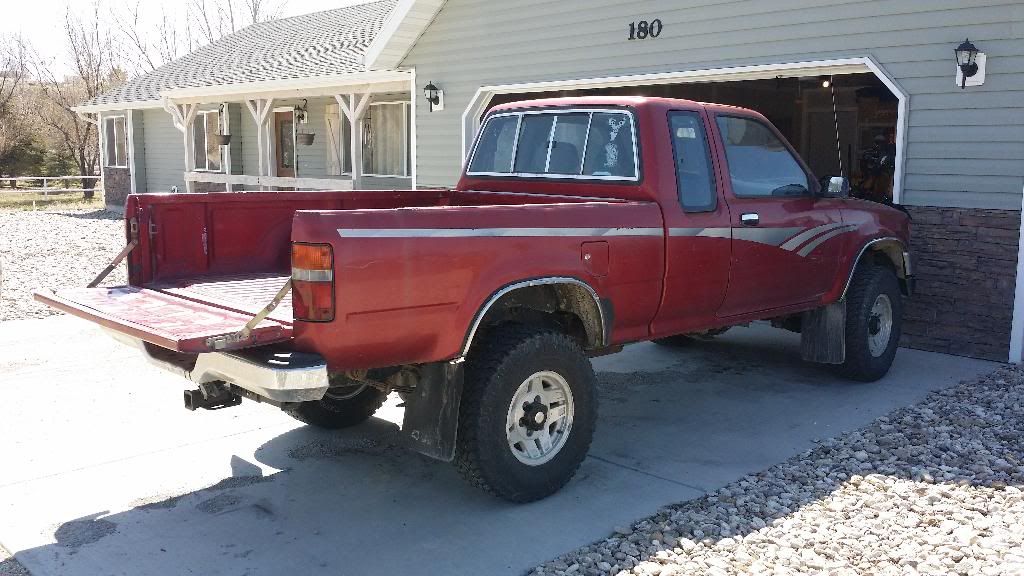 [/IMG]
After
[IMG]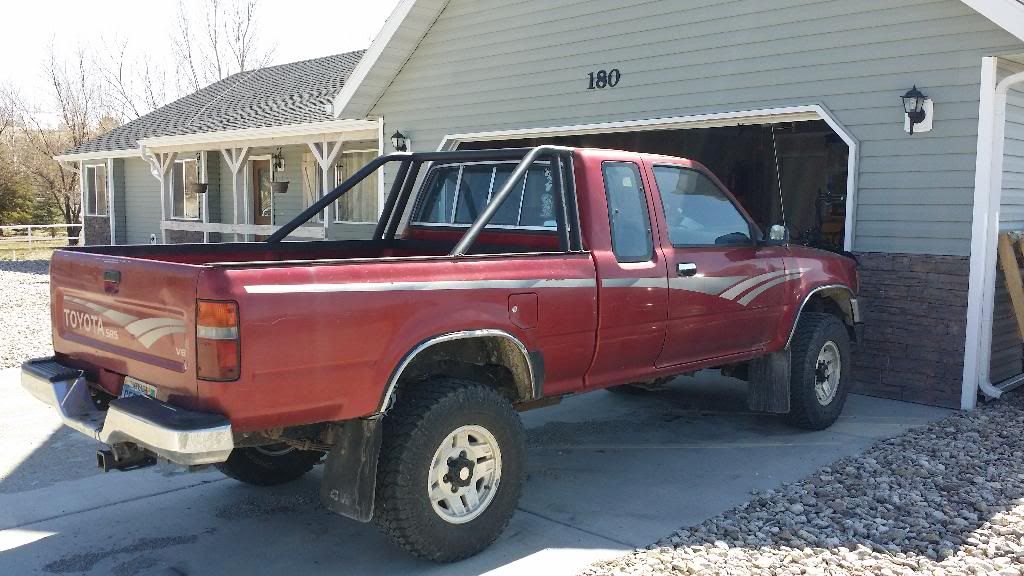 [/IMG]
Gotta love rattle cans
[IMG]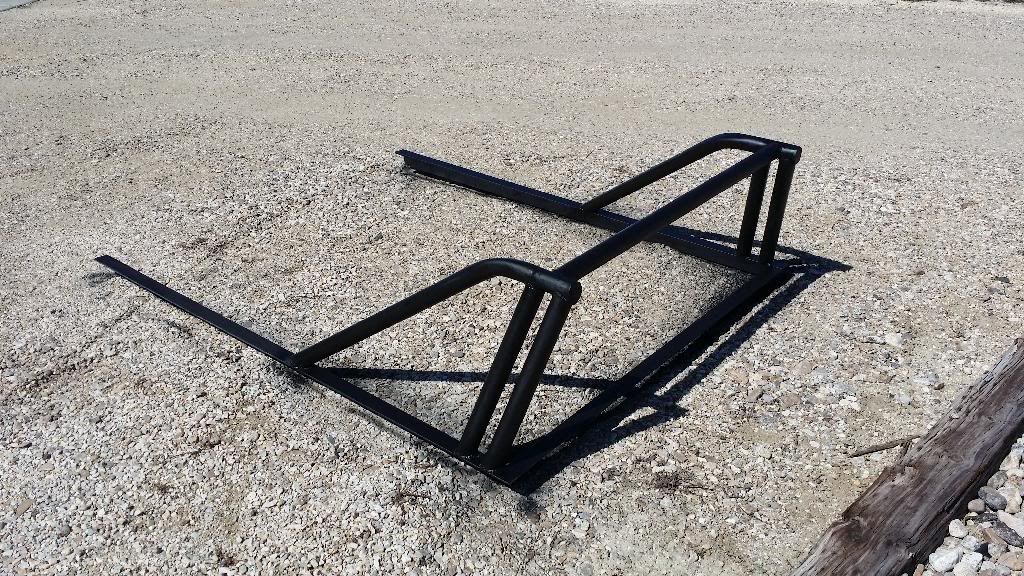 [/IMG]
I will eventually have it texture coated to cover up the crappy welds.
[IMG]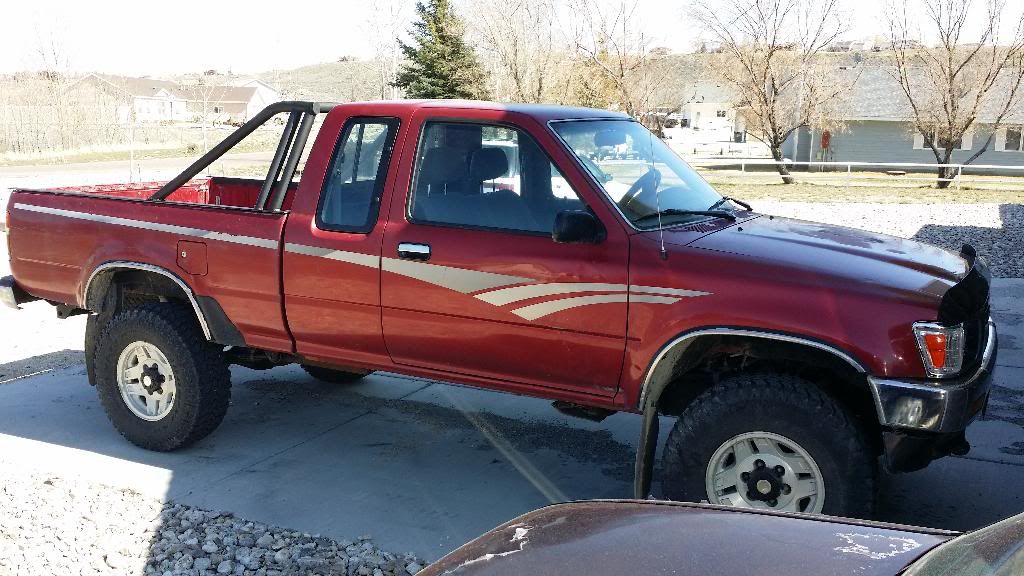 [/IMG]
[IMG]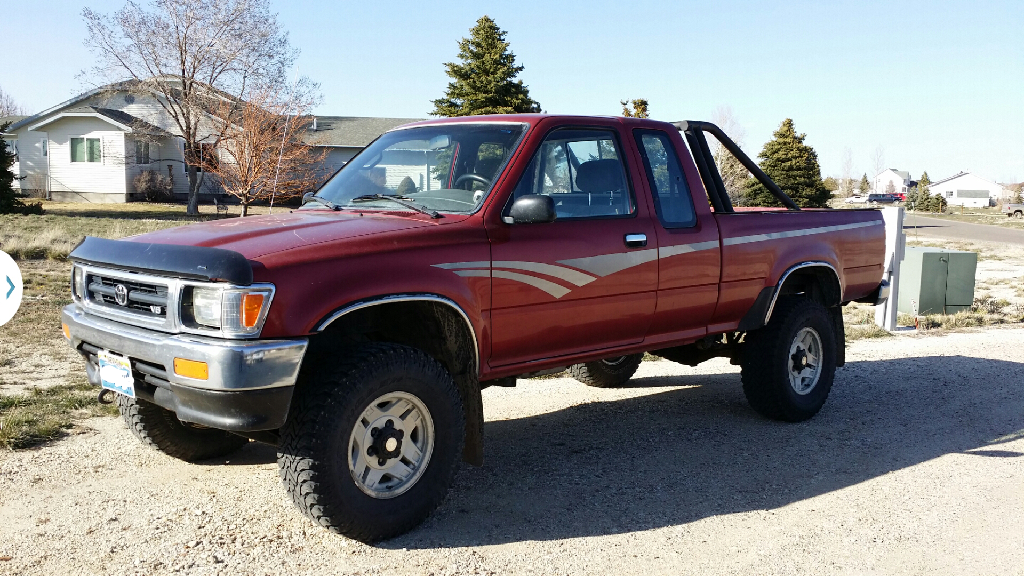 [/IMG]
It will eventually hold LED light bars, and the angle Iron will have shovel and high lift jack mounts on it to help keep the bed tidy. But for now, everyone gets to look at the crappy rusted steel and welds.
Still debating if I want to keep my cheap Harbor Freight pipe bender:
[IMG]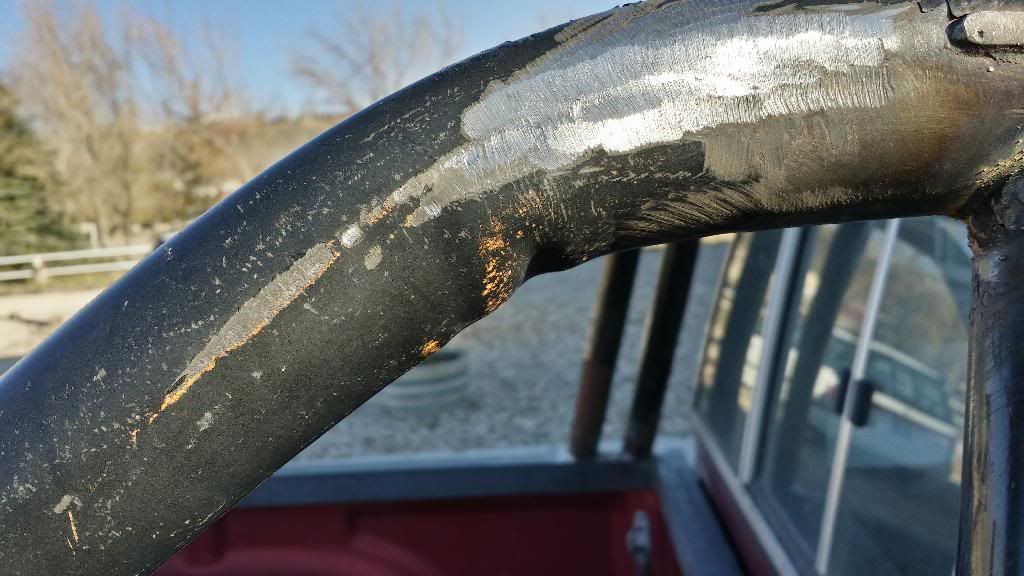 [/IMG]
I want to do custom bumpers, but with pipe bends like this I think I will have to hold off for something better. What does everyone else use to make good, cheap bends? Any ideas?
Before
[IMG]
 [/IMG]
After
[IMG]
 [/IMG]
Gotta love rattle cans
[IMG]
 [/IMG]
I will eventually have it texture coated to cover up the crappy welds.
[IMG]
 [/IMG]
[IMG]
 [/IMG]
It will eventually hold LED light bars, and the angle Iron will have shovel and high lift jack mounts on it to help keep the bed tidy. But for now, everyone gets to look at the crappy rusted steel and welds.
Still debating if I want to keep my cheap Harbor Freight pipe bender:
[IMG]
 [/IMG]
I want to do custom bumpers, but with pipe bends like this I think I will have to hold off for something better. What does everyone else use to make good, cheap bends? Any ideas?
03-25-2014, 11:18 AM
#20
Registered User
Thread Starter
iTrader: (1)
Join Date: Nov 2012
Location: Elko NV, at the foot of the Rubys
Posts: 358
Likes: 0
Received 0 Likes
on
0 Posts
Well after a quick search, it seems I will be saving up for a JD2 model 3 pipe bender! will I use it that often? probably not, but it will be sweet to have for the mean time.
But I should probably do my engine swap first... come on pay day!
But I should probably do my engine swap first... come on pay day!


