ChefYota4x4's 1987 4Runner Build-Up Thread


 05-17-2010, 07:14 AM
#83
Hey 'Z', thanks! It's amazing how NICE it is to put something together and not get filthy! lol. Of course.....I did have to get EXTREMELY filthy in order to clean it all up, but that's besides the point, eh? haha.
ROB, how's it going, man? Did you take that trip?...or do the living room/Jumanji Adventure??? How's the Cream Puff doing? lol. Not sure if you answered, but do you have a top?....aside from the soft one, of course.lol. Thanks, btw, and yeah, what I should have said in my "stupid bracket" sentence was, "MY STUPID RUMP FORGOT THIS BRACKET", HAHAHA. Actually, I was LAUGHING, HYSTERICALLY, when I realized that I'd done that for a SECOND TIME! lol.....Oh well, as I've said, .....MANY TIMES SINCE THIS BEGAN, lol, ....."live and learn.....BUT AT LEAST KEEP TRYING!" .....RIGHT???? HAHA.
Wanting to know if you made it on that trip....I'll fly over to yer thread, or PM'ya. L8r Guys! Back to work for Moi!
05-17-2010, 07:30 AM
#84
Had a question, guys......anyone? ........
I've installed the LCE Header(CA. keep in mind, so it's 'THAT' application), and I've got a new Magnaflow CAT(Direct Fit, supposedly), from Kragen. When putting my old one next to it, it seems the same at the flange, but it's a lil more round at the body. Also, the pipe inside, OD, seems to be 2", but the pipe inside the other flange of the old one seems a lil bigger....TINY bit, not much. Sooooo, my concern is that I"m putting a 2.25" pipe/flanged(provided by LCE), to my CAT from the Header..... Wont I have a problem getting that to seal right? I mean, I believe the bolt holes line up, but don't they each require a different gasket? I guess what I'm wondering is more so;......."DO I NEED A 2.25" CAT TO DO THIS RIGHT?" I'm already going to have to go down to a muffler shop and have them cut out the 1.75" Pipe that the Muffler-man didn't change(from CAT to Muffler), and the pipe after that is fine, I believe 2.5", after muffler. See, I got this CAT from Kragen for 180, out the door. The LCE one is 300$. It's not that I worry about spending a hundred more, in order to do it right, ya know? I just wonder, IS LCE's CAT really 2.25 inside? The description is the SAME, as it was in the Kragen on their computer, ...."3 Way Catalyst, 1 Directional, Magnaflow", except for LCE's site say's theirs is 2.25"....and I can't find a CAT on Magnaflow's site for my truck, ...AT ALL!
So, ....again, ..."Would I be better off finding a Magnaflow CAT online somewhere, not necessarily LCE, with a 2.25 inlet(OD)? I think I saw one at Part's Train. Com for 208, Plus Shipping-unless it's free. Or, should I just use this Magnaflow from Kragen?" Also, when they say 2.25", are they talking about the measurement from the very inner pipe extruding from the CAT(Not extruding, but literally right up to the flange)???
05-18-2010, 04:50 AM
#85
Registered User
ROB, how's it going, man? Did you take that trip?...or do the living room/Jumanji Adventure??? How's the Cream Puff doing? lol. Not sure if you answered, but do you have a top?....aside from the soft one, of course.lol. Thanks, btw, and yeah, what I should have said in my "stupid bracket" sentence was, "MY STUPID RUMP FORGOT THIS BRACKET", HAHAHA. Actually, I was LAUGHING, HYSTERICALLY, when I realized that I'd done that for a SECOND TIME! lol.....Oh well, as I've said, .....MANY TIMES SINCE THIS BEGAN, lol, ....."live and learn.....BUT AT LEAST KEEP TRYING!" .....RIGHT???? HAHA.
Wanting to know if you made it on that trip....I'll fly over to yer thread, or PM'ya. L8r Guys! Back to work for Moi!
Wanting to know if you made it on that trip....I'll fly over to yer thread, or PM'ya. L8r Guys! Back to work for Moi!
I do have a nice top. I leave it on most of the time, just take it off when I hit the local trails. I made that bikini top from an old FJ 40 soft top, It was actually very easy. The cream puff is pretty much at idle right now, just sitting. I am suffering from a broken wallet at the moment, so many other things that I need to throw money at right now. Still making plans for her & hope to get back to working on it soon.
Your new motor looks really nice! I love that header, wish I knew what to tell you about the cat. Looking forward to you getting it back on the road, be sure to post a sound clip for me. I sure am jealous of hoe nice & clean you 4runer is. Good luck!
05-18-2010, 09:23 AM
#86
***UPDATE***
Ok, exhaust issue solved. Supreme muffler, RIGHT DOWN THE STREET FROM ME, lol, is going to......
1. Weld the LCE Pipe Flange in the right place on the collector side
2. Hook up the o2 adapter kit
3. install the CAT,.. welded to the Pipe on the header side
4. Weld in a 2.25" pipe from CAT to muffler(to replace that 1.75" pipe that was there!grr)
Cost for all, including 2.25" CAT, installed, 300$ So I guess he's only chargine me 60$ or so for the couple welds and lil piece of pipe.
WOO HOO! lol. At least I don't have to pay 300$ more to LCE, just for the CAT!
I'ma get some pics, today, made some progress last night from 10pm to Midnight! lol.
I have all day today, so granting I have no snags, I should have it ready to tow to the muffler shop, tomorrow!
Wish me Luck, guys.....maybe a prayer or two as well?
ONE MORE QUESTION......
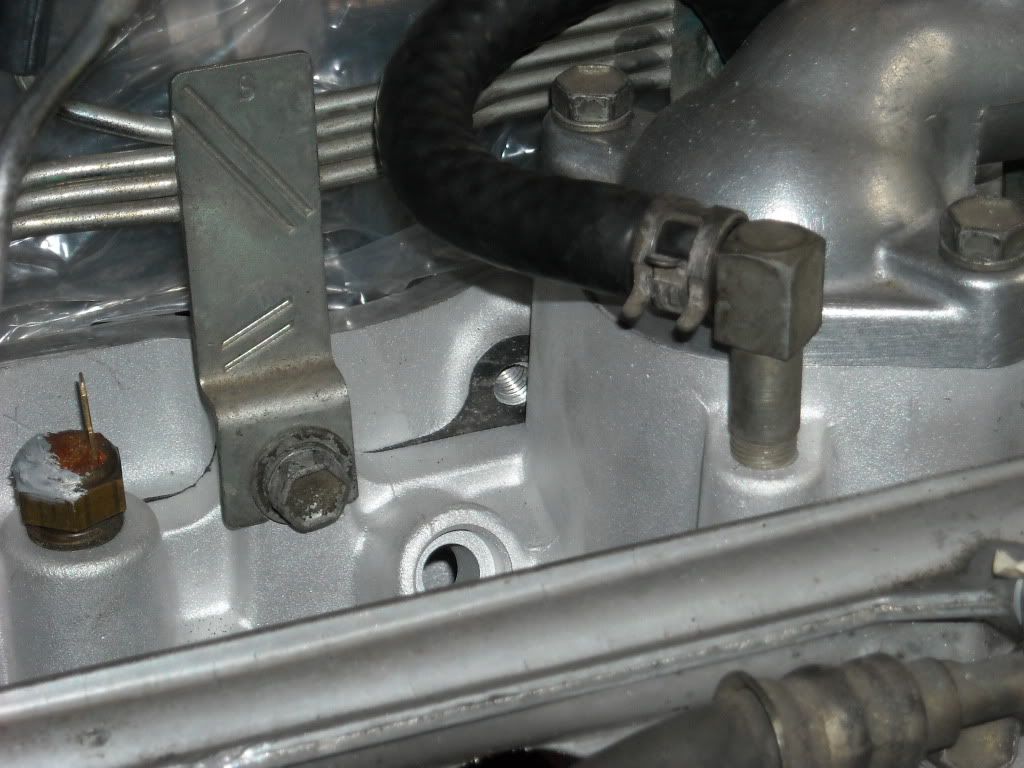
On the Lower intake manifold, behind the thermostat housing, facing the manifold from the passenger side tire, there is a bolt hole. It doesn't connect to an intake mounting slot, .....nothing that I can see. I'll take pictures, but I'm wondering if it's one of those bolt holes that is there for another engine accessory that I don't have or something?
PS> MY PLEASURE, Rob! I'm so glad you guys had a great time! I miss those days...mine are 20 and 18 now, and one is even a mother! lol. YES, I'ma Grandpa!SHUT IT! lol, just kidding, totally! It's awesome!
Ok, exhaust issue solved. Supreme muffler, RIGHT DOWN THE STREET FROM ME, lol, is going to......
1. Weld the LCE Pipe Flange in the right place on the collector side
2. Hook up the o2 adapter kit
3. install the CAT,.. welded to the Pipe on the header side
4. Weld in a 2.25" pipe from CAT to muffler(to replace that 1.75" pipe that was there!grr)
Cost for all, including 2.25" CAT, installed, 300$ So I guess he's only chargine me 60$ or so for the couple welds and lil piece of pipe.
WOO HOO! lol. At least I don't have to pay 300$ more to LCE, just for the CAT!
I'ma get some pics, today, made some progress last night from 10pm to Midnight! lol.
I have all day today, so granting I have no snags, I should have it ready to tow to the muffler shop, tomorrow!
Wish me Luck, guys.....maybe a prayer or two as well?
ONE MORE QUESTION......
On the Lower intake manifold, behind the thermostat housing, facing the manifold from the passenger side tire, there is a bolt hole. It doesn't connect to an intake mounting slot, .....nothing that I can see. I'll take pictures, but I'm wondering if it's one of those bolt holes that is there for another engine accessory that I don't have or something?
PS> MY PLEASURE, Rob! I'm so glad you guys had a great time! I miss those days...mine are 20 and 18 now, and one is even a mother! lol. YES, I'ma Grandpa!SHUT IT! lol, just kidding, totally! It's awesome!
05-18-2010, 02:28 PM
#88
Yeah, Pismo,
....I must have read right past that. hahahaha. Something of an overload, lately, with all of this stuff. Anyway, yeah, that was the answer I needed, and yet, I wanted, also, to see if someone other than those whom would be selling me something might know, before asking the shop to do it, lol. Oh well, it's figured out, and I'm very relieved.
The intake question?.....Nothing could possibly go there, because the Therm. housing is so up against it, no bolt, no matter how TEENY OF A HEAD, could fit in there along with the housing,...and if there was one, the intake wouldn't go on fully. Guess it's one of those bolt holes for a turbo or something?
I was wondering if I have to use Gasoline on the injectors to install them properly? It calls to swab the o-ring and grommet with gasoline, ...so I was just wondering. Guess I'll try to get some out of the tank, ...I'm doing the fuel pump, anyhow, so shouldn't be too difficult to get some fuel in the process, right, haha.
How's your build coming, Joe?
05-18-2010, 02:39 PM
#89
Registered User
I heard that gasoline isn't a good idea to use on injector grommets because it will harden them up faster. Witch hunter recommends using clean motor oil to lube them up. They explain that here: http://www.witchhunter.com/healthyinjectors.php4
Well my build is...well...going lol I'm just waiting on the rocker arm assembly and then the long block will be done!!! I'm choosing to have the machine shop build it like you did, I could do it but there's no "warranty" lol. My local machine shop offers a 3yr/50k mile warranty, so I look at is as I'm buying a warranty by having them assemble it lol
But its gonna be hard to one up you....its sure lookin purdyyyy in there!!!!
05-18-2010, 04:54 PM
#91
Registered User
Good call! I was trying to figure this out....but heres a pic chef
http://i22.photobucket.com/albums/b3...ess/intake.jpg
http://i22.photobucket.com/albums/b3...ess/intake.jpg

 05-18-2010, 06:37 PM
#95
Nah, lol, it's not that one,....Bleeder 'head's up'd' me on that during removal, just as an answer to "Anything I should know?" hahaha.
Actually, it's not an allen in my case, it's a 10mm hardened bolt in it's place.
This is the bolt hole I was speaking of, which is IMPOSSIBLE to be for any bolt, because then it would be impossible to bolt on the intake, lol. That is, granting I've installed the Lower intake in the right place! lol. Here's a pic of the hole, center screen.......
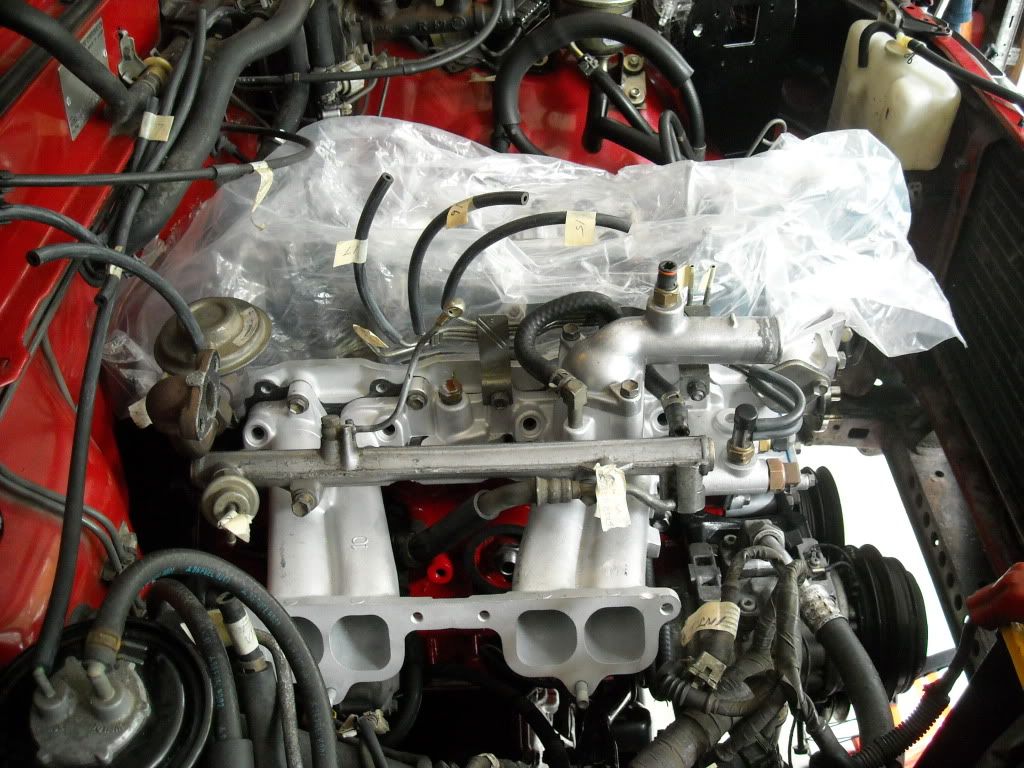
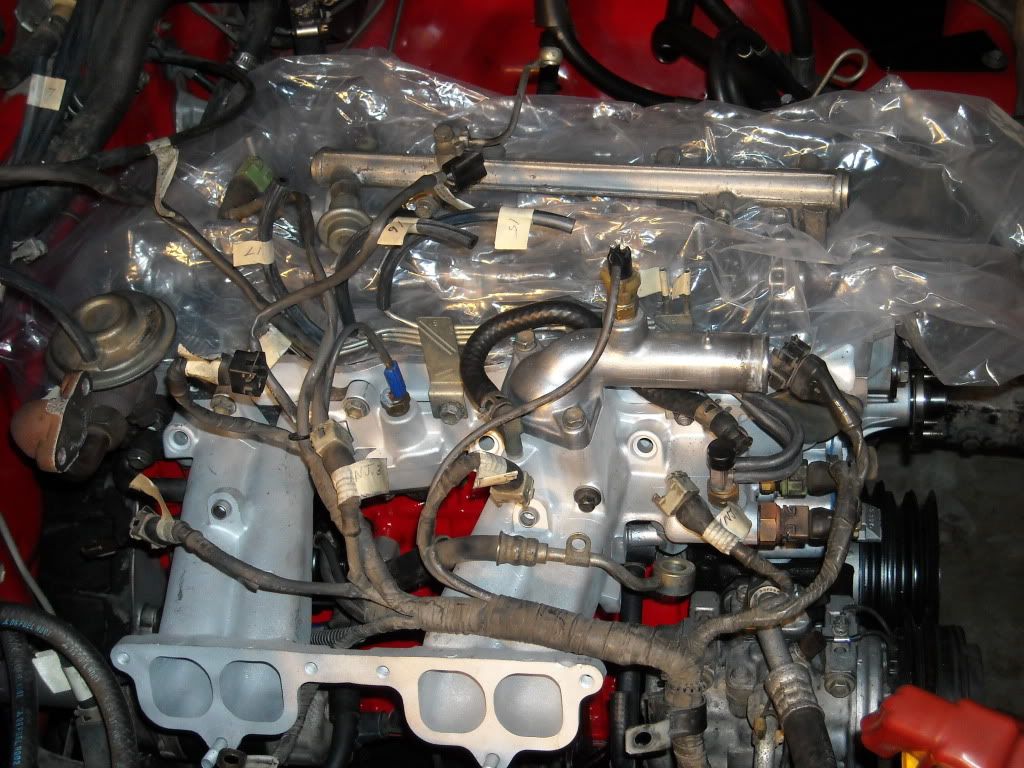
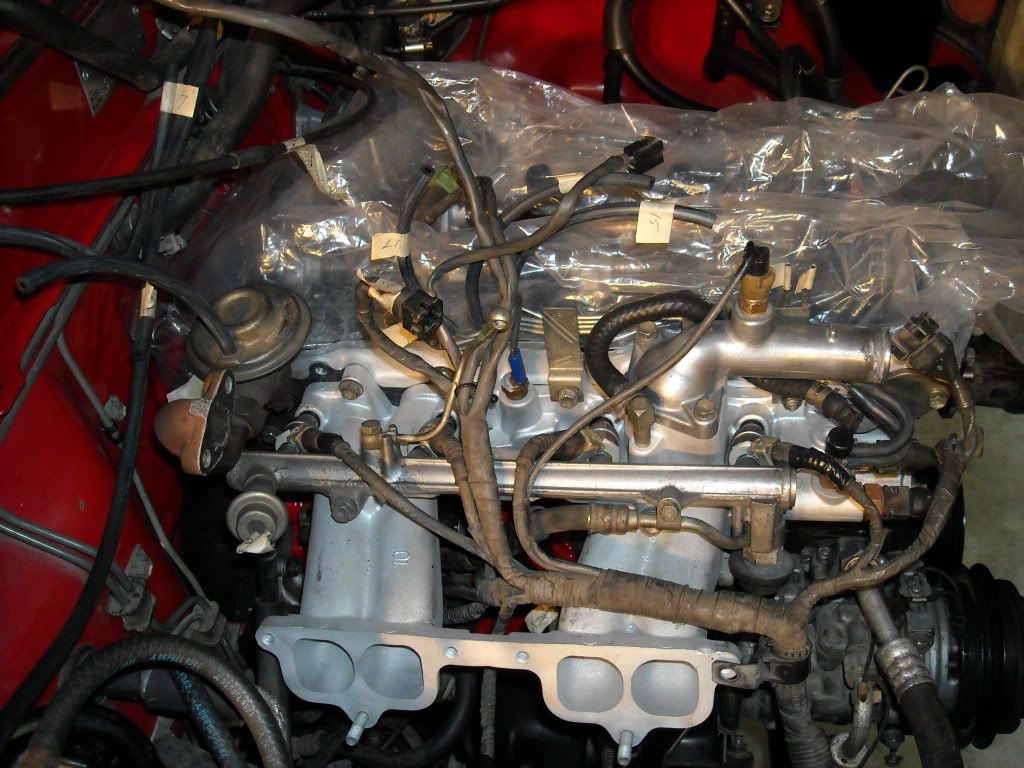
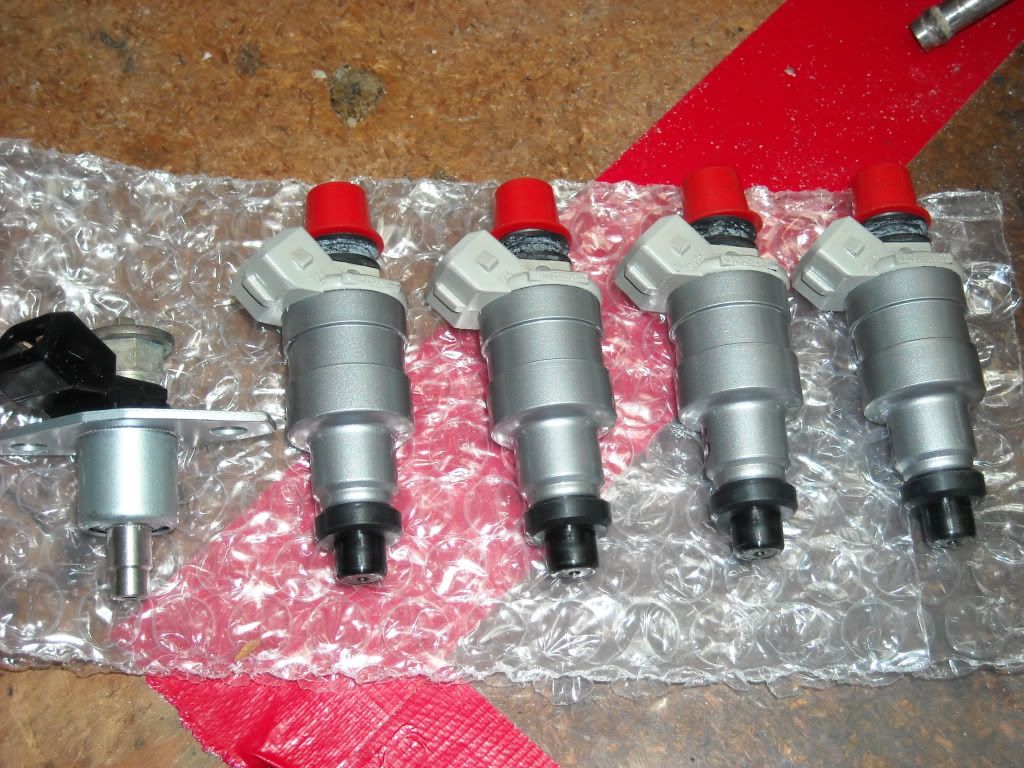
Here's the injectors, before I installed them, and then some pics of the progress today........
Here's the injectors.....done by RC Fuel Injection, Torrance, CA...............
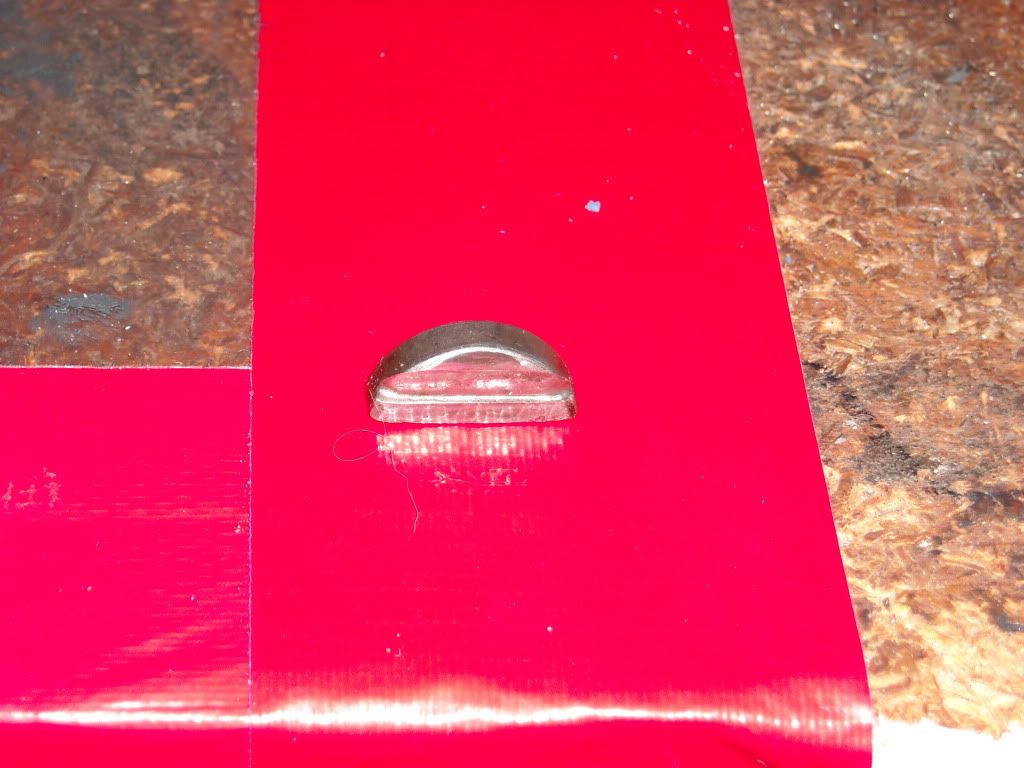
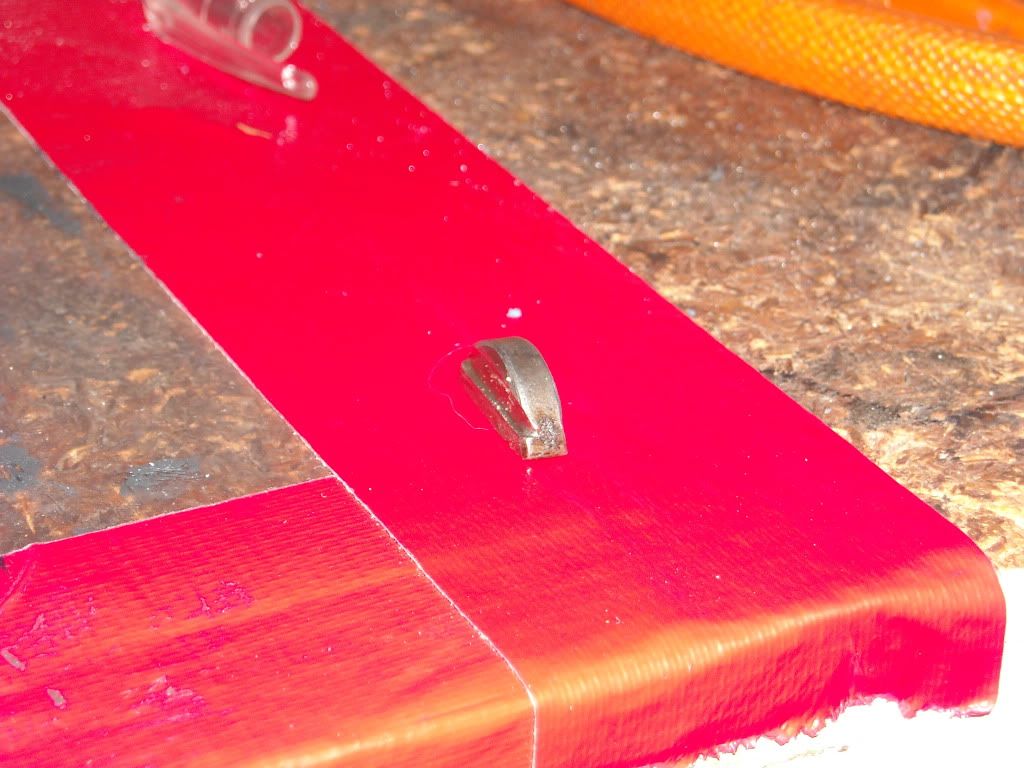
Now, this is a pic of the C.O.G. Key from the Crank I had replaced....notice anything? lol..
I had to stop a few times today, GRRRR, but it's ok, it was for my Midget(my younger daughters nickname, haha). I think I'm doing alright, considering my experience, ....but just a lil frustrated that I'm having to stop so often! lol.
THANK YOU, GUYS, SO MUCH, for offering some input on that bolt. THAT COULD BE AND I'M SURE HAS BEEN CATASTROPHIC "MISS" FOR MANYYY people!
That crank key was nearly gone, as you can see, and my harmonic balance was ALSO nearly gone. Not sure exactly what that would have caused, should it have finally snapped off in there, but I'm guessing something along the lines of "BROKEN, SMASHED, BENT EVERYTHING SCENARIO!" hahaha. So, like the guys there said, ...."YOU GOT LUCKY WITH YOUR INSTINCT"....I explained that it was a few guys from YotaTech who've inspired me to do it in the first place, lol!
Back to work, and btw......DRAINING THAT FUEL TANK IS A PITA! hahaha. Man it stinks in here! lol......also, I think I now have three thumbs! ....Fhew, no, it's just my triple vision! lolol
Actually, it's not an allen in my case, it's a 10mm hardened bolt in it's place.
This is the bolt hole I was speaking of, which is IMPOSSIBLE to be for any bolt, because then it would be impossible to bolt on the intake, lol. That is, granting I've installed the Lower intake in the right place! lol. Here's a pic of the hole, center screen.......
Here's the injectors, before I installed them, and then some pics of the progress today........
Here's the injectors.....done by RC Fuel Injection, Torrance, CA...............
Now, this is a pic of the C.O.G. Key from the Crank I had replaced....notice anything? lol..
I had to stop a few times today, GRRRR, but it's ok, it was for my Midget(my younger daughters nickname, haha). I think I'm doing alright, considering my experience, ....but just a lil frustrated that I'm having to stop so often! lol.
THANK YOU, GUYS, SO MUCH, for offering some input on that bolt. THAT COULD BE AND I'M SURE HAS BEEN CATASTROPHIC "MISS" FOR MANYYY people!
That crank key was nearly gone, as you can see, and my harmonic balance was ALSO nearly gone. Not sure exactly what that would have caused, should it have finally snapped off in there, but I'm guessing something along the lines of "BROKEN, SMASHED, BENT EVERYTHING SCENARIO!" hahaha. So, like the guys there said, ...."YOU GOT LUCKY WITH YOUR INSTINCT"....I explained that it was a few guys from YotaTech who've inspired me to do it in the first place, lol!
Back to work, and btw......DRAINING THAT FUEL TANK IS A PITA! hahaha. Man it stinks in here! lol......also, I think I now have three thumbs! ....Fhew, no, it's just my triple vision! lolol
05-18-2010, 06:47 PM
#98
Dang, I guess it's really funny to someone at Hanes and Chiltons, .....you know, that guy who is editing the book, then turns to the guy next to him and says, "Hey, let's leave out that allen bolt.....and then, maybe the hidden head bolt in the pool of oil under the distributor gear, eh? hahahahha" ...........SCUMBAGS! lol.
Can't wait to see yours coming together. I have to eat something, then I'ma get back at it tonight.......Installing the upper intake, vacuum's, CSI, valve cover, then the clutch slave and master. Should be able to do that in a couple hours, tonight. Althoughhhhhhhhhh, I do have to put the vacuum inlet pipes into the intake first, .....CAREFULLY! LOL. Anyway, it's just paint, and while I like the scheme, I'm not sure I plan on it staying that clean forever, hahaha. Plus, I might drop a wrench on it or something, ya know? haha.........Hey, WAIT A MINUTE.....that's not funny at all! lol
Can't wait to see yours coming together. I have to eat something, then I'ma get back at it tonight.......Installing the upper intake, vacuum's, CSI, valve cover, then the clutch slave and master. Should be able to do that in a couple hours, tonight. Althoughhhhhhhhhh, I do have to put the vacuum inlet pipes into the intake first, .....CAREFULLY! LOL. Anyway, it's just paint, and while I like the scheme, I'm not sure I plan on it staying that clean forever, hahaha. Plus, I might drop a wrench on it or something, ya know? haha.........Hey, WAIT A MINUTE.....that's not funny at all! lol
05-18-2010, 06:52 PM
#100
Registered User
I was just reading a really good thread that mtngoat posted about an imbalanced or improperly installed harmonic balancer....wish I bookmarked it for ya
Ill sum it up lol it ain't good at all!
Ill sum it up lol it ain't good at all!


