86-95 Trucks & 4Runners (Build-Up Section) Post your build-ups here

1988 Toyota Unimog extra cab.

Thread Tools
 
Search this Thread
 
Old 04-07-2016, 07:23 PM
  #1  
Registered User
Thread Starter
 
chriscorpus's Avatar
 
Join Date: Feb 2013
Posts: 70
Likes: 0
Received 0 Likes on 0 Posts
1988 Toyota Unimog extra cab.

Hey guys! I have a thread on pirate in the Mercedes section but I feel i would get more help and interest here. I seem to be on here anyways a lot of the time planning for my engine swap. The build is mostly complete but I still have a lot to do. Hope you all like it.
Stats.
Truck: 1988 Toyota extra cab
Engine: 22re
Transmission: W56
Transfercases: 4.7 crawlbox / Tacoma tcase
Axles: Rebuilt 1985 Unimog 404 axles front and rear. 7.54 gears with cable lockers.
Suspension: Leaf springs with traction bars.

Work to come within weeks to years.
OM617 engine swap.
1 link(technically 2) suspension with coils.
40-42"tires.
winch
onboard dewalt compressor
gear driven DRIVERS side drop t case swap.
rock lights
and much much more as the funds slowly come in.

*Disclaimer* I do most of my own work but the axles and new Tcase were put in by SCAR offroad in elcajon CA.

Last edited by chriscorpus; 04-07-2016 at 07:45 PM.
Old 04-07-2016, 07:26 PM
  #2  
Registered User
Thread Starter
 
chriscorpus's Avatar
 
Join Date: Feb 2013
Posts: 70
Likes: 0
Received 0 Likes on 0 Posts
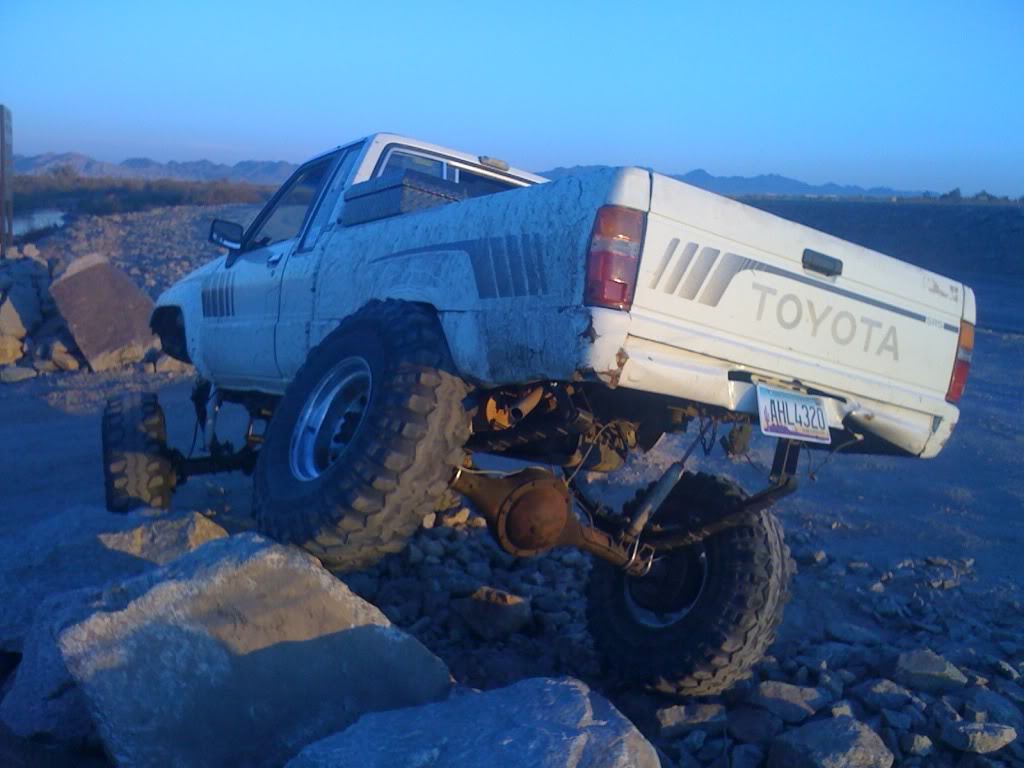
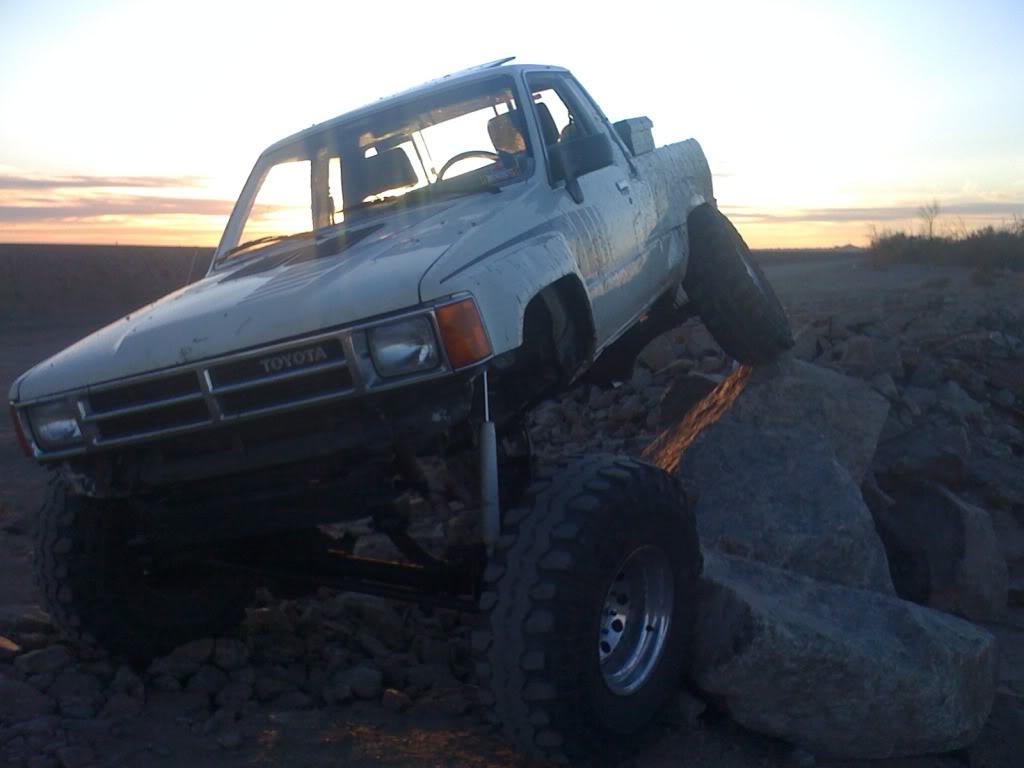
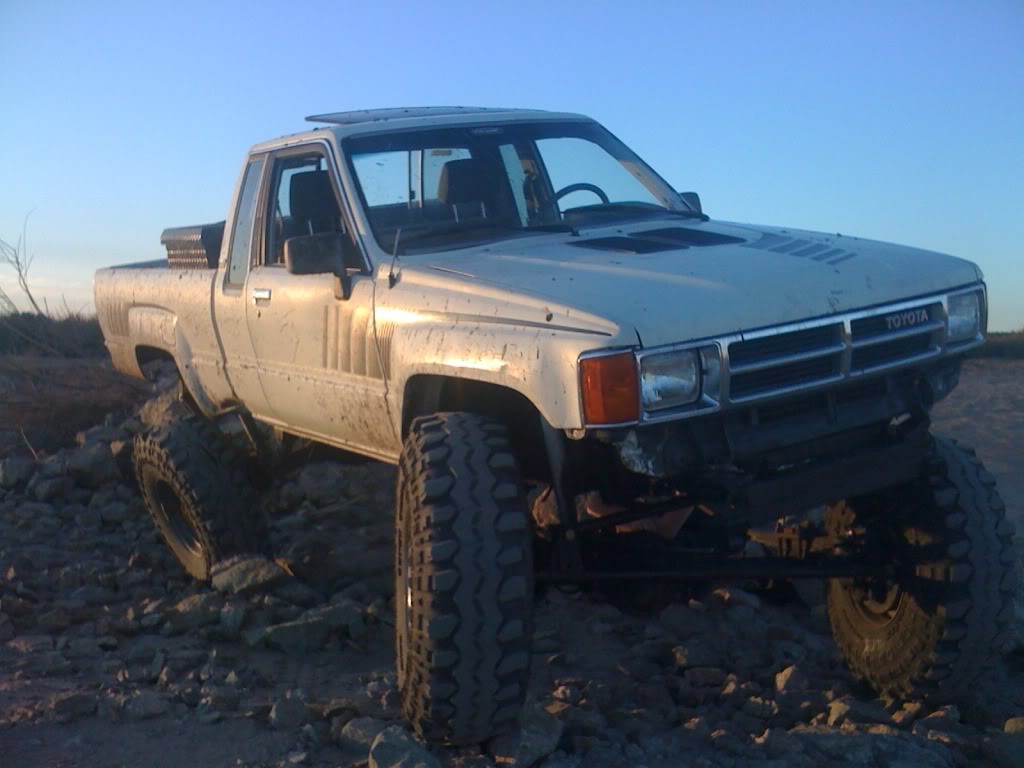
This was the trucks previous state. I bought the truck when i was 21. 30 now. it was completely stock. I put a 4" independent suspension lift on it with 35" tires. Then ripped that out and put toyota axles. Then ripped that out and put what you see here. CUCV 3/4 ton dodge axle front, HO52 1 ton axle in the rear. 5.13 gears and welded rear axle with dual stock cases.

Name:  IMG_0483.jpg
Views: 1373
Size:  96.6 KB
Name:  IMG_0481.jpg
Views: 1401
Size:  67.9 KB
Name:  IMG_0479.jpg
Views: 1350
Size:  82.3 KB
Old 04-07-2016, 07:33 PM
  #3  
Registered User
Thread Starter
 
chriscorpus's Avatar
 
Join Date: Feb 2013
Posts: 70
Likes: 0
Received 0 Likes on 0 Posts
Axles.

Name:  imagejpg1.jpg
Views: 1230
Size:  173.7 KB
Name:  imagejpg2.jpg
Views: 1124
Size:  40.8 KB
Rebuild stamps
Name:  image-1.jpg
Views: 1147
Size:  134.7 KB
Name:  image-2.jpg
Views: 1114
Size:  79.0 KB

Last edited by chriscorpus; 04-08-2016 at 07:24 AM.
Old 04-07-2016, 07:38 PM
  #4  
Registered User
Thread Starter
 
chriscorpus's Avatar
 
Join Date: Feb 2013
Posts: 70
Likes: 0
Received 0 Likes on 0 Posts
Axles and disk brake swap

Name:  10403544_872043722835783_2342681034958932908_n.jpg
Views: 1154
Size:  102.7 KB
Name:  IMG_2191.jpg
Views: 1946
Size:  103.0 KB
Name:  IMG_2193.jpg
Views: 1304
Size:  134.8 KB
Getting the axles ready for disc break swap.
Name:  IMG_2192.jpg
Views: 1679
Size:  111.3 KB
Name:  IMG_2386.jpg
Views: 1123
Size:  144.9 KB
This is the horseshoe brace/caliper mount welded to the cast iron portal housing.
Name:  IMG_2540.jpg
Views: 1111
Size:  143.8 KB
Old 04-07-2016, 07:41 PM
  #5  
Registered User
Thread Starter
 
chriscorpus's Avatar
 
Join Date: Feb 2013
Posts: 70
Likes: 0
Received 0 Likes on 0 Posts
pinion conversion and brakes.

Name:  IMG_2387_1.jpg
Views: 1152
Size:  134.9 KB
Name:  IMG_2705.jpg
Views: 1128
Size:  170.1 KB
This is the finished brake product. The hub was machined to be 8 lug on 6.5". 3/4 chevy rotors and wilwood 4 piston calipers.
Name:  IMG_2712.jpg
Views: 1104
Size:  154.6 KB
Old 04-07-2016, 07:42 PM
  #6  
Registered User
Thread Starter
 
chriscorpus's Avatar
 
Join Date: Feb 2013
Posts: 70
Likes: 0
Received 0 Likes on 0 Posts
I have more pics. Ill add some more tomorrow.
Old 04-07-2016, 09:26 PM
  #7  
Registered User
 
84 yota dude's Avatar
 
Join Date: Mar 2013
Posts: 1,060
Received 48 Likes on 31 Posts
Dude one word.. BADASS
Old 04-07-2016, 11:12 PM
  #8  
Registered User
iTrader: (2)
 
rustED's Avatar
 
Join Date: Sep 2010
Location: Tri-Cities, Wa
Posts: 2,715
Received 4 Likes on 3 Posts
Awesome build, I always thought it would be cool to get ahold of some Unimog portal axels, can't wait to see some more pics!
Old 04-08-2016, 07:29 AM
  #9  
Registered User
Thread Starter
 
chriscorpus's Avatar
 
Join Date: Feb 2013
Posts: 70
Likes: 0
Received 0 Likes on 0 Posts
Originally Posted by 84 yota dude
Dude one word.. BADASS
Originally Posted by rustED
Awesome build, I always thought it would be cool to get ahold of some Unimog portal axels, can't wait to see some more pics!
Thank guys. Its been many years and a lot of transformations and i like how she is sitting now.

rustED. I got the axles off of eBay of all places. rebuilt and in great condition for 1800$ which is a steal! There is a lot of work to get them under a toyota or any vehicle really but in my opinion its well worth it if your up for the work.
Old 04-08-2016, 07:36 AM
  #10  
Registered User
Thread Starter
 
chriscorpus's Avatar
 
Join Date: Feb 2013
Posts: 70
Likes: 0
Received 0 Likes on 0 Posts
leaf springs

Bolt on leaf spring perches.
Name:  10941528_914148568625298_111912674_n.jpg
Views: 1112
Size:  62.6 KB
Name:  IMG_2377.jpg
Views: 1081
Size:  97.4 KB
Name:  IMG_2376.jpg
Views: 1083
Size:  96.7 KB
Name:  IMG_2378.jpg
Views: 1126
Size:  134.6 KB
F150 springs are used in the rear. Stock tacoma rear springs in the front.
Name:  IMG_2388.jpg
Views: 1085
Size:  134.1 KB
Name:  IMG_2375.jpg
Views: 1117
Size:  125.8 KB
Old 04-08-2016, 07:45 AM
  #11  
Registered User
Thread Starter
 
chriscorpus's Avatar
 
Join Date: Feb 2013
Posts: 70
Likes: 0
Received 0 Likes on 0 Posts
Name:  11071528_949519405088214_6417591043398990851_n.jpg
Views: 1079
Size:  128.4 KB
Name:  10360480_949519308421557_6360544668236439471_n.jpg
Views: 1091
Size:  140.7 KB
The shackle was later relocated to the front of the front springs to make the axle articulate correctly with the traction bar
Name:  11077956_949518395088315_1506943395314446804_n.jpg
Views: 1100
Size:  85.8 KB
Old 04-08-2016, 07:49 AM
  #12  
Registered User
Thread Starter
 
chriscorpus's Avatar
 
Join Date: Feb 2013
Posts: 70
Likes: 0
Received 0 Likes on 0 Posts
the stance

Name:  1560716_949518358421652_7354256302639019029_n.jpg
Views: 1146
Size:  89.6 KB
Name:  882C61FD-5317-419E-9E30-991D799AFCB9.jpg
Views: 1188
Size:  156.5 KB
Old 04-08-2016, 07:57 AM
  #13  
Registered User
Thread Starter
 
chriscorpus's Avatar
 
Join Date: Feb 2013
Posts: 70
Likes: 0
Received 0 Likes on 0 Posts
When i originally installed the dual cases i moved the rear axle to the rear 5.5" rather then modifying the rear drive shaft. When installing the mog axles i decided to keep this wheelbase long since the height would be increased a bit due to the long and relatively centered pinion wanting to interfere with the oil pan.
Old 04-08-2016, 10:04 AM
  #14  
Registered User
 
tj884Rdlx's Avatar
 
Join Date: Apr 2007
Location: ATL!
Posts: 1,458
Likes: 0
Received 3 Likes on 3 Posts
Dude i have that exact same setup!!

*crickets*

Lol OK maybe not.

Very, very, cool custom build. Thanks for posting pics!
Looking forward to seeing this drive straight up the side of a building, or something like that.

Last edited by tj884Rdlx; 04-08-2016 at 10:05 AM.
Old 04-08-2016, 11:00 AM
  #15  
Registered User
iTrader: (2)
 
rustED's Avatar
 
Join Date: Sep 2010
Location: Tri-Cities, Wa
Posts: 2,715
Received 4 Likes on 3 Posts
Originally Posted by chriscorpus
Thank guys. Its been many years and a lot of transformations and i like how she is sitting now.

rustED. I got the axles off of eBay of all places. rebuilt and in great condition for 1800$ which is a steal! There is a lot of work to get them under a toyota or any vehicle really but in my opinion its well worth it if your up for the work.
Thats is a great price, last time I was looking at some they wanted twice that for one axel!
I can't get over how much ground clearance you have under the diffs! That thing is going to be sweet when you get the diesel motor in! Keep up the good work!
Old 04-08-2016, 01:41 PM
  #16  
Registered User
Thread Starter
 
chriscorpus's Avatar
 
Join Date: Feb 2013
Posts: 70
Likes: 0
Received 0 Likes on 0 Posts
Originally Posted by rustED
Thats is a great price, last time I was looking at some they wanted twice that for one axel!
I can't get over how much ground clearance you have under the diffs! That thing is going to be sweet when you get the diesel motor in! Keep up the good work!
Yeah the clearance is pretty nice. This is with 37" tires air down to 4psi. I think it was like 15 or 16". I can't remember.
Name:  IMG_4813.jpg
Views: 1106
Size:  184.1 KB
Old 04-08-2016, 01:42 PM
  #17  
Registered User
Thread Starter
 
chriscorpus's Avatar
 
Join Date: Feb 2013
Posts: 70
Likes: 0
Received 0 Likes on 0 Posts
Originally Posted by tj884Rdlx
Dude i have that exact same setup!!

*crickets*

Lol OK maybe not.

Very, very, cool custom build. Thanks for posting pics!
Looking forward to seeing this drive straight up the side of a building, or something like that.
Thanks. Im working a few brake line issues right now. As soon as i get parts in, it should be ready to wheel for the first time.
Old 04-08-2016, 01:44 PM
  #18  
Registered User
Thread Starter
 
chriscorpus's Avatar
 
Join Date: Feb 2013
Posts: 70
Likes: 0
Received 0 Likes on 0 Posts
traction bars

Name:  IMG_2801.jpg
Views: 1139
Size:  97.5 KB
Name:  IMG_2815.jpg
Views: 1103
Size:  128.8 KB
Name:  IMG_2816.jpg
Views: 1316
Size:  111.3 KB
Old 04-08-2016, 01:51 PM
  #19  
Registered User
Thread Starter
 
chriscorpus's Avatar
 
Join Date: Feb 2013
Posts: 70
Likes: 0
Received 0 Likes on 0 Posts
Finished traction bars

Name:  IMG_4831.jpg
Views: 1110
Size:  212.3 KB
Name:  IMG_4830.jpg
Views: 1132
Size:  235.2 KB
Old 04-08-2016, 01:55 PM
  #20  
Registered User
Thread Starter
 
chriscorpus's Avatar
 
Join Date: Feb 2013
Posts: 70
Likes: 0
Received 0 Likes on 0 Posts
shock mounts and steering

Name:  11071928_951440084896146_8279956927629843436_n.jpg
Views: 1080
Size:  71.1 KB
Name:  1964896_951440061562815_1755700633156398277_n.jpg
Views: 1067
Size:  84.3 KB
Name:  11102879_951440134896141_2206395260193818967_n.jpg
Views: 1091
Size:  79.5 KB
Name:  11082514_951440118229476_3586291917481305158_n.jpg
Views: 1078
Size:  87.0 KB
Name:  11075169_951587178214770_8153692435826985411_n.jpg
Views: 1078
Size:  87.4 KB
Name:  1947726_951587231548098_4844522988720770446_n.jpg
Views: 1098
Size:  73.0 KB
Name:  14888_951587251548096_2960376109132904944_n.jpg
Views: 1083
Size:  109.6 KB
Name:  11020486_951587198214768_263667016618794689_n.jpg
Views: 1100
Size:  83.3 KB
The tie rod ended up needing to be moved to the front in a high steer set up. It would have interfered with the traction bar. Also this shackle was moved forward
Name:  11077956_949518395088315_1506943395314446804_n.jpg
Views: 1123
Size:  85.8 KB
This is the final steering and shackle set up.
Name:  IMG_4832.jpg
Views: 1101
Size:  206.7 KB

Last edited by chriscorpus; 04-08-2016 at 01:57 PM.


Quick Reply: 1988 Toyota Unimog extra cab.


All times are GMT -8. The time now is 06:20 PM.