Xyphus42's 85 4Runner Build-Up Thread
 05-19-2011, 10:38 AM
#41
Registered User
Thread Starter
Still waiting on bearings.... man summit is slow.
Anyway I'm doing the valve cover while I wait.
Will post pics after I'm done.
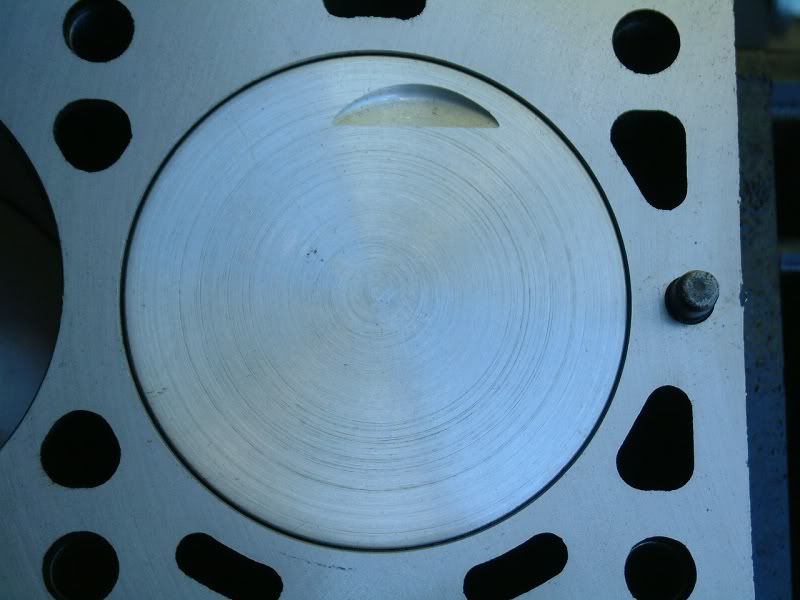
Did some port work on the head anyway, wanted to change out the valve stem seals, the new ones are viton and I have no idea what the other ones were made of... Gray in color if that means anything.
Here's what I did.... I love my dremel!
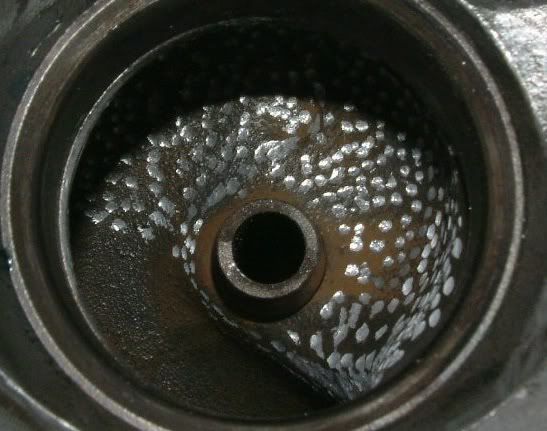
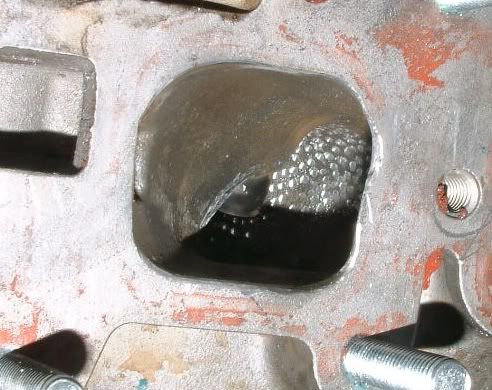
I read from Engnbldr (IIRC) that they had good numbers from dimpling the bowl on their porting. So I "golf balled" my bowl as much as I could reach as well as port matched the gasket hence the funny shape on the right.
The gasket was actually cleared out for the injector. I also gasket matched the lower and upper manifold halves. Man there is a TON of area to clear out when doing that. At least on the upper half anyway
Anyway I'm doing the valve cover while I wait.
Will post pics after I'm done.
Did some port work on the head anyway, wanted to change out the valve stem seals, the new ones are viton and I have no idea what the other ones were made of... Gray in color if that means anything.
Here's what I did.... I love my dremel!
I read from Engnbldr (IIRC) that they had good numbers from dimpling the bowl on their porting. So I "golf balled" my bowl as much as I could reach as well as port matched the gasket hence the funny shape on the right.
The gasket was actually cleared out for the injector. I also gasket matched the lower and upper manifold halves. Man there is a TON of area to clear out when doing that. At least on the upper half anyway
 05-21-2011, 06:50 AM
#42
Registered User
Thread Starter
Well, I got the bearing in the mail. Have to wait until Monday to get them down to the shop.
Found a good article/forum thread on the T-chain tensioner, over at 4x4wire. Its a long read and actually its two threads long. There is some good info in it though.
Thread 1
Thread 2
I'm going to open mine up and clean it out, as described in the thread.
Found a good article/forum thread on the T-chain tensioner, over at 4x4wire. Its a long read and actually its two threads long. There is some good info in it though.
Thread 1
Thread 2
I'm going to open mine up and clean it out, as described in the thread.
05-22-2011, 02:16 AM
#43
Registered User
Thread Starter
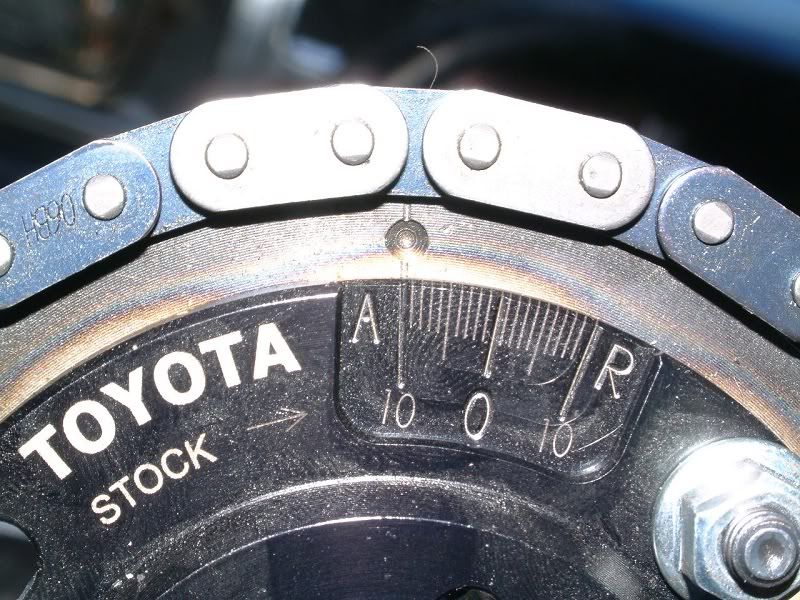
I read recently about how to put in the knock sensor on the old block. Weld a 12mm x 1.25 nut to the head of the upper rear engine mount bolt. Ingenious, thanks Marlin!
I am also contemplating putting in a third guide on the timing set. When I took apart the 22R, i had a heck of a time getting the drivers side rail off. The chain had worn the tops of the bolt heads almost clean off. So the third guide would really just be a safety and ease of removal add-on. I was thinking about using some 1/8" thick angle iron and drilling a couple holes in it to put it right close the heads of the bolts but still enough to get a socket on. Like this,
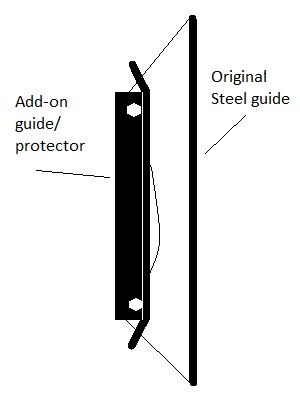
I would also polish it so it was real smooth for the chain to slide on if it happens to do so. Save from busted off bolts and slapping chains, I would think.
I am also contemplating putting in a third guide on the timing set. When I took apart the 22R, i had a heck of a time getting the drivers side rail off. The chain had worn the tops of the bolt heads almost clean off. So the third guide would really just be a safety and ease of removal add-on. I was thinking about using some 1/8" thick angle iron and drilling a couple holes in it to put it right close the heads of the bolts but still enough to get a socket on. Like this,
I would also polish it so it was real smooth for the chain to slide on if it happens to do so. Save from busted off bolts and slapping chains, I would think.
Last edited by Xyphus42; 05-23-2011 at 09:57 PM.
05-23-2011, 10:20 PM
#44
Registered User
Thread Starter
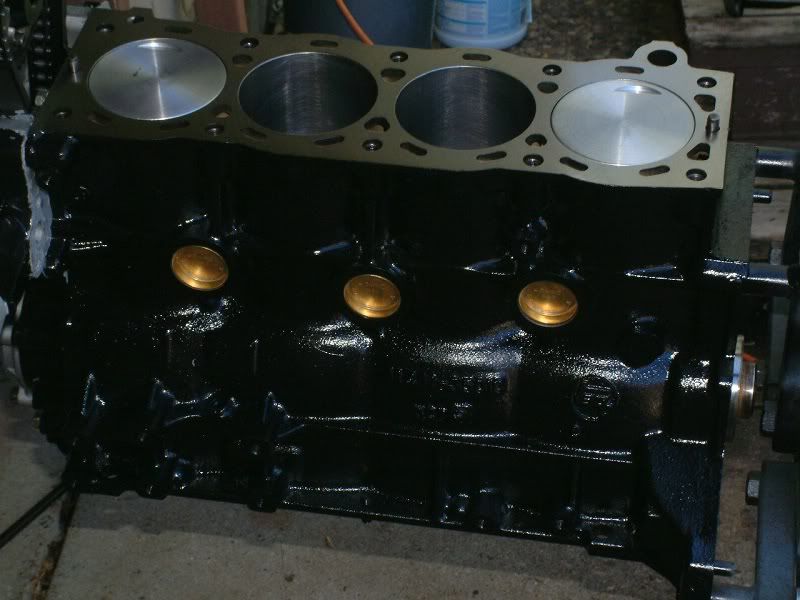
Well I got the bearings, flywheel and harmonic balancer down to the shop for balancing the crank. He's been so back logged. He was only able to get the block decked so far, .010".
I noticed something in the intake manifold. A pretty decent restriction right at the throttle body. The EGR piping goes right in front of the upper side of the intake. So I cut it out with a sawzall and my dremel, since my EGR is non functional anyway, and have the block plates from LCE. I will be putting some sealer and possible foam in the EGR pipe, to smooth out the air and keep it from "whistling". As well, from before the EGR was deleted, it was chock full of gunk, so I had the shop hot tank it for me, $20. Worth it to have a shiny clean intake ready for paint.
I started on the snorkel today. 3" pipe right into the firewall, where the A/C used to be. Went through the firewall and straight into the air box, after removing the A/C coil of course. Should be good, enough free air in the box and added benefit of more air if I turn the fan on. It's in the box directly after the fan so it won't be hot or cold air, just cabin temp, or less. Going to seal it up with silicone after some final test fits and adjustments. A torch is real handy for bending up Schedule 40 PVC. At the moment I have a perfectly straight piece from the firewall to the air box and will need to bend it some to relieve some pressure on it. It does fit, just a little tooo snug for my tastes. The air box was a real simple move. Drilled a hole where the drain hole was through the fender well and put a bolt with metal/rubber washers and a nut. The latches clear but just barely, since I still have my washer fluid reservoir in its stock location. Flattened out a piece of the PVC pipe to use as a permanent plug for the original air box breather hole. Little bit of silicone and it will be good to go. I cut it for a nice snug fit in the hole. I will also add some silicone to the mounting bolt to make sure it's good and sealed as well.
I noticed something in the intake manifold. A pretty decent restriction right at the throttle body. The EGR piping goes right in front of the upper side of the intake. So I cut it out with a sawzall and my dremel, since my EGR is non functional anyway, and have the block plates from LCE. I will be putting some sealer and possible foam in the EGR pipe, to smooth out the air and keep it from "whistling". As well, from before the EGR was deleted, it was chock full of gunk, so I had the shop hot tank it for me, $20. Worth it to have a shiny clean intake ready for paint.
I started on the snorkel today. 3" pipe right into the firewall, where the A/C used to be. Went through the firewall and straight into the air box, after removing the A/C coil of course. Should be good, enough free air in the box and added benefit of more air if I turn the fan on.
It's in the box directly after the fan so it won't be hot or cold air, just cabin temp, or less. Going to seal it up with silicone after some final test fits and adjustments. A torch is real handy for bending up Schedule 40 PVC. At the moment I have a perfectly straight piece from the firewall to the air box and will need to bend it some to relieve some pressure on it. It does fit, just a little tooo snug for my tastes. The air box was a real simple move. Drilled a hole where the drain hole was through the fender well and put a bolt with metal/rubber washers and a nut. The latches clear but just barely, since I still have my washer fluid reservoir in its stock location. Flattened out a piece of the PVC pipe to use as a permanent plug for the original air box breather hole. Little bit of silicone and it will be good to go. I cut it for a nice snug fit in the hole. I will also add some silicone to the mounting bolt to make sure it's good and sealed as well.
Last edited by Xyphus42; 05-23-2011 at 10:23 PM.
05-27-2011, 03:24 PM
#45
Registered User
Thread Starter
Got a new gas tank, $110 with shipping from rock auto.
The old tank was rusted on the inside. Don't want to take that chance with the new motor.
Machine shop is still back logged but he will be getting it honed out this weekend.
I'm so anxious to get this thing put together. Once I do get it put all together and running I'll make a write up on the engine. About what's needed to put a 22re head on an old style tall block.
05-31-2011, 06:11 AM
#46
Registered User
Thread Starter
Got the new tank painted and installed.
Kind of disappointed in the new tank, its smaller then the old one. have an extra 2 1/2" between the tank and the rock guard. There wasn't a capacity listing on the Rock auto site so be careful if you order one through them. The packing list on the other hand had the capacity, 14.8 gal. With the smaller tank, I had to modify the pump holder and return line. I had to cut and re-weld the pump holder 1 1/2" higher and 1" off the return tube. It all fit nicely after that.
Oh well, looks like I will be looking to move the spare tire and add a second tank, in the future. I will be holding on to my original tank. If I can track down the "rust cleaner" that I heard about in a motorcycle shop, I will use my original tank and add it as a second. When I do that I will plumb it with a pipe between the bottoms of the tanks. Doing it that way I won't have to add an extra pump or switches or anything. It will just increase capacity.
I'm still waiting on word from the machine shop, it's so close I can taste it.
06-02-2011, 02:24 PM
#47
Registered User
Thread Starter
I'm a little worried... Machine shop called and hung up yesterday. Called back today and he's gone to Texas to get a new Boring Bar.  I really hope it didn't break while he was doing my block.
I really hope it didn't break while he was doing my block.
06-07-2011, 07:54 AM
#48
Registered User
Thread Starter
Well, I got some distressing news.
The machine shop called me yesterday, and he messed up the block, sort of.
While doing the bore his gauge messed up and ended at .003 more then it should have in the rough. So he bored it to .060 instead. Bad news is I don't have the cash to come up with for the set of .060's. He's talking with his boss to see if they will exchange the .040's for the .060's, even though I didn't buy the .040's from them. They sell the .040's exact brand and size so I don't see where the problem would be, except that I didn't buy them from them. I'm gonna have to fight for this I think, because it's not my fault or problem, that he went too big on the bore. It's either they give me the bigger pistons for exchange or they get me a new block, one or the other.
I recalculated the CR and it came up 10.646 static, only another .1 more with the .060's.
I may have to run boosted premium now due to the higher CR. Instead of mid-grade or premium, from before. Hopefully I won't, Altitude suck some times, ya know?
This will be run close to the 8000-10000 foot range most of the time, so the ignition timing will be retarded to begin with, just a personal preference gained from my father.
06-09-2011, 07:38 AM
#49
Registered User
Thread Starter
Still no word from the machine shop. They better make it right. I would hate to get nasty, but you have to do what you have to do. It's been over a month, and I have nothing to show for it. I understand being backed up with work, but more then a month and a messed up part, gimme a break.
They have officially lost my business forever more, including the napa in front. They used to be a reputable business, now not even close.
They have officially lost my business forever more, including the napa in front. They used to be a reputable business, now not even close.
06-14-2011, 09:09 PM
#50
Registered User
Thread Starter
Well another week and still no word from the shop. I think this is going to be expensive.
As a side note, since I had some extra time, I filled my holes and painted first coat of rubber.
To start off i took a grinder to the the holes and surrounding area to get to some clean metal. I filled the rust holes in my body with some news paper wadding, to take up most of the back space. Then I got some foam insulation in a can, the stuff for sealing pipes and what not in the house. Sprayed it in until the holes were not quite full and let it sit to cure. After it was good and cured I grabbed a mask and some goggles and went to work on shaping the foam back to the body shape/line with the side grinder. After the first round went back in with some touch up foam to fill in some of the larger holes from the foam expansion. I went back over it with the grinder, to smooth it up.
Since I really liked the way the gas tank came out, I ordered 8 more cans of the under coat paint. Dupli-color under coat (UC101 from O'rielly, $4.49/can) I gave it a single coat over most of it with three cans (a little heavier on the foam parts). Now to give it over night to make sure its good and cured. Next I'll tape and mask the chrome bits and windows and give it a real good coat with the other five cans. After that I think I'm gong to the hardware store to get some black green and brown and do a camo on it, except the rear cover and roof, I like those in black. Finish it all up with some clear coat to keep the paint from flaking/rubbing away in the bushes and it will be good to go for hunting season.
Well whenever the shop gets done dinking around.
06-17-2011, 08:54 PM
#51
Registered User
Thread Starter
Update:
Called the manager of the Napa. He still had not yet talked to the Co-Owner, about what they were going to do for me. The GF has had it with the run around they have been giving me. She called the head of the Napa corporate office and put in some nasty notes and asked for them to call me back. And their options were thus: Give me a new block or talk to my lawyer and go to court.
Looks to me like I'm going to have to find another machinist.
06-28-2011, 09:56 AM
#52
Registered User
Thread Starter
Finally came to an agreement with the shop. They decided to take $100 off the bill and with the return of the old pistons it comes out even, sort of. The .060's they had did not come with rings, so I had to buy a set of hastings plain cast off of EBay for $35. As well they didn't have a 4-jaw lathe so I had to take them to another machine shop which did. $100/hour so that's another $50-100 over original. The other shop is a good outfit but they are a true Machine Shop, fabrications and what not. The old guy build's his own ride on mini trains, so I figure that's a good place to go. Oh well, I just want this thing done. Summer is almost over and I want to go play.
07-02-2011, 09:37 AM
#53
Registered User
Thread Starter
Returned the pistons to Napa, for the valve relief cuts and balancing on the crank. Also, I gave them the rings for the balance work. He said that he should have it all done by this coming weds./thurs. I am so ready to get this thing rolling. Summer's almost gone, and I haven't played once yet. When I get the stuff back I will start another post on the engine build, for those of you who would like to know.
07-14-2011, 07:58 AM
#54
Registered User
Thread Starter
Yet another week goes by and the machine shop still has not finished work. 3 month's is just outrageous, for some fairly simple work to be done. At least napa is not doing the balancing, thank god. Its out at a specialty shop for balance work. Here's to hoping for next week.
07-21-2011, 11:01 AM
#55
Registered User
Thread Starter
Still another week goes by, not finished yet. I wonder what legal recourse I have against these jokers. I'll have to talk to a lawyer. I hate having to do that, but these guys can't keep doing this to people. I've asked around and I'm not the only one to have problems with them. I wish I would have taken it to a different shop to begin with. They used to be very good, that's why I went there. Anyway, I'll keep everyone posted when things finally get done, or next week another not done post
08-02-2011, 12:00 PM
#57
Registered User
Thread Starter
Finally!!!!
Well finally have it all back and actually started on assembly. 
I forgot to get some pictures, but all is well. I have to start over a little anyway. I got the pistons in and turned it over with the head on and the cam timed, but I had sooooo much blow-by, I decided to tear it down and try a different set of rings. The first set was cast, the new set which will be in soon is Chrome. Both sets by Hastings, they seem to be the only ones I can find online that come in .060 o/s.
I'm so relieved to be finally starting on this.
Oh and when I get some pictures I'll start on the separate engine build thread.
I forgot to get some pictures, but all is well. I have to start over a little anyway.
I got the pistons in and turned it over with the head on and the cam timed, but I had sooooo much blow-by, I decided to tear it down and try a different set of rings. The first set was cast, the new set which will be in soon is Chrome. Both sets by Hastings, they seem to be the only ones I can find online that come in .060 o/s.I'm so relieved to be finally starting on this.
Oh and when I get some pictures I'll start on the separate engine build thread.
08-22-2011, 05:54 PM
#58
Registered User
Thread Starter
Awesome!!!


This engine is godly. Just got it all put together and took it out for some test runs and to seat the rings. It pulls at full throttle all the way from 1k to 4.5k rpm.
I'll post up the pics in here as well as start the other thread, on the engine itself.
 09-18-2011, 10:52 AM
#59
Registered User
Thread Starter
Well I have ~600 miles on the engine. This thing is incredible. have done the oil changes at 250 and 500 and coolant checks constantly. The temp reads at 200* after warm up, with a 180* t-stat. Kind of unnerving but it doesn't get any hotter then that. I figured this was from doing the electric fan swap, but can't be positive. I will be putting another 12" fan on the front side of the radiator in a couple weeks, just to get some more consistent air movement. Other then that all is perfect, I love this motor!
As well I swapped out to my 33x12.50's today and I still had plenty of power at take off. Better then the old motor to be sure. Little more testing and some tweeks and it should be ready to go hunting.
I'm going to adams lake today starting at transfer trail in Glenwood and coming out at meadow lake this evening. It will be a great test of power in the old girl, moderate trail and easy to do.
09-18-2011, 09:57 PM
#60
Registered User
Thread Starter
Transfer trail was a bust, have to track down an EFI fuse issue. Possibly the EFI relay or Open relay. I have the circuit by-passed on the fuel pump side but the other things fed by that fuse need looking into.


