csuviper's Junktrk (84 Yota Pickup) Build
 04-12-2012, 09:32 PM
#81
OK, so i have some news.....
Good news and bad news.
The good news I have a new tool:
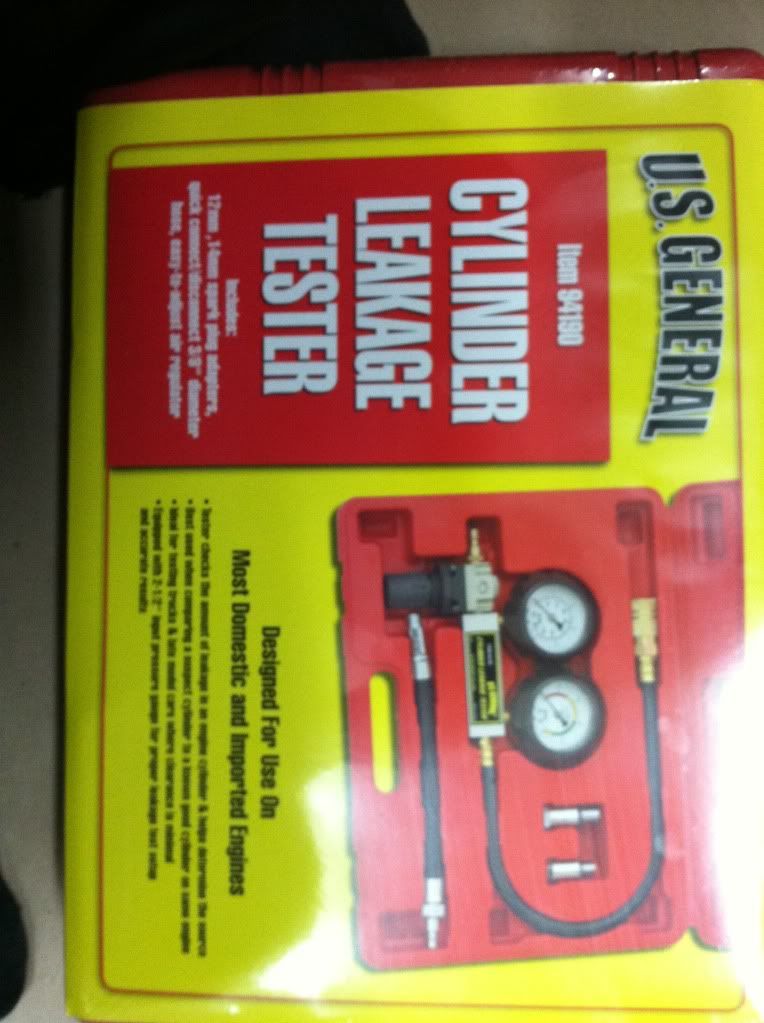
Well a little more good news:
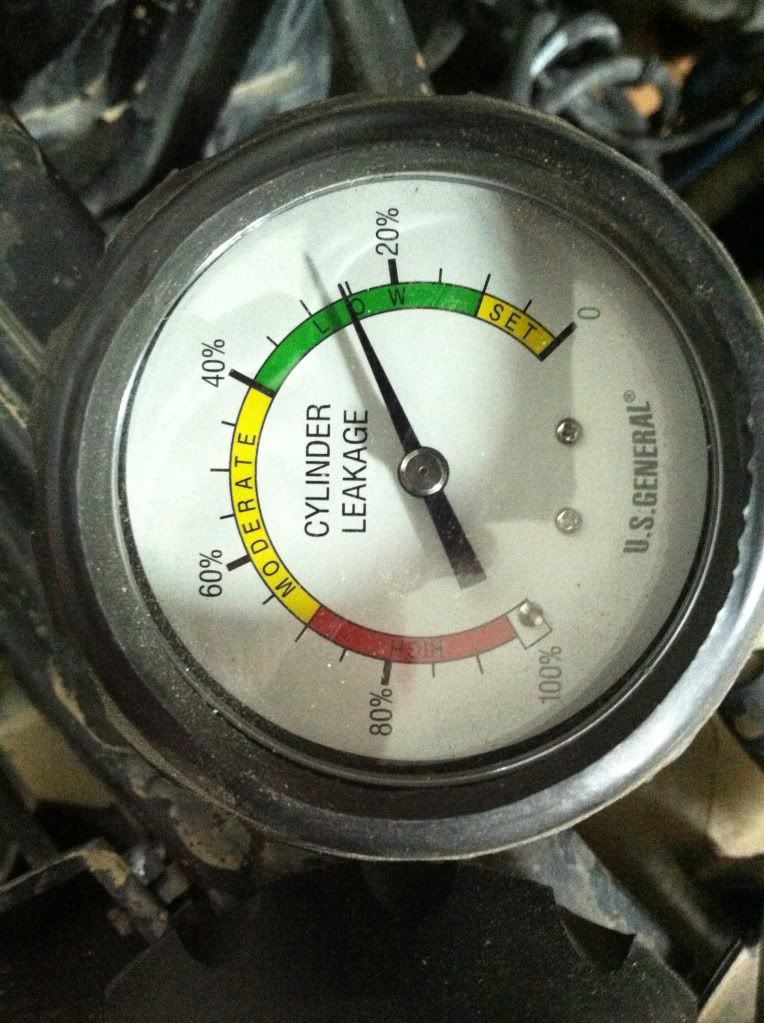
I am in the low range of range of cylinder leakage. As some say acceptable range.
The bad news:
I will have to change the rings at some point, probably sooner than later.
I am fairly confident that the air was leaking past the rings and only there. I say this because the air was coming out of the timing chain area. Is this correct???????
Here are pics of each cylinder leakage gauge:
Cylinder 1
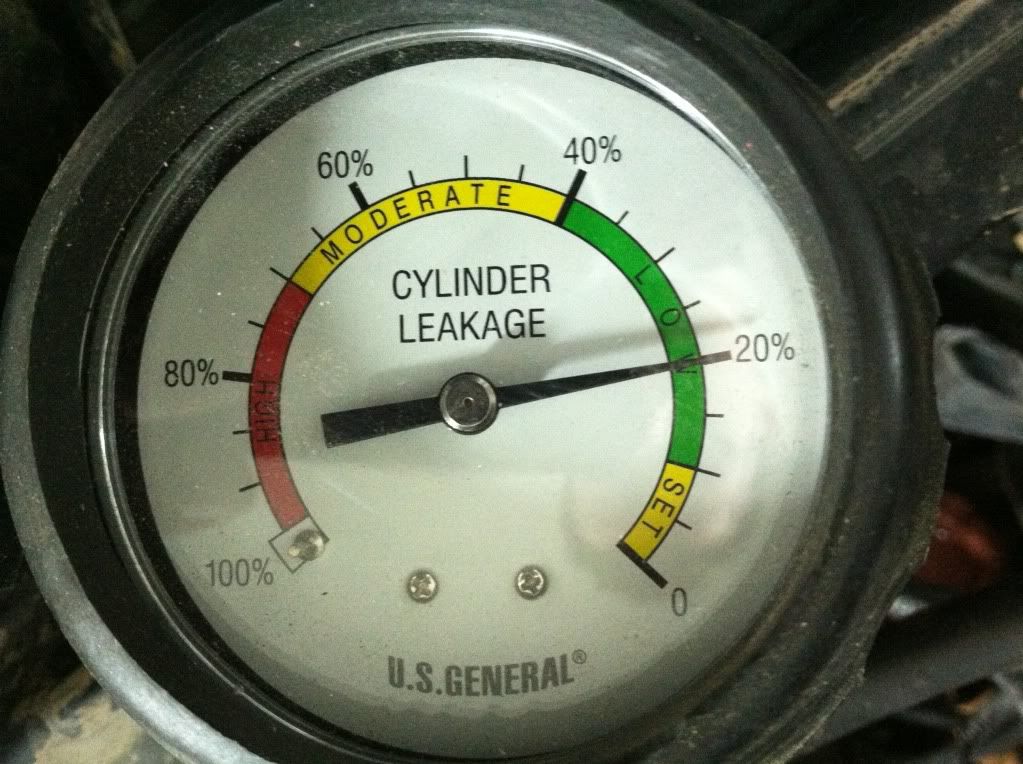
Cylinder 2
Cylinder 3
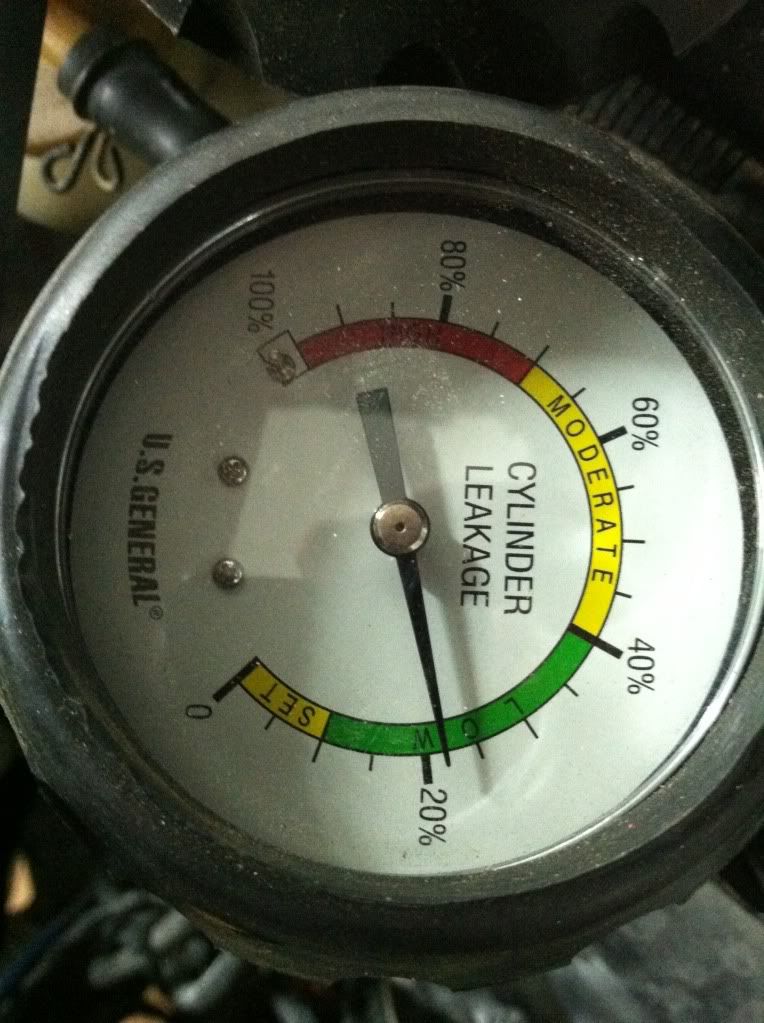
Cylinder 4
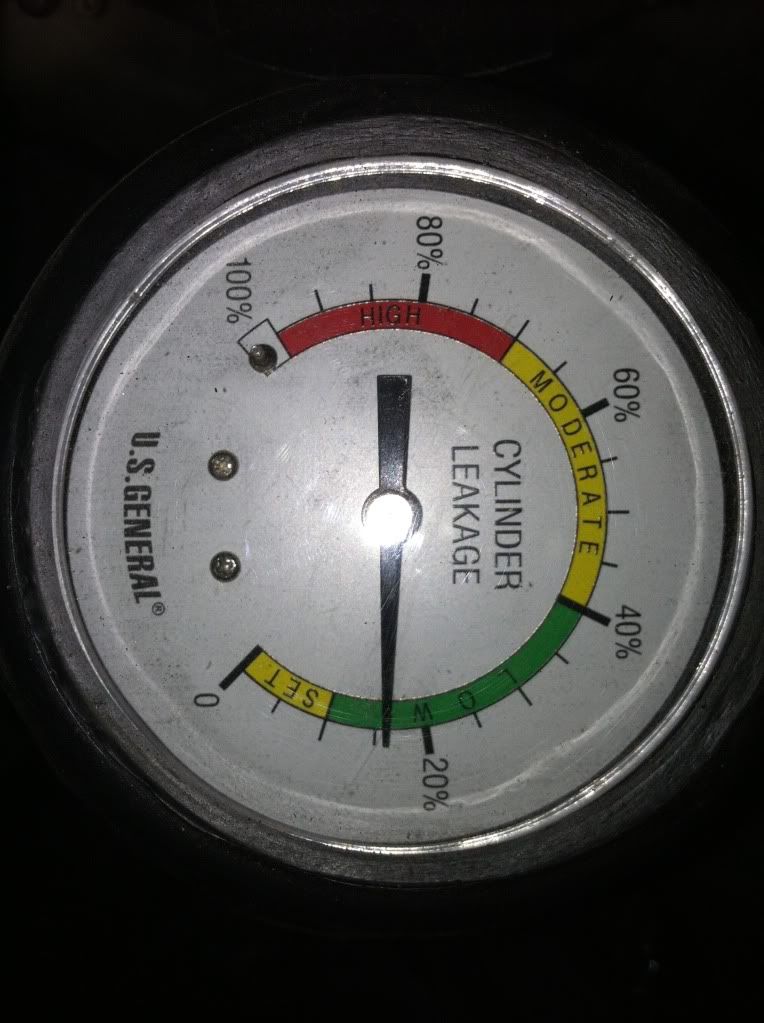
Not very happy about the amount of leakage. They are however fairly consistent across the board. That to me says its normal weardown and not a big failure of a ring or two.
What this means is that I will have to see if my compression is acceptable. If the compression is at an acceptable then I will close her up and see If I can get her running well. If compression is bad then i either pull the engine apart and change the rings or replace the engine or replace the truck.
Compression test will happen on Saturday.
Good news and bad news.
The good news I have a new tool:
Well a little more good news:
I am in the low range of range of cylinder leakage. As some say acceptable range.
The bad news:
I will have to change the rings at some point, probably sooner than later.
I am fairly confident that the air was leaking past the rings and only there. I say this because the air was coming out of the timing chain area. Is this correct???????
Here are pics of each cylinder leakage gauge:
Cylinder 1
Cylinder 2
Cylinder 3
Cylinder 4
Not very happy about the amount of leakage. They are however fairly consistent across the board. That to me says its normal weardown and not a big failure of a ring or two.
What this means is that I will have to see if my compression is acceptable. If the compression is at an acceptable then I will close her up and see If I can get her running well. If compression is bad then i either pull the engine apart and change the rings or replace the engine or replace the truck.
Compression test will happen on Saturday.
 04-12-2012, 09:50 PM
#82
Couple of sites that discuss this;
1.) Enginestake lots of abuse. Mostly because they tend to be used in harsh conditions. They may power a chain saw, a go-kart, a leaf blower, or a dirt bike. So they may be exposed to dirt that clogs their air filters and moisture that corrodes their parts. They may be subjected to sudden accelerations or may be kept running at peak power for longer periods than they were designed.
Here is all about the automobile engines that may help you to troubleshoot your problem or know more about your automotive engine.
A leak down or a "cylinder leakage" test is about the same as a compression test because it tells how well the engine's cylinders are sealing. But instead of measuring cylinder pressure, it will measures cylinder pressure loss.
A leak down test requires all the spark plugs be removed. Turn the crankshaft so that each piston is at top dead center (both valves closed) when each individual cylinder is tested. It is a good practice to start with the number one cylinder and follow the engine's firing order. It saves time in the long run and less turning of the crankshaft to get things lined up.
Attach a threaded coupling to a leakage gauge and screw it into a spark plug hole. Attach Compressed air (80 to 90 psi) and feed it into the cylinder you are testing.
An engine that is in great condition should show only 5 to 10% leakage/loss. An engine that is still in pretty good condition may show up to 20% leakage/loss. But more than 30% leakage/loss indicates trouble.
A cool thing about a leakage test (as opposed to a compression test) is that it can be a faster and easier way to figure out where the pressure is going. If you hear air coming out of the tailpipe, it indicates a leaky exhaust valve. Air coming out of the throttle body or carburetor points to a leaky intake valve. Air coming out of the breather vent or PCV valve fitting would tell you the rings and/or cylinders are worn.
A leakage test can also be used along with a compression test to help diagnose other kinds of problems.
A cylinder that has poor compression, but minimal leakage, usually has a valvetrain problem such as a worn cam lobe, broken valve spring, collapsed lifter, bent push rod, etc.
If all the cylinders have low compression, but show minimal leakage, the most likely cause is incorrect valve timing. The timing belt or chain may be off a notch or two.
If compression is good and leakage is minimal, but a cylinder is misfiring or shows up weak in a power balance test, it indicates a fuel delivery (bad injector) or ignition problem (fouled spark plug or bad plug wire).
************************************************** **********
2.) http://www.aa1car.com/library/leakdown.htm ;
A leakdown or cylinder leakage test is similar to a compression test in that it tells you how well your engine's cylinders are sealing. But instead of measuring pressure, it measures pressure loss.
A leak down test requires the removal of all the spark plugs. The crankshaft is then turned so that each piston is at top dead center (both valves closed) when each cylinder is tested. Most people start with cylinder number one and follow the engine's firing order.
A threaded coupling attached to a leakage gauge is screwed into a spark plug hole. Compressed air (80 to 90 psi) is then fed into the cylinder.
An engine is great condition should generally show only 5 to 10% leakage. An engine that's still in pretty good condition may show up to 20% leakage. But more than 30% leakage indicates trouble.
The neat thing about a leakage test (as opposed to a compression test) is that it's faster and easier to figure out where the pressure is going. If you hear air coming out of the tailpipe, it indicates a leaky exhaust valve. Air coming out of the throttle body or carburetor would point to a leaky intake valve. Air coming out of the breather vent or PCV valve fitting would tell you the rings and/or cylinders are worn.
A leakage test can also be used in conjunction with a compression test to diagnose other kinds of problems.
A cylinder that has poor compression but minimal leakage usually has a valvetrain problem such as a worn cam lobe, broken valve spring, collapsed lifter, bent push rod, etc.
If all the cylinders have low compression but show minimal leakage, the most likely cause is incorrect valve timing. The timing belt or chain may be off a notch or two.
If compression is good and leakage is minimal, but a cylinder is misfiring or shows up weak in a power balance test, it indicates a fuel delivery (bad injector) or ignition problem (fouled spark plug or bad plug wire).
************************************************** *************
Really like Ericthecarguy ...... lol....
04-12-2012, 10:19 PM
#83
Hmmmm, seems to me that with a 22R, if you're hearing air in the .......'TIMING COVER', it's coming from the crank case...... You can hook up the compression testing hose, after removing the shrader inside, put the plug adapter back on and pop it in there... Then just hook up shop air and listen for where it's coming from. (it's in that video... He's a very helpful guy, has ALWAYS answered me, personally[when he has time, lol] )
*Carb/Throttle body = Leaking Intake Valve
*Bubbles in Coolant = HG
*Tailpipe = Exhaust Valve
*Oil fill/PCV/(Timing?) = Rings
*Carb/Throttle body = Leaking Intake Valve
*Bubbles in Coolant = HG
*Tailpipe = Exhaust Valve
*Oil fill/PCV/(Timing?) = Rings
04-13-2012, 08:13 AM
#84
Thanks for the info man. Yea i actually watched that video last night before performing the test.
When you put oil into the truck doesn't it go down the timing chain cover area?
I did check the oil level tube and noticed some air leaking there.
I would say its a leak past the rings down into the oil pan.
I did notice oil in the pvc tube when i pulled it off.
I will recheck the leak down after installing the valve cover. Just a double check.
Compression test should be a good indicator. If its low then I have problems. If its good then the truck should run.
04-13-2012, 10:05 AM
#85
Hey, low or not, you could still run it, lol.... Just wait for it to blow, lol. BUT, if the 'VALVE TIMING' is off... could be that things are just slowly getting bent AND you have ring/s heading south.... In which case... would suck to be 'out there, you're pushing it, crawling up something... and POOF', lol. These are VERY resilient motors... I'm sure it would run for a while like that... But if it IS timing like I was guessing.... Well, how can you enjoy it with the thing bogging out, etc.??
I would really make CERTAIN that the carb is right, too... leakage might cause you to lose power, but it shouldn't intermittently bog out, etc., I wouldn't think. A carb or ignition issue might cause that. Of course, you could have intermittent combustion building up due to oil, then 'WOOSH', it's all forced out and back to semi-normal every few revolutions? I just can't say, man... The Leakdown and Compression will CERTAINLY point you in the right direction.
Look at it this way... If you verify the carb and hot spark and ignition is ok ie/ Dizzy, coil, even vacuum advance, .... I can't see a huge issue with yanking it and just slapping a kit in it over a few days, ya know? From now on, I'll probably search for low as possible mile short blocks and rebuild the heads on whatever it came off of... Bore em over .20, slap some hastings-USA rings Sankae Bearings in there... Engnbldr valve set with bronze guides(or OEM chilled iron depending on how aggressive with the head), Viton Seals , 261 CAM, verify all the rockers integrity and slap that witch back together! lol. I did mine for around 650$(doing most of the machining and almost all of the assembly myself... Had I not, I'm sure it would be much more).
I mean, seriously.... Top and Bottom end mechanical issues/timing problems, .....they can wreak HELLACIOUS havoc!.... I feel like your issues are maybe both? (Motor issues AND something with the CARB/IGN) ... ya know? Only you can figure it out though....
BEST WISHES, MAN! Let me know how it goes/what you find!
04-13-2012, 11:52 AM
#86
Yep I agree. I think its a combination of everything. Hence the name I gave the truck. I bought it wanting something quick and cheaper to get to to the trails. Hoping when I bought it to just fix some leaks and then have fun "breaking it in". Not really the case. I have learned so much though so you cant take that away. I might end up selling it or parting it out and getting something a little newer to build up.
My biggest problem is time. With work, activities and a baby on the way I am limited. I can definitely go the route of rebuilding the engine to the fullest but my problem is when. I am hard pressed to hit the trails before the baby comes because after I will need to stay home and help out.
My biggest problem is time. With work, activities and a baby on the way I am limited. I can definitely go the route of rebuilding the engine to the fullest but my problem is when. I am hard pressed to hit the trails before the baby comes because after I will need to stay home and help out.
04-13-2012, 11:21 PM
#87
Well, ... if you just yoink that motor and slap one in... you can do it in a weekend and find one for around 1500$, delivered............ ??? lol. I hear ya.... see what you find and then report back. If the heads ok, you could just grab a short block for pretty reasonable and do that in a weekend as well, ya know? Think it over and let us know, bud!
04-23-2012, 02:56 PM
#88
Ok so I got it running again, timed again and took it to the streets a couple weekends ago. When in the garage just throttling it, everything was good. Idled and revved up just fine. Hit 60mph and the same thing happens again, loss of all power. I am attributing this to the carb or ignition now.
04-23-2012, 03:05 PM
#89
So I purchase a 1yr old Weber carb yesterday and stock ignition coil that I know works. I am excited to put it on.
One thing I'm worried about is that it didn't have an adapter plate. I thought you had to have adapters in order for it to work. I am now worried that the intake manifold wasn't stock and that it was actually aftermarket specific for the carb. The guy I bought it from (friend of a friend of a friend) bought the truck from the PO with the carb on it (brand new at the time). Good news is that if it doesn't fit he will sell the intake manifold to me for $20. Just means another trip to get it and another week without the truck to its full potential.
Hitting up Left hand this weekend. If I can get the truck running well I will drive it there. If not I will tow it. Runs good at slow speeds so why not test it out.
04-24-2012, 09:10 PM
#90
Weber install questions for those that have installed one
1) I am having troubles finding how to hook up all the vacuum lines for my 84. Does anyone have pics or a good diagram from an 84? Lots more going on than what the diagram shows from Weber. The EGR vacuum modulator has 3 connections, not one. Is the dist connected to the vacuum switch still or just the carb? Where does the ASV vacuum line go to, or does it get plugged?
2) Will the Weber pass emissions? I say this because it seems like alot of vacuum lines are blocked off and/or re-routed.
04-24-2012, 11:03 PM
#91
WOW, good to see you're making progress... Was wondering what happened to ya! lol...
Have you looked in the FSM link in my sig? I believe they have an FSM for 79-85 toward the top... Hit that link and head to 'emissions'.... Should show every vacuum diagram for them, including yours. In fact, if you download it and look in the PDF(mine is up right now, lol)... You can 'blow up' sections that you highlight with your browser and it shows pretty clear how they're all hooked up to the rail, etc.
Best wishes... Can't help on the Carb questions, sorry man.
PS> Gonna try to hit the smog test again soon with my new modulator and timing retarded to stock and ........ well, more stuff! lol.
04-25-2012, 06:38 AM
#92
WOW, good to see you're making progress... Was wondering what happened to ya! lol...
Have you looked in the FSM link in my sig? I believe they have an FSM for 79-85 toward the top... Hit that link and head to 'emissions'.... Should show every vacuum diagram for them, including yours. In fact, if you download it and look in the PDF(mine is up right now, lol)... You can 'blow up' sections that you highlight with your browser and it shows pretty clear how they're all hooked up to the rail, etc.
Best wishes... Can't help on the Carb questions, sorry man.
PS> Gonna try to hit the smog test again soon with my new modulator and timing retarded to stock and ........ well, more stuff! lol.
Have you looked in the FSM link in my sig? I believe they have an FSM for 79-85 toward the top... Hit that link and head to 'emissions'.... Should show every vacuum diagram for them, including yours. In fact, if you download it and look in the PDF(mine is up right now, lol)... You can 'blow up' sections that you highlight with your browser and it shows pretty clear how they're all hooked up to the rail, etc.
Best wishes... Can't help on the Carb questions, sorry man.
PS> Gonna try to hit the smog test again soon with my new modulator and timing retarded to stock and ........ well, more stuff! lol.
04-25-2012, 09:19 AM
#93
I think I'm making this harder than it needs to be but here are the diagrams. Help me with routing if you can. I am getting mixed up because there are differences.
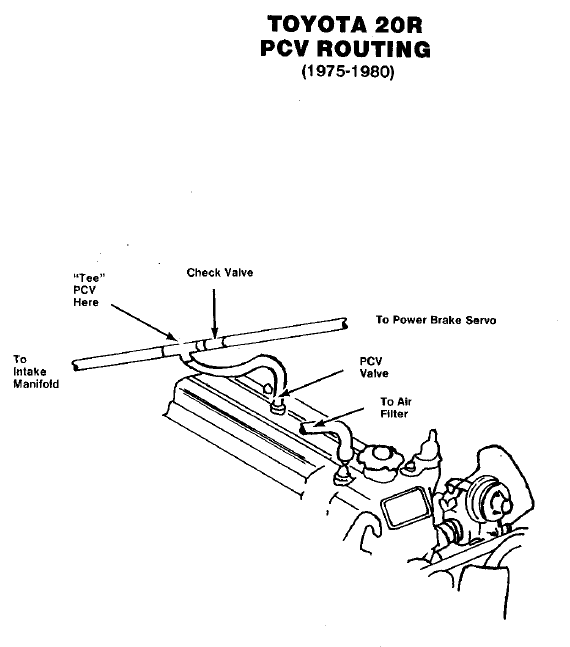
Here is my plan for the pcv valve. I know that the diagram shows its for 1975-80 trucks but if i don't do it this way, where would it connect?
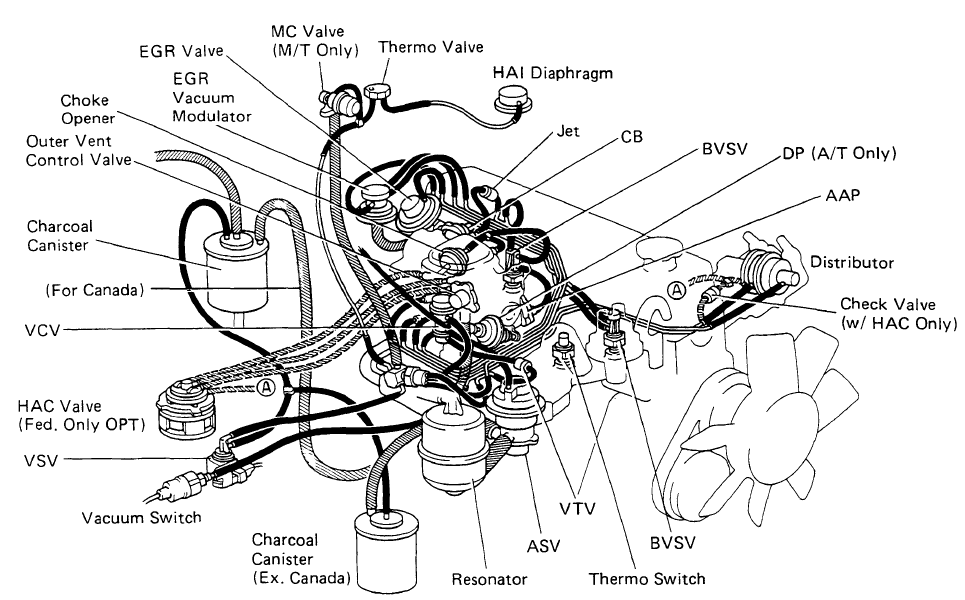
Here is what my stock system looks like:
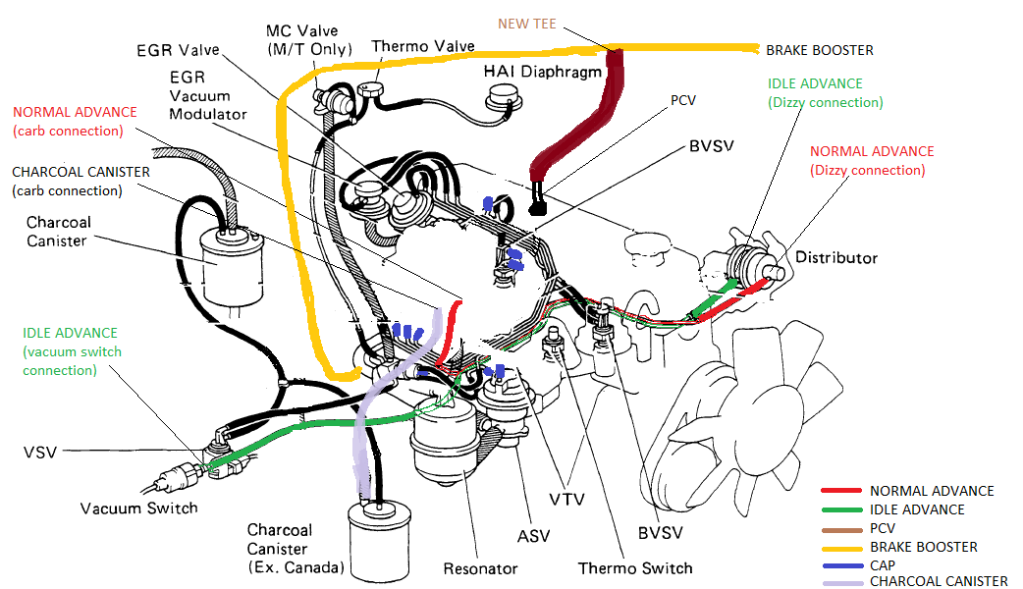
Here is the weber install diagram:

I had the correct routing for the stock carb, now switching to the weber is were I am failing to understand what lines are capped and which emissions components can still be functional by rerouting them elsewhere.
Here is my plan for the pcv valve. I know that the diagram shows its for 1975-80 trucks but if i don't do it this way, where would it connect?
Here is what my stock system looks like:
Here is the weber install diagram:
I had the correct routing for the stock carb, now switching to the weber is were I am failing to understand what lines are capped and which emissions components can still be functional by rerouting them elsewhere.
Last edited by csuviper; 04-25-2012 at 11:50 AM.
04-25-2012, 11:08 AM
#94
Only one guy I know is really 'read up' on the Weber.. He has one.. But he's hard to get a hold of.... I will try.(PS> he's in CA). What state are you in again?
Yeah, I'm not sure how much different that 20R is(in the first diagram) from the 22R.
I think The Wabbit is pretty 'apt' with Webers.... Might give him a holla. If he doesn't see this stuff on one of those threads he's commonly on, it's a 50-50% chance that he'll see this... I think you'd have to fish him down. Big Mike of Marlin should be well learned on this too, I would imagine.
I will ask around to try and get someone over here who's 'in the know', ok?
04-25-2012, 11:16 AM
#96
Thanks Chef. Just worried that the first post after making that a new post would be something like "use the search button". I have searched and I have seen pics of some peoples setups but the engine didn't have the same components like the egr vacuum modulator with multiple in/outs and ASV to name a few. I will keep trying.
04-25-2012, 11:37 AM
#97
I have a local guy who worked on the 22R as a 19 year old when the trucks were new that I take mine to fix. 
I'm a fab guy with some mechanical knowledge and most of that is I know who to get to fix it that is much smarter than I.
:wabbit2:
I'm a fab guy with some mechanical knowledge and most of that is I know who to get to fix it that is much smarter than I.
:wabbit2:
04-25-2012, 11:49 AM
#98
Bummer, just reaching out.
04-25-2012, 12:59 PM
#99
I wouldn't worry about that, Buddy! There will always be a 'KNOB' stopping in to troll through your brain! lol.... DON'T EVEN RESPOND... Just wait and the REAL helpful people will chime in, ya know?
Also, ... I don't mind those trolls when they actually GIVE ME THE ANSWER! ahahahah.... They have no personal bearing in my day to day 'joy', if ya know what I mean? The reason you want to start a 'specific' thread is 2 fold.... 1. While you've been at this a while... It's a slow moving thread(WITH LOTS DONE, just kinda 'straight forward')... whereas the 'WEBER' issue is a 'MOD', really.. And could just drop into the "troubleshooting" category, right?
Either way, I hear ya.... I know Brandon(XXXtreme) has a Weber with a Spacer/single piece adapter plate..... He runs like a RAPED APE! lol... But I'm not sure he has to deal with Emissions, etc. What I DO know is that his is 87... So while it might have some that you don't.... it WILL likely have a lot on it, like yours, that the 79-80 ones would not, ya know? Those things are a VACUUM SPAGHETTI SOUP NIGHTMARE! lol.... But still, like Brandon says... "At least I can adjust it... Your EFI don't like "tweekin" ", hahaha. He's got me there.
04-26-2012, 12:56 PM
#100
OK so I hooked it up how i think it should be for the distributor advance, pcv and brake booster.
Here is the modified diagram of what my system looks like now:
Questions:
- By leaving some of the emission control stuff hooked up am i hurting the trucks ability to function properly or hurting performance?
- By leaving the Idle advance hooked up to the vacuum switch am i doing good or harm? Should it just be plugged?
I put it together as shown above and was able to get the truck running last night. Sounded good but the throttle cable/idle needs to be adjusted because it would die if I didn't hold the pedal down a little.
- Teed the pcv valve into the brake booster line before the check valve.
- Connected the "normal advance" on the distributor (connection closest to the radiator) to the carb vacuum port.
- Left the connection for the "idle advance" on the distributor (connection closest to the engine) connected to the vacuum connected to the vacuum switch.
- Blocked off all ports that were connected to the old carb.
- Left all other emissions related hoses connected as they were previously.
- Installed the gas line with regulator set at 3psi.
- Vent still connects to the stock filter housing.
- Resonator still connects to the stock filter housing.
- Charcoal canister also connects to the carb.
Here is the modified diagram of what my system looks like now:
Questions:
- By leaving some of the emission control stuff hooked up am i hurting the trucks ability to function properly or hurting performance?
- By leaving the Idle advance hooked up to the vacuum switch am i doing good or harm? Should it just be plugged?
I put it together as shown above and was able to get the truck running last night. Sounded good but the throttle cable/idle needs to be adjusted because it would die if I didn't hold the pedal down a little.
Last edited by csuviper; 04-26-2012 at 01:06 PM.


