When you click on links to various merchants on this site and make a purchase, this can result in this site earning a commission. Affiliate programs and affiliations include, but are not limited to, the eBay Partner Network.
Never seen a Selecto hub before. Guessing it was a rare option back then? That quad cab would be snatched up quick here and having the diesel in it would be that much better. I rememeber seeing the quad cabs when I was over seas in the 80's and they started getting here in the 2000ish years and was a hit. We are just a little behind the times on those. Really would like to have one myself. Your truck is looking better each time I see it. Great work you are doing!!!
These dual cabs are fairly common over here. I couldn't sell this parts truck.
Eventually went to crusher for $200, (when scrap steel prices were high).
Interestingly, short wheelbase trucks (shorties) are unobtanium & would never end up at the scrapyard. I have only ever seen a couple in Aus. You guys don't know how fortunate you are.....
Cab is fairly stripped, time to attend to the badness around windscreen. Once it was kicked out, the true extent of the rust became apparent. The previous owner had tried to caulk up the leaky screen with silicone sealer. Bad idea.
Toyota had a good idea when they designed these trucks, but many people poorly understood the design of the windscreen rubber. While keeping 99% of water from migrating under the outer lip, it was an inevitability that some would find it's way into the windscreen aperture. The lower aperture would act like a channel, fill with water, then steadily leak into the cab. Wet carpet, footwells etc. So Toyota put a drain on each side of the channel. Basically a 1/4" hole to let this water drain into the plenum. They then fitted a small nylon grommet (nozzle) to try and lead the water away from sitting in contact with the underside of the scuttle.
The windscreen rubber works perfectly with no sealer along the bottom, as long as the drain is clear & functional. Inevitably when the screens replaced, the fitter would fill this with mastic sealer & presto, the water has nowhere
to go and eventually the aperture rusts out.
So once I cut out the rusted bits & fabbed up some sections, I set about improving the original concept. Locating the drain position (lowest point), I made up some stainless tubes & welded / brazed them in. The tube diameter is larger than the original but still hides under the rubber lip. Also the tubes are a fair bit longer to ensure the water does not aggregate under the scuttle.
Next, it seems that someone at some stage has stood on the scuttle and flattened it. Luckily the donar truck had a good scuttle and gave me an accurate idea of the correct contour to repair it, although in retrospect it may have been easier to unpick it and replace it!
Anyway, after much fiddly bondo work, she's ready for primer.
The cab is on it's way. New genuine door hinges (from Griffith Toyota in Oregon), doors hung and everything adjusted 100%. Rear of cab has been repaired along with turret & some rust attended to on the R/H gutter.
So now ready for paint. Well sought of! Under the cab was stone guarded & painted. I ended up making a trolley to move the cab around. It really made the job easier. (Anybody want the trolley, just PM me!).
After MUCH detail sanding of the cab, it was wheeled into the spraybooth. For those interested, the whole cab including engine bay was thoroughly degreased and detali sanded with P320 - P400 grit dry with the flat sections dynabraded. All bodyseams were wirewheeled because the 35 year old sealer was dried out & cracked and needed to be re-done. Then 1 single even coat of Debeer (Valspar) wet on wet primer was carefully laid down. All body seams were then redone.
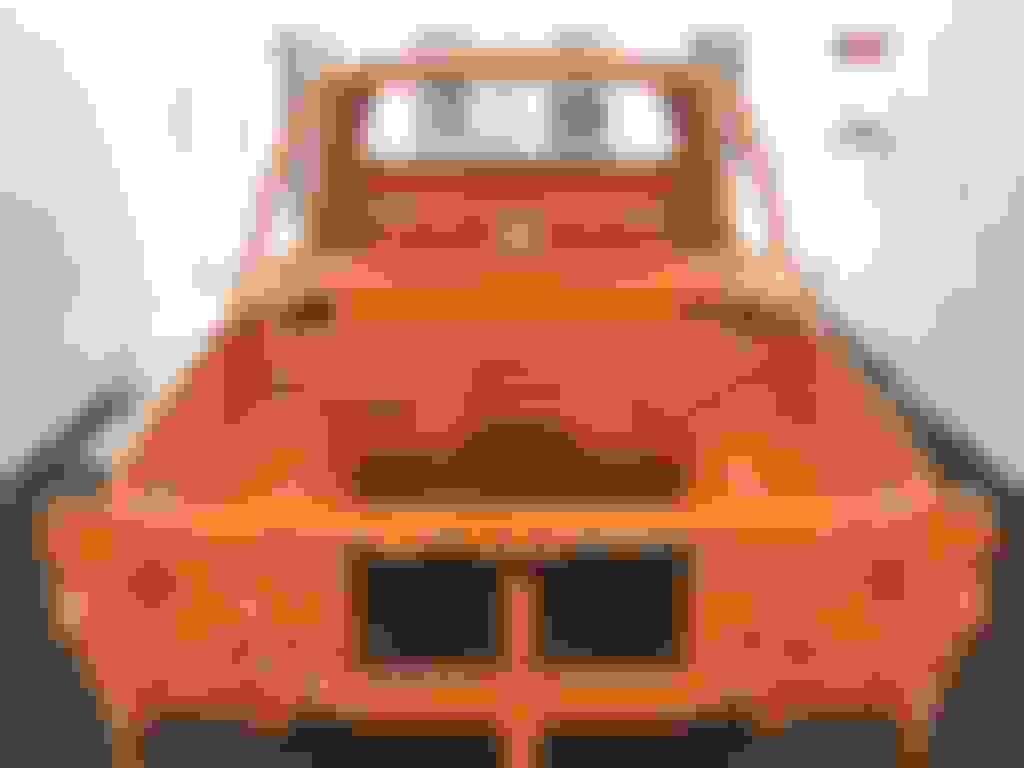
Then time to shoot the topcoat. I would have liked to do a tricoat pearl orange (Subaru Tangerine), but that would have meant complete priming and sanding, then painting the cab as an assembly with all swing on panels in place. Too much work! As it turns out I matched the color (2K Debeer) to this colour anyway. I had some obsolete lead based tinter stashed away, so the color had excellent opacity. I painted it as an MS (not HS) and only reduced it 3% with ultraslow hardener & reducer. I had to heat the paint in a waterbath to about 60 degrees (130 Fahrenheit) to get the viscosity right down. I hammered it on with a 1.4 fluid tip and not one run, and flat!
Restoring an old car (truck) is a bit like digging a hole. As you plow into it the hole just seems to get bigger and bigger and you have nothing except a huge pile of muck and a vision of what might be. And then something happens. You get to a certain point and all of a sudden your vision starts to become a reality. For me that point was when I lowered the freshly painted cab back onto the chassis.
Because I have replaced the stock 4 speed / transfer with a later G52, I wasn't quite sure how much of the floor I'd have to chop. As it turns out, I was pretty lucky!
Close! But no banana!!!
With the luxy all strapped down, I was on my way home. Luckily my other truck is a turbo diesel Hilux!
Because I was installing air from the donor truck and because it was later model (square headlight) and diesel, I had to cut and splice the wiring looms. In the end I decided to go with the later heater controls and fascia.
Outwardly this didn't seem like a big deal but as it turned out it was a PITA.
The actual metal dash panel is different (to accommodate the rotary fan switch). Also the way Toyota changed the heater controls meant junking all the original cabling and actuators. I kinda like the later dash but in retrospect I think I would have tried to dig up an earlier model with air. Anyway, all done and everything seems to work (so far!).
I really wanted the transmission shifter and boot to look factory. I ended up fabbing up a panel that followed the contours of the tunnel. This I could rivet to the floor and had recessed rivnuts that the shifter boot screwed onto. This was actually a head scratcher because I had to make sure that the rubber boot was located correctly in the relaxed position before lining up the frame.
The crash pad and steering wheel was next on the agenda. If this thing was a left hook I would have sourced a new OEM crashpad from US of A. But they are obsolete as right hand drive. So I had a go at fixing the original. I plastic primed the old brittle vinyl, opened up the splits with a grinder and filled them with a new flexible body filler that we are using at work. Then I 2 pack primed them with heaps (25% elastic additive). I really didn't know if this was going to work but I amazed it actually looks pretty good. I used the 2K color that I painted the dash panel with but added a heap of matting additive to give the crashpad that original flat look.
The original 3 spoke steering wheel was royally rooted. (aussie expression !!) The donor truck had a salvageable item but was brown. I used a dedicated polyurethane primer (PPG), primed and painted it with a heap of elastic additive. Turned out really ggod and is very flexible, (wont split/crack).
Engine all hooked up. Fuel, oil, coolant & bugger me, she fires up first go. Now I'm really inspired!
Wow mate. I Don't even own an rn46 yet but this has inspired me... Lol Im looking at 1 to buy at the moment and googled them and came across this thread and honestly you have tipped me over... I am definitely gonna buy it now... Top work mate
 01-29-2015, 01:34 PM


 New genuine door hinges (from Griffith Toyota in Oregon), doors hung and everything adjusted 100%. Rear of cab has been repaired along with turret & some rust attended to on the R/H gutter.


 !!) The donor truck had a salvageable item but was brown. I used a dedicated polyurethane primer (PPG), primed and painted it with a heap of elastic additive. Turned out really ggod and is very flexible, (wont split/crack).

 Now I'm really inspired!


