When you click on links to various merchants on this site and make a purchase, this can result in this site earning a commission. Affiliate programs and affiliations include, but are not limited to, the eBay Partner Network.
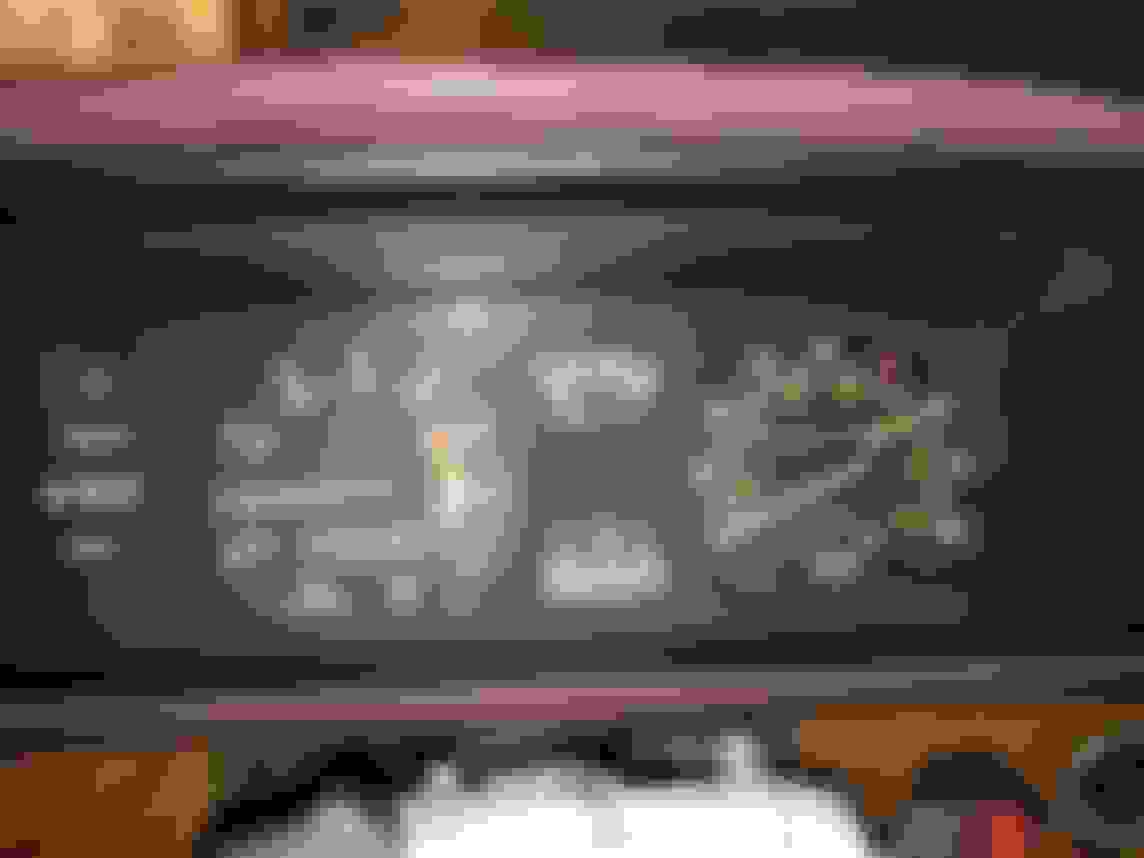
Going to totally switch subjects here but since it was raining today i decided to remove my cluster to fix my odometer that does not seem to spin. I have read a few threads stating that they tend to get sticky over time and eventually just seize and no longer spin. The reason why i think this has happened to mine is because everything works normal including my trip and only the odometer will not spin. Been this way since i got it so who knows how many miles the truck really has.
I have been messing with it for a while but cant seem to get it to spin. I keep fidgeting the white gear below back and forth hoping it will eventually break free but nothing as of yet.
Anyone have any input or past experience on how to properly clean up these gears.I'm thinking i need to pop it out entirely to clean it good but dont want to take it apart if not necessary.
I have basically the exact same pictures in my build thread. I took it apart to where yours is. I did not want to try to pry the Speedo needle off because off it brokecid say too many 4 letter words and be unable to fin a new one so I attempted to use simple green and a Qtip to clean it. I tried 2 times and mine still doesnt work.
with mine, the white 10ths wheel turns but when it gets ready to turn the first miles wheel it sticks, you can see it lock up a bit then it makes a tiny click sound and the white 10ths just rolls over again.
my trip also works so I'm keeping a little tiny notepad in glovebox and keep track of mileage and tanks of gas via the trip LOL.
works for me because I doubt I'll even roll the trip over 2 times in a whole year.
my 82 is my 3rd vehicle but I love driving it.
Was hoping to hear your story of success but i also decided to just leave the needle on and not risk breaking it off. Tried Cleaning it with some Qtips and a bit of rubbing alcohol. Not sure if i'm supposed to be using any specific kind of oil or grease.
Mine has to be one of the tiny cogs in there. It probably cracked or something.
there is no way to disassemble that rolodex of numbers without removing the needle so I just put it all back together. I used simple green and also used a bit of dry graphite after with no luck .
Mine has to be one of the tiny cogs in there. It probably cracked or something.
there is no way to disassemble that rolodex of numbers without removing the needle so I just put it all back together. I used simple green and also used a bit of dry graphite after with no luck .
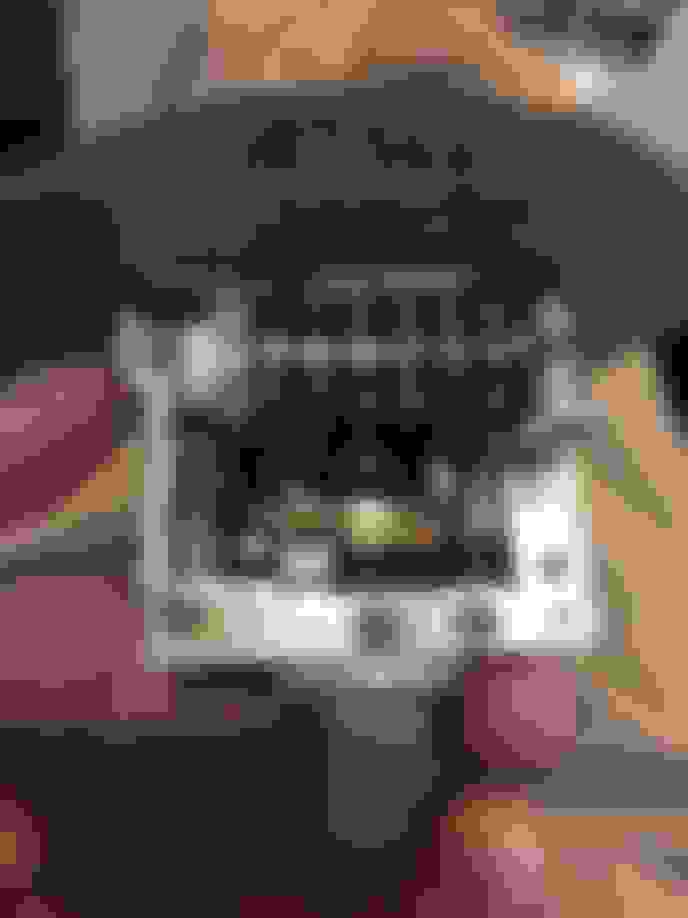
I was able to get it out without removing the needle yesterday. I removed both screws holding down the face plate and i had just enough room to remove the pin that holds down the shaft in place.
If you get it working I might open mine up again. Keep us updated. I saw that thread and that's what got me motivated to try it.
I will make sure to keep you posted. Here is what i am currently working with, that C Clip is being such a pain to take off.
Would you happen to know if that grey worm gear on the last picture should be able to spin? I cannot spin it even without the dials in there and i am wondering if that is my problem?
Yes that grey worm gear should turn. I ran mine back and forth with a drill trying to get it to work but on mine onky the 10ths dual turns. I ran it up to 80mph with my Makita haha and that work gear turns.
Alright you guys i have an update on the stuck odometer.
I was finally able to get the C Clip off and as i popped it off i heard it go flying across my room lol luckily i heard something hit my bed and found it on the floor, thank god.
I grabbed some wire and kept everything in exact order using the wire as i took it apart. Some spots were so dirty and sticky i had to twist them pretty good to pry them off.
I then began to clean every part and reassemble it one by one making sure everything went in order. I used White lithium grease
I put everything back together and added a few thousand miles to make up for the years of it not keeping track. Remember to grease all the worm gears that you were not able to take out and clean them as best as you can.
Threw the cluster back in and took the truck for a drive and what do you know, the odometer is spinning again So far its only been 10 miles but hey ill take that over nothing.
Thanks again for everyone's help.
Last edited by Abraham Contreras; 03-19-2018 at 09:09 PM.
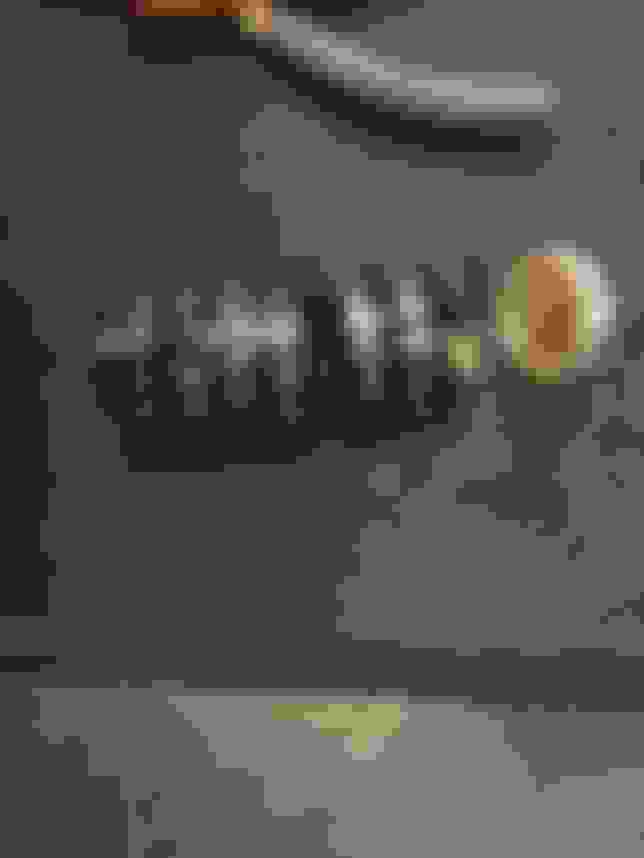
While i had the cluster out i decided to swap out all the bulbs for LEDs and it looks so much better now.
I might go back and swap the 4wd LED for a regular bulb because it is way too bright when on at night. Then again i hardly use the 4x4 let alone at night so ill see. you might want to consider leaving the turn signals as regular bulbs as well. They are pretty bright when flashing
In case you would like to swap to LED's the bulb size for the instrument cluster is either a 158 or 194. I say both because after doing some research i believe they are about the same except 194 are a bit brighter. The bulbs i pulled off the cluster were 158 but I went with the194. and make sure to find a shorter length LED, the ones i have below barely fit and i had ordered some prior to this that did not fit. To be safe you can just get the ones that are flat.
The bulb size for the gauge unit (voltage and oil pressure) will be a 1445 the one on the right of the picture
Nice work getting it going. So do you think if I take it all apart mine might work? I used a bit of spray lube with it all still assembled I wonder if it's because I didn't take it all apart that it's still messed up?
I was able to get it out without removing the needle yesterday. I removed both screws holding down the face plate and i had just enough room to remove the pin that holds down the shaft in place.
Nice work getting it going. So do you think if I take it all apart mine might work? I used a bit of spray lube with it all still assembled I wonder if it's because I didn't take it all apart that it's still messed up?
It's a good possibility it will work. The metal shaft that holds all the dials or whatever you call them was really dirty in spots i would not have been able to clean without removing it. Take your time and clean the worm gears as best as you can, i used Electric parts cleaner thats safe on plastic and Qtips.
Originally Posted by 95yoda
how did you remove that pin?
If you cannot completely remove the face plate like me then unscrew the two screws holding the face plate down to give you some room to work with. The pin is hallow so when you squeeze it with pliers it's going to get crushed.Get a good grip of the pin and twist it back and forth to loosen it. Eventually you should be able to wiggle it out. Just be very patient with it because you can easily break your face plate if the pliers slip or let go of the pin. Let me know how it turns out if you decide to try.
Nice work! Those leds look great. One thing you could try is putting a lens in front of the led. I remember replacing a started bulb once in my old pickup for the hvac control and there was a little rubber boot that went over the bulb reducing the light output, seemed kinda weird cause they weren't that bright to begin with lol. I know the leds are a weird shape, but maybe you can add a plastic lens on the cluster to reduce the light output.
[QUOTE=95yoda;52393867]So you're saying don't squeeze the pin too hard also for it might get crushed?
No what i meant to say was it's okay if you crush it because it will help you get a better grip of the pin. When you put the pin back in grab it from the same side so you don't crush both ends.
Nice work! Those leds look great. One thing you could try is putting a lens in front of the led. I remember replacing a started bulb once in my old pickup for the hvac control and there was a little rubber boot that went over the bulb reducing the light output, seemed kinda weird cause they weren't that bright to begin with lol. I know the leds are a weird shape, but maybe you can add a plastic lens on the cluster to reduce the light output.
Thanks they made a big difference. The oil pressure and voltage meter actually had a green rubber covering the bulb. I guess that's why it looked green before. I didn't know or else i would of bought Green Leds but i dont mind the white.
Here's a better angle of what the Cluster now looks like. Oh and is there a fast way to crop this pictures so they aren't so huge?
Thanks they made a big difference. The oil pressure and voltage meter actually had a green rubber covering the bulb. I guess that's why it looked green before. I didn't know or else i would of bought Green Leds but i don't mind the white.
Here's a better angle of what the Cluster now looks like. Oh and is there a fast way to crop this pictures so they aren't so huge?
Looks good! LEDs would probably be too bright for me but many people like them.
If you are using a windows computer, you can use Microsoft Paint and click on the "resize" tool. You can also "crop".
 03-13-2018, 08:24 PM


 but i also decided to just leave the needle on and not risk breaking it off. Tried Cleaning it with some Qtips and a bit of rubbing alcohol. Not sure if i'm supposed to be using any specific kind of oil or grease.


 lol luckily i heard something hit my bed and found it on the floor, thank god.


 So far its only been 10 miles but hey ill take that over nothing.