
Installing a GM alternator and have some wiring questions

 03-13-2013, 01:23 PM
#22
Registered User
Thread Starter
iTrader: (2)
Join Date: Dec 2009
Location: Pleasanton, CA - SF Bay Area
Posts: 2,159
Likes: 0
Received 7 Likes
on
5 Posts
I believe it's the OEM charge wire (on the OEM alternator harness there is a wire that attached to the charging post - I think this routes through the fuse box, then to the + terminal on the battery.
My plan was to preserve this connection, both on the battery/fuse bose, and on the alternator. The 4 gauge charge wire from the alternator to the + would be in addition to the OEM connection. Now thinking out loud, I probably don't want to do that because the fuse box wire is designed for 60 AMPS, not the 120 AMPS I'm adding here....right?
Also, any ideas on the 150 AMP fuse for the charging wire (4 gauge) to the battery - does it matter where in line I put it (would prefer to put between + on battery and the wire so I don't have to cut the 4 gauge wire....
03-14-2013, 10:39 AM
#23
Registered User
Thread Starter
iTrader: (2)
Join Date: Dec 2009
Location: Pleasanton, CA - SF Bay Area
Posts: 2,159
Likes: 0
Received 7 Likes
on
5 Posts
Bingo!
So I dropped by the auto parts store near work, where I had my manifolds/etc hot tanked recently for my HG job, and asked if they could drill out the yota pulley to match the shaft on the GM alternator. They pulled out a box full of old V belt pulleys, and we found one that is a PERFECT fit:
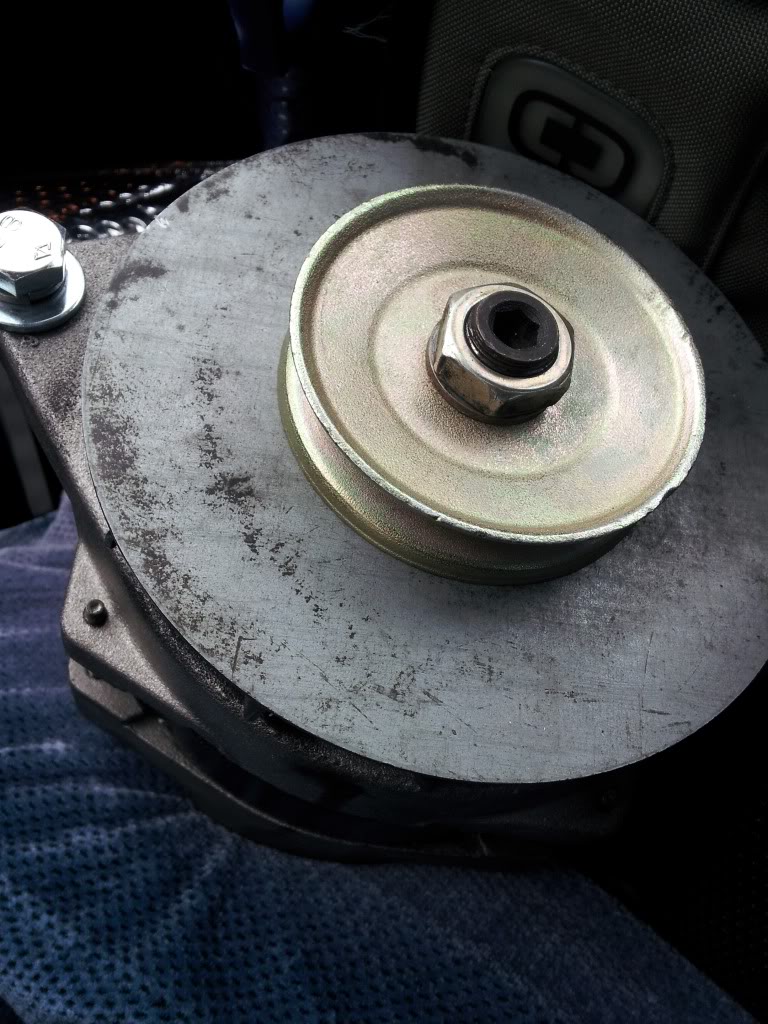
Pretty stoked about that!
Now....I need to know still:
1) For the 4 gauge wire from the Alt to the + post, does the 150A fuse need to go closer to the alt or to the battery? If the battery, can I attach the fuse to the + post and then to the wire? I want to avoid cutting.
2) Do I re use the OEM charging wire that goes to my fuse box (in addition to the 4 gauge wire I'm going to run), and then to my + or is the amp output going to fry my OEM wiring?
03-14-2013, 11:19 AM
#24
Now....I need to know still:
1) For the 4 gauge wire from the Alt to the + post, does the 150A fuse need to go closer to the alt or to the battery? If the battery, can I attach the fuse to the + post and then to the wire? I want to avoid cutting.
2) Do I re use the OEM charging wire that goes to my fuse box (in addition to the 4 gauge wire I'm going to run), and then to my + or is the amp output going to fry my OEM wiring?
2)You can remover the OEM charge wire from the alt but leave it hooked up to the battery so it can still power things up. I made this mistake when I installed mine and half of my crap wouldn't work (gauges, tail lights, etc.). Just tuck it away somewhere safe and capped off so it can't short out on anything.
03-14-2013, 11:23 AM
#25
Registered User
Thread Starter
iTrader: (2)
Join Date: Dec 2009
Location: Pleasanton, CA - SF Bay Area
Posts: 2,159
Likes: 0
Received 7 Likes
on
5 Posts
1) Where ever is easiest to service it if it ever blows.
2)You can remover the OEM charge wire from the alt but leave it hooked up to the battery so it can still power things up. I made this mistake when I installed mine and half of my crap wouldn't work (gauges, tail lights, etc.). Just tuck it away somewhere safe and capped off so it can't short out on anything.
2)You can remover the OEM charge wire from the alt but leave it hooked up to the battery so it can still power things up. I made this mistake when I installed mine and half of my crap wouldn't work (gauges, tail lights, etc.). Just tuck it away somewhere safe and capped off so it can't short out on anything.
Will keep you guys updated...I'm out of town through all of next week so I won't have any news for a little bit.
Phil
03-25-2013, 10:03 AM
#26
Registered User
Thread Starter
iTrader: (2)
Join Date: Dec 2009
Location: Pleasanton, CA - SF Bay Area
Posts: 2,159
Likes: 0
Received 7 Likes
on
5 Posts
Just a small update:
I finally got the Alt installed but have not done the wiring splice yet.
For the Trail Gear mount, I actually had a to use an angle grinder to grind out a tad bit more space on the adjuster rail (the part that the top of the alt slides left to right for adjustment. The bolt was just a little too thick....strange.
I have another question on wiring. Looking back at my old alternator, and the wiring on the new one, I see no grounds. Is the alternator grounded through its mount? Do I need another wire grounding it?
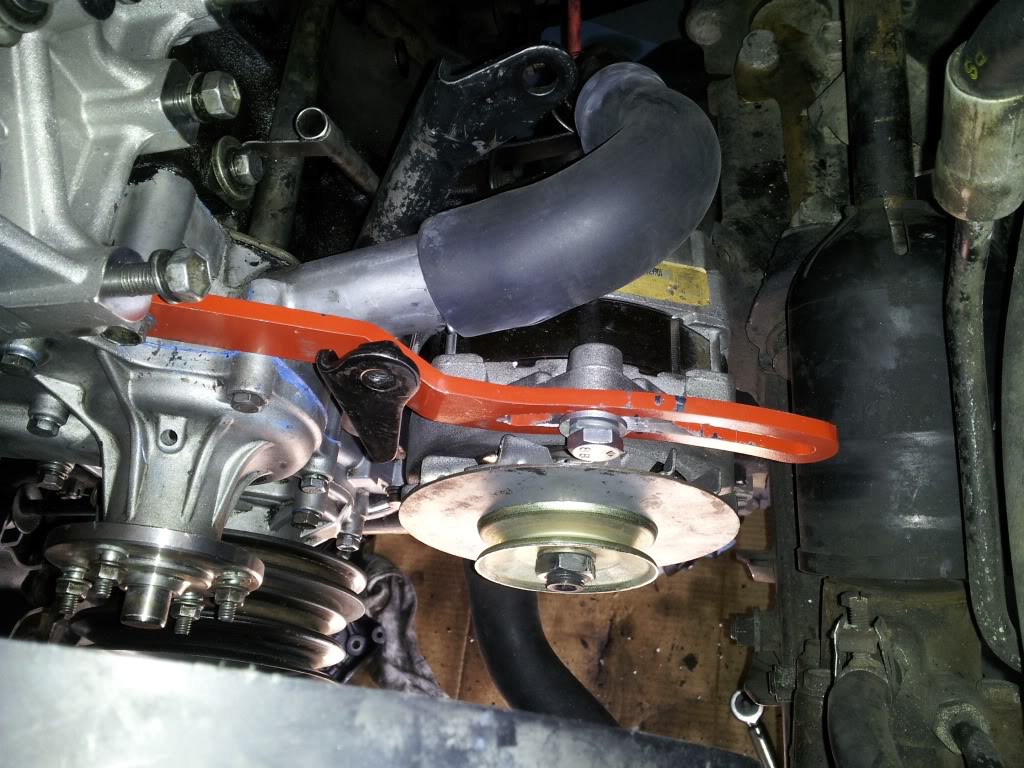
Thanks!
I finally got the Alt installed but have not done the wiring splice yet.
For the Trail Gear mount, I actually had a to use an angle grinder to grind out a tad bit more space on the adjuster rail (the part that the top of the alt slides left to right for adjustment. The bolt was just a little too thick....strange.
I have another question on wiring. Looking back at my old alternator, and the wiring on the new one, I see no grounds. Is the alternator grounded through its mount? Do I need another wire grounding it?
Thanks!
06-11-2013, 09:57 AM
#27
Subscribed. Gonna be doing this soon because I am doing a timing chain and I'm taking off the distributor and power steering pump as well as other parts, so I have complete access to put the larger alternator in. Hey Phil how did it work out?
I am going to order a CS-144 alternator from here.
And from the same site, check this out.
I am going to order a CS-144 alternator from here.
And from the same site, check this out.
10-31-2013, 05:52 PM
#28
I am waiting for my $229.95 .....D1-CS144-A170........NA...............New 170 amp Delco-Remy type CS-144 series alternator
with Top Quality Components and OEM Voltage Regulator from alternatorparts.com to come in because I pulled the power steering pump to rebuild it. The Trail Gear bracket came in the other day and I have to throw some paint on it. I will take plenty of pics and post up...but just FYI, I am an extreme procrastinator.
Now I just need to get this truck done before deer gun season that's coming up....
I am going w 2 gauge AWG cable because I had some left over from my Ford plow truck and because I'm going with the 170 amper. For the inline fuse, the guy from alternator parts told me to choose a fuse that is rated for 80% of the load carrying capacity (or ampacity) I saw online...In West Marine's catalog it shows a max amp rating for the 2 gauge cable at 210 amps so I thought the 175 amp AMG fuse should be good. More info to follow....
Philbert, how'd you make out with yours??
Last edited by daved5150; 11-01-2013 at 05:38 PM.
10-31-2013, 06:11 PM
#29
Registered User
Thread Starter
iTrader: (2)
Join Date: Dec 2009
Location: Pleasanton, CA - SF Bay Area
Posts: 2,159
Likes: 0
Received 7 Likes
on
5 Posts
Sounds great Dave!
mine has been doing great so far though I have not tried to text with any extra lighting or other high amp accessories.
having to grind out that Trail Gear mounting bracket is really annoying I have to keep it just in the belt every thousand miles or so because it loosens up
mine has been doing great so far though I have not tried to text with any extra lighting or other high amp accessories.
having to grind out that Trail Gear mounting bracket is really annoying I have to keep it just in the belt every thousand miles or so because it loosens up
11-01-2013, 05:32 PM
#32
There is the end of the adapter that goes into the stock Yota alt connecter. Here is a pic of my Trail gear bracket that thanks to Philbert's pic, I have the area marked that I have to file down...finally, there is the correct 3/8" pulley I need for my 22re.
*EDIT* Anyone looking for a TrailGear GM alternator bracket, Low Range Off Road has them on sale for $29.
*EDIT* Anyone looking for a TrailGear GM alternator bracket, Low Range Off Road has them on sale for $29.
Last edited by daved5150; 11-01-2013 at 06:29 PM.
11-01-2013, 05:35 PM
#33
"having to grind out that Trail Gear mounting bracket is really annoying I have to keep it just in the belt every thousand miles or so because it loosens up"
Why don't you just Locktite that bolt with some blue?? Just an idea.
Why don't you just Locktite that bolt with some blue?? Just an idea.
Last edited by daved5150; 11-03-2013 at 09:00 PM.
11-04-2013, 01:48 AM
#34
Hey Phil, couple questions for ya.
Did you use the bottom mount of the Trail Gear bracket? I am thinking I will use my stock factory bracket with a spacer/few washers because it will work and then I don't have to mess with removing/replacing that bracket making my life easier.
About the wiring, did you use the OEM charge wire or just hang it to the side like I have read a lot of guys do? I am doing a lot of reading on threads here and else where to research. I have read that some guys have used the OEM wire along with the new bigger cable with no problems. That makes sense because you can piggy back two different wires and they act as a bigger single gauge wire. This way you don't have to do extra work with removing the OEM wire.
I am going to add a 6 gauge wire from the battery to the 80 amp main fuse on top of the stock charge wire that runs from the alternator. Because whether I remove the OEM charge cable from the alternator or leave it on the alternator, that wire runs from the fuse box to the battery. Therefore, it's the same electrically because the new wire from the alternator runs to the + post and the fuse box is connected to the + post, whether or not the OEM cable is connected to the alternator. What I am trying to say is that it won't hurt that the OEM charge cable is left on. As long as a new bigger wire is there to handle the extra capacity of the alternator when needed, the two wires there will be fine.
Another important factor is upgrading the grounds also with same gauge wire.
Let me know what you think. Also, I want to know what everyone thinks of me using a 175 amp fuse with 2 gauge AWG cable. Thanks.

Thread
Thread Starter
Forum
Replies
Last Post


