
 03-30-2016, 10:51 AM
Last edit by: IB Advertising
See related guides and technical advice from our community experts:
- Toyota Tacoma How to Wire Independent Fog Lights<br>Step by step instructions for do-it-yourself repairs.

Fog Light Mod - on when you WANT them to be on, not just with the low beam headlights
06-13-2011, 07:19 PM
#1
Contributing Member
Thread Starter
Fog Light Mod - on when you WANT them to be on, not just with the low beam headlights
I've had my 2006 Tacoma for all of two days, and the fact that my fog lights will ONLY come on when I have the low-beam headlights on is driving me nuts! Just turn on the running lights, they wont come on... turn on your bright lights, they'll go off... So after a little digging on the interwebs, I found a few DIY's on it and decided to go a little different route that what I found.
I also found it strange that we don't have a step by step how-to here on YotaTech about this; all the threads I could find simply redirect you to a different forum and it's how-to. So, here's YotaTech's how-to
DISCLAIMER!
I, nor the site, is responsible of any damages done to your vehicle by performing this modification.
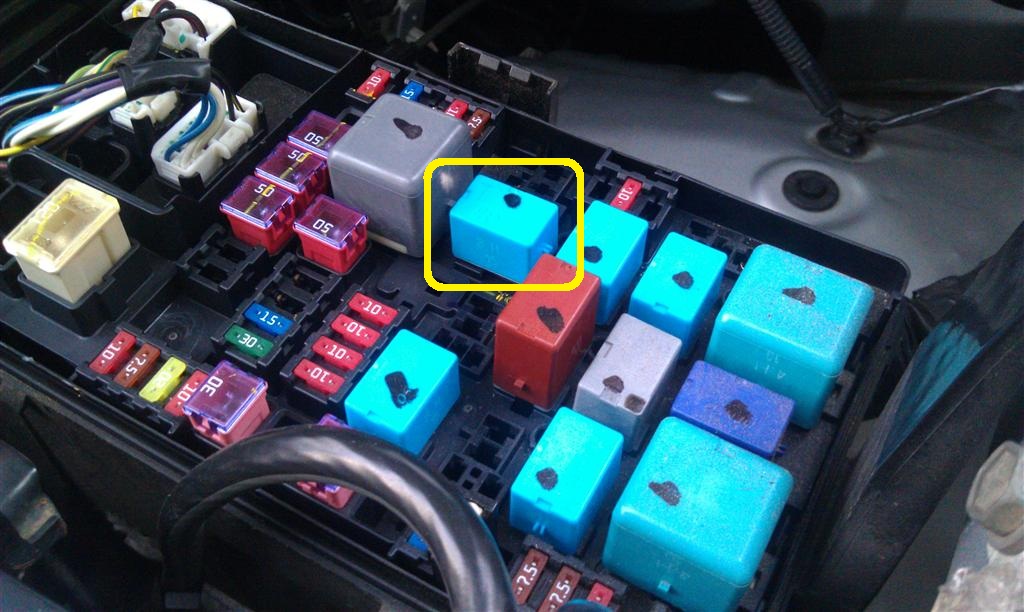
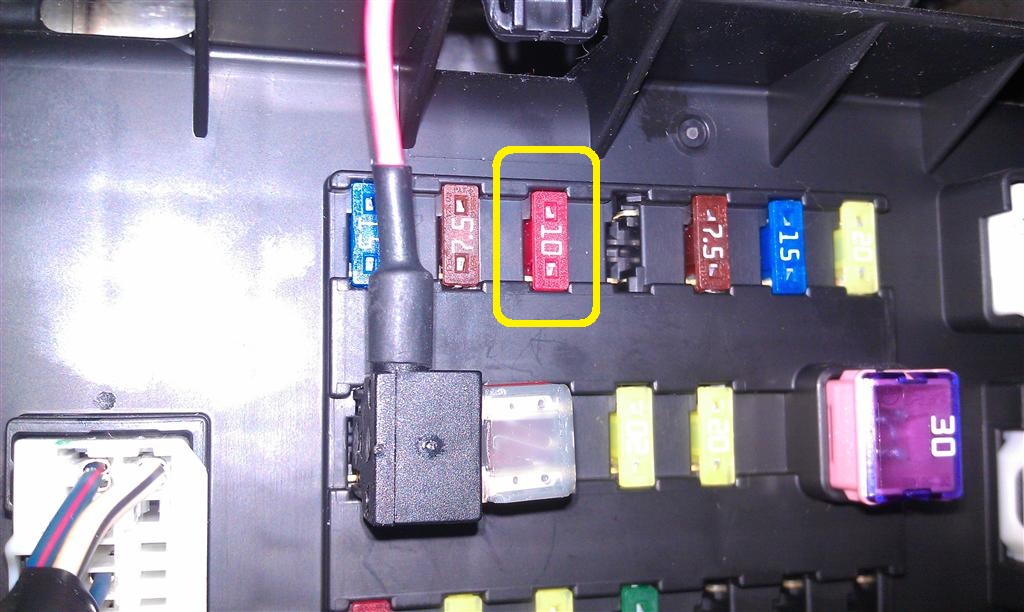
Alright, now that that's out of the way There's a few different ways you can do this, and it all depends on how you want the lights to work in the end. But I'll get to that in a minute. The first thing that needs to be done, no matter how you want the lights to work, is to pop the hood and pull the lid off the fuse box and find the relay for the fog lamps.
Here it is circled in yellow
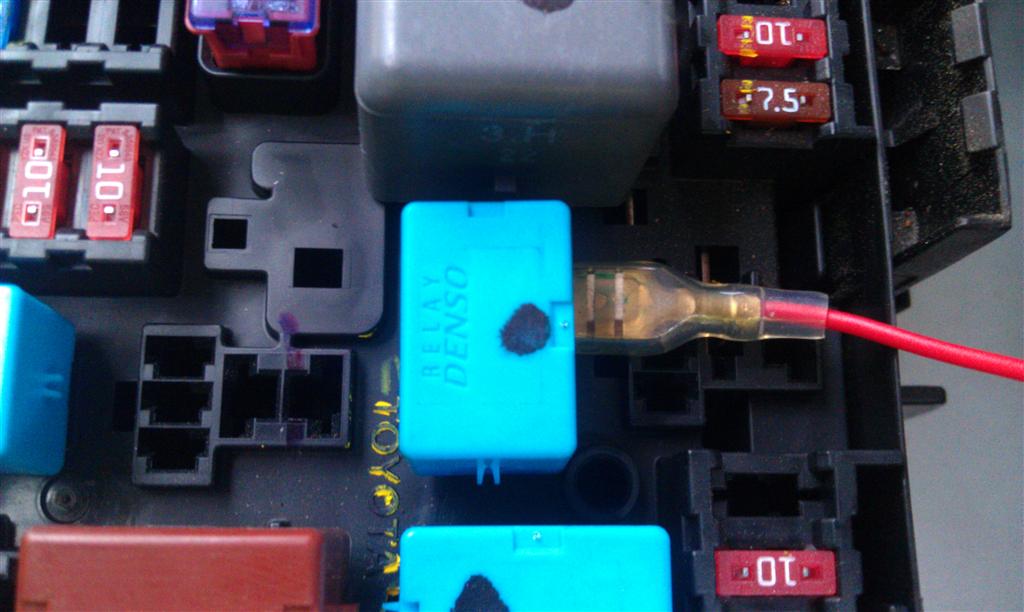
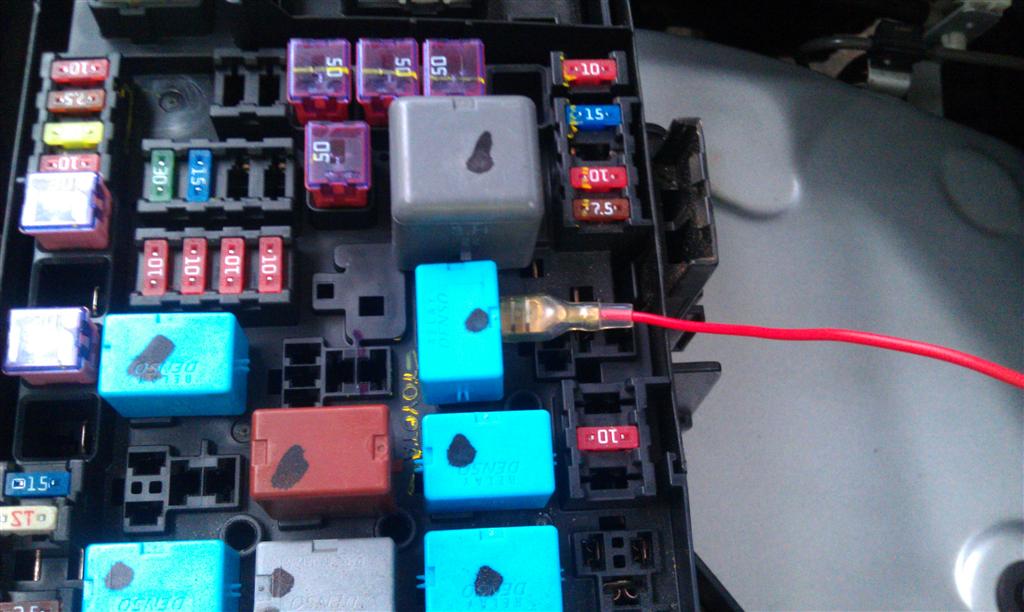
The relay trigger works by getting it's + power when the low-beam headlights are on, and the switch on the dash grounds out the - side of the trigger in the relay. Basically, the objective here is to make it so the relay trigger get's it's + power when WE want it to, not just when the low-beams are on. To do this, you need to pull the relay out and bend one of the prongs over. This is the prong that get's the + power when the low-beam headlights are on. Bending it over allows you to attach a female quick-connect to the relay prong.
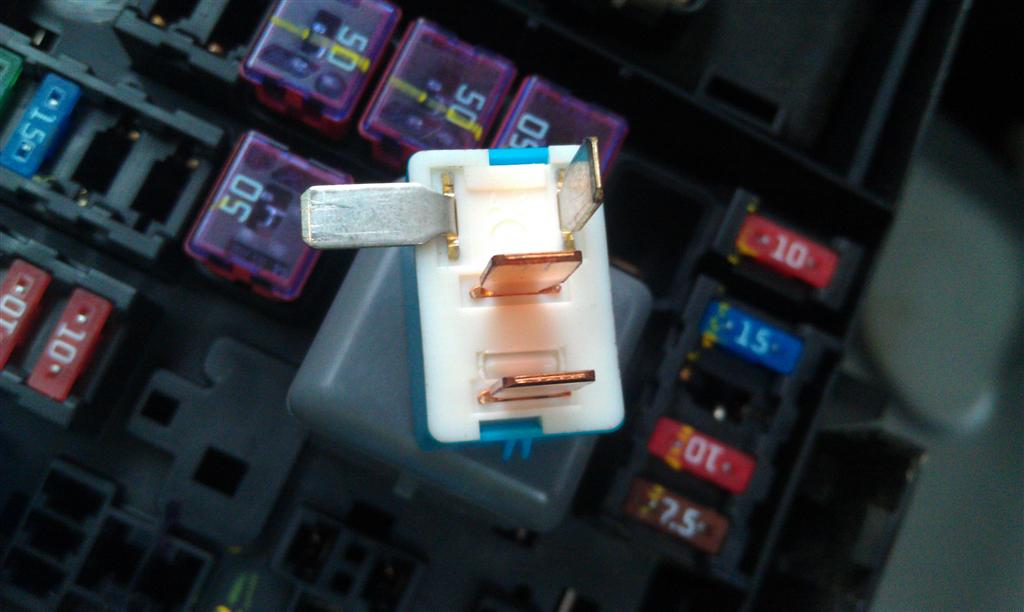
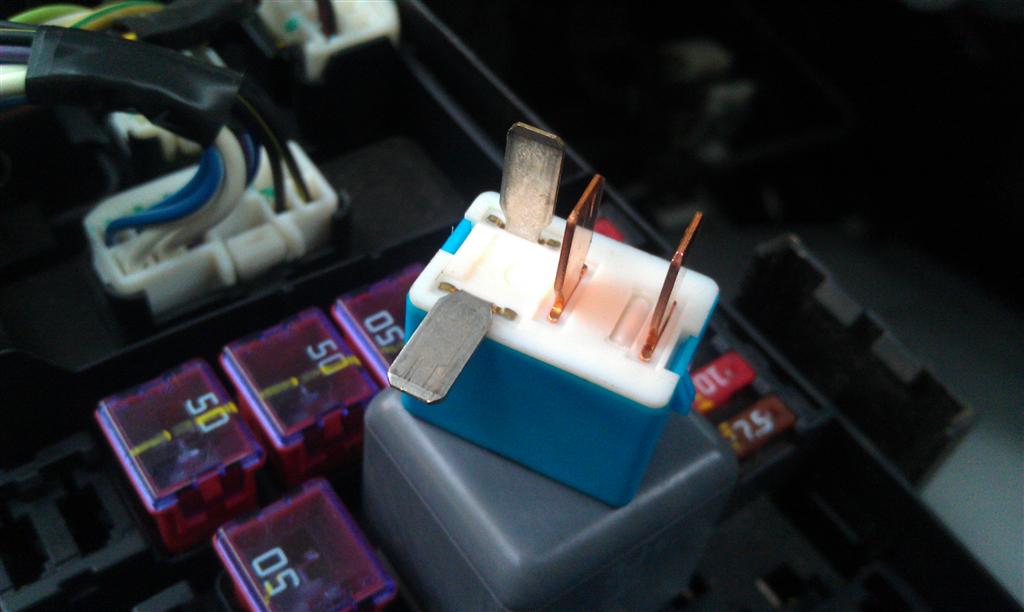
Make SURE you bend over the leg pictured above. When you plug the female connector onto the bent-over leg, it should be pointing towards the cab of the truck, like so:
Once that's done, you need to decide how you want the fog lights to function, and there's a few options depending on what power source you tap into, each with it's pros and cons.
1) Constant 12v power. Doing this will allow you to turn the fog lights on with the switch on the dash no matter WHAT lights are on, or even if the key isn't in the truck! This is definitely the simplest method and requires the least work, and it gives you pretty much COMPLETE control over your fog lights. BUT, since they can be left on without even having the key in the truck, you have to make sure you don't accidentally leave them on and kill your battery...
To do this method, just attach the new wire you have that's attached to the bent-over terminal on the relay to a near by constant 12v power. You can either use a fuse tap and tap into a fuse in the fuse box that has constant power (which most do under the hood), or just connect it to the nut-bolt there in the fuse box that has constant power. Either method keeps you from having any exposed wires outside the fuse box.
2) Ignition switched 12v power. This option is similar to option 1, only instead of the con of being able to accidentally leave the fog lights on, if the ignition is turned off and the key is out of the truck, the fog lights will not be able to come on. Basically, you have full control over the fog lights, SO LONG AS the ignition is on.
This method can actually be just as easy as the wiring them into constant power method; you just have to use a fuse tap and tap into a fuse that comes on only with the ignition.
3) Power when parking lamps are on. Using this method, the fog lights are only able to come on when the running lights are on. This is actually how fog lights operate on most other vehicles made today.
Although this is the most in-depth method that requires the most work (although still not much at all), this is the method I chose, and I'll explain why I did it the way I did a little later.
They way I did the 3rd option was to route my new wire that was connected to the relay into the cab of the truck so that I could get to the fuse box under the dash on the driver's side.
Route it however you like, this is just the method I chose. Remember not to tighten your zip-ties down until you get the wire routed all the way into the dash


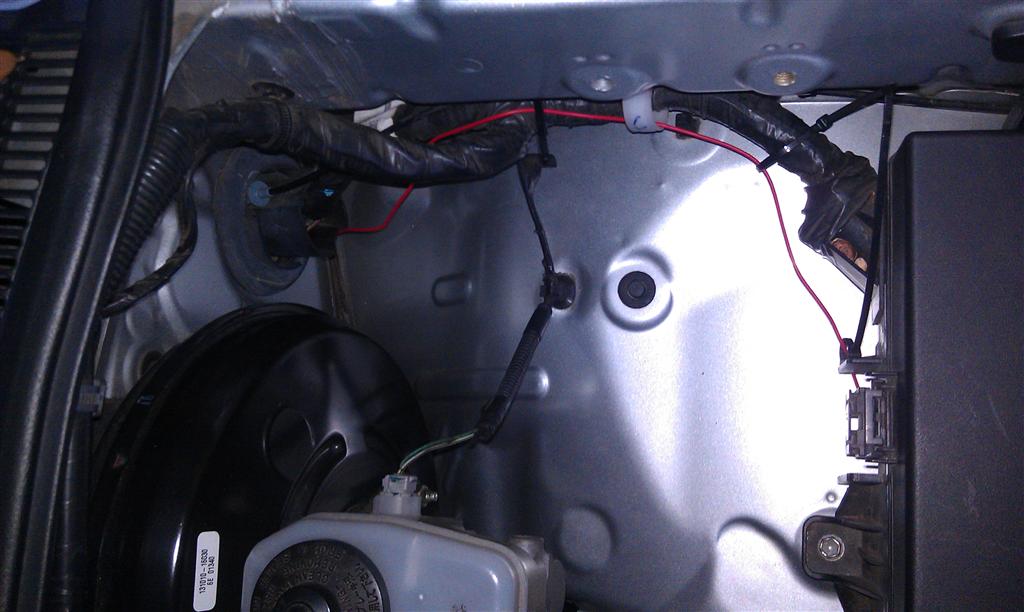

Once that wire was zip tied tight under the hood, all the work under the hood was done, and it was time to move into the cab, and things don't get much more difficult in here, lol.
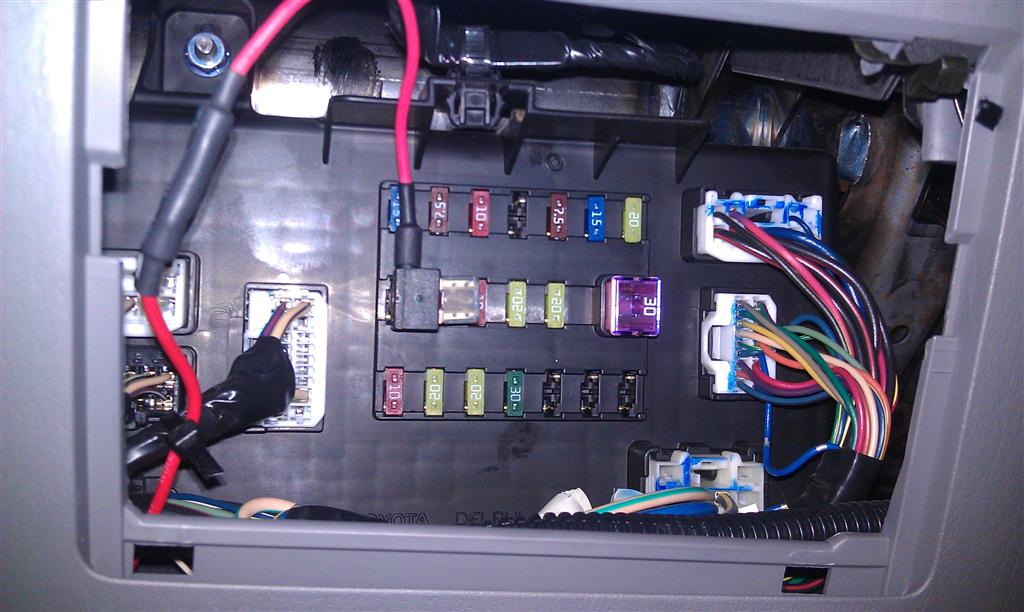
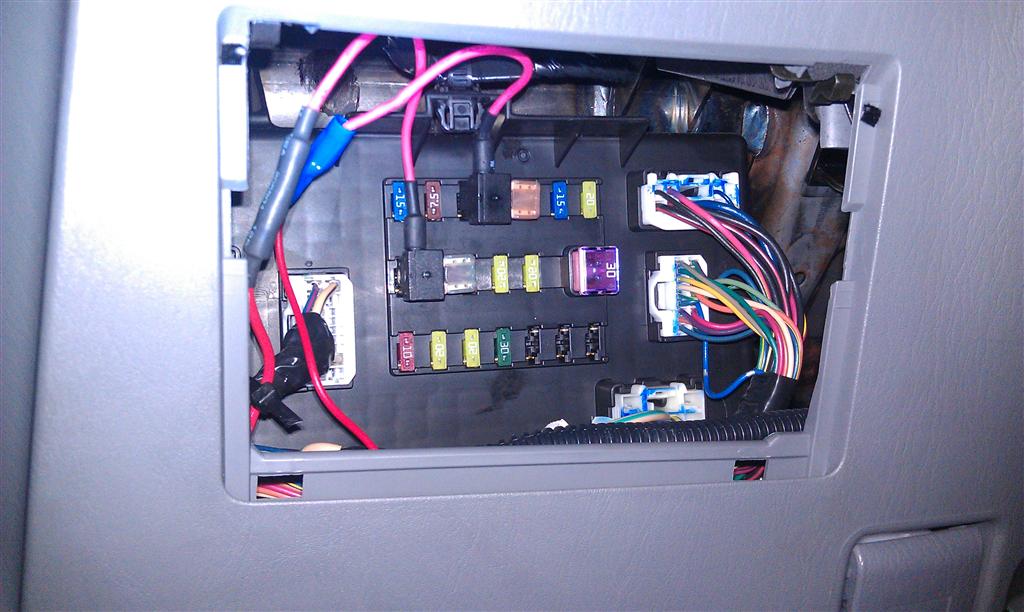
Route that new wire up close to the fuse box, being sure to zip tie it up out of the way of the parking brake.
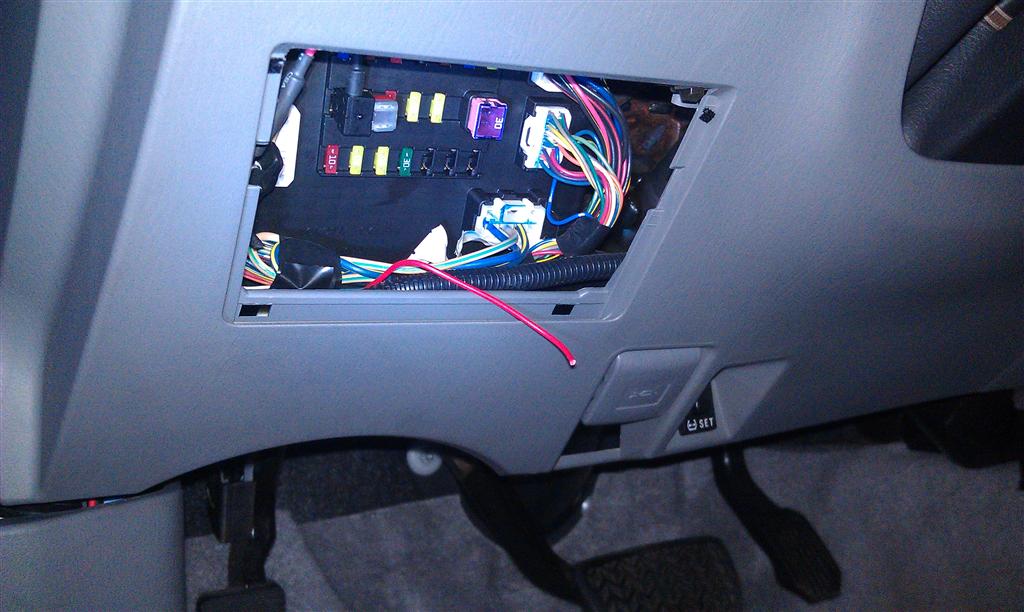
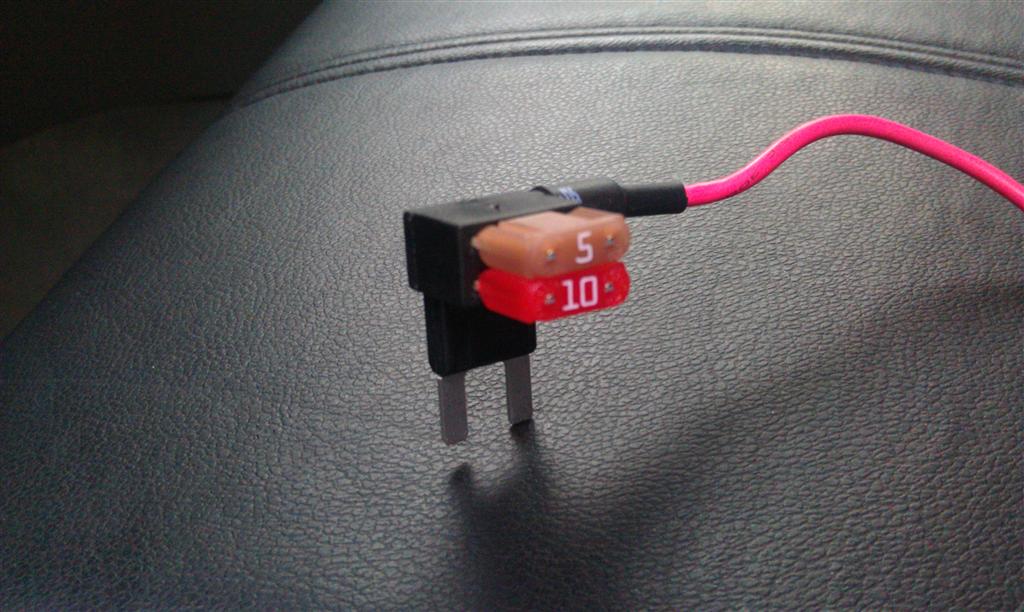
Now it's time to tap into a fuse there under the dash. This is where you'll need a little mini fuse tap. You can get them at pretty much any auto parts store for about $5
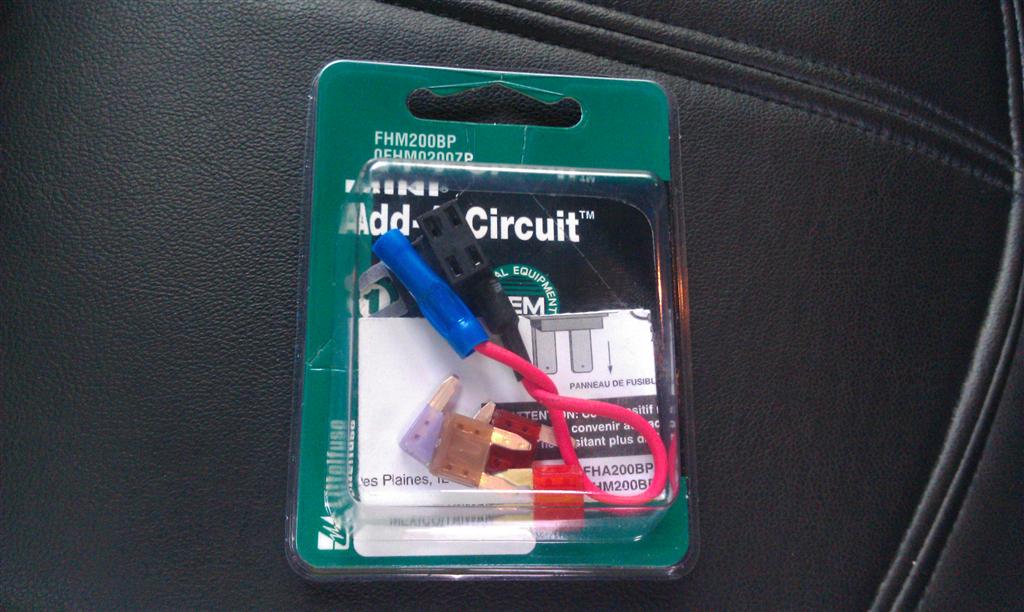
Although they're for the mini fuses with the legs, they work just fine the the Toyota's fuse box that uses the fuses without the legs. Mine came with an assortment of fuses, with is great because we need a fuse that matches the amperage of the fuse that we're going to be tapping into for power, and also a fuse for the fog light relay circuit that we're adding.
As I said, I'm tapping into the running lights to get my power to the relay. This happens to be the 10 amp fuse labeled as "TAIL"
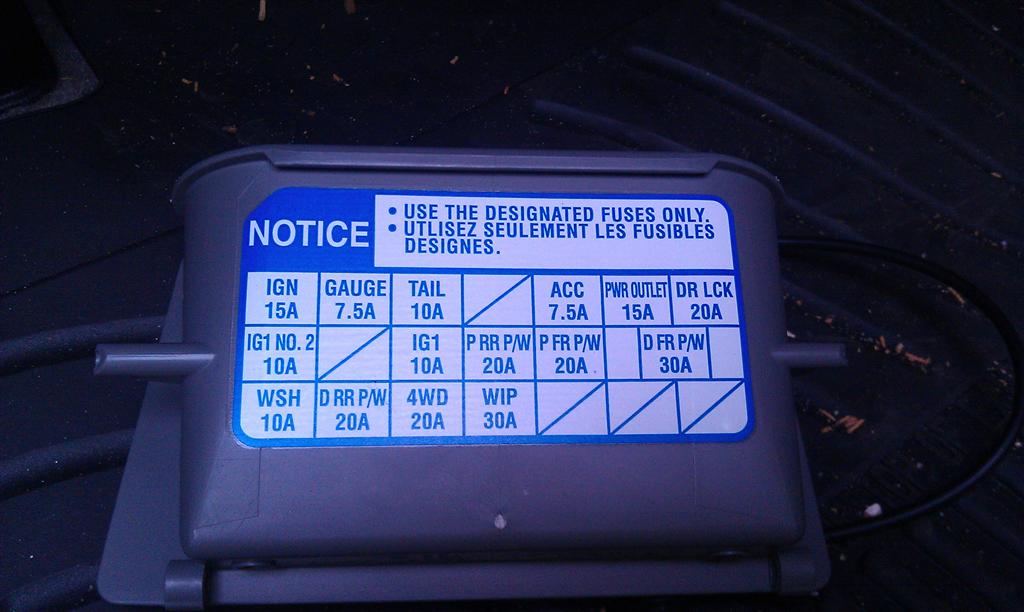
(you might notice I already have one fuse tap in place; that's for my GPS charger that I wired in to turn on with the ignition)
So since I'm tapping into a circuit that uses a 10 amp fuse to begin with, I'm going to need a 10 amp fuse to put into one spot in the fuse tap to replace the original fuse, and I'm also going to need a low amperage fuse to put into the other slot in the fuse tap to fuse the new fog light relay circuit. I probably could have used the 3 amp fuse that came with the fuse tap, but I opted instead to use a 5 amp fuse.
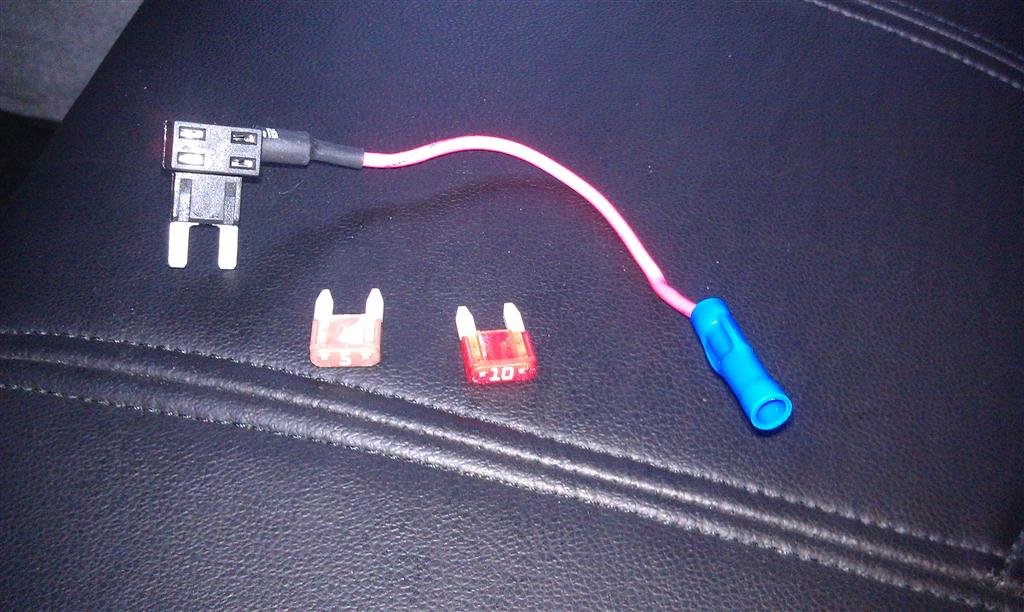
In the bottom fuse holder of the tap, you'll place the fuse equal to the fuse that you're removing and putting the tap in place of. In the top fuse holder is where you'll put the fuse for you're new circuit.
Then just crimp (and heat-shrink if you'd like) that fuse tap to the wire you routed in from under the hood.
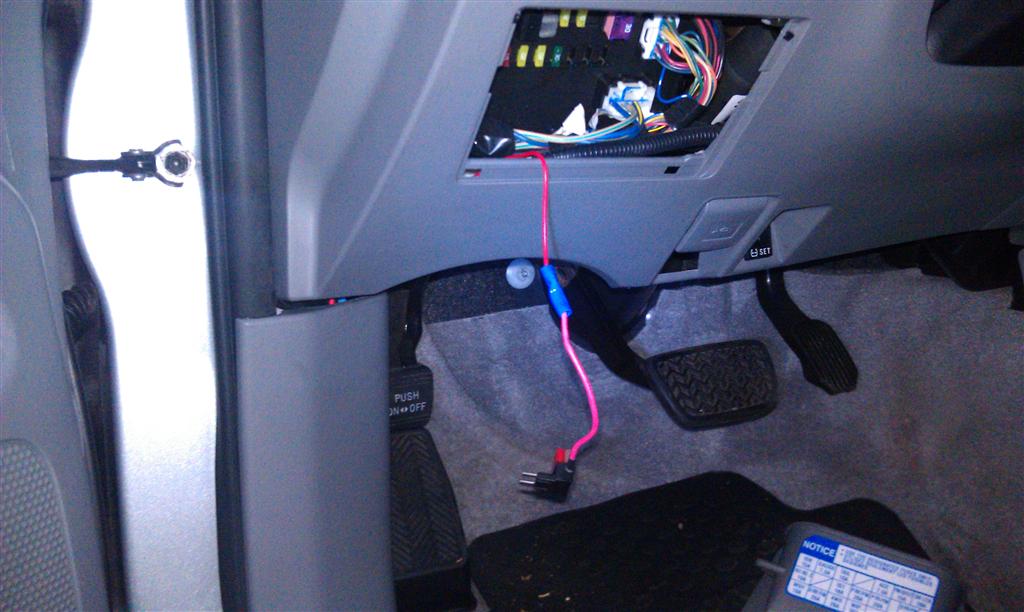
After that, it's just a matter of plugging the fuse tap in, and enjoying your newly-found control over your fog lights!
Works with just running lights:
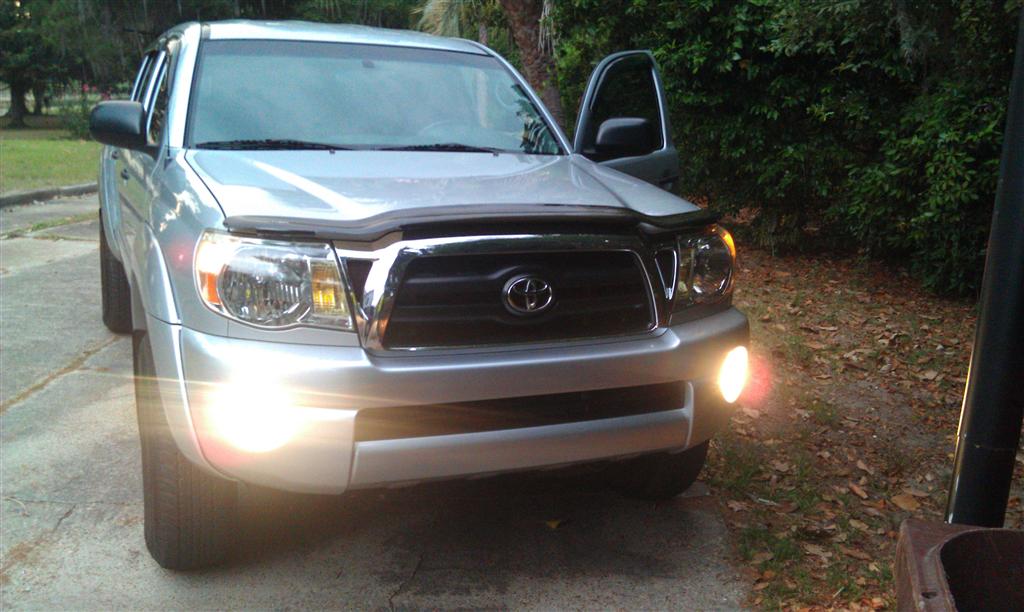
And of course with low beams:
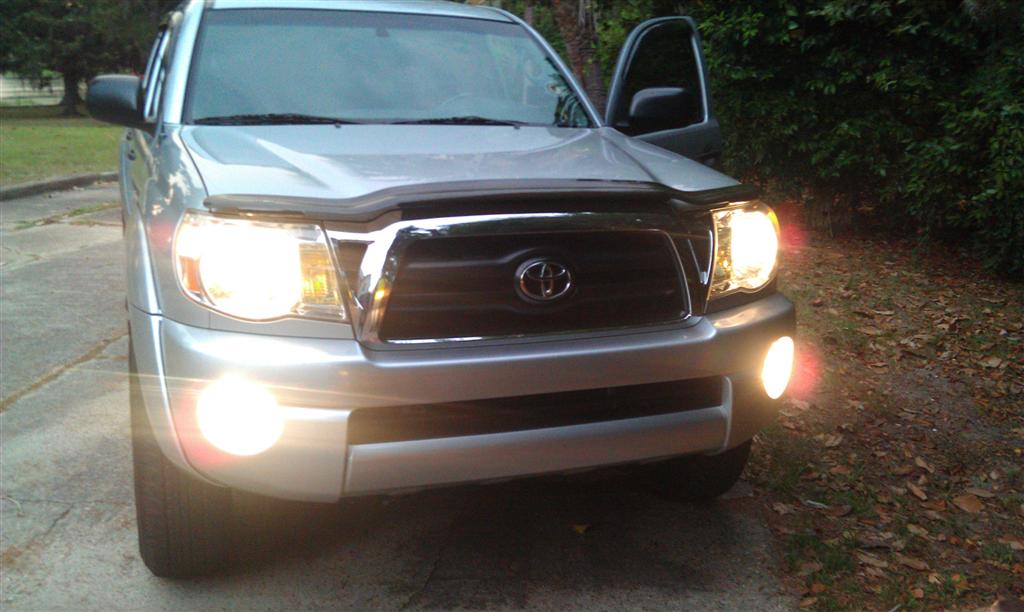
AND high beams!
All still using the factory switch on the dash!
The reason I went through the trouble of routing the wire into the dash is because I now have the option of making the fog lights work however I want them to, simply by changing the location of the fuse tap. If I wanted them to work with the ignition, I could just move the fuse tap to a fuse that's hot with the ignition only, such as the "IG1" or even the power window fuses. If I wanted to be able to control them regardless of the running lights OR ignition, I can just tap into the door lock fuse that's always hot. So I really have all options available to me just by taking the extra step and routing the power to come from the fuse box in the cab.
I also found it strange that we don't have a step by step how-to here on YotaTech about this; all the threads I could find simply redirect you to a different forum and it's how-to. So, here's YotaTech's how-to
DISCLAIMER!
I, nor the site, is responsible of any damages done to your vehicle by performing this modification.
Alright, now that that's out of the way
There's a few different ways you can do this, and it all depends on how you want the lights to work in the end. But I'll get to that in a minute. The first thing that needs to be done, no matter how you want the lights to work, is to pop the hood and pull the lid off the fuse box and find the relay for the fog lamps.Here it is circled in yellow
The relay trigger works by getting it's + power when the low-beam headlights are on, and the switch on the dash grounds out the - side of the trigger in the relay. Basically, the objective here is to make it so the relay trigger get's it's + power when WE want it to, not just when the low-beams are on. To do this, you need to pull the relay out and bend one of the prongs over. This is the prong that get's the + power when the low-beam headlights are on. Bending it over allows you to attach a female quick-connect to the relay prong.
Make SURE you bend over the leg pictured above. When you plug the female connector onto the bent-over leg, it should be pointing towards the cab of the truck, like so:
Once that's done, you need to decide how you want the fog lights to function, and there's a few options depending on what power source you tap into, each with it's pros and cons.
1) Constant 12v power. Doing this will allow you to turn the fog lights on with the switch on the dash no matter WHAT lights are on, or even if the key isn't in the truck! This is definitely the simplest method and requires the least work, and it gives you pretty much COMPLETE control over your fog lights. BUT, since they can be left on without even having the key in the truck, you have to make sure you don't accidentally leave them on and kill your battery...
To do this method, just attach the new wire you have that's attached to the bent-over terminal on the relay to a near by constant 12v power. You can either use a fuse tap and tap into a fuse in the fuse box that has constant power (which most do under the hood), or just connect it to the nut-bolt there in the fuse box that has constant power. Either method keeps you from having any exposed wires outside the fuse box.
2) Ignition switched 12v power. This option is similar to option 1, only instead of the con of being able to accidentally leave the fog lights on, if the ignition is turned off and the key is out of the truck, the fog lights will not be able to come on. Basically, you have full control over the fog lights, SO LONG AS the ignition is on.
This method can actually be just as easy as the wiring them into constant power method; you just have to use a fuse tap and tap into a fuse that comes on only with the ignition.
3) Power when parking lamps are on. Using this method, the fog lights are only able to come on when the running lights are on. This is actually how fog lights operate on most other vehicles made today.
Although this is the most in-depth method that requires the most work (although still not much at all), this is the method I chose, and I'll explain why I did it the way I did a little later.
They way I did the 3rd option was to route my new wire that was connected to the relay into the cab of the truck so that I could get to the fuse box under the dash on the driver's side.
Route it however you like, this is just the method I chose. Remember not to tighten your zip-ties down until you get the wire routed all the way into the dash
Once that wire was zip tied tight under the hood, all the work under the hood was done, and it was time to move into the cab, and things don't get much more difficult in here, lol.
Route that new wire up close to the fuse box, being sure to zip tie it up out of the way of the parking brake.
Now it's time to tap into a fuse there under the dash. This is where you'll need a little mini fuse tap. You can get them at pretty much any auto parts store for about $5
Although they're for the mini fuses with the legs, they work just fine the the Toyota's fuse box that uses the fuses without the legs. Mine came with an assortment of fuses, with is great because we need a fuse that matches the amperage of the fuse that we're going to be tapping into for power, and also a fuse for the fog light relay circuit that we're adding.
As I said, I'm tapping into the running lights to get my power to the relay. This happens to be the 10 amp fuse labeled as "TAIL"
(you might notice I already have one fuse tap in place; that's for my GPS charger that I wired in to turn on with the ignition
)So since I'm tapping into a circuit that uses a 10 amp fuse to begin with, I'm going to need a 10 amp fuse to put into one spot in the fuse tap to replace the original fuse, and I'm also going to need a low amperage fuse to put into the other slot in the fuse tap to fuse the new fog light relay circuit. I probably could have used the 3 amp fuse that came with the fuse tap, but I opted instead to use a 5 amp fuse.
In the bottom fuse holder of the tap, you'll place the fuse equal to the fuse that you're removing and putting the tap in place of. In the top fuse holder is where you'll put the fuse for you're new circuit.
Then just crimp (and heat-shrink if you'd like) that fuse tap to the wire you routed in from under the hood.
After that, it's just a matter of plugging the fuse tap in, and enjoying your newly-found control over your fog lights!
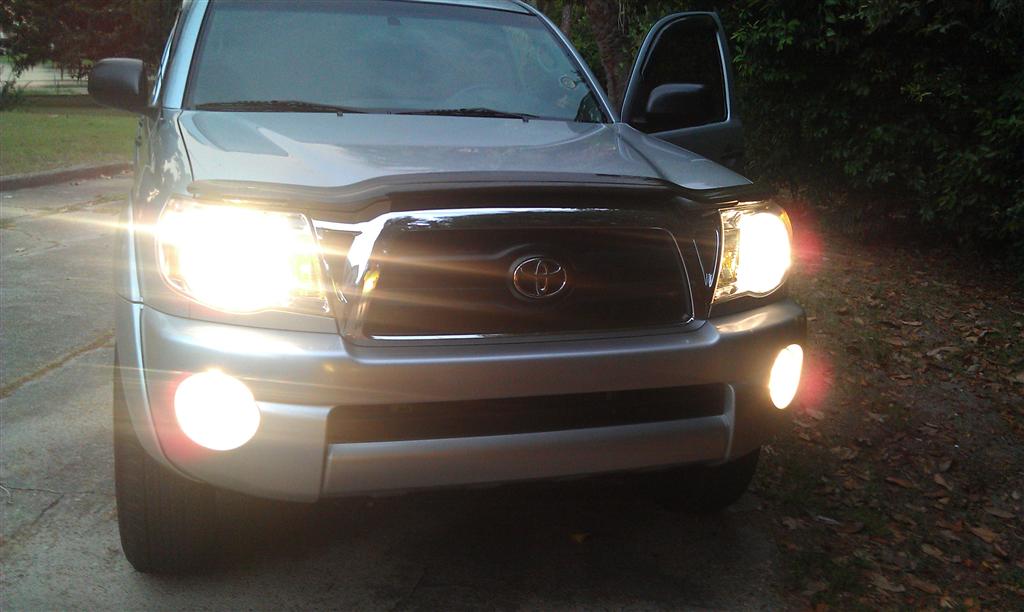
Works with just running lights:
And of course with low beams:
AND high beams!
All still using the factory switch on the dash!
The reason I went through the trouble of routing the wire into the dash is because I now have the option of making the fog lights work however I want them to, simply by changing the location of the fuse tap. If I wanted them to work with the ignition, I could just move the fuse tap to a fuse that's hot with the ignition only, such as the "IG1" or even the power window fuses. If I wanted to be able to control them regardless of the running lights OR ignition, I can just tap into the door lock fuse that's always hot. So I really have all options available to me just by taking the extra step and routing the power to come from the fuse box in the cab.

 06-13-2011, 07:57 PM
#6
Registered User

now, why didnt you think of that? jeeze, think with your noggin
Trending Topics
06-14-2011, 02:48 PM
#10
Contributing Member
Thread Starter
In the F150 community, there's a common mod known as the "Bambi mod" that I believe just makes the fog lights not turn off with the high beams, and all you have to do for it is to pull the relay out and bend over one prong, and put it back in; that's it! You don't even have to plug it into anything!
06-14-2011, 02:56 PM
#11
Registered User
haha only ford guys would come up with a mod with the name Bambi in it.
Oh yeah got to stay on topic this is a pretty cool mod, now I just got to get me one of those "cool" 2wd yotas so I can do it.
Oh yeah got to stay on topic this is a pretty cool mod, now I just got to get me one of those "cool" 2wd yotas so I can do it.
06-14-2011, 03:01 PM
#12
Contributing Member
Thread Starter
and why ya gotta pick on the 2wd? not everyone needs a 4wd to get to where they need to be...
Last edited by iamsuperbleeder; 06-14-2011 at 03:02 PM.
06-14-2011, 03:23 PM
#14
Contributing Member
Thread Starter
although... let a 4.0l come into my job with a TRD SC on it, and I might have to snatch it up if the price is right
 06-15-2011, 05:24 PM
#15
Contributing Member
Join Date: Mar 2003
Location: COTKU,Ontario,Canada
Posts: 11,334
Likes: 0
Received 0 Likes
on
0 Posts
Cool write up super... don't let folks get too you about the 4wd thing... at least you don't have those suuuuuper wide swamp tires like a lot of your fellow "statespersons" seem to run lol... of course those seem to be more common of ford/chevy bambi rides...
 07-10-2011, 03:04 PM
#18
Contributing Member
Join Date: Jul 2003
Location: Orlando, FL
Posts: 9,076
Likes: 0
Received 0 Likes
on
0 Posts
Just read this thread at your recommendation - great write-up dude!
As of right now, I don't have the desire to use them by themselves.
The most annoying this is that they turn off when the high beams are on...that makes no sense to me.
Oh well...at least Toyota does just about every other aspect of the vehicle right.
Fink
As of right now, I don't have the desire to use them by themselves.
The most annoying this is that they turn off when the high beams are on...that makes no sense to me.
Oh well...at least Toyota does just about every other aspect of the vehicle right.
Fink
07-11-2011, 01:31 AM
#19
Registered User
Join Date: Apr 2011
Location: Twin Cities, MN
Posts: 27
Likes: 0
Received 0 Likes
on
0 Posts
Awesome write up! I'm gonna look into this for the wife's '09 VENZA. I believe the 'Reason' for automatically shutting off the fogs when the high beams come on, is to let your eyes adjust to seeing farther away. But, its a mute point when most of my high beam use in the VENZA is down neighborhood roads (at less than 35 mph) where I want ALL the light available (It gets pretty dark up here!).
Cheers
Cheers


