
So, I'm THIS close to finishing up my V6 caliper swap and....(stuck)
 11-06-2012, 12:15 PM
#21
Registered User
Thread Starter
iTrader: (2)
Join Date: Dec 2009
Location: Pleasanton, CA - SF Bay Area
Posts: 2,159
Likes: 0
Received 7 Likes
on
5 Posts
Actually....
Just looked at Corax's write up again and his are done like mine (opposite of yours):
http://www.expeditionportal.com/foru...4Runner-Brakes

http://www.expeditionportal.com/foru...4Runner-Brakes

 11-06-2012, 04:57 PM
#24
Registered User
The reason i did it the way i did was because as you roll forward the rotor spins from the bottom to the top of the caliper, you don't want any parts to be pulled into thr assembly. If you attach to the top, then loose end of the clip is down has a chance to be grabbed into the assemby if something were to go wrong.
At least that is what i was thinking when i did it.
At least that is what i was thinking when i did it.
11-06-2012, 08:23 PM
#25
Two things-
-First---it shouldn't take very much pressure to compress a piston, IF the bore is clean and the piston and o-ring seal are in good shape. Its very easy to get a piston crooked in the bore... Are these new calipers or yard specials?
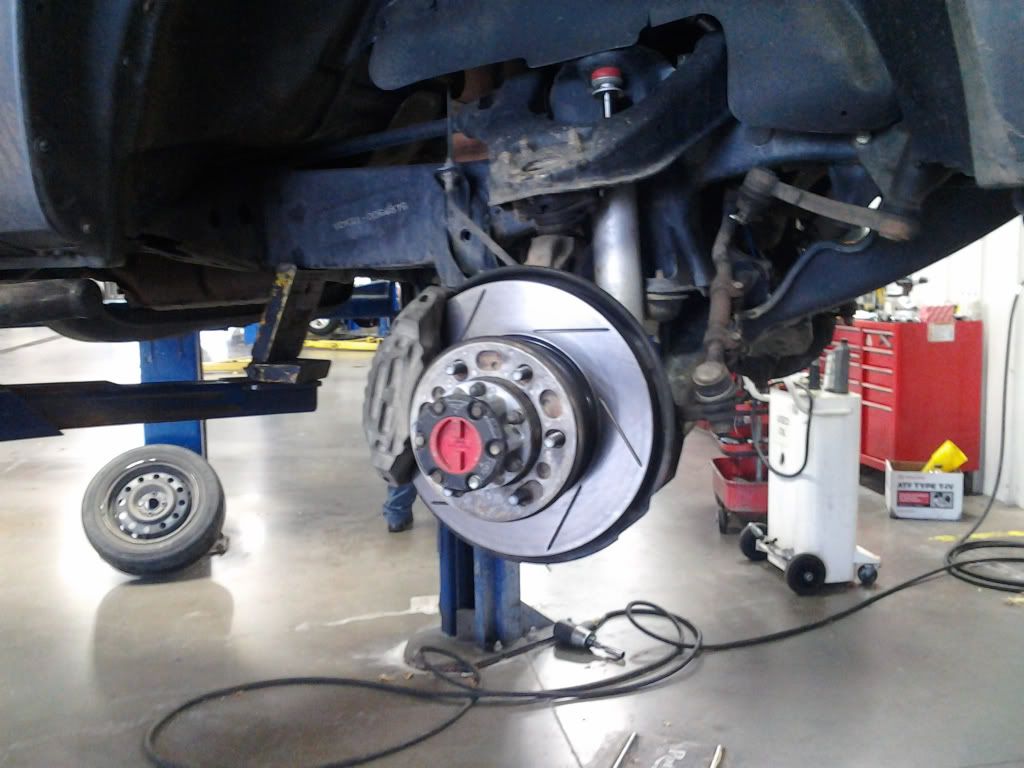
Second-- SC, where did you get those slotted rotors?
-First---it shouldn't take very much pressure to compress a piston, IF the bore is clean and the piston and o-ring seal are in good shape. Its very easy to get a piston crooked in the bore... Are these new calipers or yard specials?
Second-- SC, where did you get those slotted rotors?
Last edited by rokblok; 11-06-2012 at 08:25 PM.
11-06-2012, 08:58 PM
#26
Registered User
Hey, got those from tire rack, search for t100 rotors, they don't make them for the pickup. The only difference is they are 5mm thicker than standard rotors. I believe you need late model v6 calipers as well. I had already poached my calipers for my 81, so i bought rebuilt (i used 95 t100 as a reference model) ones at napa for like 45 bucks a piece plus i used my old solid axle ones for a core.
11-06-2012, 08:58 PM
#27
Registered User
If I'm not mistaken, their powerslots, like mine.
Would have gotten them from summit, but the were out of stock for a while. I can't remember where I got them.
-edit- scratch that...I'm a few beers in and those aren't powerslots. Now you got me curious SC...what kinda rotors you got?
Would have gotten them from summit, but the were out of stock for a while. I can't remember where I got them.
-edit- scratch that...I'm a few beers in and those aren't powerslots. Now you got me curious SC...what kinda rotors you got?
Last edited by 250000_yota; 11-06-2012 at 09:00 PM.
11-09-2012, 08:17 AM
#30
Registered User
Thread Starter
iTrader: (2)
Join Date: Dec 2009
Location: Pleasanton, CA - SF Bay Area
Posts: 2,159
Likes: 0
Received 7 Likes
on
5 Posts
One more thing....
So, I've done brakes before but never replaced the MC/pads/calipers/rotors all in one job.
I have everything mounted up, wheels on, and poured in some brake fluid to the MC to get things started (didn't have time to bleed yet...maybe this weekend).
Anyway, I poured in some brake fluid to the MC till it was at the full line, then pumped the brake pedal a few times to get it into the system (I know there's going to be air and I'll have to bleed it). However, there is pretty much zero pressure on the brake pedal and the MC remains at the "full" line.
Keep in mind this is a brand new MC, and that I lost a lot of fluid when I disconnected everything, so my system is pretty empty.
Can someone suggest the proper way to do this, get that fluid into the system, get some brake pedal pressure back, so I can bleed this sucker and start road testing?
Thanks!
11-09-2012, 08:22 AM
#31
Contributing Member
Join Date: Apr 2006
Location: TENN Native Languishing in Virginia
Posts: 4,787
Likes: 0
Received 34 Likes
on
14 Posts
If I'm not mistaken, their powerslots, like mine.
Would have gotten them from summit, but the were out of stock for a while. I can't remember where I got them.
-edit- scratch that...I'm a few beers in and those aren't powerslots. Now you got me curious SC...what kinda rotors you got?
Would have gotten them from summit, but the were out of stock for a while. I can't remember where I got them.
-edit- scratch that...I'm a few beers in and those aren't powerslots. Now you got me curious SC...what kinda rotors you got?
Those rotors are on the wrong side; slots should be angled the other direction.
11-09-2012, 08:28 AM
#32
Contributing Member
Join Date: Apr 2006
Location: TENN Native Languishing in Virginia
Posts: 4,787
Likes: 0
Received 34 Likes
on
14 Posts
So, I've done brakes before but never replaced the MC/pads/calipers/rotors all in one job.
I have everything mounted up, wheels on, and poured in some brake fluid to the MC to get things started (didn't have time to bleed yet...maybe this weekend).
Anyway, I poured in some brake fluid to the MC till it was at the full line, then pumped the brake pedal a few times to get it into the system (I know there's going to be air and I'll have to bleed it). However, there is pretty much zero pressure on the brake pedal and the MC remains at the "full" line.
Keep in mind this is a brand new MC, and that I lost a lot of fluid when I disconnected everything, so my system is pretty empty.
Can someone suggest the proper way to do this, get that fluid into the system, get some brake pedal pressure back, so I can bleed this sucker and start road testing?
Thanks!
I have everything mounted up, wheels on, and poured in some brake fluid to the MC to get things started (didn't have time to bleed yet...maybe this weekend).
Anyway, I poured in some brake fluid to the MC till it was at the full line, then pumped the brake pedal a few times to get it into the system (I know there's going to be air and I'll have to bleed it). However, there is pretty much zero pressure on the brake pedal and the MC remains at the "full" line.
Keep in mind this is a brand new MC, and that I lost a lot of fluid when I disconnected everything, so my system is pretty empty.
Can someone suggest the proper way to do this, get that fluid into the system, get some brake pedal pressure back, so I can bleed this sucker and start road testing?
Thanks!
11-09-2012, 08:39 AM
#33
Registered User
Actually, their not. I even called centric, the company that makes them to verify. The technical assistance rep said that that particular part number does not have a directional vane, so mounting direction is not imprortant. I mounted them the direction the stickers stated. I could have run them the other way, but I decided to just go with the stickers and be different. Trust me, I've had ALOT of people point out their mounted the wrong direction, but I've put almost 5000 miles on these rotors with no problem.
11-09-2012, 08:46 AM
#34
Registered User
Thread Starter
iTrader: (2)
Join Date: Dec 2009
Location: Pleasanton, CA - SF Bay Area
Posts: 2,159
Likes: 0
Received 7 Likes
on
5 Posts
Thanks TN Rabbit - I've used vacuum bleeders in the past...but my issue is that the MC is full right now, and I have ZERO pressure. I can't add more since it's full. Wondering what I need to do next.....open a bleeder valve on a caliper and pump/add fluid?
11-09-2012, 08:50 AM
#35
Registered User
Did you bench bleed the master? Cause it sounds like there is air trapped in the mc. It wont build pressure or allow fluid to pass if their is air trapped in the mc itself.
11-09-2012, 08:55 AM
#36
 11-09-2012, 10:02 AM
#38
Registered User
Thread Starter
iTrader: (2)
Join Date: Dec 2009
Location: Pleasanton, CA - SF Bay Area
Posts: 2,159
Likes: 0
Received 7 Likes
on
5 Posts
Thanks guys - came across this YT post from 7 years ago that I think sums it up:
https://www.yotatech.com/forums/f2/b...ylinder-51409/
I also have the old brake lines that came with the donor calipers, so I may use them to re route back into the reservoir if the thumb method does not work.
PS - the bench bleeding guides all mentioned pushing in the piston and letting it out...but my brand new TG 1" MC came with the piston fully pushed in and flush to the mounting bracket....not sure how it would "let it itself out" in this exercise...hmmmm
Stay tuned!
11-13-2012, 11:46 AM
#39
Registered User
Thread Starter
iTrader: (2)
Join Date: Dec 2009
Location: Pleasanton, CA - SF Bay Area
Posts: 2,159
Likes: 0
Received 7 Likes
on
5 Posts
Update (and more questions)
OK guys-thanks for all the help along the way on this - really made a difference!
I was able to bench bleed the MC while in the truck - used old brake lines and some 1/4" clear tubing to feed back into the MC reservoir, and just pumped the pedal/added fluid to MC until no more air came out.
I just ordered the Motive power bleeder to do the rest before I road test it. Have folks coming into town this weekend so this will probably not wrap up till then....
That said, what's concerning me now is the wheel bearings. I followed this 5 step guide on Youtube (think it's a member here?) for his 94 4Runner front brake job and wheel bearing replacement:
http://www.youtube.com/user/eturkov
However, I noticed his bearing/hub set up was pretty different from mine.
I took mine apart carefully and put it back together as it was before. I did not torque anything to spec because I didn't know to at the time. I also didn't do the "pre load" thing because I didn't know what that was and I don't have the spring tool to measure. I can borrow a 54mm socket from a guy here at work.
Basically, I'm wondering if I will be fine since I took apart the hub/bearing assembly, then put it togther as it was. I need to torque appropriately and do the pre load thing too, I know.
Here are some photos of the disassembly to give you an idea of the hub setup on my auto hub SR5 87 4Runner:
Here are all the parts:
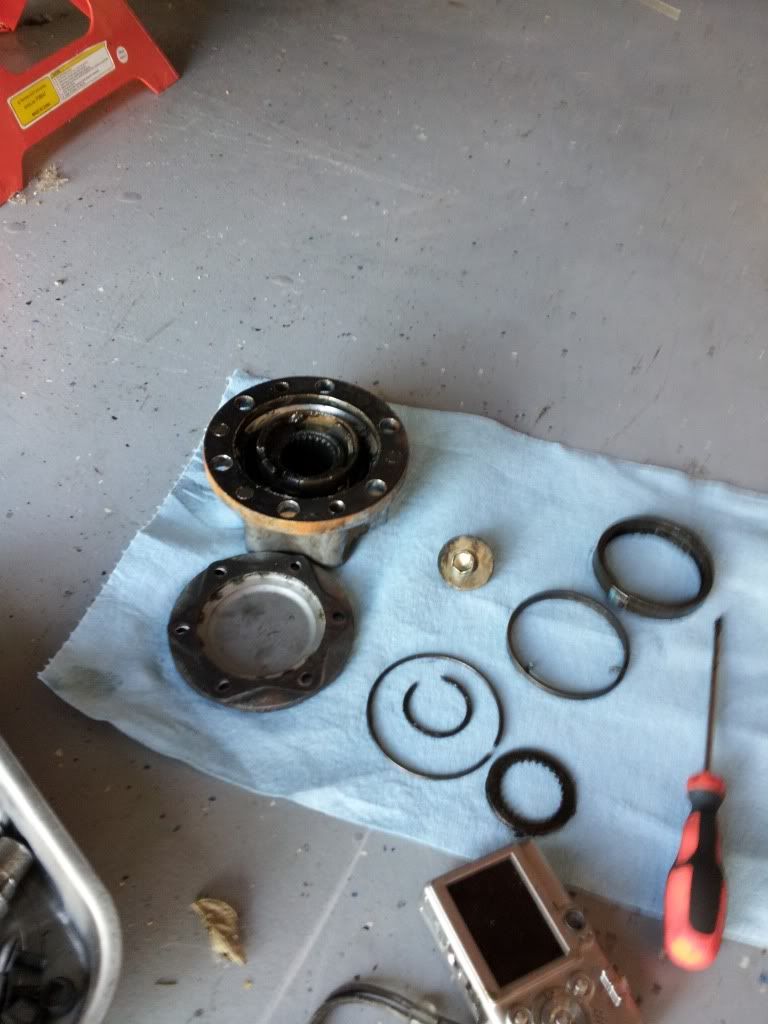
This is the spindle after the hub was removed - instead of what's in the youtube video (the tabbed ring where you bend tabs to lock in place), I had this ring piece of steel with 9 holes in it, 3 of which had small "hex" screws to hold it in place (think allen nuts but star shaped). There was a star/spline interior washer (which you see below, right next to my camera, which I think was held in place with that smaller c-clip snap ring, just to its left. The auto-locking spring mechanism (just to the right of the screwdriver) I took apart by mistake on the first one I did....I got it back together thank god, and left the other side intact when I tore it down.
I guess what I'm wondering about is:
1) Do my bearings/hubs even have a preload setting, since it uses that star-nut locking ring and c clip snap ring to hold the star washer (star being the spline pattern on the inside)? I didn't remove the inner bearings since I just wanted to get the rotor off for this job. When doing the pre load test/torque of 54mm nut, do you want the front hubs engaged or totall free?
2) What do I need to do to ensure I don't screw up my bearings/etc on a road test (the truck is still sitting in my garage)?
3) My FSM didn't appear to have torque settings for:
- hub plastic cover
- hub itself
- spindle nut (in the middle of the rag in the photos below -gold)
- rotor-to-hub bolts

I was able to bench bleed the MC while in the truck - used old brake lines and some 1/4" clear tubing to feed back into the MC reservoir, and just pumped the pedal/added fluid to MC until no more air came out.
I just ordered the Motive power bleeder to do the rest before I road test it. Have folks coming into town this weekend so this will probably not wrap up till then....
That said, what's concerning me now is the wheel bearings. I followed this 5 step guide on Youtube (think it's a member here?) for his 94 4Runner front brake job and wheel bearing replacement:
http://www.youtube.com/user/eturkov
However, I noticed his bearing/hub set up was pretty different from mine.
I took mine apart carefully and put it back together as it was before. I did not torque anything to spec because I didn't know to at the time. I also didn't do the "pre load" thing because I didn't know what that was and I don't have the spring tool to measure. I can borrow a 54mm socket from a guy here at work.
Basically, I'm wondering if I will be fine since I took apart the hub/bearing assembly, then put it togther as it was. I need to torque appropriately and do the pre load thing too, I know.
Here are some photos of the disassembly to give you an idea of the hub setup on my auto hub SR5 87 4Runner:
Here are all the parts:
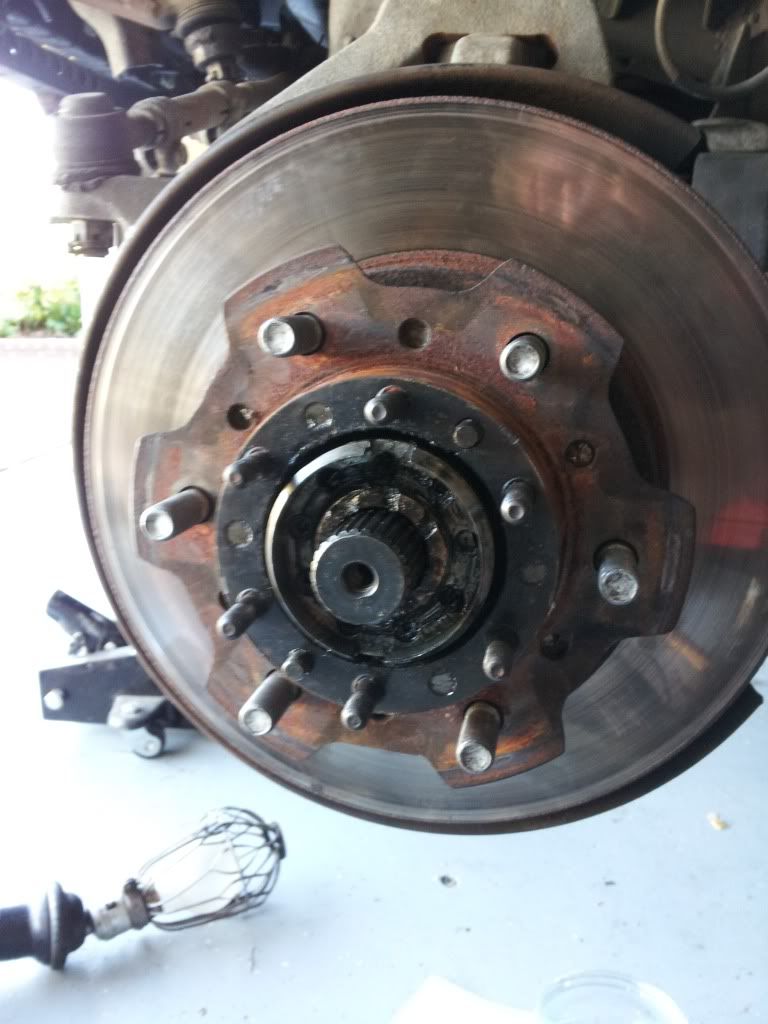
This is the spindle after the hub was removed - instead of what's in the youtube video (the tabbed ring where you bend tabs to lock in place), I had this ring piece of steel with 9 holes in it, 3 of which had small "hex" screws to hold it in place (think allen nuts but star shaped). There was a star/spline interior washer (which you see below, right next to my camera, which I think was held in place with that smaller c-clip snap ring, just to its left. The auto-locking spring mechanism (just to the right of the screwdriver) I took apart by mistake on the first one I did....I got it back together thank god, and left the other side intact when I tore it down.
I guess what I'm wondering about is:
1) Do my bearings/hubs even have a preload setting, since it uses that star-nut locking ring and c clip snap ring to hold the star washer (star being the spline pattern on the inside)? I didn't remove the inner bearings since I just wanted to get the rotor off for this job. When doing the pre load test/torque of 54mm nut, do you want the front hubs engaged or totall free?
2) What do I need to do to ensure I don't screw up my bearings/etc on a road test (the truck is still sitting in my garage)?
3) My FSM didn't appear to have torque settings for:
- hub plastic cover
- hub itself
- spindle nut (in the middle of the rag in the photos below -gold)
- rotor-to-hub bolts
11-13-2012, 12:11 PM
#40
Registered User
You will still need to seat the bearings in their races straight and preload them so they don't kill themselves. Too much play or too tight is bad. Actually, in the pre 85 section toyospearos solid axle rebuild thread has a simple method for seating the bearings, which are the same for IFS and SA trucks.


