
Slim's Free '87 Pickup 22R revival/ 22RE to 22R conversion
 03-02-2014, 08:15 PM
#1
Registered User
Thread Starter

Slim's Free '87 Pickup 22R revival/ 22RE to 22R conversion
Hey everyone.
I posted about a year ago that I had scored a free '87 Pickup with a blown 22R. due to extenuating circumstances, I never got around to fixing it, and now I'm about to move in two months, so I've got to get the truck running to get it out of my backyard. So this is a synopsis of where I'm at.
While transporting the truck last year, there were a lot of spare parts sitting on the bench seat, including two bottles of gear oil, which tipped over and soaked through the bench and into the floor. I didn't noticed for at least a month. So the first order of business now that I'm working on it, was to gut the interior and start ridding it of the horrid gear oil smell.

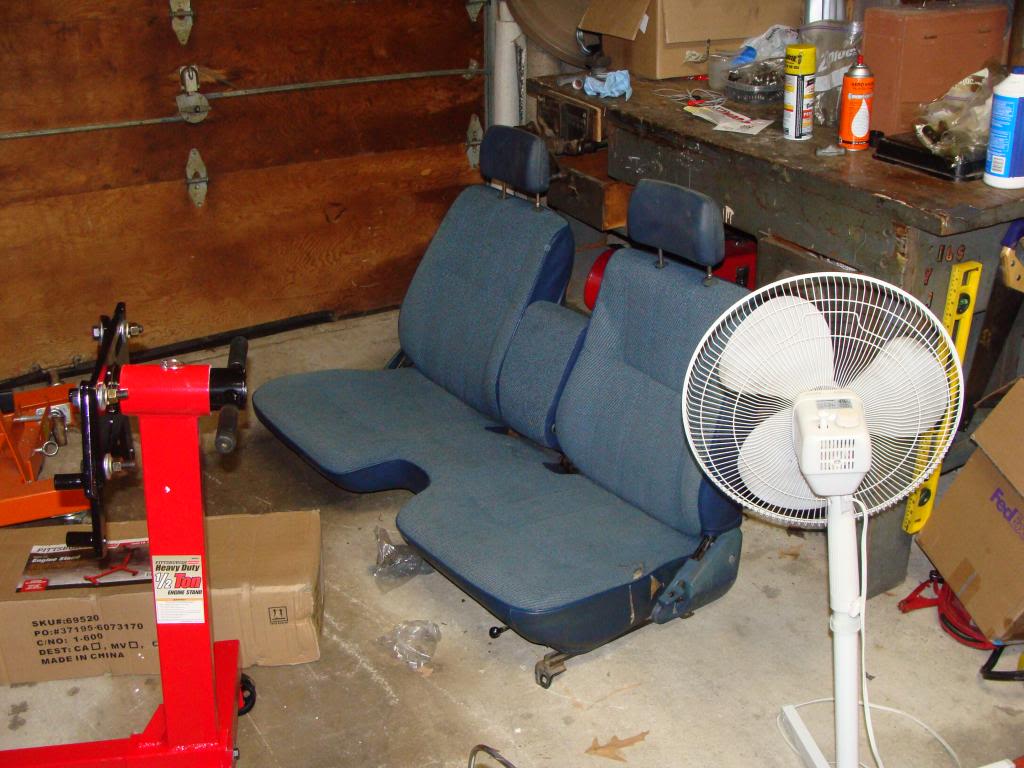
I snagged a better bench seat semi-locally for $50
The truck clearly has at least 1 spun rod bearing, and I started to do a compression check, but have no compression on cylinders 1 or 2, so I quit after that. Being on a tight time crunch, and in the interest of saving money for now, I decided to snag a junkyard motor that supposedly is good.
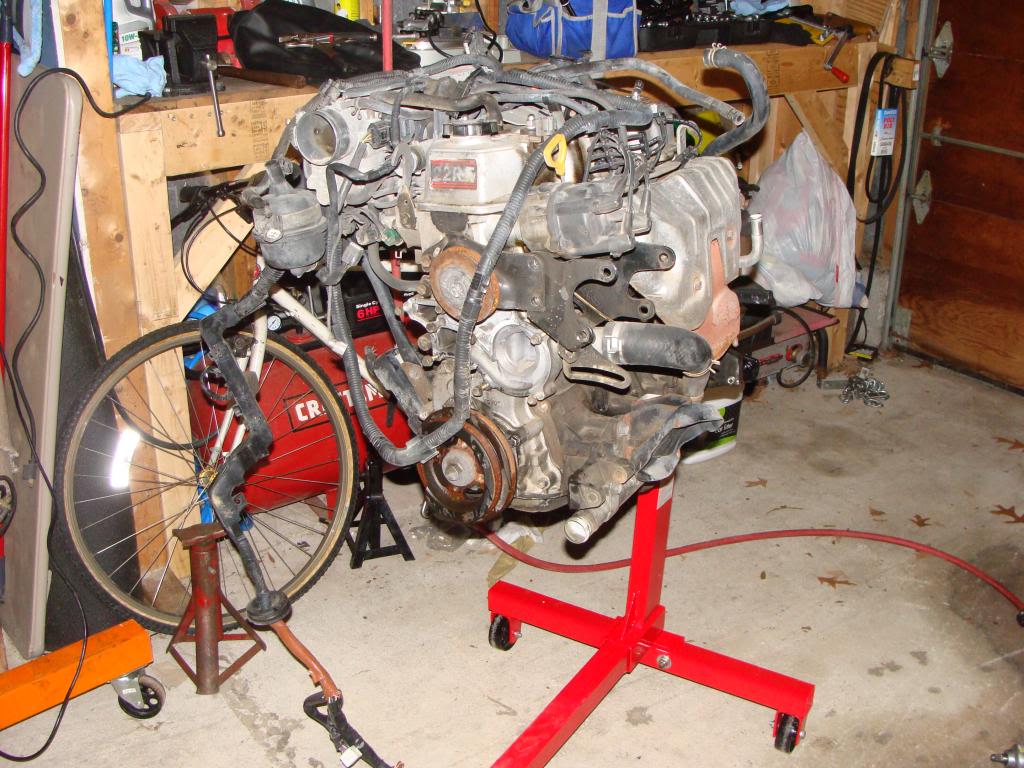
Cue $845 JY motor, 1994 22RE with 160k miles:
I toyed with the idea of 22R -> RE conversion, but after seeing how primitive this fuel injection is, have canned that idea. If I convert to fuel injection, it'll be later on with an engine swap. If I keep this truck, this weak little 22R isn't going to cut it.
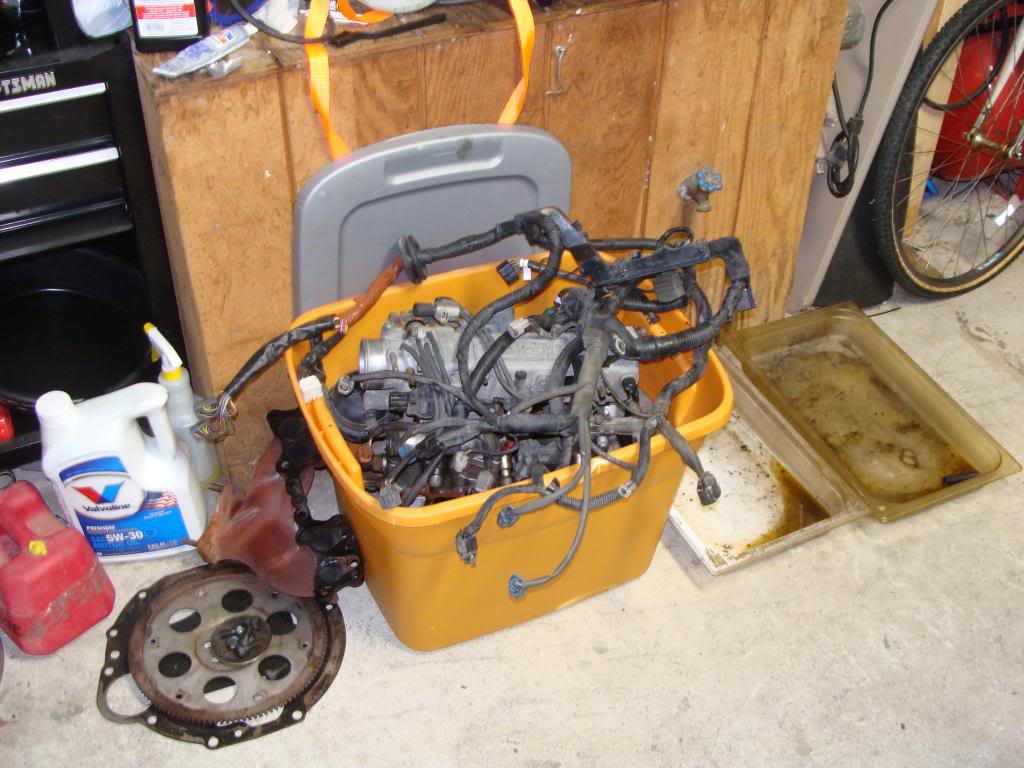
Box of Fuel Injection junk:
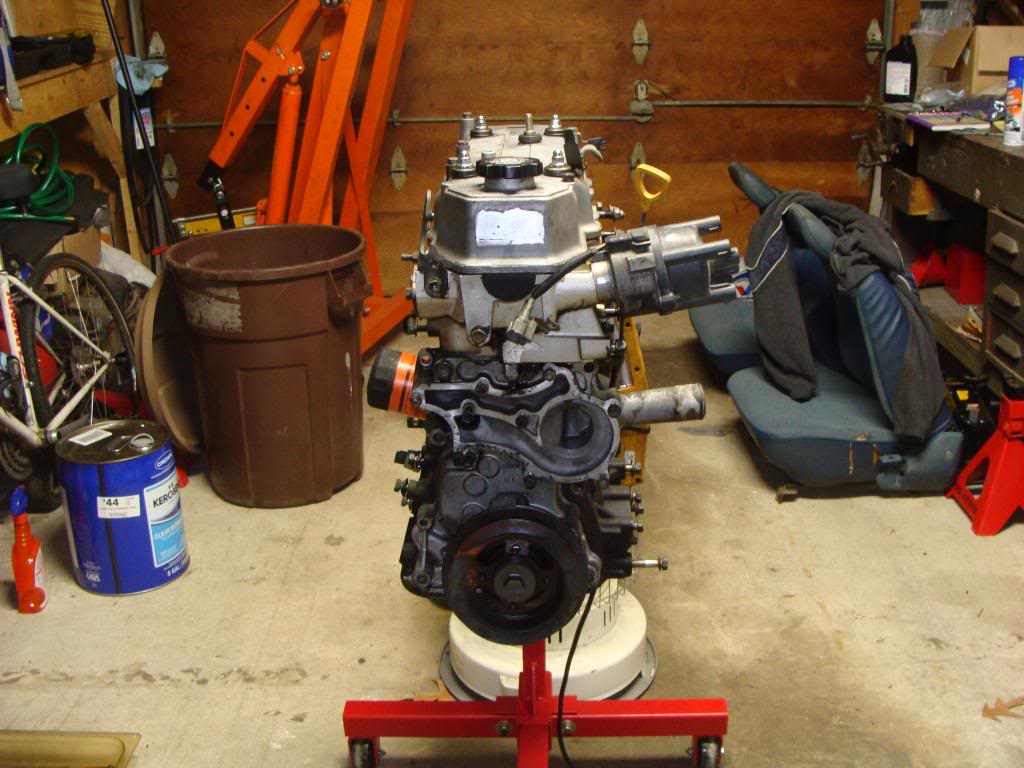
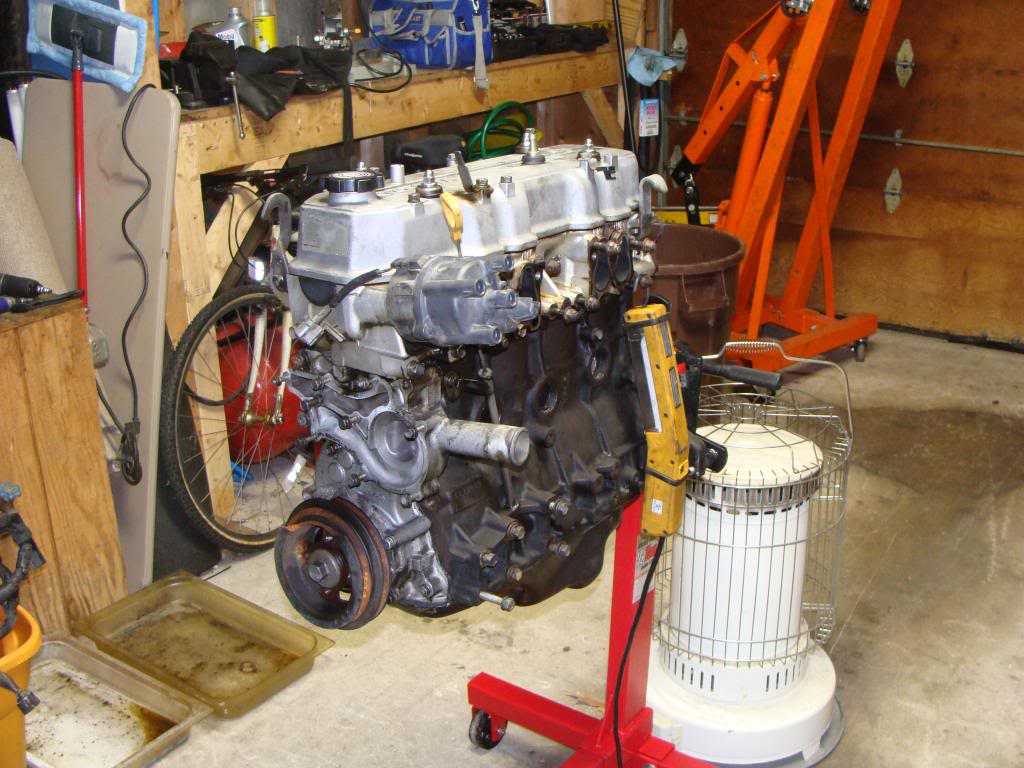
Longblock stripped down and degreased:
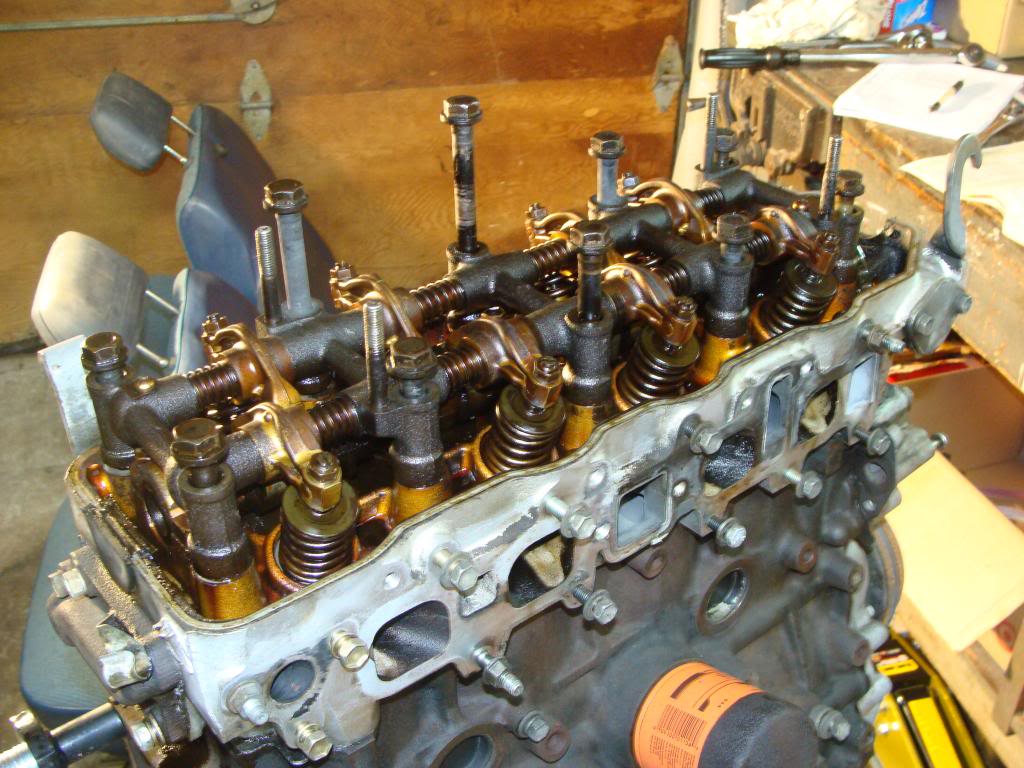
I just did a leakdown check on it, and they're all acceptable; seems like the exhaust valves are leaking a little on #2,3,4. I planned on replacing all the gaskets anyways, so while I have the head off I'll clean everything up and see if I can get it to seal. I might also be able to salvage the head off the engine that's still in the truck, if it's not all beat up. If I can't get either to pass a pressure test, not sure what I'm going to do. I know that everyone loves just buying a pre-assembled head from Engnbldr, but on a shoe-string budget, a $400+ head isn't going to happen.
So, on to the questions:
1) Are the blocks and heads identical through all years of the second gen (85+) 22R/RE? Can anyone think of any reason I won't be able to bolt my carb'ed manifold onto this longblock once I've got it back together, and run it?
2) One of the spare parts I got was Cork oil pan gasket. Is there a better composite available, or is Cork still the standard? How about the head gasket? I'm used to MLS head gaskets... I have no idea what is standard on this engine. I've read Engnbldr is the place to go to for parts; does this extend to gaskets as well? I just looked on Ebay, and found what is supposedly a full gasket kit for $42. That seems beyond too good to be true, considering head gaskets alone for my GTO are nearly $200.
3) I have no doubt that the carb on this thing is going to need rebuilt. Advance Auto, which is usually my go-to shop, doesn't list a rebuild kit online for an '87 Pickup, and I didn't see one on Engnbldr's website either. Anyone want to recommend to me a place to get a decent carb rebuild kit?
That's it for now. I'll post more questions as I can think of them.
I posted about a year ago that I had scored a free '87 Pickup with a blown 22R. due to extenuating circumstances, I never got around to fixing it, and now I'm about to move in two months, so I've got to get the truck running to get it out of my backyard. So this is a synopsis of where I'm at.
While transporting the truck last year, there were a lot of spare parts sitting on the bench seat, including two bottles of gear oil, which tipped over and soaked through the bench and into the floor. I didn't noticed for at least a month. So the first order of business now that I'm working on it, was to gut the interior and start ridding it of the horrid gear oil smell.
I snagged a better bench seat semi-locally for $50
The truck clearly has at least 1 spun rod bearing, and I started to do a compression check, but have no compression on cylinders 1 or 2, so I quit after that. Being on a tight time crunch, and in the interest of saving money for now, I decided to snag a junkyard motor that supposedly is good.
Cue $845 JY motor, 1994 22RE with 160k miles:
I toyed with the idea of 22R -> RE conversion, but after seeing how primitive this fuel injection is, have canned that idea. If I convert to fuel injection, it'll be later on with an engine swap. If I keep this truck, this weak little 22R isn't going to cut it.
Box of Fuel Injection junk:
Longblock stripped down and degreased:
I just did a leakdown check on it, and they're all acceptable; seems like the exhaust valves are leaking a little on #2,3,4. I planned on replacing all the gaskets anyways, so while I have the head off I'll clean everything up and see if I can get it to seal. I might also be able to salvage the head off the engine that's still in the truck, if it's not all beat up. If I can't get either to pass a pressure test, not sure what I'm going to do. I know that everyone loves just buying a pre-assembled head from Engnbldr, but on a shoe-string budget, a $400+ head isn't going to happen.
So, on to the questions:
1) Are the blocks and heads identical through all years of the second gen (85+) 22R/RE? Can anyone think of any reason I won't be able to bolt my carb'ed manifold onto this longblock once I've got it back together, and run it?
2) One of the spare parts I got was Cork oil pan gasket. Is there a better composite available, or is Cork still the standard? How about the head gasket? I'm used to MLS head gaskets... I have no idea what is standard on this engine. I've read Engnbldr is the place to go to for parts; does this extend to gaskets as well? I just looked on Ebay, and found what is supposedly a full gasket kit for $42. That seems beyond too good to be true, considering head gaskets alone for my GTO are nearly $200.
3) I have no doubt that the carb on this thing is going to need rebuilt. Advance Auto, which is usually my go-to shop, doesn't list a rebuild kit online for an '87 Pickup, and I didn't see one on Engnbldr's website either. Anyone want to recommend to me a place to get a decent carb rebuild kit?
That's it for now. I'll post more questions as I can think of them.
Last edited by slimbobaggins; 03-02-2014 at 08:22 PM.
 03-03-2014, 01:13 AM
#2
Super Moderator
Staff
iTrader: (1)
Join Date: Aug 2008
Location: Anderson Missouri
Posts: 11,788
Likes: 0
Received 21 Likes
on
19 Posts
85 and up the blocks and heads are the same and will interchange. You will need a mechanical fuel pump on the very front of the head on the passenger side of the head. Not sure what you will need to make the fuel lines and system work using a fuel injected tank.
Toyota sells a black sealant that works best for the oil pan, you could use the gasket if you wanted to. I don't care for cork myself. Seems to leak as it ages in my opinion.
Get a head gasket from Toyota or Engine builder.
No suggestions on where to get a rebuild kit. If you are going to have it rebuilt, and depending on cost, check into a Webber Carb.
03-03-2014, 03:45 AM
#3
Registered User
Thread Starter
85 and up the blocks and heads are the same and will interchange. You will need a mechanical fuel pump on the very front of the head on the passenger side of the head. Not sure what you will need to make the fuel lines and system work using a fuel injected tank.
Toyota sells a black sealant that works best for the oil pan, you could use the gasket if you wanted to. I don't care for cork myself. Seems to leak as it ages in my opinion.
Get a head gasket from Toyota or Engine builder.
No suggestions on where to get a rebuild kit. If you are going to have it rebuilt, and depending on cost, check into a Webber Carb.
Toyota sells a black sealant that works best for the oil pan, you could use the gasket if you wanted to. I don't care for cork myself. Seems to leak as it ages in my opinion.
Get a head gasket from Toyota or Engine builder.
No suggestions on where to get a rebuild kit. If you are going to have it rebuilt, and depending on cost, check into a Webber Carb.
I did look at Weber Carbs last night after I posted this. At $300+, Ill only go that route if this carb is shot. Last time I rebuilt a carb, and its been about 11 years, a rebuild kit was about $25. Much better than $300+, on a shoestring budget.
Thanks for the suggestion on the oil pan gasket. Im very leery of the cork... will talk to engnbldr about other options
Last edited by slimbobaggins; 03-03-2014 at 03:48 AM.
03-03-2014, 06:11 AM
#4
Registered User

Deff rebuild your carb, it will save you a lot of hassle in the long run. The weber 32/36 is only 1 cfm bigger than the stock carb so unless you go with the 38/38 you will not see a performance upgrade.
You can buy a rebuild kit here:
http://www.lceperformance.com/Carbur...-p/1031001.htm
If you do plan on fuel injecting the truck down the road save all your fuel injection parts. I would recomend a megasquiet fuel/ignition controler then use the stock 22re intake manifold. Maybe add a edis ignition setup from a Ford and you will have a very smooth running engine.
03-03-2014, 11:02 AM
#5
Registered User
Thread Starter
Thanks for the link to the rebuild kit... that's more in line with the price I'm looking to spend. I'm definitely going to rebuild it now. I also found a link on pirate with a lot of detail pics on the stock carb.
I guess I'll hang on to the EFI parts for now. If I was going to do a swap down the road with an EFI engine I planned on megasquirt, but maybe I'll do it on the 22R first just to get some experience of an EFI conversion without having to worry about all the other complications of a motor swap.
I guess I'll hang on to the EFI parts for now. If I was going to do a swap down the road with an EFI engine I planned on megasquirt, but maybe I'll do it on the 22R first just to get some experience of an EFI conversion without having to worry about all the other complications of a motor swap.
03-03-2014, 04:54 PM
#6
Registered User
Thread Starter
The inside of this 22RE is pretty dirty and varnished. Apparently the previous owner didn't believe in frequent oil changes.
A couple of head bolts were very difficult to back out. I was removing them per the sequence in the haynes manual, 1/4 turn at a time, and most loosed up, but a few never got hand tight.
Well, I didn't notice until much too late, it appears they were lopsidedly dragging the rocker assembly up with them, so now it's jammed on the locating dowels. Not sure yet how I'm going to go about fixing this. The head has no more clamping force on the block, only the front cover is holding it on. I don't want to pry too much, but I'm afraid if I tap the driver's side back down with a mallet, that it'll make the situation worse rather than easier.
You can see the gap on the left:
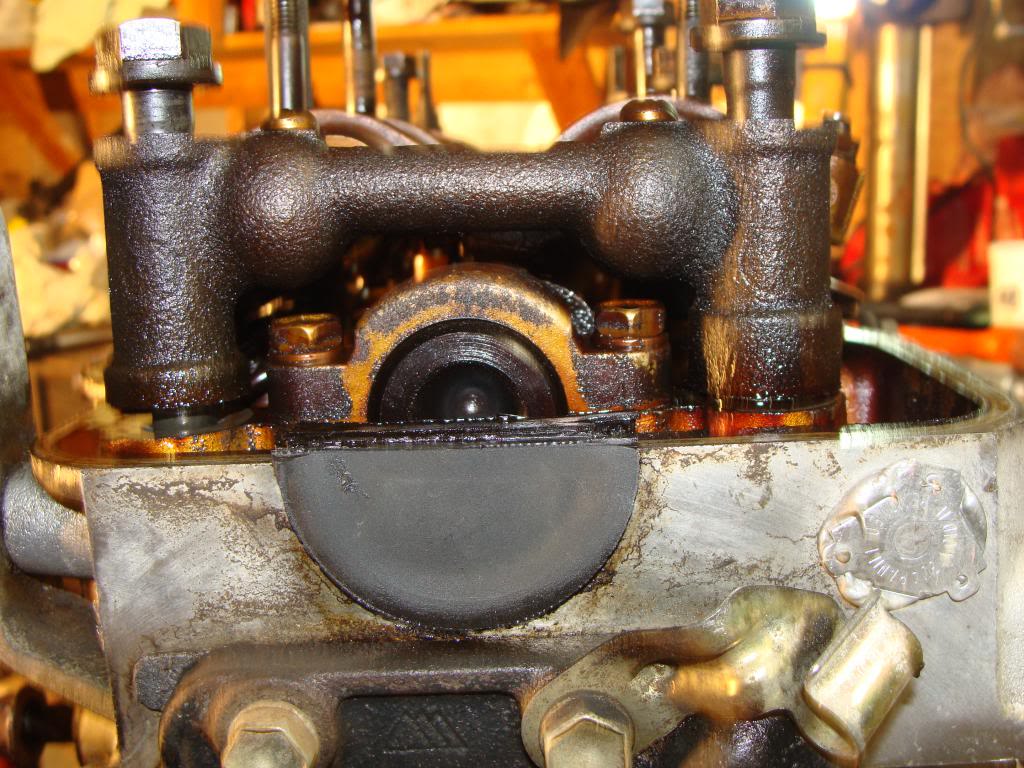
03-03-2014, 05:18 PM
#7
Registered User
Thread Starter
So that ended up not being a big deal... took one of my smaller flat heads, did a little intelligent prying and tapping with a mallet, and got it off.
22RE -> 22R question:
While pulling off the cam sprocket, I saw in the Haynes where it referenced there being some sort of driver behind the distro gear, that drives the mechanical fuel pump. Obviously this being an EFI engine, it doesn't have it, so I know before I complete assembly I have to rob it off of my 22R that's still in my truck. Can anyone think of any other engine internals that I might need to swap over, off the top of their head?
Trending Topics
03-04-2014, 06:52 PM
#8
Registered User
Thread Starter
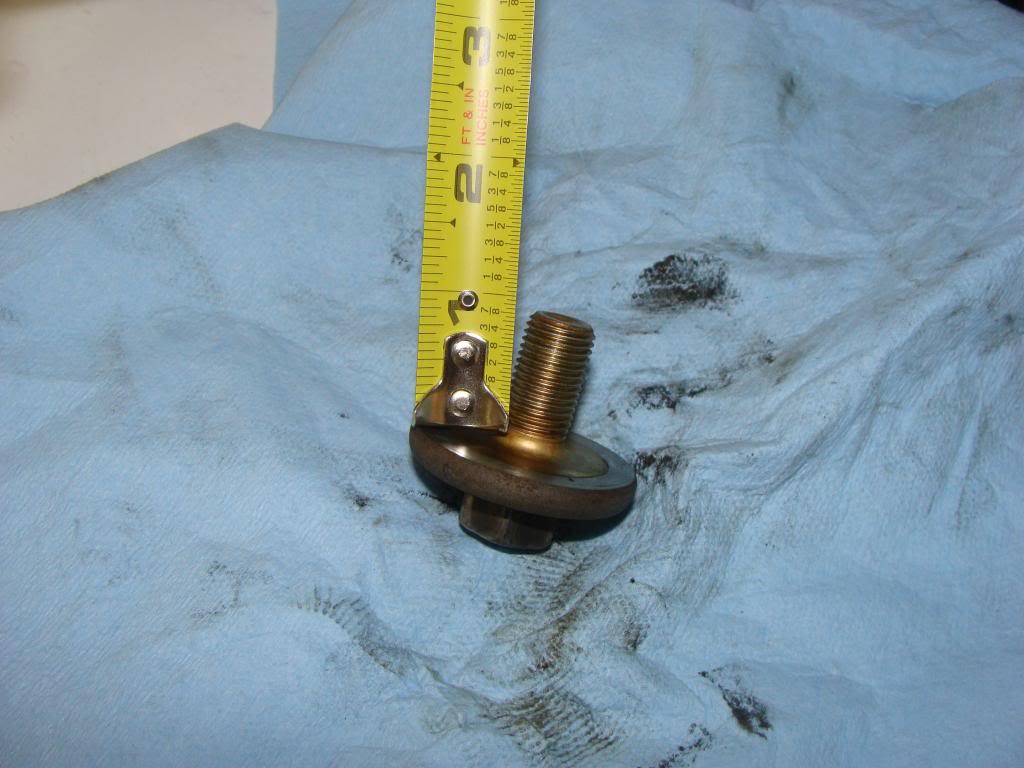
Sheared off a 3/8" drive torque wrench last night trying to get the crank pulley bolt off (it was a broke torque wrench I saved to use as a breaker bar). Picked up a 1/2" breaker bar from Harbor Freight today for $9.80 including tax... still couldn't get the bolt loose. This after I attempted with two separate impact guns with my compressor turned all the way up.
Ended up putting a 4' long cheater bar on the 25" breaker bar, had to have my brother stand on the engine stand to keep it from flipping over, finally the bolt came loose. I thought at first it had broke, because what came out of the crank is only about 1 inch long, but I looked in the crank and don't see any other pieces in there.
Is this all of it? Seems short to me:
Of course I'm an idiot and forgot to rent a pulley puller, so I'm still stuck on the front cover for tonight.
03-06-2014, 08:16 PM
#9
Registered User
Thread Starter
Well, this engine might be done.
Finally got the crank pulley/ front cover off tonight so that I could un-bind the chain enough to rotate the motor completely, and found this in number 4:
The left line is deep enough that I can catch the edge of my nail on it.
Not sure where I'm going to go from here. Send this and a few other pics to a machinist for his opinion. Since I'm on a time crunch I was really trying to avoid a rebuild, hence buying a running engine from the junk yard. Once I've got the machinist's opinion I'm going to go to the yard and discuss it with them. They supposedly have a 30 day warranty on their engines, but you never want to actually have to count on them to do the right thing.
Last edited by slimbobaggins; 03-11-2014 at 12:12 PM.
03-07-2014, 02:44 AM
#10
Super Moderator
Staff
iTrader: (1)
Join Date: Aug 2008
Location: Anderson Missouri
Posts: 11,788
Likes: 0
Received 21 Likes
on
19 Posts
You just need the cam lobe off of your 22r to drive the fuel pump this motor. The crankshaft bolt is a pain to get off. I use the starter to remove it.
Ouch on the groove. Not looking to good.
Ouch on the groove. Not looking to good.
03-07-2014, 11:04 AM
#11
Registered User
Thread Starter
Thanks for the reply. Plan to start stripping out the original motor tomorrow.
The guys at work are telling me to hone that cylinder, put new rings on the piston, and run it.
The guys at work are telling me to hone that cylinder, put new rings on the piston, and run it.
03-11-2014, 12:15 PM
#12
Registered User
Thread Starter
So I didn't get any work done this past weekend because I have been laid up sick with a cold since Friday night/Sat morning.
I emailed Tod/Ted at Engnbldr with pics of the cylinder, and have decided that I'm going to hone the cylinders and re-ring them. Won't seal perfect but hopefully it'll help.
So yeah... bought a junkyard engine because I didn't want to do a rebuild... and now I'm basically doing a rebuild.
Talked to the junkyard yesterday, and they did give me $100 back on the purchase price to cover the cost of rings and bearings, so I'm happy about that.
Hopefully I'll start feeling better tomorrow and will resume work on the engine. Still have to place an order with Engnbldr for most of the stuff, bought a couple things off Amazon already.
03-11-2014, 04:49 PM
#13
Registered User

Join Date: Feb 2014
Posts: 58
Likes: 0
Received 0 Likes
on
0 Posts
That scratch in your cylinder wall is negligible. Your not going to notice much if any in the way of it running and will probably continue to run fine for another 100k before the scoring affects the compression to much. I wouldnt even worry about it unless I was doing a performance build.
03-12-2014, 03:32 AM
#14
Registered User
Thread Starter
That scratch in your cylinder wall is negligible. Your not going to notice much if any in the way of it running and will probably continue to run fine for another 100k before the scoring affects the compression to much. I wouldnt even worry about it unless I was doing a performance build.
That said, considering I have no prior experience doing this kind of work to an engine (I've never messed with the rotating assembly prior to now), I'm well aware that I could potentially make what might be a minor problem a lot worse. I'm researching honing and the different types of hones available right now.
I am still really debating whether I should bother or not, because I'll be twice as mad at myself if I hone and re-ring the cylinders, and then have a bunch of problems.
Last edited by slimbobaggins; 03-12-2014 at 03:34 AM.
03-14-2014, 07:42 AM
#15
Registered User
Thread Starter
After a couple days of debating, and pricing machine work in my area, Ive decided to just clean everything up and put it back together as-is for now, and deal with rebuilding it later once Ive moved. If my block that's in the truck right now is salvageable, then Ill bore it out and build it on the stand, swap it in in place of this engine, and sell this one as a rebuildable core.
So, I ordered engnbldr's overhaul kit off ebay, ordered a carb rebuild kit, and four more M12 x 1.25 x 80mm bolts from fastenal so I can pull the existing motor, put it on a stand next to this one, and swap over whatever I need to, prior to reinstall.
I spent last night cleaning up the head gasket surface and cleaning carbon off the pistons, and oiled it all so it doesnt rust.
Tonight I'll clean up the front cover and oil pan surfaces, and the cover itself. Despite the plastic guide being broken, there isnt much wear on the front cover from the chain, so Ill probably reuse it.
Still have to clean up the head and its parts, including lapping the valves in to eliminate the sealing problems that I had.
04-21-2014, 05:32 PM
#16
Registered User
Thread Starter
Okay, so over a month later, the old engine is out and on a stand, and I'm about ready to reassemble the "new" one and throw it in the truck.
A work schedule from hell + a few funerals + life in general has really held things up.
I'm looking over all the parts I have, and I cannot for the life of me figure out where the blue metal rings from the gasket kit belong. In my travels disassembling the junkyard engine, I did not come across anything like this. Can someone identify these for me? I don't really want to reassemble the engine without knowing, I don't want to forget something and have to take things back apart.
Blue rings ^ What are they?
05-18-2014, 06:50 AM
#18
Registered User
Thread Starter
Havent updated this in a while (had a couple spin off threads), but the motor is back in as of midnight last night. Didnt rebuild the carb (yet) because of time constraints with moving. Probably not even going to try and fire it up, just get everything back on so that it can be towed... Which is what I was trying to avoid, but today is my last day to work on it.

Thread
Thread Starter
Forum
Replies
Last Post
87blyota
86-95 Trucks & 4Runners
6
07-01-2015 05:26 PM
PureTacoma_Tundra
PureTacoma_Tundra
0
06-29-2015 09:45 AM


