
Philbert's 87 4runner W56 tranny swap/build thread
 01-06-2012, 02:06 PM
#21
Registered User
Thread Starter
iTrader: (2)
Join Date: Dec 2009
Location: Pleasanton, CA - SF Bay Area
Posts: 2,159
Likes: 0
Received 7 Likes
on
5 Posts
Thanks again - yes, that is exactly what the kit comes with. The donor tranny has a fork and clips already, so I think I can just put the new bearing on there and not worry about pulling off the old one?
The photo is at an angle, so maybe it's not scored imperfectly. I will have to check. Should there not be scoring/wear like that at all if it's put together right?
I'll take better photos of it when I tear it down later.
What should I look for on the flywheel to know if it needs resurfaced?
The photo is at an angle, so maybe it's not scored imperfectly. I will have to check. Should there not be scoring/wear like that at all if it's put together right?
I'll take better photos of it when I tear it down later.
What should I look for on the flywheel to know if it needs resurfaced?
 01-06-2012, 02:27 PM
#22
Contributing Member
I would go ahead and resurface the flywheel and everything will be like new. Are you going to replace the front transmission seal? I put one of those transmissions in with a floor jack last year and it is definetly a two man job. If you want, I would be happy to come up from San Jose when you are ready, and give you a hand.
01-06-2012, 03:43 PM
#23
Registered User
Thread Starter
iTrader: (2)
Join Date: Dec 2009
Location: Pleasanton, CA - SF Bay Area
Posts: 2,159
Likes: 0
Received 7 Likes
on
5 Posts
I would go ahead and resurface the flywheel and everything will be like new. Are you going to replace the front transmission seal? I put one of those transmissions in with a floor jack last year and it is definetly a two man job. If you want, I would be happy to come up from San Jose when you are ready, and give you a hand.
Thanks a ton for the offer to help - I may just take you up on that in the coming few weeks when I get to this point
 I'd really like to use a transmission jack so I have more control over the angle, but coming up empty asking folks here at work.
Most auto shops offer resurfacing right - like Kragen/Autozone?
01-06-2012, 04:30 PM
#24
Contributing Member
I don't know if the trany seal is necessary. My install was the last step of an engine install and I did not replace mine, but I am curios what other members think about doing the trany seal.
A good auto store will do the flywheel.
Every transmission that I have ever installed I did with a floor jack no problem. Those were all different vehicles. On my 4runner it was a major PIA to get things lined up. We used a combination of an engine hoist and the floor jack to get things just right. Otherwise it is a pretty simple job. It might be worth renting a transmission jack for a day.
Last edited by Buck87; 01-06-2012 at 04:42 PM.
01-06-2012, 05:51 PM
#25
Registered User
Join Date: Mar 2008
Location: Temecula Valley, CA
Posts: 12,723
Likes: 0
Received 4 Likes
on
4 Posts
There's a "carrier" for the release bearing. The bearing is "press" fit on to the carrier and that is what's "clipped" to the release fork. Some models have the carrier simple spring clipped and others may have a pin that holds it to the fork. Sorry to be ambiguous but I don't have photos or such to illustrate what I mean.
01-06-2012, 09:04 PM
#26
Contributing Member
There's a "carrier" for the release bearing. The bearing is "press" fit on to the carrier and that is what's "clipped" to the release fork. Some models have the carrier simple spring clipped and others may have a pin that holds it to the fork. Sorry to be ambiguous but I don't have photos or such to illustrate what I mean.


 01-07-2012, 08:21 AM
#28
Contributing Member
1987 throw out berring
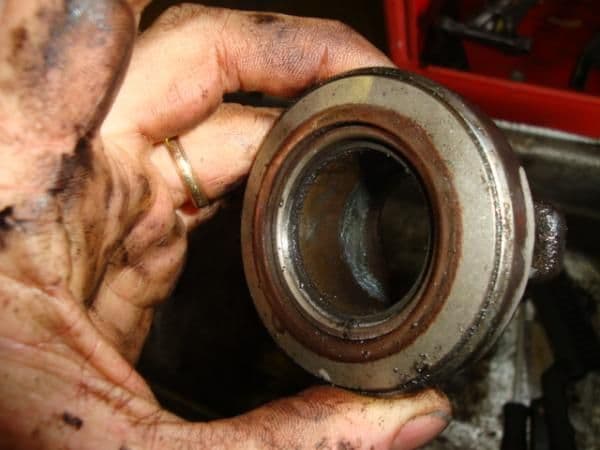
Berring must be pressed into this carrier. I used a bench vice and sockets.

The retainer clip
The clip installed into the fork
I am aware that ther are other styles of retainers. This is what is on my '87 SR5 4runner, 22re.
Berring must be pressed into this carrier. I used a bench vice and sockets.
The retainer clip
The clip installed into the fork
I am aware that ther are other styles of retainers. This is what is on my '87 SR5 4runner, 22re.
Last edited by Buck87; 01-07-2012 at 08:23 AM.
 Hey Fat Man Little Truck,
01-08-2012, 02:26 AM
Hey Fat Man Little Truck,
01-08-2012, 02:26 AM
#30
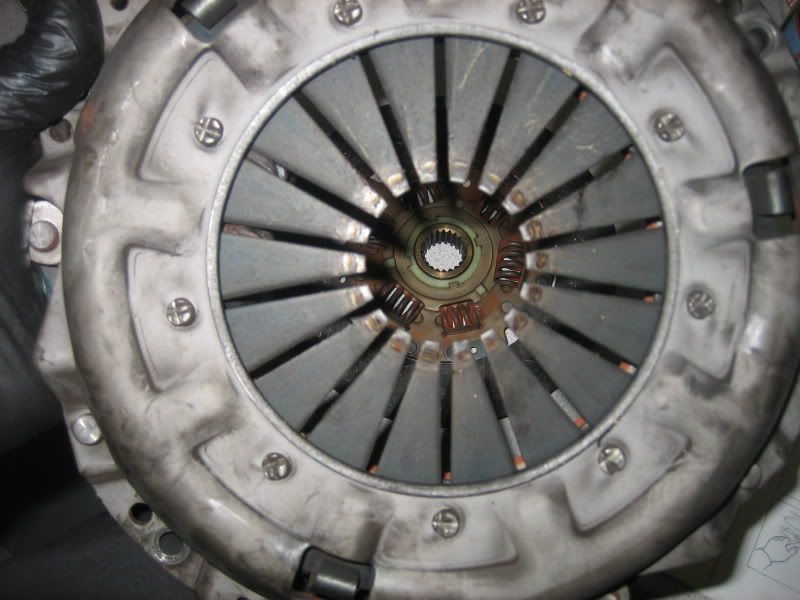
Is it me or does that lok like a lot of white grease on that shaft?
I'm wondering if too much grease was used and you disk is lubrcated now?
Do you have clutch dust or is it greasy little balls / black grease paint on everything?
It looks like grease is even on the bellhousing too.
I would the seal regardless along with all the others, since that clutch is supposed to be dry.
01-08-2012, 04:02 PM
#31
Registered User
Thread Starter
iTrader: (2)
Join Date: Dec 2009
Location: Pleasanton, CA - SF Bay Area
Posts: 2,159
Likes: 0
Received 7 Likes
on
5 Posts
Thanks guys for all the comments, please keep them coming as I progress on this 
The clutch didn't seem to have any oil on it or marring. There was a lot of that white grease you saw in the photos, like Skypilot said.
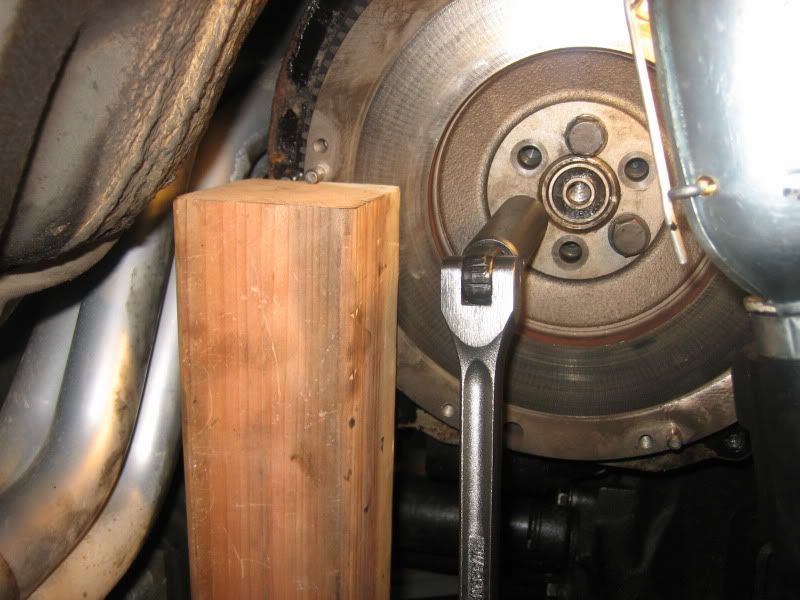
I got the clutch, pressure plate, and flywheel off last night. The flywheel was a B**** to get off, since the crankshaft rotates as you try to break the bolts. I used a 90 PSI POS Craftsman impact wrench and brok 5 of 6 bolts loose. I was getting really scared on the 6th because it was starting to round a little. Finally broke with an 18" breaker bar, and was blocking the flywheel's rotation with some stacked 4x4 wood blocks under one of the metal dowels in the flywheel.
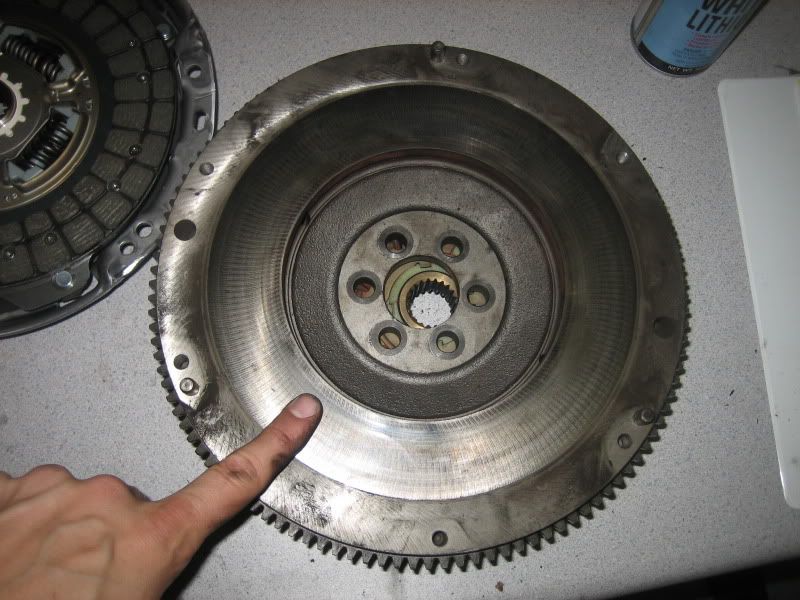
That said, the flywheel seems to be in good shape - I ran my fingers over it and it seems uniformly smooth - is that enough or should I get it resurfaced anyway?
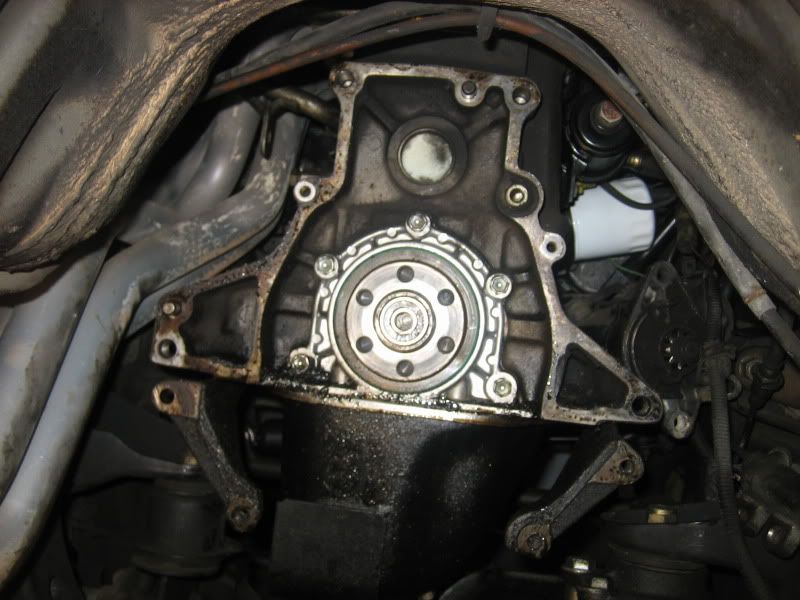
Now, next up will be the rear main seal, but the FSM seems a little lacking in addressing how to do this. I also need to remove the pilot bearing (new one is in the clutch kit). Any of you guys done this and can recommend the next steps? Rear main looks pretty simple - just remove the 5 bolts, take off the metal housing, then use a pick/small flathead (carefully!) to pry the old seal off and reverse? I also have a thin metal sleeve for the crank, should there be any marring. Looking at it, I can't figure out how to remove the 6 bolt housing that the flywheel mounted to - seems larger than the crank would be? While I'm in there, I'm also going to put some more FIPG on the back of the oil pan, since I do get some leaks from there and it's hard to get to otherwise.
Would love your input/advice on this guys!
Phil
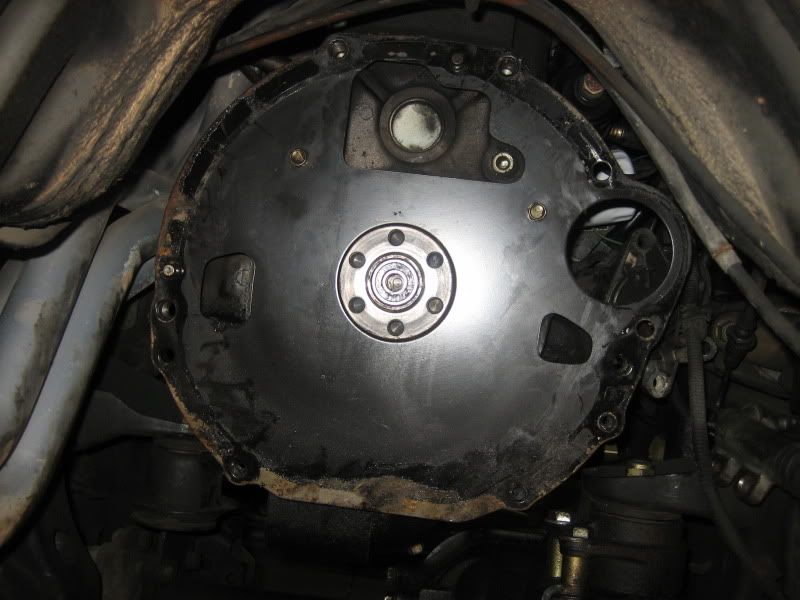
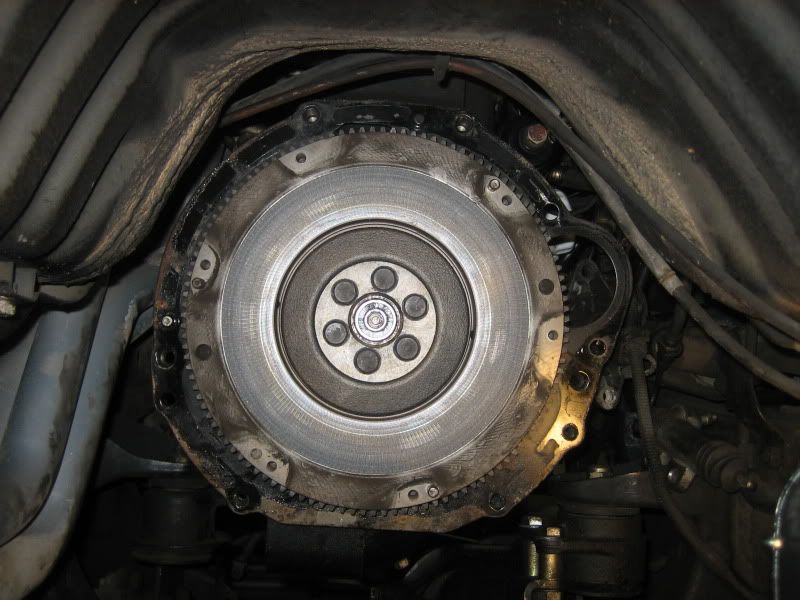
The flywheel...look ok to you guys?
The current leaky oil situation where the oil pan meets the block:
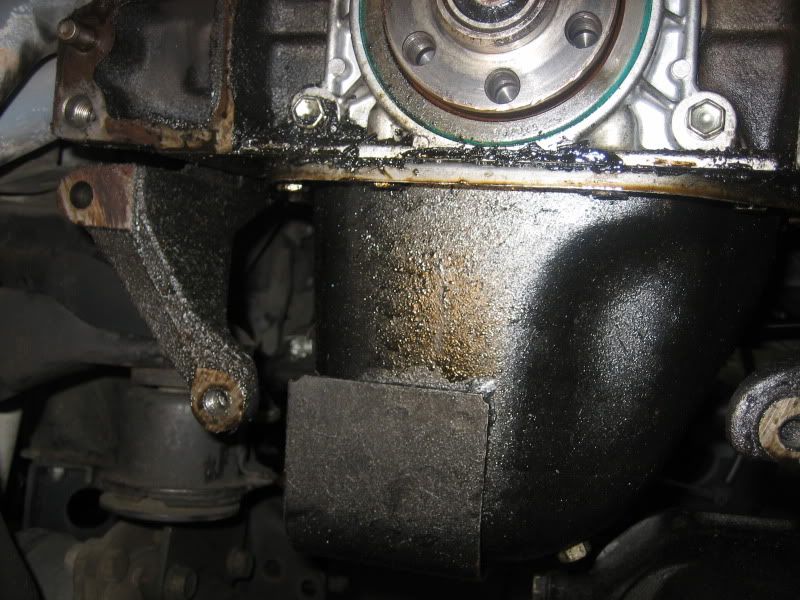
YUCK!
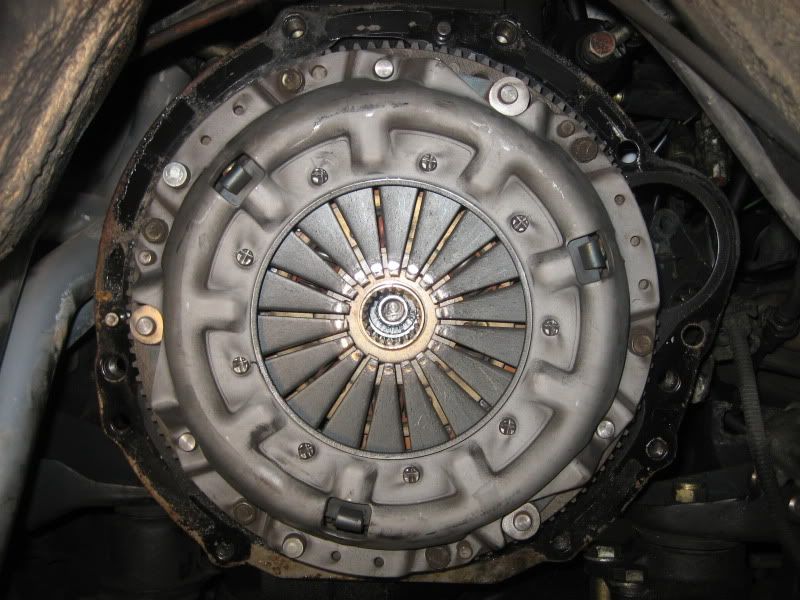
How I got that last bolt loose (other two are finger tight to hold the flywheel in place):
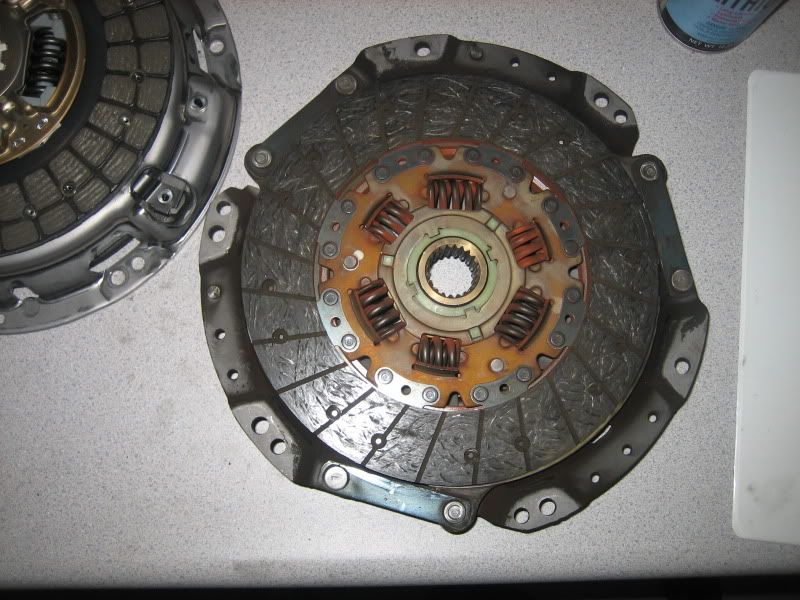
Better photo of the old pressure plate and the marks on the fingers:
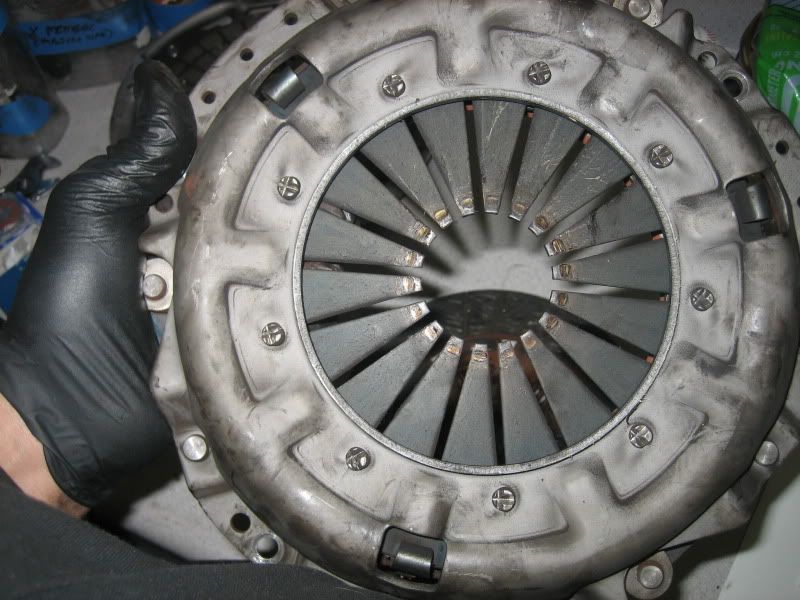
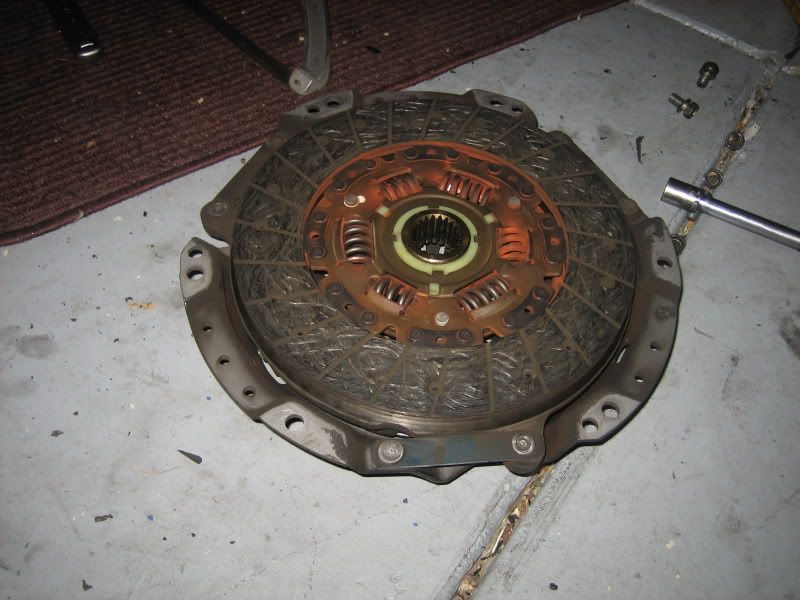
Old clutch and pressure plate (those marks looks normal?):
The flywheel before the impact wrench came out:
The pressure plate before coming off. This is a more "head on" shot to show the symmetry of the wear on the ends of the fingers:
The clutch didn't seem to have any oil on it or marring. There was a lot of that white grease you saw in the photos, like Skypilot said.
I got the clutch, pressure plate, and flywheel off last night. The flywheel was a B**** to get off, since the crankshaft rotates as you try to break the bolts. I used a 90 PSI POS Craftsman impact wrench and brok 5 of 6 bolts loose. I was getting really scared on the 6th because it was starting to round a little. Finally broke with an 18" breaker bar, and was blocking the flywheel's rotation with some stacked 4x4 wood blocks under one of the metal dowels in the flywheel.
That said, the flywheel seems to be in good shape - I ran my fingers over it and it seems uniformly smooth - is that enough or should I get it resurfaced anyway?
Now, next up will be the rear main seal, but the FSM seems a little lacking in addressing how to do this. I also need to remove the pilot bearing (new one is in the clutch kit). Any of you guys done this and can recommend the next steps? Rear main looks pretty simple - just remove the 5 bolts, take off the metal housing, then use a pick/small flathead (carefully!) to pry the old seal off and reverse? I also have a thin metal sleeve for the crank, should there be any marring. Looking at it, I can't figure out how to remove the 6 bolt housing that the flywheel mounted to - seems larger than the crank would be? While I'm in there, I'm also going to put some more FIPG on the back of the oil pan, since I do get some leaks from there and it's hard to get to otherwise.
Would love your input/advice on this guys!
Phil
The flywheel...look ok to you guys?
The current leaky oil situation where the oil pan meets the block:
YUCK!
How I got that last bolt loose (other two are finger tight to hold the flywheel in place):
Better photo of the old pressure plate and the marks on the fingers:
Old clutch and pressure plate (those marks looks normal?):
The flywheel before the impact wrench came out:
The pressure plate before coming off. This is a more "head on" shot to show the symmetry of the wear on the ends of the fingers:
01-08-2012, 08:01 PM
#32
Contributing Member
To me everything looks good. You could probably get away with reusing it all. Not sugesting that you reuse everything but you could probably get away with reusing that flywheel the way it is. I have never put a new clutch on a used flywheel, but that one only has 20kmi right? Your call.
01-08-2012, 08:22 PM
#33
Registered User
Thread Starter
iTrader: (2)
Join Date: Dec 2009
Location: Pleasanton, CA - SF Bay Area
Posts: 2,159
Likes: 0
Received 7 Likes
on
5 Posts
To me everything looks good. You could probably get away with reusing it all. Not sugesting that you reuse everything but you could probably get away with reusing that flywheel the way it is. I have never put a new clutch on a used flywheel, but that one only has 20kmi right? Your call.
Any advice on pilot bearing or rear main seal?
01-09-2012, 04:59 AM
#34
Ok; what I see is chattering due to oil on the disk. All that white lube excess; some got on the disk. The clutch is is a very rough uneven surface which is fine, but it looks like at least half of the springs are rusted. Hit the flywheel with some 80 / 100 grit emery paper on a sander of some kind to break the glaze off. way too smooth & shiny looking for it to give good results with a new disk. When you do it you will see the uneven surface, but its Ok, thats all I did for 335k miles. be sure to degrease the whole flywheel before reassembly. I never re-use a disk, too cheap vs 10 hours labor. The pressure plate looks Ok; same deal grind the glaze off, I used the same pressure plate for 320k miles and I put in a NAPA unit (never again will I use a Chinese clutch)
What I'm wondering is if that over torqued bolt spread the oil seal surface of the crankshaft. That one bolt should never have been that tight. It doesn't look too bad but do not be surprised if you have some leakage from that area. it will not be much but nothing to cry over either. i put the flywheel bolts in with locktight blue ( never red) just a drop, no more. so you do not need to really put force into it beyond the FSM, in fact if you were a little low it would still be Ok.
Pull the pilot bearing and put in a new one, period. Go buy or rent a puller. the puller I used was abused so I had to stick a large nail between the pawls so it would hold and get the bearing out. Just wear gloves and watch your fingers.......... Tap the new one in almost all the way since the input shaft tends to get torn up over time from bouncing around inside that bearing. it gives it a little bit of a new surface farther back on the shaft. Just back out slow and careful and you will be just fine.
If you pull that plate put on a new gasket and seal. do it right, it will punish you by having to do it again, and now your twenty plus hours into the job. take your time and get it right this alligator has some bite.
01-09-2012, 08:31 AM
#35
Registered User
Thread Starter
iTrader: (2)
Join Date: Dec 2009
Location: Pleasanton, CA - SF Bay Area
Posts: 2,159
Likes: 0
Received 7 Likes
on
5 Posts
Thanks Skypilot!
Would sanding by hand with those grits get me there you think or do I really need a sander?
I'm using a new pressure plate that came with the clutch kit from TrailGear/Wabbit. I had planned to spray flywheel down with brake parts cleaner before it goes on, to keep the surfaces clean.
For the pilot bearking removal, I had seen this video last month and thought this would be a good approach, since I don't have a puller (and don't know how to use one....I've seen steering wheel pullers and actually have a set of gear pullers but never pulled a bearing before and would not know where to start with this one):
http://www.youtube.com/watch?v=1xuR7T8G1Ys
Here's my remaining question on the rear main seal....I found this entertaining video also when I found the one above and it makes sense:
http://www.youtube.com/watch?v=TPskVbX6CIQ
However, it does not address the need to replace/repair the crankshaft end if it's scored. Someone, in my other thread about the transmission noises, mentioned that I may need to re sleeve the crank when in there doing the rear main seal (Think it was OrRunner). BUT, I can't understand where I would sleeve it??? The 6 bolt part that surrounds the pilot bearing....isn't that the end of the crankshaft? That seems larger than the sleeve I bought (just in case).
Any additional input here would be appreciated - going to try out the pinion removal in the next couple days but would like to know more about the crankshaft sleeving before I do the rear main replacement.
Thanks!
Phil
01-09-2012, 08:46 AM
#36
Ok here we go
The pilot bearing, Find a socket the same size or a tad smaller and tap it out of the fly wheel, your flywheel shoud be lifted up so the bearing falls through.
Resurface your fly wheel, for $30 its worth it.
On your rear main seal HOUSING dont forget to take the two bolts out of the oil pan or the housing will not come off,(where your leaking situation is right now)
When you get the rear main off, this will expose the end of the crank, this is where you will micro sleeve the crank end to cover up the ring where oil is leaking, You will see it one the rear main and housing are off (7 bolts not 5)
01-09-2012, 08:59 AM
#38
Registered User
Thread Starter
iTrader: (2)
Join Date: Dec 2009
Location: Pleasanton, CA - SF Bay Area
Posts: 2,159
Likes: 0
Received 7 Likes
on
5 Posts
OrRunner - you were there the whole time???
That's what the first video says to do for the pilot bearing, so I will do that "soaked paper" approach - seems pretty simple.
Thanks for the tip on the oil pan bolts - that would have been frustrating!
So, when the housing for the rear main is off (and the pilot bearing is off), how do you "see" the crank? Does that 6 holed piece that the flywheel bolts to slip off somehow (and you sleeve in between that and the crank)?
I'm assuming I go in this order:
1) remove pilot bearing
2) remove rear main housing (7 bolts not 5)
3) remove/replace rear main seal in housing
4) Re sleeve crank (need to know the step before this)
5) Install newly sealed rear main housing
6) Tap in new pilot bearing with block of wood and hammer
7) install (surfaced) flywheel)
8) install clutch/pressure plate
9) install transmission
10) have a few beers
01-09-2012, 10:09 AM
#39
Yes Sir, been following the whole time, I choose not to post on most things as there seems to be a lack of OPINION when it comes to certain process. So this is MY OPINION on what to do.
In reference to your question, when you unbolt the rear main housing and pull it off (lightly pry it off) (again make sure your oil pan bolts are out) The rear main seal will come off with it. At that exact point, your crank end will be exposed, That rear main seal rides against the crank end and that is what causes the groove in the crank, thus requiring a micro sleeve. So once the rear main seal and housing is off, Clean your crank shaft end of all oil and dirt, put your micro sleeve on (it will act like it does not want to go on but little by little it will, be paitient and careful cause they will bend) then install your rear main into the rear main housing and that will slide and bolt back on over the crank which now has the micros sleeve on it
1 remove rear main seal and housing
2 remove rear main from housing, clean
3 install new rear main in housing
4 install micro sleeve on crank (clean crank end before installing micro sleeve
5 install rear main seal housing with new rear main seal over the crank end with micro sleeve on it.
6 bolt back on and continue on.
I have found that a small piece of "soft wood" like pine or what not, and a hammer with light taps, to be very useful installing the micro sleeve, also a little pertrlium jelly (very little)on the sleeve it self to help "slide" into place.
also make sure the sleeve is ALL the way on, or it will not solve the leaking issue (i dont believe it covers the groove in the crank, just makes a bigger "lip" so the rear main flushes up against it)
Hope this helps, post questions if you need more help, again this is MY OPINION
Last edited by OrRunner; 01-09-2012 at 10:12 AM.
01-09-2012, 10:15 AM
#40
Registered User
Thread Starter
iTrader: (2)
Join Date: Dec 2009
Location: Pleasanton, CA - SF Bay Area
Posts: 2,159
Likes: 0
Received 7 Likes
on
5 Posts
OrRunner, thank you so much for the details and step by step - very much appreciated
Will keep you all posted and hopefully grab some pics for others to reference in the future!
Phil
Will keep you all posted and hopefully grab some pics for others to reference in the future!
Phil


