My Gasket's Giving Me Gas! (pics/vids)
 04-23-2011, 03:27 AM
#1
Registered User
Thread Starter
Join Date: Aug 2010
Location: Willamette Valley, Oregon.
Posts: 73
Likes: 0
Received 0 Likes
on
0 Posts
My Gasket's Giving Me Gas! (pics/vids)
That's right you read it right my head gasket is giving me an ulcer!
My 1992 Toyota PU is the pride and joy of my toys but it has been dormant for about six months due to a leaky Head Gasket. The symptoms are white smoke coming from tailpipe, engine overheating, poor running. I have checked the oil and coolant and as far as I can tell there is neither in either one...lol hope that makes since.
This makes me think the leak is internal which would explain the overheating and the white smoke. I already looked for exhaust in the coolant and found what I think is good evidence that there is. I removed the thermostat from its housing allowing coolant to flow with engine cold. I then removed the radiator cap and started the engine. Immediately a constant flow of tiny bubbles appeared carrying exhaust fumes. After about five minutes of observing this the amount and size of the bubbles did not change so I shut the engine off and pushed the rig next to my place. That was last September lol.
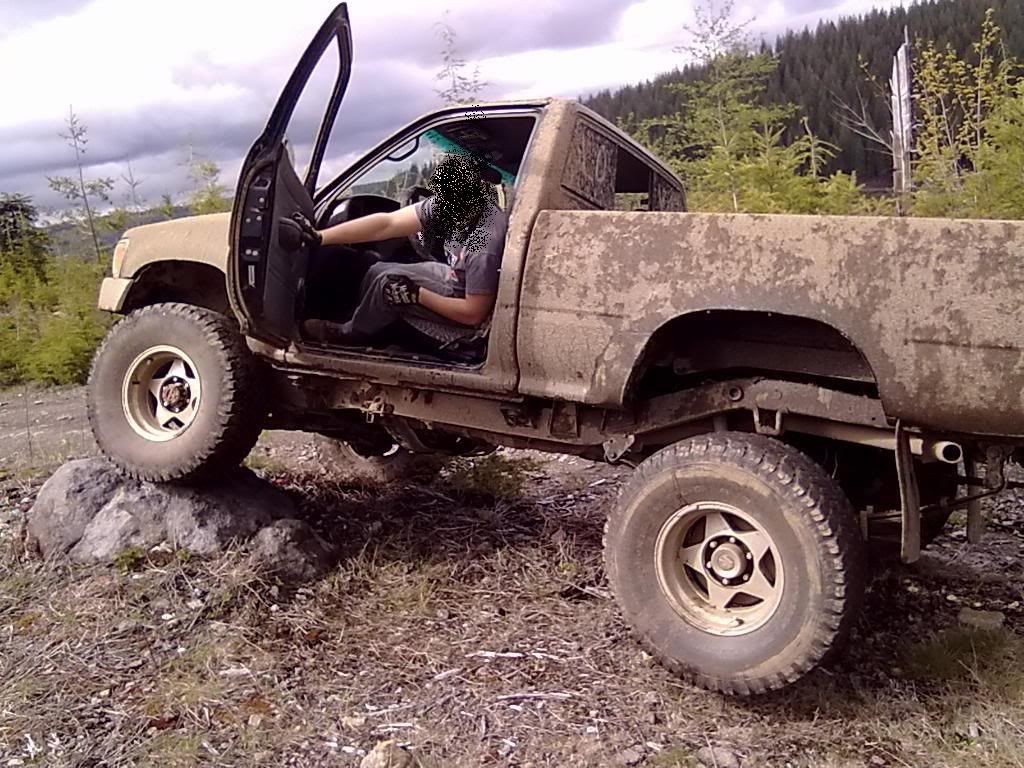
Here it is in its prime. Summer 2010
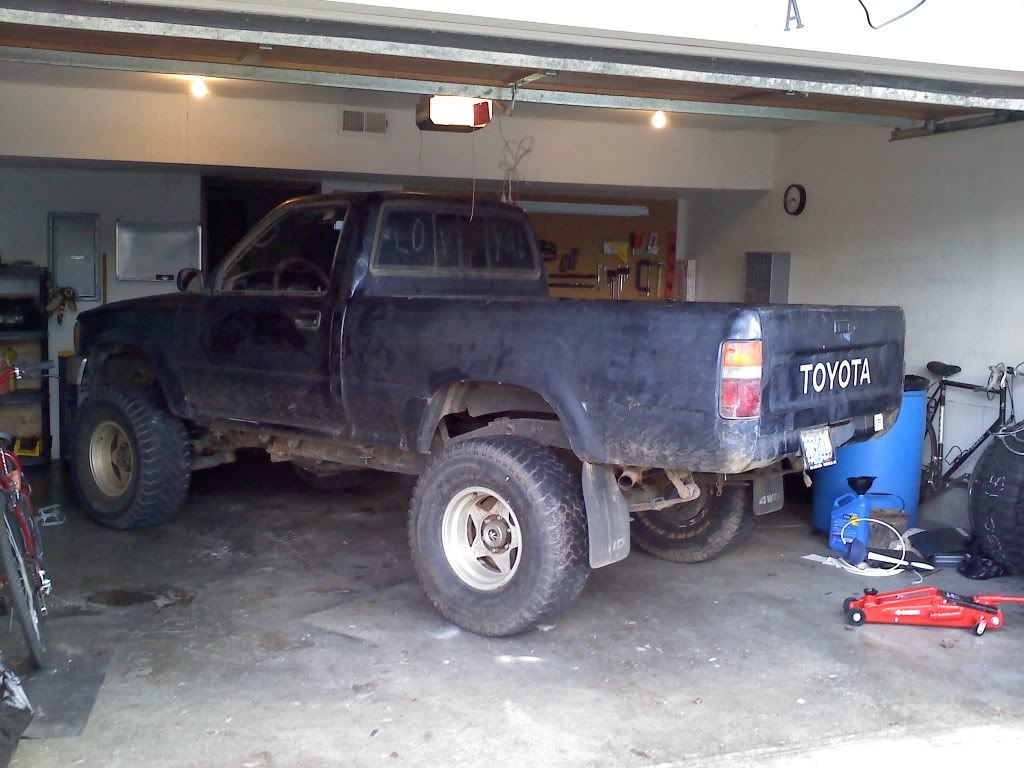
And here it sits (took this yesterday)
Time to get started I usually work until 3am so I can call my The Nocturnal Mechanic =)
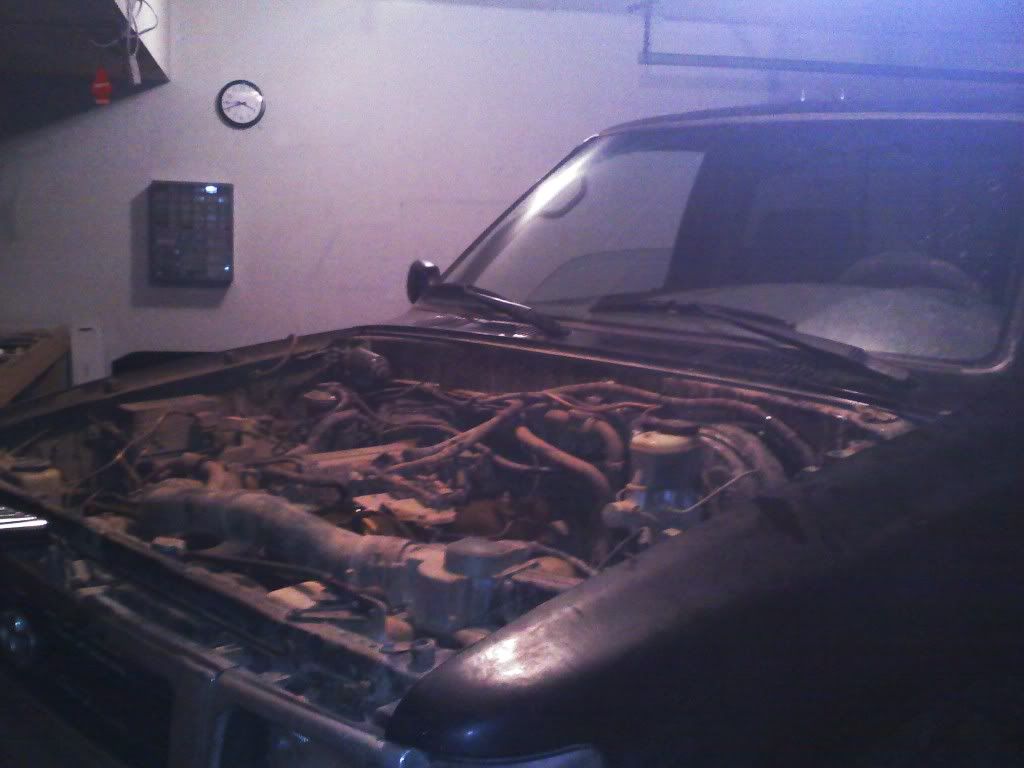
Okay so today I began the prep for the tear-down starting with the removal of the hood (super easy by myself) and a quick look over for brainstorming.
Removed hood
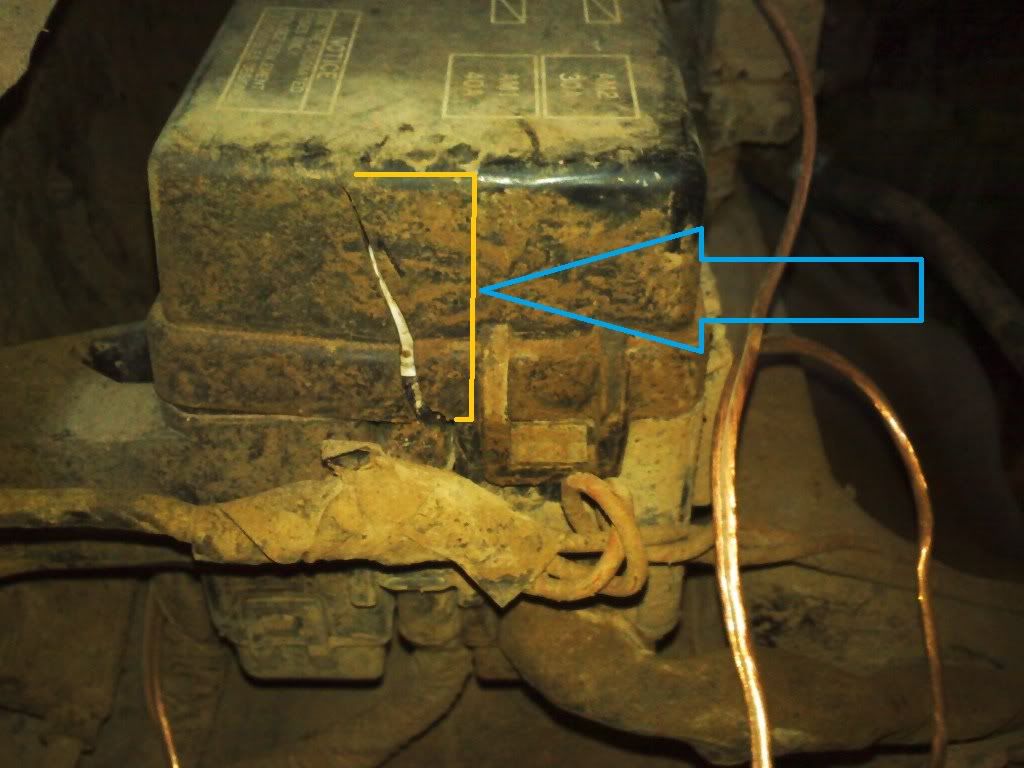
Just noticed this. A crack in my fuse block.
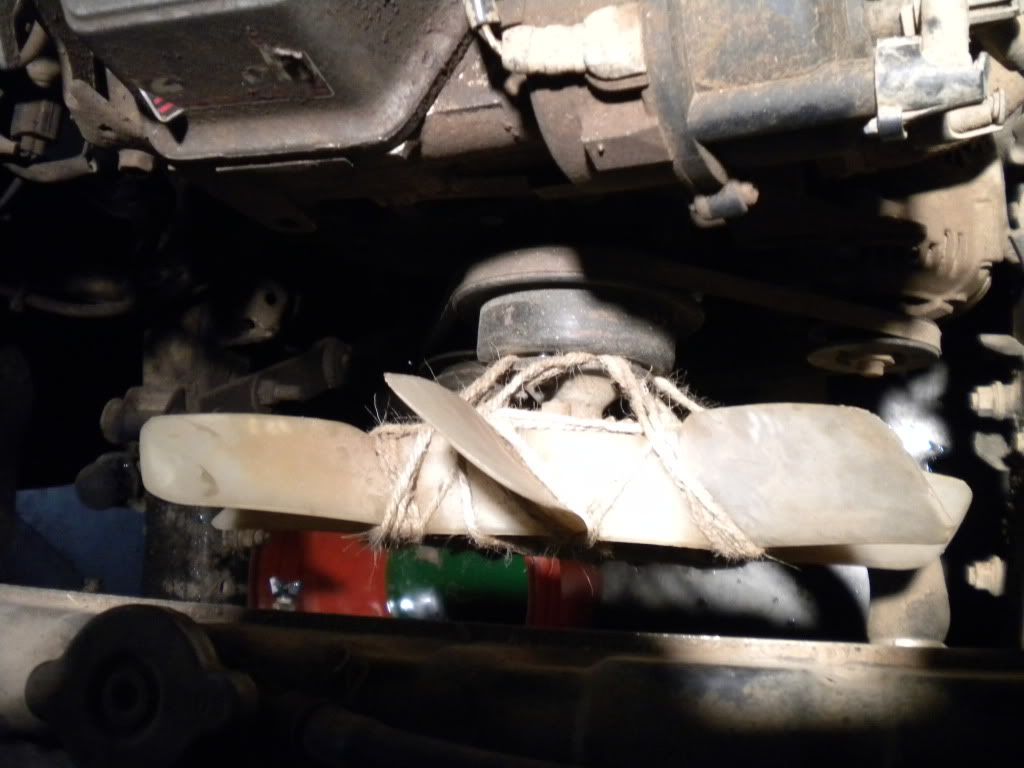
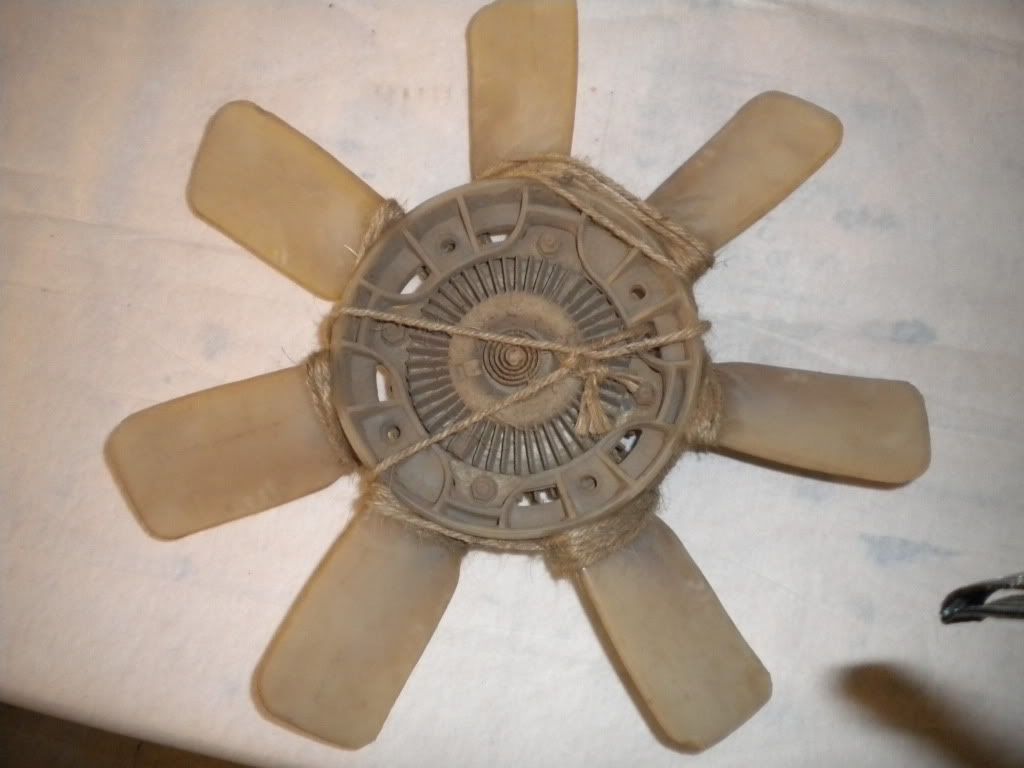
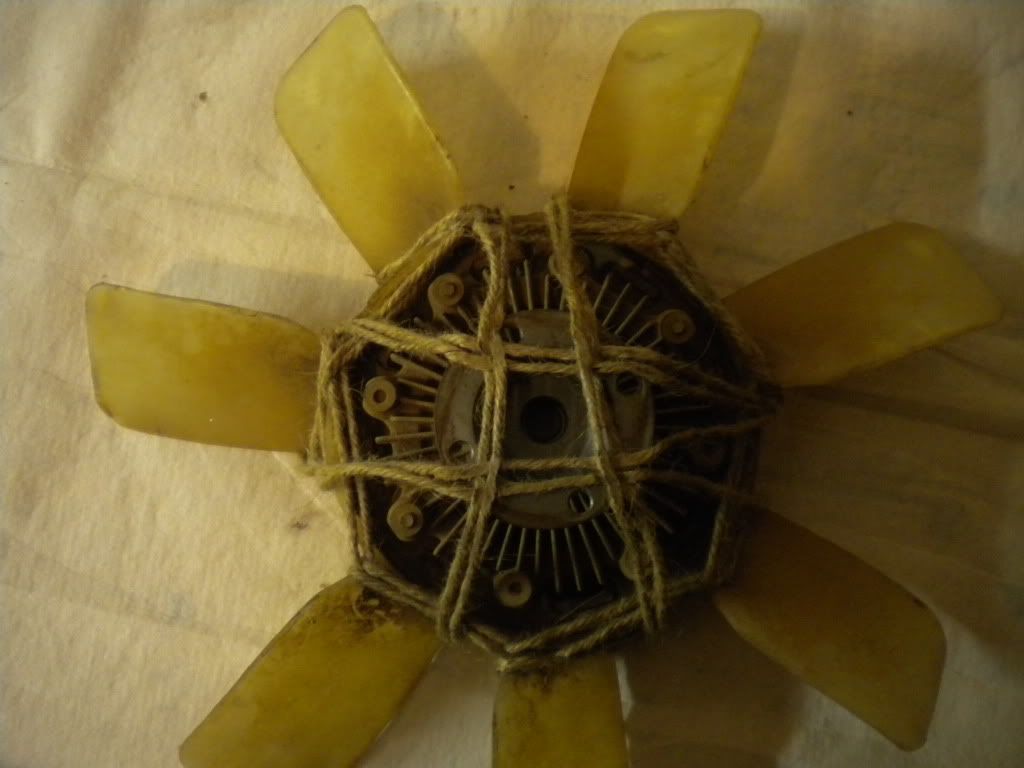
I don't have much money to throw at this project but having said that I will be replacing the clutch fan for obvious reasons haha.
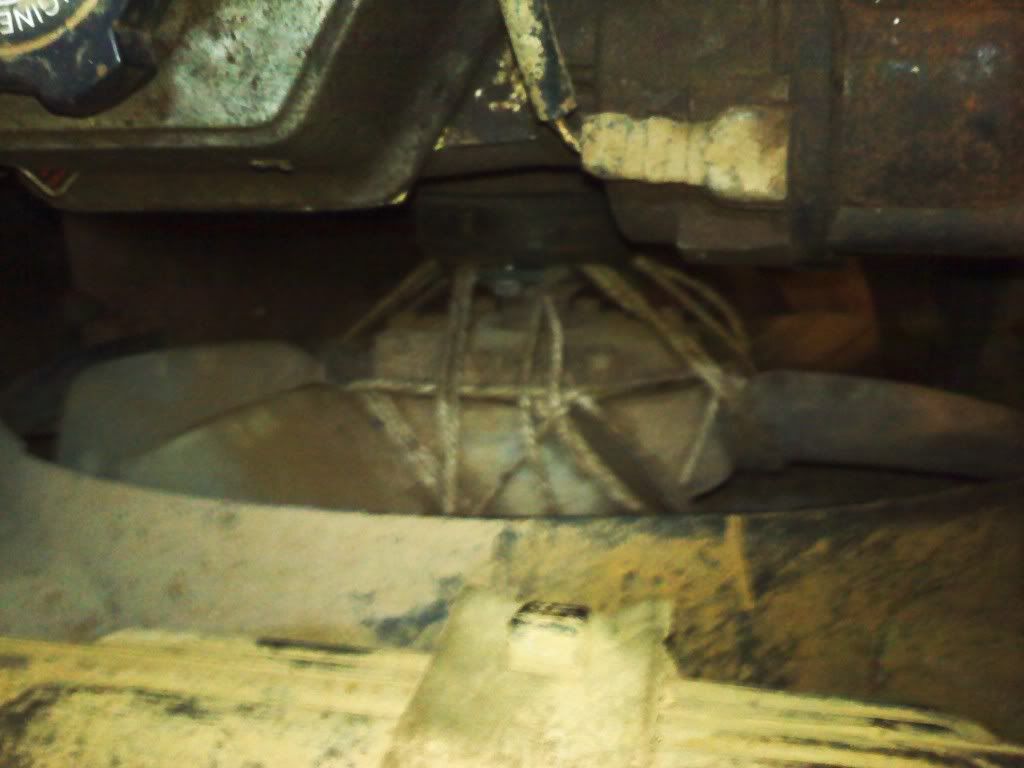
Yeah that is bailing twine holding the fan potion to the fan clutch housing. Say what you will it works great lol.
Don't laugh I already did =P
My 1992 Toyota PU is the pride and joy of my toys but it has been dormant for about six months due to a leaky Head Gasket. The symptoms are white smoke coming from tailpipe, engine overheating, poor running. I have checked the oil and coolant and as far as I can tell there is neither in either one...lol hope that makes since.
This makes me think the leak is internal which would explain the overheating and the white smoke. I already looked for exhaust in the coolant and found what I think is good evidence that there is. I removed the thermostat from its housing allowing coolant to flow with engine cold. I then removed the radiator cap and started the engine. Immediately a constant flow of tiny bubbles appeared carrying exhaust fumes. After about five minutes of observing this the amount and size of the bubbles did not change so I shut the engine off and pushed the rig next to my place. That was last September lol.
Here it is in its prime. Summer 2010
And here it sits (took this yesterday)
Time to get started I usually work until 3am so I can call my The Nocturnal Mechanic =)
Okay so today I began the prep for the tear-down starting with the removal of the hood (super easy by myself) and a quick look over for brainstorming.
Removed hood
Just noticed this. A crack in my fuse block.
I don't have much money to throw at this project but having said that I will be replacing the clutch fan for obvious reasons haha.
Yeah that is bailing twine holding the fan potion to the fan clutch housing. Say what you will it works great lol.
Don't laugh I already did =P
Last edited by MID SIZED BOSS; 04-23-2011 at 03:47 AM.
 04-23-2011, 04:07 AM
#2
Registered User
Join Date: Jan 2011
Location: Clarksville, TN / Ft. Campbell
Posts: 1,369
Likes: 0
Received 1 Like
on
1 Post
 wow
wowEverything you said makes sense. Well, maybe not the twine... Is that something you did???
Seems like there's been a recent outbreak of 22REs blowin head gaskets (or people finally getting around to replacing them) My new gaskets should be here this week so I can finally get mine put back together after having been torn apart for nearly 3 months.
04-23-2011, 04:25 AM
#3
Registered User
Thread Starter
Join Date: Aug 2010
Location: Willamette Valley, Oregon.
Posts: 73
Likes: 0
Received 0 Likes
on
0 Posts
Yeah I noticed that too in fact I just finished posting on Ohios thread about how the three of us are going through the same thing.
I did put the twine on myself. See I first noticed the overheating while cruising back from Portland on I-5 so I took the Woodburn exit and parked in the Wal-Mart lot. I checked the coolant level first thing and while staring blankly at my engine bay it hit me that I might have a clutch fan. I tried spinning it with my hand and felt no resistance at all with the engine hot so I made it solid. I bought twine from the Wal-Mart I was parked at, removed the fan pulley with my leathermen and walla! You get what you see now lol.
Worked fine for a while but after a few more trips to work and back I noticed even that wasn't keeping the engine cool which is when I found my head gasket leak =(
04-23-2011, 04:43 AM
#5
Registered User
Thread Starter
Join Date: Aug 2010
Location: Willamette Valley, Oregon.
Posts: 73
Likes: 0
Received 0 Likes
on
0 Posts
very well could be cause I skipped the compression test and decided to just dive in head first (excuse the pun). I figure as long as the block and pistons are fine I should be able to get a new head before summer gets here IF it is warped/cracked. Or it's not that bad of a warp perhaps machine it flat again...only time will tell.
04-23-2011, 04:50 AM
#6
Registered User
Join Date: Jan 2011
Location: Clarksville, TN / Ft. Campbell
Posts: 1,369
Likes: 0
Received 1 Like
on
1 Post
OK this is officially weird. I swear I'm talking to myself lol
I skipped the pressure test and compression test and, like you, dove in head first and started tearing it apart. I was just going to get a new head from engnbldr with new everything in it, but funds don't permit.
I skipped the pressure test and compression test and, like you, dove in head first and started tearing it apart. I was just going to get a new head from engnbldr with new everything in it, but funds don't permit.
04-23-2011, 04:59 AM
#7
Registered User
Thread Starter
Join Date: Aug 2010
Location: Willamette Valley, Oregon.
Posts: 73
Likes: 0
Received 0 Likes
on
0 Posts
ditto man I got better things to spend my cash on for the time being but with summer fast approaching I will be peeved if I can't make it to the mountains! Okay no more warped/cracked head talk...no need to scare myself yet lol.
With that said it's time for me to get started on today's tear down. I will post pics and vids of my progress tonight or first thing tomorrow.
Thanks l8tr.
With that said it's time for me to get started on today's tear down. I will post pics and vids of my progress tonight or first thing tomorrow.
Thanks l8tr.
Trending Topics
04-23-2011, 05:02 AM
#8
Registered User
Join Date: Jan 2011
Location: Clarksville, TN / Ft. Campbell
Posts: 1,369
Likes: 0
Received 1 Like
on
1 Post
I had one guy on here put the fear of a cracked block in me when I was looking for answers to my symptoms.
Just take it one bolt at a time.
Good luck. I'm going home and going to sleep... Maybe I'll cook me some bacon first...
Just take it one bolt at a time.
Good luck. I'm going home and going to sleep... Maybe I'll cook me some bacon first...
04-24-2011, 09:09 PM
#9
Registered User
Thread Starter
Join Date: Aug 2010
Location: Willamette Valley, Oregon.
Posts: 73
Likes: 0
Received 0 Likes
on
0 Posts
Hey fellas I need a bit of help removing my fuel rail...there is the actual fuel line attached to the rail and I cannot figure out how to remove it.
Here is a pick of what i am talking about.
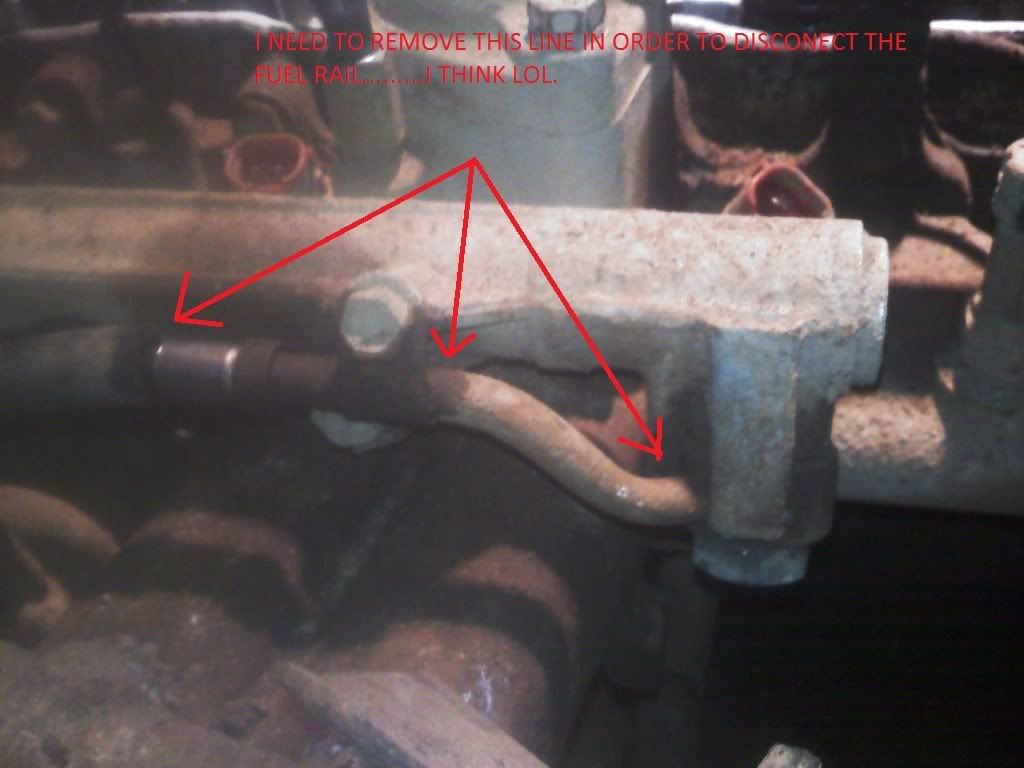
If you have any advise as to how to remove this line so I can remove the fuel delivery line I would appreciate it so very much.
Thank you for your time.
Here is a pick of what i am talking about.
If you have any advise as to how to remove this line so I can remove the fuel delivery line I would appreciate it so very much.
Thank you for your time.
04-24-2011, 09:14 PM
#10
Registered User
Thread Starter
Join Date: Aug 2010
Location: Willamette Valley, Oregon.
Posts: 73
Likes: 0
Received 0 Likes
on
0 Posts
I'm wondering if I need to just cut the line and replace it latter.
I would rather not do that if there is a way to get around it lol.
I would rather not do that if there is a way to get around it lol.
04-24-2011, 10:43 PM
#11
Registered User

Join Date: Jan 2010
Location: Australia
Posts: 29
Likes: 0
Received 0 Likes
on
0 Posts
That fuel line should go to your filter which has a banjo bolt.
otherwise it's a 22mm spanner you need to undo the fitting where the hose meets the rail.
I dont recommend cutting the line as replacing it could be expensive as it's a crimped fitting.
otherwise it's a 22mm spanner you need to undo the fitting where the hose meets the rail.
I dont recommend cutting the line as replacing it could be expensive as it's a crimped fitting.
04-24-2011, 10:51 PM
#12
Registered User
Join Date: Sep 2010
Location: Florida
Posts: 108
Likes: 0
Received 0 Likes
on
0 Posts
your really waisting your time with that dude it doesnt even need to come off leave the intake on and take a rope and tie the head to the cyling of the garage your in least thats what i did to hold it up takes me like 3 hrs to change one just do yourself a favor if you take the intake off send it down the round to be port and pollished you wouldnt believe how much it helps
04-24-2011, 11:47 PM
#13
Registered User
Thread Starter
Join Date: Aug 2010
Location: Willamette Valley, Oregon.
Posts: 73
Likes: 0
Received 0 Likes
on
0 Posts
I got it thanks guys. At first I removed the banjo bolt and attempted to separate the rail from the fuel line with no luck so I put it back in lol. There are two thin metal tabs molded to the rail that go around either side of the fuel line that have what looked to me to be spot welds so I assumed they came welded together (for whatever reason lol) from factory.
Yeah I eventually got it by myself but thanks for the help I appreciate the feedback. Including the idea for a port and polish on the intake I agree it makes a difference.
Yeah I eventually got it by myself but thanks for the help I appreciate the feedback. Including the idea for a port and polish on the intake I agree it makes a difference.
04-25-2011, 12:29 AM
#14
Registered User
Thread Starter
Join Date: Aug 2010
Location: Willamette Valley, Oregon.
Posts: 73
Likes: 0
Received 0 Likes
on
0 Posts
 ...I've been busy and made some progress. Check it out I only had Saturday night so I wasn't able to get much done. I didn't get the chance to do much yesterday Easter can be a pain sometimes.
Anyways here are some pics.
I knew it would take a while to drain the radiator completely so I did that first.
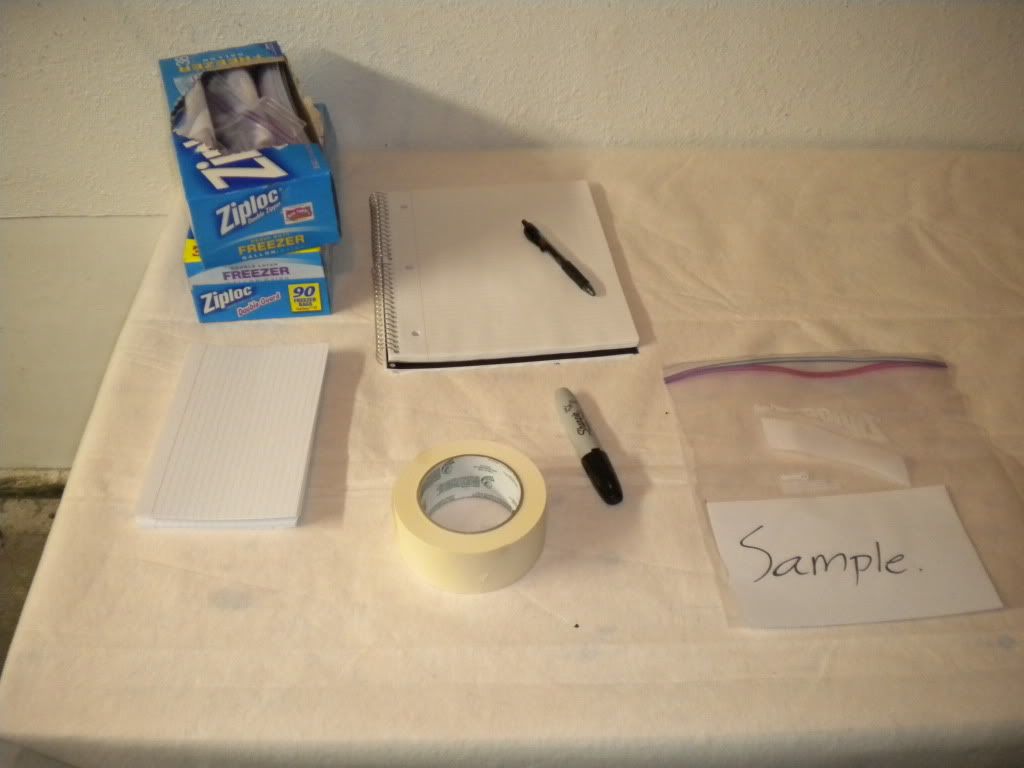
...Got my organizing tools ready. One gallon Zip Lock bags (a lot just in case) and large note cards to put in the bag for a description of the objects. Oh and a note book for notes.
Removed the air duct, upper radiator hose, fan shroud and old busted clutch fan.
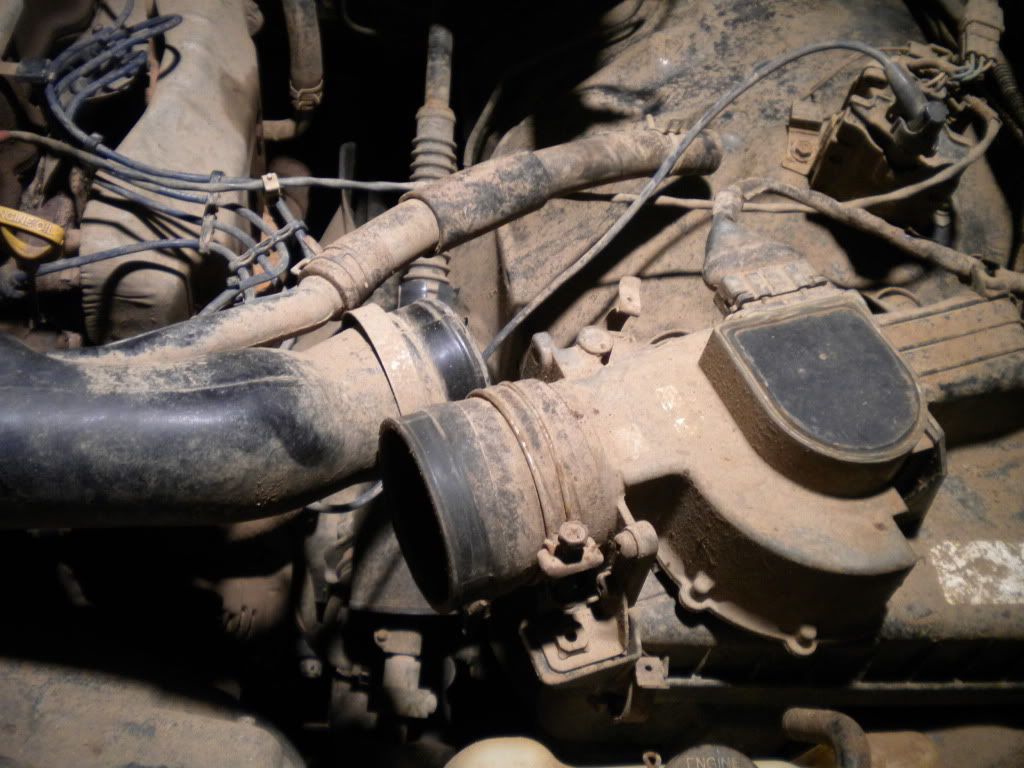
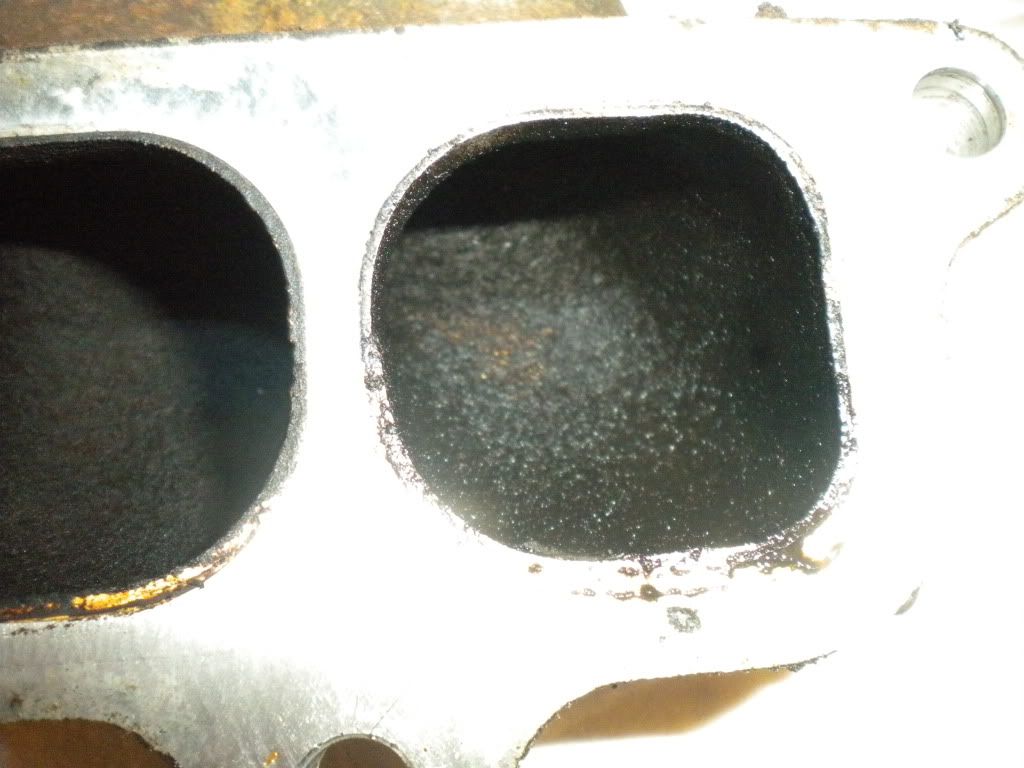
After many reference pictures and labels I was able to remove the upper intake and man that thing is dirty.

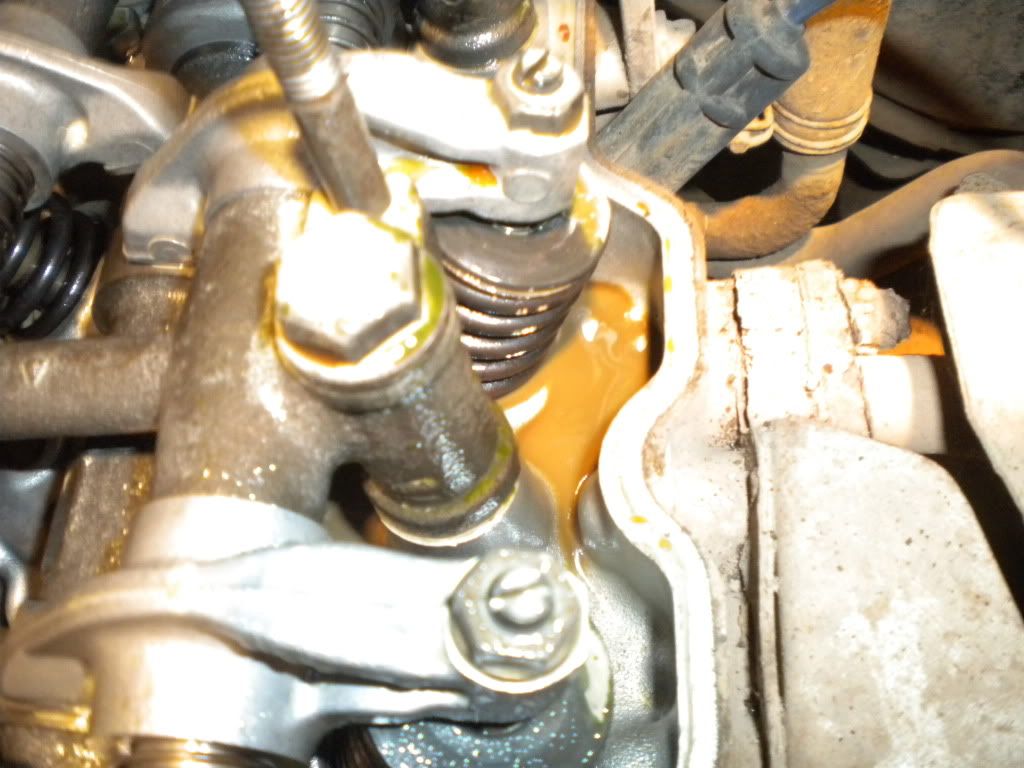
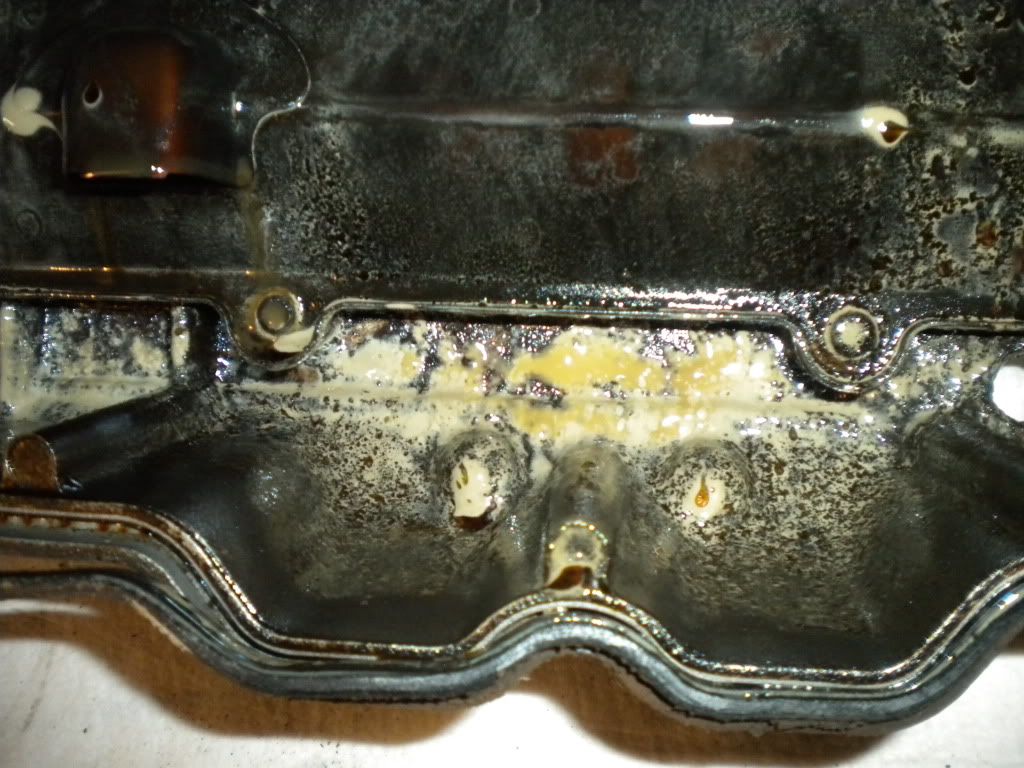
I eventually got to the valve cover and saw something I had hoped didn't happen. Looks like the coolant did mix with the oil.
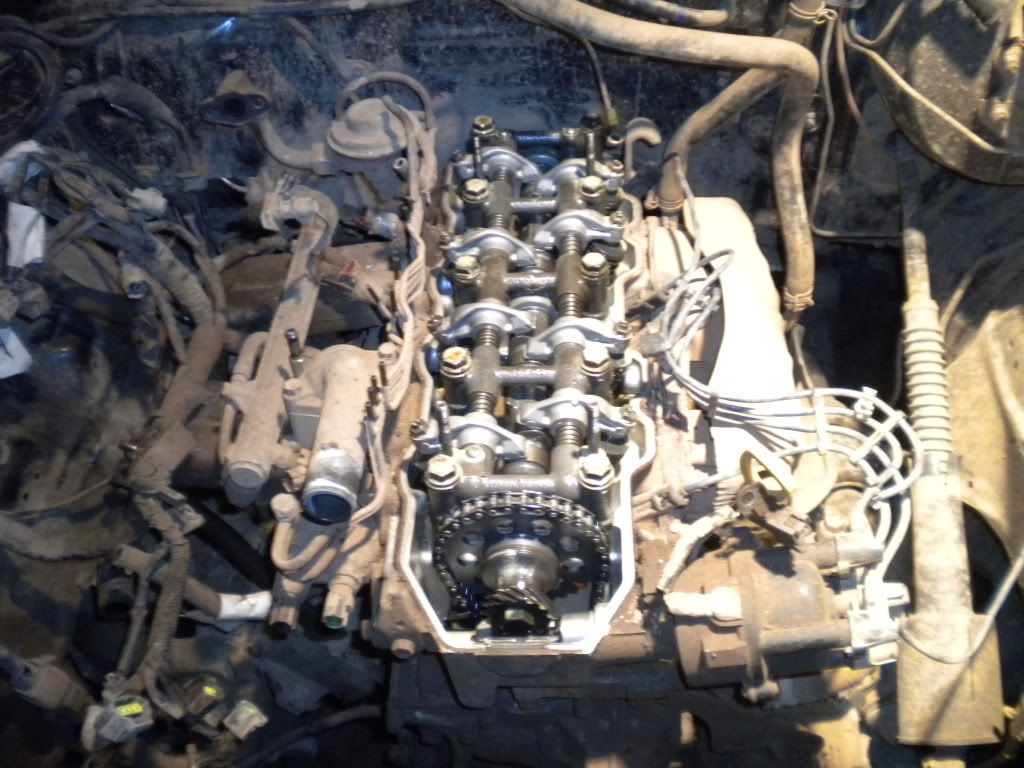
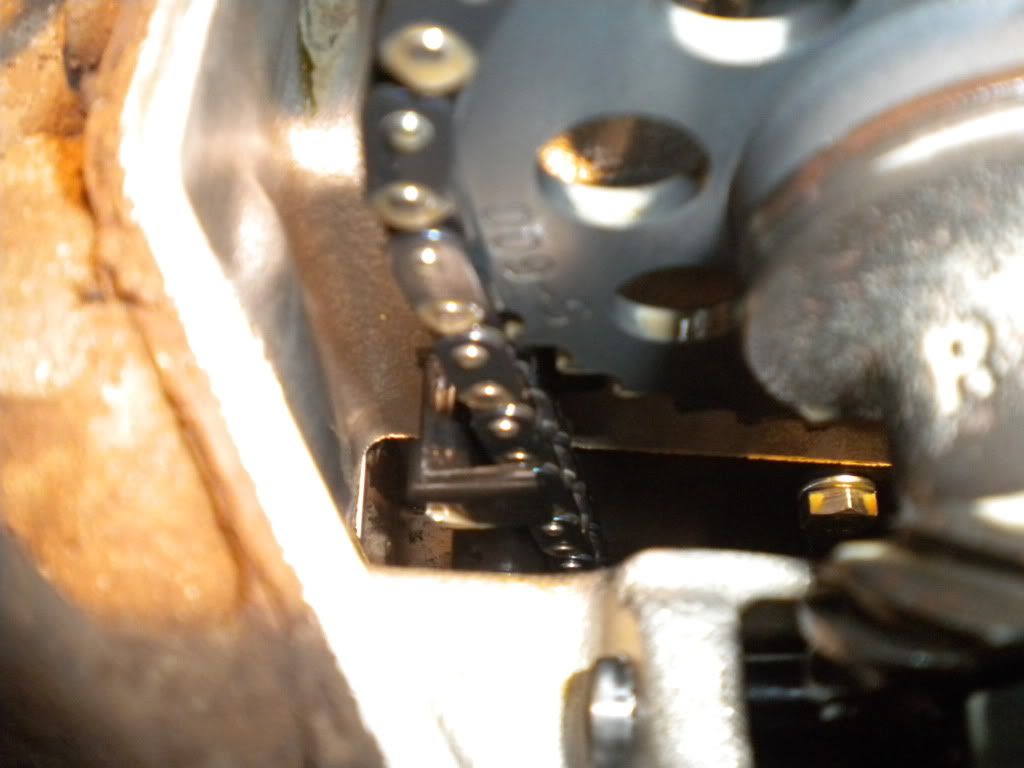
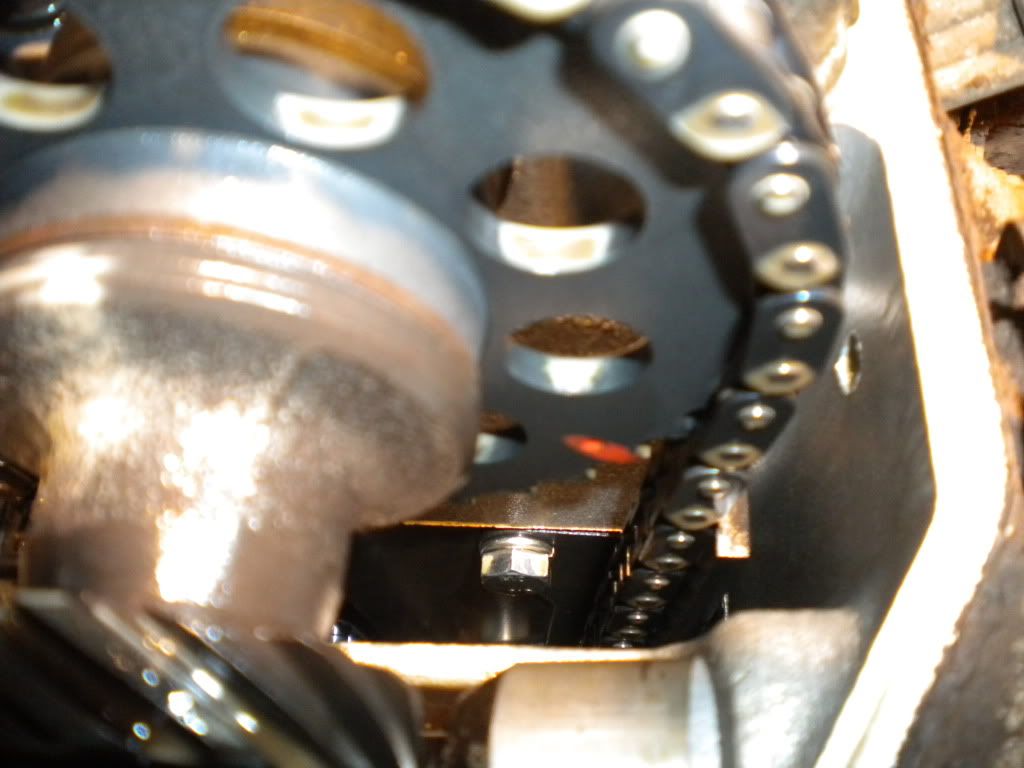
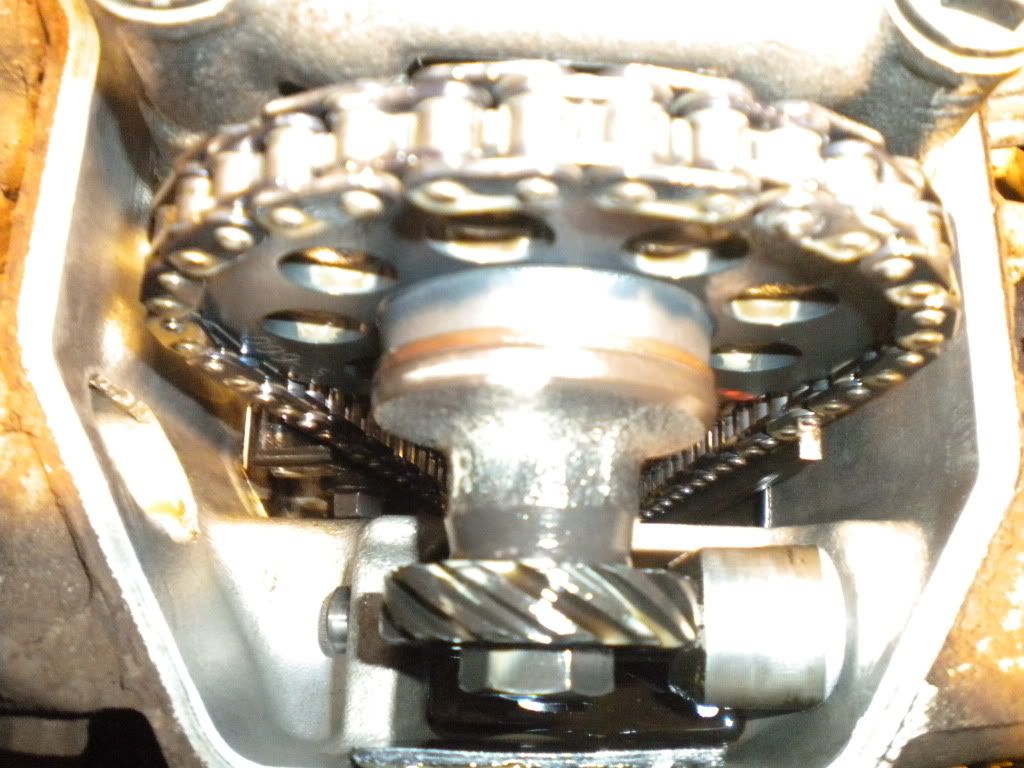
Please correct me if I am mistaken but I believe these timing chain guides look good enough to keep. Perhaps the previous owner recently rebuilt the engine? I don't know.
 04-25-2011, 01:29 AM
#15
Registered User
Thread Starter
Join Date: Aug 2010
Location: Willamette Valley, Oregon.
Posts: 73
Likes: 0
Received 0 Likes
on
0 Posts
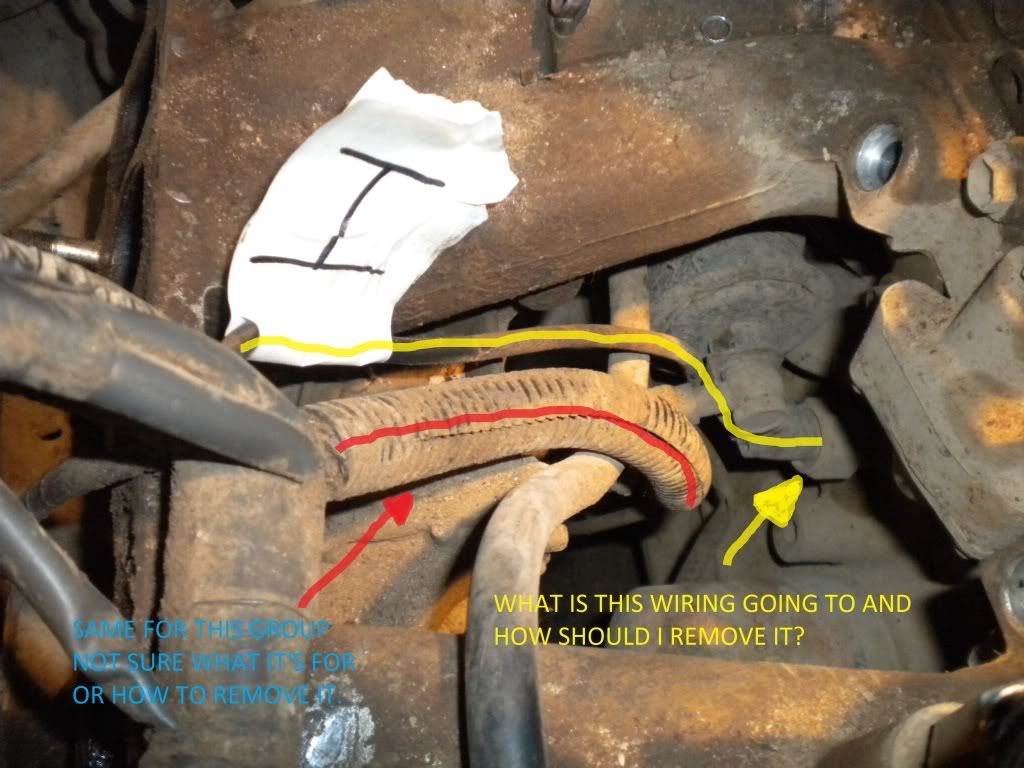
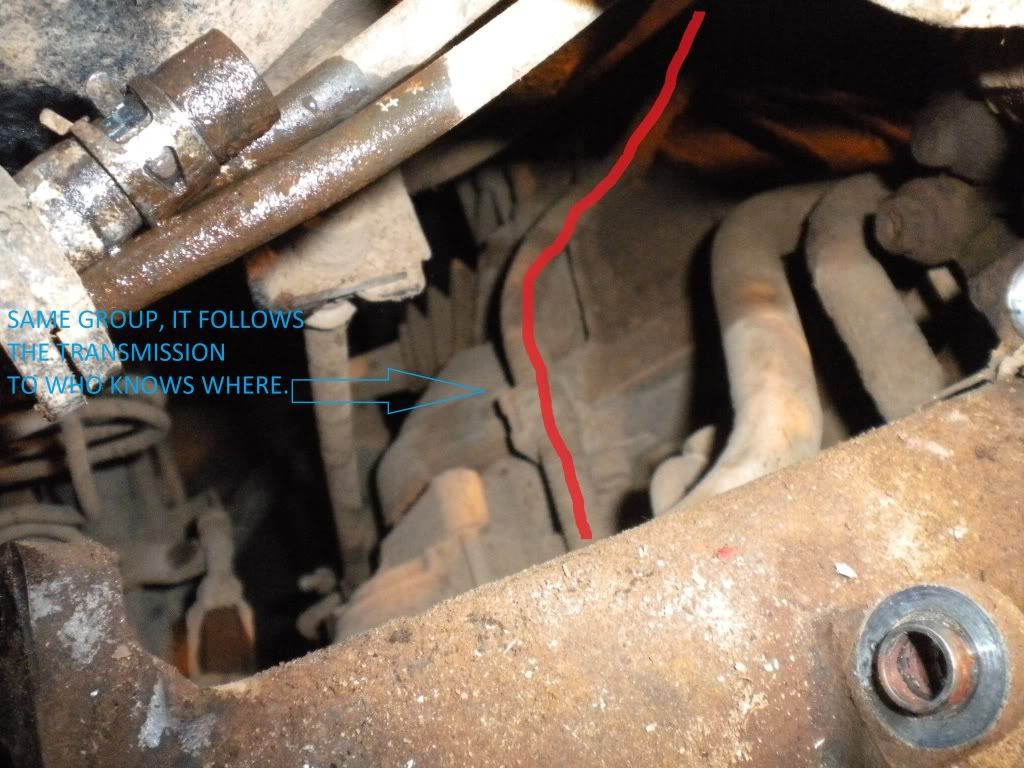
I'm having a difficult time removing the lower intake it's kinda stopped me in my tracks. I cannot figure out what to do with the wiring harness. It branches out between the lower intake before attacking to what I think is the temp sensor and some other stuff. I can't tell but I think one of the wires is going to the starter and a group of them snake along the top of the transmission and go under the cab to who knows what.
04-25-2011, 01:39 AM
#16
Registered User
Join Date: Jan 2010
Location: Australia
Posts: 29
Likes: 0
Received 0 Likes
on
0 Posts
The first pic is the knock sensor (Yellow line) it just screws to the block. Above it is the fuel filter, i'd change it while your in there.
As for your manifold dont waste your time cleaning it yourself, trust me it's a lot easier to send off and get hot tanked at a machine shop.
As for your manifold dont waste your time cleaning it yourself, trust me it's a lot easier to send off and get hot tanked at a machine shop.
04-25-2011, 01:49 AM
#17
Registered User
Thread Starter
Join Date: Aug 2010
Location: Willamette Valley, Oregon.
Posts: 73
Likes: 0
Received 0 Likes
on
0 Posts
Hot tanking sounds like a good idea I was wondering though what kind of preparation do I have to do to the upper and lower intake before I can have it tanked?
04-25-2011, 02:03 AM
#18
Registered User
Join Date: Jan 2010
Location: Australia
Posts: 29
Likes: 0
Received 0 Likes
on
0 Posts
Take off anything electrical, separate the tb from the manifold and send it all in, it'll come back looking like new, better than you will ever achieve.
I have a feeling the sludge is from the EGR system, when i bought my donor motor the inlet was filthy, after doing the motor swap i noticed the inlet on my motor (carby) was just as bad.
This weekend i started my 22r-22re swap and i noticed the inlet had cleaned it's self. 20k Km's later. Funny hey
I have a feeling the sludge is from the EGR system, when i bought my donor motor the inlet was filthy, after doing the motor swap i noticed the inlet on my motor (carby) was just as bad.
This weekend i started my 22r-22re swap and i noticed the inlet had cleaned it's self. 20k Km's later. Funny hey
04-25-2011, 03:01 AM
#20
Registered User
Join Date: Jan 2010
Location: Australia
Posts: 29
Likes: 0
Received 0 Likes
on
0 Posts
I was surprised! The 425000k old carby manifold was cleaner than my attempt at cleaning. Just have a look at the egr pipes and you will see where the gunk comes from.


