
Installing aftermarket eng temp gauge on 3.0.
 10-10-2006, 12:32 PM
#1
Registered User
Thread Starter

Installing aftermarket eng temp gauge on 3.0.
How have you guys done this? Has anyone been able to install one while still having the stock gauge work?
 10-10-2006, 02:49 PM
#2
Registered User
This part is on the the top rear of the motor.
See where the arrow points? That's flat & closed off on a stocker.
Drill and tap a hole there and install the fitting as shown in this pic.

See where the arrow points? That's flat & closed off on a stocker.
Drill and tap a hole there and install the fitting as shown in this pic.
Last edited by MonsterMaxx; 10-10-2006 at 02:50 PM.
10-10-2006, 03:28 PM
#4
Registered User
Pretty sure you need to pull the upper plenum off, maybe not...try it.
I did mine during one of the many many many many Head Gasket & Engine failures I've had with the 3.slow while the POS was in pieces.
I did mine during one of the many many many many Head Gasket & Engine failures I've had with the 3.slow while the POS was in pieces.
10-10-2006, 07:46 PM
#5
Contributing Member
Join Date: Oct 2002
Location: Santee, CA
Posts: 2,724
Likes: 0
Received 0 Likes
on
0 Posts
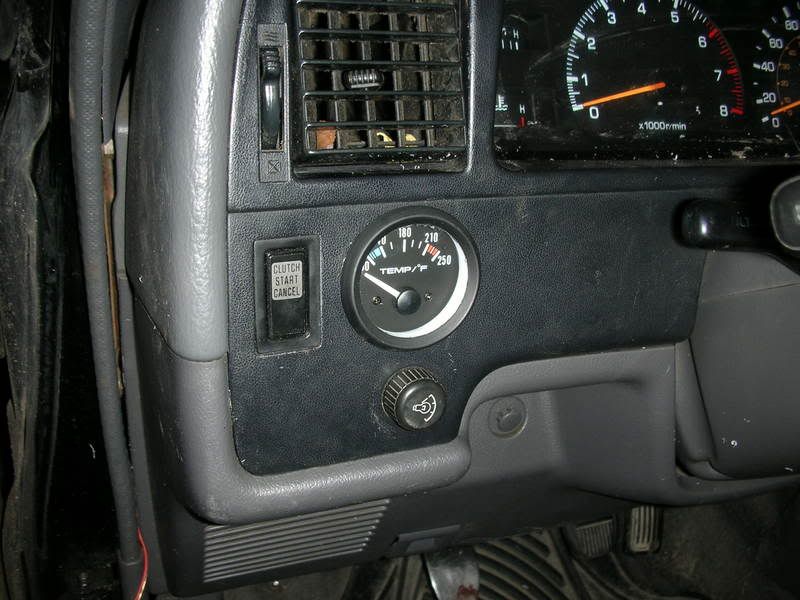
I installed mine pretty easily. I bought the guage and sender combo from Sunpro, and had to get the metric adapter set.
Mine took the place of the sender next to the blue fitting--a 2 prong fitting was replaced
With a little patience, deep sockets, and teflon tape it all went together.
I dont have any pics of the sender, but here is the guage...

Mine took the place of the sender next to the blue fitting--a 2 prong fitting was replaced
With a little patience, deep sockets, and teflon tape it all went together.
I dont have any pics of the sender, but here is the guage...
Last edited by Marc P; 10-10-2006 at 07:48 PM.
10-11-2006, 10:12 AM
#6
Registered User
Thread Starter
I installed mine pretty easily. I bought the guage and sender combo from Sunpro, and had to get the metric adapter set.
Mine took the place of the sender next to the blue fitting--a 2 prong fitting was replaced
With a little patience, deep sockets, and teflon tape it all went together.
I dont have any pics of the sender, but here is the guage...
Mine took the place of the sender next to the blue fitting--a 2 prong fitting was replaced
With a little patience, deep sockets, and teflon tape it all went together.
I dont have any pics of the sender, but here is the guage...
On the 89 the setup back there is a little different. There is no empty tower to drill out. What is the blue piece with the vaccuum lines attached to it? There has to be a way to do this.
What about on the front of the engine where that little housing is, the one where the hot coolant comes out of the engine and goes into the rad? Would that be a silly place for it since there is air coming off the rad and hitting it?
Trending Topics
11-07-2006, 03:33 PM
#8
Contributing Member
Join Date: Nov 2004
Location: Aurora, Indiana
Posts: 1,285
Likes: 0
Received 0 Likes
on
0 Posts
Like marc showed, take out the one with one prong, this is the one that runs the gauge on your dash. Get a sunpro gauge, a metric adaptor, and some teflon tape you'll be good to go.
11-07-2006, 07:30 PM
#9
Registered User
Join Date: Apr 2006
Location: Vancleave, Mississippi
Posts: 1,368
Likes: 0
Received 0 Likes
on
0 Posts
x2 as i did the exact same thing a few months ago, it was a bit hard finding the right adaptor tho..and i had to drill the middle of it out to make the sender fit properly but it works great!
11-08-2006, 06:50 AM
#10
Registered User
Thread Starter

My current question is what is the blue thing that the vaccuum lines attach to????
11-08-2006, 07:14 AM
#13
Contributing Member
Join Date: Oct 2002
Location: Santee, CA
Posts: 2,724
Likes: 0
Received 0 Likes
on
0 Posts
I am usually running between 190 and 220...this past weekend on a long hot hill climb it went a little past 220, but not up to 250
Last edited by Marc P; 11-08-2006 at 07:21 AM.

Thread
Thread Starter
Forum
Replies
Last Post
the1998sr5
95.5-2004 Tacomas & 96-2002 4Runners
15
07-14-2020 08:35 PM
GreatLakesGuy
The Classifieds GraveYard
8
09-04-2015 09:27 AM
Poncho0206
95.5-2004 Tacomas & 96-2002 4Runners
3
07-10-2015 06:21 PM


