Idle up vacuum and other vacuum mysteries
 07-30-2012, 08:55 AM
#1
Registered User
Thread Starter
Join Date: Jun 2009
Location: Northern California
Posts: 76
Likes: 0
Received 0 Likes
on
0 Posts
Idle up vacuum and other vacuum mysteries
So I decided to check all my vac lines against my underhood sticker and FSM and found several issues:
The idle-up diaphragm on the passenger side of the carb has nowhere to connect to. Is this because it is only needed on trucks equipped with AC (mine is not). In that case, should it's port be plugged or just left open?
The other thing that I don't see on the diagram is a small port on the passenger side of the air cleaner that just goes from the outside of the air cleaner to the inside - it does not connect to any components at all - is this meant to just stay open?
My "Jet" was missing in line to the CB. I picked one off of an '85 at the junkyard, but it's not clear which direction it goes. It's yellow on one end and clear/white on most of the body. Which end goes to the CB?
The vacuum going to the steel line in the front of the carb that feeds the BVSV, AAP, CB, etc. was disconnected. As soon as I connect it to vacuum the truck dies. I found gas in the line going to the AAP so I guess I need to replace it. Do I have to buy the entire rebuild kit to get just that part?
 07-30-2012, 05:19 PM
#2
Registered User

When the A/C compressor turns on, the A/C VSV will route vacuum to that idle-up diaphragm to increase the engine rpms.
Your choice. Or you can even remove the idle-up diaphragm from the carburetor.
Or, here's a link to the parts fiche.
http://www.utoyot8.com/FullImage.asp...-8808%2922R..W
Both routes are available.
AAP diaphragm part number: 21667-35510.
http://www.utoyot8.com/images/147907305/184584525.png
Toyota Parts Zone here in California has it priced at $39 plus tax & shipping.
http://www.toyotapartszone.com/Page_...onentsIndex=30
Autozone, as an example, has the whole kit, including that AAP diaphragm for $35.
http://www.autozone.com/autozone/par.../N-iivveZ8vd1z
07-30-2012, 09:10 PM
#3
Registered User
Thread Starter
Join Date: Jun 2009
Location: Northern California
Posts: 76
Likes: 0
Received 0 Likes
on
0 Posts
Thanks for the answers!
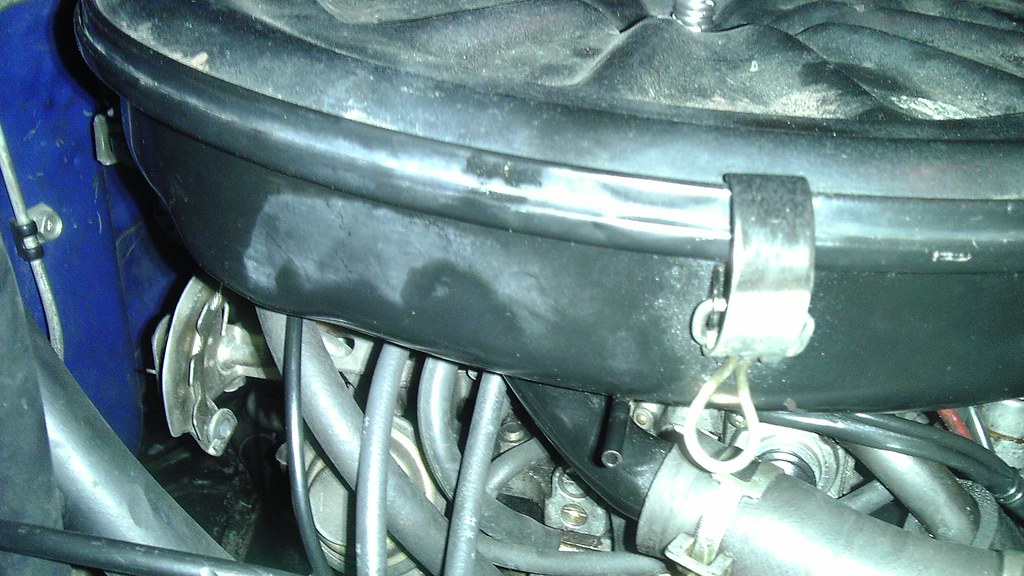
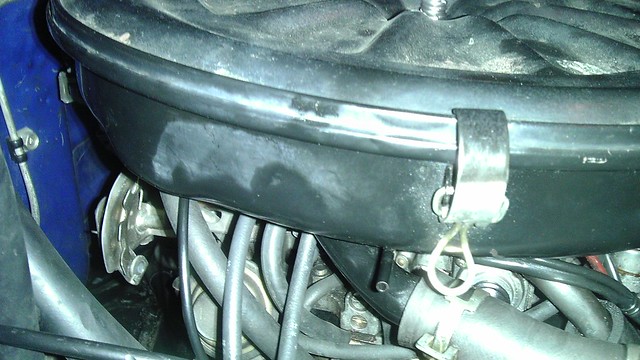
Here's the pic of the little port on the air cleaner:

I lucked out. Rock auto had a rebuild kit on closeout for $10. Now, will I be lazy and just do the APs or will I face my fears and do the complete rebuild?
Here's the pic of the little port on the air cleaner:
I lucked out. Rock auto had a rebuild kit on closeout for $10. Now, will I be lazy and just do the APs or will I face my fears and do the complete rebuild?
07-30-2012, 09:20 PM
#4
Registered User
Thread Starter
Join Date: Jun 2009
Location: Northern California
Posts: 76
Likes: 0
Received 0 Likes
on
0 Posts
07-30-2012, 10:36 PM
#6
Registered User
When I did mine, rebuilding the internal carburetor was not that hard. That was the easy part. What was hard was all the external linkages and mechanisms around the carburetor. Keeping track of all those little items.
There's a thread here on Yotatech of a poster using egg cartons to place each of the components into each of the cups in the carton. Worked out great.
I had a serious problem getting the choke housing off the carb body. I nearly striped the bolts holding it on. The screw-head, of course, are J.I.S. (Japanese Industrial Standards) and not Phillips head screw bolt. I had to use an impact screw driver, the kind that you hammer on. After I removed them I bought new bolts. Those things were fasten very tightly.
Trending Topics
07-31-2012, 08:56 PM
#8
Registered User
Join Date: Mar 2008
Location: Temecula Valley, CA
Posts: 12,723
Likes: 0
Received 4 Likes
on
4 Posts
nope.
have to find the photo where the link ends in ".jpg". what you posted is: http://www.flickr.com/photos/81512376@N07/7681967986/
have to find the photo where the link ends in ".jpg". what you posted is: http://www.flickr.com/photos/81512376@N07/7681967986/
Last edited by abecedarian; 07-31-2012 at 08:57 PM.
 07-31-2012, 09:02 PM
#13
Registered User
Thread Starter
Join Date: Jun 2009
Location: Northern California
Posts: 76
Likes: 0
Received 0 Likes
on
0 Posts
Okay, this time I posted:
https://www.dropbox.com/s/5iqs4ju8jpabznv/IMAG0396.jpg
And I did it using the little image button thingy.

https://www.dropbox.com/s/5iqs4ju8jpabznv/IMAG0396.jpg
And I did it using the little image button thingy.
07-31-2012, 10:24 PM
#16
Registered User
08-01-2012, 05:01 AM
#17
Registered User
Thread Starter
Join Date: Jun 2009
Location: Northern California
Posts: 76
Likes: 0
Received 0 Likes
on
0 Posts
It doesn't lead to anything. It's just open on the inside of the cleaner too. Capping it off sounds good to me. By the way what site do you guys use for pics? I've tried Flickr and dropbox with epic failures:-)
08-01-2012, 01:20 PM
#19
Registered User
As an example your Flikr page of the above picture is this:
http://www.flickr.com/photos/8151237...n/photostream/
Normally, one would right click and copy the properties of that picture. The web address for that picture would end in dot jpg (blah_blah_blah.jpg). Actually, it looks like you might have some security setting going on with that picture.
Anyhoo, with Flickr, you have to go upto the "Actions" tab, then click on "View All Sizes". Then from there you can right-click to get the image link ("Properties": MS Internet Explorer or "Copy Image Location" for Firefox) to link the image here, or anywhere on the web.
At least that has been my experience with Flikr.
Or like Hunter says: "works for me".
Typically a lower idle rpm and/or stumbling idle rpms, or if large enough, an audible hissing sound.
Several options can be used to check vacuum leaks. One is using something like WD40 (or even a fine mist of water) to spray around suspected leak. As the fluid gets sucked into the opening, the rpms will change. Two, use a mechanic's stethoscope to listen for the leak. There are two versions, one with a solid rod to listen to vibrations and the second that is a hollow rod to listen to leaks. Three, a specifically built "propane vacuum leak detection" devise. It uses an unlit stream of propane channeled through a wand to wave around the suspected vacuum leak. It works on the same principle as the WD40.