How To: clutch bracket removal/repair/assembly w/ pictures!
 08-02-2014, 08:40 PM
#1
Registered User
Thread Starter
Join Date: Feb 2014
Posts: 173
Likes: 0
Received 0 Likes
on
0 Posts
How To: clutch bracket removal/repair/assembly w/ pictures!
Howdy all,
After driving my new-to-me 1990 4runner for about 2 minutes after a front end rebuild, I realized I had a broken clutch bracket. This is extremely common on the 89-95 Toyotas. I decided to remove it, get it repaired, and re-install.
The two methods I heard about were to either remove the steering column or the brake pedal. I heard several people having success with the steering column so I decided to go that route. I'm glad I did.
It was a little intimidating for someone that has never done something like this, but it worked out great. However, there were virtually no pictures of the disassembly, so I figured I would document the journey for others like me.
This picture shows all the tools I used to get it out and back in -
It includes the following -

3/8" socket wrench
3/8" extension, short and long
10mm socket, short
12mm socket, short
12mm socket, long
14mm socket, short
14mm socket, long
flashlight (absolutely necessary)
marker
I'm sure you could do without some of these options, but they were a luxury of convenience. You could also get away with a regular phillips screwdriver, but the cordless drill made things go a little faster. I did make use of a dremel for cutting an optional reinforcement plate I installed behind the clutch master cylinder in the engine bay, but this may or may not pertain to your situation.
First thing, unhook the battery, just because you are undoing electrical connections.
Next, open the hood and take a look at your brake booster and clutch master cylinder.
The clutch bracket has threaded posts that the clutch master cylinder attaches to through the firewall, but has threaded holes for the 4 posts of the brake booster to attach to, also through the firewall. So, to remove all the bolts holding it in, you will need to remove the clutch master cylinder bolts from inside the engine bay, and the rest of the bolts from underneath the dash area.
Here are the bolts holding on the clutch master cylinder -

I unscrewed those. I ended up removing the hardline and taking out the master cylinder to install a reinforcing bracket (described later), but if you are just taking off the bracket you don't need to fully remove it.
To keep pressure off the brake lines, I supported the brake booster with some tape so once it was unbolted nothing would be damaged.
From here, nearly all your work is going to be inside the cab of the vehicle.
This lower panel comes off - it has several phillips screws and I think 1 10mm bolt in the lower left hand corner -


On the right side it has plastic clips that look pretty brittle if you get a little to forceful, so just pull on it gently to start out.

Detaching the lower dash panel gives you access to the gas cap door release lever and the hood release lever.

The gas cap door release has this tiny little clip that holds the plastic pull lever onto the metal shaft - think how a window roller attaches onto a regulator shaft, only smaller. Thing is...be careful! That little metal clip has a tendency to shoot out at around 100 mph and typically right in the opening of the door and frame, never to be seen again. Don't ask.
Here is a view of the gas cap door release with the lever detached.

From here you can unscrew the retainer from the molding. The screws are a little tough to get out with the lever in place. The hood release is easier. You simply pull the lever and have access to the retaining screws -

Once you pull those you can pull the lower panel off -

To not get confused on where bolts start coming out, I put the panel bolt back into where it mounted -

The trim piece surrounding the ignition just popped right out for me -

Next, lets remove the upper and lower steering column trim pieces. I believe there were 6 (?) screws securing the two halves together, accessible from the bottom half. Once all the screws are undone, the bottom half falls away and you can wiggle the top half from around the steering column. Again, exercise care during removal -

Once you have all the trim pieces out of the way, here is what you are looking at -

I don't know what your wiring looks like underneath, but here is mine -

Not the prettiest. Next, remove the plastic ductwork behind the wiring to gain better access to the rest of the bolts you will be removing -

This bolt needs to come out - it is attaching a metal shroud that covers up one of the 4 bolts that attaches the steering column onto the dash framework. Also, note the clutch pedal return spring mount location directly behind this shroud. You will need to remember where to attach that spring to during re-assembly!
It's time to start unclipping some wiring. Here is the main connector, which has two connecters that clip to it -

Also this connector to the right side -

This is an area you really want to be careful - take your time and those connectors will eventually come apart.
Once you get the wiring clips unfastened, you are now ready to remove the steering column. It is attached by 2 bolts and 2 nuts to the underside of the dash framework,and also at the splines where it connects to the steering linkage.
After driving my new-to-me 1990 4runner for about 2 minutes after a front end rebuild, I realized I had a broken clutch bracket. This is extremely common on the 89-95 Toyotas. I decided to remove it, get it repaired, and re-install.
The two methods I heard about were to either remove the steering column or the brake pedal. I heard several people having success with the steering column so I decided to go that route. I'm glad I did.
It was a little intimidating for someone that has never done something like this, but it worked out great. However, there were virtually no pictures of the disassembly, so I figured I would document the journey for others like me.
This picture shows all the tools I used to get it out and back in -
It includes the following -
3/8" socket wrench
3/8" extension, short and long
10mm socket, short
12mm socket, short
12mm socket, long
14mm socket, short
14mm socket, long
flashlight (absolutely necessary)
marker
I'm sure you could do without some of these options, but they were a luxury of convenience. You could also get away with a regular phillips screwdriver, but the cordless drill made things go a little faster. I did make use of a dremel for cutting an optional reinforcement plate I installed behind the clutch master cylinder in the engine bay, but this may or may not pertain to your situation.
First thing, unhook the battery, just because you are undoing electrical connections.
Next, open the hood and take a look at your brake booster and clutch master cylinder.
The clutch bracket has threaded posts that the clutch master cylinder attaches to through the firewall, but has threaded holes for the 4 posts of the brake booster to attach to, also through the firewall. So, to remove all the bolts holding it in, you will need to remove the clutch master cylinder bolts from inside the engine bay, and the rest of the bolts from underneath the dash area.
Here are the bolts holding on the clutch master cylinder -
I unscrewed those. I ended up removing the hardline and taking out the master cylinder to install a reinforcing bracket (described later), but if you are just taking off the bracket you don't need to fully remove it.
To keep pressure off the brake lines, I supported the brake booster with some tape so once it was unbolted nothing would be damaged.
From here, nearly all your work is going to be inside the cab of the vehicle.
This lower panel comes off - it has several phillips screws and I think 1 10mm bolt in the lower left hand corner -
On the right side it has plastic clips that look pretty brittle if you get a little to forceful, so just pull on it gently to start out.
Detaching the lower dash panel gives you access to the gas cap door release lever and the hood release lever.
The gas cap door release has this tiny little clip that holds the plastic pull lever onto the metal shaft - think how a window roller attaches onto a regulator shaft, only smaller. Thing is...be careful! That little metal clip has a tendency to shoot out at around 100 mph and typically right in the opening of the door and frame, never to be seen again. Don't ask.
Here is a view of the gas cap door release with the lever detached.
From here you can unscrew the retainer from the molding. The screws are a little tough to get out with the lever in place. The hood release is easier. You simply pull the lever and have access to the retaining screws -
Once you pull those you can pull the lower panel off -
To not get confused on where bolts start coming out, I put the panel bolt back into where it mounted -
The trim piece surrounding the ignition just popped right out for me -
Next, lets remove the upper and lower steering column trim pieces. I believe there were 6 (?) screws securing the two halves together, accessible from the bottom half. Once all the screws are undone, the bottom half falls away and you can wiggle the top half from around the steering column. Again, exercise care during removal -
Once you have all the trim pieces out of the way, here is what you are looking at -
I don't know what your wiring looks like underneath, but here is mine -
Not the prettiest. Next, remove the plastic ductwork behind the wiring to gain better access to the rest of the bolts you will be removing -
This bolt needs to come out - it is attaching a metal shroud that covers up one of the 4 bolts that attaches the steering column onto the dash framework. Also, note the clutch pedal return spring mount location directly behind this shroud. You will need to remember where to attach that spring to during re-assembly!
It's time to start unclipping some wiring. Here is the main connector, which has two connecters that clip to it -
Also this connector to the right side -
This is an area you really want to be careful - take your time and those connectors will eventually come apart.
Once you get the wiring clips unfastened, you are now ready to remove the steering column. It is attached by 2 bolts and 2 nuts to the underside of the dash framework,and also at the splines where it connects to the steering linkage.
Last edited by Red Leader; 08-02-2014 at 09:14 PM.
 08-02-2014, 08:44 PM
#2
Registered User
Thread Starter
Join Date: Feb 2014
Posts: 173
Likes: 0
Received 0 Likes
on
0 Posts
Here are the 2 mounting bolts - these are the ones furthest from the steering wheel, nearest to the steering linkage splines -

These nuts, one on each side of the steering column, mount it to the dash nearest to the steering wheel end -

Before undoing all the nuts, it is a good idea to mark the spline location when the steering column connects to the linkage -

My first lines didn't quite line up right, so I made a second set of lines and then removed the bolt fastening the steering column to the linkage -

From there, you can start removing the actual 4 steering column bolts. I started with the lower ones near the linkage -

Next, I unscrewed the 2 nuts holding on the column near the ignition. Once you get those 4 removed, the steering column will lower down into the seat -

The nice thing about this assembly is that there is a metal hook on the column that catches a bracket underneath the dash, which takes a lot of the pressure of lifting the entire assembly up or down and alleviates any stress on the linkage.
From here, you can start to see what the clutch bracket looks like -

Mine cracked in the typical spot (see center of picture) -

The next step is to remove the clutch pedal mount point from the master cylinder -

Go ahead and pull that spring off, making a mental note of where it attaches up under the dash. That had me a little stumped when I put it back together.

Next, remove the pin/cotter pin holding the pedal to the master cylinder -

Here is the clutch start sensor connector, just to the left of the clutch pedal-

Also, the way this sensor attaches to the bracket is a little deceptive. At first, you see this -

And you say to yourself 'another *&%$ plastic bracket I'm going to chew up and destroy', only not quite!
Toyota knew you'd be doing this and left you a tiny mental escape - just snap it out of the retainer -

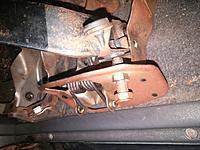
On the brake pedal, remove the large spring, making note of its attachment points -

In this picture you can also make out the interface of the hook/bracket, visible at the top of the picture, that the steering column hook slides into. There is a clearer picture in the reassembly instructions below.
Next, remove its pin/cotter pin -

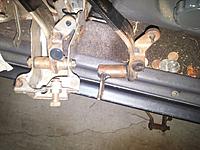
Here is a look straight back from the brake pedal, looking at the nuts holding the brake booster to the firewall and clutch bracket.
Uh oh! Watch out for the hidden bolt!

There is a brake sensor that needs to be undone.


These nuts, one on each side of the steering column, mount it to the dash nearest to the steering wheel end -
Before undoing all the nuts, it is a good idea to mark the spline location when the steering column connects to the linkage -
My first lines didn't quite line up right, so I made a second set of lines and then removed the bolt fastening the steering column to the linkage -
From there, you can start removing the actual 4 steering column bolts. I started with the lower ones near the linkage -
Next, I unscrewed the 2 nuts holding on the column near the ignition. Once you get those 4 removed, the steering column will lower down into the seat -
The nice thing about this assembly is that there is a metal hook on the column that catches a bracket underneath the dash, which takes a lot of the pressure of lifting the entire assembly up or down and alleviates any stress on the linkage.
From here, you can start to see what the clutch bracket looks like -
Mine cracked in the typical spot (see center of picture) -
The next step is to remove the clutch pedal mount point from the master cylinder -
Go ahead and pull that spring off, making a mental note of where it attaches up under the dash. That had me a little stumped when I put it back together.
Next, remove the pin/cotter pin holding the pedal to the master cylinder -
Here is the clutch start sensor connector, just to the left of the clutch pedal-
Also, the way this sensor attaches to the bracket is a little deceptive. At first, you see this -
And you say to yourself 'another *&%$ plastic bracket I'm going to chew up and destroy', only not quite!
Toyota knew you'd be doing this and left you a tiny mental escape - just snap it out of the retainer -
On the brake pedal, remove the large spring, making note of its attachment points -
In this picture you can also make out the interface of the hook/bracket, visible at the top of the picture, that the steering column hook slides into. There is a clearer picture in the reassembly instructions below.
Next, remove its pin/cotter pin -
Here is a look straight back from the brake pedal, looking at the nuts holding the brake booster to the firewall and clutch bracket.
Uh oh! Watch out for the hidden bolt!
There is a brake sensor that needs to be undone.
08-02-2014, 08:49 PM
#3
Registered User
Thread Starter
Join Date: Feb 2014
Posts: 173
Likes: 0
Received 0 Likes
on
0 Posts
There are two upward mounting bolts that hold the bracket to the underside of the dash sheet metal.
One is under the clutch pedal -


The other is under the brake pedal -

Removal of these top bolts, 14mm -


Removal of hidden bolt under the nuts for the brake booster -

Removed the nuts for the brake booster -

Going back to the engine bay on the other side of the firewall, I undid this bolt to give me a little bit more wiggle room with the hard lines -

Now the tape for the booster starts to come in handy -
And finally, once you have out the two top bolts, the clutch master cylinder nuts from the engine bay, the 4 brake booster nuts, and the hidden bolt all removed, plus the sensor connectors, you should be ready to pull the clutch bracket out!

Just start wiggling it out. It is a little hard to get around that plastic duct piece still attached, but the bolt attaching that plastic duct work was so ridiculously hard to get to I just left it and worked around it -
And...voila!

This picture, sans the 2 upper mounting bolts, gives a good indication of what you'll be removing to pull it out.

The extremely offensive damage, what put me though an hour of sweat, blood and contortion -

Looking at the picture, I can't help but noticed the strategically placed hole. Its almost as if the Toyota engineers knew it would fail and just...added a hole?
In any case, I decided to repair it. The cost of a new one was out of the budget for me (budget of precisely $0) and wanted one reinforced anyway. Here it is all cleaned up -

I fabbed up a homemade bracket to weld to it to strengthen it up in this area -

I took it to a buddy I know who does metal work and initially was going to drop it off but he took one look at it and said "Oh, I'll just do that right now!" I did reimburse him some German beer for his time
Here is the bracket now welded up - he used a tig welder and it was cool seeing it done -


I don't think it is going to let loose any time soon.
One is under the clutch pedal -
The other is under the brake pedal -
Removal of these top bolts, 14mm -
Removal of hidden bolt under the nuts for the brake booster -
Removed the nuts for the brake booster -
Going back to the engine bay on the other side of the firewall, I undid this bolt to give me a little bit more wiggle room with the hard lines -
Now the tape for the booster starts to come in handy -
And finally, once you have out the two top bolts, the clutch master cylinder nuts from the engine bay, the 4 brake booster nuts, and the hidden bolt all removed, plus the sensor connectors, you should be ready to pull the clutch bracket out!
Just start wiggling it out. It is a little hard to get around that plastic duct piece still attached, but the bolt attaching that plastic duct work was so ridiculously hard to get to I just left it and worked around it -
And...voila!
This picture, sans the 2 upper mounting bolts, gives a good indication of what you'll be removing to pull it out.
The extremely offensive damage, what put me though an hour of sweat, blood and contortion -
Looking at the picture, I can't help but noticed the strategically placed hole. Its almost as if the Toyota engineers knew it would fail and just...added a hole?
In any case, I decided to repair it. The cost of a new one was out of the budget for me (budget of precisely $0) and wanted one reinforced anyway. Here it is all cleaned up -
I fabbed up a homemade bracket to weld to it to strengthen it up in this area -
I took it to a buddy I know who does metal work and initially was going to drop it off but he took one look at it and said "Oh, I'll just do that right now!" I did reimburse him some German beer for his time
Here is the bracket now welded up - he used a tig welder and it was cool seeing it done -
I don't think it is going to let loose any time soon.
08-02-2014, 08:59 PM
#4
Registered User
Thread Starter
Join Date: Feb 2014
Posts: 173
Likes: 0
Received 0 Likes
on
0 Posts
Now, I did order some new parts to freshen up things a bit.
Here is the metal bushing for the cotter pin bolt where the spring mounts -

Here are the bushings (X2) for the clutch pedal mounting bolt -

Here are the old bushings still in the pedal assembly -

Taking old ones out -


New ones go on in reverse order. I made sure to use plenty of grease.
Another modification I did was to the clutch master cylinder/firewall interface. I had read about severe clutch bracket breakage issues where such force was delivered through the firewall that it actually cracked the firewall at the master cylinder. The more I read, I found that Toyota actually made a reinforcement plate that is designed to strengthen this area. When I looked and saw that my '90 4runner did not have any type of backing, I thought that it couldn't hurt. I ordered one and $6 later here it is -

Now for whatever reason, this plate did not quite fit flush against the firewall and the way it was formed, so it might have been made for a different model, a 1st gen, a truck, etc. It was easy to modify to fit -

To install, I removed the hard line from the master cylinder so I could remove it completely -

Then it came out -

It had this rubber seal around it that I suppose seals the weather and moisture from inside the engine bay so none gets into the cabin area. This had disintegrated. To make sure I still got a good seal, I just used some ultra grey and that took care of the seal -

Now it was time to put everything together. I painted my clutch bracket as just the most basic rust preventative measure -


It goes in how it comes out - you wiggle it back into place. I came up from the bottom and then slide over to the left to get it in -


A moment of dumbness, I realized I forgot to put the hidden bolt in and with the way the trim laid, I had to remove the bracket and get the trim out of the way and then install the bolt -

Here is the metal bushing for the cotter pin bolt where the spring mounts -
Here are the bushings (X2) for the clutch pedal mounting bolt -
Here are the old bushings still in the pedal assembly -
Taking old ones out -
New ones go on in reverse order. I made sure to use plenty of grease.
Another modification I did was to the clutch master cylinder/firewall interface. I had read about severe clutch bracket breakage issues where such force was delivered through the firewall that it actually cracked the firewall at the master cylinder. The more I read, I found that Toyota actually made a reinforcement plate that is designed to strengthen this area. When I looked and saw that my '90 4runner did not have any type of backing, I thought that it couldn't hurt. I ordered one and $6 later here it is -
Now for whatever reason, this plate did not quite fit flush against the firewall and the way it was formed, so it might have been made for a different model, a 1st gen, a truck, etc. It was easy to modify to fit -
To install, I removed the hard line from the master cylinder so I could remove it completely -
Then it came out -
It had this rubber seal around it that I suppose seals the weather and moisture from inside the engine bay so none gets into the cabin area. This had disintegrated. To make sure I still got a good seal, I just used some ultra grey and that took care of the seal -
Now it was time to put everything together. I painted my clutch bracket as just the most basic rust preventative measure -
It goes in how it comes out - you wiggle it back into place. I came up from the bottom and then slide over to the left to get it in -
A moment of dumbness, I realized I forgot to put the hidden bolt in and with the way the trim laid, I had to remove the bracket and get the trim out of the way and then install the bolt -
08-02-2014, 09:07 PM
#5
Registered User
Thread Starter
Join Date: Feb 2014
Posts: 173
Likes: 0
Received 0 Likes
on
0 Posts
Don't forget to hook up the sensors during reassembly -

If you loosened this bolt to put some slack in the hard lines, don't forget to re-tighten it -

Hook up your clutch and brake cotter pin bolts and pins -


I got a new spring for the clutch return -

I had a little trouble remembering where it hooked up, but once I figured it out I took a picture. It is a little hard to see unless you have a double jointed neck -

Now the steering column goes back in!

Remember that little hook at the upper bottom of the steering column? That needs to hook in to the sheet metal bracket. Think down and up. It is a little tricky, because right where you are trying to hook it to the underside of the dash, is right where the splines on your steering linkage first start to mate up, so you have to monitor that and the hooking action all at once. If you just hook the steering linkage splines back together with the steering column resting on the seat, you have to pull it back out some for the hook to engage. More often than not, when that happens, the linkage spines just fall back apart.
In short, you have to hook up this:

At the same time as you do this:

Also, watch your spine mate up. Make sure your lines are lining up or you have to pull it out and start again -

That is really the hardest part. After that is it just bolting stuff together.
Hook up electrical -

Don't forget that little protective cover and bolt (which your yota may or may not have) -

Reinstall your duct work -


Now it is on to trim pieces -


If you loosened this bolt to put some slack in the hard lines, don't forget to re-tighten it -
Hook up your clutch and brake cotter pin bolts and pins -
I got a new spring for the clutch return -
I had a little trouble remembering where it hooked up, but once I figured it out I took a picture. It is a little hard to see unless you have a double jointed neck -
Now the steering column goes back in!
Remember that little hook at the upper bottom of the steering column? That needs to hook in to the sheet metal bracket. Think down and up. It is a little tricky, because right where you are trying to hook it to the underside of the dash, is right where the splines on your steering linkage first start to mate up, so you have to monitor that and the hooking action all at once. If you just hook the steering linkage splines back together with the steering column resting on the seat, you have to pull it back out some for the hook to engage. More often than not, when that happens, the linkage spines just fall back apart.
In short, you have to hook up this:
At the same time as you do this:
Also, watch your spine mate up. Make sure your lines are lining up or you have to pull it out and start again -
That is really the hardest part. After that is it just bolting stuff together.
Hook up electrical -
Don't forget that little protective cover and bolt (which your yota may or may not have) -
Reinstall your duct work -
Now it is on to trim pieces -
08-02-2014, 09:09 PM
#6
Registered User
Thread Starter
Join Date: Feb 2014
Posts: 173
Likes: 0
Received 0 Likes
on
0 Posts
On the bottom dash panel...
Hook up your speaker -

Watch those clips on the right side!

Hook your hood release back up through the opening, pull lever and reinstall the two screws holding it on -

Next, take your gas cap door release cable and line it back up. Install two screws, place lever back on and insert tiny, easily lost clip (last picture omitted due to lost clip) -

Install any remaining pieces (ignition switch trim cover) and you are done!
The entire process took me a while (tear down, drive to friend to weld up bracket, scour junkyard for lost clip, etc) but if you had a brand new clutch bracket to install and didn't want to do anything else (reinforcement plate, bushings, cleaning, etc) then I suppose it would take you about 2 hours or so, but give yourself 3 or 4 as a safe buffer and a more relaxing environment where working on your yota is enjoyable!
I hope this was helpful to someone. Thanks!
Hook up your speaker -
Watch those clips on the right side!
Hook your hood release back up through the opening, pull lever and reinstall the two screws holding it on -
Next, take your gas cap door release cable and line it back up. Install two screws, place lever back on and insert tiny, easily lost clip (last picture omitted due to lost clip) -
Install any remaining pieces (ignition switch trim cover) and you are done!
The entire process took me a while (tear down, drive to friend to weld up bracket, scour junkyard for lost clip, etc) but if you had a brand new clutch bracket to install and didn't want to do anything else (reinforcement plate, bushings, cleaning, etc) then I suppose it would take you about 2 hours or so, but give yourself 3 or 4 as a safe buffer and a more relaxing environment where working on your yota is enjoyable!
I hope this was helpful to someone. Thanks!
Trending Topics
09-18-2015, 02:35 PM
#8
This is awesome. Mine broke about a year ago and had a buddy weld it up. He went the lazy route and tried to do it without taking everything out so it is either failing AGAIN or something is off because the piston isnt going stright into clutch master and it keeps blowing the seal. I am going to pull it out myself and have it reinforced that way. Again AWESOME write up.
08-18-2016, 06:40 PM
#9
Registered User

Join Date: Aug 2016
Posts: 4
Likes: 0
Received 0 Likes
on
0 Posts
I'm curious what symptoms were you having that led you to a problem. Like mine the pedal goes all the way to the floor to engage clutch then you barely let out and clutch engages. Thanks for awesome pics and info...
08-18-2016, 08:07 PM
#10
Registered User
Thread Starter
Join Date: Feb 2014
Posts: 173
Likes: 0
Received 0 Likes
on
0 Posts
As far as your clutch goes, check the FSM for how to adjust your clutch and make sure it is not an adjustment problem, which would be a lot easier to deal with. If it is your bracket, I would pull it sooner than later, otherwise you may find yourself not being able to pull the clutch in to shift.
08-18-2016, 08:37 PM
#11
Registered User
BTW - that "strategic hole" that Toyota made in the bracket.... a hole is often used to STOP a crack from spreading
So in this case - it did what it was supposed to do.
Great write up BTW.
I wonder if mine is broke...
So in this case - it did what it was supposed to do.
Great write up BTW.
I wonder if mine is broke...
08-18-2016, 08:44 PM
#12
Registered User
Thread Starter
Join Date: Feb 2014
Posts: 173
Likes: 0
Received 0 Likes
on
0 Posts

Especially with how much new ones cost!
Thanks for your kind words.
I think if you get a good flashlight you can get down there and see what's what.
Last edited by Red Leader; 08-18-2016 at 08:45 PM.
04-10-2017, 12:03 PM
#13
Registered User

Join Date: Apr 2017
Posts: 1
Likes: 0
Received 0 Likes
on
0 Posts
Red Leader - was following your instructions (which were excellent) and on reinstalling steering column, I discovered that the mark I made on the female part had been rubbed off. Any tips on how to handle this? I'm not sure if I should just guess or if there is another way to figure out how to get the steering column back in the right place. Any thought or help would be appreciated. This is on a 1990 4Runner. Thanks.
04-10-2017, 02:33 PM
#14
Registered User

Join Date: Sep 2007
Location: San Francisco East Bay
Posts: 8,251
Likes: 0
Received 820 Likes
on
648 Posts
Drive down the road, and when you're going straight, put a piece of tape on the top of the steering wheel. Measure the circumference of the steering wheel, then measure how far your tape is from the correct top of the steering wheel. Compare that ratio to the total number of splines; that will tell you how many splines you are off.
NOW mark the column, pull it apart, and move the exact number of splines you need.
What if you're still off by a fraction of one spline? This can be adjusted out with the toe adjustment, but this is really a job for someone with alignment equipment. If you're lucky your alignment was correct before you pulled the steering wheel, so it will be correct after you reinstall it.
07-06-2017, 04:32 PM
#15
Registered User

Join Date: Mar 2010
Location: North County San Diego, CA
Posts: 6
Likes: 0
Received 0 Likes
on
0 Posts
Thanks so much for taking the time to really show how this is done! It's much appreciated! I do have a question though...
I've got a 92 4x4 22re DLX Pickup. I thought I read somewhere that, on the pickups, the steering column does not need to be removed. Can you confirm? Do you have any experience with the pickups?
One difference I noticed is that my truck doesn't have a gas tank release. Mine has a lock on the gas door keyed to the main key.
If you are familiar with this job on a pickup, do you have any tips specific to them?
Thanks again for your detailed guide. Things are close enough that I can use it for my truck. Mine pretty much completely failed yesterday. When I push the pedal while looking under the dash, the tab on the pedal no longer even touches the clutch start switch. The alignment is that far off. I had to drive 20 miles in stop and go rush hour traffic with basically no clutch. More fun than one should be allowed to have!
07-18-2017, 07:03 PM
#16
Registered User

Join Date: Jul 2017
Location: Los Angeles
Posts: 5
Likes: 0
Received 0 Likes
on
0 Posts
WTF why is my pedal bracket different??? 1990 v6 4x4
First off thank you so much for this detailed write up!
After a long drawn out struggle I finally wrestled my pedal bracket from the firewall. I got a replacement off ebay, and it doesn't have a large spring attached to the clutch pedal from the pedal bracket as seen in these photos. What do I do?!
In the first photo my pedal bracket is on the left and the replacement is on the right

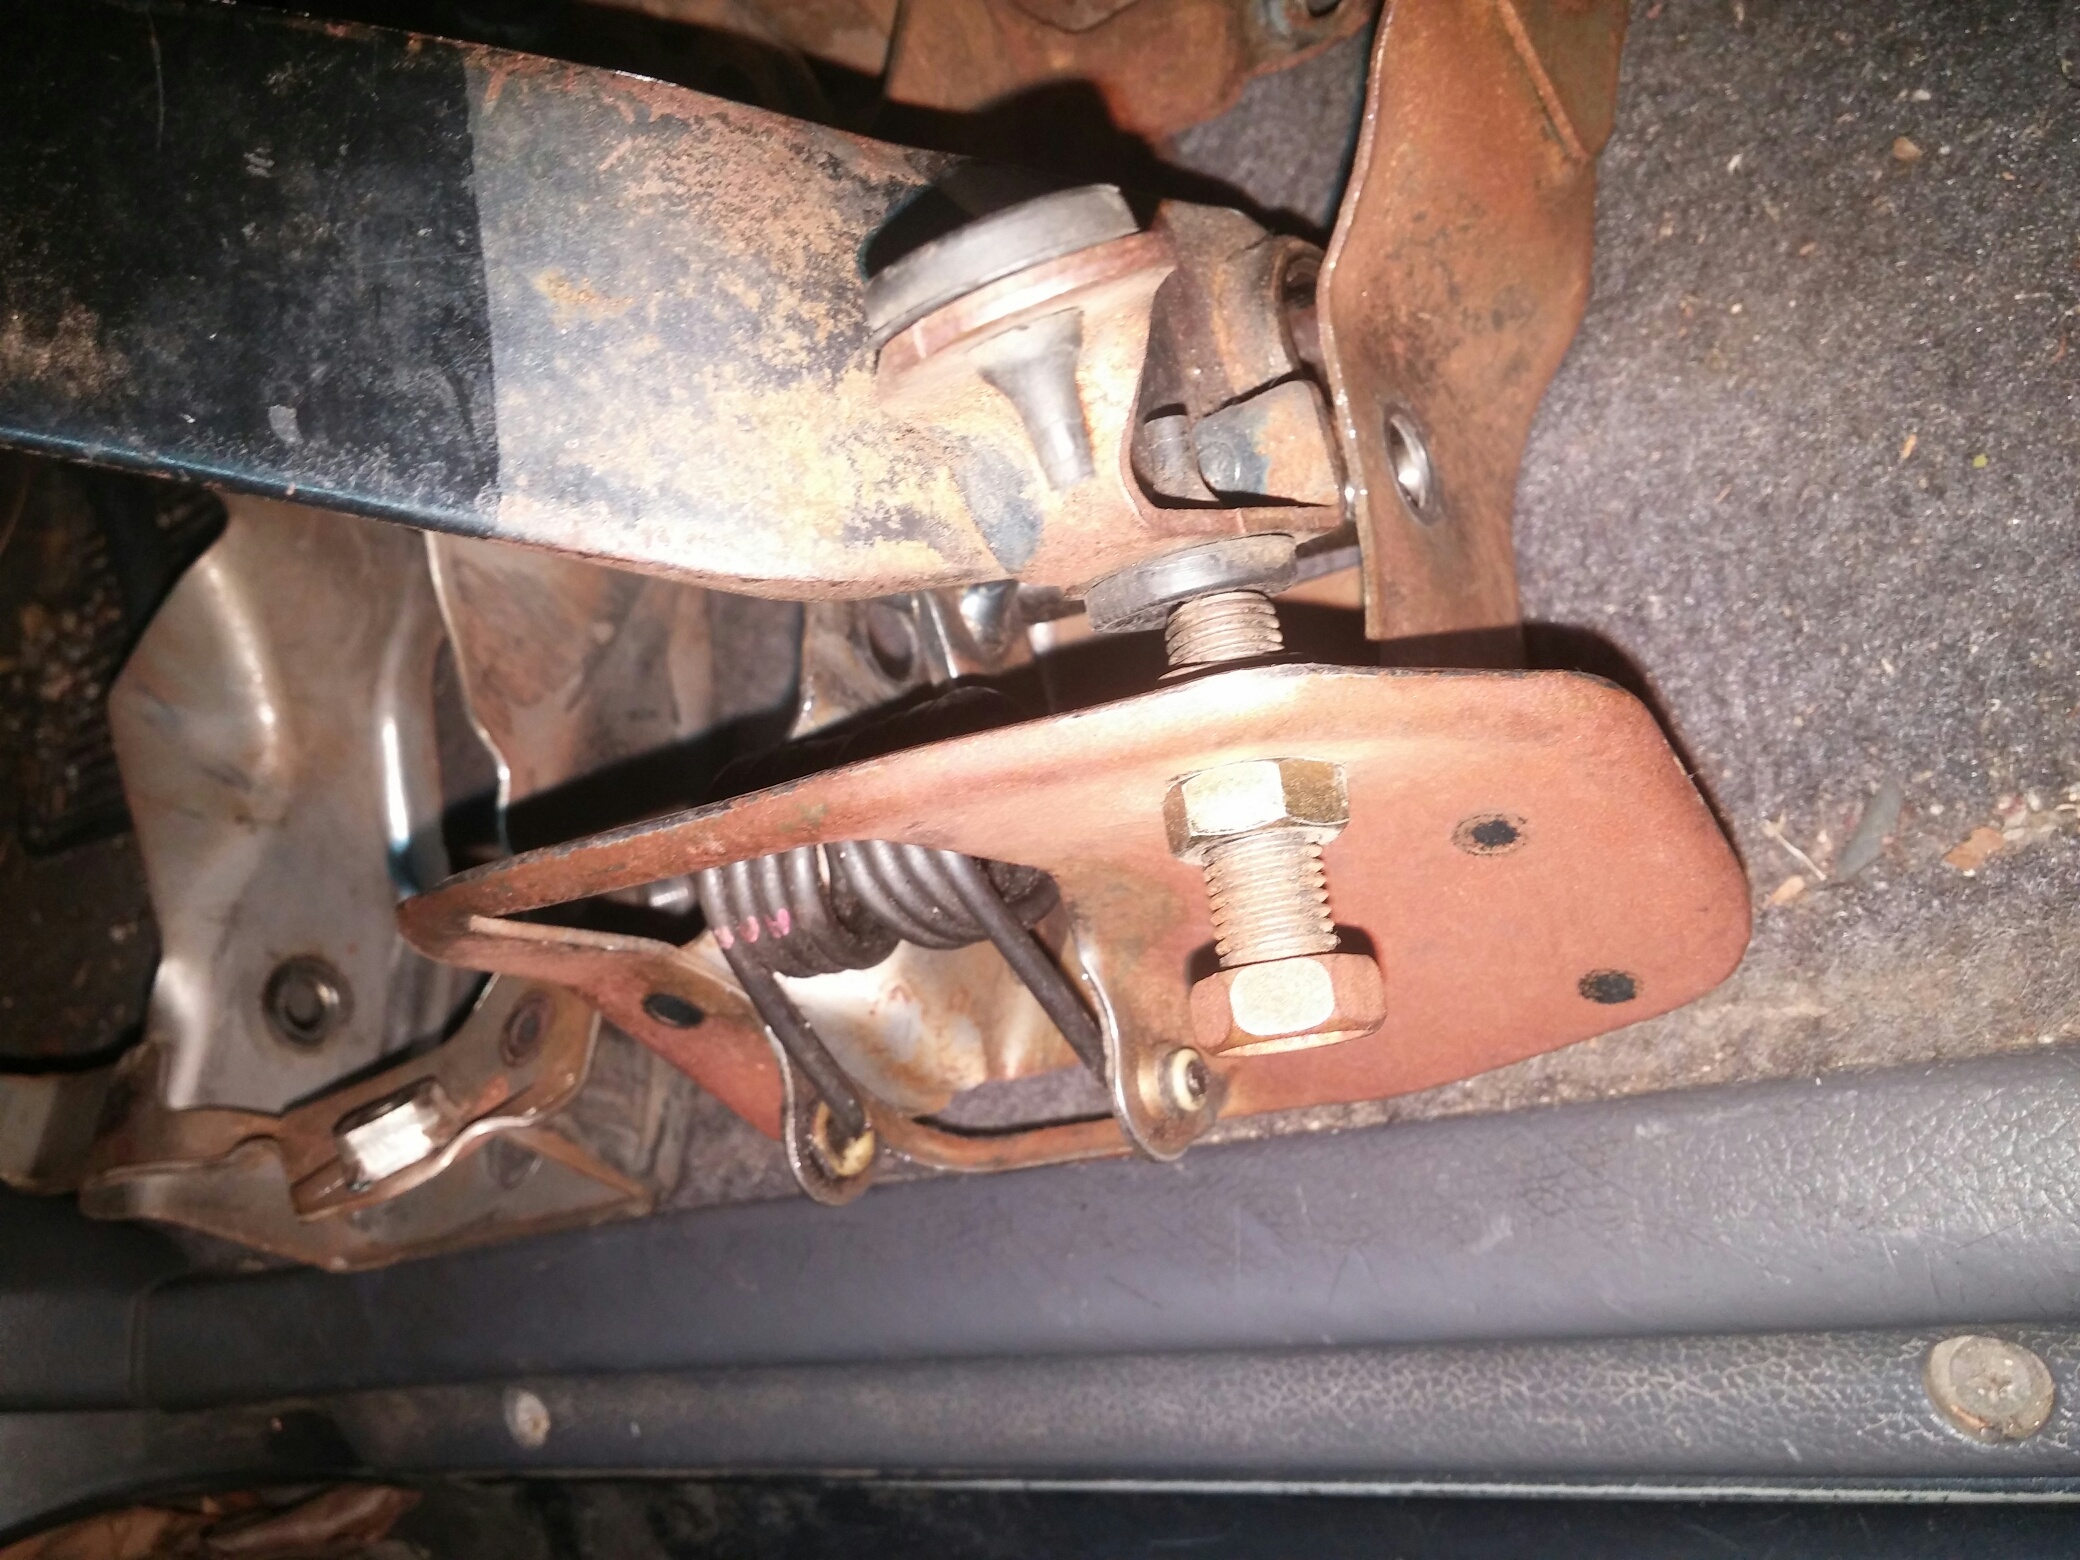
Close up of where spring attaches to pedal bracket
Also you can notice the difference in clutch pedals! note the bracket welded onto the clutch pedal on the right, where the spring connects to the pedal. and the clutch pedal on the left does not have that same metal piece welded onto it.
Thanks
After a long drawn out struggle I finally wrestled my pedal bracket from the firewall. I got a replacement off ebay, and it doesn't have a large spring attached to the clutch pedal from the pedal bracket as seen in these photos. What do I do?!
In the first photo my pedal bracket is on the left and the replacement is on the right
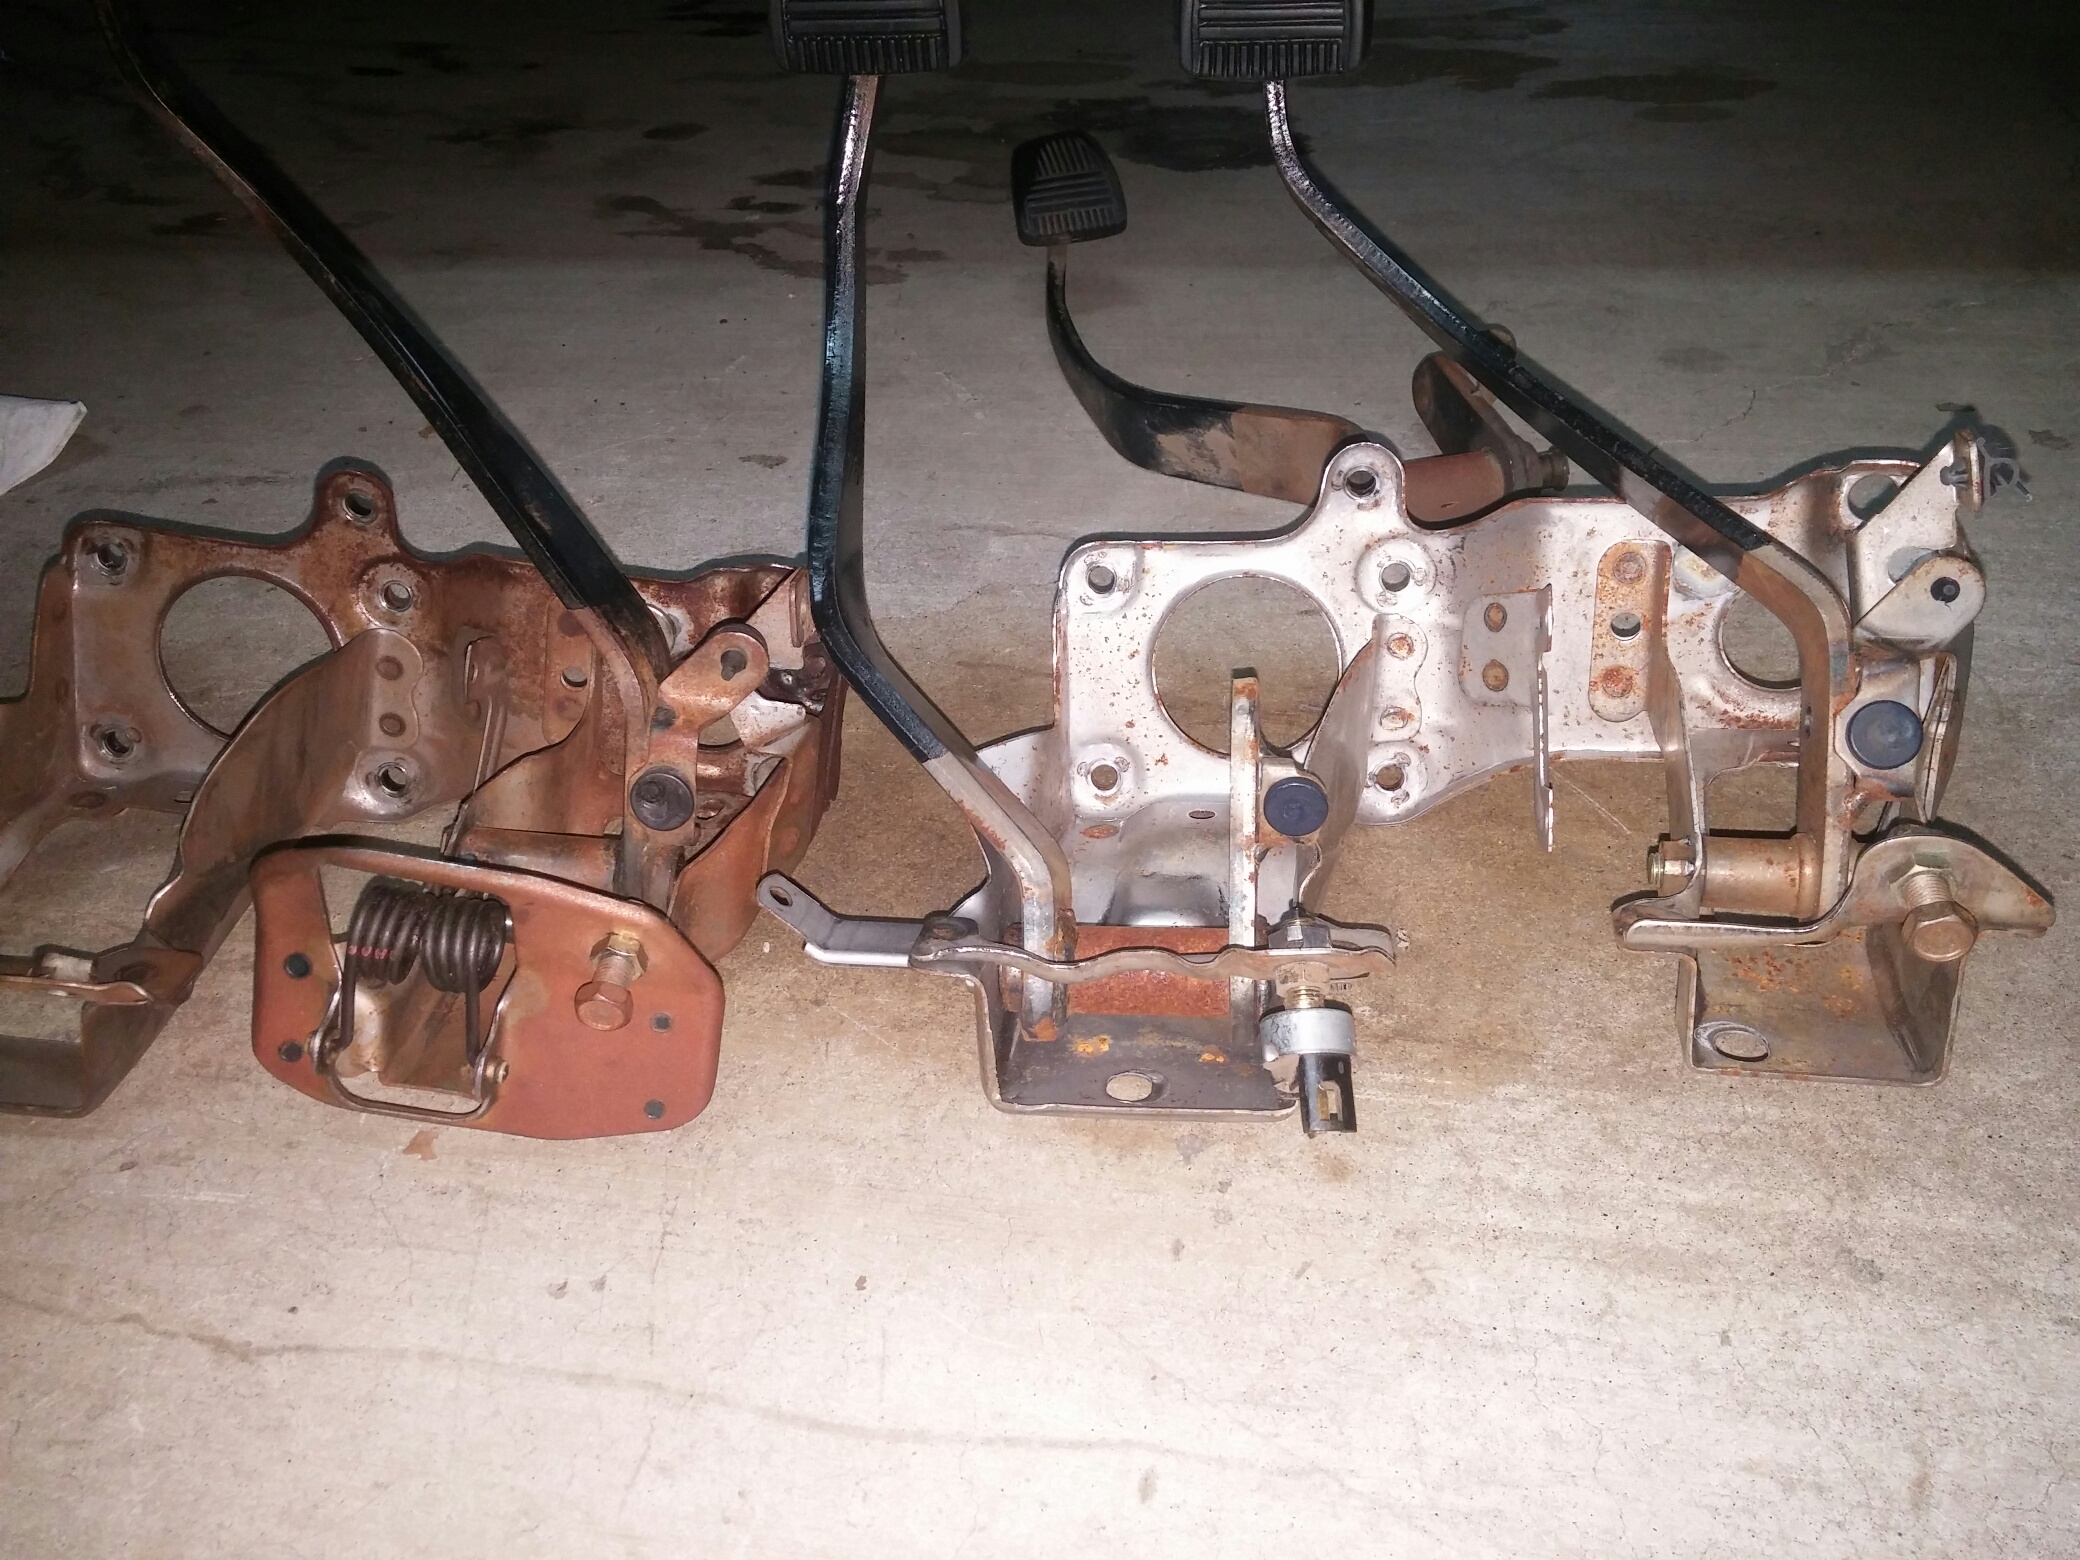
Close up of where spring attaches to pedal bracket
Also you can notice the difference in clutch pedals! note the bracket welded onto the clutch pedal on the right, where the spring connects to the pedal. and the clutch pedal on the left does not have that same metal piece welded onto it.

Thanks
01-31-2018, 04:13 PM
#17
Registered User

Join Date: Jan 2018
Posts: 1
Likes: 0
Received 0 Likes
on
0 Posts
This is my first try at this so I hope I don't screw it up. I just read your post w/ pictures on replacing a broken/cracked clutch pedal mounting bracket. My 1990 4runner has a broken bracket.I found this out after replacing the clutch when I probably didn't need to, and after having the guy who put my clutch in adjust my clutch afterwards just to have my runner start showing the symptoms again in less than a week .That sent me searching for what it could be and I correctly diagnosed it by reading your and many others posts. Anyway, your photos and how to are excellent, thank you for that. My question is, on a scale 1-10, what level difficulty would you put on this task? The guy that usually works on my Toyotas is telling me it's similar to pulling the motor out and putting it back in. His concern seems to be dropping the steering column. I suspect maybe he just doesn't want to do it. He has told me it would take him a day and a half or 2 days to tear it down and put back together. I'm on a very tight budget, if I can't do this myself I will have to sell it at a huge discount and find something else. And I don't deny I would love the satisfaction of showing him I did it. I have limited experience, though, at doing mechanical work, But I'm not afraid to try. Being in my 50's, and female with a torn rotater cuff in my shoulder makes me nervous about some of the bigger bolts and force required to loosen them. Any advice? Thank you so much.
01-31-2018, 07:38 PM
#18
Registered User
Join Date: Mar 2010
Location: North County San Diego, CA
Posts: 6
Likes: 0
Received 0 Likes
on
0 Posts
Repairing, or replacing?
This is my first try at this so I hope I don't screw it up. I just read your post w/ pictures on replacing a broken/cracked clutch pedal mounting bracket. My 1990 4runner has a broken bracket.I found this out after replacing the clutch when I probably didn't need to, and after having the guy who put my clutch in adjust my clutch afterwards just to have my runner start showing the symptoms again in less than a week .That sent me searching for what it could be and I correctly diagnosed it by reading your and many others posts. Anyway, your photos and how to are excellent, thank you for that. My question is, on a scale 1-10, what level difficulty would you put on this task? The guy that usually works on my Toyotas is telling me it's similar to pulling the motor out and putting it back in. His concern seems to be dropping the steering column. I suspect maybe he just doesn't want to do it. He has told me it would take him a day and a half or 2 days to tear it down and put back together. I'm on a very tight budget, if I can't do this myself I will have to sell it at a huge discount and find something else. And I don't deny I would love the satisfaction of showing him I did it. I have limited experience, though, at doing mechanical work, But I'm not afraid to try. Being in my 50's, and female with a torn rotater cuff in my shoulder makes me nervous about some of the bigger bolts and force required to loosen them. Any advice? Thank you so much.
I bought a new one from a dealer online, and didn't install the plate on the firewall. I bought one, but my firewall is fine. Took me the better part of a day, and my wife helped me to replace the steering column. I'm not going to get into my ailments, but I'm in my 50s, and I got it done.
Your torn cuff could be an issue with the awkward, upside down angles. It's a bit advanced, but not impossible.
Mine is a 92 4x4 pick-up.
best of luck to you!
05-20-2018, 12:29 PM
#19
Registered User

Join Date: May 2018
Posts: 1
Likes: 0
Received 0 Likes
on
0 Posts
What is the part number for the reinforcement plate? I'm about to attempt this on my '90 4runner with a new bracket and didn't know about the reinforcement plate. As long as i'm there.......
Thanks for any help.
Thanks for any help.
12-12-2018, 03:40 PM
#20
Registered User
Thank you for this thread. I'm embarrassed to even say how much time I wasted before I found this problem, oh well at least I have brand new parts......
strike one for the roundeye. lol
strike one for the roundeye. lol


