
cargo/camping system for a 92 short bed pickup (dialup beware)
 09-26-2011, 12:00 AM
#1
Registered User
Thread Starter

cargo/camping system for a 92 short bed pickup (dialup beware)
First post here, been lurking and learned a lot so this is an attempt to give back a bit. All images and possibly a few more are in my gallery:
https://www.yotatech.com/members/fil...go+system.html
Here’s a cargo system for a 92 short bed pickup dd.

Design:
The design calls for maximum use of space and ability to haul a significant load. I also wanted it to be good for camping, with bed above and camping storage below. There are four main components:
- The two wheel well boxes, which are sealed
- The drawer, which slides out. Drawer height is maximized for tools.
- The deck, which covers everything and fixes the wheel well boxes in their relative positions. The deck does not slide out.
- The tailgate locks, which must be unlocked to access anything in the wheel well boxes or the drawer.
Materials:
5 sheets 3/4 ACX ply for most structure. $30 a sheet where I live. Lots of waste unfortunately.
16 1.5'' fixed casters.
1 1/4 x 1/8 angle iron (24 inch is plenty) and suitable 1 inch self tapping metal scews
8 hinges to taste for cubby storage
2 padlockable barrel bolts for tailgate locking, and a couple padlocks.
6 d-ring loops for cargo tie down.
1x4x8(ripped) wood or other scrap inside the drawer
glue
deck screws. 1 5/8. plenty of them.
Drywall screws 1 1/4
sandpaper
caulk
primer - I used a good quality oil based primer as this is my protective coat and my canopy does leak around the tailgate.
paint – I used an epoxy-based paint, but it will get trashed soon enough.
Got it all at Home Depot except the plywood, which was a much better quality at a local lumber yard, and the primer and paint, which is better at a real paint shop. New pallets of ply tend to have nice flat sheets on top fwiw.
Before:

I removed the canopy and bed liner to maximize space. Was going to rhino line it but decided it wouldn’t do a thing for me here but cost time and money.
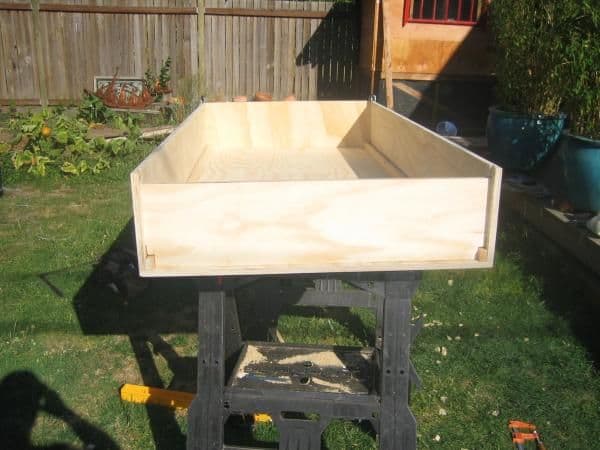
On to the carpentry. There’s a lot of ways to make the wheel well boxes but they all start with a bottom.

Front of a bottom. I wanted two boxes, not four.

Rear of a bottom. You’ll soon notice that your bed is neither flat nor square, the corners are all elegantly rounded, which slows things down a bit. Cut and dry fit, rinse and repeat until it sits level and plumb in the bed.


More details. I glued and screwed some runners to hold the boxes off the bed � inch. In the corners the bed is so rounded that I had to lift the boxes up out of the rounded over parts as best I could. Notice I shaved one corner at the wheel well because the wheel well round over is extra big.

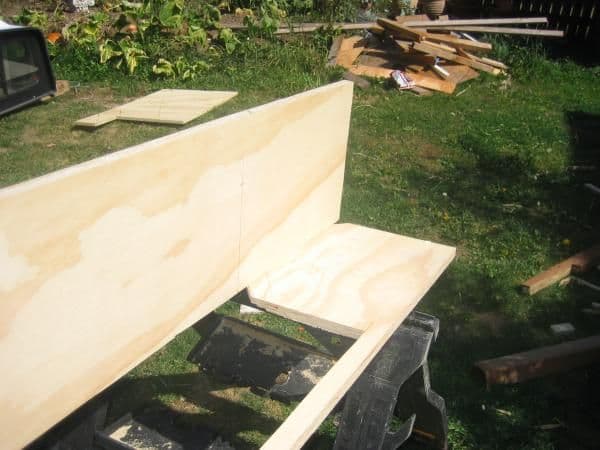
A side of a box.

Drivers side box. The interior side of the box rests directly on the bed, so the points of contact with the bed are inner side and the runners on the bottom.
Passenger side box. It has a slightly different design.
Dry fit of both boxes. The boxes are glued and screwed together, and slightly different from each other by design.
The drawer:
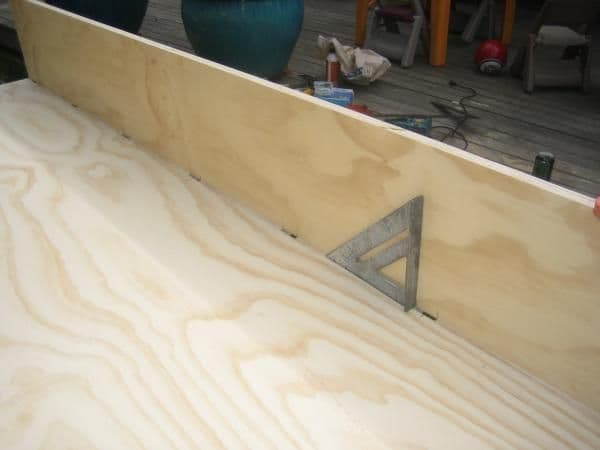
Here I’m marking the side to be notched out to match the bottom. 7 casters each side

Box with one side installed, and the opposite side notched out for casters.

Interior view of drawer. You can see the casters from inside, so that will need to be covered so dust doesn’t fall into the bed and gum up the casters.

Dry fitting the functional part of the drawer. In general my tolerances are 3/8 of an inch: the casters hang 3/8 below the drawer and there is 3/8 between the drawer and the wheel well boxes on either side. The casters run along the top of one of the ‘peaks’ of the bed. I didn’t use any glue on the drawer in case I want to upgrade to beefier casters in the future, or need to make repairs.

The final two casters are mounted on the top of the drawer sides at the front. These will run along the bottom of the deck and keep the drawer from tipping out as it is fully extended. They are notched in enough to give � inch clearance to the deck.

The rear of the drawer is a solid piece that slides in and out. Here I routered a groove for that piece. I wanted the rear removable for easy access to tools and so I can sweep out the drawer.
The rear of the drawer, installed.

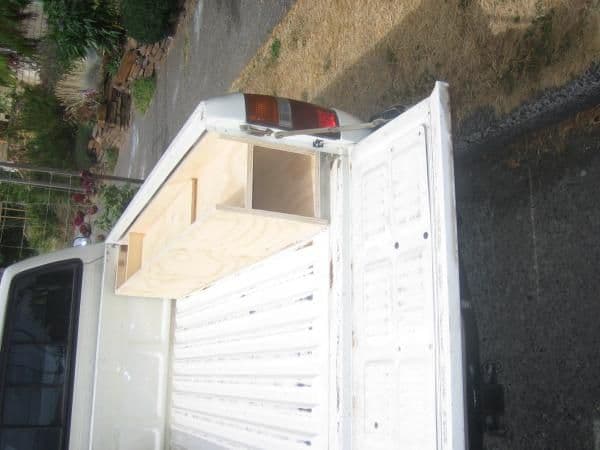
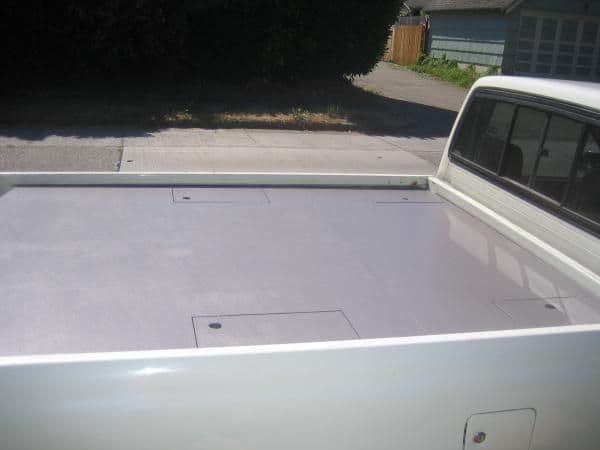
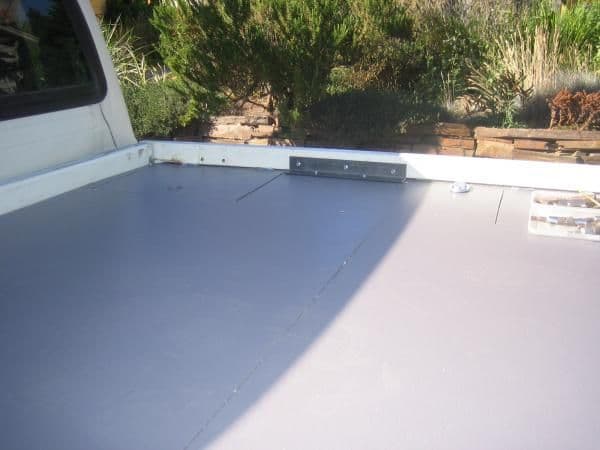
Not a lot of in-progress shots of the deck, sorry. Nor of the painting. I painted it for protection mostly, stain doesn’t penetrate this grade of ply for crap. So I laid out considerable cash and effort to prime and paint even though I know my tools are going to trash it fast. But I take pride in properly finishing a job and short of a rhinoline this is the best I could do. Does rhinoline bond to wood? Anyway here's a veiw of the deck from above. No glue here, obviously. There are two doors per side to get to the contents of the wheelwell box that can’t be reached from the rear.

The side cubby access. I expect small boxes of screws and such will be reached from these doors.

Front cubby access. Hard to get to but good for emergency parts and such. I put in ledgers for the door to rest against in the closed position.
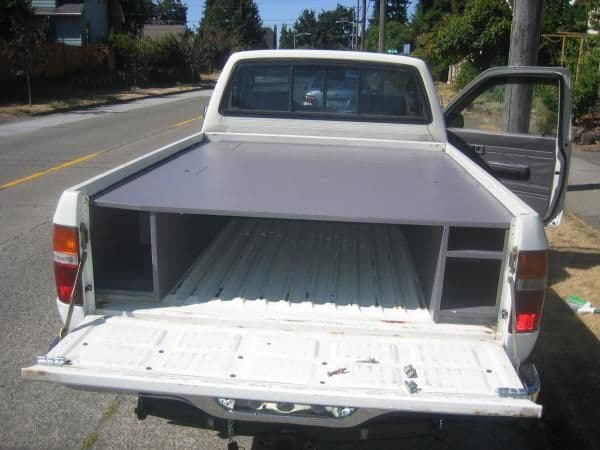
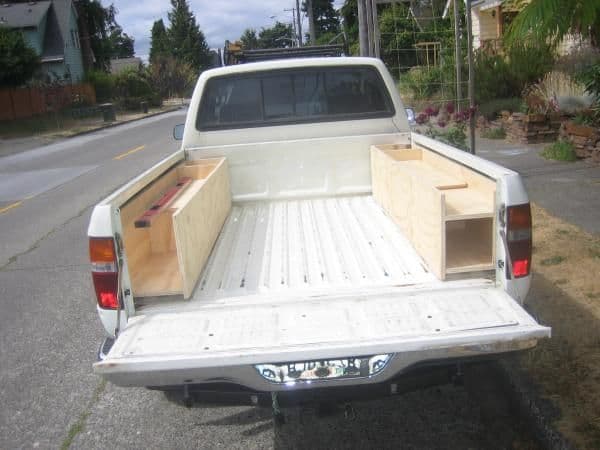
Rear View minus drawer. The passenger wheelwell box has a shelf for levels, angle iron etc in 4 + foot length sections, the drivers side is more general purpose. You can’t see it but I scribed the front of the deck to the front of my bed since it was far from straight. The deck is in two pieces, a 24 inch wide piece at the front and a roughly 48 inch wide piece at the back. Seems plenty stiff so I skipped adding some angle iron that I had bought. It tucks under the bottom of the bed rail a bit but can still be removed if I take the canopy off.

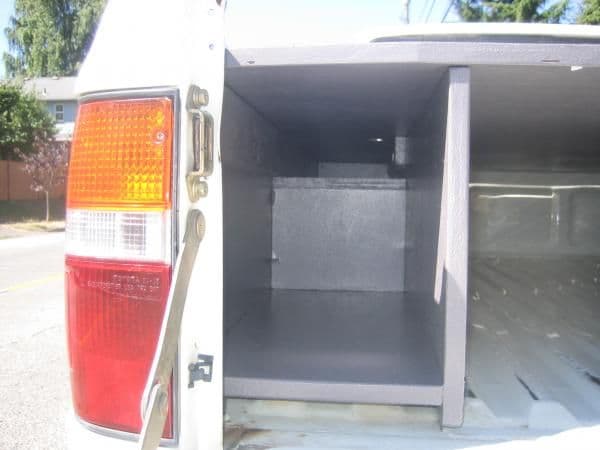
Some rear closeups minus drawer
Side view

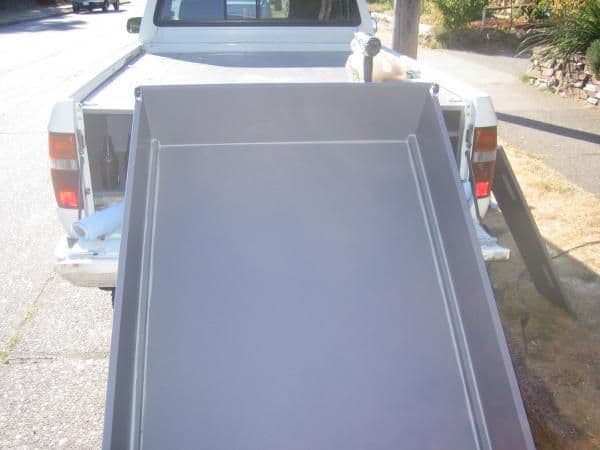
Nearly complete. Rear of drawer has been removed.
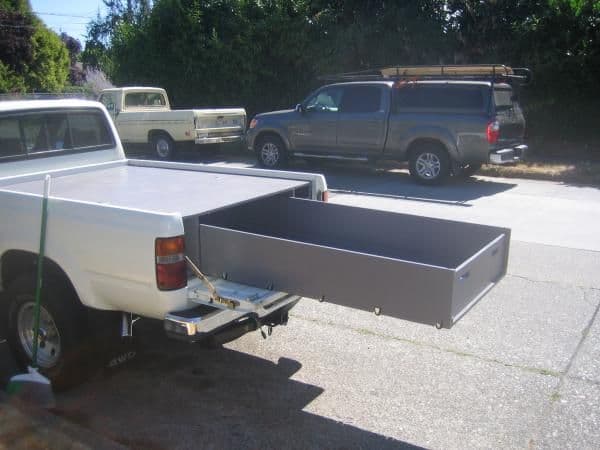
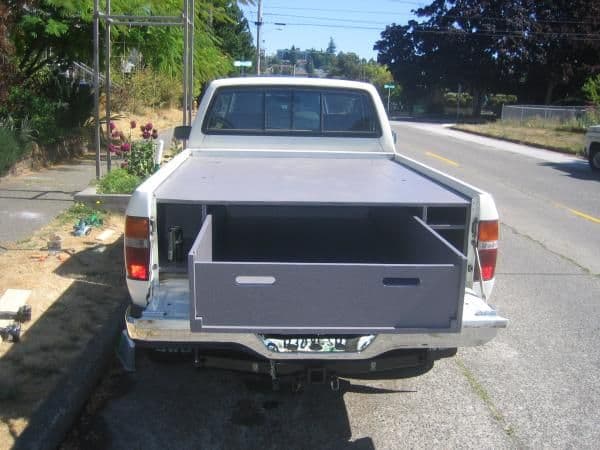
The drawer in action. My drawer fits very tightly against the tailgate in the closed position. I don’t want it to slide around when I accelerate or brake. I've extended a fully loaded drawer this far without any problems but I am careful of the huge force on the deck and try to extend it no more than 2/3 in general.
View of rear. Cargo on the deck is now close to the canopy windows so I put in some tie-downs to prevent sliding cargo from breaking windows. Barrel bolts lock the tailgate shut to prevent access to the drawer contents. Seriously, pop a lock needs to get it together and offer us non-Tacoma owners a locking tailgate solution
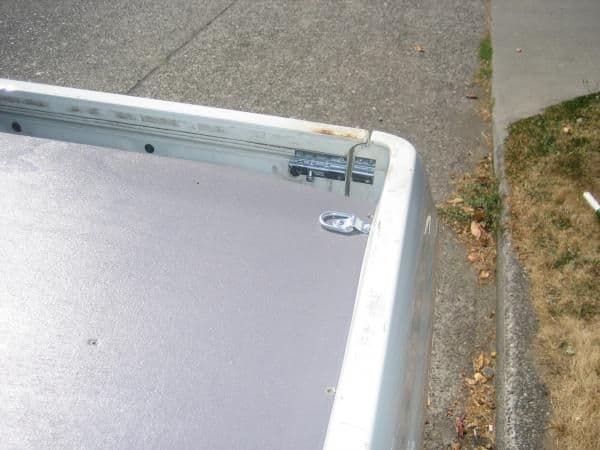
The only mounts: 1 � angle iron fixes system to truck. Originally I had planned to bolt the wheel well boxes to the bed but decided against it since the deck is maybe � inch below the bottom of the bed rails and tucks under them so the system cannot move vertically. My main concern was the whole thing cantilevering up on cab side when the drawer is fully loaded and extended but the deck would prevent that. I did notice however the system would rack out of square (glad I had to go the hardware store!) with driving and make the drawer pinch against the boxes so I went ahead and fixed the system to the truck bed rails on both sides towards the front.
Drawer seams caulked. Any dirt that falls through the seams will gum the casters, so I screwed in some small runners. Weather permitting I would have done this before paint but whatever.

Loading out the tools

Some final views
I've been using this for about a month and despite the cost and time I absolutely love it. I can lock a couple grand of tools and park on the street without fear yet still stuff lumber or tile or whatever on the top deck. Needless to say some memory foam cut to size would make a great bed for two with lots of secure storage below as well. My buddy has a full size truck with sliding bed, and tho it can handle a ton of weight his wheelwell area is useless and he has no deck for materials. Different tools for different needs.
Since I built this I put some 1/4 acx on the tailgate so the runners would have a smooth surface to roll over and ripped my pendaliner tailgate cover down to cover the top rail of the tailgate. I'll put pics up when I get the acx painted, but I'm buying a house and slammed with work.
Thing I’d do different:
- Use a cheaper grade of plywood for the wheel well boxes. They took up a lot more wood than I had planned. I’d also consider using a lesser width, like 5/8 or even �. You can always stiffen up the corners if you’re worried about heavy loading.
- Use 2-inch casters. Wouldn’t affect cost, fabrication, or design to upgrade. Right now the bed action, when loaded with a couple hundred pounds of tools, is pretty stiff. I not complaining though. I live in hilly terrain.
- Figure out some sort of headache rack. Cargo sliding forward could easily break my canopy and truck sliding windows all at once. Not to mention giving me a headache.
Things I may have to do:
- Add some stopping mechanism so the drawer cannot slide out the back of the truck on a hill.
- Add more tie downs. Cargo really wants to break those windows.
- Add some removable pieces to the drawer so I can throw my chop saw or table saw on top of the extended drawer and work.
https://www.yotatech.com/members/fil...go+system.html
Here’s a cargo system for a 92 short bed pickup dd.
Design:
The design calls for maximum use of space and ability to haul a significant load. I also wanted it to be good for camping, with bed above and camping storage below. There are four main components:
- The two wheel well boxes, which are sealed
- The drawer, which slides out. Drawer height is maximized for tools.
- The deck, which covers everything and fixes the wheel well boxes in their relative positions. The deck does not slide out.
- The tailgate locks, which must be unlocked to access anything in the wheel well boxes or the drawer.
Materials:
5 sheets 3/4 ACX ply for most structure. $30 a sheet where I live. Lots of waste unfortunately.
16 1.5'' fixed casters.
1 1/4 x 1/8 angle iron (24 inch is plenty) and suitable 1 inch self tapping metal scews
8 hinges to taste for cubby storage
2 padlockable barrel bolts for tailgate locking, and a couple padlocks.
6 d-ring loops for cargo tie down.
1x4x8(ripped) wood or other scrap inside the drawer
glue
deck screws. 1 5/8. plenty of them.
Drywall screws 1 1/4
sandpaper
caulk
primer - I used a good quality oil based primer as this is my protective coat and my canopy does leak around the tailgate.
paint – I used an epoxy-based paint, but it will get trashed soon enough.
Got it all at Home Depot except the plywood, which was a much better quality at a local lumber yard, and the primer and paint, which is better at a real paint shop. New pallets of ply tend to have nice flat sheets on top fwiw.
Before:
I removed the canopy and bed liner to maximize space. Was going to rhino line it but decided it wouldn’t do a thing for me here but cost time and money.
On to the carpentry. There’s a lot of ways to make the wheel well boxes but they all start with a bottom.
Front of a bottom. I wanted two boxes, not four.
Rear of a bottom. You’ll soon notice that your bed is neither flat nor square, the corners are all elegantly rounded, which slows things down a bit. Cut and dry fit, rinse and repeat until it sits level and plumb in the bed.
More details. I glued and screwed some runners to hold the boxes off the bed � inch. In the corners the bed is so rounded that I had to lift the boxes up out of the rounded over parts as best I could. Notice I shaved one corner at the wheel well because the wheel well round over is extra big.
A side of a box.
Drivers side box. The interior side of the box rests directly on the bed, so the points of contact with the bed are inner side and the runners on the bottom.
Passenger side box. It has a slightly different design.
Dry fit of both boxes. The boxes are glued and screwed together, and slightly different from each other by design.
The drawer:
Here I’m marking the side to be notched out to match the bottom. 7 casters each side
Box with one side installed, and the opposite side notched out for casters.
Interior view of drawer. You can see the casters from inside, so that will need to be covered so dust doesn’t fall into the bed and gum up the casters.
Dry fitting the functional part of the drawer. In general my tolerances are 3/8 of an inch: the casters hang 3/8 below the drawer and there is 3/8 between the drawer and the wheel well boxes on either side. The casters run along the top of one of the ‘peaks’ of the bed. I didn’t use any glue on the drawer in case I want to upgrade to beefier casters in the future, or need to make repairs.
The final two casters are mounted on the top of the drawer sides at the front. These will run along the bottom of the deck and keep the drawer from tipping out as it is fully extended. They are notched in enough to give � inch clearance to the deck.
The rear of the drawer is a solid piece that slides in and out. Here I routered a groove for that piece. I wanted the rear removable for easy access to tools and so I can sweep out the drawer.
The rear of the drawer, installed.
Not a lot of in-progress shots of the deck, sorry. Nor of the painting. I painted it for protection mostly, stain doesn’t penetrate this grade of ply for crap. So I laid out considerable cash and effort to prime and paint even though I know my tools are going to trash it fast. But I take pride in properly finishing a job and short of a rhinoline this is the best I could do. Does rhinoline bond to wood? Anyway here's a veiw of the deck from above. No glue here, obviously. There are two doors per side to get to the contents of the wheelwell box that can’t be reached from the rear.
The side cubby access. I expect small boxes of screws and such will be reached from these doors.
Front cubby access. Hard to get to but good for emergency parts and such. I put in ledgers for the door to rest against in the closed position.
Rear View minus drawer. The passenger wheelwell box has a shelf for levels, angle iron etc in 4 + foot length sections, the drivers side is more general purpose. You can’t see it but I scribed the front of the deck to the front of my bed since it was far from straight. The deck is in two pieces, a 24 inch wide piece at the front and a roughly 48 inch wide piece at the back. Seems plenty stiff so I skipped adding some angle iron that I had bought. It tucks under the bottom of the bed rail a bit but can still be removed if I take the canopy off.
Some rear closeups minus drawer
Side view
Nearly complete. Rear of drawer has been removed.
The drawer in action. My drawer fits very tightly against the tailgate in the closed position. I don’t want it to slide around when I accelerate or brake. I've extended a fully loaded drawer this far without any problems but I am careful of the huge force on the deck and try to extend it no more than 2/3 in general.
View of rear. Cargo on the deck is now close to the canopy windows so I put in some tie-downs to prevent sliding cargo from breaking windows. Barrel bolts lock the tailgate shut to prevent access to the drawer contents. Seriously, pop a lock needs to get it together and offer us non-Tacoma owners a locking tailgate solution
The only mounts: 1 � angle iron fixes system to truck. Originally I had planned to bolt the wheel well boxes to the bed but decided against it since the deck is maybe � inch below the bottom of the bed rails and tucks under them so the system cannot move vertically. My main concern was the whole thing cantilevering up on cab side when the drawer is fully loaded and extended but the deck would prevent that. I did notice however the system would rack out of square (glad I had to go the hardware store!) with driving and make the drawer pinch against the boxes so I went ahead and fixed the system to the truck bed rails on both sides towards the front.
Drawer seams caulked. Any dirt that falls through the seams will gum the casters, so I screwed in some small runners. Weather permitting I would have done this before paint but whatever.
Loading out the tools
Some final views
I've been using this for about a month and despite the cost and time I absolutely love it. I can lock a couple grand of tools and park on the street without fear yet still stuff lumber or tile or whatever on the top deck. Needless to say some memory foam cut to size would make a great bed for two with lots of secure storage below as well. My buddy has a full size truck with sliding bed, and tho it can handle a ton of weight his wheelwell area is useless and he has no deck for materials. Different tools for different needs.
Since I built this I put some 1/4 acx on the tailgate so the runners would have a smooth surface to roll over and ripped my pendaliner tailgate cover down to cover the top rail of the tailgate. I'll put pics up when I get the acx painted, but I'm buying a house and slammed with work.
Thing I’d do different:
- Use a cheaper grade of plywood for the wheel well boxes. They took up a lot more wood than I had planned. I’d also consider using a lesser width, like 5/8 or even �. You can always stiffen up the corners if you’re worried about heavy loading.
- Use 2-inch casters. Wouldn’t affect cost, fabrication, or design to upgrade. Right now the bed action, when loaded with a couple hundred pounds of tools, is pretty stiff. I not complaining though. I live in hilly terrain.
- Figure out some sort of headache rack. Cargo sliding forward could easily break my canopy and truck sliding windows all at once. Not to mention giving me a headache.
Things I may have to do:
- Add some stopping mechanism so the drawer cannot slide out the back of the truck on a hill.
- Add more tie downs. Cargo really wants to break those windows.
- Add some removable pieces to the drawer so I can throw my chop saw or table saw on top of the extended drawer and work.
Last edited by fillayminyon; 09-26-2011 at 01:14 AM.
 09-26-2011, 04:23 AM
#2
Registered User
Join Date: Mar 2010
Location: Peoria, AZ
Posts: 504
Likes: 0
Received 0 Likes
on
0 Posts
Great work! Looks very well done.
Something to consider since this appears to be more of a daily driver / utility vehicle versus off-road Toy is the "Zuk mod" to help with the payload. Just do a search. It'll level out the back too with the right springs. There have also been springs discovered that require no mods whatsoever.
Something to consider since this appears to be more of a daily driver / utility vehicle versus off-road Toy is the "Zuk mod" to help with the payload. Just do a search. It'll level out the back too with the right springs. There have also been springs discovered that require no mods whatsoever.
09-26-2011, 07:43 AM
#4
Registered User
Thread Starter
Great work! Looks very well done.
Something to consider since this appears to be more of a daily driver / utility vehicle versus off-road Toy is the "Zuk mod" to help with the payload. Just do a search. It'll level out the back too with the right springs. There have also been springs discovered that require no mods whatsoever.
Something to consider since this appears to be more of a daily driver / utility vehicle versus off-road Toy is the "Zuk mod" to help with the payload. Just do a search. It'll level out the back too with the right springs. There have also been springs discovered that require no mods whatsoever.

Trending Topics


 09-26-2011, 02:39 PM
#11
Registered User
Join Date: Jan 2011
Location: Glens Falls, NY
Posts: 82
Likes: 0
Received 0 Likes
on
0 Posts
Looks great, well thought out. I converted a Ford Aerostar in to a camper van a few weeks ago and traveled all over with it. I've been toying about building a bed/storage area also for my pickup. Will definitely be borrowing a few ideas!
09-26-2011, 04:51 PM
#13
Registered User
Thread Starter
Theres a thread on the net where someone did that with I think a f-250. He used diamond plate for the deck. Looked fantastic, probably cost well better than a thousand bucks. Living in the pacific northwest I don't think I'd ever trust that I weatherproofed something that well but hats off to that guy.
 09-26-2011, 06:59 PM
#15
Registered User
Thread Starter
A friend of mine - the finest carpenter I've ever worked with - has an aerostar tricked out for work use. They haul a shocking amount of tools properly kitted, and don't seem to complain much about weight. Plus who'd break into an aerostar haha.
09-26-2011, 07:16 PM
#16
Registered User

Join Date: Aug 2011
Posts: 10
Likes: 0
Received 0 Likes
on
0 Posts
I like the cubby hole action on top use of all real estate, if you was camping and sleeping in there i could see my shoes keys hell what ever going in there.good idea does it all come out fairly easy if need be!
09-26-2011, 07:24 PM
#17
Registered User
I like how much time and attention to detail you put into this. What with the cutting/bracing/painting/caulking to keep dust out of the castors/etc it looks great. Now go take all those silly tools out of there, load up a bunch of camping gear and hit a trail somewhere so we can see some camping shots and you can let us know how well it works in the hills. I hear the PNW is great for camping.
09-26-2011, 07:28 PM
#18
Registered User
09-26-2011, 08:15 PM
#19
Registered User
Thread Starter
I like how much time and attention to detail you put into this. What with the cutting/bracing/painting/caulking to keep dust out of the castors/etc it looks great. Now go take all those silly tools out of there, load up a bunch of camping gear and hit a trail somewhere so we can see some camping shots and you can let us know how well it works in the hills. I hear the PNW is great for camping.

Plus my new house needs another bathroom and a deck and my shop needs some insulation and a gas heater. All in due time. Excuses excuses....
09-26-2011, 10:57 PM
#20
Registered User
*Sigh* I hear ya bro. With my first house (MY FIRST GARAGE / SHOP OH HELL YEA!) incoming and a ˟˟˟˟ty economy I take all the jobs I can get, which funny enough is about as many as when the economy was booming haha. Guess craftsmanship is always in demand. But yea its hard to get away and though I love my hard earned tools I'd love to tuck them away in exchange for a grill, a fishing rod, my girl, a cooler of beer and whiskey, a few friends and a hard-to-reach view here in Washington state. Its spectacular here. *Sigh* Price you pay to live in the big city where the money and work is.
Plus my new house needs another bathroom and a deck and my shop needs some insulation and a gas heater. All in due time. Excuses excuses....
Plus my new house needs another bathroom and a deck and my shop needs some insulation and a gas heater. All in due time. Excuses excuses....
I've worked every day since I was too young to know what not working was.... now I'm chasing odd jobs and unemployment pay (which embarrasses me to my core).
Bless you for being a working man.
Last edited by Junkers88; 09-26-2011 at 11:00 PM.


