
3VZE Valve clearance check upon rebuild.
 01-06-2009, 09:05 PM
#1
Registered User
Thread Starter

Join Date: Dec 2008
Posts: 5
Likes: 0
Received 0 Likes
on
0 Posts
3VZE Valve clearance check upon rebuild.
Ok people,
I've read a few threads regarding this and talked to my machinist and tried and tried, but I can't seem to get the right combo with the lifter/shims. Everything is on the tight side and now I'm down to 3/12 to work out,(and that includes one .008in on exhaust, first cyl., right bank). I guess I should go to toyota and get a few various smaller size shims?
Can it really be this difficult? I've been out there for hours upon hours playing the shell game!!!
I'm gonna lose my mind.
There must be something I, as a novice, can do here. I'm sure it's time to invest in a micrometer, but along with that. WHAT AM I DOING WRONG!
Oh, and the valves weren't ground and lifters weren't marked from machinist. Put em' in like I got em'. I may have mixed them up in the first place(d'oh!).
I really wanna finish this and get on with my life...
Thank you in advance for any feedback!
enzand
93' runner stock and stock, I guess. Had it three years and drove it once. Backing into my driveway.
 01-07-2009, 06:09 AM
#3
OK dude, I’m no expert, but I have done valve adjustments on these o/h cam Toyotas a few times. Many of the different engines I’ve worked on i.e. 2uz, 3vze, 3rzfe, etc all use the same type of components and adjustment procedures. You really need to get a copy of the FSM or a Chilton or Haynes manual. There is a chart in there that you need. I thought there was a sticky on this site with a pdf of the manual, but I’m a dork and can’t find it. Maybe thook knows.
You said you had 3 of the 12 valves correctly shimmed. Now you need to just need to worry about 9 of them. You need to start from scratch though. Measure and record each clearance, be sure to write them down in order and it helps if you can measure them to the nearest ten-thousanth. You will notice that the chart shows the clearances to four places beyond the decimal---0.0000. Your feeler gauges will not measure that finely, you will have to use some judgement, i.e a loose fitting feeler gets a higher number in the last position, etc.
Then you need to remove only those shims that are out of spec, and measure the thickness (yes you should use a micrometer if you have one. I use an accurate set of dial calipers) of each shim and record it next to the valve clearance. Also, I write the thickness on each shim with a magic marker, to help me sort stuff out later.
So now that you have all the clearances recorded, and all of the shim thicknesses recorded, you can utilize the chart in the manual to select the correct shim thickness for each out of spec valve.
Here is what the chart will look like. There are two charts, ones for intake and one for exhaust. You simply cross reference clearance and existing shim thickness to find out what shim you need. This is not the manual for your truck so don’t use it. It is just an example:
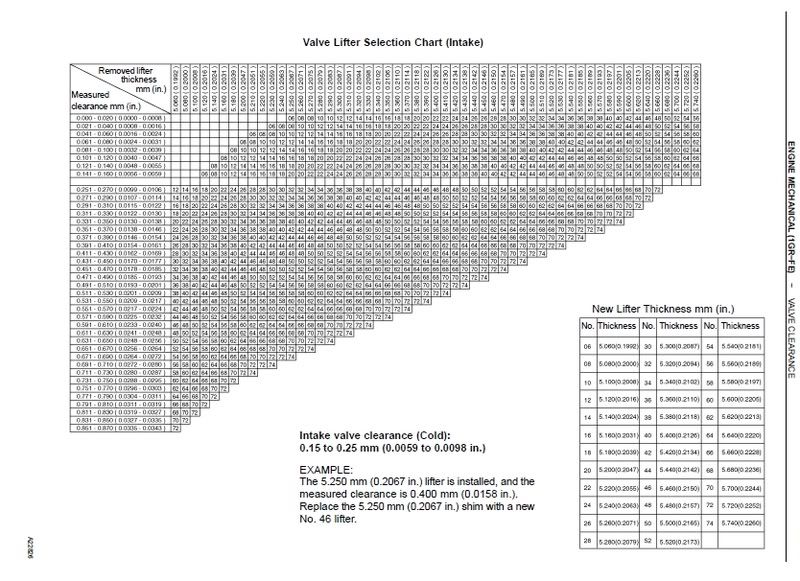
Since you wrote all of the shim thicknesses on the shims, you can now see if they match up with any of the shims you need. A shim that makes a tight fit on one valve might be just perfect for another. After you are done with that, you have a list to take to the dealership in order to buy the shims you need. Take the chart with you to help avoid confusion at the parts counter. The shims are around $6 to $8 each, IIRC.
Then just consult your notes while you reassemble it and you should be good to go.
You said you had 3 of the 12 valves correctly shimmed. Now you need to just need to worry about 9 of them. You need to start from scratch though. Measure and record each clearance, be sure to write them down in order and it helps if you can measure them to the nearest ten-thousanth. You will notice that the chart shows the clearances to four places beyond the decimal---0.0000. Your feeler gauges will not measure that finely, you will have to use some judgement, i.e a loose fitting feeler gets a higher number in the last position, etc.
Then you need to remove only those shims that are out of spec, and measure the thickness (yes you should use a micrometer if you have one. I use an accurate set of dial calipers) of each shim and record it next to the valve clearance. Also, I write the thickness on each shim with a magic marker, to help me sort stuff out later.
So now that you have all the clearances recorded, and all of the shim thicknesses recorded, you can utilize the chart in the manual to select the correct shim thickness for each out of spec valve.
Here is what the chart will look like. There are two charts, ones for intake and one for exhaust. You simply cross reference clearance and existing shim thickness to find out what shim you need. This is not the manual for your truck so don’t use it. It is just an example:
Since you wrote all of the shim thicknesses on the shims, you can now see if they match up with any of the shims you need. A shim that makes a tight fit on one valve might be just perfect for another. After you are done with that, you have a list to take to the dealership in order to buy the shims you need. Take the chart with you to help avoid confusion at the parts counter. The shims are around $6 to $8 each, IIRC.
Then just consult your notes while you reassemble it and you should be good to go.
Last edited by zlathim; 01-07-2009 at 06:19 AM.
01-07-2009, 07:37 AM
#4
Registered User
Join Date: Mar 2008
Location: Temecula Valley, CA
Posts: 12,723
Likes: 0
Received 4 Likes
on
4 Posts
Sorry to go tangenital, and I'm not trying to be alarmist, but before you start measuring and replacing shims...
Since the valves have all been removed and there's no way to replace them in the cylinder they came from there is a chance that a valve will not seat properly in another location. This is important for the exhaust valves in particular because if the valve does not match the seat it can overheat and warp / burn. On an engine that has a known tendency to run warm on the rear cylinders this would be even more important.
Do you know how to lap valves?
What did the machinist have to say about the problem?
01-07-2009, 08:44 AM
#5
Registered User
Join Date: Oct 2005
Location: Berkeley, CA
Posts: 587
Likes: 0
Received 0 Likes
on
0 Posts
I went through the "measure clearance-measure shim-find new shim thickness" procedure during my rebuild. I only had 4 or 5 valves I needed to do this on, but it was no problem at all. If you follow the FSM there's really not much to it, just do as they say. There is no reason to go out and buy an assortment of shims, if you measure and read the manual correctly you should be spot on after you do your exchange.
01-07-2009, 09:44 AM
#6
Sorry to go tangenital, and I'm not trying to be alarmist, but before you start measuring and replacing shims...
Since the valves have all been removed and there's no way to replace them in the cylinder they came from there is a chance that a valve will not seat properly in another location. This is important for the exhaust valves in particular because if the valve does not match the seat it can overheat and warp / burn. On an engine that has a known tendency to run warm on the rear cylinders this would be even more important.
Do you know how to lap valves?
What did the machinist have to say about the problem?
Since the valves have all been removed and there's no way to replace them in the cylinder they came from there is a chance that a valve will not seat properly in another location. This is important for the exhaust valves in particular because if the valve does not match the seat it can overheat and warp / burn. On an engine that has a known tendency to run warm on the rear cylinders this would be even more important.
Do you know how to lap valves?
What did the machinist have to say about the problem?
I could be sorely mistaken, but I assumed he didn't pull the valves, but just got the shims mixed up.
01-09-2009, 09:12 AM
#7
Registered User
Thread Starter
Join Date: Dec 2008
Posts: 5
Likes: 0
Received 0 Likes
on
0 Posts
valve clearances again today 3vze
thanks so much, especially zlathim, this all seems to make much better sense. my silly manual does not have such a chart, so off to the search the net for one.
anyhow, i only have three (or four-if I should replace no.2 exhaust being one thousandth tight) out of twelve to get to spec.
so I add the existing clearance to the shim size and use the chart to determine shim number?
And yeah, i think the lifters got scrambled when I took it apart. The valves were, I guess just checked.
Thanks again. I'm sure I'll be back.
Hopefully I get to the motor install early next week!
enzand
Oh, btw, what is the valve lap abecedarian is talking bout'?
Trending Topics
01-09-2009, 09:21 AM
#8
Good luck, I'm sure you will get it all straightened out soon.
Last edited by zlathim; 01-09-2009 at 09:30 AM.
01-09-2009, 09:36 AM
#9
He's talking about lapping the existing valves and seats. I think he was under the impression that you had removed the valves themselves and gotten them mixed up. In that case, it is good advice, but if I am reading this correctly, you don't need to worry about it.
Did you compress the springs, remove the keepers, and remove the valves from the head? If you did, and got them mixed up then I have been reading this whole thing all wrong and you should probably follow abes advice.
Did you compress the springs, remove the keepers, and remove the valves from the head? If you did, and got them mixed up then I have been reading this whole thing all wrong and you should probably follow abes advice.
01-09-2009, 02:21 PM
#10
Registered User

Join Date: Jan 2009
Posts: 175
Likes: 0
Received 0 Likes
on
0 Posts
Zlathim, I don't know if you remember me, I'm the one with the diesel sounding Toy. hoping to avoid doing this! Enzand, I feel your pain my Toyota brethren! Listen to Zlathim, get yourself a micrometer (preferably digital,and a quality one not from harber frt.) to just make it a little easier. Also, I found all the tech specs I needed on line from my local library (free to download). There is a way to do it (replace the shims) with out having to remove the cam, but you would need a special tool, which really makes life A LOT easier!!
01-10-2009, 06:21 PM
#11
Zlathim, I don't know if you remember me, I'm the one with the diesel sounding Toy. hoping to avoid doing this! Enzand, I feel your pain my Toyota brethren! Listen to Zlathim, get yourself a micrometer (preferably digital,and a quality one not from harber frt.) to just make it a little easier. Also, I found all the tech specs I needed on line from my local library (free to download). There is a way to do it (replace the shims) with out having to remove the cam, but you would need a special tool, which really makes life A LOT easier!!
01-10-2009, 06:48 PM
#12
Enzand, I feel your pain on this one. Build my first 3.0 last spring and had a rough time getting the valves adjusted after having the heads done. Like you, the machinist never ground the valve stems back so my shim set was worthless. It took me two attempts to get all intake/exhaust shims right. Best wishes to you on this journey! Let us know how it turns out and what compression values you get for each cylinder.
Aaron
Aaron
01-11-2009, 08:29 PM
#13
Registered User
Thread Starter
Join Date: Dec 2008
Posts: 5
Likes: 0
Received 0 Likes
on
0 Posts
thanks y'all. and stepside trd for the library heads up cuz I can't seem to find a readable copy out here. I found a link on an autozone site but the intake is so blurry it hurts to look at. also, the shim numbers are different between intake and exhaust???!
FOr example, intake shim#1 is .0866 while exhaust shim #1 is .0984? I'm trying to wrap my puny brain around this...it has got me feeling a little "outnumbered"(lol). i'll continue my work here this week to see if I can get any headway.
got a micrometer from my machinist to borrow, so getting closer, just could really use a good link or copy of the 3VZE valve adjustment charts to really make it happen. Many thanks if anyone can do it. There should be a good one out there anyhow..
ciao
01-12-2009, 04:20 AM
#14
enzand. I have a copy of the shim tables from the FSM that are somewhat readable. PM with with an email address that I can send them to if you want.
There are probably many way of attacking the shim measurement, but I will suggest for accuracy doing the following:
1. remove all your shim and select one shim that you know will fit under all lobes with enough space remaining to get your feeler gauges under.
2. Use this same shim for all buckets and measure its thickness using the micrometer.
3. For each bucket/lobe, insert the shim and measure the gap to the nearest .0001 in.
4. Add the shim thickness to the gap distance and then subtract the spec. intake/exhaust clearance (e.g. .0090 and .0110). I used Excel spreadsheet for this table so I would not make a mistake.
5. Look up the resulting value on the shim tables to get the shim number you need to order.
6. I found that half of my shims could be recycled after measuring them and determining their shim number. Where they may not have worked in one bucket, they were a perfect fit in another bucket.
Aaron

Thread
Thread Starter
Forum
Replies
Last Post


