3vze Top End rebuild...W/pics...slowly
 02-09-2005, 08:02 PM
#21
Registered User
Thread Starter
Join Date: Jan 2005
Location: Moreno Valley, Ca
Posts: 571
Likes: 0
Received 0 Likes
on
0 Posts
Encouragement
Thanks for the link Bumpin'Yota I've checked them out. Brass freeze plugs are ordered as well as what seems like everything else. I contacted Toyota stealership and they quoted me:
part no. 82219-89103 wire sensor for 11.47
part no. 89615-20010 knock sensor for 179.28
Can anyone recommend a better price or place or just stay with the stealership?
Man Ifeel so vulnerable just revealing my dirty/abuse engine to everyone here. Bumpin' if i'm ever in your area again we'll have to get together and wrench/drink/yota
Dragon thanks for the link, my haynes manual will appreciate it (but my printer will no longer be my friend after I'm done printing it out a 100 or so times).
Thanks
-=Morphine=-
 02-09-2005, 08:15 PM
#22
Registered User
Hey if you need the Toyota Factory Service Manual for removing the heads and reinstalling them as well asdissassembly, just gimme an email addy that can take a BIG attachment. Lots of pics (ok drawings lol) are included.
02-09-2005, 08:16 PM
#23
Registered User

Join Date: Feb 2005
Location: Atsugi Japan
Posts: 344
Likes: 0
Received 0 Likes
on
0 Posts
Morph,
don't feel bad bout the motor.... I could always post the picture of my old one with the number one piston so low in the cyl that you can tell the con rod is just not there.....Your in California so we can just say it like this.....
 Yes it the prior care provider could have down more, but counseling is being conducted, and everything will be better in a few more sessions
don't feel bad bout the motor.... I could always post the picture of my old one with the number one piston so low in the cyl that you can tell the con rod is just not there.....Your in California so we can just say it like this.....
Yes it the prior care provider could have down more, but counseling is being conducted, and everything will be better in a few more sessions
02-10-2005, 01:00 PM
#24
Registered User
Join Date: Apr 2003
Location: PEORIA, AZ
Posts: 1,851
Likes: 0
Received 0 Likes
on
0 Posts
Perhaps I ought to rephrase my question because of comprehendible issues.
When is it mandatory to replace the knock senser? When doing doing the timing belt replacement or when doing engine re-build?
Is it not quite clear as to when to replace it at the above mention.
I will be replacing my timing belt in the next few segments and I would like to know if to tackle it then or not.
Highly appreciate a generous and non-effortless response.
02-10-2005, 02:37 PM
#25
Registered User
Join Date: Oct 2003
Location: Fresno
Posts: 191
Likes: 0
Received 0 Likes
on
0 Posts
I'm wondering the same thing. I want to make sure my knock sensor is not working before I plump down 200 on a new one...
on another note, everyone is saying to ground the knock sensor wire to the block. this seams wierd since there is only one wire comming off the knock sensor, and it doesn't look thick enough to be shielded.
can you guys give better details to this grounding deal?
on another note, everyone is saying to ground the knock sensor wire to the block. this seams wierd since there is only one wire comming off the knock sensor, and it doesn't look thick enough to be shielded.
can you guys give better details to this grounding deal?
02-12-2005, 10:47 PM
#26
Registered User
Thread Starter
Join Date: Jan 2005
Location: Moreno Valley, Ca
Posts: 571
Likes: 0
Received 0 Likes
on
0 Posts
Sorry for being a post whore in my thread
****NEED HELP PLEASE****
In tearing down my engine I have come to a snag. I can't seem to remove the Camshaft pulley and the crankshaft pullry. The FSM says to use the SST's (that I don't have). I read in another post to dislodge the starter and use a prybar to block the flywheel from turning (for the camshaft pulley atleast).
Does anyone have any info on what I can do to get these off so I can move on to the removal of the heads and oil & water pumps?
Also the crossover pipe from the exhaust manifold...Damn those bolts are on there. Any advise there to remove them?
"I'm a computer tech not a mechanic...what the helll am I doing to this truck?"
Please help.
-=Morphine=-
02-12-2005, 10:56 PM
#27
Registered User
Join Date: Apr 2004
Location: NV
Posts: 2,583
Likes: 0
Received 0 Likes
on
0 Posts
I used a cheapo pulley remover from harbor freight (10 bucks). It will hold the pulley still while you crank on the bolt. It's design is similair to that of an oil filter wrench (if you were wondering). I wouldn't recommend sticking anything in the flywheel to stop the engine (although they make a key specifically for that purpose), I think you would ruin your timing belt by doing so. The crankshaft pulley is very tight. 181 ft/lbs if I remember correctly.
I broke the first harbor freight pulley remover on the second pulley and had to return it and get another. It all worked out though. Good luck.
I broke the first harbor freight pulley remover on the second pulley and had to return it and get another. It all worked out though. Good luck.
02-12-2005, 11:03 PM
#28
Registered User
Thread Starter
Join Date: Jan 2005
Location: Moreno Valley, Ca
Posts: 571
Likes: 0
Received 0 Likes
on
0 Posts
Thank you
Chickenlover is awesome...Quick response. I've been trying to figure this out and have had no luck. I ordered the engnbldr.com oversized valves for the engine and now need to get the heads off for the machine work. The clock is ticking....
Anymore advice on anything else I might run into...crossover pipe removal??
-=Morphine=-
Anymore advice on anything else I might run into...crossover pipe removal??
-=Morphine=-
Last edited by Morphine; 02-12-2005 at 11:04 PM.
02-12-2005, 11:12 PM
#29
Registered User
Join Date: Apr 2004
Location: NV
Posts: 2,583
Likes: 0
Received 0 Likes
on
0 Posts
I ran into a little confusion when removing the head bolts. You need a 12mm socket, but it has to be a 12 point socket as well. The regular 6 point (?) sockets I have wouldn't fit. Can't help you with the crossover. Mine was removed with a cutting torch during my headers install. Once you get the heads off, you might want to consider sound proofing the firewall. I had a roll of sound/heat blanket laying around so I put a double layer on the firewall. 3vze ticking be damned! If I think of anything else, I'll be sure to let you know. Mine is torn down the the block right now too (waiting on parts), so if you come up with any advice or recommendations - send em over here.
02-12-2005, 11:23 PM
#30
Registered User
Thread Starter
Join Date: Jan 2005
Location: Moreno Valley, Ca
Posts: 571
Likes: 0
Received 0 Likes
on
0 Posts
Advice.... me..... Crazy talk.
Thanks again. I already borrowed the 12mm 12 point socket for the head bolts. I have my parts list but I want to get the heads off and inspect the block and what not before ordering. I'm this deep into it so I'm trying to be as cautious with the repairs as possible. I want everything to run smooth and for another 251,000 miles.
The best advise I have to offer that was given to me was...
Don't force it, breathe, walk away and come back in ten minutes. Put down the sledgehammer and remeber "You are smarter than the engine".
-=Morphine=-
The best advise I have to offer that was given to me was...
Don't force it, breathe, walk away and come back in ten minutes. Put down the sledgehammer and remeber "You are smarter than the engine".
-=Morphine=-
Last edited by Morphine; 02-12-2005 at 11:35 PM.
02-13-2005, 04:41 AM
#31
Registered User
Join Date: Aug 2004
Location: Grew up in Santa Clarita/San Fernando Valley's...now in Washington State
Posts: 279
Likes: 0
Received 0 Likes
on
0 Posts
Hey....Hey you...put down the wrench and slowly step away from the Toyota...keep your hands at your sides were I can see 'em....lol. I take it you started w/out me. Had to make a 3 day power run to Washington to pick up a damn Polarus. Just got home few hours ago. It's 5:37 in the am so I guess I'll try calling you at 'round 7 or so.
Wouldn't you know it, when I set off on my last minute adventure for my dad to get this 4-wheeler, I left my cell phone at the house, and took the FSM's up there with me? And driving a friends full size chevy 4x4 up there, to boot....I'll be in touch...
Tony
Wouldn't you know it, when I set off on my last minute adventure for my dad to get this 4-wheeler, I left my cell phone at the house, and took the FSM's up there with me? And driving a friends full size chevy 4x4 up there, to boot....I'll be in touch...
Tony
02-13-2005, 04:58 AM
#32
Registered User
Join Date: Feb 2005
Location: lake in the hills
Posts: 43
Likes: 0
Received 0 Likes
on
0 Posts
Hey Morphine. I am about to start the same overhaul. and this thread is going to very valuable to me THANKS. Could you throw together a list of things you bought. If you could that would be great. I dont want to start and have to go searching. Mabee a sticky or some thing for the future. This seems to be the only thread like this.
Or I am just a moron and cant use the search correctly
Deep breaths....Jay...
Or I am just a moron and cant use the search correctly
Deep breaths....Jay...
02-13-2005, 08:30 AM
#33
Registered User
Thread Starter
Join Date: Jan 2005
Location: Moreno Valley, Ca
Posts: 571
Likes: 0
Received 0 Likes
on
0 Posts
Drkgypsy good to hear from you. Yeah I started head first with blind folds on. It's going smoother than I thought but I'm lacking some tools and knowledges. Harbor Freight here I come. Once the Camshaft pulley, crankshaft pulley, and crossover piper are off, I'll be ready to hit the machine shop. Call me and get down here, I need a wrenching/drinking/lunch buddy.
Jaymo, glad this thread can help you. I'll get a few more pics on here to. Nothing High quality as my camera is pretty old. As far as parts go I went to engnbldr for my valves, sent my fuel injectors to cruzinperformance for a flow test and cleaning, and gaskets, oil pump, water pump etc from partsdinosaur . He has ebay auctions for his products but I found buying direct from his siite I was able to get a btter deal and pay less. His site came recommended to mefrom a few other yotatecher's. I'll post the actual parts ordered in a few days when I actual order them.
-=Morphine=-
02-13-2005, 09:13 PM
#34
Registered User
Join Date: Feb 2005
Location: Atsugi Japan
Posts: 344
Likes: 0
Received 0 Likes
on
0 Posts
Morph,
I brake tension on all three of those bolts asap and make it a point to do so. The crank is done with a breaker bar and bumping the starter. The cam pullies are done with a long pipe over the end of the 1/2in breaker bar and a socket stuck in each pully back to one of the 10 mil bolts for the time cover with the tbelt still in place. I have done this job on more than a dozen 3vz engines and started that trick on number 3 or 4 and used it since with out damaging anything.
Once I got one motor that had been done before by KING KONG I had to work around the cam pullies until I could pull the cam out the front with the pully still attached. I sent the cam to a mach shop and they twised the cam in two and still could not get the bolt off. When they finally did get it free they had rigged it in a press and still had to jack the press up to over 300lbs/ft to break it free and then discovered that it had been put on with loc-tite. They give me a 1/2 off discount on the replacement cams.
Just let the cross over pipe hang out in the back of the engine bay out of the way, once the heads are it there is plenty of room get it out. Chilton says not to remove the EXH header on the block but wait till the head is out to remove. I do it that way and it does seem easier.....break the nut free before you un torque the head then when head is out it is real easy to get the EXH header off....
02-14-2005, 09:14 PM
#35
Registered User
Thread Starter
Join Date: Jan 2005
Location: Moreno Valley, Ca
Posts: 571
Likes: 0
Received 0 Likes
on
0 Posts
Slow going...Tool Fairy arrived
Ok slow going as I've been ill and definitely don't have the right tools for this. I will persist and get through this. Thanks for the recommendations Dragon564, tomorrow after work I hope to get everything finished, taken off that is. My buddy dave stopped by and saw what I was working with and was "AMAZED" how far I had gotten with so little.
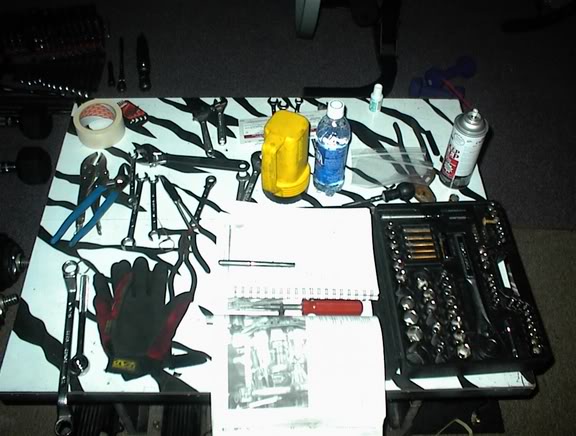
So Dave took the time to gather up some appropriate tools to help me get the job done. Now with the wider selection of tools, air tools, and correct sockets and breaker bars I should be able to get this thing rolling along.
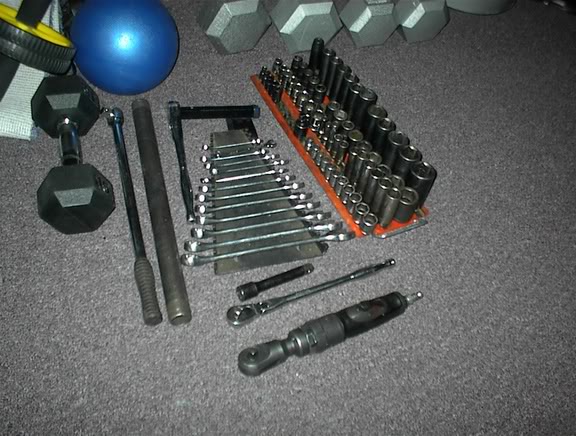
If all goes well my next repost will have the heads off and on their way to the machine shop.
-=Morphine=-
So Dave took the time to gather up some appropriate tools to help me get the job done. Now with the wider selection of tools, air tools, and correct sockets and breaker bars I should be able to get this thing rolling along.
If all goes well my next repost will have the heads off and on their way to the machine shop.
-=Morphine=-
02-15-2005, 09:13 PM
#36
Registered User

Join Date: Feb 2005
Location: Talkeetna AK
Posts: 2
Likes: 0
Received 0 Likes
on
0 Posts
I tried to seperate the crossover pipe from the manifold and couldn't do it.
So I ended up unbolting the manifolds from the heads and then I was able to remove the crossover pipe/manifold as a unit and dismember them on the floor at my leisure.I still ended up snapping one of the studs, though. (It felt kinda good, at the moment)
Ditto on using a 10mm socket with an extension on the timing cover to prevent the cams from turning. Damn those buggerly timing gear bolts are tight.
02-15-2005, 11:14 PM
#37
Registered User
Join Date: Feb 2005
Location: Atsugi Japan
Posts: 344
Likes: 0
Received 0 Likes
on
0 Posts
Morph,
The upgraded selections of tools will get you over the the hump with the TOY. Which is much better than the reverse of that, which is what was happening. Just one question....because you have stumped me...I see you special service tool (SST) blue ball...but what part of the TOY is it used on????
Smile and laugh hope your feeling better.
let me know if there is anythign I can do for ya
02-15-2005, 11:47 PM
#38
Registered User

Join Date: Jan 2005
Location: Park City, Utah
Posts: 33
Likes: 0
Received 0 Likes
on
0 Posts
Try this link for the cam sprocket removal tool
http://www.thetoolwarehouse.net/shop/SP-96800.html
Make sure you use a impact socket on you're breaker bar. My regular craftsman 1/2 inch socket didn't stand the test and had me making a trip to sears for a new socket. You will need to use cheater bars for extra leverage and an extra body.
http://www.thetoolwarehouse.net/shop/SP-96800.html
Make sure you use a impact socket on you're breaker bar. My regular craftsman 1/2 inch socket didn't stand the test and had me making a trip to sears for a new socket. You will need to use cheater bars for extra leverage and an extra body.
02-16-2005, 06:57 PM
#39
Contributing Member
Just saw the post on your work. Go to this link and you can download the '95 Factory Service Manual. Good luck!
'95 Service Manual
'95 Service Manual
02-17-2005, 02:15 AM
#40
Registered User

Join Date: Nov 2004
Location: Toms River, NJ
Posts: 150
Likes: 0
Received 0 Likes
on
0 Posts
Hey Morph
I really like the pic's of your progress! They make a great example.
Are you planning on replacing the exhaust manifold gaskets? I don't know if they come with the gasket set. Now is the time to replace them, if it's within your budget of course.., and would save you alot or work if the old ones won't seal correctly or fail shortly after you get done with this...


