
3VZE crank no-start shortly after rebuild
 01-03-2017, 03:01 PM
#1
Registered User
Thread Starter

Join Date: Jan 2017
Posts: 22
Likes: 0
Received 0 Likes
on
0 Posts
3VZE crank no-start shortly after rebuild
Hello world -
I was sent here by RonJR from toyota-4runner.org; he suggested this board has a greater focus on earlier 4Runners than that one. I have quickly condensed this post down from a series of posts written over a day or so, so please excuse any errors.
The tall-deer is: Complete rebuild, difficult to start at first but ran fine, idled 800 after settling to operating temp, coolant temp/oil psi good, ign timing good, compression good for a fresh build. Ran great on short test drive, ran ~90min total. Next day, no-start with liquid fuel in the intake manifold and tailpipe.
Long version: I have a '94 V6 4WD on which I just finished a complete engine rebuild(long-term project, I spent about two years on it).
Last Thursday I started it for the first time: it took probably 30 seconds of cranking before it started; chugging at first but quickly smoothing out and settling at 1500rpm. I worked out all of the air from the coolant, stopping and starting a few more times over the next several minutes(it never started quite right away, cranking and chugging for a few seconds each time before settling into an idle, but seemed to start better when warm), set the timing at 10*BTDC, and messed around checking connectors, clamps etc while it warmed up. It settled around 800rpm, oil pressure and coolant temperature good, and I took my wife and kids out for a celebratory drive around the neighborhood, maybe two miles, before parking it for the night. I noticed a bunch of black specks/spots on the driveway right by the tailpipe, and assumed it was just rusty crap that had formed over two years of sitting and been jarred loose by the heat and vibration of starting after so long. Compression was 100-105psi all round before first startup. It ran for about 90 minutes in total, and aside from difficult starting it ran just fine(anyway, a damn sight better than it did with a burned valve and poor compression in two other cylinders).
The next day, I went to start the truck and it just cranked for several seconds without catching. It started farting and chugging a bit, puffing white smoke(not steam) from the tailpipe and nearly starting, but would not run after I stopped cranking. Thinking it to be a fuel issue, I pulled the cold start injector and set it in a cup, cranked for a moment and found a very small amount(1/2-1tsp) of fuel in the cup, but then I had to stop to take care of the kids and couldn't get back to it that night.
Next day I went outside, just for fun tried cranking for ~15sec(again lots of farting and almost-starting but no success), and started testing the usual suspects(in order of ease of access ). Noticed a little stream of liquid in the tailpipe. I tasted it to be sure it wasn't water or coolant, and I suppose it's gasoline mixed with rust... it tasted like ˟˟˟˟ and I probably now have tongue cancer. I now assume that the black spots I'd seen the day before were liquid gasoline that had run out the tailpipe carrying rust and general filth along with it, fallen to the driveway and soaked into the concrete.
Cold start injector, coil, AFM, TPS all ohm out properly per the FSM, mechanical timing does not appear to have jumped(distributor rotor is where it belongs, anyway). No trouble codes. I had the six main injectors bench-tested and rebuilt before putting the engine back together.
I ohmed what I thought was the ECT sensor, got 80 ohms(cold engine, ~55* ambient temp) and thought "AHA, bad sensor for sure, problem found"! Loosened the upper intake to get a socket around the sensor, and noted gasoline pooling on the bottom of the upper intake and throat of the throttle body. Anyway, I pulled the sensor, then dangled it in some ~150* water on the stove. It was then that I realized that I had pulled the cold start injector time switch(d'oh). Resistance stayed at 79-80 ohms. I stuck it in the freezer and later checked it, got 40 ohms. That checks out.
While the CSITS was chilling, I ohmed the actual ECT sensor, which appeared to be open(but awfully difficult to get probes down to). I pulled it and replaced it today, to no noticeable effect.
Pulled CSI connector and it seems to have improved; it seems a little closer to catching.
It seems to be hitting better after I pull the EFI fuse and crank a few seconds to blow out anything already in the intake, then try again.
I used a cheap inline spark tester set to .31" or whatever spark plug gap should be per Haynes, and there sure seems to be a good spark at 1. I'll try the rest in a few minutes.
That's a long read and thanks for getting through it. I didn't want to leave out anything which might have been important.
I've made much use of this forum during the rebuild(as a lurker ) and appreciate any help you might have to offer now from your own experiences.
- Ben
I was sent here by RonJR from toyota-4runner.org; he suggested this board has a greater focus on earlier 4Runners than that one. I have quickly condensed this post down from a series of posts written over a day or so, so please excuse any errors.
The tall-deer is: Complete rebuild, difficult to start at first but ran fine, idled 800 after settling to operating temp, coolant temp/oil psi good, ign timing good, compression good for a fresh build. Ran great on short test drive, ran ~90min total. Next day, no-start with liquid fuel in the intake manifold and tailpipe.
Long version: I have a '94 V6 4WD on which I just finished a complete engine rebuild(long-term project, I spent about two years on it).
Last Thursday I started it for the first time: it took probably 30 seconds of cranking before it started; chugging at first but quickly smoothing out and settling at 1500rpm. I worked out all of the air from the coolant, stopping and starting a few more times over the next several minutes(it never started quite right away, cranking and chugging for a few seconds each time before settling into an idle, but seemed to start better when warm), set the timing at 10*BTDC, and messed around checking connectors, clamps etc while it warmed up. It settled around 800rpm, oil pressure and coolant temperature good, and I took my wife and kids out for a celebratory drive around the neighborhood, maybe two miles, before parking it for the night. I noticed a bunch of black specks/spots on the driveway right by the tailpipe, and assumed it was just rusty crap that had formed over two years of sitting and been jarred loose by the heat and vibration of starting after so long. Compression was 100-105psi all round before first startup. It ran for about 90 minutes in total, and aside from difficult starting it ran just fine(anyway, a damn sight better than it did with a burned valve and poor compression in two other cylinders).
The next day, I went to start the truck and it just cranked for several seconds without catching. It started farting and chugging a bit, puffing white smoke(not steam) from the tailpipe and nearly starting, but would not run after I stopped cranking. Thinking it to be a fuel issue, I pulled the cold start injector and set it in a cup, cranked for a moment and found a very small amount(1/2-1tsp) of fuel in the cup, but then I had to stop to take care of the kids and couldn't get back to it that night.
Next day I went outside, just for fun tried cranking for ~15sec(again lots of farting and almost-starting but no success), and started testing the usual suspects(in order of ease of access
). Noticed a little stream of liquid in the tailpipe. I tasted it to be sure it wasn't water or coolant, and I suppose it's gasoline mixed with rust... it tasted like ˟˟˟˟ and I probably now have tongue cancer. I now assume that the black spots I'd seen the day before were liquid gasoline that had run out the tailpipe carrying rust and general filth along with it, fallen to the driveway and soaked into the concrete.Cold start injector, coil, AFM, TPS all ohm out properly per the FSM, mechanical timing does not appear to have jumped(distributor rotor is where it belongs, anyway). No trouble codes. I had the six main injectors bench-tested and rebuilt before putting the engine back together.
I ohmed what I thought was the ECT sensor, got 80 ohms(cold engine, ~55* ambient temp) and thought "AHA, bad sensor for sure, problem found"! Loosened the upper intake to get a socket around the sensor, and noted gasoline pooling on the bottom of the upper intake and throat of the throttle body. Anyway, I pulled the sensor, then dangled it in some ~150* water on the stove. It was then that I realized that I had pulled the cold start injector time switch(d'oh). Resistance stayed at 79-80 ohms. I stuck it in the freezer and later checked it, got 40 ohms. That checks out.
While the CSITS was chilling, I ohmed the actual ECT sensor, which appeared to be open(but awfully difficult to get probes down to). I pulled it and replaced it today, to no noticeable effect.
Pulled CSI connector and it seems to have improved; it seems a little closer to catching.
It seems to be hitting better after I pull the EFI fuse and crank a few seconds to blow out anything already in the intake, then try again.
I used a cheap inline spark tester set to .31" or whatever spark plug gap should be per Haynes, and there sure seems to be a good spark at 1. I'll try the rest in a few minutes.
That's a long read and thanks for getting through it. I didn't want to leave out anything which might have been important.
I've made much use of this forum during the rebuild(as a lurker
) and appreciate any help you might have to offer now from your own experiences.- Ben
 01-03-2017, 04:57 PM
#2
Registered User
Thread Starter
Join Date: Jan 2017
Posts: 22
Likes: 0
Received 0 Likes
on
0 Posts
Seem to have strong spark - it jumped 1/4" at #3.
I unbolted the cat and levered the forward exhaust pipe 1/2" or so to the side, tried to start, and noticed no change except that it's louder. I heard a bit of a hiss when I separated the cat from the forward pipe, which puzzled me. The cat, as far as I can see, appears undamaged. Didn't see any buildup, cracks, meting etc.
UPDATE I have checked compression again out of frustration and found 0 compression at 1 and 6. Doesn't even budge the needle. Others are exactly where they were the first day. I am blown away right now. Don't even know what to think. I am going to take a shower and forget about the truck for the night.
Still would appreciate any thoughts you might have as to what could have happened and/or what I might have done wrong.
Thanks, Ben
01-03-2017, 06:40 PM
#3
Registered User
Thread Starter
Join Date: Jan 2017
Posts: 22
Likes: 0
Received 0 Likes
on
0 Posts
Update to update: I am reading of people with really serious overfueling having cylinder washout lead to zero or near-zero compression, which would fit with my prior issue.
I am bothered by the fact that a six-cylinder engine should certainly start and run(run really poorly, but nonetheless run) on four good cylinders. On the other hand, the spark plugs are probably garbage by now, so my next step is to squirt some oil into the affected cylinders(or all of them?), replace the spark plugs, change the engine oil and see what things sound like after that.
I am bothered by the fact that a six-cylinder engine should certainly start and run(run really poorly, but nonetheless run) on four good cylinders. On the other hand, the spark plugs are probably garbage by now, so my next step is to squirt some oil into the affected cylinders(or all of them?), replace the spark plugs, change the engine oil and see what things sound like after that.
01-08-2017, 01:46 PM
#4
Registered User
Thread Starter
Join Date: Jan 2017
Posts: 22
Likes: 0
Received 0 Likes
on
0 Posts
I did the wet-compression test and it produced no changes on the two affected cylinders. I only bothered to take a reading on one of the known good cylinders, and it came out to 150psi, again this engine has about two miles on it and the rings are not yet seated, so I'm pretty pleased with that number.
I brought out the leakdown tester and found air shooting out the throttle body when fed into each bad cylinder. The next step was to pull a cam cover and poke around. I opened up the easy side and found the intake valve bucket for #6 sitting way down in its channel. I'm not sure whether the valve is stuck in its guide, or the valve spring broke, or maybe something else. Hopefully will know more soon. I wonder if the machine shop who assembled the heads screwed my pooch again - I also had them press new pistons onto the existing rods, and I had to bring those back because they put them together backwards...
Edit: also checked fuel pressure since I had the parts. I used a banjo bolt with 1/8" NPT female threads in the head and a straight Schrader valve so I could use my gauge. I'll probably leave it there permanently for convenience. Indicated 48psi, a bit high but probably not enough to be much of a concern.
Last edited by identity; 01-08-2017 at 01:49 PM.
01-08-2017, 02:08 PM
#5
Registered User
Doesn't sound like a fuel or spark issue, I'm going to guess cam timing is wrong or you didn't get the cam(s) installed correctly with the buckets.
I had a hole burned in a piston that you could put a ball point pen thru and it was completely cracked too, still had some compression. I'm going to lay money you've got some sort of valve issue.
Pull the front timing cover and check that your marks line up, if they do, you have to pull the valve covers and see what's up.
Last edited by MonsterMaxx; 01-08-2017 at 02:10 PM. Reason: added picture
01-08-2017, 05:15 PM
#6
Registered User
Thread Starter
Join Date: Jan 2017
Posts: 22
Likes: 0
Received 0 Likes
on
0 Posts
Doesn't sound like a fuel or spark issue, I'm going to guess cam timing is wrong or you didn't get the cam(s) installed correctly with the buckets.
I had a hole burned in a piston that you could put a ball point pen thru and it was completely cracked too, still had some compression. I'm going to lay money you've got some sort of valve issue.
Pull the front timing cover and check that your marks line up, if they do, you have to pull the valve covers and see what's up.
You're correct. I haven't pulled the timing cover yet, but I pulled both cam covers to find #1 intake and #6 intake both stuck at the bottom of their bore, probably 5mm+ between the valve bucket shim and the cam. Cam lobes look fine(not scored or anything), but I wasn't able to free #6 intake by tapping on it and I can't do much else without the cam in place.
Mechanical timing is correct; #1 and #6 only are affected. The others are right on and have good compression - and the two dead cylinders had good compression too, before they went bad overnight - and I verified ignition timing at first start, and the distributor rotor points where it should as I turn the crank by hand now.
Right now it looks like I have to at least pull the cams and see if I can find and correct the reason for the valves sticking. Failing that I will have to pull the heads and bring them back to the machine shop who did the head work.
I don't know very much about the valvetrain, which is why I sent the work out. It looks like there are just a few potential causes for this problem: broken valve springs, crap built up in the valve guides, lack of oil to the valves. I haven't been able to spend as much time as I would like to, but at a glance I did not notice the wear I would expect to see as a result of oil starvation.
Again though, I'm not familiar with this engine's valvetrain, so there might be another cause I'm overlooking.
There are two questions I now have to answer:
First, what caused the two valves to stick *after* a good first start, gentle warm-up and test-drive?
Second, why wouldn't the engine start and run, even with two dead holes? I think the answer to this one is that the two stuck-open valves allow the dead cylinders to pump air into the intake plenum, destroying the clean flow of air to the good cylinders. Anybody have thoughts to that?
(Edited for clarity)
Last edited by identity; 01-08-2017 at 05:17 PM.
01-08-2017, 06:00 PM
#7
Registered User

Join Date: Sep 2007
Location: San Francisco East Bay
Posts: 8,254
Likes: 0
Received 822 Likes
on
649 Posts
...
Second, why wouldn't the engine start and run, even with two dead holes? I think the answer to this one is that the two stuck-open valves allow the dead cylinders to pump air into the intake plenum, destroying the clean flow of air to the good cylinders. Anybody have thoughts to that? ...
Second, why wouldn't the engine start and run, even with two dead holes? I think the answer to this one is that the two stuck-open valves allow the dead cylinders to pump air into the intake plenum, destroying the clean flow of air to the good cylinders. Anybody have thoughts to that? ...
Based on your examination of the shim buckets, it sure sounds like you've got two valves stuck open. Just so you know, the 3VZE is not an interference engine, so you don't often see bent valves (from breaking a timing belt, for instance).
Trending Topics
01-08-2017, 10:32 PM
#8
Registered User
Thread Starter
Join Date: Jan 2017
Posts: 22
Likes: 0
Received 0 Likes
on
0 Posts
Weird. Before I got into it, this truck ran with one totally dead cylinder, two poor and three decent
Yeah, from what I've been able to read and search for it seems like people only find valves stuck when there's stuff taking up space in the valve guides. Sure shouldn't be any of that in my case.
It'll be a few days until I can get back at the truck but I will follow up when I know more, which may be when the heads come off. Sigh.
Thanks scope103.
01-09-2017, 10:30 AM
#9
Registered User

Join Date: Nov 2016
Posts: 105
Likes: 0
Received 0 Likes
on
0 Posts
Long shot, but for consideration. When In had my heads surfaced, I paid the shop to replace the valve seals, but did not do a complete valve job. I purchased the Toyota gasket kit, so figured I might as well use them. Shop had good reviews, but wished I would have went with my gut instincts and done the work myself. I am a novice and make my share of mistakes, but at least I know exactly what was or was not done. Before giving them the heads, I removed the cams and the buckets. Put each in a zip lock and labeled so it would go back in the same spot.
After getting the heads back and before installing the buckets, I was looking down around the springs and saw "trash" inside the spring on at least one valve, then more. Stuff I fished out was parts of the old valve seals. I am sure this kind of stuff could definitely get stuck under a valve seat. Some were pretty big chunks of twisted metal.
Long story short, I ended up removing all of the valves myself so I could clean out the debris the shop left behind. Also found metal shavings from the head milling. I used a couple cans of cleaner to blow out/wash down the heads and re-assembled.
Shop charged $50 per head to replace the seals and I seriously wished I had spent the money on buying a good tool to do the job myself. I could not find a tool locally for removing the valves (actually removing is easy, getting the keepers back in was a pain) so I had to order one. Since it was Christmas eve and I got impatient, I ended up fabricating a tool with a welding clamp and a piece of PVC to compressed the spring. It worked surprising well. Will post a picture if anybody is interest. The kit I ordered arrive 3 days later, so I now have a valve spring tool kit....for the next time. LOL.
01-09-2017, 10:46 AM
#10
Registered User
Join Date: Sep 2007
Location: San Francisco East Bay
Posts: 8,254
Likes: 0
Received 822 Likes
on
649 Posts
Valve removal tool
High-priced valve removal tool:
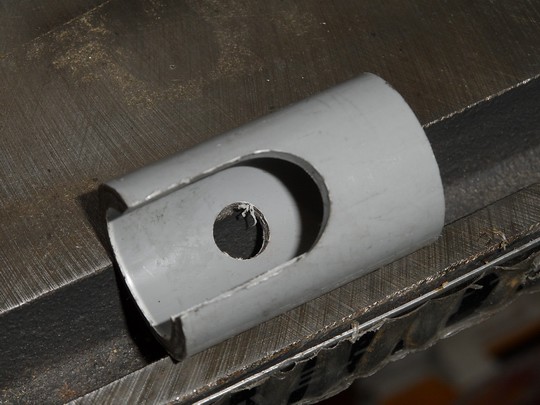
(1/2" pvc pipe, cut out with router).
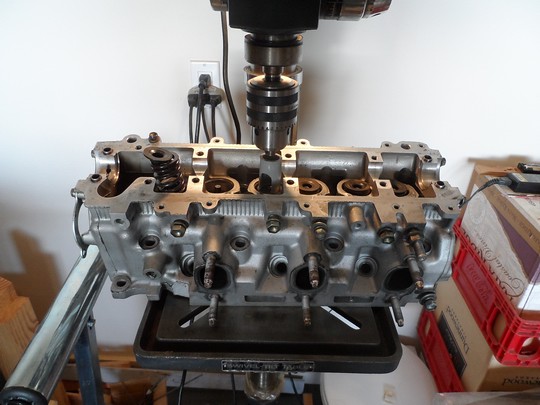
Valve removal tool in use (drill-press not included):
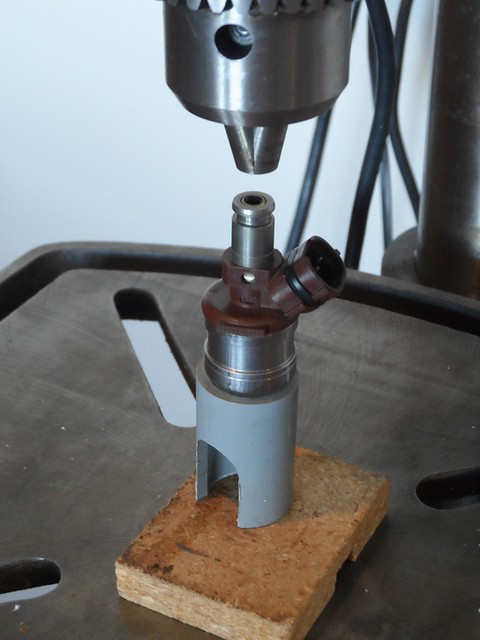
Also useful for pressing in injector filters:
(1/2" pvc pipe, cut out with router).
Valve removal tool in use (drill-press not included):
Also useful for pressing in injector filters:
01-09-2017, 10:59 AM
#11
Registered User
Join Date: Nov 2016
Posts: 105
Likes: 0
Received 0 Likes
on
0 Posts
My version was similar, but not quite as neatly cut. I used a PVC union and cut the access area with a Rotozip. The PCV union has a ridge on the inside which holds a fender washer and then used a large welder's F-sytle clamp from Harbor freight. http://www.harborfreight.com/12-inch...amp-65683.html.
01-09-2017, 11:13 AM
#12
Registered User
Join Date: Sep 2007
Location: San Francisco East Bay
Posts: 8,254
Likes: 0
Received 822 Likes
on
649 Posts
Just so it's clear, you have to tilt the head (towards you in the photo) so that the valves are approximately vertical. I think there's a scrap 1x under the back edge. Then, you need to put something under the valve head to push against. I used two valve shims, but the height isn't critical as long as you're within about 1/4". Use a magnetic "finger" to pull out the two parts of the retainer. Installing the retainers was even easier than removing them; just push them in with an oily finger, and they magically sit in the right place when you gently remove the pressure on the spring.
01-09-2017, 06:30 PM
#13
Registered User
Thread Starter
Join Date: Jan 2017
Posts: 22
Likes: 0
Received 0 Likes
on
0 Posts
Wow! Those are some good ideas.
I probably will wind up getting into the heads myself, so it's good to get your experiences first.
Thanks again. I will follow up later when I get the heads off and/or have more details.
- Ben
I probably will wind up getting into the heads myself, so it's good to get your experiences first.
Thanks again. I will follow up later when I get the heads off and/or have more details.
- Ben
02-11-2017, 10:20 PM
#14
Registered User
Thread Starter
Join Date: Jan 2017
Posts: 22
Likes: 0
Received 0 Likes
on
0 Posts
So, I pulled the heads this past Monday(a great deal faster the second time, thank you very much ). #1 intake was stuck fully open - I couldn't even rotate it, let alone slide it closed. I could overcome the valve spring pressure with my thumbs at each of the "good" valves, but #6 had crept closed at some point and I could not move that one by hand although I did get it down by turning the cam sprocket. It again crept closed over the next few hours.
I brought the heads back to the machine shop and the owner said old gasoline was the cause and that he will clean the heads, but I need to have the tank boiled etc or replace it or the same thing will happen again.
The truck had sat for about two years while I did the work as time and money allowed, but I had run the tank nearly dry and diluted whatever was left with new fuel so thought I would be okay. Anyway, the interwebs are awash with stories of people having similar problems with old gasoline(older than mine, usually, but who knows). Oops. Costly mistake.
I expect to get it back together next weekend, assuming I get the heads back and the new tank shows up in time. I'll let yall know.
- Ben
). #1 intake was stuck fully open - I couldn't even rotate it, let alone slide it closed. I could overcome the valve spring pressure with my thumbs at each of the "good" valves, but #6 had crept closed at some point and I could not move that one by hand although I did get it down by turning the cam sprocket. It again crept closed over the next few hours.I brought the heads back to the machine shop and the owner said old gasoline was the cause and that he will clean the heads, but I need to have the tank boiled etc or replace it or the same thing will happen again.
The truck had sat for about two years while I did the work as time and money allowed, but I had run the tank nearly dry and diluted whatever was left with new fuel so thought I would be okay. Anyway, the interwebs are awash with stories of people having similar problems with old gasoline(older than mine, usually, but who knows). Oops. Costly mistake.
I expect to get it back together next weekend, assuming I get the heads back and the new tank shows up in time. I'll let yall know.
- Ben
02-12-2017, 06:30 AM
#15
Registered User
Join Date: Sep 2007
Location: San Francisco East Bay
Posts: 8,254
Likes: 0
Received 822 Likes
on
649 Posts
Good report, I hope your machinist is right, and hot tanking will clear it up.
There's a good chance the valve guide (or valve stem) was damaged. He should check the valve guide clearance. http://web.archive.org/web/201208130...68cylinder.pdf (page EG2-65). Note that the acceptable range is only 0.0007", beyond the resolution of a good digital caliper. You need the measurement tool designed for that.
There's a good chance the valve guide (or valve stem) was damaged. He should check the valve guide clearance. http://web.archive.org/web/201208130...68cylinder.pdf (page EG2-65). Note that the acceptable range is only 0.0007", beyond the resolution of a good digital caliper. You need the measurement tool designed for that.
03-14-2017, 07:53 PM
#16
Registered User
Thread Starter
Join Date: Jan 2017
Posts: 22
Likes: 0
Received 0 Likes
on
0 Posts
My wife took the kids yesterday morning for an overnight trip to give me some uninterrupted truck time, and I got it all wrapped up around noon today. It took ten or fifteen seconds of cranking to start, but when it did start it caught right up and ran smoothly. Just like last time, I freaked out when the idle started surging and coolant started steaming/popping out the radiator neck, and just like last time that all stopped as soon as I worked some air pockets out of the system(which did not take as long this time, as I did not drain the block). No hiccups, all gauges reading normal, I got the timing set at 10* and took it out for a quick drive. Everything seems to be good so far. I have not done a compression test yet, mostly because my wrists are scraped up enough already and I can hear as the engine cranks that the cylinders have even compression.
In addition to all of the engine parts I had previously replaced, I had to buy a new head gasket set and bolts(and I regret not going through engnbldr this time, I feel his HGs were of higher quality than the Rock ones I bought locally), and rather than have my fuel tank reconditioned I bought a new aftermarket one for about the same cost. Also replaced the fuel pump and fuel filter, and ran some carb cleaner through each injector using a syringe, rubber hose and 9V battery. Dropping the tank was a major PITA, mostly because of the tight quarters around the filler and vent hoses, and I hope not to ever have to do it again.
I don't expect to have any further problems as I have either cleaned or replaced every part of the fuel system, but I will follow up in a day or two.
Now to get to the "little" stuff... the sometimes-working master window/lock switch, the dead dash clock, install the CB, get an alignment done(I also replaced a really clunky idler arm).
I have taken notes on things I did that others may overlook, as well as things I did "right" the second time or that I was able to work around instead of disassembling, and I will get it written up for another post.
Take care - Ben
05-15-2018, 07:28 PM
#17
Registered User

Join Date: Feb 2018
Posts: 24
Likes: 0
Received 0 Likes
on
0 Posts
93 3vz efi fuse pops
Hey I have a similar problem after changing the knock sensor. Now the efi fuse keeps popping like a short but if I disconnect the cable from the ecu is doesn't pop. I am also getting a resistance of 25 on the 4wd wire green/white and resistance of 31 on the W wire purple. Is this sounding like a broken rcu or a short on one of these wires?
05-15-2018, 07:40 PM
#18
Registered User
Thread Starter
Join Date: Jan 2017
Posts: 22
Likes: 0
Received 0 Likes
on
0 Posts
If you�re blowing a fuse it�s a short. Did you replace the knock sensor wire when you replaced the sensor? From what I�ve read the wire is more commonly the issue than the sensor. Mine had some seriously brittle insulation, so I was glad I�d bought the thing while I was going to be in there... it sure would be a pain in the ass to get to any other time.
I�m sorry to say, if you didn�t replace the wire, yours might have broken insulation or frayed cable and that is where I�d start.
Anyway, you ought to start a fresh thread. My issue came from bad fuel and was mechanical in nature; yours is different and there are people here more qualified than me to help.
Good luck! I hope you can get it sorted.
05-15-2018, 08:08 PM
#19
Registered User
Join Date: Feb 2018
Posts: 24
Likes: 0
Received 0 Likes
on
0 Posts
If you�re blowing a fuse it�s a short. Did you replace the knock sensor wire when you replaced the sensor? From what I�ve read the wire is more commonly the issue than the sensor. Mine had some seriously brittle insulation, so I was glad I�d bought the thing while I was going to be in there... it sure would be a pain in the ass to get to any other time.
I�m sorry to say, if you didn�t replace the wire, yours might have broken insulation or frayed cable and that is where I�d start.
Anyway, you ought to start a fresh thread. My issue came from bad fuel and was mechanical in nature; yours is different and there are people here more qualified than me to help.
Good luck! I hope you can get it sorted.
I�m sorry to say, if you didn�t replace the wire, yours might have broken insulation or frayed cable and that is where I�d start.
Anyway, you ought to start a fresh thread. My issue came from bad fuel and was mechanical in nature; yours is different and there are people here more qualified than me to help.
Good luck! I hope you can get it sorted.
05-16-2018, 07:35 AM
#20
Before you go nuts; I had one that did not use the cold start injector for long enough. It sounds like you have a leaking injector.
Now you can jump the CSI to put gas into it so it will start. Pull the connector and use two wires from the battery (with a fuse please) and power the CSI with the two wires carefully and only for a couple of seconds. You need a partner to hold the key in start or jump the pump manually (needs pressure to work). There is a time limit on the CSI you do not want it to get hot so less than 10 fingers / seconds at most.
The fuse is harder but get a light bulb wired into the fuse socket and when the light goes out you found it. I just chipped the top of a fuse off and soldered a wire to it.
These trucks are old, so corroded grounds and dried up wires and Toyota using smaller wire gauges than they should do not help. You may have to replace some runs with new larger wires. I know it helped my head lights immensely.


