1987 4runner SR5 Rear Differential Gasket Replacement DIY Guide (with Pics!)
 02-24-2010, 10:11 AM
#1
Registered User
Thread Starter
iTrader: (2)
Join Date: Dec 2009
Location: Pleasanton, CA - SF Bay Area
Posts: 2,159
Likes: 0
Received 7 Likes
on
5 Posts
1987 4runner SR5 Rear Differential Gasket Replacement DIY Guide (with Pics!)
Hi Guys,
So, I actually did this DIY write up about 2 years back, with the intention of posting in on the T4R.org forums I was frequenting (before I discovered Yotatech....). I did lots of documentation with photos and wrote up a whole word document with IMG codes to copy/paste into my forum posting, and then, sadly, realized that thier forum software does not support linking to multiple photos in one post, even if hosted on Photobucket (LAME!).
So, now that I'm here, I remembered that I had the word document saved somewhere and could post (WITH THE PICS!). Hoping this helps some of you guys out - it was a daunting task for me at the time and I saved a lot of money doing it myself.
Next one I'll do is the ZUK mod (weldless) in a few weeks I hope (springs in the mail!).
Enjoy,
Phil
------------------------------------------------------
1987 4runner SR5 Rear Differential Gasket Replacement DIY Guide (with Pics!)
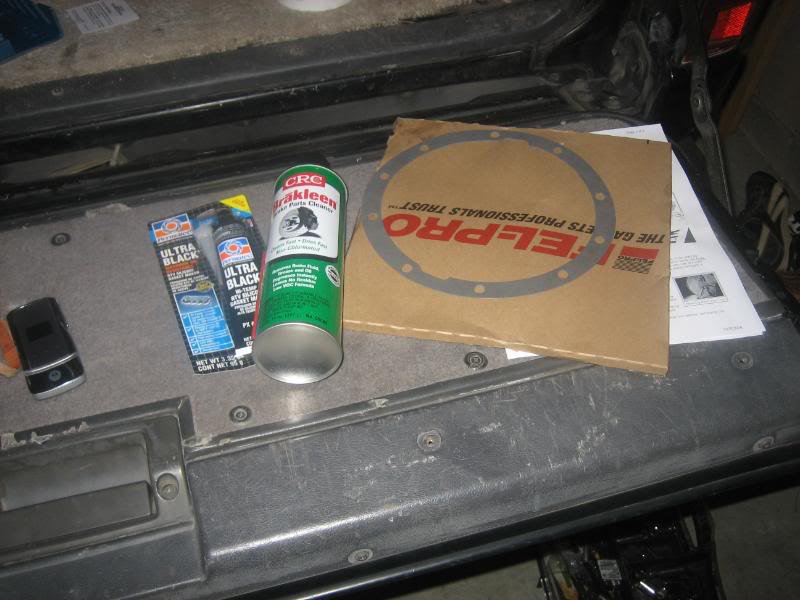
Hi everyone � I�d rate myself at a 4/10 technically for DIY projects on my cars (changed oil/filter, clutch master cylinder replacement, air box replacement, valve adjustments and some other �easier� stuff). When my rear differential started leaking, I decided I didn�t want to lay out $400+ to my mechanic to do the work, and wanted to learn more about the truck (and grow my mechanic resume!). So I did some research online, and in my Chilton manual, and bought the needed parts:
1) Felpro gasket
2) Black silicone gasket maker
3) Gear oil
4) Gasket scraper (just a razor blade on a stick really)
5) DOT 3 brake fluid
Other tools you�ll need:
(2) jack stands & Floor jack
(1) Set of wheel 2 chocks or pieces of wood to block the front wheels
(1) Creeper (not needed but nice)
(1) �� tire iron and/or socket with extender (for the wheels � this may be different for OEM wheels � I have aftermarket wheels/tires that have � inch lugs)
(1) torque wrench
(Lots of) rags and old cardboard for catching leaky gear oil and brake fluid
(1) can of (new) DOT 3 brake fluid
(1) Brake bleeder kit (for bleeding the system at the end
(1) 14mm socket
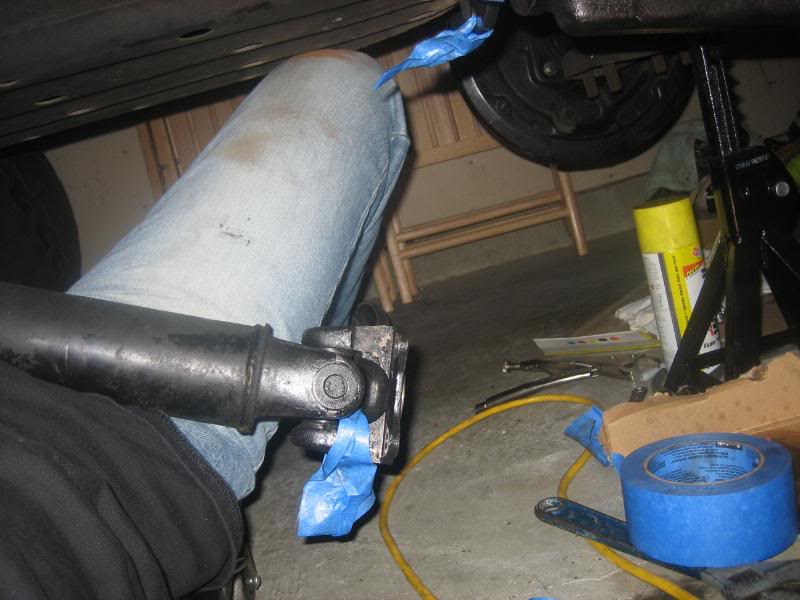
(2) 14mm closed end wrenches (to remove the driveshaft yoke nut/bolt combo from differential carrier)
(1) 10mm socket
(1) 10mm flared open wrench (brake lines) � make sure it�s a good wrench � cheaper ones aren�t exact and may strip your bleeder valves!
(1) Box of latex gloves (you�ll go through a LOT!)
(1 can) Grease cleaner (orange pumice stuff works great)
PROCESS:
Step 1:
First, get under the truck and make sure that the fill plug on the differential can be removed�.you�d hate to drain it, only to find out you cannot refill it later!
Step 2:
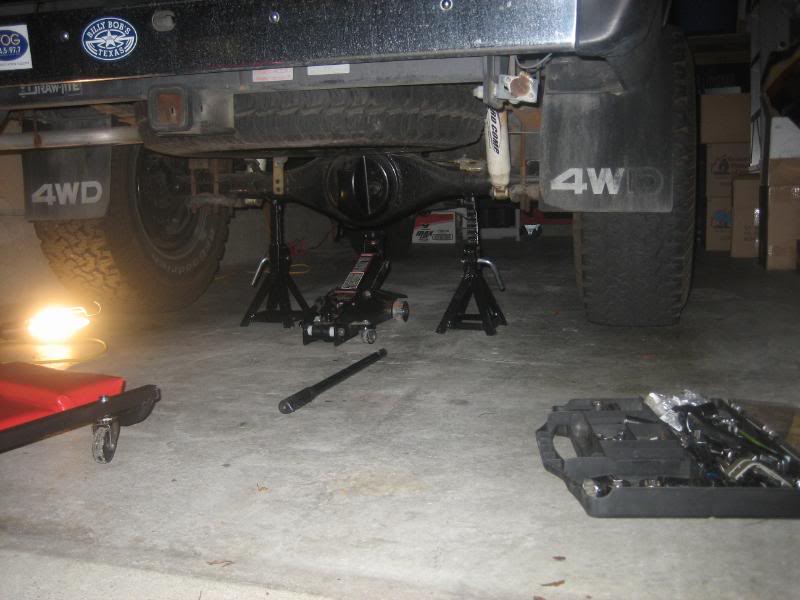
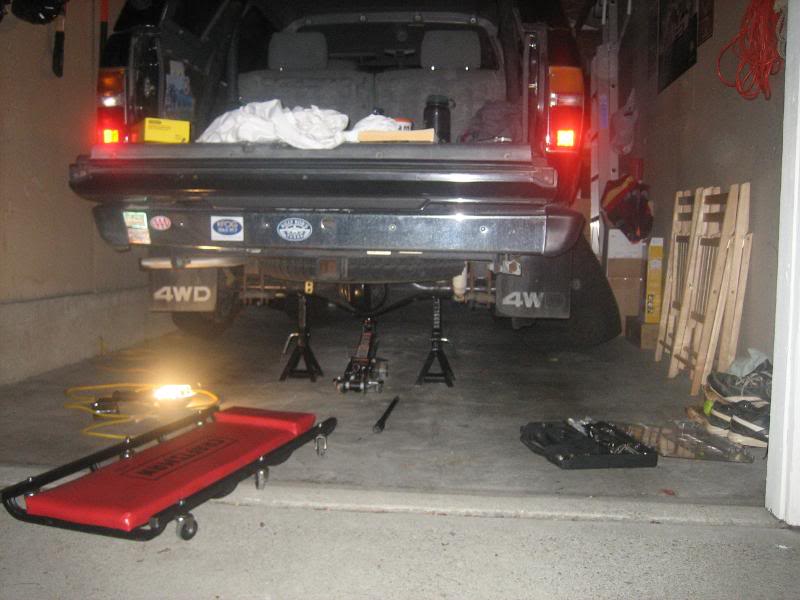
Release your emergency brake and put the wheel chocks on the front wheels (front of wheels for sure�.front and back of front wheels to be super safe). Get your jack stands ready. Put the floor jack under the differential carrier. Using a tire iron, loosen the lug nuts on the rear wheels (just finger loose). Once loose, use the jack to jack up the rear axle high enough that the rear wheels are an inch or so off the ground. Put the jack stands in place on the axel � on either side of the differential carrier. Lower the jack so that the axel rests on the jack stands. Remove jack. Remove rear wheels/tires.
Step 3:
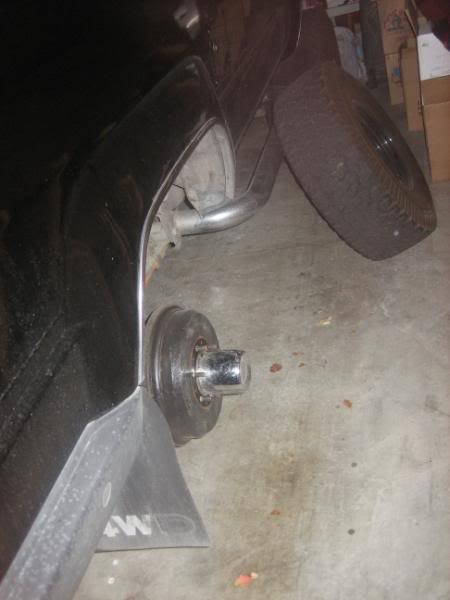
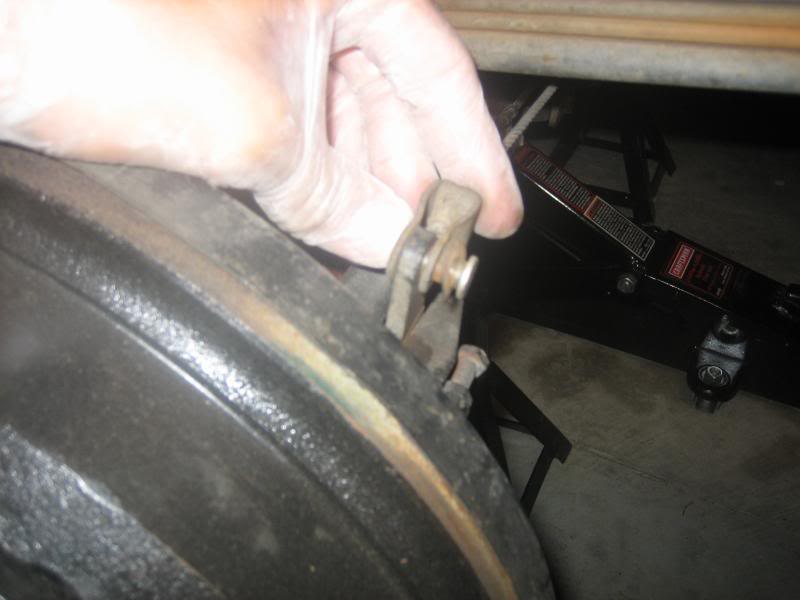
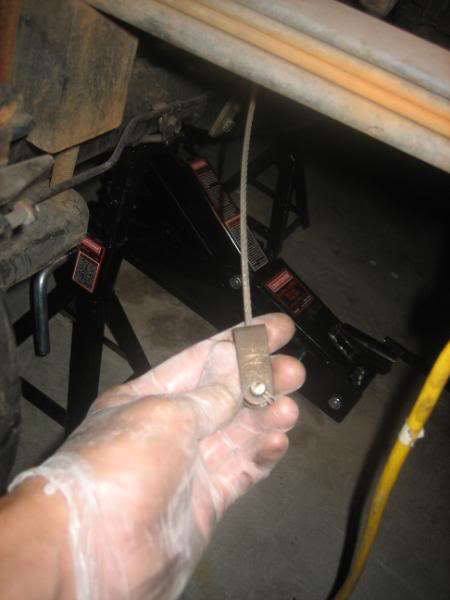
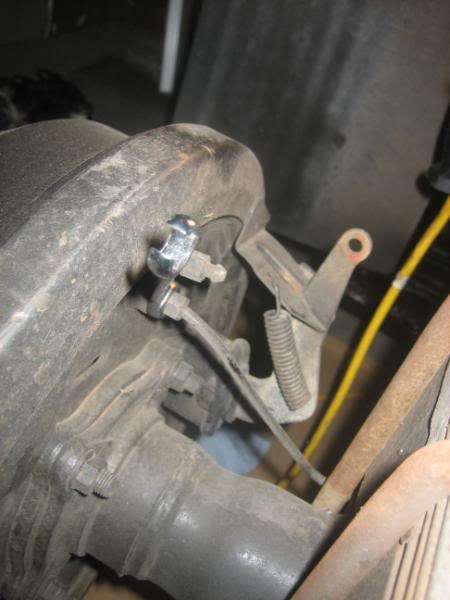
Prepping the axles for removal. Remove the emergency brake cables from the back of each wheel hub. There is a cable that leads to each spring loaded level, which is attached with a post and a cotter pin. Simply remove the cotter pin, remove the post from the brake apparatus, and replace pin and set aside for later. On the back of each rear wheel hub, there are 4 nuts. Use a 10mm socket to remove these. You�ll also need to remove the brake lines on each wheel (have a rag and old cup ready � it will leak a little � don�t let it touch paint or the brake hardware.

Step 4:
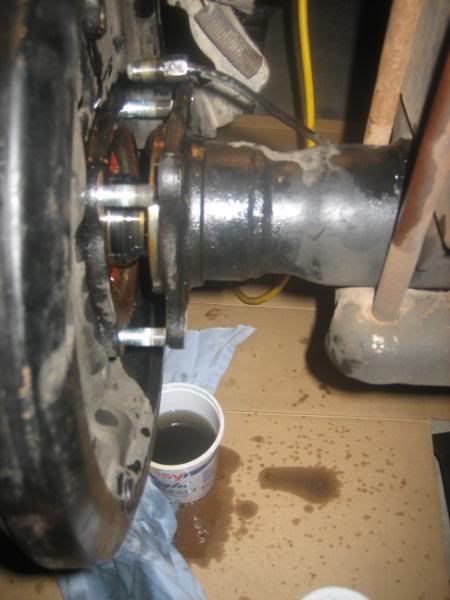
Once the axles/hubs are no longer mated to the axle housing, you can pull them out � making sure they are in line with the axle. You can pull out about 6 inches to disengage from the differential, or you can pull out completely like I did. Either way, be careful of the rubber seal on the end of the axle housing, where the axle shaft enters � too much weight on this could damage it. Also, be careful not to get any dirt on the actual axle shafts � use a fresh pair of latex gloves when removing (maybe enlist the help of a friend �they are heavy!). Once axles are off, store upright (careful of drums � they may be loose and fall off) � store them where they won�t get dirty, or brushed up against.

Step 5:
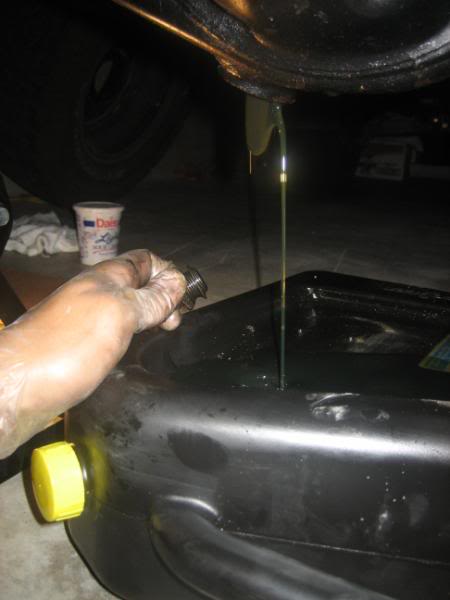
Drain the differential.
Step 6:
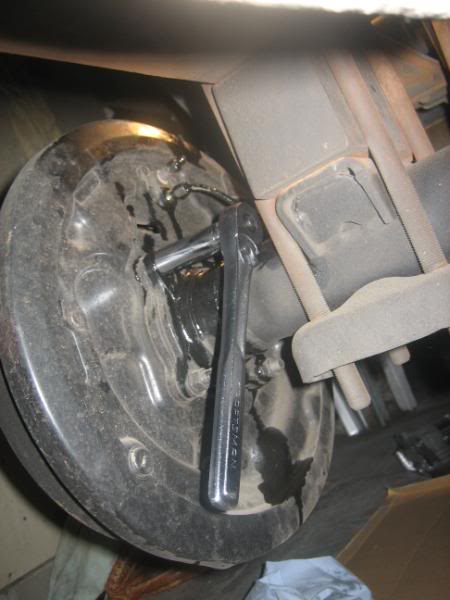
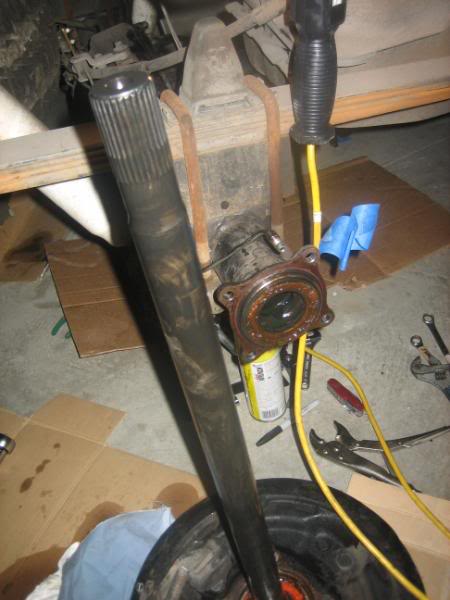
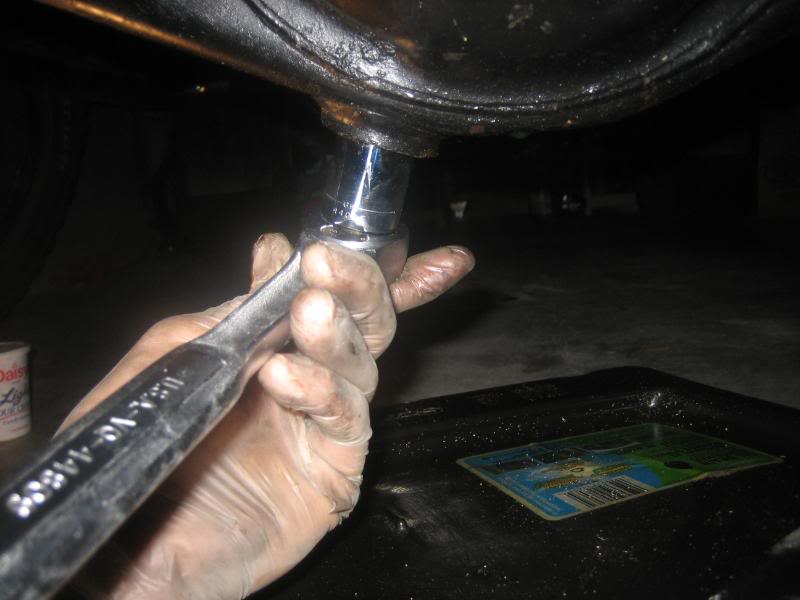
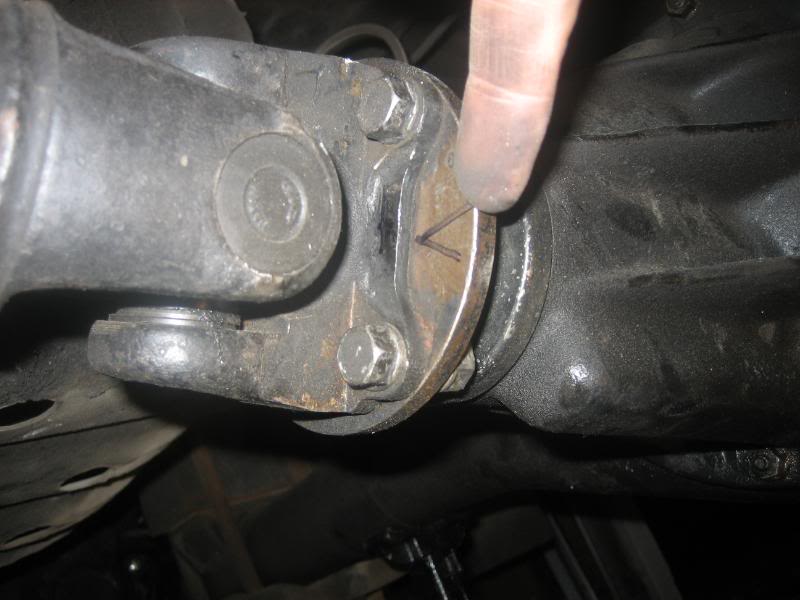
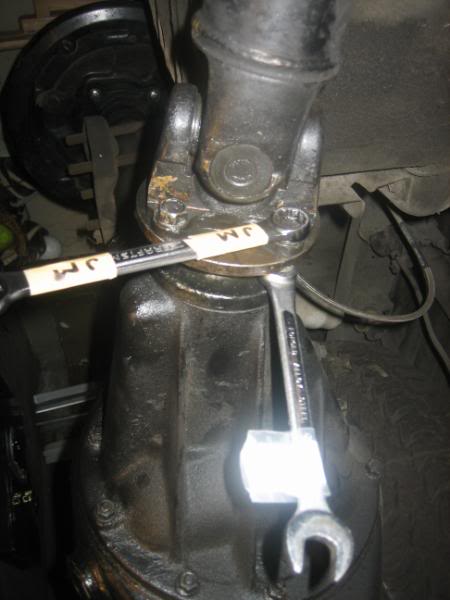
Disconnect driveshaft flange from the driveshaft � AT the rear differential. This one�s tough. Use 2 14mm closed end wrenches in tandem for the 4 bolts/nuts that connect this. Be careful NOT to strip them. Mark with a sharpie or tape where the flange meets the yoke � you want to know this for when you put it back together. Once the bolts are out, you can hand-compress the shaft toward the front of the car, and push the driveshaft off to the side out of the way.
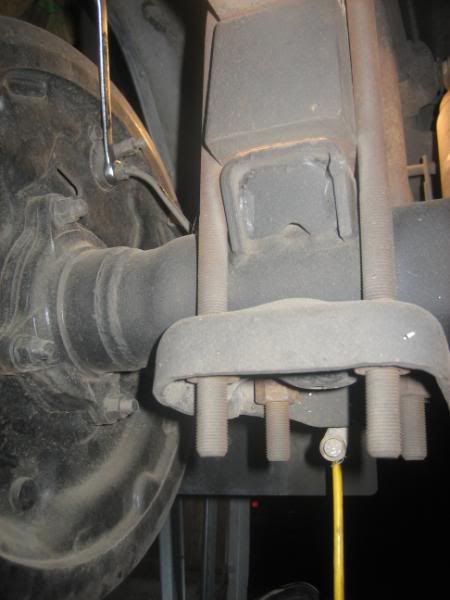
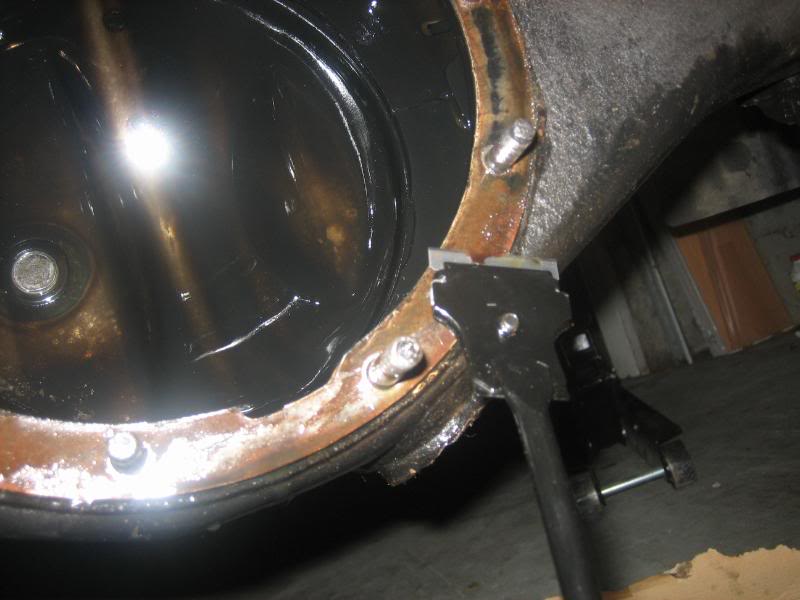
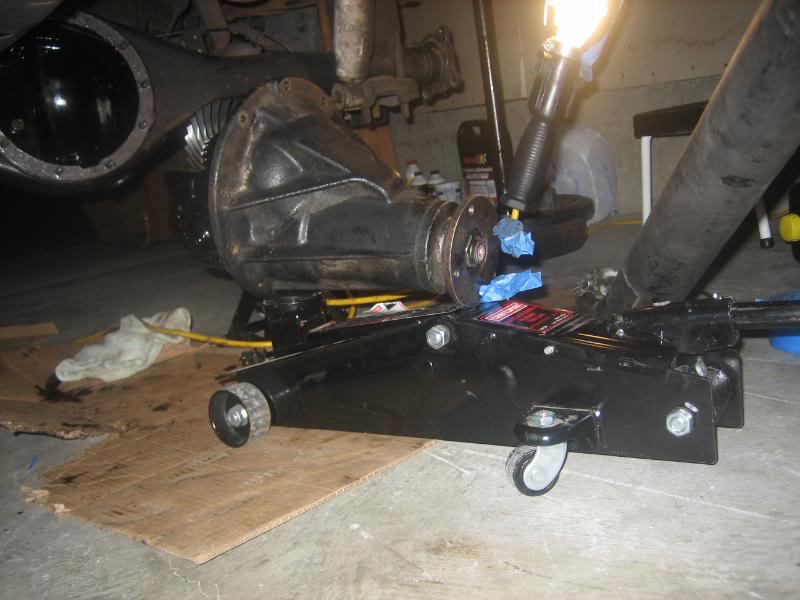
Step 7:
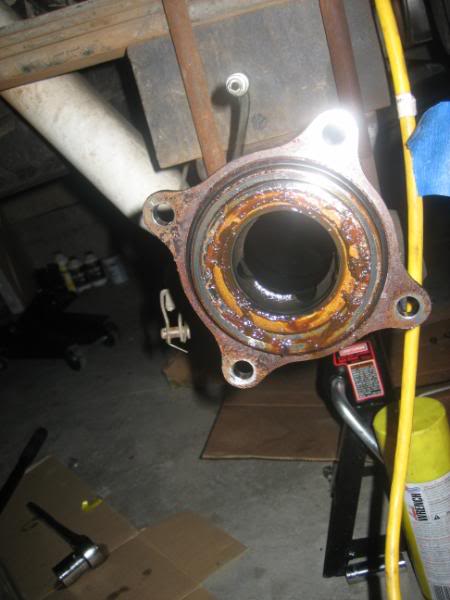
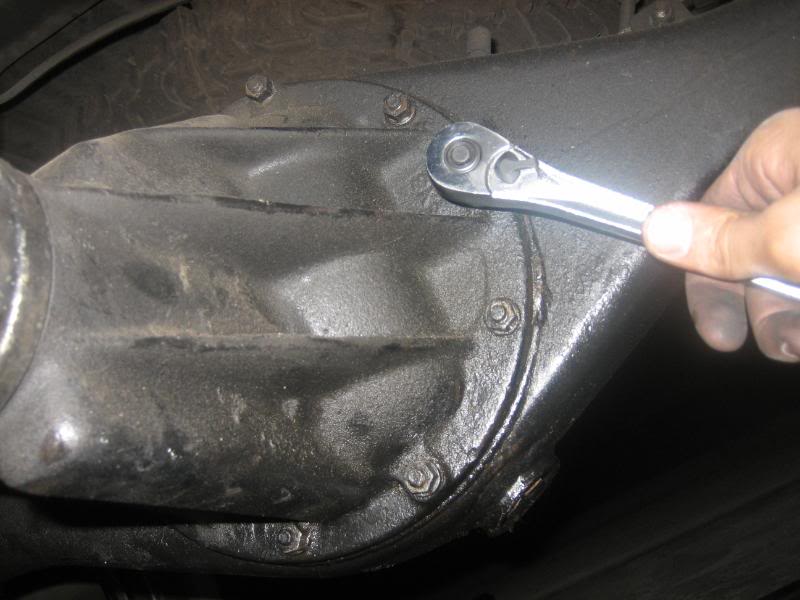
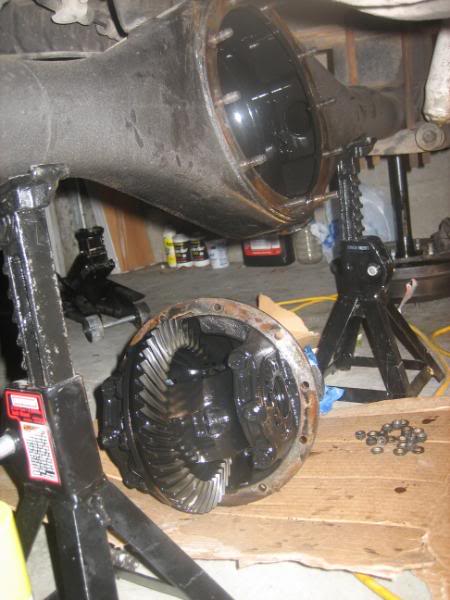
Removing the differential cover. Remove the 10 nuts around the differential carrier using a socket wrench. I removed the bottom 8 bolts first, then the top 2. This is where a friend helps. Or a floor jack. Or both. Or really, really strong shoulders back and forearms. The differential weighs in excess of 40-50 pounds and will drop if you�re not careful. Once you lift it out, set it aside (on cardboard) and keep it clean and away from dirt. It should lift straight out toward the front of the car. I cannot stress enough how damn heavy this thing is�be careful!
Step 8:
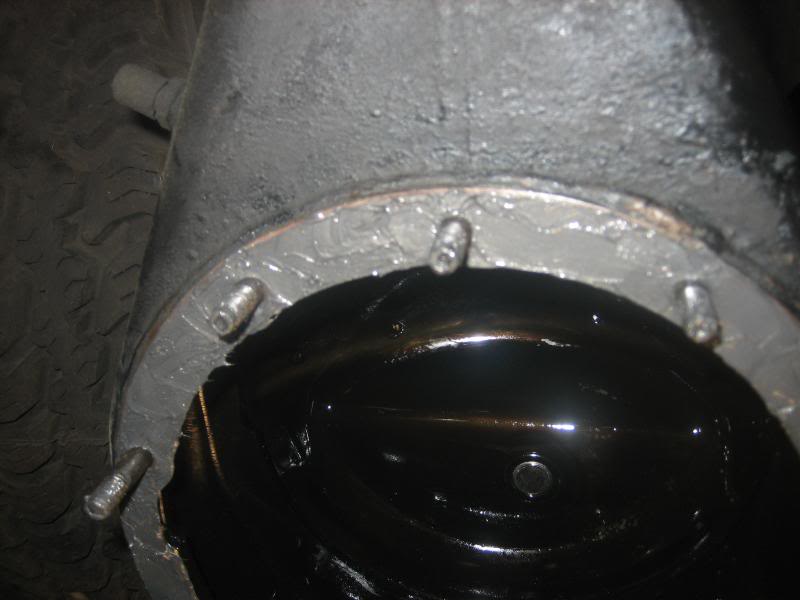
Clean the old gasket off the differential carrier and cover. I used a razor blade, being careful not to drop any of the old stuff into the inside of the differential or on the differential parts. Also, be careful not to �gouge� the gasket surfaces � you want it to remain clean and smooth as possible. I used brake parts cleaner to spray onto both surfaces and clean off with a new cotton rag.
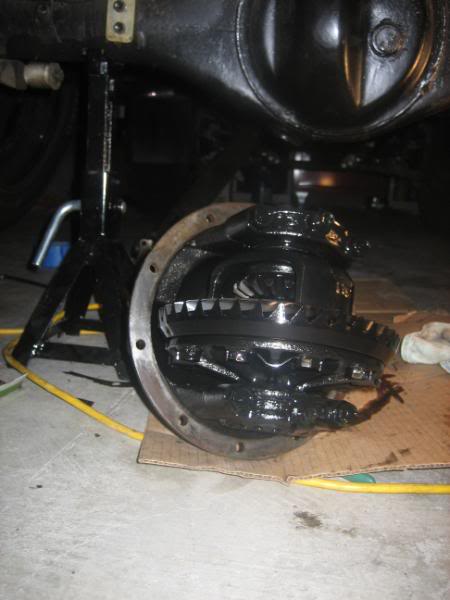
Prepare and mount new gasket. I coated the front and back of the new gasket with the black silicon gasket maker (messy!) and then gently applied to onto the differential carrier. Once it�s uniformly flat on there, you�re ready to put the actual differential back on.
Step 9:
Putting the differential back on. It�s even heavier putting it back on. This is where a friend really helps. I used a jack to help, but it was a tough battle � and you don�t want to drop it. Be slow. Be cautious. Take your time and gently put it back in � over the 10 studs. Press it gently but firmly in so that it makes a good seal with the gasket. Finger tighten the 10 nuts on the studs. Use a torque wrench to tighten to 21 lb/ft each nut. I went in an opposite pattern: 12 then 6, 1 then 7, 2 then 8, etc (like you�re looking at a clock face).
Step 10:
Putting it back together. Using clean gloves again, gently feed the axle shafts back into the axle housing until the wheel hubs are flush with the axle housing ends (careful of the wheel drums � they may be loose). Finger tighten the 4 nuts on the back of the axle housing to each wheel, then use the torque wrench to finish the job (35 lb/ft (?). I went in a 2 and 8 and 10 and 4 pattern for tightening � similar to the differential cover. Re-attach the brake lines to the back of the wheel hub. Re-attach the emergency brake cables to the wheel hubs. Re attach the drive shaft, using the marks you left to properly mate it to the yoke. Put the drain plug back into the differential carrier. Fill the differential with gear oil until it reaches just the bottom edge of the fill hole � then put the filler plug back on. Bleed the brakes. Re-mount the wheels and lug nuts (finger tight first � then lower the truck, and tighten to 76 lb/ft � in the same clock-opposite method used for the differential cover earlier.
Step 11:
Road test it in a safe area.
If I Missed anything or gave bad advice, please do call it out here � I�m only a self-proclaimed 4/10 mechanic and always learning
Thanks for reading � hope this helps someone.
Phil
So, I actually did this DIY write up about 2 years back, with the intention of posting in on the T4R.org forums I was frequenting (before I discovered Yotatech....). I did lots of documentation with photos and wrote up a whole word document with IMG codes to copy/paste into my forum posting, and then, sadly, realized that thier forum software does not support linking to multiple photos in one post, even if hosted on Photobucket (LAME!).
So, now that I'm here, I remembered that I had the word document saved somewhere and could post (WITH THE PICS!). Hoping this helps some of you guys out - it was a daunting task for me at the time and I saved a lot of money doing it myself.
Next one I'll do is the ZUK mod (weldless) in a few weeks I hope (springs in the mail!).
Enjoy,
Phil
------------------------------------------------------
1987 4runner SR5 Rear Differential Gasket Replacement DIY Guide (with Pics!)
Hi everyone � I�d rate myself at a 4/10 technically for DIY projects on my cars (changed oil/filter, clutch master cylinder replacement, air box replacement, valve adjustments and some other �easier� stuff). When my rear differential started leaking, I decided I didn�t want to lay out $400+ to my mechanic to do the work, and wanted to learn more about the truck (and grow my mechanic resume!). So I did some research online, and in my Chilton manual, and bought the needed parts:
1) Felpro gasket
2) Black silicone gasket maker
3) Gear oil
4) Gasket scraper (just a razor blade on a stick really)
5) DOT 3 brake fluid
Other tools you�ll need:
(2) jack stands & Floor jack
(1) Set of wheel 2 chocks or pieces of wood to block the front wheels
(1) Creeper (not needed but nice)
(1) �� tire iron and/or socket with extender (for the wheels � this may be different for OEM wheels � I have aftermarket wheels/tires that have � inch lugs)
(1) torque wrench
(Lots of) rags and old cardboard for catching leaky gear oil and brake fluid
(1) can of (new) DOT 3 brake fluid
(1) Brake bleeder kit (for bleeding the system at the end
(1) 14mm socket
(2) 14mm closed end wrenches (to remove the driveshaft yoke nut/bolt combo from differential carrier)
(1) 10mm socket
(1) 10mm flared open wrench (brake lines) � make sure it�s a good wrench � cheaper ones aren�t exact and may strip your bleeder valves!
(1) Box of latex gloves (you�ll go through a LOT!)
(1 can) Grease cleaner (orange pumice stuff works great)
PROCESS:
Step 1:
First, get under the truck and make sure that the fill plug on the differential can be removed�.you�d hate to drain it, only to find out you cannot refill it later!
Step 2:
Release your emergency brake and put the wheel chocks on the front wheels (front of wheels for sure�.front and back of front wheels to be super safe). Get your jack stands ready. Put the floor jack under the differential carrier. Using a tire iron, loosen the lug nuts on the rear wheels (just finger loose). Once loose, use the jack to jack up the rear axle high enough that the rear wheels are an inch or so off the ground. Put the jack stands in place on the axel � on either side of the differential carrier. Lower the jack so that the axel rests on the jack stands. Remove jack. Remove rear wheels/tires.
Step 3:
Prepping the axles for removal. Remove the emergency brake cables from the back of each wheel hub. There is a cable that leads to each spring loaded level, which is attached with a post and a cotter pin. Simply remove the cotter pin, remove the post from the brake apparatus, and replace pin and set aside for later. On the back of each rear wheel hub, there are 4 nuts. Use a 10mm socket to remove these. You�ll also need to remove the brake lines on each wheel (have a rag and old cup ready � it will leak a little � don�t let it touch paint or the brake hardware.
Step 4:
Once the axles/hubs are no longer mated to the axle housing, you can pull them out � making sure they are in line with the axle. You can pull out about 6 inches to disengage from the differential, or you can pull out completely like I did. Either way, be careful of the rubber seal on the end of the axle housing, where the axle shaft enters � too much weight on this could damage it. Also, be careful not to get any dirt on the actual axle shafts � use a fresh pair of latex gloves when removing (maybe enlist the help of a friend �they are heavy!). Once axles are off, store upright (careful of drums � they may be loose and fall off) � store them where they won�t get dirty, or brushed up against.
Step 5:
Drain the differential.
Step 6:
Disconnect driveshaft flange from the driveshaft � AT the rear differential. This one�s tough. Use 2 14mm closed end wrenches in tandem for the 4 bolts/nuts that connect this. Be careful NOT to strip them. Mark with a sharpie or tape where the flange meets the yoke � you want to know this for when you put it back together. Once the bolts are out, you can hand-compress the shaft toward the front of the car, and push the driveshaft off to the side out of the way.
Step 7:
Removing the differential cover. Remove the 10 nuts around the differential carrier using a socket wrench. I removed the bottom 8 bolts first, then the top 2. This is where a friend helps. Or a floor jack. Or both. Or really, really strong shoulders back and forearms. The differential weighs in excess of 40-50 pounds and will drop if you�re not careful. Once you lift it out, set it aside (on cardboard) and keep it clean and away from dirt. It should lift straight out toward the front of the car. I cannot stress enough how damn heavy this thing is�be careful!
Step 8:
Clean the old gasket off the differential carrier and cover. I used a razor blade, being careful not to drop any of the old stuff into the inside of the differential or on the differential parts. Also, be careful not to �gouge� the gasket surfaces � you want it to remain clean and smooth as possible. I used brake parts cleaner to spray onto both surfaces and clean off with a new cotton rag.
Prepare and mount new gasket. I coated the front and back of the new gasket with the black silicon gasket maker (messy!) and then gently applied to onto the differential carrier. Once it�s uniformly flat on there, you�re ready to put the actual differential back on.
Step 9:
Putting the differential back on. It�s even heavier putting it back on. This is where a friend really helps. I used a jack to help, but it was a tough battle � and you don�t want to drop it. Be slow. Be cautious. Take your time and gently put it back in � over the 10 studs. Press it gently but firmly in so that it makes a good seal with the gasket. Finger tighten the 10 nuts on the studs. Use a torque wrench to tighten to 21 lb/ft each nut. I went in an opposite pattern: 12 then 6, 1 then 7, 2 then 8, etc (like you�re looking at a clock face).
Step 10:
Putting it back together. Using clean gloves again, gently feed the axle shafts back into the axle housing until the wheel hubs are flush with the axle housing ends (careful of the wheel drums � they may be loose). Finger tighten the 4 nuts on the back of the axle housing to each wheel, then use the torque wrench to finish the job (35 lb/ft (?). I went in a 2 and 8 and 10 and 4 pattern for tightening � similar to the differential cover. Re-attach the brake lines to the back of the wheel hub. Re-attach the emergency brake cables to the wheel hubs. Re attach the drive shaft, using the marks you left to properly mate it to the yoke. Put the drain plug back into the differential carrier. Fill the differential with gear oil until it reaches just the bottom edge of the fill hole � then put the filler plug back on. Bleed the brakes. Re-mount the wheels and lug nuts (finger tight first � then lower the truck, and tighten to 76 lb/ft � in the same clock-opposite method used for the differential cover earlier.
Step 11:
Road test it in a safe area.
If I Missed anything or gave bad advice, please do call it out here � I�m only a self-proclaimed 4/10 mechanic and always learning
Thanks for reading � hope this helps someone.
Phil

The following users liked this post:
Napo87 (04-20-2023)
02-24-2010, 10:43 AM
#2
Nice write up Phil. Hopefully that will help someone out down the road. Since it's been 2 years, have you had any leaks? I ask because I've done it a couple of times now. Once with a Toyota paper gasket (and your FelPro looks much nicer) and once with Ultra Gray RTV only. The paper job eventually leaked very slightly. (got on the axle but never enough to drip in the driveway) The RTV only jobs have held tight and dry. I asked for and recieved collective opinions about that here:
https://www.yotatech.com/forums/f66/...-pleas-151454/
The only other thing I do differently is that I tighten the diff back on until the RTV starts to squeeze out the edges, then let it dry/cure overnight before applying the final torque and refilling with oil.
https://www.yotatech.com/forums/f66/...-pleas-151454/
The only other thing I do differently is that I tighten the diff back on until the RTV starts to squeeze out the edges, then let it dry/cure overnight before applying the final torque and refilling with oil.
02-24-2010, 10:55 AM
#3
Registered User
Thread Starter
iTrader: (2)
Join Date: Dec 2009
Location: Pleasanton, CA - SF Bay Area
Posts: 2,159
Likes: 0
Received 7 Likes
on
5 Posts
Nice write up Phil. Hopefully that will help someone out down the road. Since it's been 2 years, have you had any leaks? I ask because I've done it a couple of times now. Once with a Toyota paper gasket (and your FelPro looks much nicer) and once with Ultra Gray RTV only. The paper job eventually leaked very slightly. (got on the axle but never enough to drip in the driveway) The RTV only jobs have held tight and dry. I asked for and recieved collective opinions about that here:
https://www.yotatech.com/forums/f66/...-pleas-151454/
The only other thing I do differently is that I tighten the diff back on until the RTV starts to squeeze out the edges, then let it dry/cure overnight before applying the final torque and refilling with oil.
https://www.yotatech.com/forums/f66/...-pleas-151454/
The only other thing I do differently is that I tighten the diff back on until the RTV starts to squeeze out the edges, then let it dry/cure overnight before applying the final torque and refilling with oil.
 02-24-2010, 11:07 AM
#5
Registered User
Thread Starter
iTrader: (2)
Join Date: Dec 2009
Location: Pleasanton, CA - SF Bay Area
Posts: 2,159
Likes: 0
Received 7 Likes
on
5 Posts
That's what I figured - I sure could ahve used one of these when I set out to do the job
 Photos are such an asset in jobs like this, so I'm glad I found a site that supports them
02-24-2010, 11:44 AM
Photos are such an asset in jobs like this, so I'm glad I found a site that supports them
02-24-2010, 11:44 AM
#6
I've seen a kit at LCE that is a "stud eliminator" for $30 (comes with RTV tube too). I guess the holes for the studs go all teh way through and you can feed these new bolts through from the inside out, then use provided nuts and washers....I may end up going there if it ever gets to be a bad leak.
The only other thing I can add is that TG's install instructions mention it "might be a good idea" to chase the threads before install. I think it's a "must do". I struggled mightily with the first one or two, then chased the threads on the others and was able to put them in with my fingers.
 Live and learn.
LCE http://www.toyotacatalog.net/M1WebGe...B-E47890BF3977
TG http://www.trail-gear.com/toy-diffstud.html
02-24-2010, 11:57 AM
#7
Registered User
Nice write up Phil. Mind if I link to it in the Gear sticky? I already linked Matt16's rear third removal, and this would take care of the earlier parking brake, for those that need pics!! Ok, I already did it!!
I just couldn't stay clean enough to get pics, about 2 steps in it became "screw it, I am running out of towels to keep cleaning my hands...."
Good work, and we need more folks doing these little write-ups to make it easier for newbs to navigate the site.
Also, the little caps on the gear oil bottles? work fairly well to cap the brake lines and make a smaller mess.
Last edited by kiyobrown; 02-24-2010 at 02:23 PM.
Trending Topics
02-24-2010, 06:59 PM
#8
Registered User
Thread Starter
iTrader: (2)
Join Date: Dec 2009
Location: Pleasanton, CA - SF Bay Area
Posts: 2,159
Likes: 0
Received 7 Likes
on
5 Posts
Great Jason, thanks - I'm famous now 
Thanks for the gear oil tip too....though I am not picturing it....the gear oil I used was a large jug - like the size of antifreeze (large cap). How would it affix to the brake lines? Or are there smaller bottles/caps I haven't seen yet?
Thanks for the gear oil tip too....though I am not picturing it....the gear oil I used was a large jug - like the size of antifreeze (large cap). How would it affix to the brake lines? Or are there smaller bottles/caps I haven't seen yet?
02-24-2010, 07:05 PM
#9
Registered User
Gotcha. The smaller quart bottles had little conical caps that look like the ones on tubes of caulk. Yeah, I guess the gallon jug cap might not have slowed the flow much. Good work, man. This is exactly the kind of stuff we need!
02-24-2010, 07:17 PM
#10
i would have drained the diff first before pulling the shafts out = less of a mess
and it doesn't matter where your flange meets up with your shaft, no need to mark it.
if your just swapping thirds quickly you can also leave the brakes connected, and undo the bolts that hold the line to the axle and pull the shafts out far enough to pull the third out.
and it doesn't matter where your flange meets up with your shaft, no need to mark it.
if your just swapping thirds quickly you can also leave the brakes connected, and undo the bolts that hold the line to the axle and pull the shafts out far enough to pull the third out.
Last edited by crolison; 02-24-2010 at 07:22 PM.
02-24-2010, 07:38 PM
#11
Registered User
Thread Starter
iTrader: (2)
Join Date: Dec 2009
Location: Pleasanton, CA - SF Bay Area
Posts: 2,159
Likes: 0
Received 7 Likes
on
5 Posts
i would have drained the diff first before pulling the shafts out = less of a mess
and it doesn't matter where your flange meets up with your shaft, no need to mark it.
if your just swapping thirds quickly you can also leave the brakes connected, and undo the bolts that hold the line to the axle and pull the shafts out far enough to pull the third out.
and it doesn't matter where your flange meets up with your shaft, no need to mark it.
if your just swapping thirds quickly you can also leave the brakes connected, and undo the bolts that hold the line to the axle and pull the shafts out far enough to pull the third out.
Agreed on the less mess comment - thanks for adding!
Didn't realize that about the driveshaft - always thought it was a balance issue and didn't want to take chances...good to know.
Good tip on the quick change....though my research at the time (and the FSM) warned against putting too much pressure on the axle seals, so that's why I took them all the way out.
02-24-2010, 07:52 PM
#12
Registered User
I also drained the diff first, remember to do the fill plug before the drain plug. And I heard the same things about busting the seals.
02-24-2010, 08:01 PM
#13
Registered User
Thread Starter
iTrader: (2)
Join Date: Dec 2009
Location: Pleasanton, CA - SF Bay Area
Posts: 2,159
Likes: 0
Received 7 Likes
on
5 Posts
I actually was reading a magazine recentlyn called "Modified", that had a great DIY feature on turning a 2002 WRX into an STI using junkyard STI parts and some aftermarket goodies....and they said to DRAIN FIRST THEN OPEN THE FILL PLUG (!). Otherwise, a great write up with tons of photos - just my style!
02-24-2010, 08:03 PM
#14
Registered User
I totally missed step one since it didn't have a pic. hahaha 
So whatcha gonna do a write up on next?
And you still digging that exhaust?
So whatcha gonna do a write up on next?
And you still digging that exhaust?
Last edited by kiyobrown; 02-24-2010 at 08:05 PM.
02-24-2010, 08:18 PM
#15
Registered User
Thread Starter
iTrader: (2)
Join Date: Dec 2009
Location: Pleasanton, CA - SF Bay Area
Posts: 2,159
Likes: 0
Received 7 Likes
on
5 Posts
Still liking the exhaust a lot - can't believe the difference in power - 1 to 2 gear difference in HW hills.
Next up is the ZUK mod for my tired springs and crappy 4" blocks. Springs in the mail already and I walked into an Autozone today to get new u bolts and get this.... they only had the rounded version (for axle over the leafs), not the squared off version....as I sighed with disappointment, this young Autozone guy says "you want some U bolts? I've got some in the back of my Tacoma (I had parked next to his newer Taco)". turns out he'd just swapped in some new rear springs and had his (newer) OEM U Bolts and leafs in the back of his bed. I measured them to my axle and the length/width/etc checked out fine. $10 later I was 4 ubolts (and nuts) richer! Awesome coincidence....
So, in a couple weeks, look for a photo-jammed write up on that adventure
Oh, and I have a "garage camera" - it's a Canon powershot that has a cracked LCD - still takes great photos, you just can't see them before/after the snap.
03-27-2010, 10:06 AM
#16
Registered User

Join Date: Mar 2010
Location: San Francisco
Posts: 2
Likes: 0
Received 0 Likes
on
0 Posts
Great Write up
Thanks for the great write up, the pictures are great, way better than using the manual. I plan on using your guide rather than paying up the ass at a mechanic. Thanks again.
03-28-2010, 12:06 PM
#17
Registered User
Thread Starter
iTrader: (2)
Join Date: Dec 2009
Location: Pleasanton, CA - SF Bay Area
Posts: 2,159
Likes: 0
Received 7 Likes
on
5 Posts
Thanks Owen - glad it helps - that's why I did it. Just remember to really be careful supporting the third member so you don't drop it. Getting a buddy to help raise/lower with your floor jack is a great plan (that I didn't do).
Good luck!
Good luck!
03-28-2010, 02:40 PM
#18
Contributing Member
Join Date: Feb 2007
Location: maple ridge, British Columbia, Canada
Posts: 9,055
Likes: 0
Received 9 Likes
on
5 Posts
Make sure the diff breather is not plugged, if it is the diff will leak again. I thought I was going to have to do the same thing awhile back, simply removed the breather and it was plugged solid. Replaced with a barb and ran an extended diff breather.
03-28-2010, 02:43 PM
#19
Registered User

https://www.yotatech.com/forums/f100...thread-208139/
Last edited by kiyobrown; 03-28-2010 at 02:46 PM.
03-28-2010, 02:58 PM
#20
Contributing Member
Join Date: Feb 2007
Location: maple ridge, British Columbia, Canada
Posts: 9,055
Likes: 0
Received 9 Likes
on
5 Posts
I hardly ever go in deep water but the diff breather mod is cheap.
Cost me like $5 for brass fittings, $10 for hose (used Vac hose, expensive but nice. Need to replace the rear hose with the same) and $5 for fuel filters to cap the ends with.
Cost me like $5 for brass fittings, $10 for hose (used Vac hose, expensive but nice. Need to replace the rear hose with the same) and $5 for fuel filters to cap the ends with.


