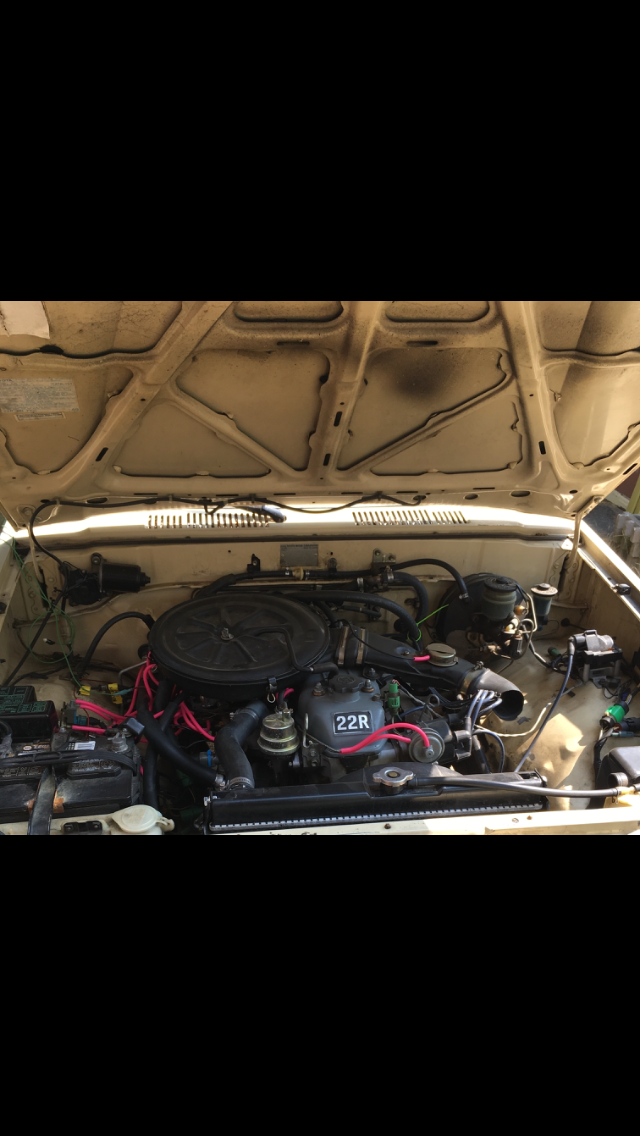
Vacuum sticker pics needed, please!
#1
Registered User
Thread Starter
Join Date: Jul 2018
Location: Eastern Oregon
Posts: 20
Likes: 0
Received 0 Likes
on
0 Posts
Vacuum sticker pics needed, please!
Please help! Need Pics of under hood vacuum diagram sticker (caution plate) for my 84 22R RN FED. The big number in the lower right corner of the sticker I need is 38. (Toyota part # 17792-35381 but is discontinued). Mechanic who put new engine in "my baby" screwed up all the vacuum lines. My sticker is too worn to read. Even pics of a partial sticker would help. Thanks so much to anyone willing to go pop the hood of their truck and check.
#5
Registered User
Thread Starter
Join Date: Jul 2018
Location: Eastern Oregon
Posts: 20
Likes: 0
Received 0 Likes
on
0 Posts
Omg it's beautiful! Thank you soooo much!!!! I have been looking for this for months! I should have come here first. Tremendous help! Thank you!
#7
Registered User
Beauty is in the eye of the beholder. It's kind of a Picasso version of the original.
Did you get whatever the problem was resolved?
Trending Topics
#8
Registered User
Thread Starter
Join Date: Jul 2018
Location: Eastern Oregon
Posts: 20
Likes: 0
Received 0 Likes
on
0 Posts
Turns out there were two reasons for the vacuum leak. Lines were all misrouted and he didn't clean the old spacer before installing the carb, so that was sucking air too. It was filthy. As soon as I get the new gaskets and some silicone vac line, I'll put everything back together.
The truck was stolen a couple years ago and I found it via the grapevine and got it back. Have been rebuilding ever since. That diagram was the last piece of the puzzle I needed! I'll let you know when I get it running
The truck was stolen a couple years ago and I found it via the grapevine and got it back. Have been rebuilding ever since. That diagram was the last piece of the puzzle I needed! I'll let you know when I get it running

#10
Registered User
Turns out there were two reasons for the vacuum leak. Lines were all misrouted and he didn't clean the old spacer before installing the carb, so that was sucking air too. It was filthy. As soon as I get the new gaskets and some silicone vac line, I'll put everything back together.
The truck was stolen a couple years ago and I found it via the grapevine and got it back. Have been rebuilding ever since. That diagram was the last piece of the puzzle I needed! I'll let you know when I get it running
The truck was stolen a couple years ago and I found it via the grapevine and got it back. Have been rebuilding ever since. That diagram was the last piece of the puzzle I needed! I'll let you know when I get it running

You gonna do a carb rebuild since it is off?
#11
Registered User
Thread Starter
Join Date: Jul 2018
Location: Eastern Oregon
Posts: 20
Likes: 0
Received 0 Likes
on
0 Posts
I've actually been trying to figure out how to post pics here from my phone. Was going to post a pic of the dirty spacer.
I bought a reman from National Carb in Fla. they get good reviews and have been in business at least 30 years. It looks well done.
They meth head that stole her destroyed almost everything so it's really been a saga. I should put together a list of everything I've replaced. Lol
I bought a reman from National Carb in Fla. they get good reviews and have been in business at least 30 years. It looks well done.
They meth head that stole her destroyed almost everything so it's really been a saga. I should put together a list of everything I've replaced. Lol
#14
Registered User
I've actually been trying to figure out how to post pics here from my phone. Was going to post a pic of the dirty spacer.
I bought a reman from National Carb in Fla. they get good reviews and have been in business at least 30 years. It looks well done.
They meth head that stole her destroyed almost everything so it's really been a saga. I should put together a list of everything I've replaced. Lol
I bought a reman from National Carb in Fla. they get good reviews and have been in business at least 30 years. It looks well done.
They meth head that stole her destroyed almost everything so it's really been a saga. I should put together a list of everything I've replaced. Lol
On the right in red it says "My Pictures" - click that
Upload pics there
When you need a pic from there for a post click on the square icon next to the smiley face above where you write your post.
#18
Registered User
Thread Starter
Join Date: Jul 2018
Location: Eastern Oregon
Posts: 20
Likes: 0
Received 0 Likes
on
0 Posts
Haha! Good eye. I didn't have it hooked back up yet when I took that pic and didn't notice that when I posted but it's definitely connected now. After cleaning the carb riser and putting in new gaskets, plus hooking up the lines per the diagram you sent, she's running great! I sure appreciate your help!
Thread
Thread Starter
Forum
Replies
Last Post
FRANCOARMANI
84-85 Trucks & 4Runners
2
08-17-2017 06:43 AM
TrafficTechII
84-85 Trucks & 4Runners
0
05-07-2017 08:11 PM
EWAYota
86-95 Trucks & 4Runners
10
05-07-2006 09:51 AM


