Putting a 22RE head on a 22R tall block (early style) - Write up
 08-23-2011, 05:50 AM
#1
Registered User
Thread Starter
Putting a 22RE head on a 22R tall block (early style) - Write up
To start things off...
THIS IS NOT FOR THE FAINT OF HEART!!
ok now that's out of the way.
To do this it will require a full rebuild from the bottom up.
If you have a good 22R short block all that is really required is a dis-assembly and some extra machine work.
Ok now parts that are required:
22R pistons/rods/crank/block (early model, NO flying saucer on drivers side)
Early 22R Blocks 81-84 9.120"
Late 22RE Blocks 85-95 8.930" ("lazer" block)
22RE head (with EFI)
Adjustable timing gear
Timing set (just to be safe) for the 83-84 single row in case a Half-link is needed.
I'm going to make this write-up under the assumption that you have either rebuilt an engine before or have done research and are comfortable with doing this.
Pictures to determine the depth of the dome section (If new the box may have a cross section illustration)
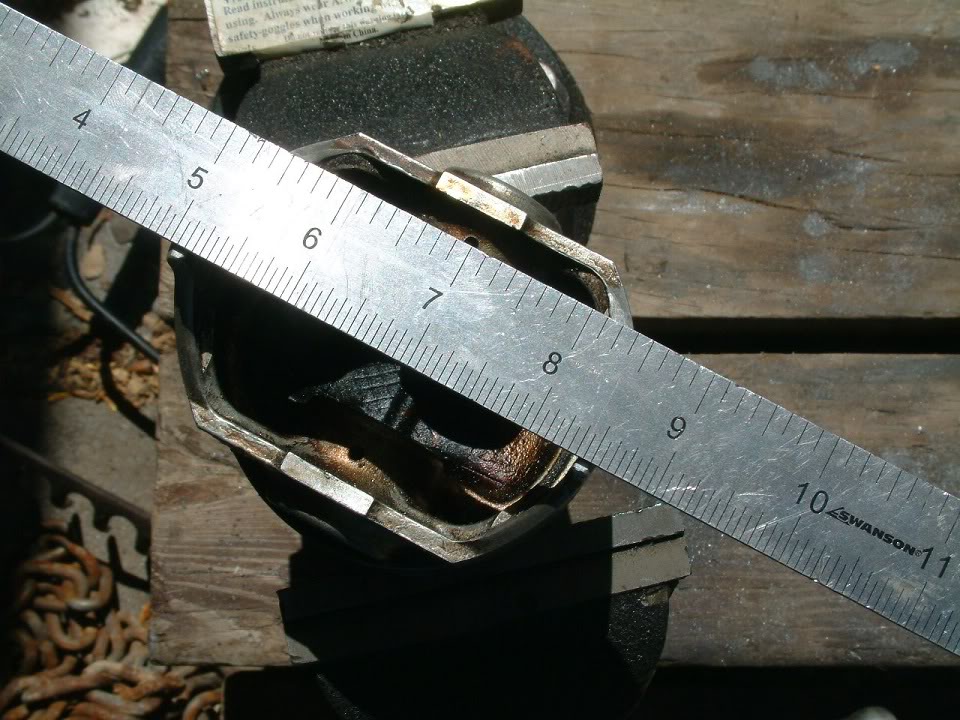
You will need the pistons removed and taken to a reputable Machinist's shop.
Make sure before you go down to the shop that they have a 4 jaw lathe.
Make sure to mark the front of the piston with a punch or something, at the wrist pin boss, for installation later. Unless it has the cutout on the rim of the top ring land, the machine shop will remove the arrow that points front!
Have the machinist only remove the dome!! None of the ring land area!
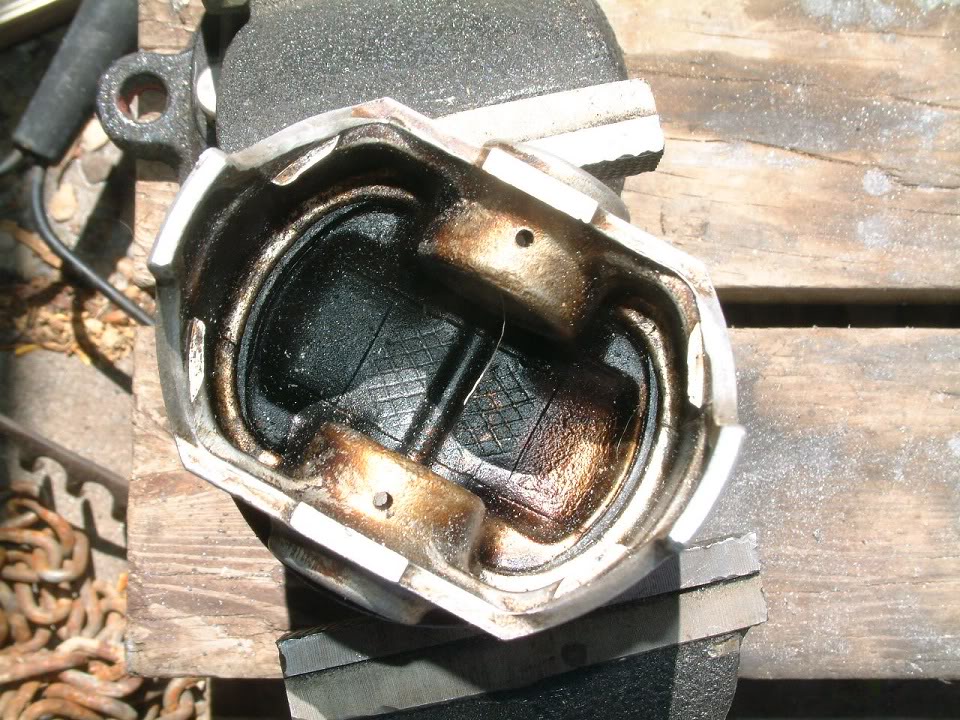
Picture of the top of the piston after machining (installed)
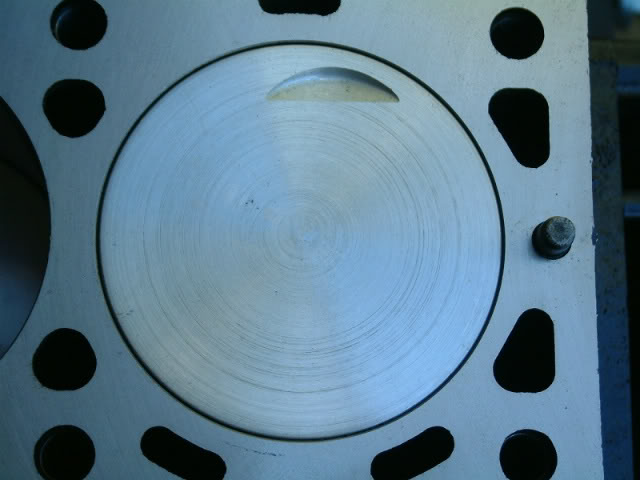
The valve relief's are cut in two positions. one relief in the front position of center line and one in rear position. So you have two pistons in front and two in back. the order for assembly is cyl #1 front, cyl #2 rear, cyl #3 front, cyl #4 rear. The same placement as the valves on the 22RE head. They were cut by the machine shop in standard position using a scrap 22RE piston for a guide.
This was a standard style piston with the dome on top of it, looks like a volcano.
After the machine work is done to the tops assemble the short block as normal. Everything according to the FSM. Check your deck clearance with a dial indicator. Clearance must be +.006 or less. Mine came out at -.012 to .009 between all 4 cylinders and works just fine.
THIS IS NOT FOR THE FAINT OF HEART!!
ok now that's out of the way.
To do this it will require a full rebuild from the bottom up.
If you have a good 22R short block all that is really required is a dis-assembly and some extra machine work.
Ok now parts that are required:
22R pistons/rods/crank/block (early model, NO flying saucer on drivers side)
Early 22R Blocks 81-84 9.120"
Late 22RE Blocks 85-95 8.930" ("lazer" block)
22RE head (with EFI)
Adjustable timing gear
Timing set (just to be safe) for the 83-84 single row in case a Half-link is needed.
I'm going to make this write-up under the assumption that you have either rebuilt an engine before or have done research and are comfortable with doing this.
Pictures to determine the depth of the dome section (If new the box may have a cross section illustration)
You will need the pistons removed and taken to a reputable Machinist's shop.
Make sure before you go down to the shop that they have a 4 jaw lathe.
Make sure to mark the front of the piston with a punch or something, at the wrist pin boss, for installation later. Unless it has the cutout on the rim of the top ring land, the machine shop will remove the arrow that points front!
Have the machinist only remove the dome!! None of the ring land area!
Picture of the top of the piston after machining (installed)
The valve relief's are cut in two positions. one relief in the front position of center line and one in rear position. So you have two pistons in front and two in back. the order for assembly is cyl #1 front, cyl #2 rear, cyl #3 front, cyl #4 rear. The same placement as the valves on the 22RE head. They were cut by the machine shop in standard position using a scrap 22RE piston for a guide.
This was a standard style piston with the dome on top of it, looks like a volcano.
After the machine work is done to the tops assemble the short block as normal. Everything according to the FSM. Check your deck clearance with a dial indicator. Clearance must be +.006 or less. Mine came out at -.012 to .009 between all 4 cylinders and works just fine.
Last edited by Xyphus42; 08-23-2011 at 06:41 AM.
 08-23-2011, 06:11 AM
#2
Registered User
Wow - this is the first I've seen this done. I still have to get my head around this because it goes aginst all prior thinking. However, I know anything is possible.
Have you ran the motor yet? How does it run?
Good job to you...
Have you ran the motor yet? How does it run?
Good job to you...
08-23-2011, 06:13 AM
#3
Registered User
How much material is left on the top of that piston specifically where the new valve notches were cut into the piston? And which timing kit? How did you correct for chain length differences. I know you mentioned the adj cam gear.
Last edited by xxxtreme22r; 08-23-2011 at 06:16 AM.
08-23-2011, 06:23 AM
#4
Registered User
Thread Starter
Continued....
Once the short block is assembled assemble the rest of the engine with the Adjustable timing gear on the cam.
Use a degree wheel to get the cam timing right.
Picture of my timing at 1* advanced
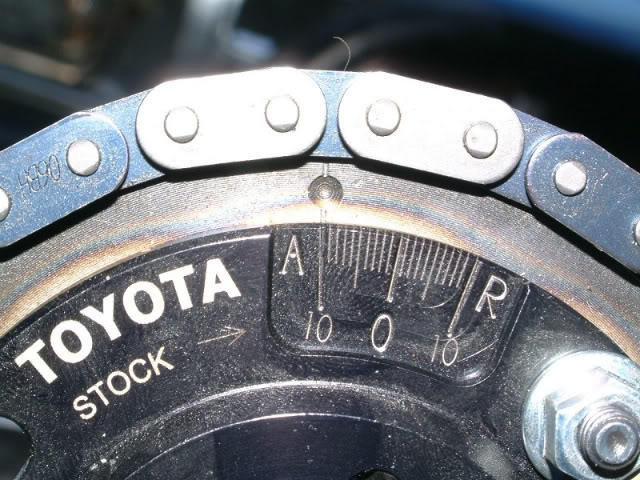
The length difference between the 22R head and the 22RE head is where that extra 9* advance comes from, as well as .010 block decking and .010 head decking.
If you have your block decked and your head decked quite a bit you may have to put in a half link in the timing chain. the standard type chain is 06B so a half-link for that type chain would be required. I found one on amazon for less than $10. The only way to really know if you will need one or not is to assemble and check your slack. I did not use one and I have an incredible amount of slack on the passenger side. But the tensioner still has ~1/4" left before it hits the stop.
I reused the original passenger side timing guide (steel with no wear) but during installation I put the upper bolt in the far left hole to relieve more slack. And it puts more chain contact on the cam gear
Ok next thing is to find a place to put the Knock sensor. Thanks to Marlin (over at MarlinCrawler) the solution is simple.

Since there is no place on the block to just put it in and according to LCE a relocate is required for forged pistons this is a good way to solve the problem. A 12mm X 1.25 nut welded to the engine mount bolt (make sure it had the dish in the top of the bolt) will allow the sensor to bottom out on the land not on the tip. During welding I used a engine stand bolt to make sure the threads in the nut didn't foul up. And made a good ground point for the welder
Now assemble the engine the rest of the way as per the FSM. Make all adjustments and do the break in. (if you used your old 22R and just did the machining, the break in is not much of an issue)
With all this advancement in the cam timing, I had to ream out my distributor on the Retard side to get it to time some what properly. My final timing for ignition came out to 13* BTDC which is good for me at high altitude and high compression. NO PINGING!! That's the important part.
Use a degree wheel to get the cam timing right.
Picture of my timing at 1* advanced
The length difference between the 22R head and the 22RE head is where that extra 9* advance comes from, as well as .010 block decking and .010 head decking.
If you have your block decked and your head decked quite a bit you may have to put in a half link in the timing chain. the standard type chain is 06B so a half-link for that type chain would be required. I found one on amazon for less than $10. The only way to really know if you will need one or not is to assemble and check your slack. I did not use one and I have an incredible amount of slack on the passenger side. But the tensioner still has ~1/4" left before it hits the stop.
I reused the original passenger side timing guide (steel with no wear) but during installation I put the upper bolt in the far left hole to relieve more slack. And it puts more chain contact on the cam gear
Ok next thing is to find a place to put the Knock sensor. Thanks to Marlin (over at MarlinCrawler) the solution is simple.
Since there is no place on the block to just put it in and according to LCE a relocate is required for forged pistons this is a good way to solve the problem. A 12mm X 1.25 nut welded to the engine mount bolt (make sure it had the dish in the top of the bolt) will allow the sensor to bottom out on the land not on the tip. During welding I used a engine stand bolt to make sure the threads in the nut didn't foul up. And made a good ground point for the welder
Now assemble the engine the rest of the way as per the FSM. Make all adjustments and do the break in. (if you used your old 22R and just did the machining, the break in is not much of an issue)
With all this advancement in the cam timing, I had to ream out my distributor on the Retard side to get it to time some what properly. My final timing for ignition came out to 13* BTDC which is good for me at high altitude and high compression. NO PINGING!! That's the important part.
Last edited by Xyphus42; 08-23-2011 at 06:31 AM.
08-23-2011, 06:35 AM
#5
Registered User
Thread Starter
This thing is running right now in my truck. It has power to spare. I can pull in 3rd gear from 20mph to 45mph in about 3 seconds. much improved over the old tired 22re I had. As well the higher compression greatly improved the low end torque.
current setup is cam timed at stock, ignition timed at 13* and redline is ~5k
My first test drive I thought I had a V6 swapped in. It pulls just like my GF's nissan pathfinder with the V6 in it.
much improved over the old tired 22re I had. As well the higher compression greatly improved the low end torque.current setup is cam timed at stock, ignition timed at 13* and redline is ~5k
My first test drive I thought I had a V6 swapped in. It pulls just like my GF's nissan pathfinder with the V6 in it.
Last edited by Xyphus42; 08-23-2011 at 06:37 AM.
08-23-2011, 06:40 AM
#6
Registered User
Thread Starter
xxtreme,
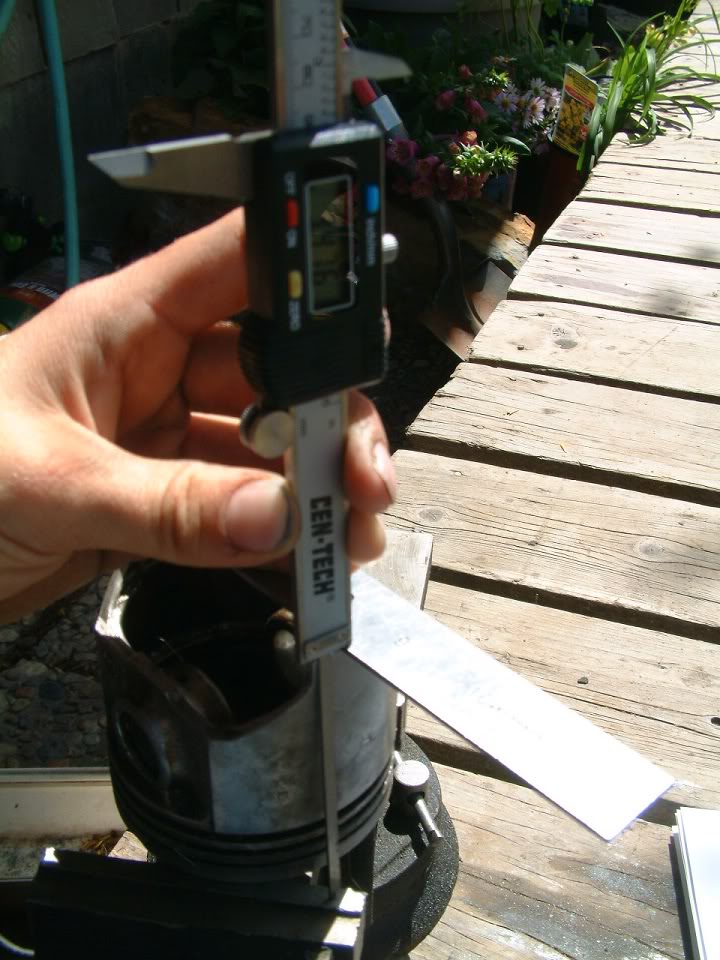
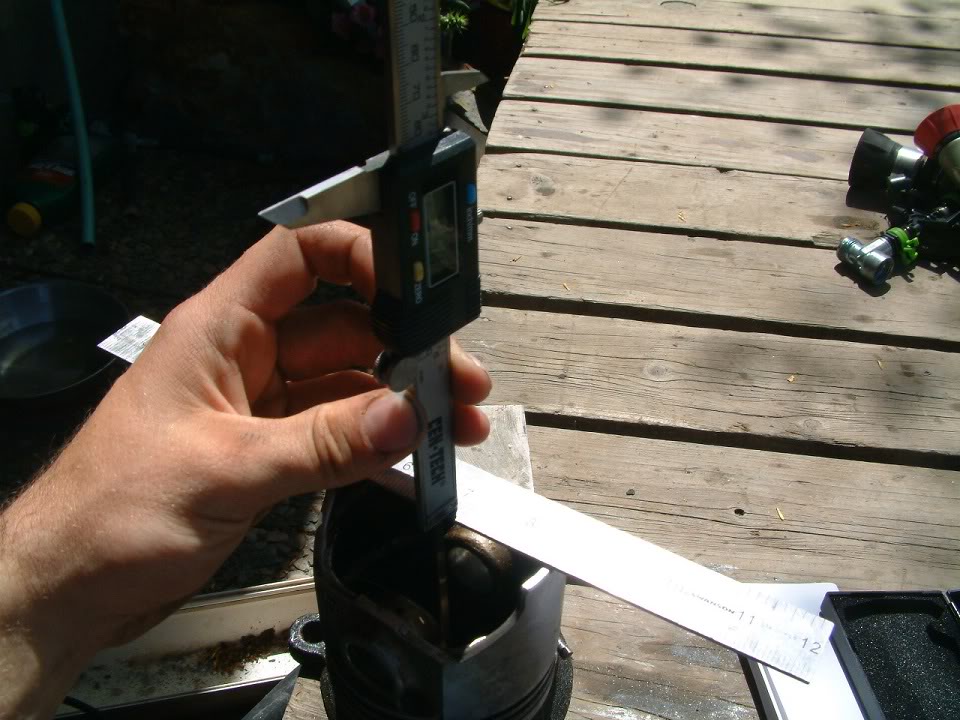
the meat left on the top of the piston is around .200" the domes were the thickest part. the "dip" section of the dome is only about .075"
the meat left on the top of the piston is around .200" the domes were the thickest part. the "dip" section of the dome is only about .075"
Trending Topics
02-08-2013, 11:55 PM
#8
Registered User
Thread Starter
The .075 was what was removed to flatten the top. Still has more then .190 in the thinnest section, right under the exhaust valve cut. 
The only thing I have to worry about is temperature. Keeping it around 200-210. Under load gets warm, and on hold back gets really cold. Other then that, I think it had enough power to kill my drive line. (little extra vibration after driving it awhile) To give you some perspective:
I used to run 31's and moved up to 33's, before the engine change. Used to be real doggy and I had to work the clutch alot. After though, not a problem to run 65 (technically 75) in 5th, down the highway with out a whimper.
Now if only I could find the finances to get my under carriage done :wabbit2:
Last edited by Xyphus42; 02-09-2013 at 12:02 AM.
02-09-2013, 07:44 AM
#9
Registered User

Join Date: Nov 2012
Posts: 94
Likes: 0
Received 0 Likes
on
0 Posts
looks good, i had one a hybrid engine before. it was a 22re bottum end with a 22r top end. I bought it with a "blown" motor. when i took it apart i was a little confused lol. due to the amout of oil leaks etc, it had been that way for a while. I ended up putting a different 22re in it.
10-21-2013, 07:50 AM
#10
Registered User
Thread Starter
Long time on the rebuild
Been quite awhile since I've been on here, work being the main factor.
The Engine is still running like a champ, no loss in power and actually got more now that rings are seated properly.
Took it out first day of hunting season and found some steep hills covered in mud. It spun the 33's all the way up the hills (~35 degree incline).
I am very pleased with this build and highly recommend others try it. A little costly in machining and extra parts. But it is so worth not going to a v6 and all the headaches involved with that.
One thing I may not have mentioned in the original postings.
DO NOT USE REGULAR GAS!!!
Premium only.
It pinged like crazy when I tried regular once. I ended up dropping the tank and refilling with premium
11-12-2013, 05:06 PM
#13
Registered User

Join Date: Jun 2010
Location: Yuma, AZ
Posts: 83
Likes: 0
Received 0 Likes
on
0 Posts
I'm curious if using later pistons would result in a lower cr than stock? I think I just ruined my 88, but have all the guts and head/efi parts in good shape, and a couple spare pre-84 blocks. I could obviously do the same, but with no decking and later model pistons it might be even easier to put together... plus I have a dual row timing kit to add...
03-16-2014, 02:32 PM
#15
Registered User
Thread Starter
Later pistons
the real issue with the later pistons is that they are .040" shorter (wrist pin to top deck) as well as dished. This would make compression way too low. Not a bad thing if you plan on doing 25-60 psi turbo, but natural aspiration I doubt it would run. Minimum compression that I know runs on a piston motor is ~7:1.
Worst case scenario is you put it together and then have to go get different pistons and rebalance your crank for the weight difference.
Worst case scenario is you put it together and then have to go get different pistons and rebalance your crank for the weight difference.
01-28-2016, 05:50 AM
#17
Registered User
Thread Starter
Compression height
Yes. Because they were machined right at the lip where the dome starts which is the exact same measurement as the 22re dish pistons, only .040 taller. Thats where the .040 difference in deck height was made up.
01-28-2016, 04:58 PM
#19
Registered User

Join Date: Jan 2016
Posts: 5
Likes: 0
Received 0 Likes
on
0 Posts


