
IFS box setup ?? - 84 4runner crossover hy-steer
 Sep 22, 2011 | 11:04 AM
#1

Thread Starter
Registered User
Joined: Nov 2008
Posts: 1,319
Likes: 2
IFS box setup ?? - 84 4runner crossover hy-steer
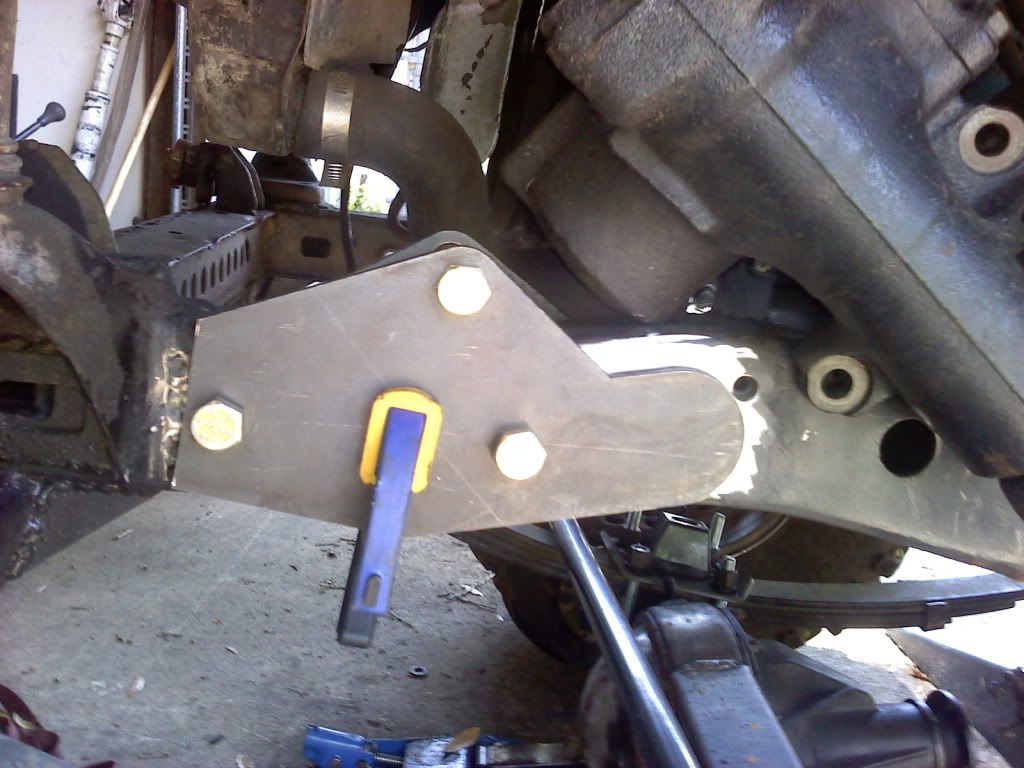
Ok so here is the deal, I have put a lot of hours into this and reading online, so I am definitely not just posting up looking for an easy way out without have putting in the work on it. I have pushed the box completely forward on the frame (toward the front of the truck) until it hits the body. The clearance from the frame to pitman is deceiving in the photo, but I can check that and it clears now. The problem is getting the box forward enough without having interference with the tie rod and the drag link at max flex (I can't completely flex it at the moment as my jack maxes out and can't allow more flex and that is with blocks on the jack as well).
I may be over thinking it. The only way I can get these two to become "parallel" (not vertically, but horizontally) is to drop the front of the box which lowers pitman where the drag connects quite a bit. I'm looking for maximum clearance on this, so I can pretty much max out the setup and leafs no matter what shock setup I have (may change it in the future).
I think that normally this wouldn't be an issue, but I have the classic front and rear lift (4" front and 5" rear) from wabfab and it seems that the front axle is pushed forward a bit with the new springs/setup up front. Here are some photo that hopefully show what I'm talking about.
I have contemplated cutting a bit out of the body so that the box and mount move even further forward (about 2" forward), but the body mount is right up there and would lose some (half) of its rigidity. I have checked lock to lock and the gear box has a couple inches on the steering to go, so losing some on the angle is no big deal.
I suppose if the axle shifted forward/back if the tires were facing forward (point that would cause the most interference) would be a good piece of knowledge to know as well. It appears that it would shift a little back, but hard to say.
I have got the links here to the original photo size so you can get a good look without killing the page with large photos:
http://i300.photobucket.com/albums/n...7/e04bbb67.jpg
http://i300.photobucket.com/albums/n...7/f9721638.jpg
http://i300.photobucket.com/albums/n...7/b5ccde4d.jpg
Last edited by live4soccer7; Sep 22, 2011 at 11:12 AM.
Sep 22, 2011 | 01:09 PM
#2
The classic lift from Wabbit is from TG. It does move the axle forward 1.5". You can generally just move the box WAY forward and not have to slice a bunch of stuff up, and it will clear. If you're worried about horizontal alignment, I wouldn't. Front to back overlap from tie rod and draglink is where you should watch for interference. The tie rod will be completely horizontal, the drag link will angle up to the box. But if its jacked up, the draglink will hit the tie rod as the front suspension cycles up and down.
I just looked at your pics. Drop the box down, make the sector shaft more vertical, which will allow you to push the box towards the front of the truck. Did you get the reinforcement plates for the IFS box?
The top sleeve should get pretty close to the frame, maybe not touching, but closer than you have it.
Last edited by rokblok; Sep 22, 2011 at 01:12 PM.
Sep 22, 2011 | 01:23 PM
#3
Thread Starter
Registered User
Joined: Nov 2008
Posts: 1,319
Likes: 2
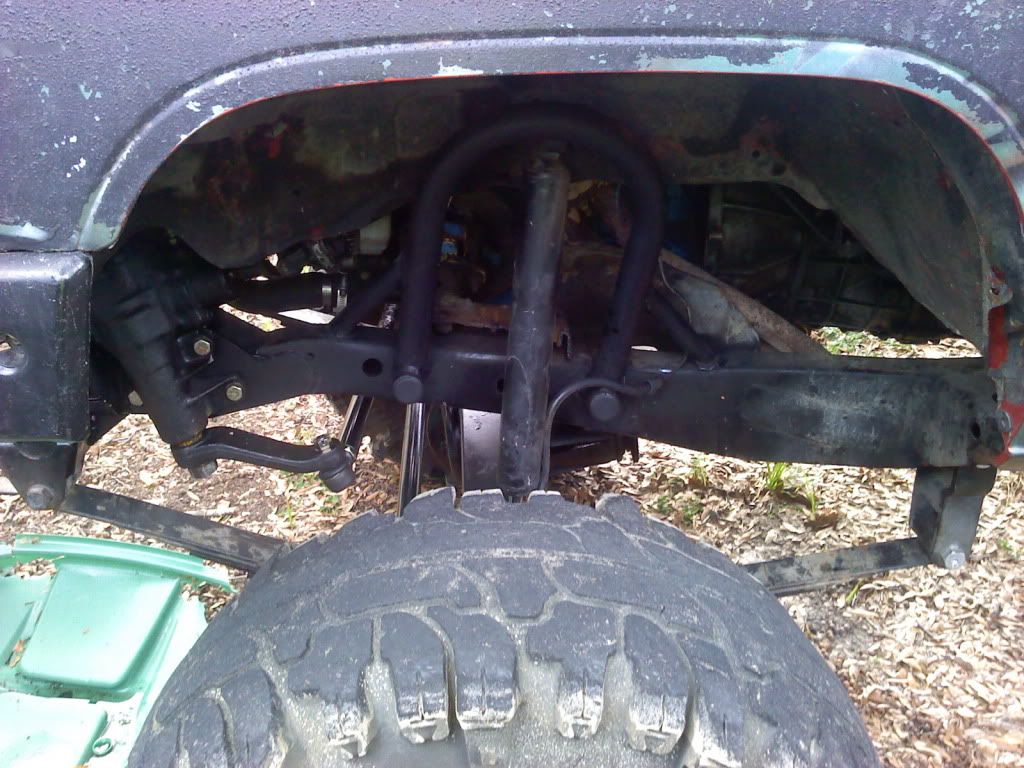
I completely agree with your statement on the interference. The upward angle of the drag link is no big deal. It is the overlap of the tie rod and drag. Check this photo and note the spring vs where the drag link connects to the pitman arm. If the end of the pitman is dropped to much where the drag connects then it will become an issue interfering with the spring as it is near full compression. Getting the best of both worlds as far as spring clearance and the clearance between the drag and tie rod is what I'm hung up on. I'd hate to have that pitman arm where the drag connects be a limiting factor now or in the future.
Will the tie rod come up completely vertically under compression or will it move slightly forward/back? Just trying to get an idea on how much spacing between the drag and tie rod. Thanks for taking a look.
Edit: yes, I have all the braces etc... Just placing it now. I'll throw that plate in there for final placement for pitman to frame clearance purposes.
http://www.4crawler.com/4x4/JohnsonV...Rjambo9_23.jpg
Last edited by live4soccer7; Sep 22, 2011 at 01:25 PM.
Sep 22, 2011 | 01:39 PM
#4
If you are that concerned with the spring getting stuffed that high, you can put in a bumpstop to prevent damage, or you might try the flat pitman arm that is offered from TG and those guys. I would prob fab up something to ACT as a pitman until I knew whether or not it would work. Even just a bored out piece of scrap steel or wood should be fine. It would be just to check full lock-to-lock clearance issues.
The flat pitman arm would probably allow you to make the IFS box more vertical which, in turn, would allow you to move it farther forward...
The flat pitman arm would probably allow you to make the IFS box more vertical which, in turn, would allow you to move it farther forward...
Last edited by rokblok; Sep 22, 2011 at 01:41 PM.
Trending Topics
Sep 22, 2011 | 02:04 PM
#8
Thread Starter
Registered User
Joined: Nov 2008
Posts: 1,319
Likes: 2
the straight across distance between the two is the same from hole to hole (not angled).
I talked with someone about the install and they were saying that as long as the drag link and tie rod were directly above each other at the end then it "should" clear, but if behind it at all then it would be an issue b/c the axle will shift backwards when it flexes out.
I think I'm going to pound out the body where the box is hitting to try and get it to push back a little bit more to be safe. I'll post up once I get that done and mounted.
Sep 22, 2011 | 02:07 PM
#9
Registered User
Joined: Jun 2007
Posts: 1,825
Likes: 6
From: Inverness,FL
best pic of how mine is mounted (dont have any completed pics lol).. i have the regular pitman from TG and i have 0 clearance issues, the pic that you posted of 4crawler has has alcan's ? or deavers and they use 7 leaves and are pretty thick, plus his springs are pretty reversed arched in that pic...if your going to put your bumpstops where ur springs dont reverse arch you wont have any probs, o yeah i dont have bumstops either 
Sep 22, 2011 | 02:39 PM
#11
Registered User
Joined: Jun 2007
Posts: 1,825
Likes: 6
From: Inverness,FL
yes i did, but it was maybe a 2x3" piece i had to cut out, i dont think you'll have to go that far i was just showing what angle mine was at, but i also have a 3" body lift, if you dont have any you'll have to cut quite a bit out of the body itself too...
Sep 22, 2011 | 02:43 PM
#12
Thread Starter
Registered User
Joined: Nov 2008
Posts: 1,319
Likes: 2
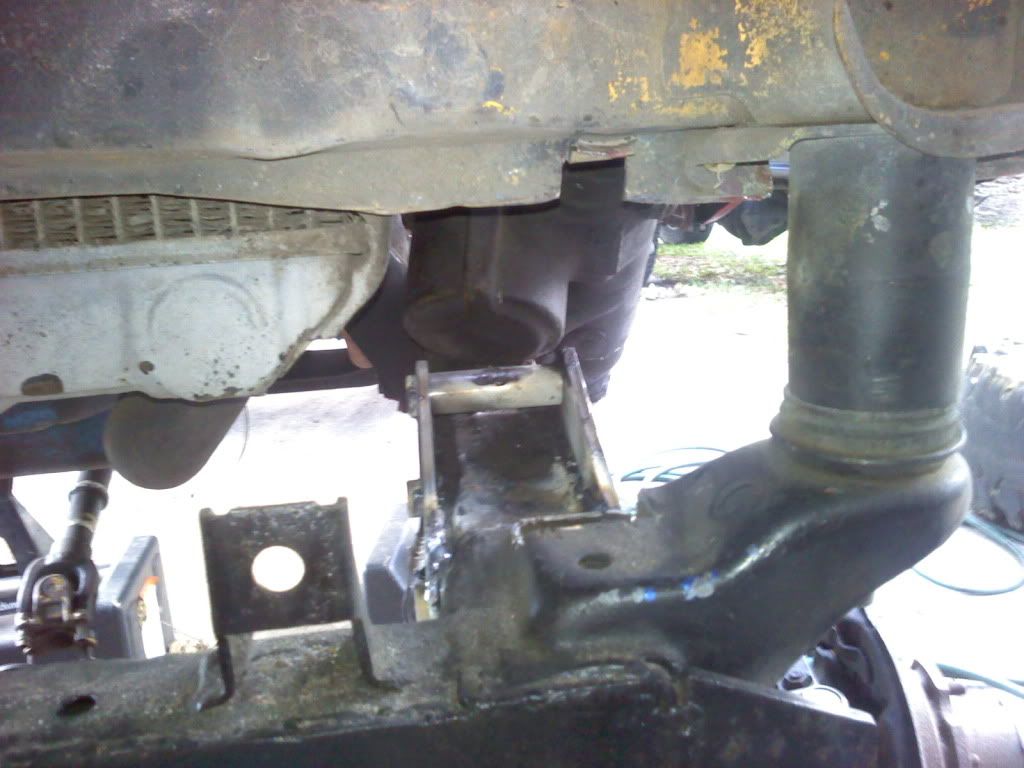
Should I be concerned with the integrity of the body mount right up there. If you look on opposing side of the ifs box where the mount is you can see how it is braced into the body. None of the actual mount would be cut out at all, but about 40% of the bracing would have to be removed. Opinions?
 Sep 22, 2011 | 02:46 PM
#14
Registered User
Joined: Jun 2007
Posts: 1,825
Likes: 6
From: Inverness,FL
note i had to use an air grinder with a dremel cutting blade to get to that lol, could use a dremel too i spose..
and as far as bracing...i havnt had any issues, and i dont recall a whole lot of people re-bracing it after they cut it...unless it was ALOT
and as far as bracing...i havnt had any issues, and i dont recall a whole lot of people re-bracing it after they cut it...unless it was ALOT
Sep 22, 2011 | 02:52 PM
#15
Registered User
Joined: Jun 2007
Posts: 1,825
Likes: 6
From: Inverness,FL
i found a pic of a steering box in the same place but without a body lift..shows what would be cut out of the rad support..
http://www.pirate4x4.com/forum/showt...t=steering+box
http://www.pirate4x4.com/forum/showt...t=steering+box
Sep 23, 2011 | 12:51 PM
#16
Registered User
Joined: Aug 2004
Posts: 2,077
Likes: 1
From: Vancouver, WA
Hmm I went with less of angled approach. Is there an advantage to having such an extreme angle to the box?

It sits almost against the core support but not quite. Didn't want to cut the body mount.


It sits almost against the core support but not quite. Didn't want to cut the body mount.
Sep 23, 2011 | 01:45 PM
#17
Registered User
Joined: Jun 2010
Posts: 182
Likes: 0
From: Beaumont. Ca.
I'm running the trail gear long travel kit on my 84 runner and have the box pushed up against the core suport (with a little b.f.h clearance) and havn't had a problem yet. But i've only have about an inch gap between the stearing rods with the wheels straight.

Last edited by windedwalrus; Sep 23, 2011 at 01:50 PM.
Sep 23, 2011 | 06:29 PM
#19
Thread Starter
Registered User
Joined: Nov 2008
Posts: 1,319
Likes: 2
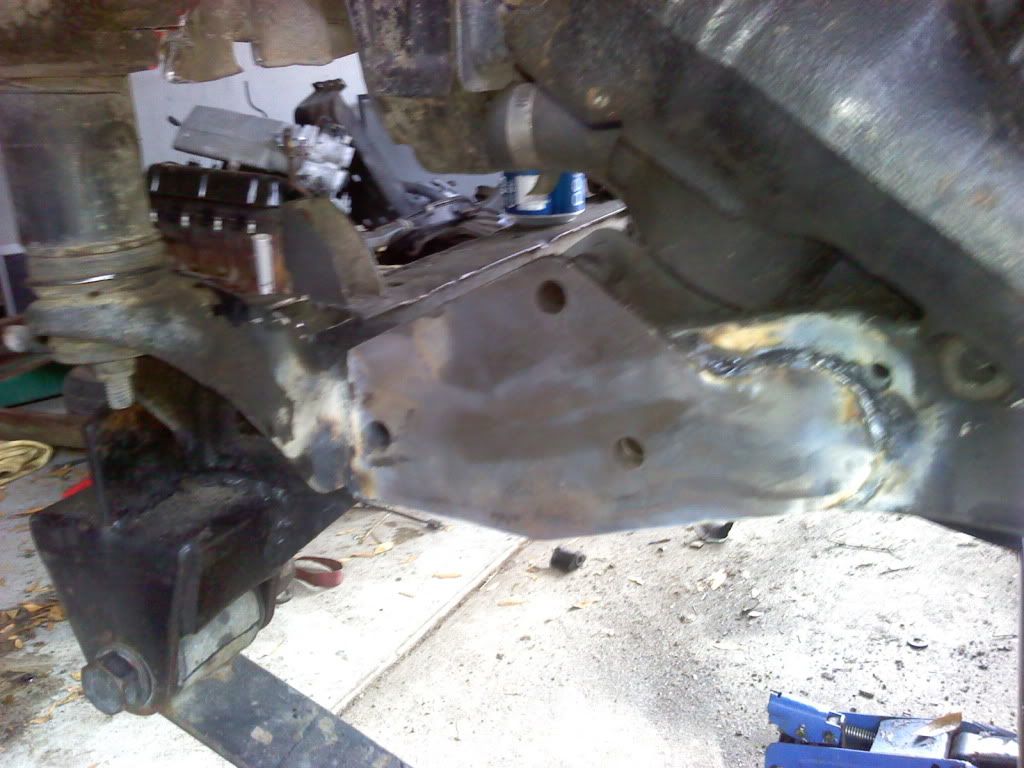
Yes, it will. Here is what I did. I took a look at some posts over at pirate and talked with some folk at TG about it and they said the same thing about the axle shifting back. I though this would be the case, but don't have too much experience with this stuff yet and I didn't want to make any assumptions. I ended up getting it set right with max clearances with the box angled. I cut into the front of the truck where the rad support is. There won't be any issues at all with a little taken out there.
It was about 330am and i finished drilling the holes and I grabbed the plate that was suppose to go on the back and welded it on the outside (oops). Didn't realize until it was about 430 when I sat back to look at the work. Man was I pissed. Instead of cutting it off I just modified the bracket to be similar to the one that was suppose to be there and drill another hole for the top mount that goes over the frame and used the other plate on the backside. All in all it worked pretty dang well, but that rookie mistake cost me a few hours of work.
I don't have pic right now and am on my way out of town, but i'll get one up. When it was all said and done it was pretty touch getting the bolts through everything once they were all ready to get bolted together with the box there. I hope I don't have to take it off, ever. ha ha. I'm gonna hate it when I do though.
Things left to do on the lift:
Front shock mounts
brake lines
bleed brakes
bump stops
extend steering column shaft
drive shaft work
go wheeling!!!
Sep 23, 2011 | 10:00 PM
#20
Registered User
Joined: Jun 2010
Posts: 182
Likes: 0
From: Beaumont. Ca.
i wouldn't worry about it too much i did the same thing. if you look realy close i also didn't get the plate lined up right on the frame (gota stop fabing stuff with Jim B. and Jack D. as my co-pilots) 


