Redeth's Overland Trailer Build
 04-18-2016, 08:32 AM
#81
Registered User
Thread Starter
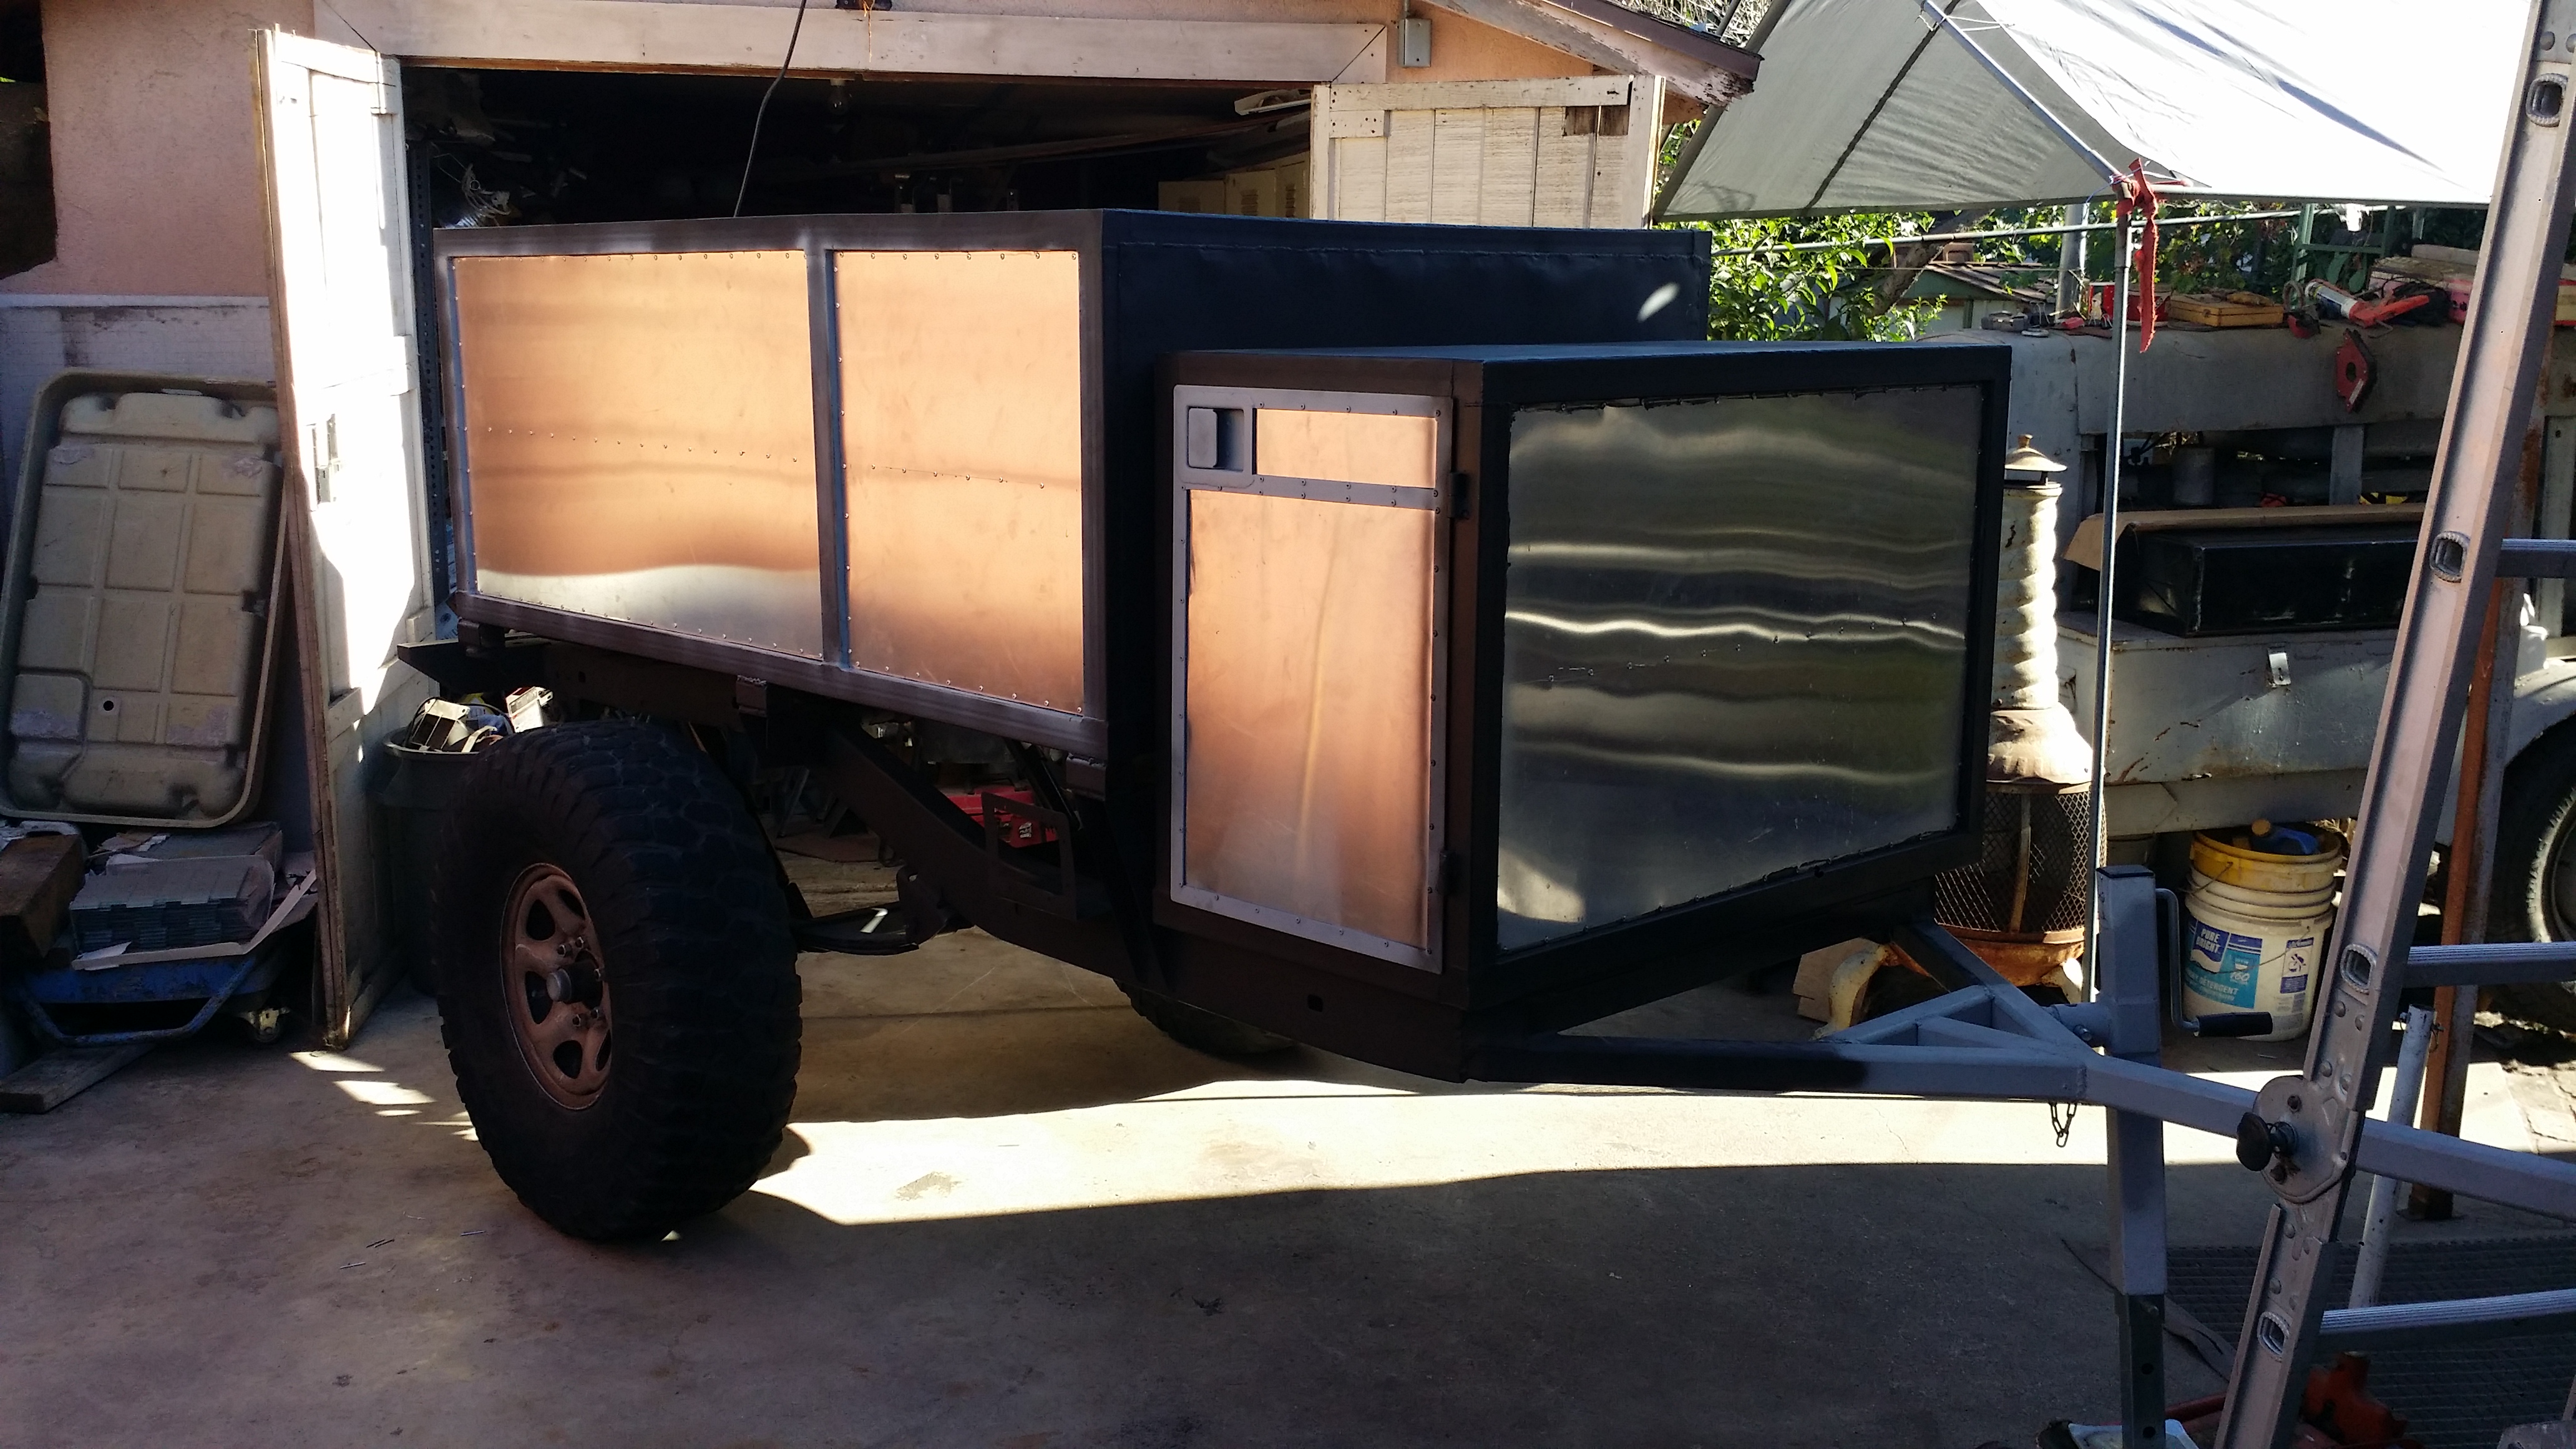
honestly, i was being cheap. The Shop where i buy the metals doesn't sell scrap pieces of aluminum; only steel. And rather than buy a $100 4'x10' sheet of aluminum i figured i would do use the semi large piece i had on that other door rather than tossing it. by adding that small piece on the bottom it was just enough to use. if i didn't put the brace though that piece of aluminum would have been about 1" too short. i kinda wish i would have done the other side like this though because it is more solid on the latch since its welded on 3 sides vs 2 sides like the driver side. It's alright though i can actually use that top part to cut out some gauges and fit them in to monitor my battery charge and maybe power consumption. i dunno we'll see.
 04-21-2016, 10:17 PM
#82
Registered User
Dude, I gotta tell you this trailer looks bad ass! I for one cannot wait to see the final finished product. I really think it's cool that you and your dad are always working on stuff together.
 05-29-2016, 10:38 AM
#84
Registered User
Thread Starter
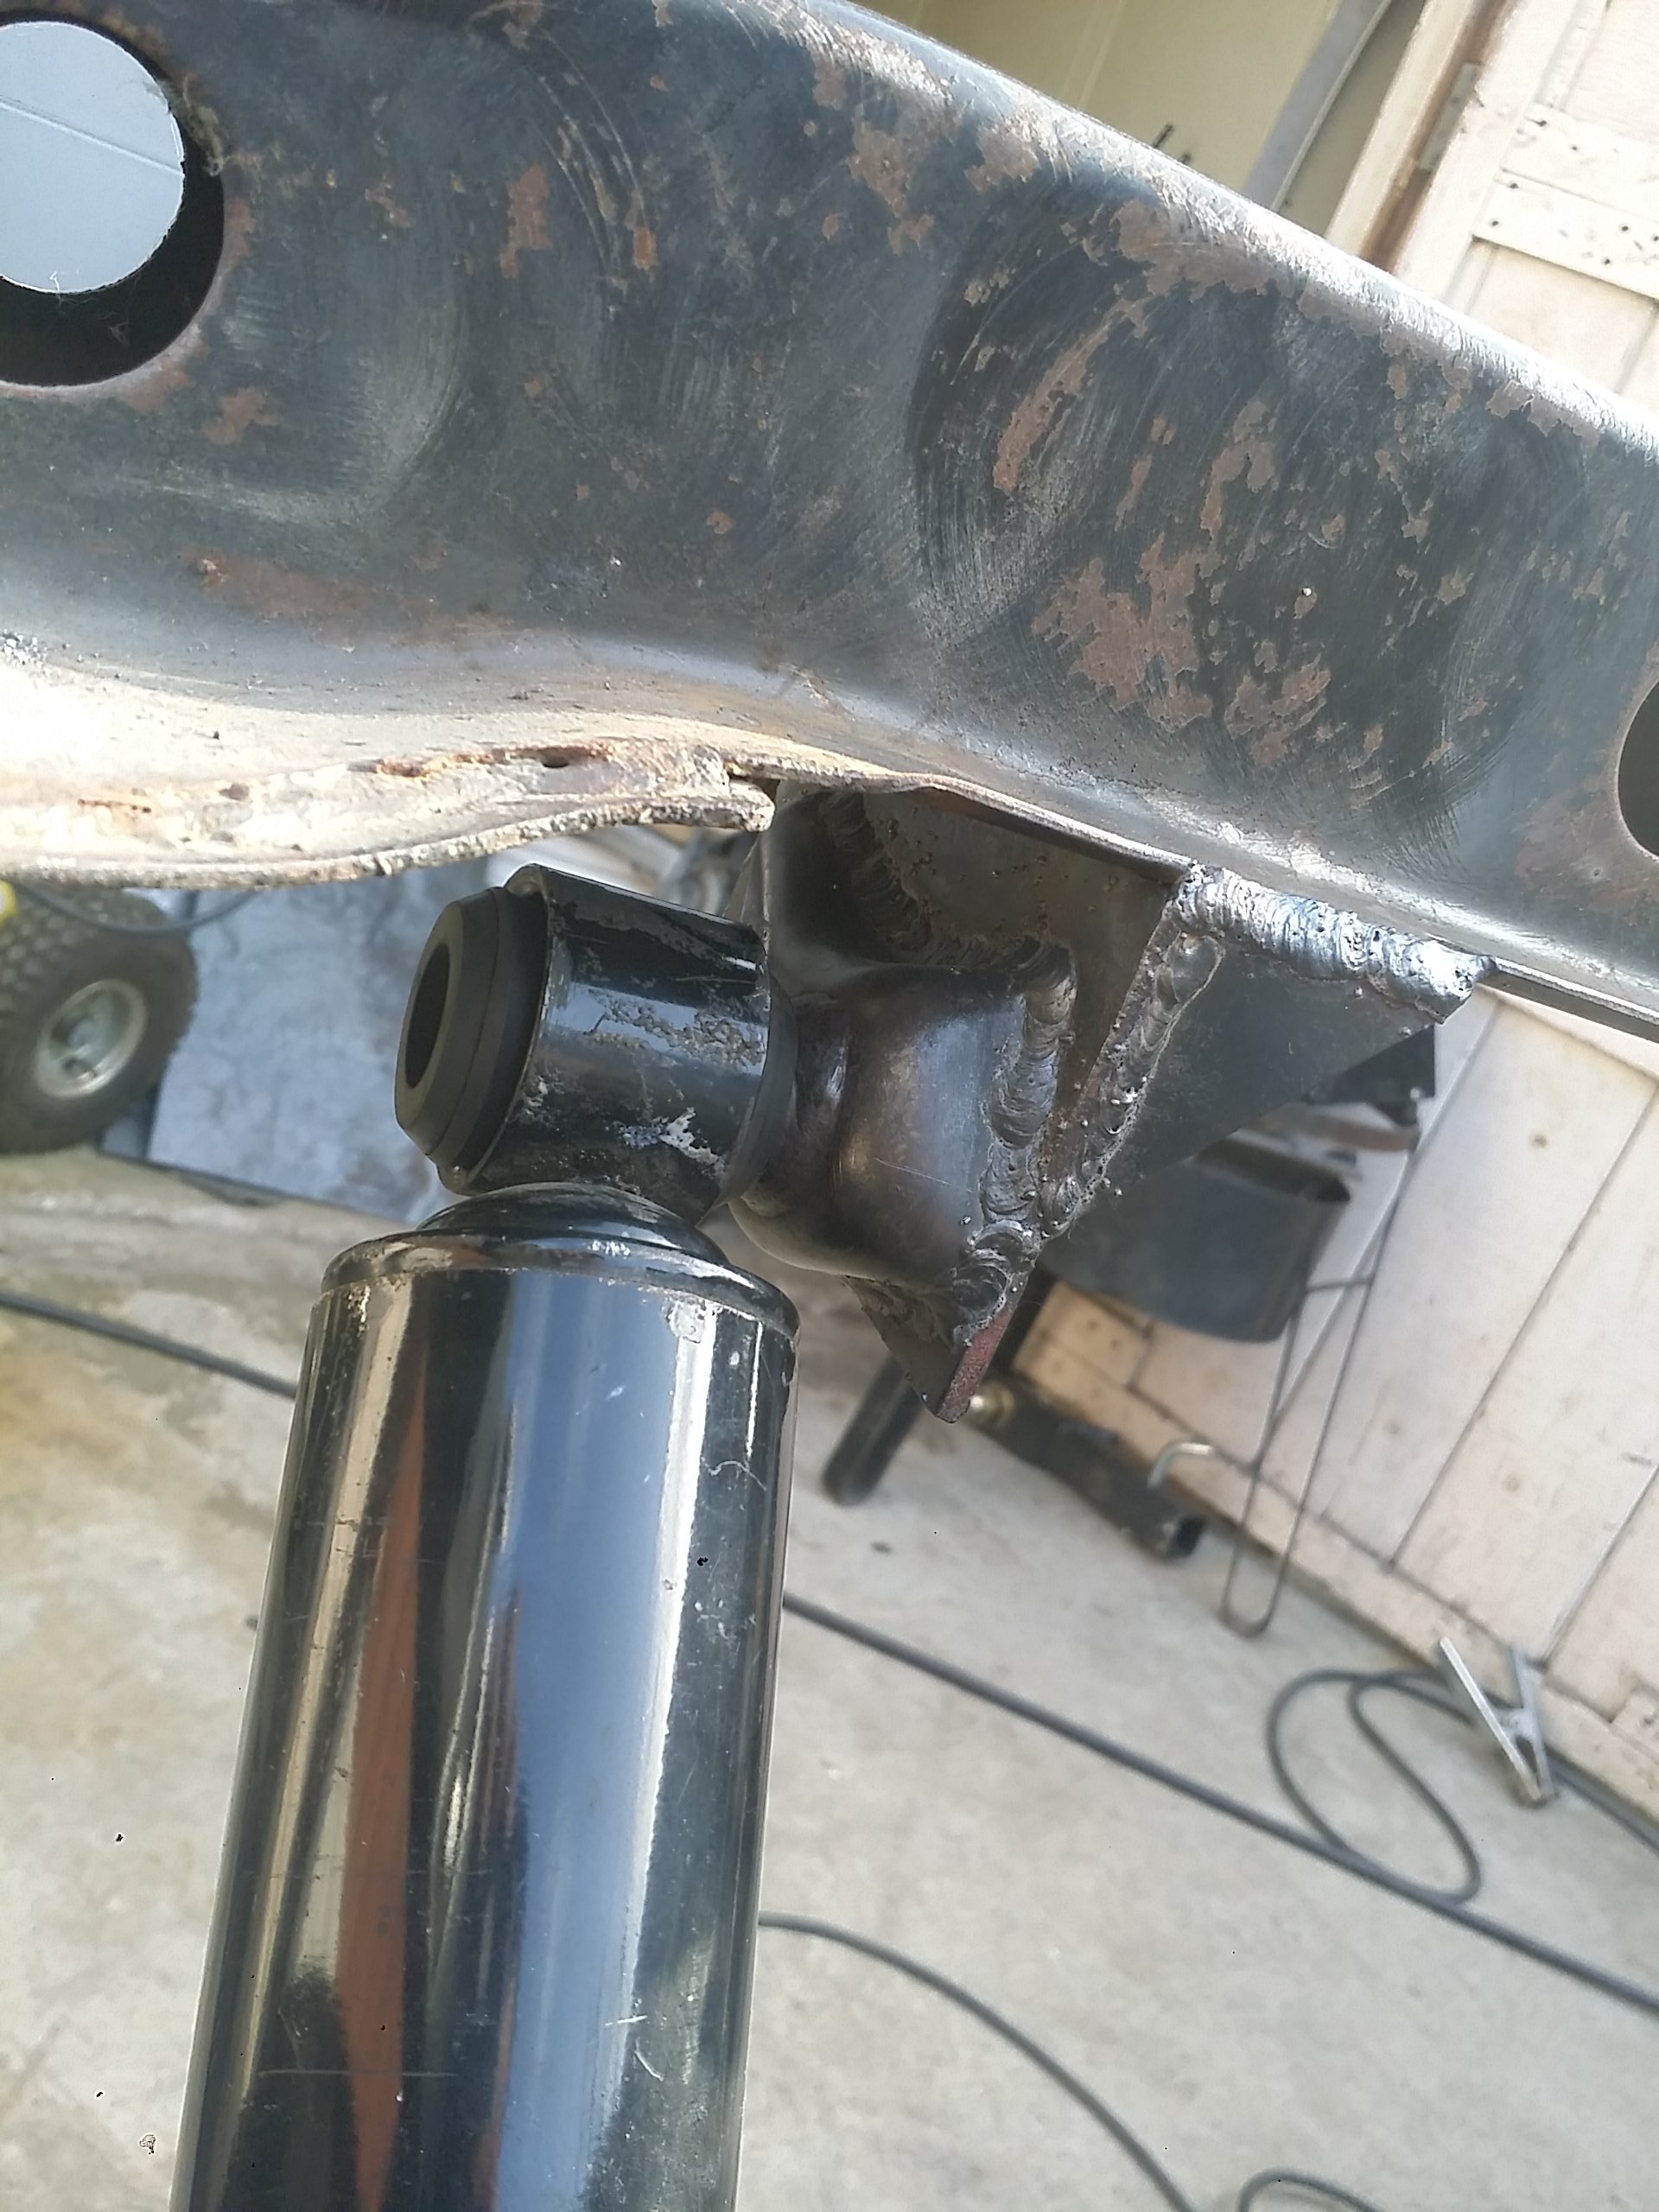
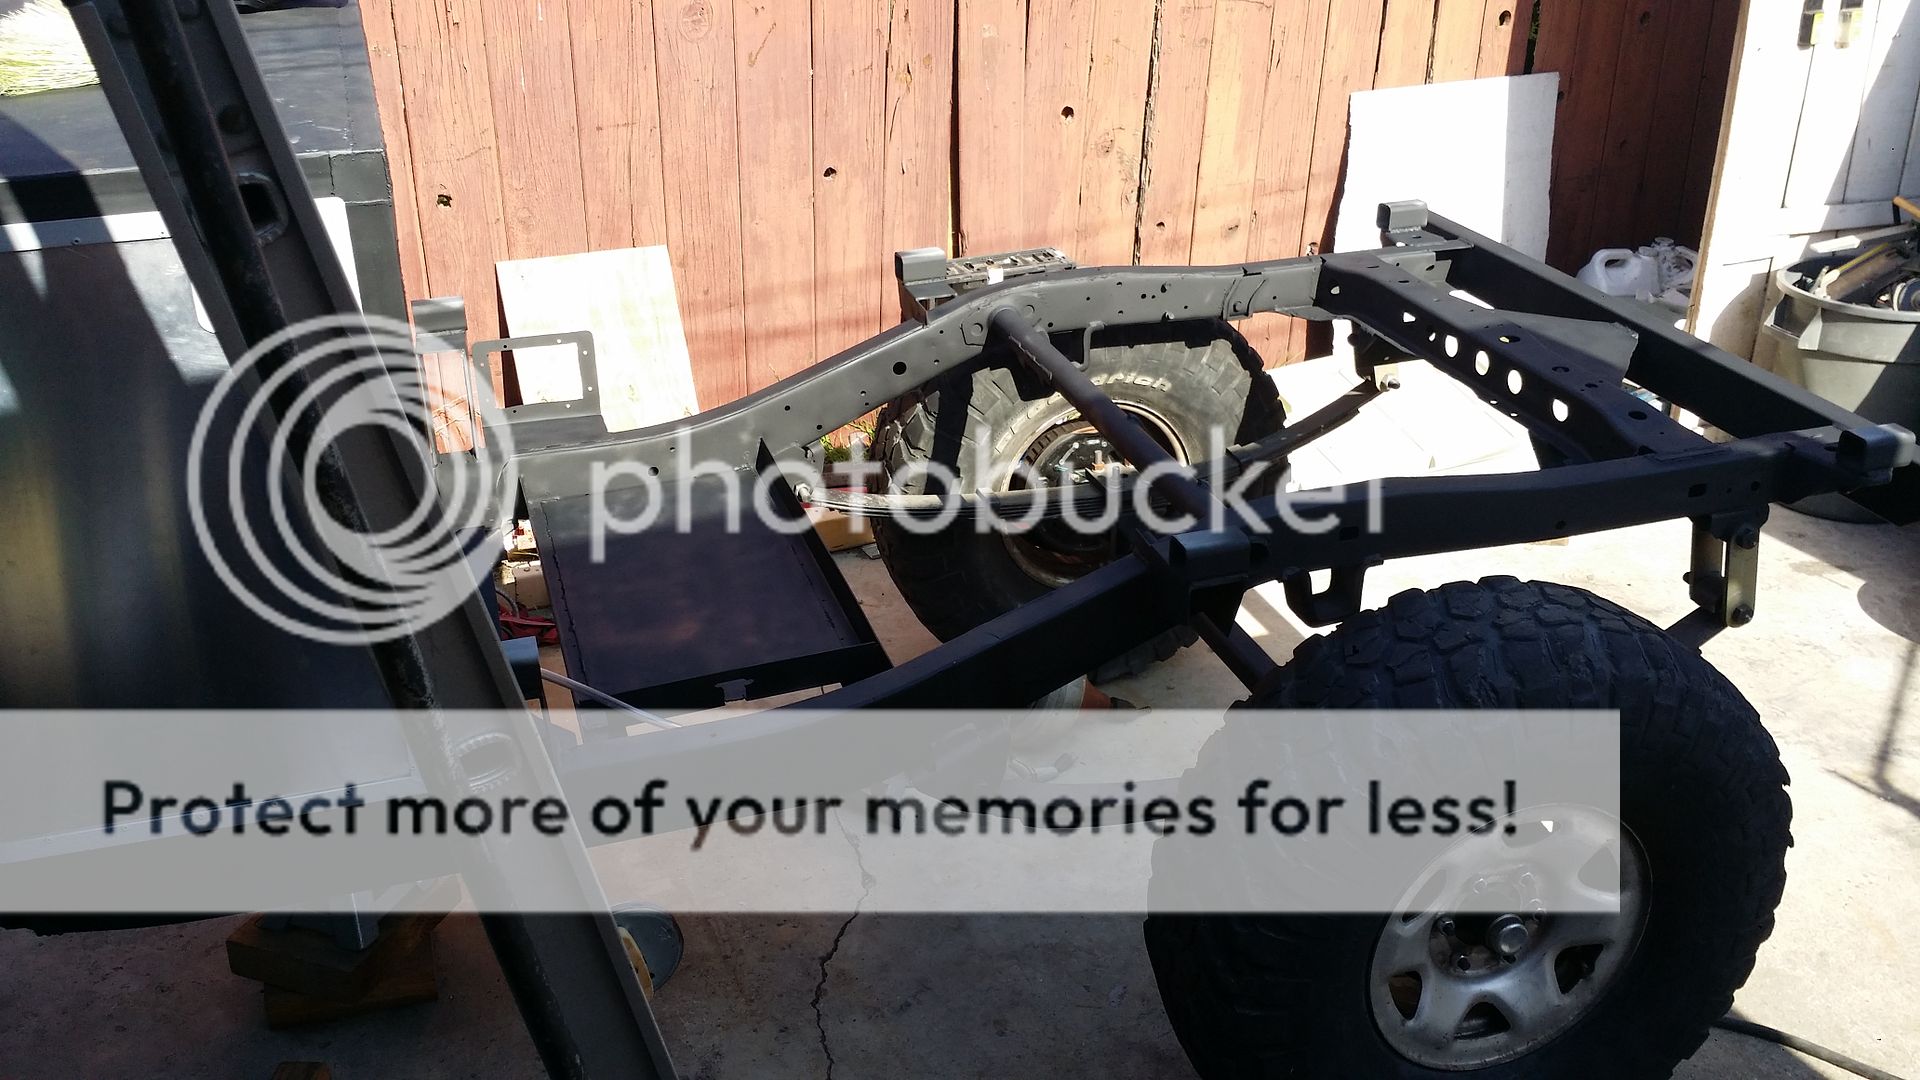
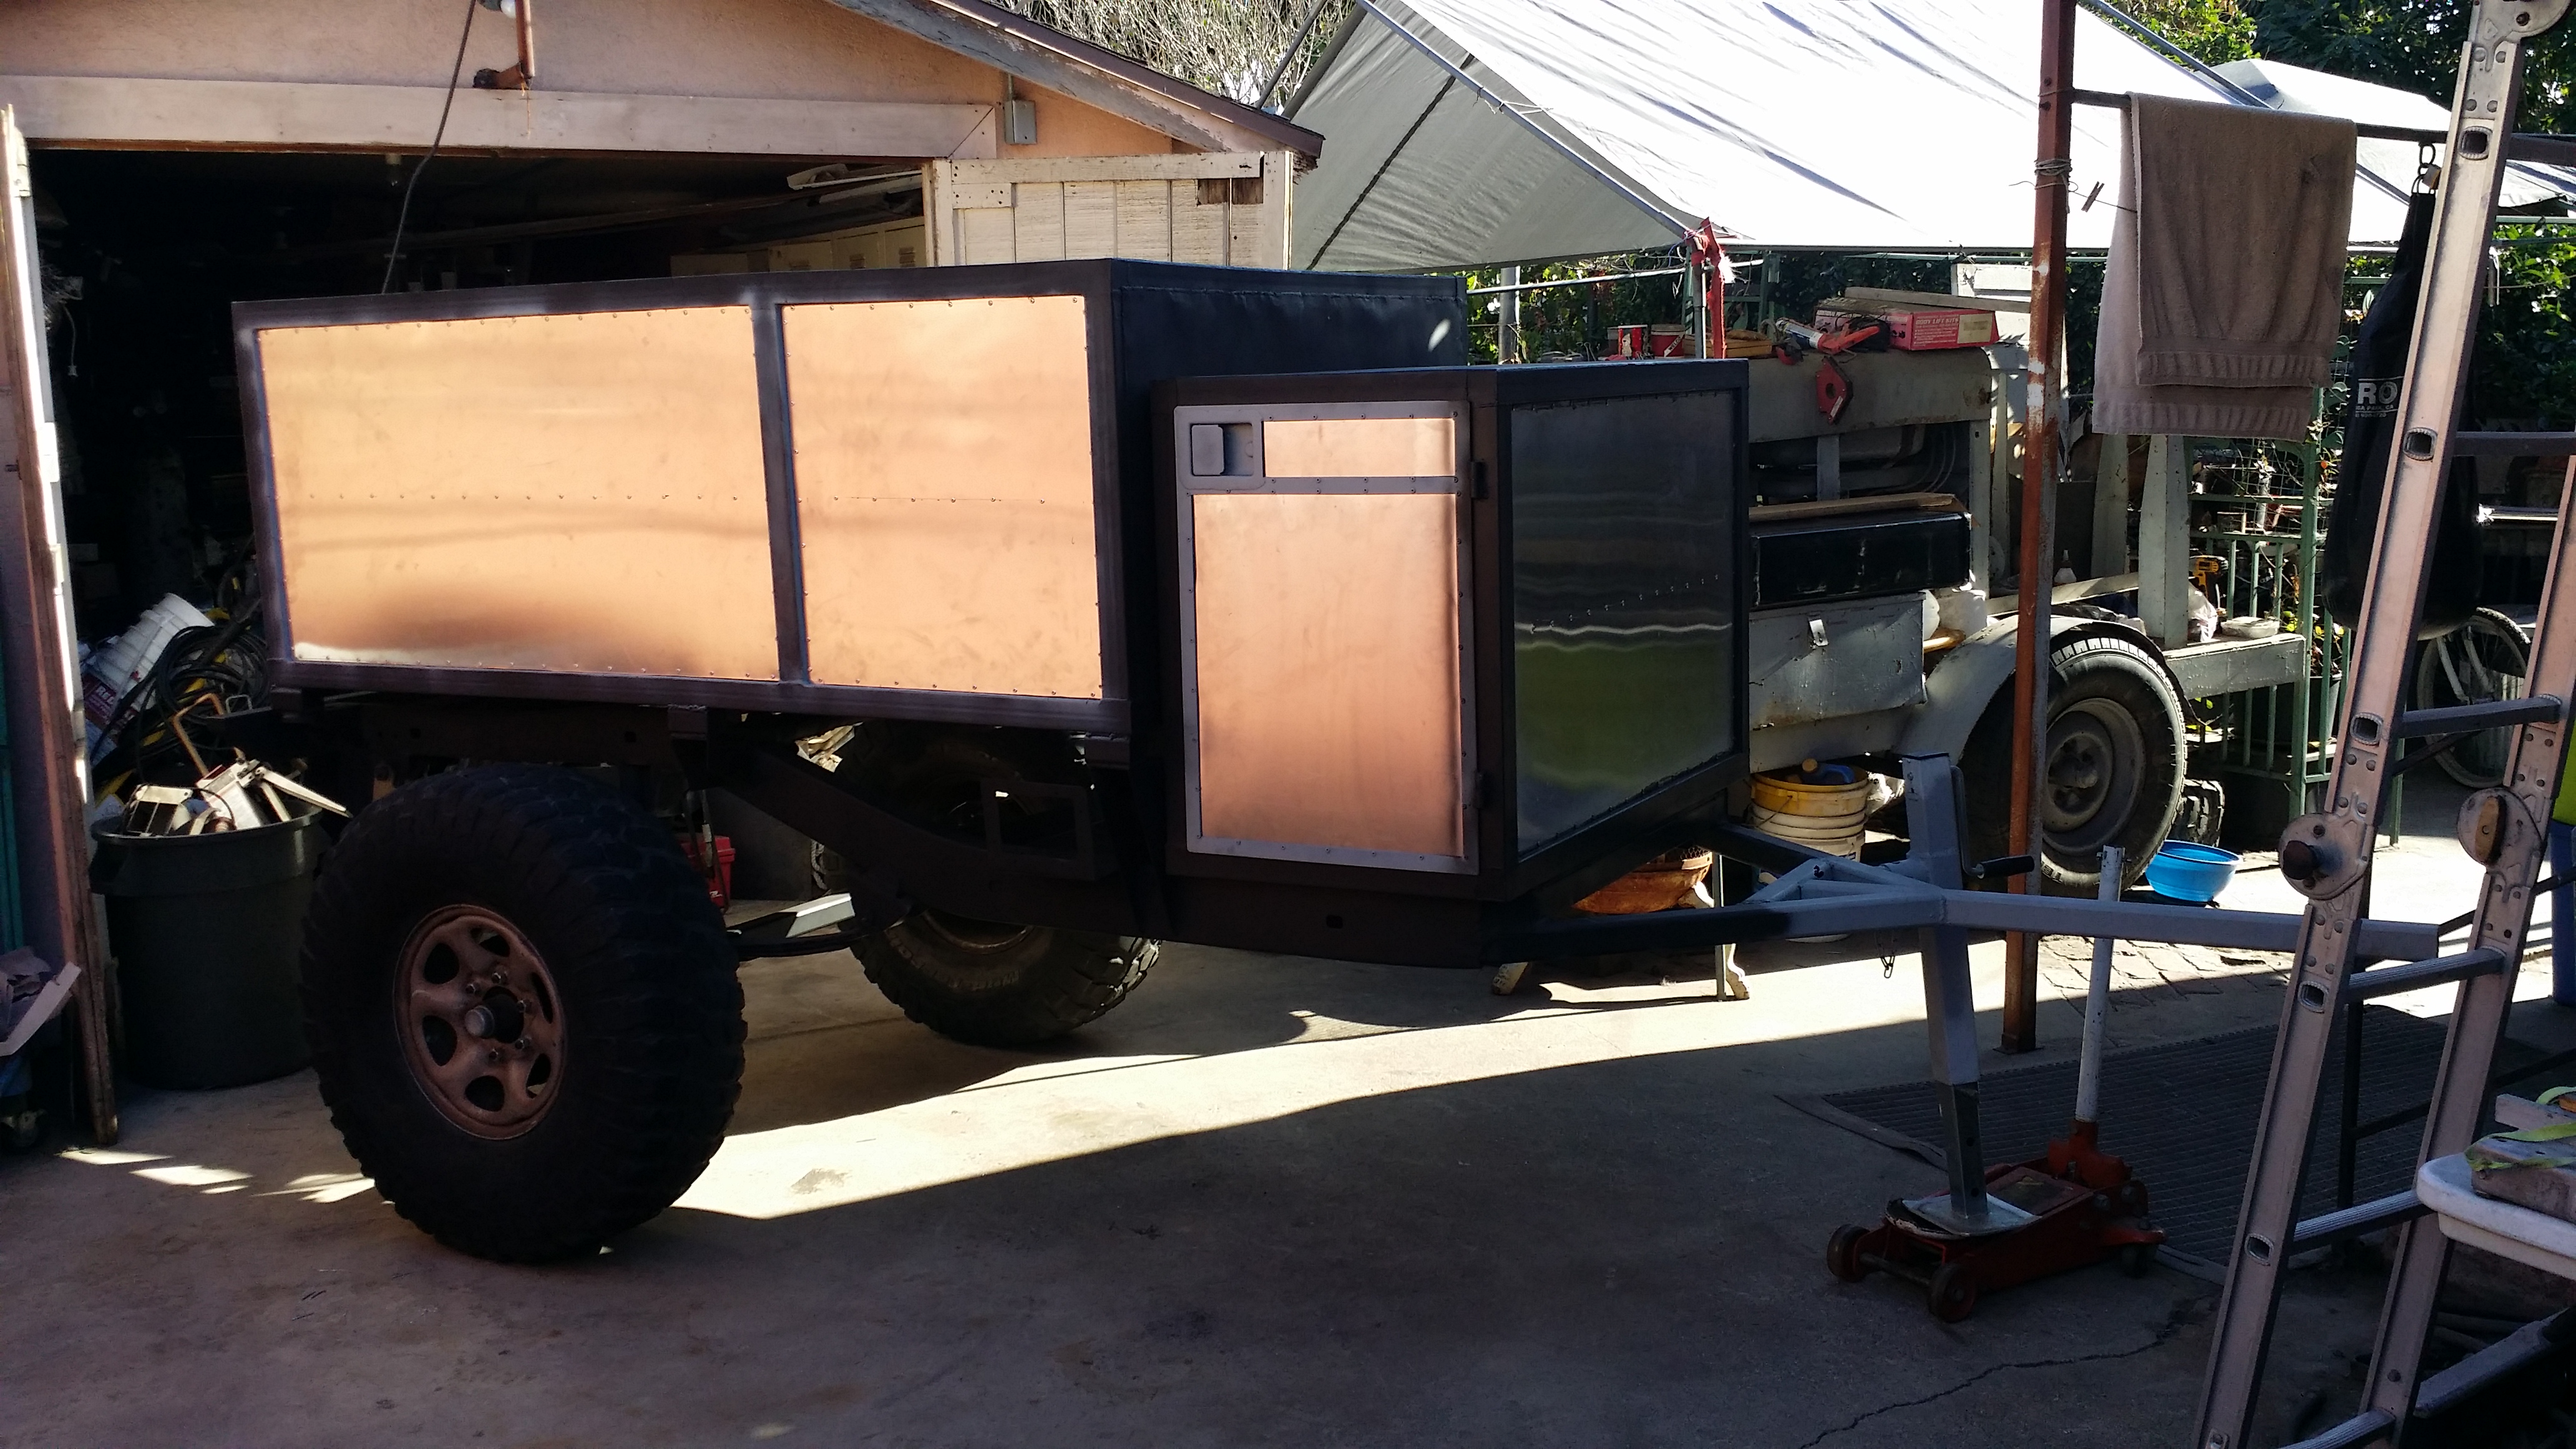
Man its been a while since I've worked on the trailer.. but if you follow my instagram page you will see what I've done before it's posted on here. Yesterday I spent the entire morning thinking up of ways to make custom shock mounts for the trailer project and I finally figured it out. I cut off the stock rear 4Runner shock mounts that were already welded to the chassis and i fabricated some basic gussets that would hold the stock ones in the new location. Then I made the mounts which will mount to the axle housing using 2"�2" square tube 1/8" thick.These mounts will work perfectly with the 8.5" Monroe shocks that @chefyota4x4 donated to me for the project. Once welded in place the shocks will have 4" of up travel and 4.5" of down travel. which I think is plenty for a trailer. Not like I'm building a rock crawler out of this lol.
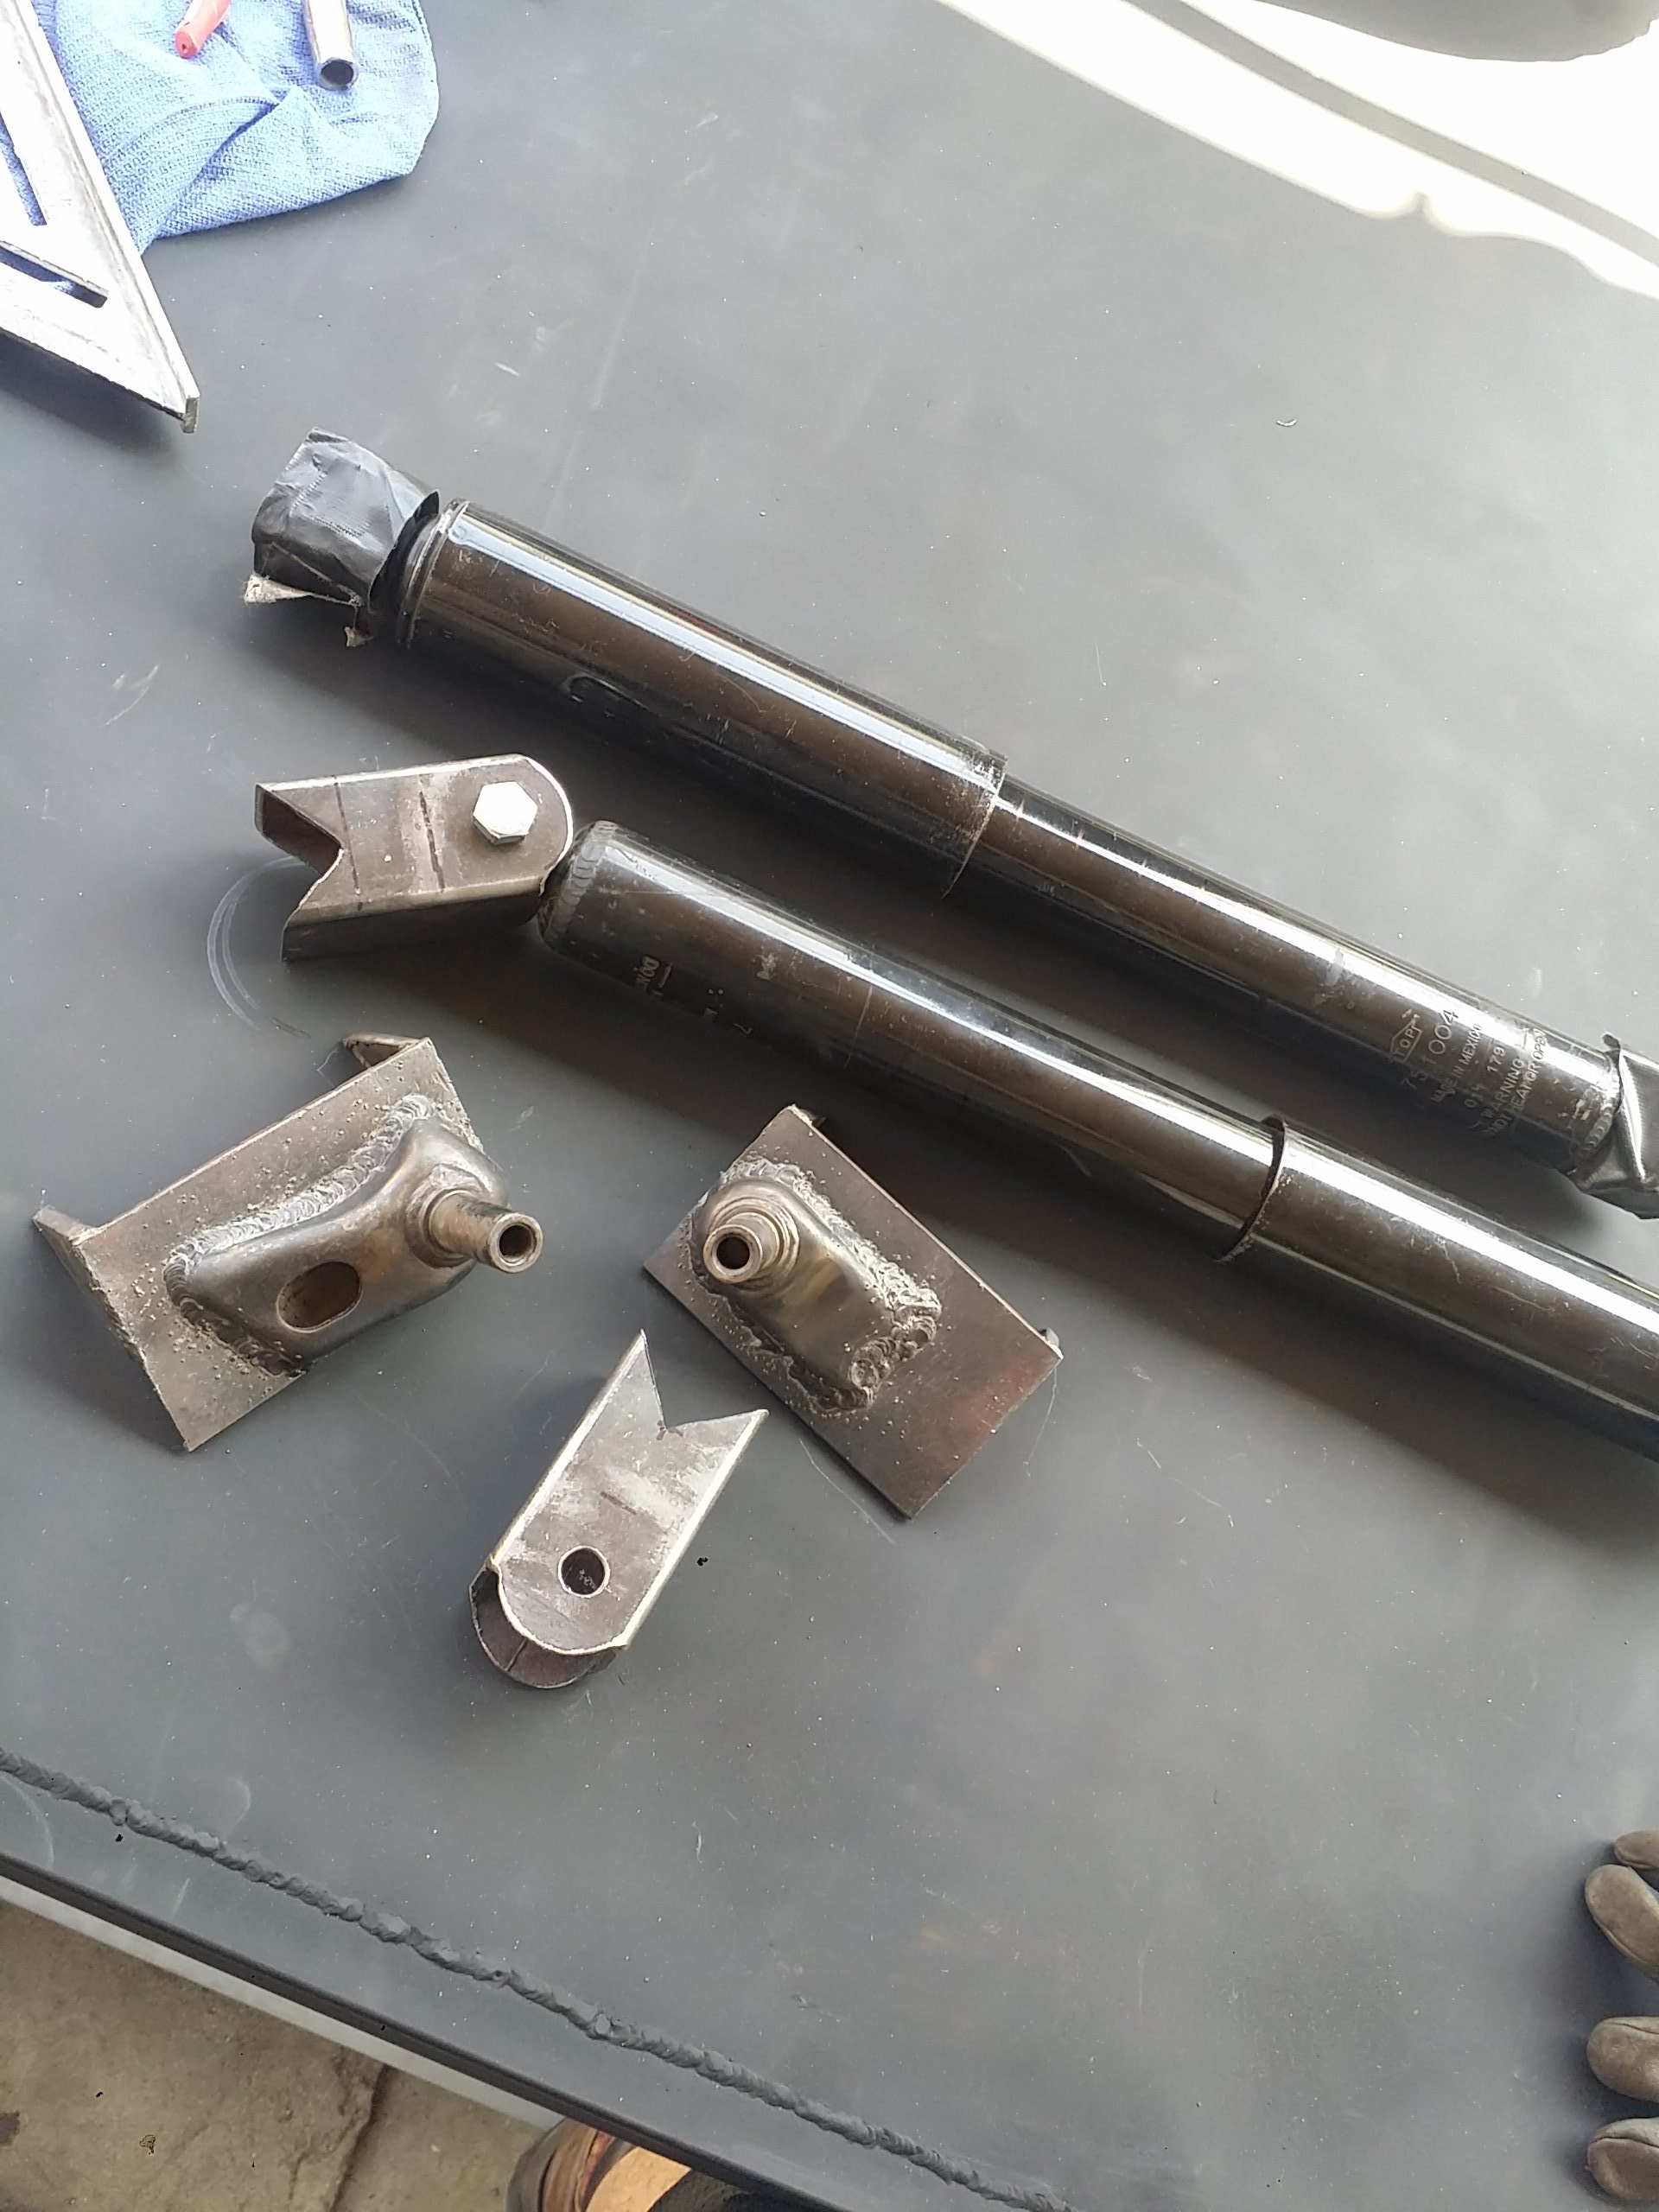
Here they are all mounted in to place! The trailer finally has shocks! I just need to find stock upper shock bolts to fit these. But I'm set on suspension now! In the end they had about 4.25" up travel and 4.25" down travel. It's all good. It will still work good.
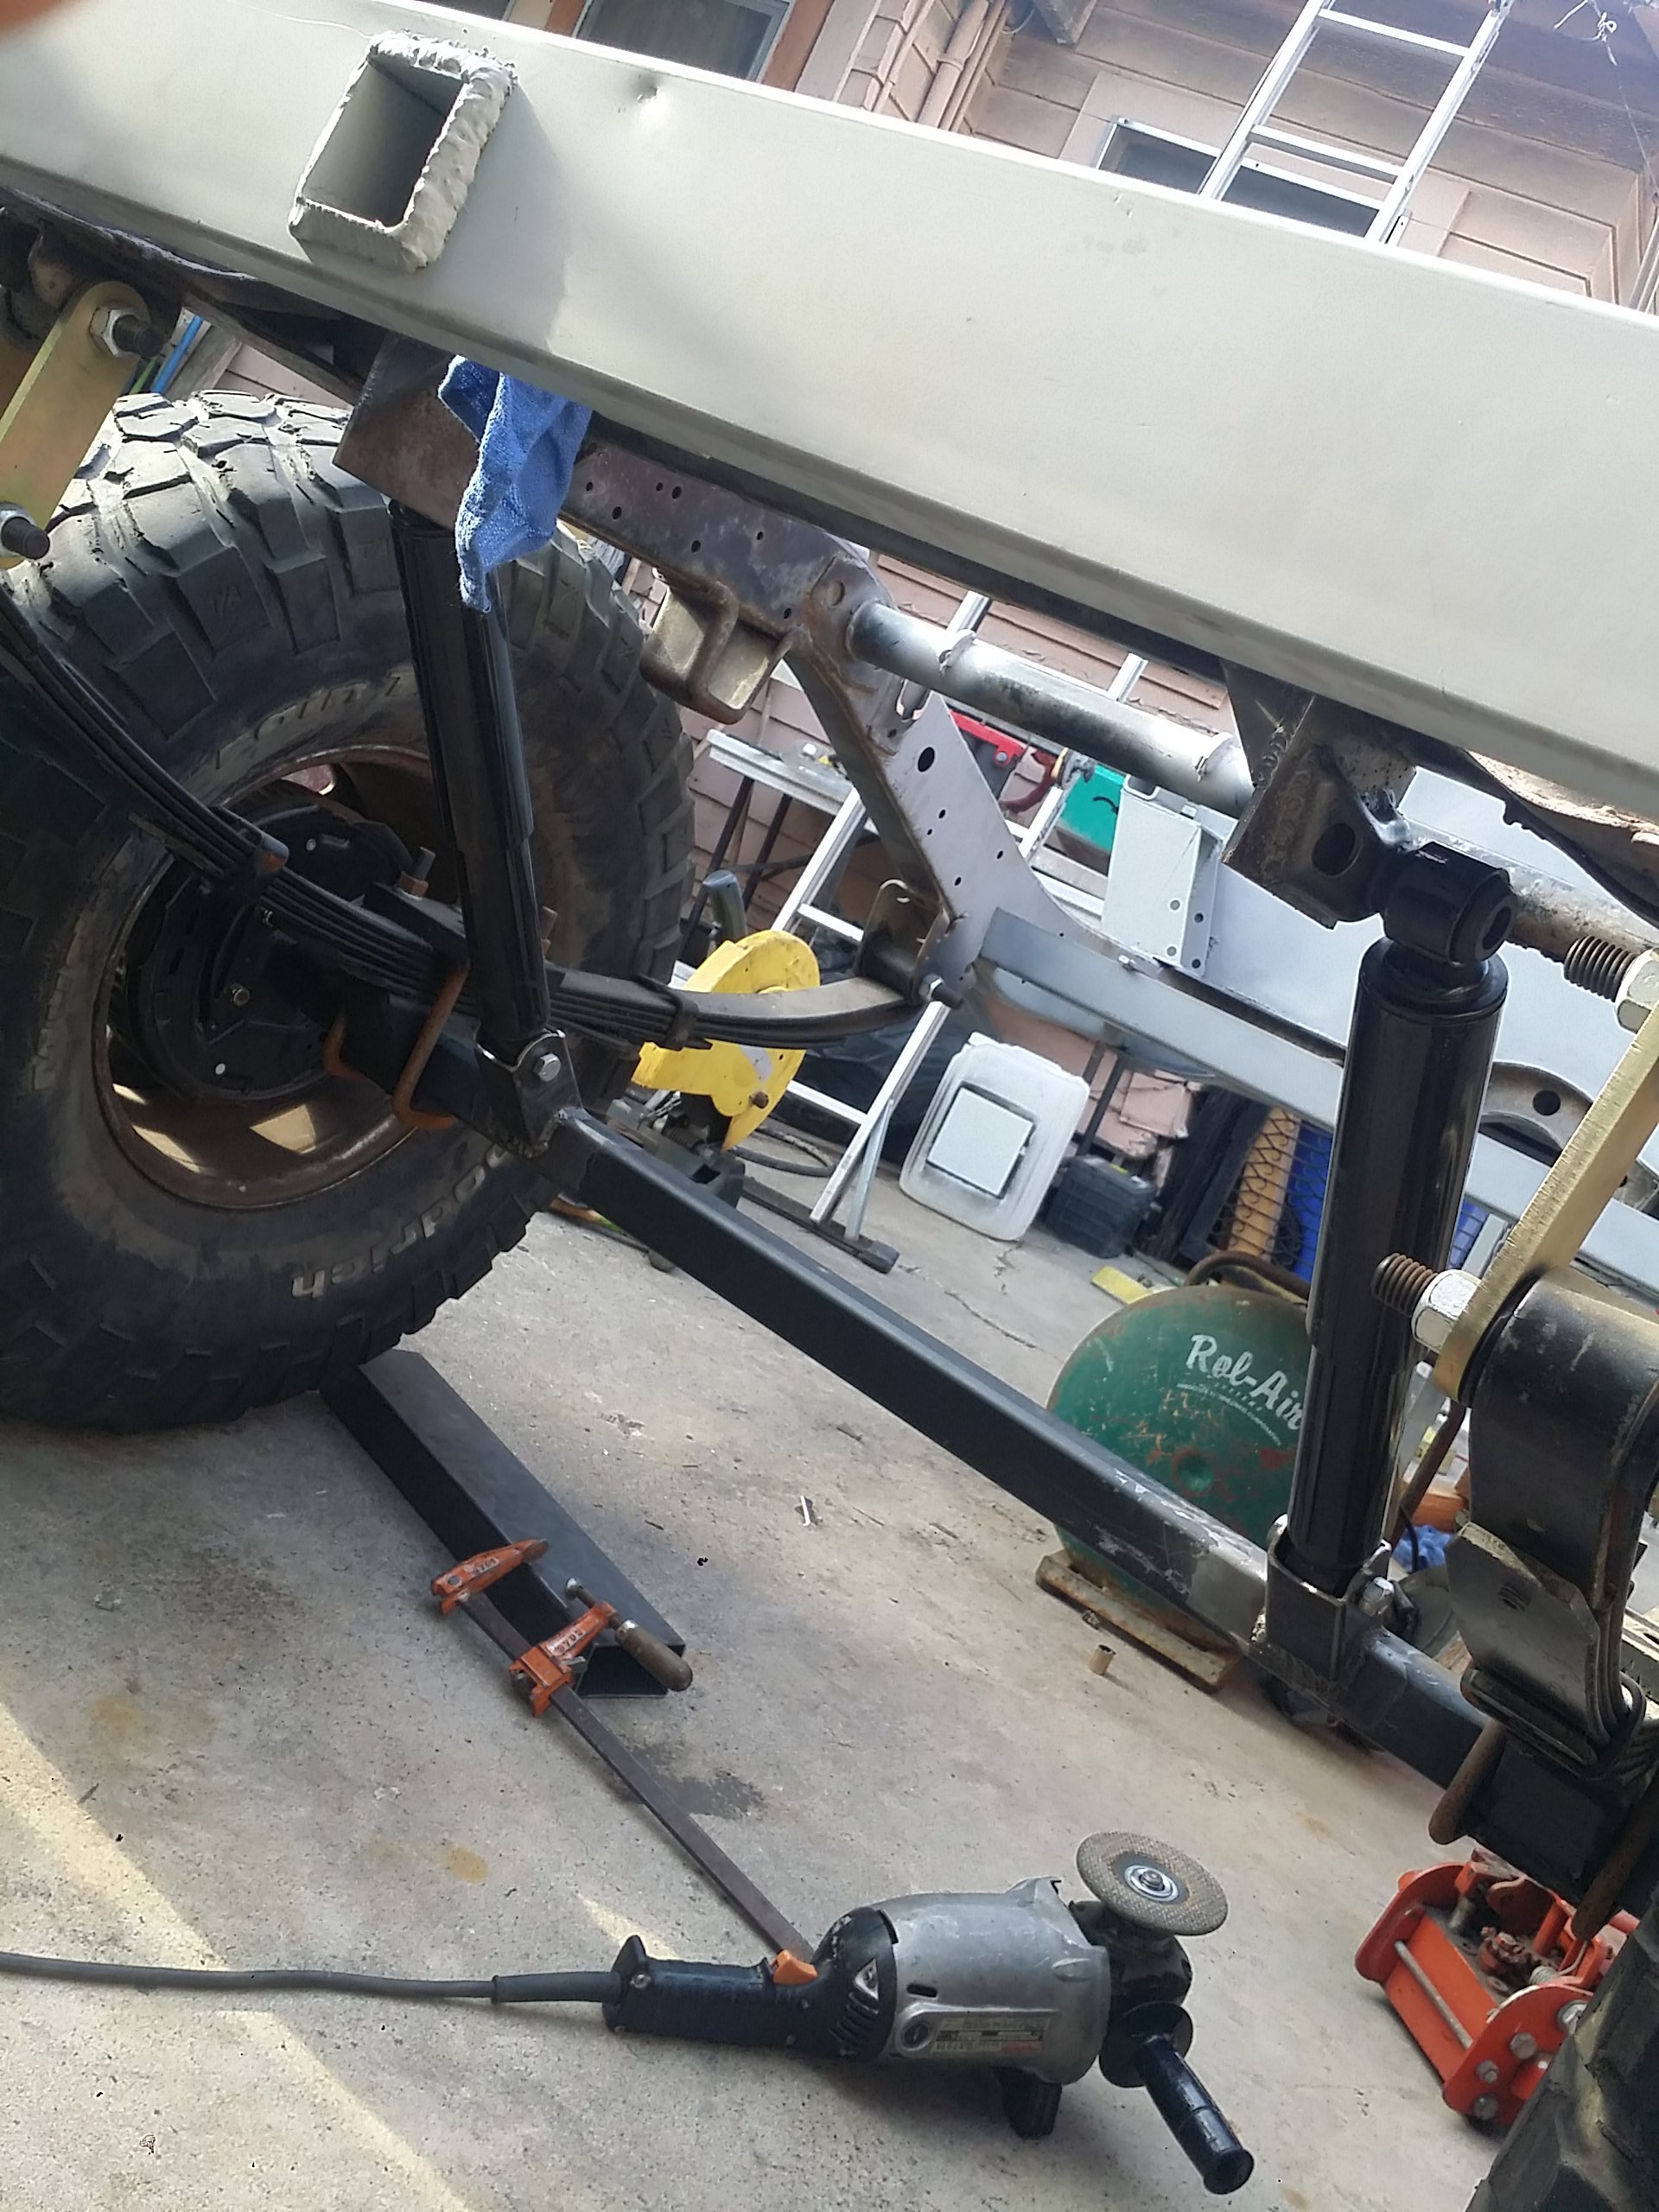
Here's a close up if the mounts I made that I welded to the rear most crossmember which is normally used for the stock spare tire carrier on these 4runners.
Passenger side
Driver side
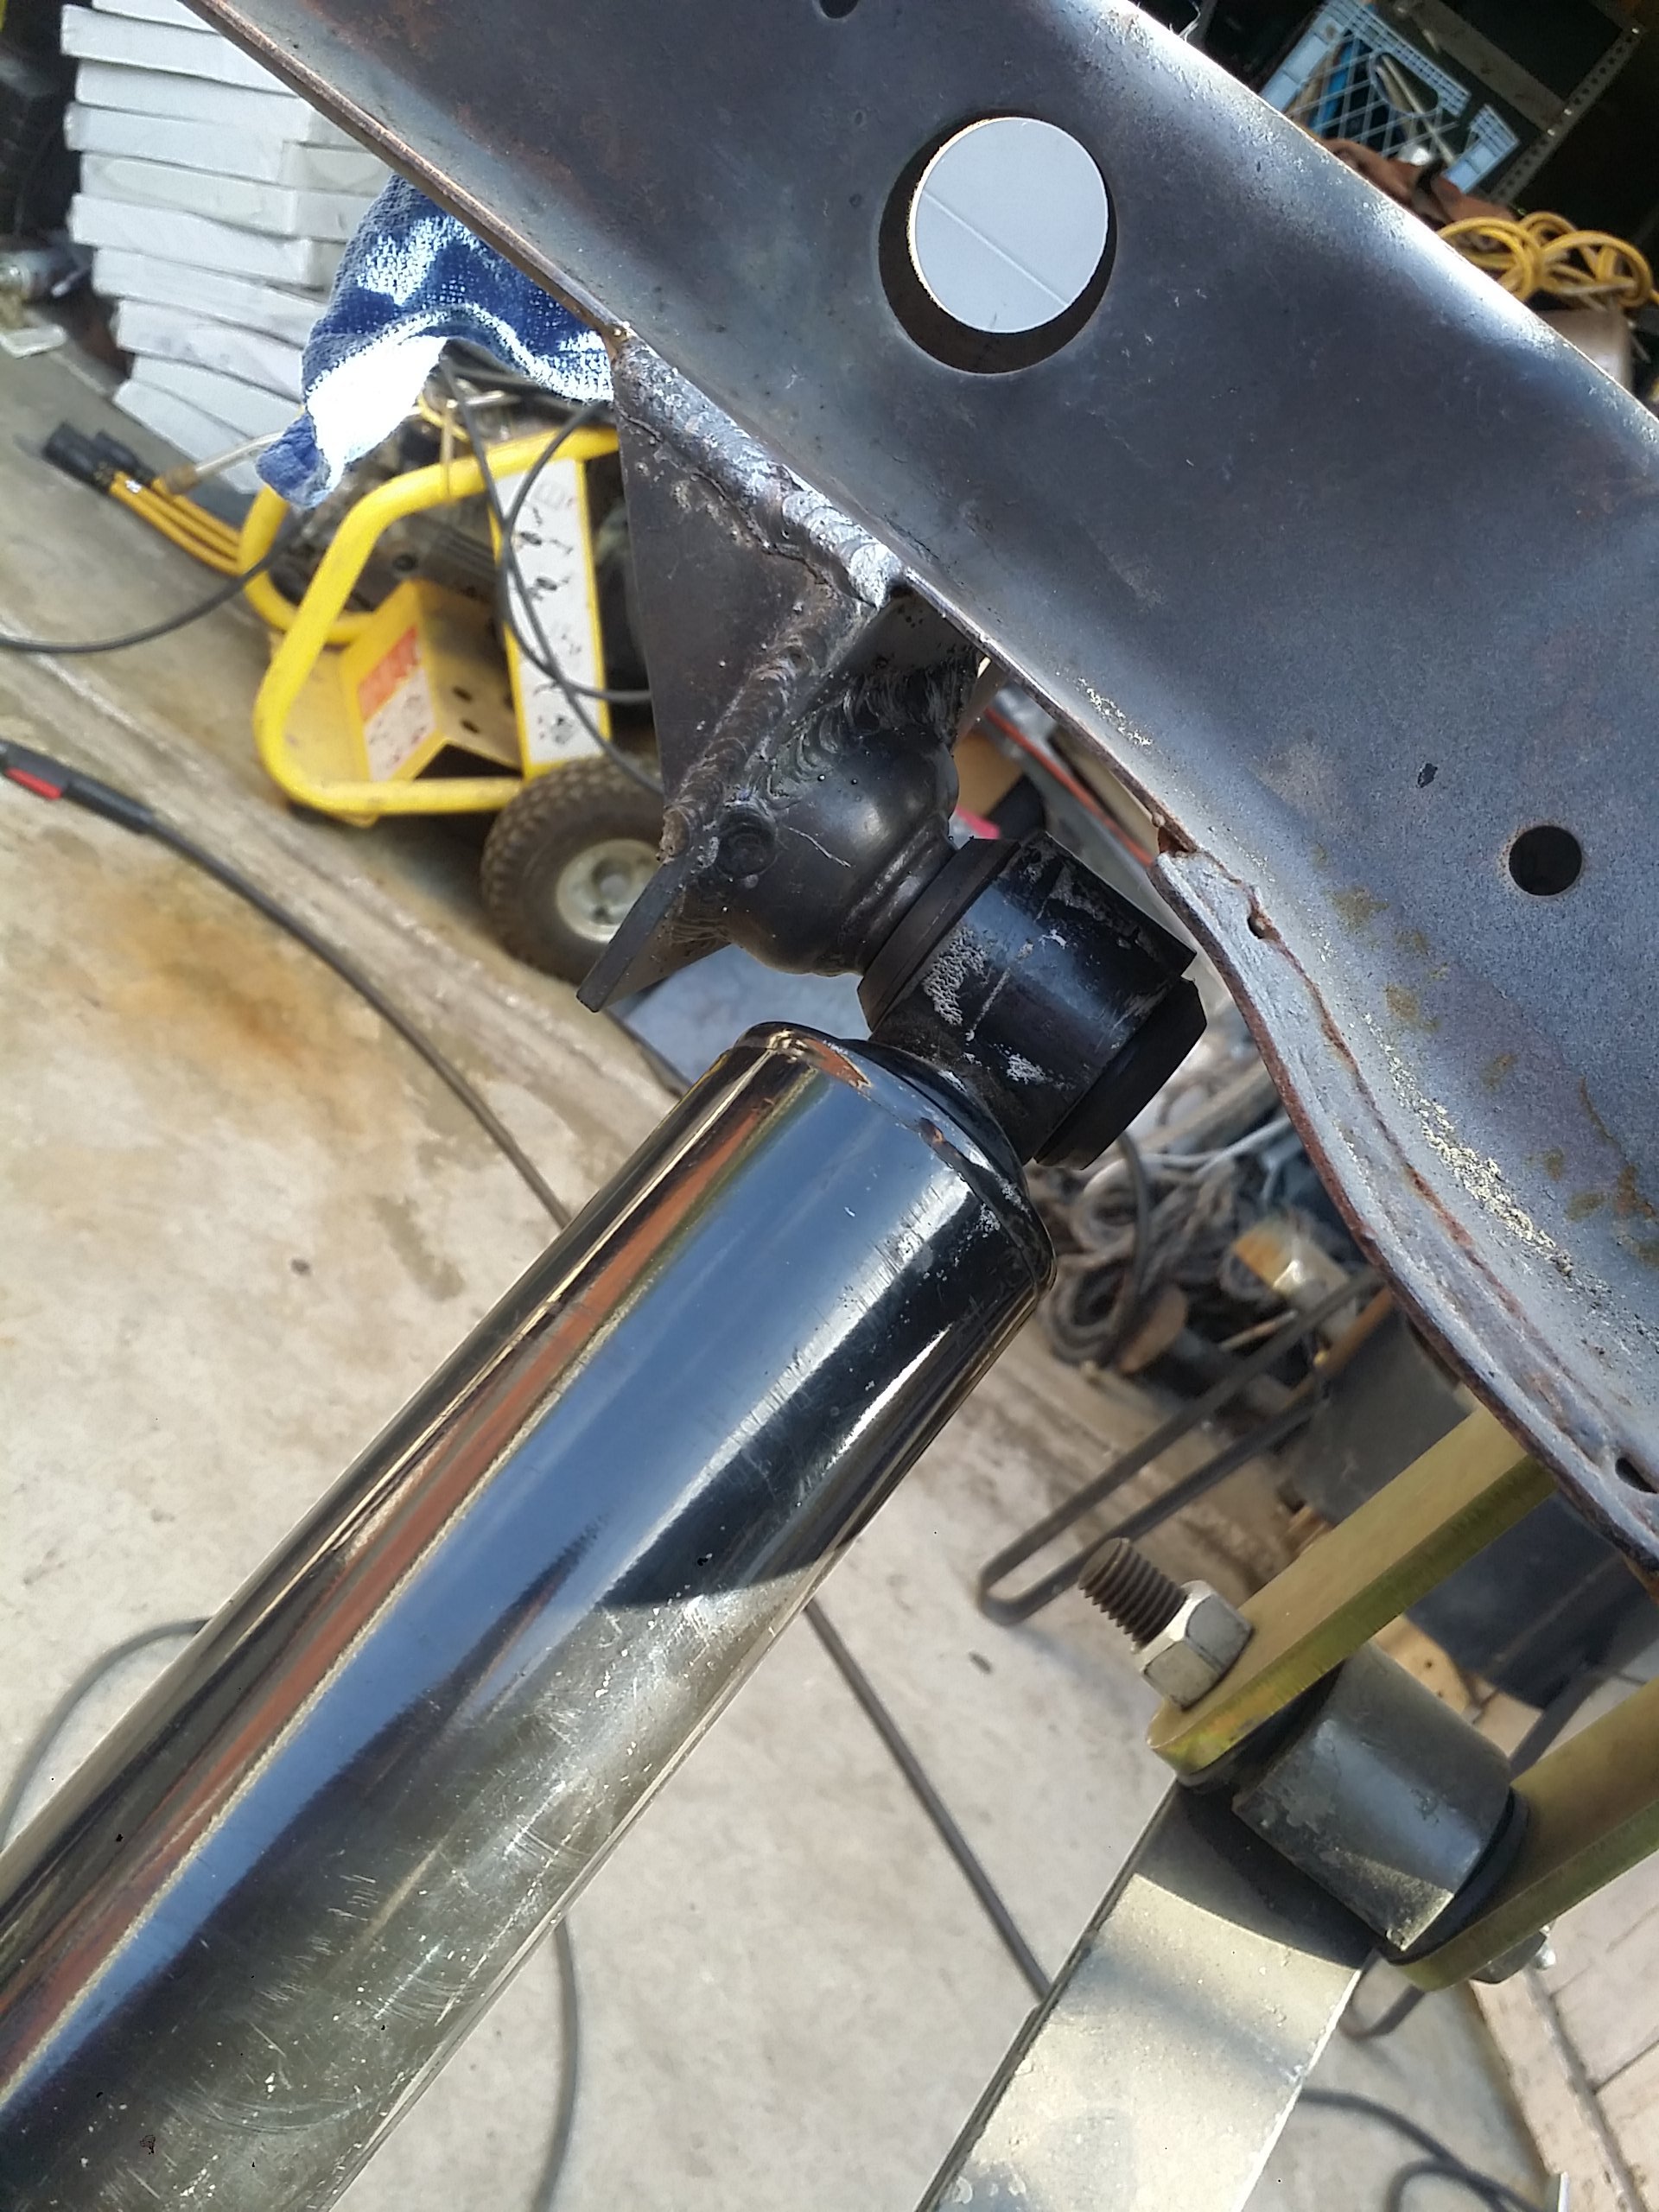
A few forum members both on Expeditionportal and YotaTech.com suggested I should add a gusset from my trailer hitch to the first cross member for support in case I ever need to have a vehicle pull the trailer from the rear bumper if I was ever to get stuck. I think they had a valid point. Without this gusset the load would be entirely on the thin bumper and it would be ruined for sure. This definitely beefs up the hitch for emergencies if needed.

Here they are all mounted in to place! The trailer finally has shocks! I just need to find stock upper shock bolts to fit these. But I'm set on suspension now! In the end they had about 4.25" up travel and 4.25" down travel. It's all good. It will still work good.

Here's a close up if the mounts I made that I welded to the rear most crossmember which is normally used for the stock spare tire carrier on these 4runners.
Passenger side

Driver side

A few forum members both on Expeditionportal and YotaTech.com suggested I should add a gusset from my trailer hitch to the first cross member for support in case I ever need to have a vehicle pull the trailer from the rear bumper if I was ever to get stuck. I think they had a valid point. Without this gusset the load would be entirely on the thin bumper and it would be ruined for sure. This definitely beefs up the hitch for emergencies if needed.
 05-30-2016, 08:21 PM
#86
Registered User
Thread Starter
 05-30-2016, 08:53 PM
#87
Registered User
Thread Starter
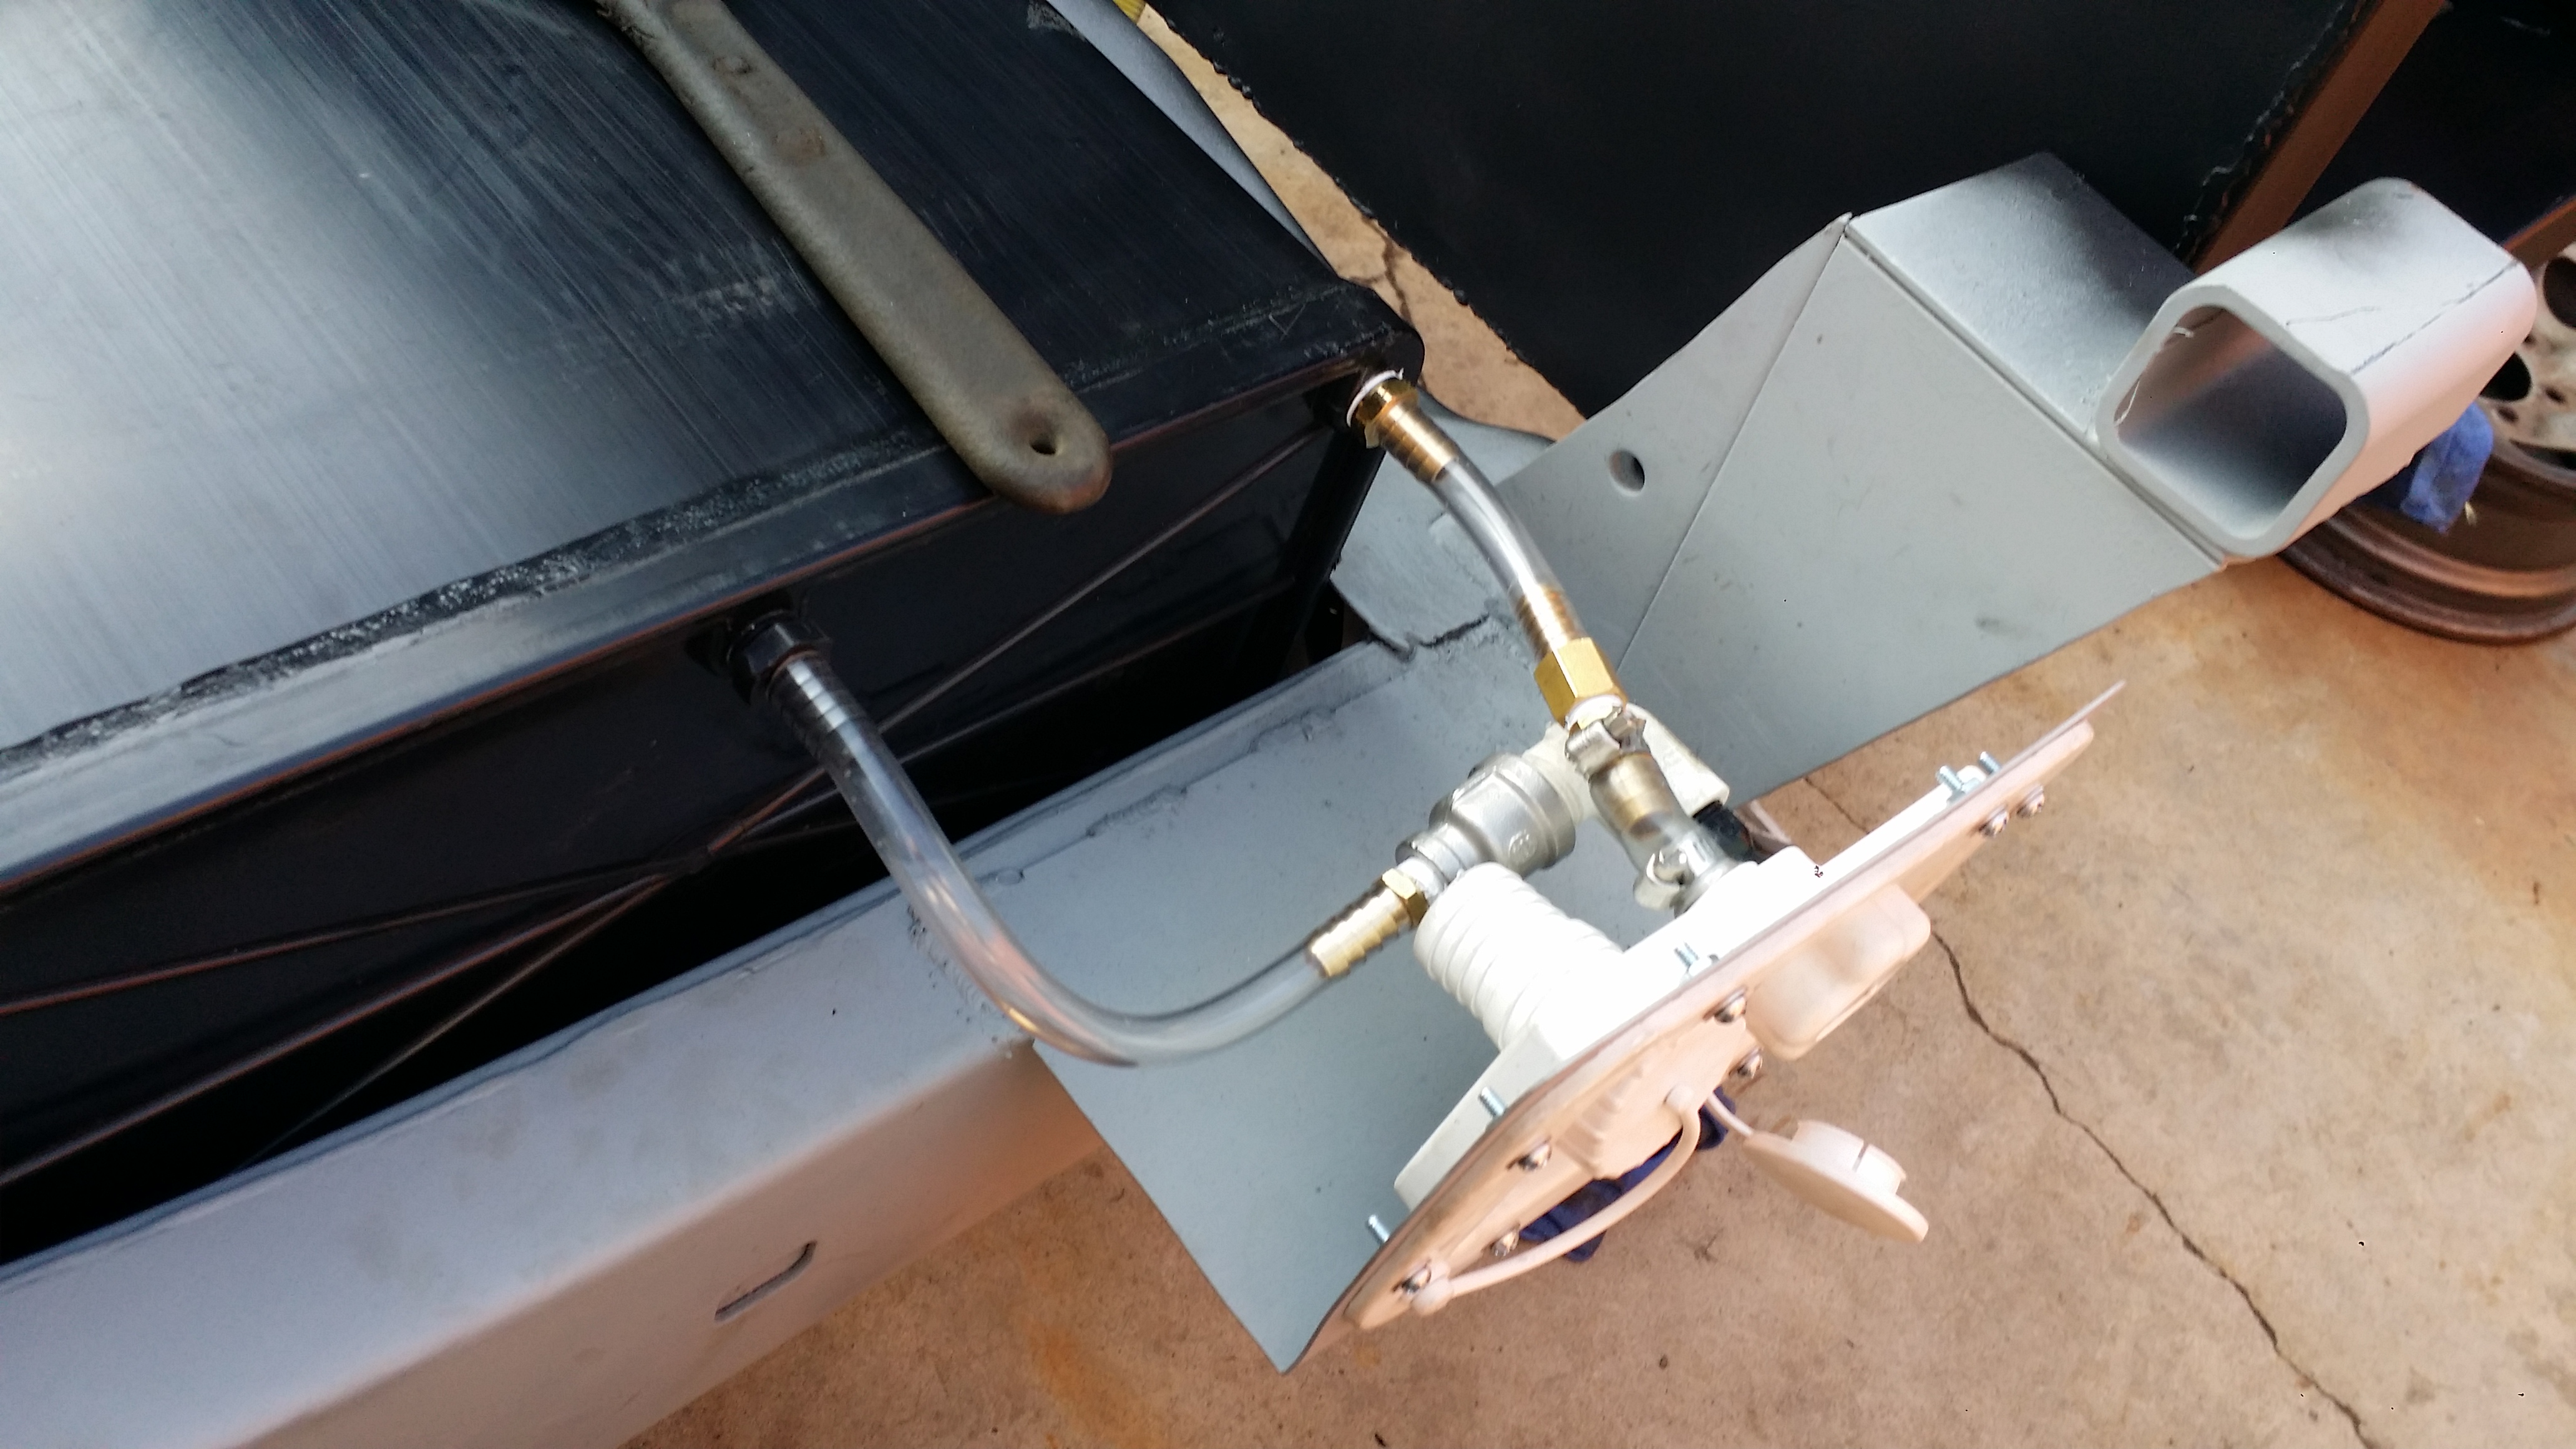
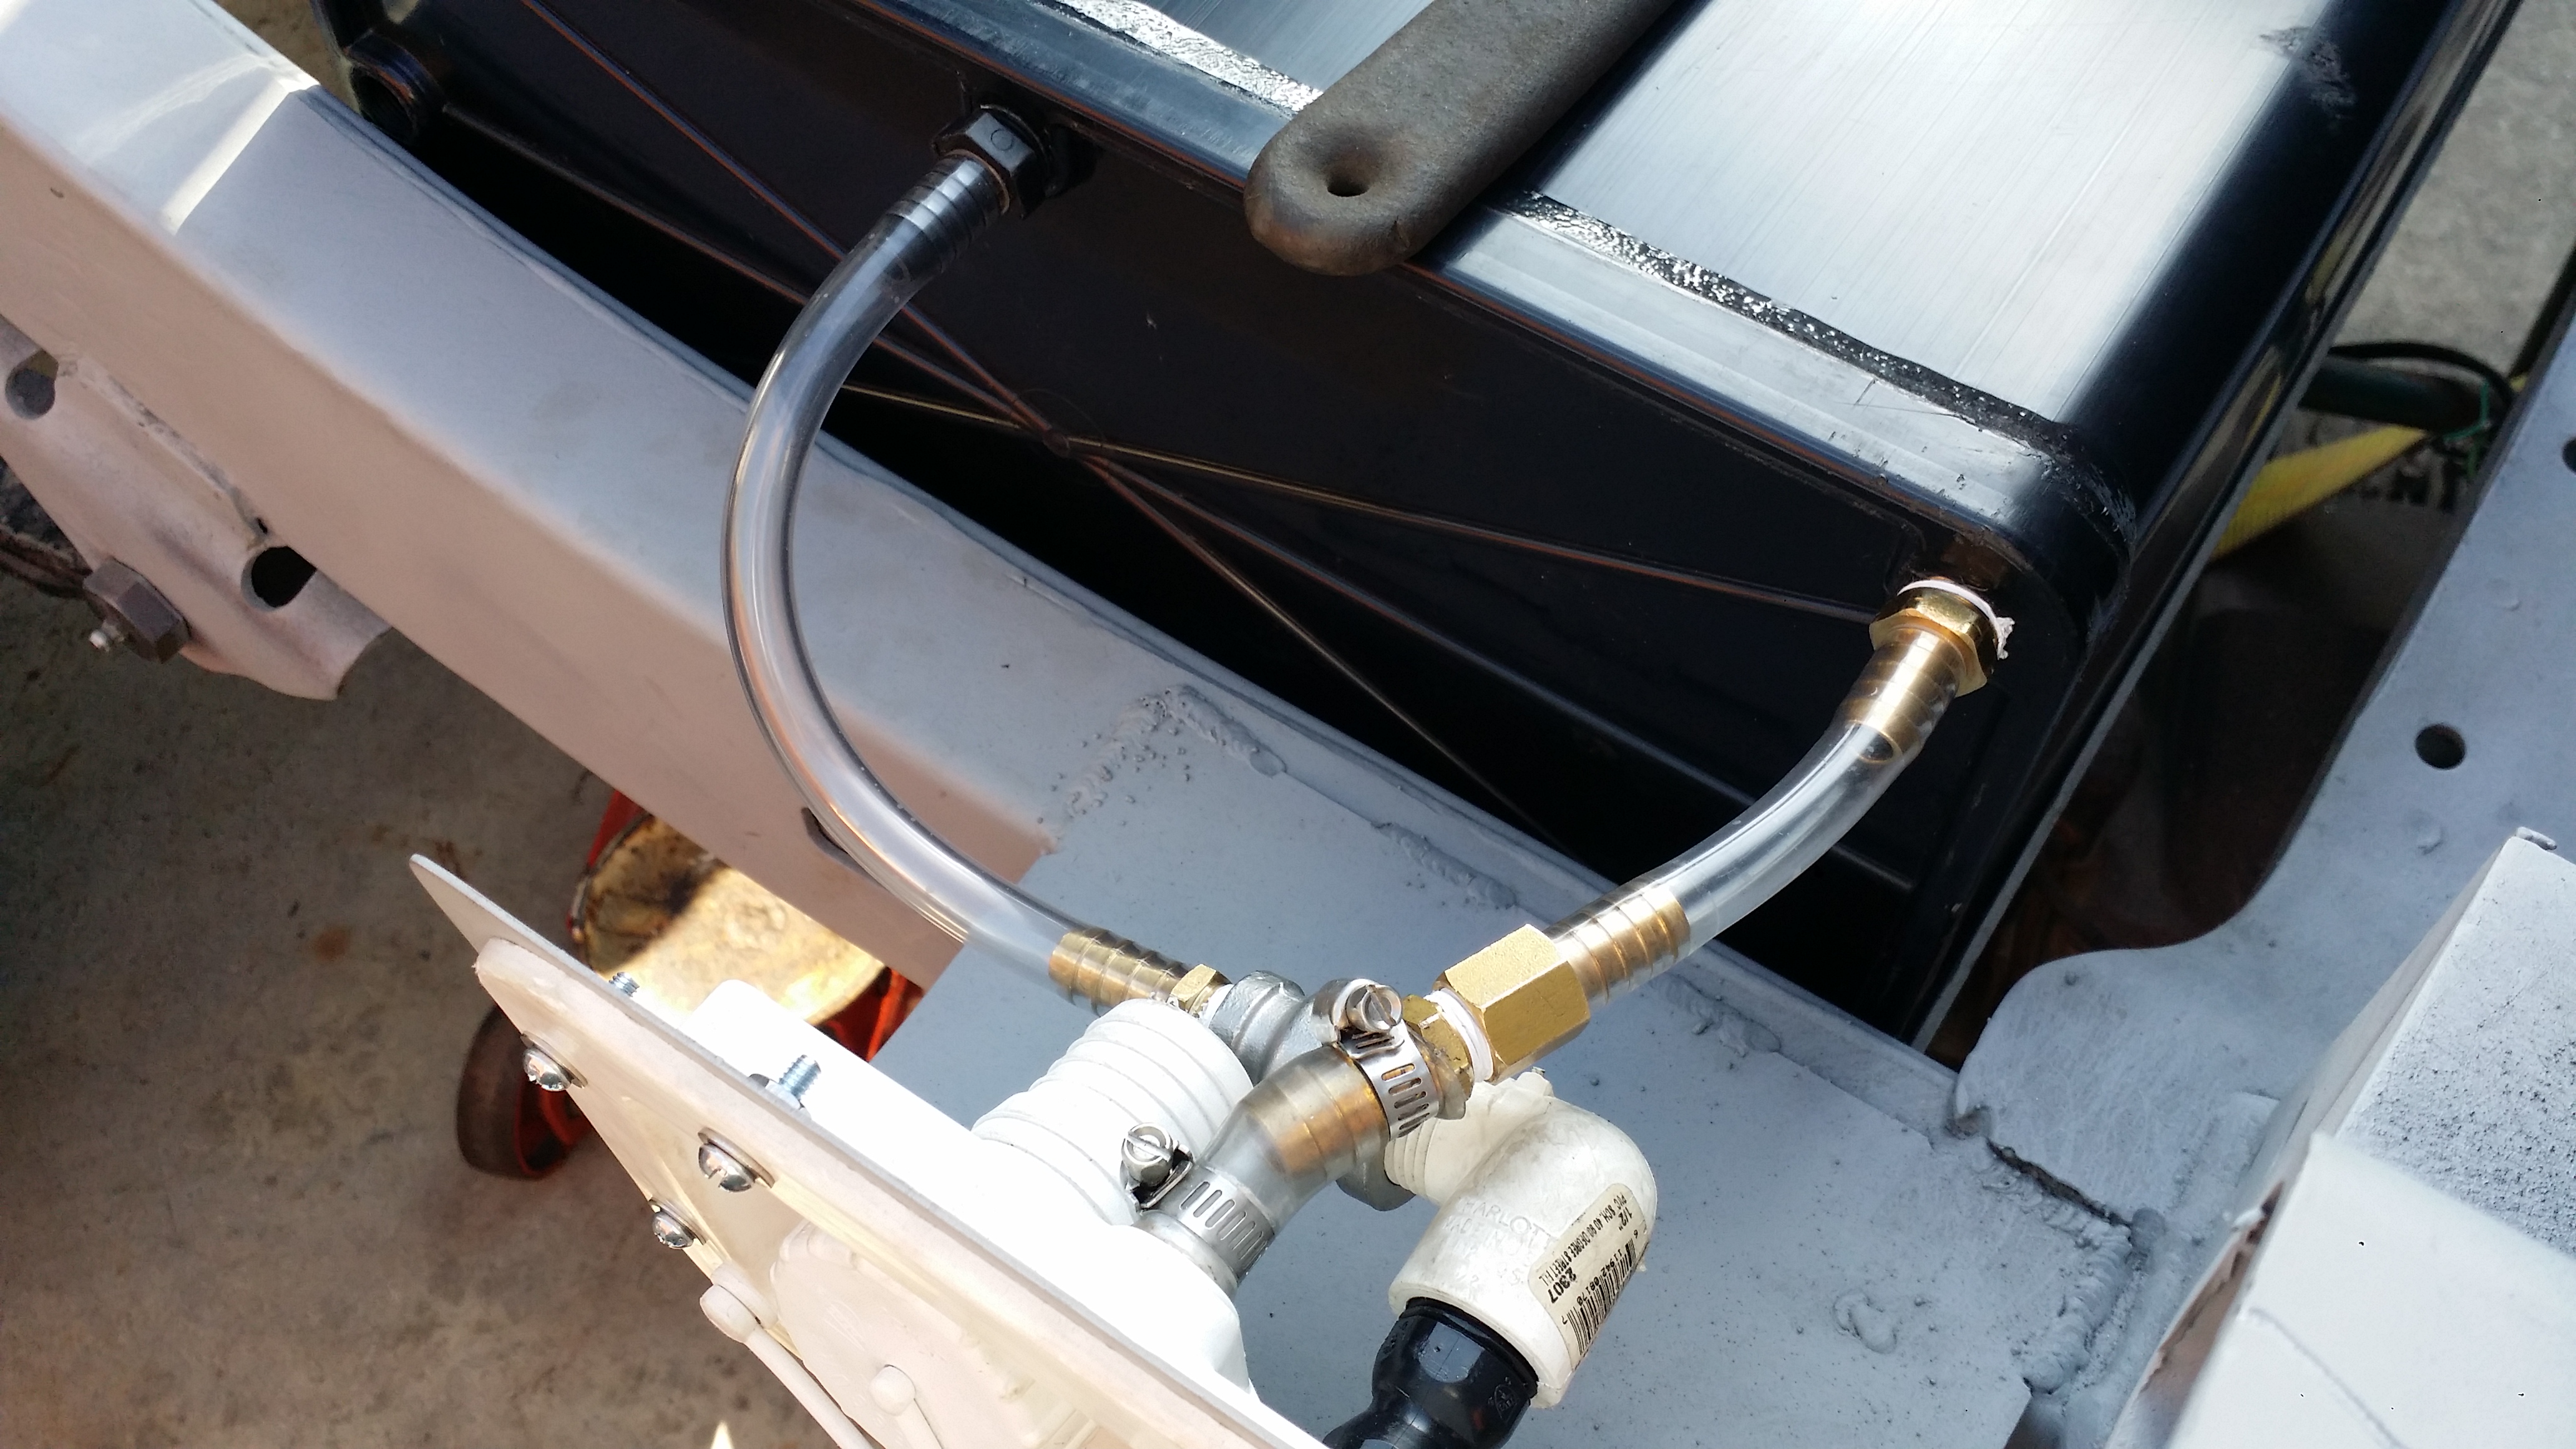
I got some pretty good progress in today with the on board shower system.
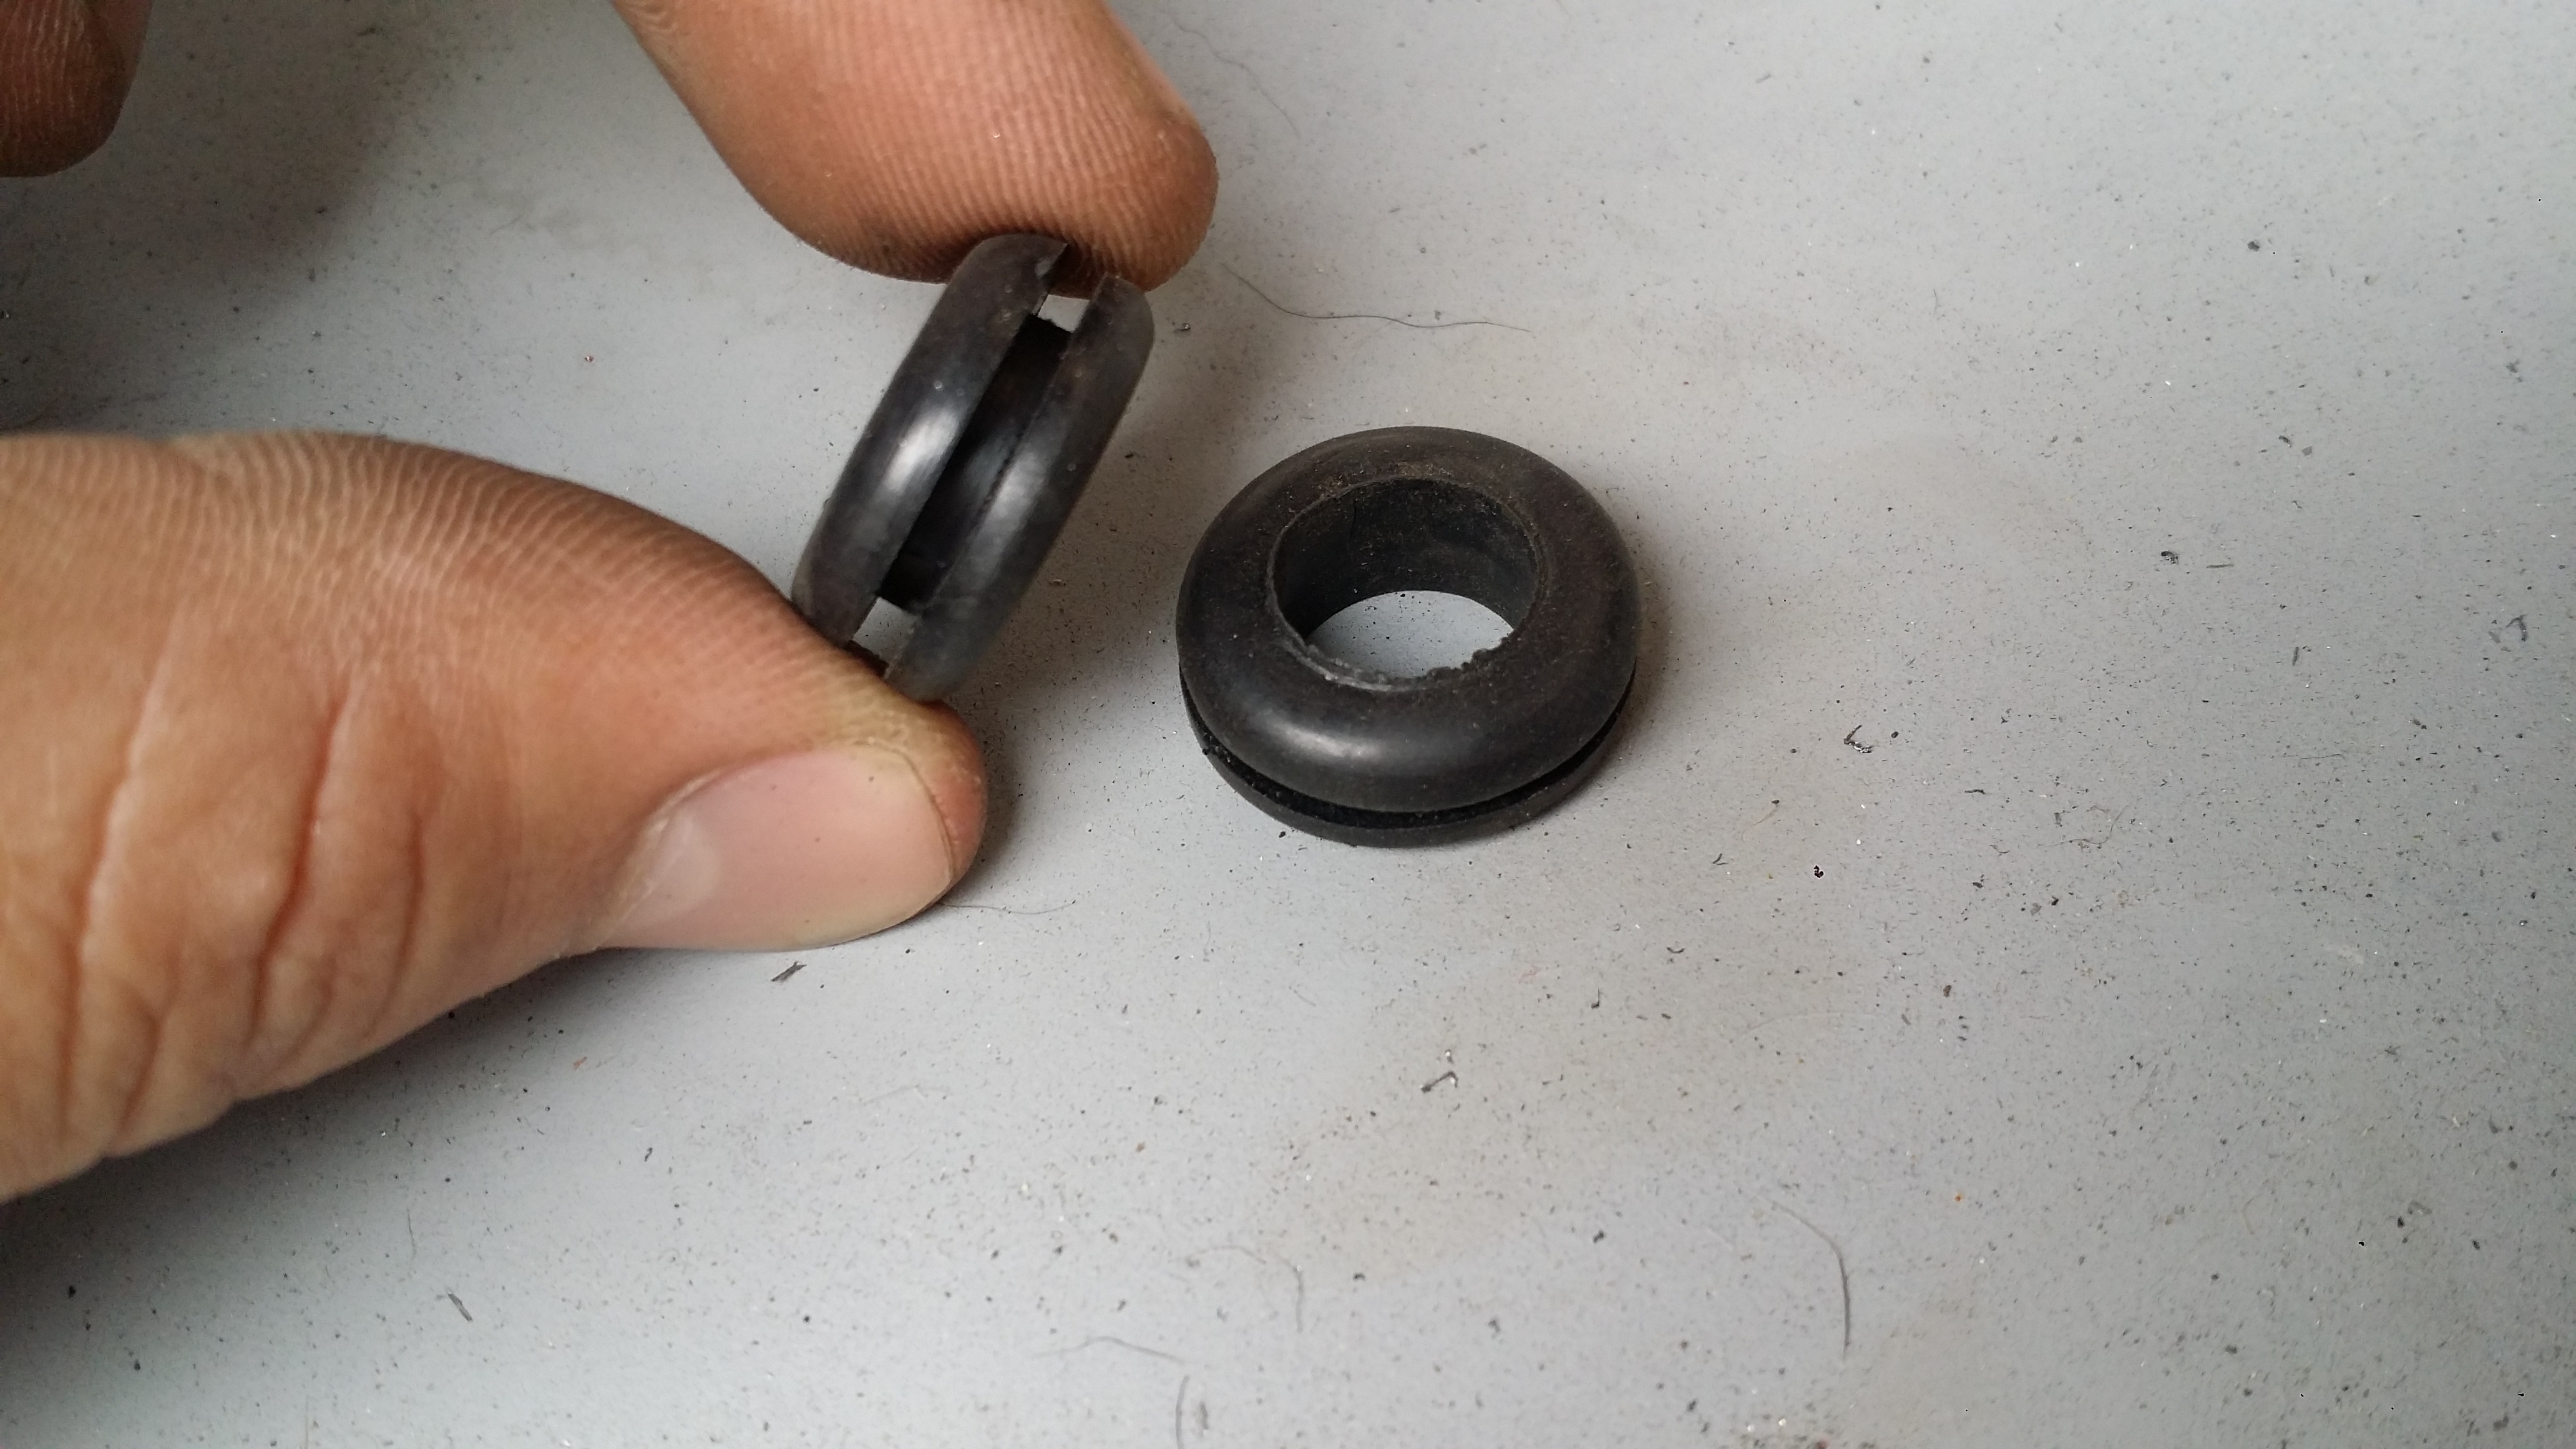
I found some wire grommets in my tool boxes from when i installed power windows into my truck and they just so happened to be the perfect size for the the vinyl tubing to pass through into the front compartment.
Hole made in the rear lower left corner of the front compartment
This will work perfect to keep the tubing from getting damaged from constant rubbing
It was tough to get the tubing in but it fits!
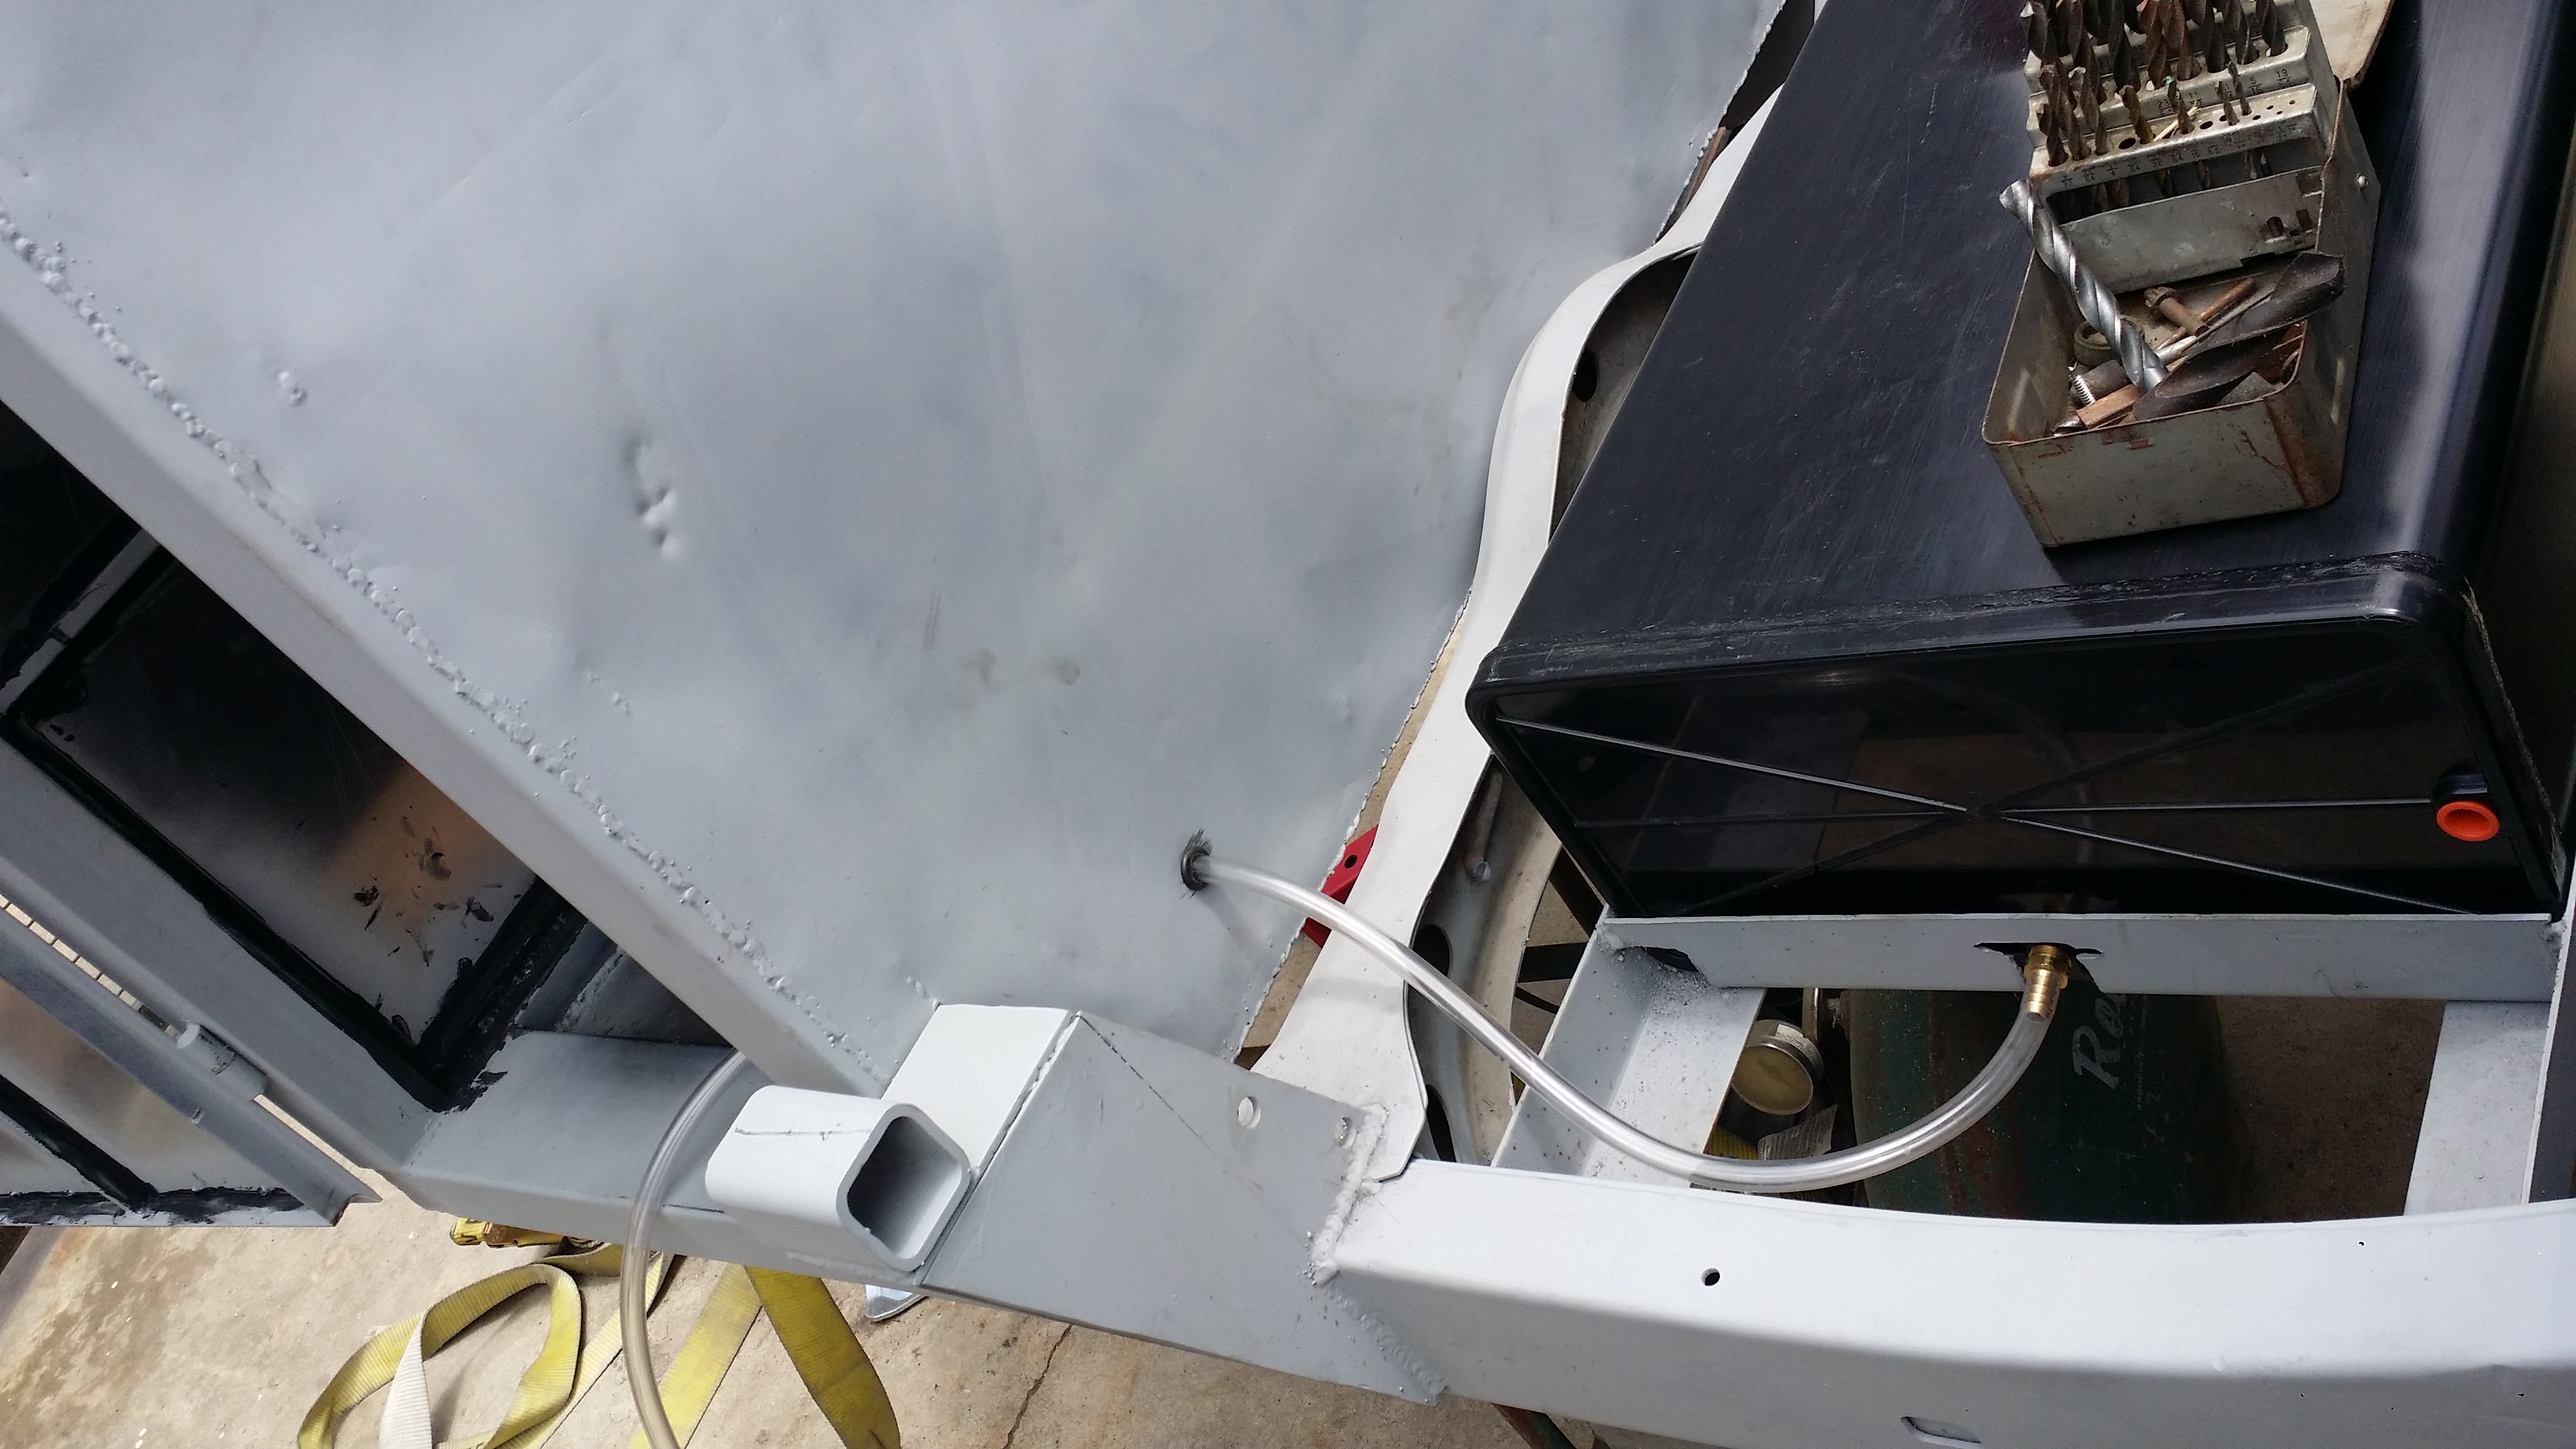
By this time i had already painted the inside and all around the exterior of that front compartment I figured it was a good time to do it now that the hole was made. I also mounted the EccoTemp heated shower to the door but not before adding some tubes on the rear side of the water heater welded to the actual door to stabilize the unit from shaking like crazy when i drive. I only added them to the bottom of the door so i may still have to add 2 more to the top side but for now it works and doesn't shake at all.
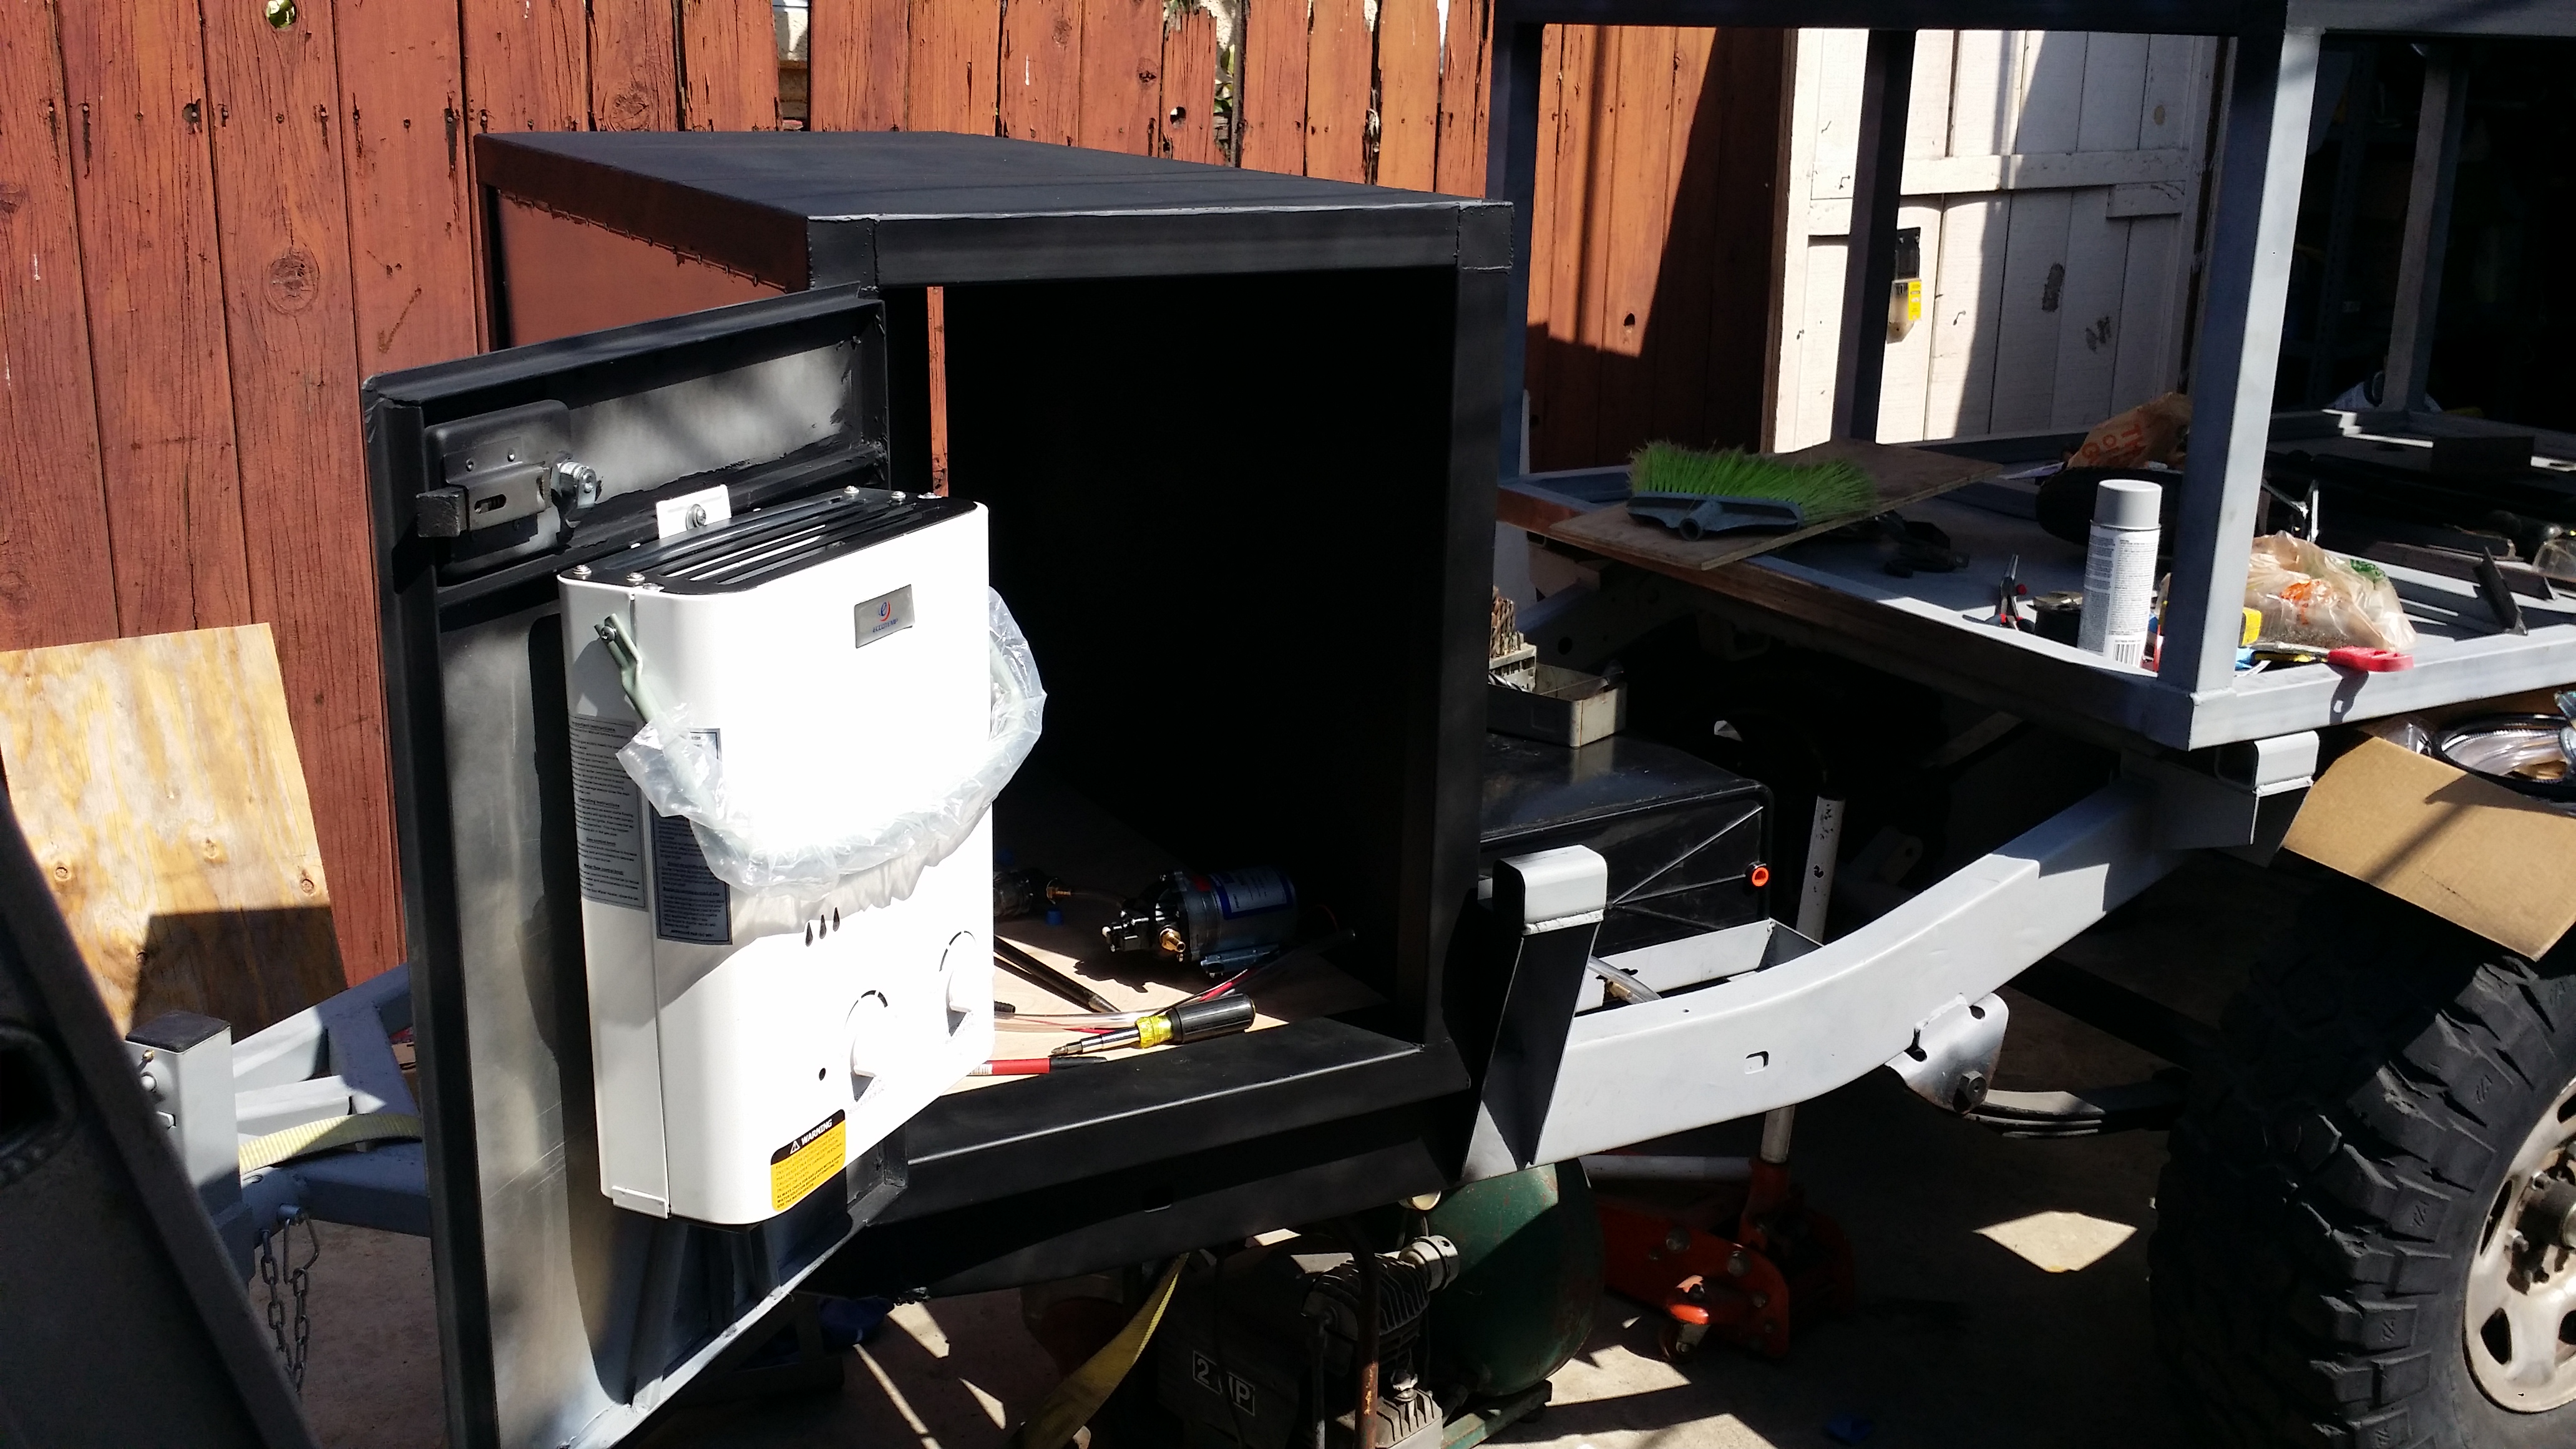
So one of the things i wish the vendor of my water tank hadn't done was make their own hole into the tank because it just so happens that every hole i needed to use was everything except the one they made into the tank lol.
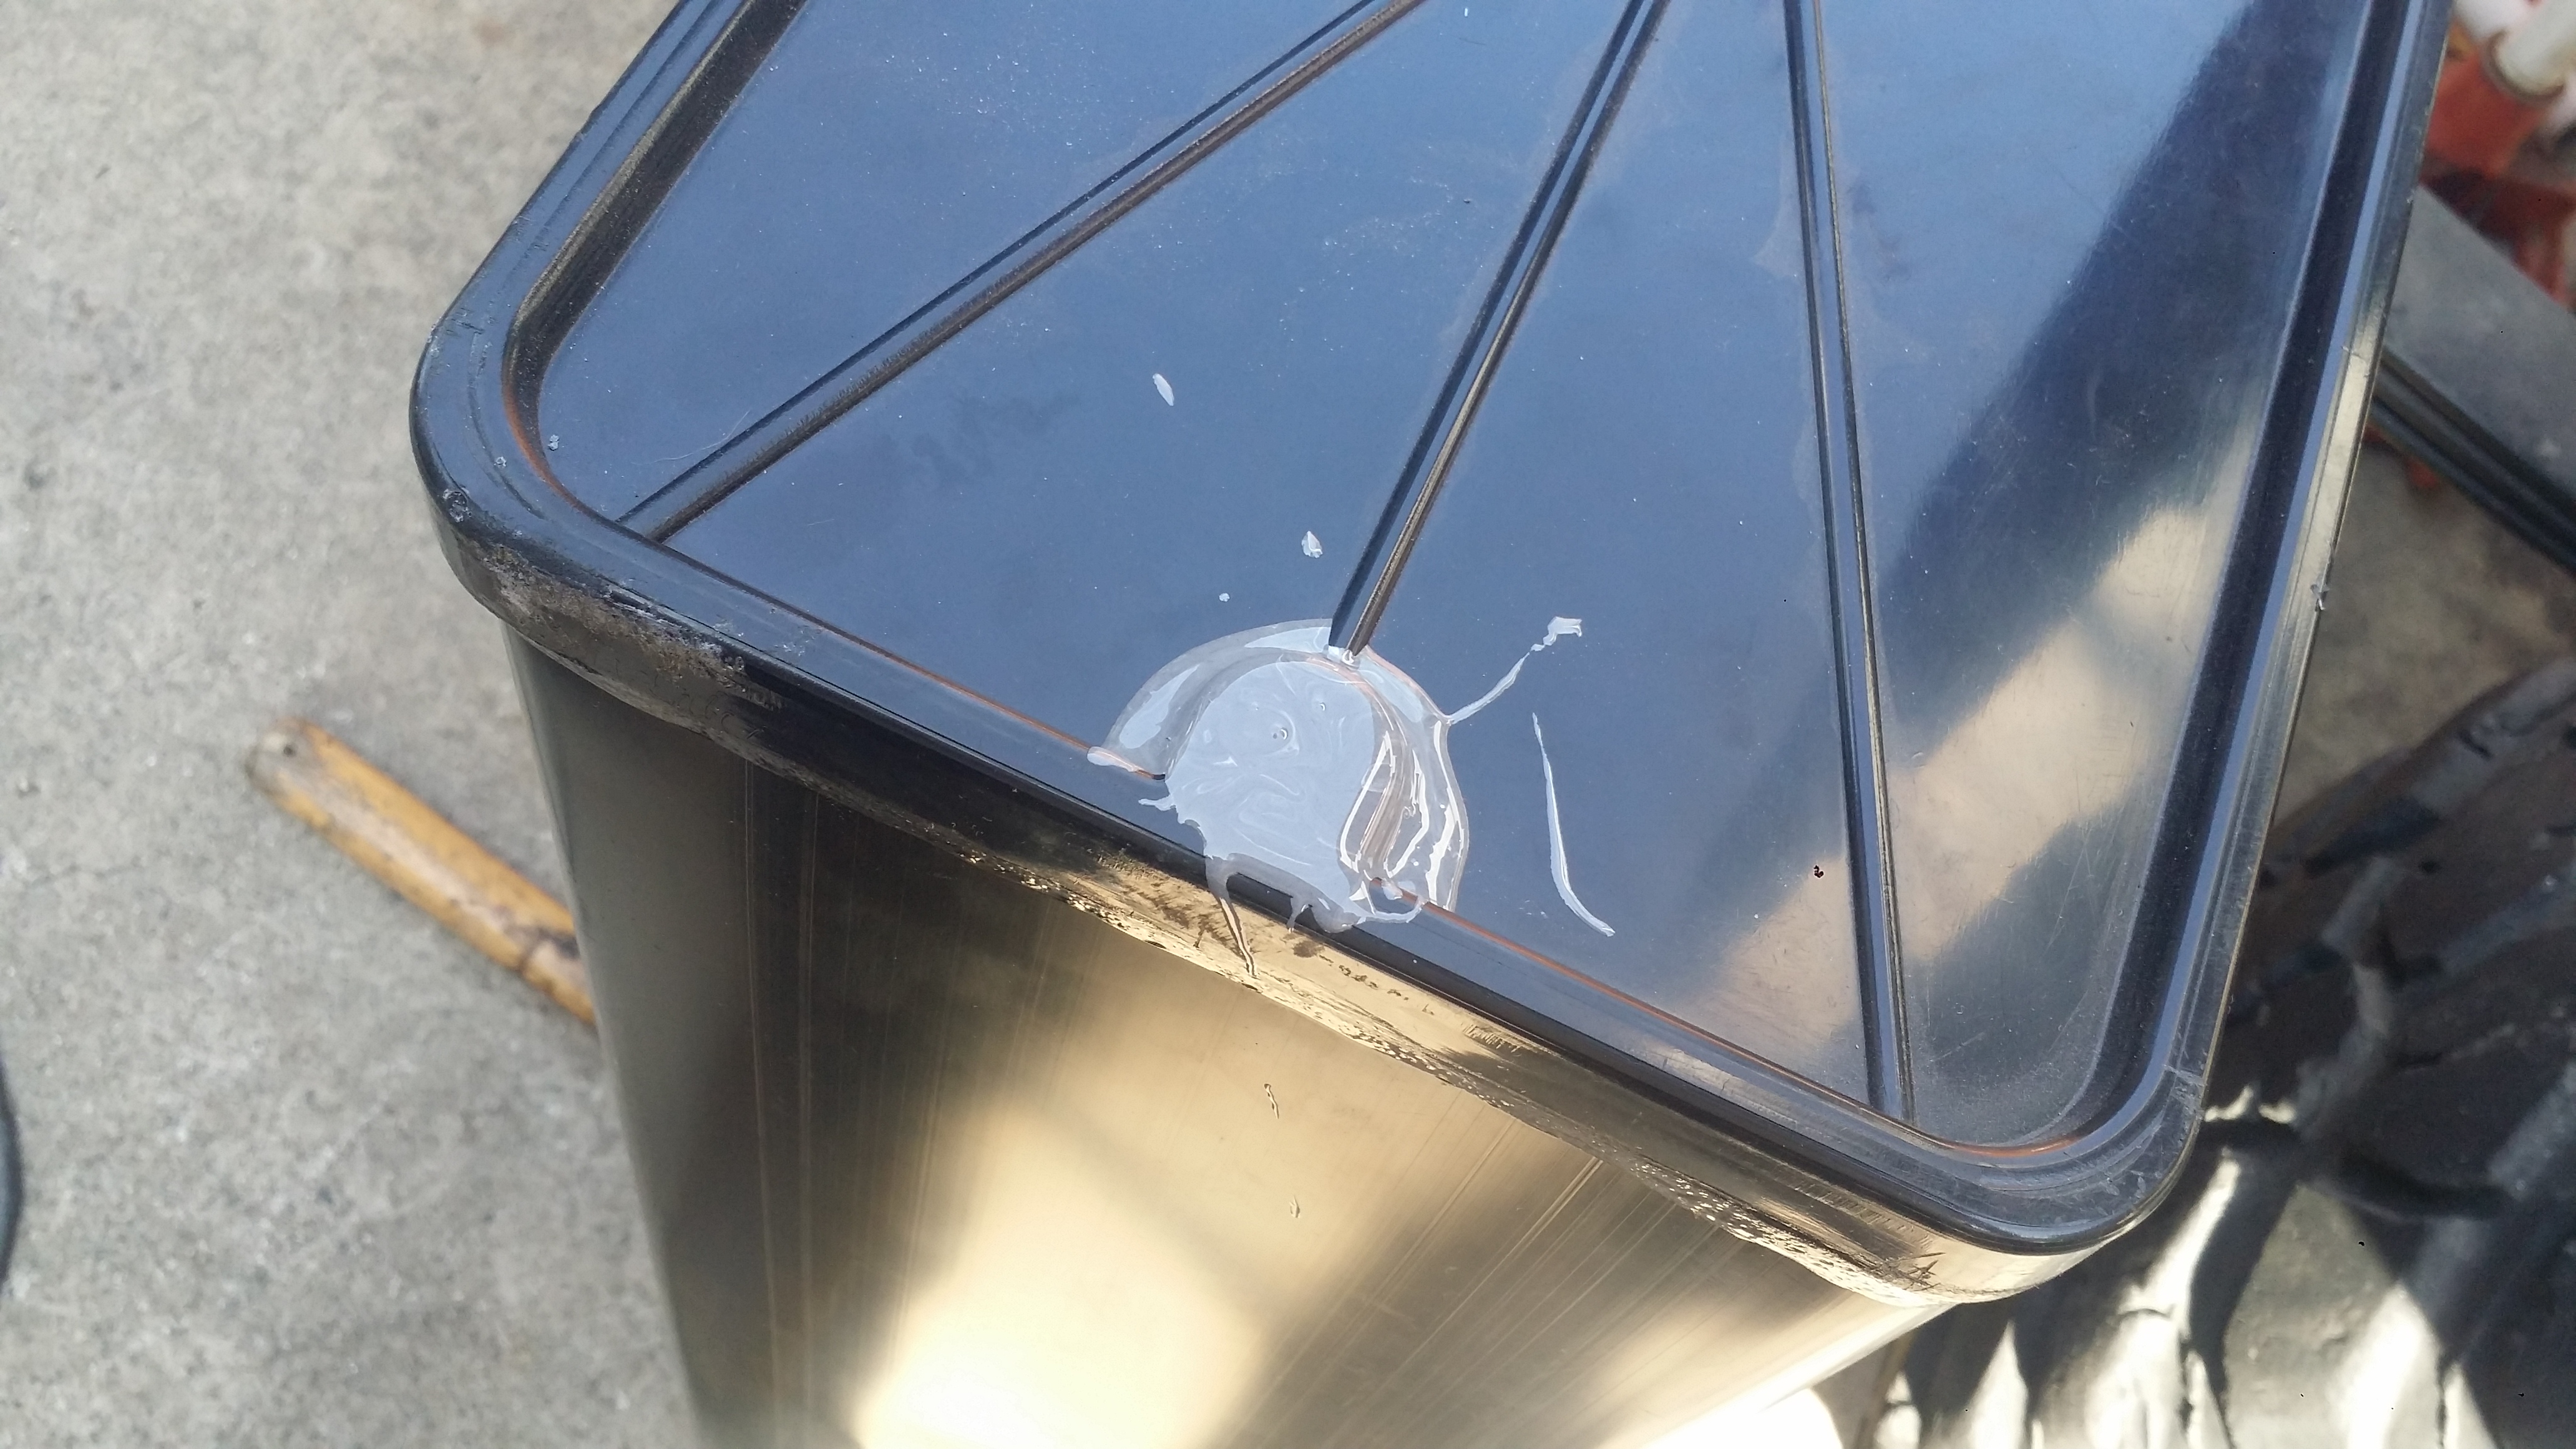
Fortunately the vendor included this temporaty orange plug shown in this picture below to keep dust out.
So I just plugged up that hole by cutting half of it off and and pushing the entire plug into the hole as far as it could go. Then i finalized the plug with some JB Weld to make sure it would hold. I'm sure this will work just fine in keeping water from spilling out.
Also made a trip to Home Depot and bought some Bolts, washers and nuts with nylon threads. It was only about 5 bucks. But it will definitely keep this baby in place!
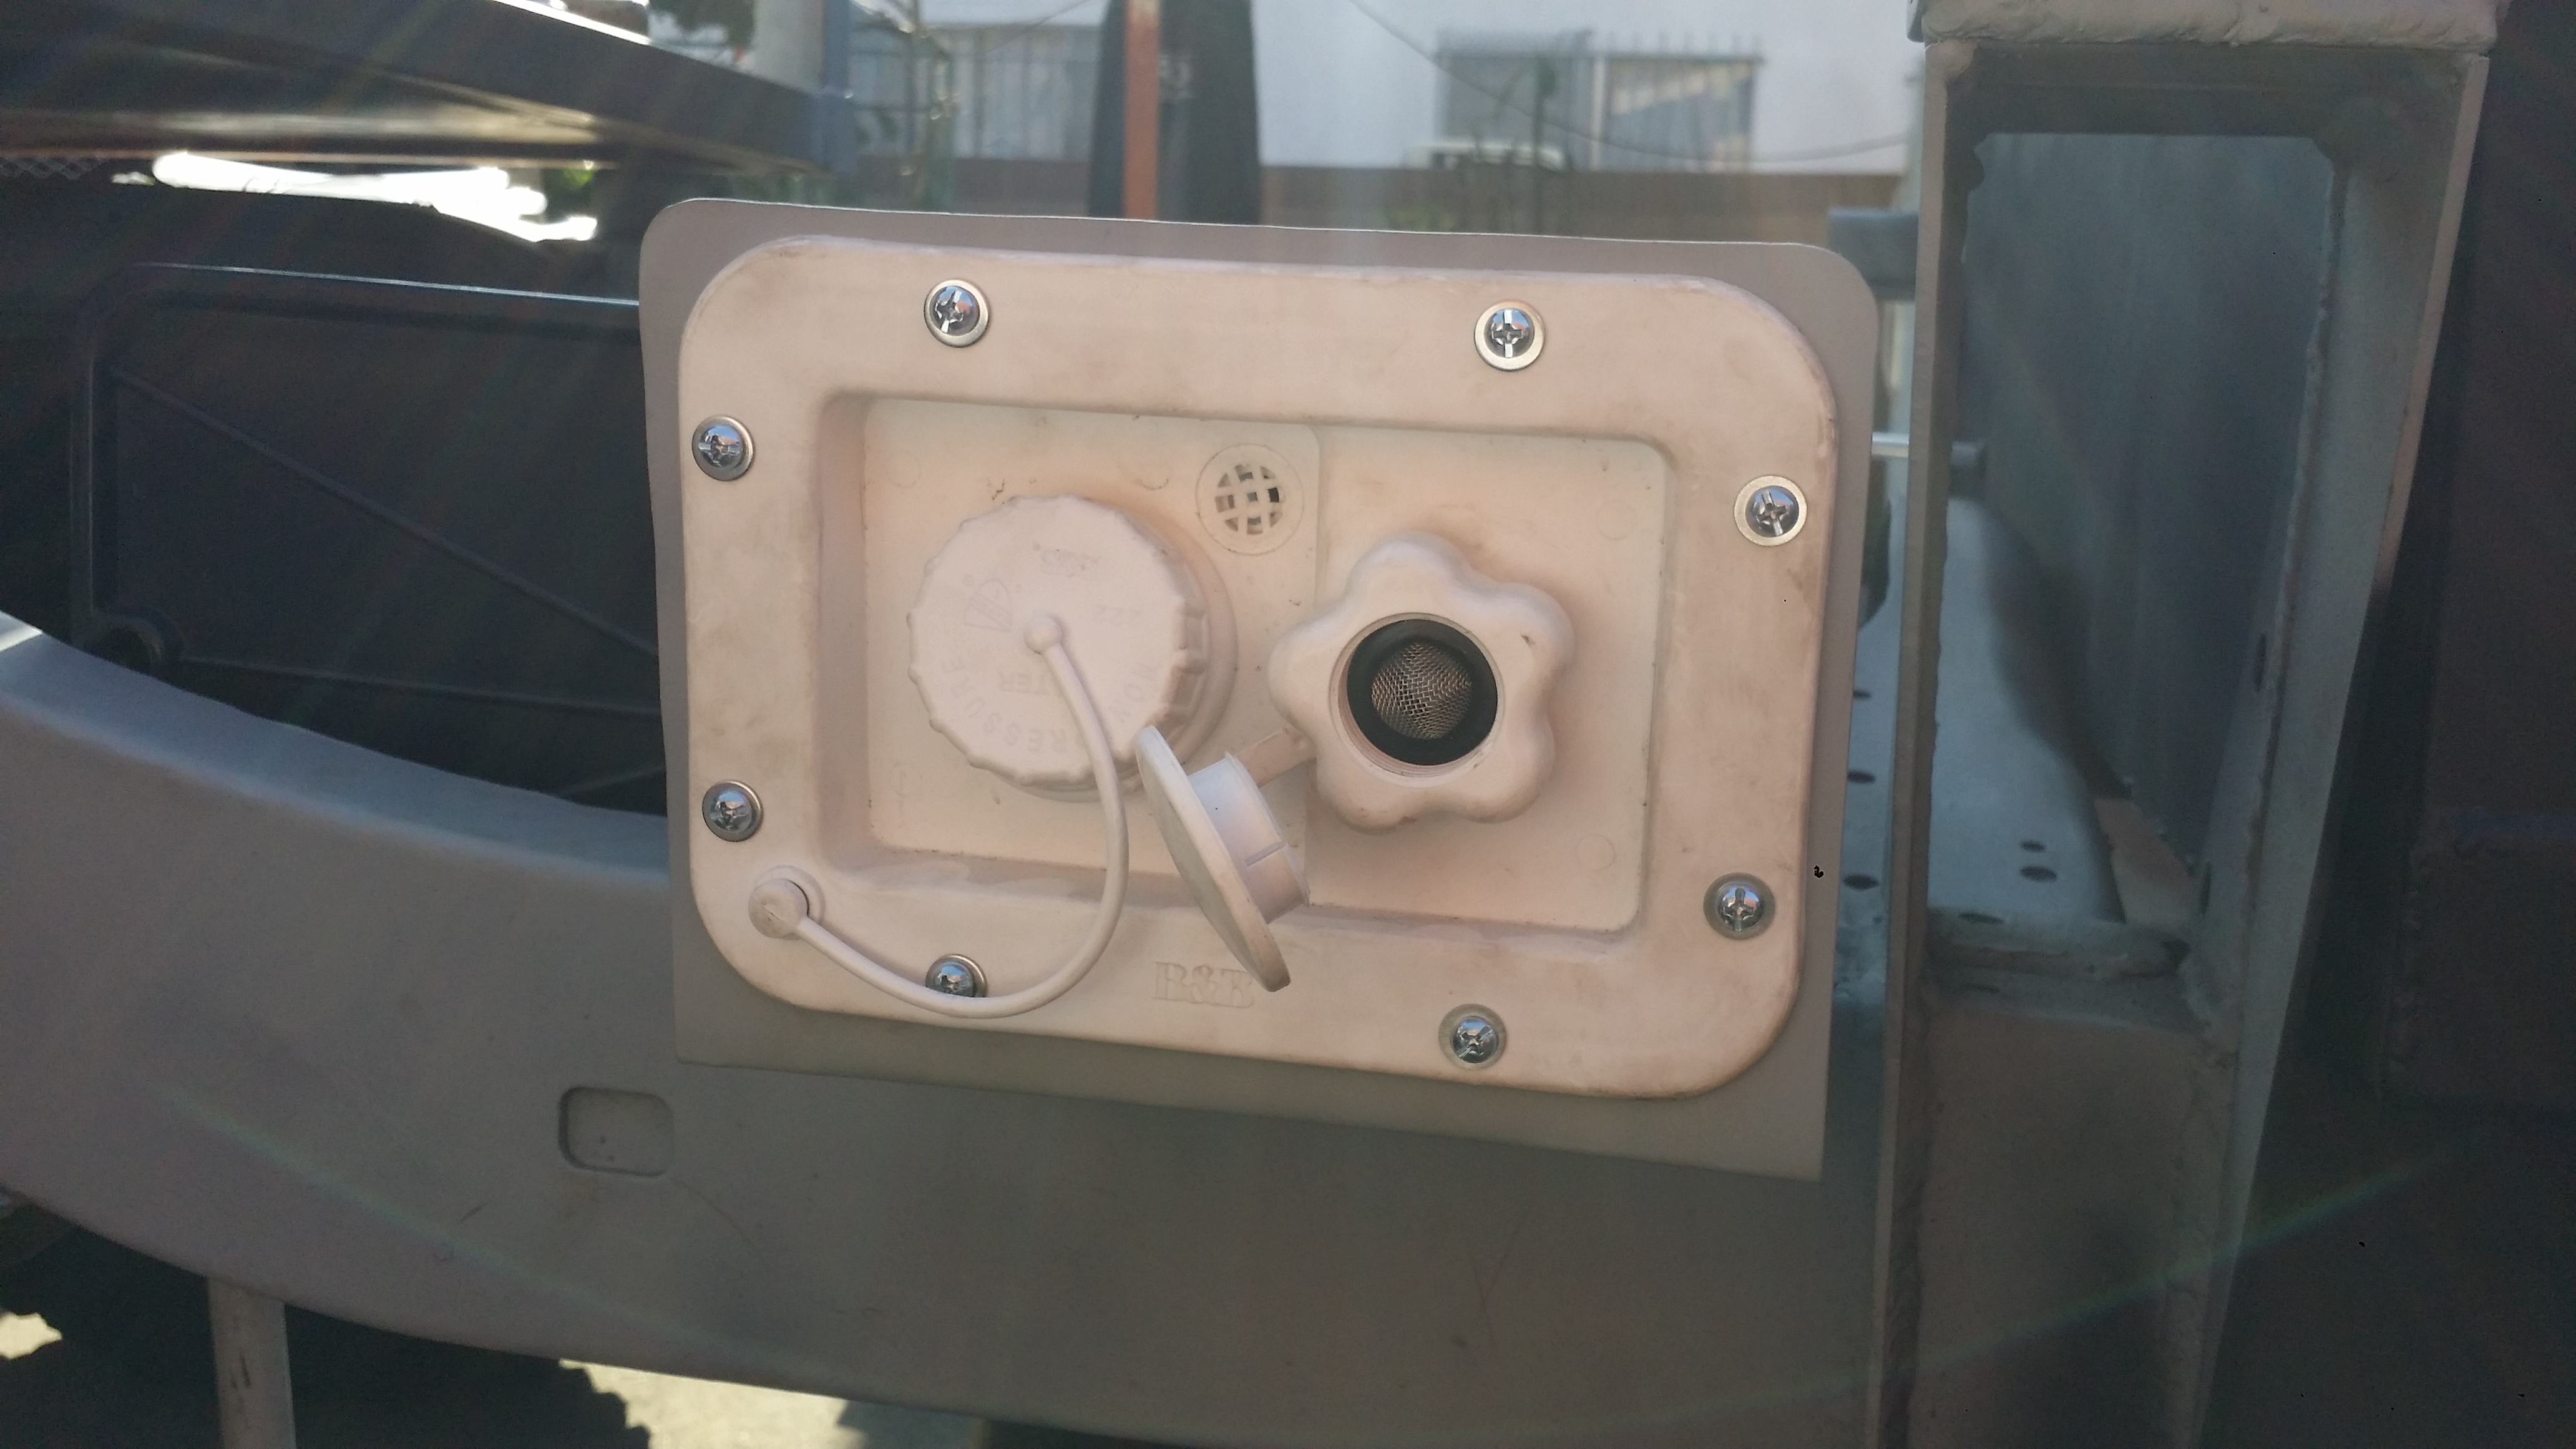
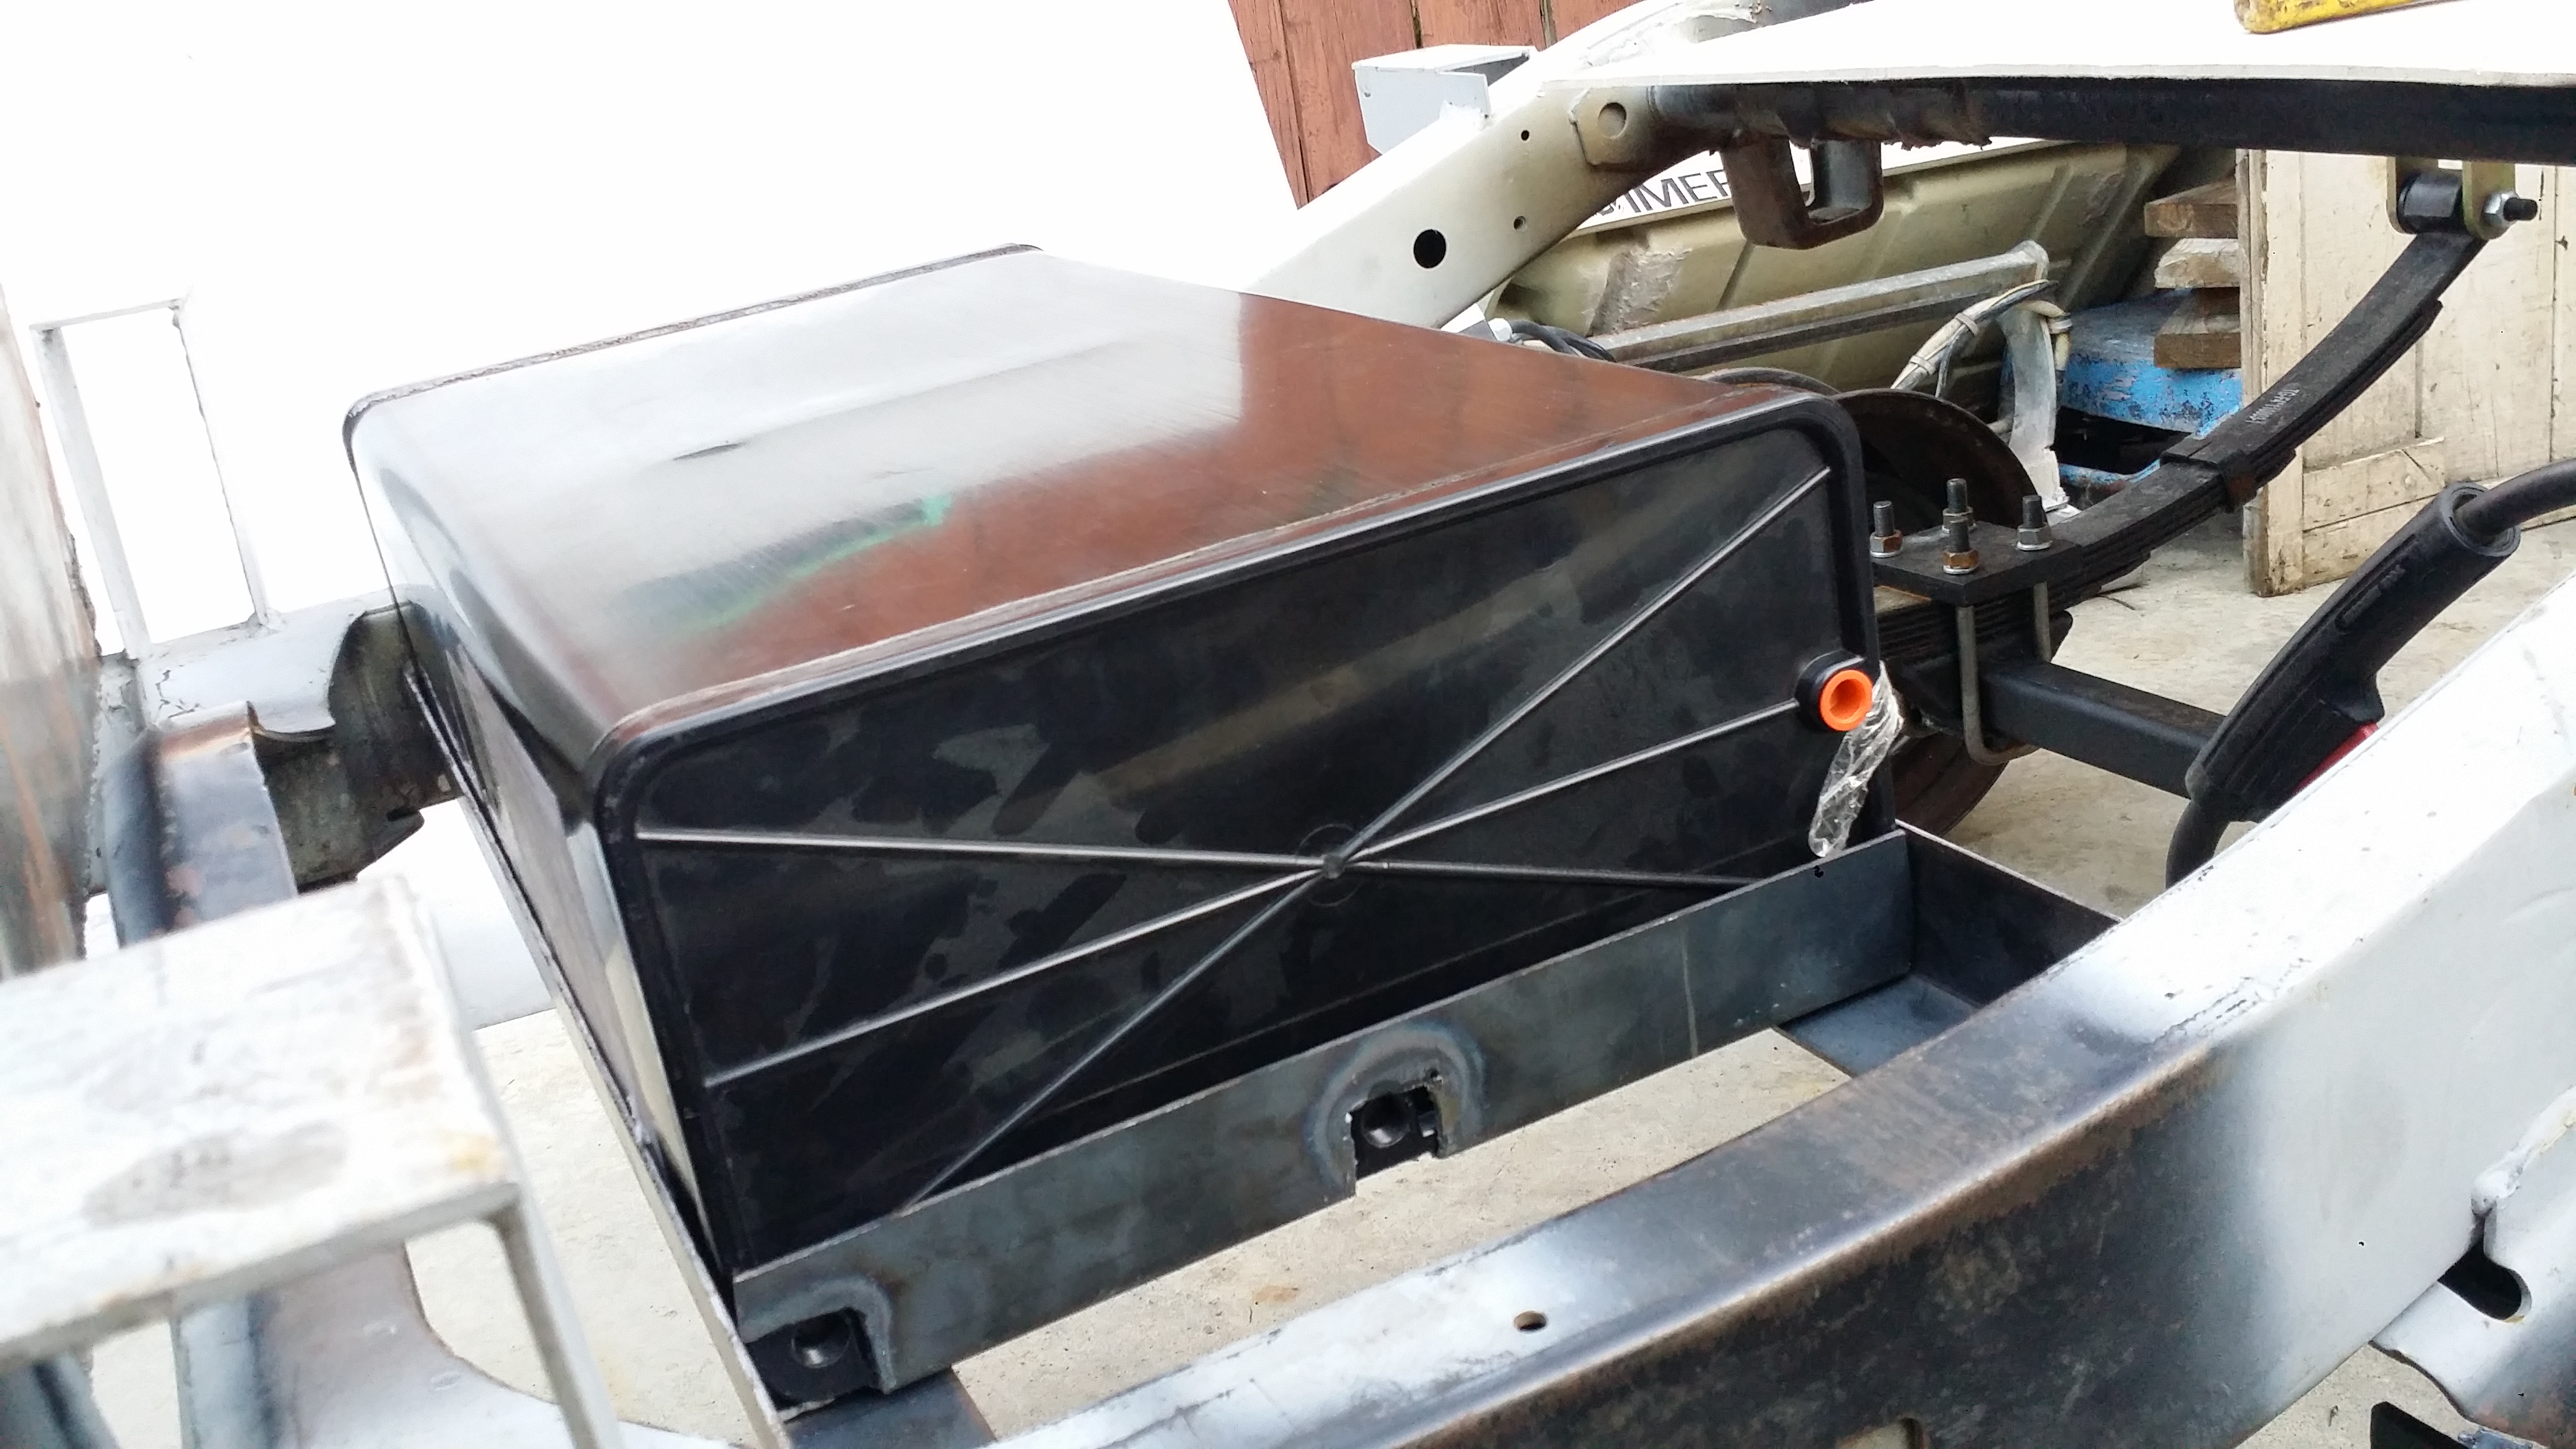
Top View.
The hose that curves provides the water to the tank via water hose.
The other hose that goes straight is meant for air to exit the tank as it is being filled.
Enough Typing. Here is a short video i had posted on my instagram page explaining and showing how this awesome shower system works! Hope you enjoy!
I found some wire grommets in my tool boxes from when i installed power windows into my truck and they just so happened to be the perfect size for the the vinyl tubing to pass through into the front compartment.

Hole made in the rear lower left corner of the front compartment

This will work perfect to keep the tubing from getting damaged from constant rubbing

It was tough to get the tubing in but it fits!

By this time i had already painted the inside and all around the exterior of that front compartment I figured it was a good time to do it now that the hole was made. I also mounted the EccoTemp heated shower to the door but not before adding some tubes on the rear side of the water heater welded to the actual door to stabilize the unit from shaking like crazy when i drive. I only added them to the bottom of the door so i may still have to add 2 more to the top side but for now it works and doesn't shake at all.

So one of the things i wish the vendor of my water tank hadn't done was make their own hole into the tank because it just so happens that every hole i needed to use was everything except the one they made into the tank lol.
Fortunately the vendor included this temporaty orange plug shown in this picture below to keep dust out.

So I just plugged up that hole by cutting half of it off and and pushing the entire plug into the hole as far as it could go. Then i finalized the plug with some JB Weld to make sure it would hold. I'm sure this will work just fine in keeping water from spilling out.

Also made a trip to Home Depot and bought some Bolts, washers and nuts with nylon threads. It was only about 5 bucks. But it will definitely keep this baby in place!

Top View.
The hose that curves provides the water to the tank via water hose.

The other hose that goes straight is meant for air to exit the tank as it is being filled.

Enough Typing. Here is a short video i had posted on my instagram page explaining and showing how this awesome shower system works! Hope you enjoy!
Last edited by Redeth005; 05-30-2016 at 09:20 PM.
06-05-2016, 08:13 PM
#88
Registered User
Thread Starter
I finally go my "Propex Heatsource HS2000" heater working. Here is a video I uploaded to YouTube. It is a full review/explanation of how this thing is set up, how it works, how many operating hours it is estimated to get, amp usage, Pretty much all the questions I had when I was looking into buying this were answered in my review because other online videos and websites don't go into depth with the details I wanted to know.
Well here ya go everyone. You have any questions just ask and ill do my best to answer.
Well here ya go everyone. You have any questions just ask and ill do my best to answer.
 06-06-2016, 07:32 AM
#91
Registered User
Thread Starter
Im sure it will be. I can already picture this thing in use. I just gotta figure out how to install the heater in my front compartment and run the one large brown hose from the inside to the outside of that compartment while still keeping it enclosed when not in use.
thank you. I'm hoping to have all the electronic stuff installed and hopefully be done with the build by the end of the year. All depends on if im able to afford the rooftop tent in time its really expensive! Hoping to have it done during winter time which will be the perfect time to test this heater out.
thank you. I'm hoping to have all the electronic stuff installed and hopefully be done with the build by the end of the year. All depends on if im able to afford the rooftop tent in time its really expensive! Hoping to have it done during winter time which will be the perfect time to test this heater out.
06-22-2016, 07:45 PM
#92
Registered User
Thread Starter
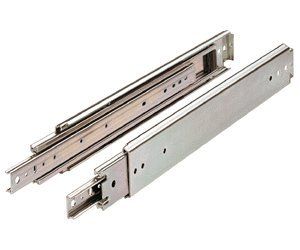
So i had originally planned to make a slide out drawer system using skateboard bearings to hold the weight of my future Engel 60 liter Combi Fridge/Freezer but in the end i found the task to be a bit too complicated. So i went with the next best thing. I just got done ordering these 36" 500lb weight capacity ball bearing slide out drawers each slide measures 3/4" wide and is 3" tall and it telescopes out 36" these will be perfect. The fridge weighs 75lbs. So im assuming with it fully loaded i shouldn't be carrying anymore then 125 max. So this heavy duty slide will kinda be overkill but at least i know it will get the job done with no problem.
Here is the fridge/freezer that i am gonna buy eventually. Im building this particular compartment specifically to the dimensions of this fridge
https://www.amazon.com/Engel-Portabl.../dp/B001OTI7IS
Here's an amazing presentation of the same model i plan to buy.
So I bought the pair of sliders on Amazon for $115.95
Here is the link: https://www.amazon.com/Drawer-Slide-.../dp/B0009OBPH4
--------------------------------------------------------------------------------------
I am also looking into starting to set up the solar battery bank stuff so i ordered a few components for this as well.
These items were all bought at Home Depot online.
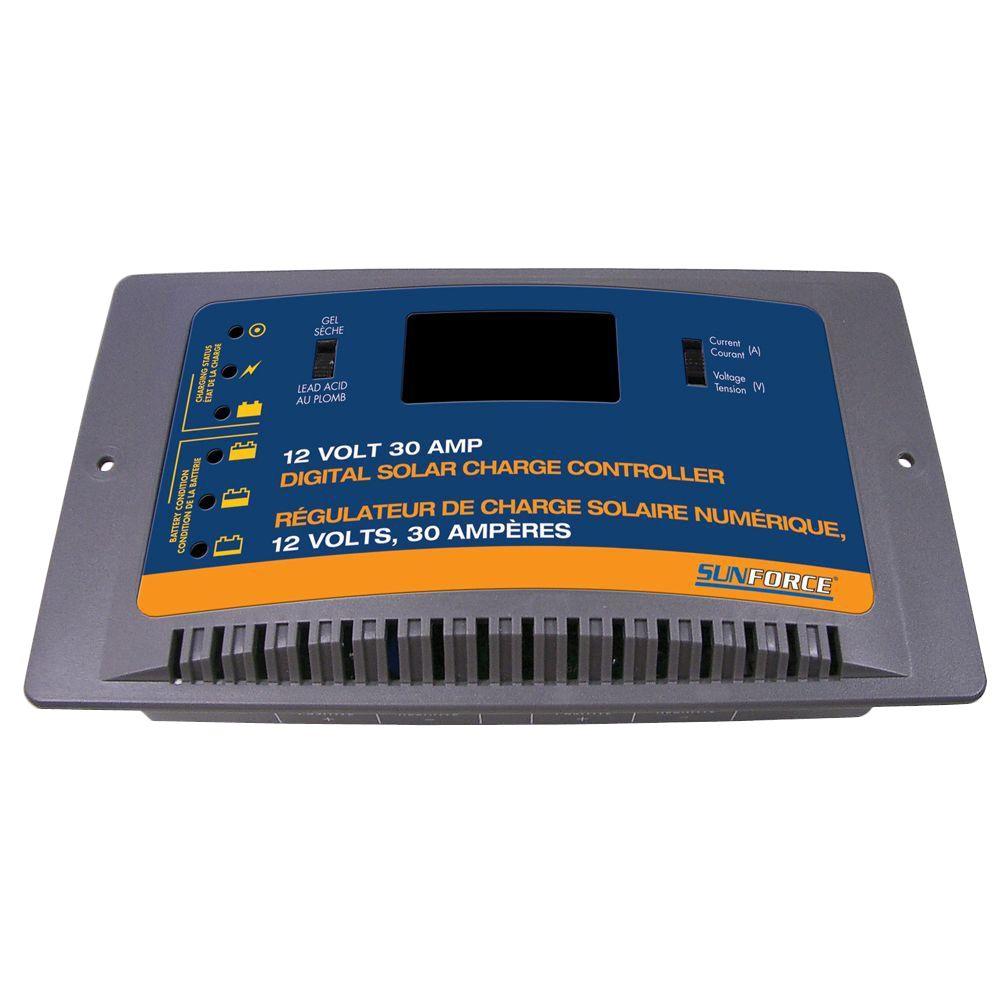
Here this is a 30amp SunForce Charge controller.
http://www.homedepot.com/p/Sunforce-...rl__W499921557
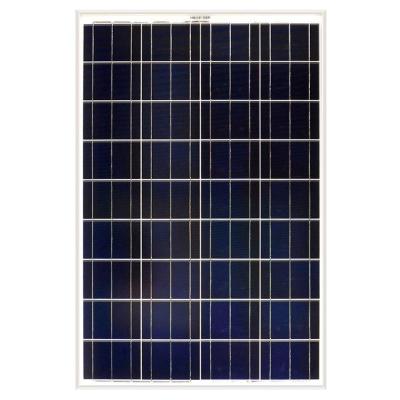
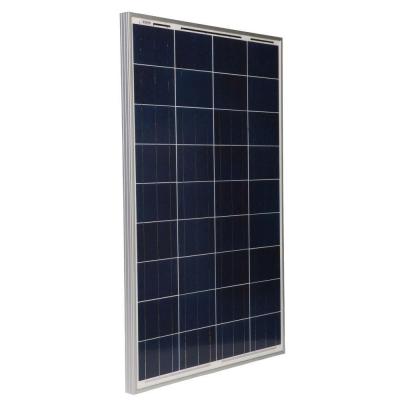
And to pair up with it i decided to go with a solar panel that best fits the overall roof of the small front compartment. There will be a slight overhang of about 4 inches on the front side of the trailer but the width was the perfect size. The roof of my front compartment measures (45"x22.5") and the solar panel measures (40.16 x 26.37 in)
The 100watt Polycrystalline Solar Panel is made by Grape Solar. It produces
5.56 amps, 100watts, 18volts
http://www.homedepot.com/p/Grape-Sol...rl__W499921557
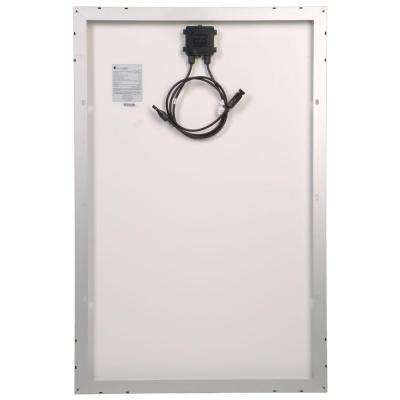
I also bought the mounting hardware for the solar panel which costed about 15 bucks. http://www.homedepot.com/p/Grape-Sol...Fab1/205481382
In total i spent about $245 for these 3 products. I cant wait for them to all come in. I still have to look into battery banks. So far what i have learned from youtube and online websites is that if i do not plan to start an engine or generator like people have on RV Mobilehomes that the best choice would be to use two 6volt golf cart batteries in series. The reason for going this route is that you do not need Cold Cranking amps in a trailer build like this. All you need is the ability to drain your battery alot without damaging the battery. Something that will last very long. And from what i have read and researched 12v deep cycle batteries are not ideal for this unless you are running them on an actual vehicle or need them to actually start up a generator. Please correct me if i am wrong. I have not bought my batteries just yet for lack of funds but i am still open to suggestions.
So far i am stuck in between buying two 6v acid gold cart batteries or going with two 6v optima deep cycle batteries. I have had a tremendously great experience running both Optima red top and yellow top batteries in my offroad rig. With the large amount of demand for power that my vehicle has to run my offroad lights, 8000 Smittybilt Winch, and 1500watt sound system these batteries have never left me stranded ever! I love these batteries for many reasons. Mainly because they handle everything i can throw at them, but also because they are highly vibration resistant and because they are completely encapsulated meaning they are also leak proof! and that is something i definitely need on my rock crawling trips when my truck gets banged up left and right. Im sure i would need something of similar quality for my trailer. I went through 2 acid batteries before finally making the switch and i love them. But i love them for vehicles. I have no idea what the quality is like in their 6v versions.
Here are the specs to the optima 6v Batteries. Yet for the price i wonder if the 12v would be better. lol I'M SO CONFUSED!
http://www.optimabatteries.com/en-us...rting-battery/
-------------------------------------------------------------------------------------
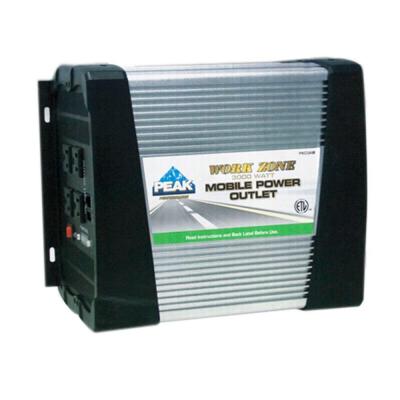
On a side note i realize i need a power inverter if i plan to run my stuff. Luckily for me i already own one that i usually use on my wheeling trips with my small 2gallon Husky Air compressor when airing my tires back up on the trail. I have a Peak brand 3000watt power inverter (6000watt peak watts) i bought this about 1 year ago and i love it! starts up my compressor every time! So i figure rather then buy a small one to just use this one instead and permanently mount it into the trailer.
http://www.homedepot.com/p/PEAK-3000...C1AW/203681140
-------------------------------------------------------------------------------------
Thats all for now guys. Hoping to get these items soon so i can continue this build!
Here is the fridge/freezer that i am gonna buy eventually. Im building this particular compartment specifically to the dimensions of this fridge
https://www.amazon.com/Engel-Portabl.../dp/B001OTI7IS
Here's an amazing presentation of the same model i plan to buy.
So I bought the pair of sliders on Amazon for $115.95
Here is the link: https://www.amazon.com/Drawer-Slide-.../dp/B0009OBPH4


--------------------------------------------------------------------------------------
I am also looking into starting to set up the solar battery bank stuff so i ordered a few components for this as well.
These items were all bought at Home Depot online.
Here this is a 30amp SunForce Charge controller.
http://www.homedepot.com/p/Sunforce-...rl__W499921557

And to pair up with it i decided to go with a solar panel that best fits the overall roof of the small front compartment. There will be a slight overhang of about 4 inches on the front side of the trailer but the width was the perfect size. The roof of my front compartment measures (45"x22.5") and the solar panel measures (40.16 x 26.37 in)
The 100watt Polycrystalline Solar Panel is made by Grape Solar. It produces
5.56 amps, 100watts, 18volts
http://www.homedepot.com/p/Grape-Sol...rl__W499921557


I also bought the mounting hardware for the solar panel which costed about 15 bucks. http://www.homedepot.com/p/Grape-Sol...Fab1/205481382
In total i spent about $245 for these 3 products. I cant wait for them to all come in. I still have to look into battery banks. So far what i have learned from youtube and online websites is that if i do not plan to start an engine or generator like people have on RV Mobilehomes that the best choice would be to use two 6volt golf cart batteries in series. The reason for going this route is that you do not need Cold Cranking amps in a trailer build like this. All you need is the ability to drain your battery alot without damaging the battery. Something that will last very long. And from what i have read and researched 12v deep cycle batteries are not ideal for this unless you are running them on an actual vehicle or need them to actually start up a generator. Please correct me if i am wrong. I have not bought my batteries just yet for lack of funds but i am still open to suggestions.
So far i am stuck in between buying two 6v acid gold cart batteries or going with two 6v optima deep cycle batteries. I have had a tremendously great experience running both Optima red top and yellow top batteries in my offroad rig. With the large amount of demand for power that my vehicle has to run my offroad lights, 8000 Smittybilt Winch, and 1500watt sound system these batteries have never left me stranded ever! I love these batteries for many reasons. Mainly because they handle everything i can throw at them, but also because they are highly vibration resistant and because they are completely encapsulated meaning they are also leak proof! and that is something i definitely need on my rock crawling trips when my truck gets banged up left and right. Im sure i would need something of similar quality for my trailer. I went through 2 acid batteries before finally making the switch and i love them. But i love them for vehicles. I have no idea what the quality is like in their 6v versions.
Here are the specs to the optima 6v Batteries. Yet for the price i wonder if the 12v would be better. lol I'M SO CONFUSED!
http://www.optimabatteries.com/en-us...rting-battery/
-------------------------------------------------------------------------------------
On a side note i realize i need a power inverter if i plan to run my stuff. Luckily for me i already own one that i usually use on my wheeling trips with my small 2gallon Husky Air compressor when airing my tires back up on the trail. I have a Peak brand 3000watt power inverter (6000watt peak watts) i bought this about 1 year ago and i love it! starts up my compressor every time! So i figure rather then buy a small one to just use this one instead and permanently mount it into the trailer.
http://www.homedepot.com/p/PEAK-3000...C1AW/203681140

-------------------------------------------------------------------------------------
Thats all for now guys. Hoping to get these items soon so i can continue this build!
07-23-2016, 09:56 PM
#93
Registered User
Thread Starter
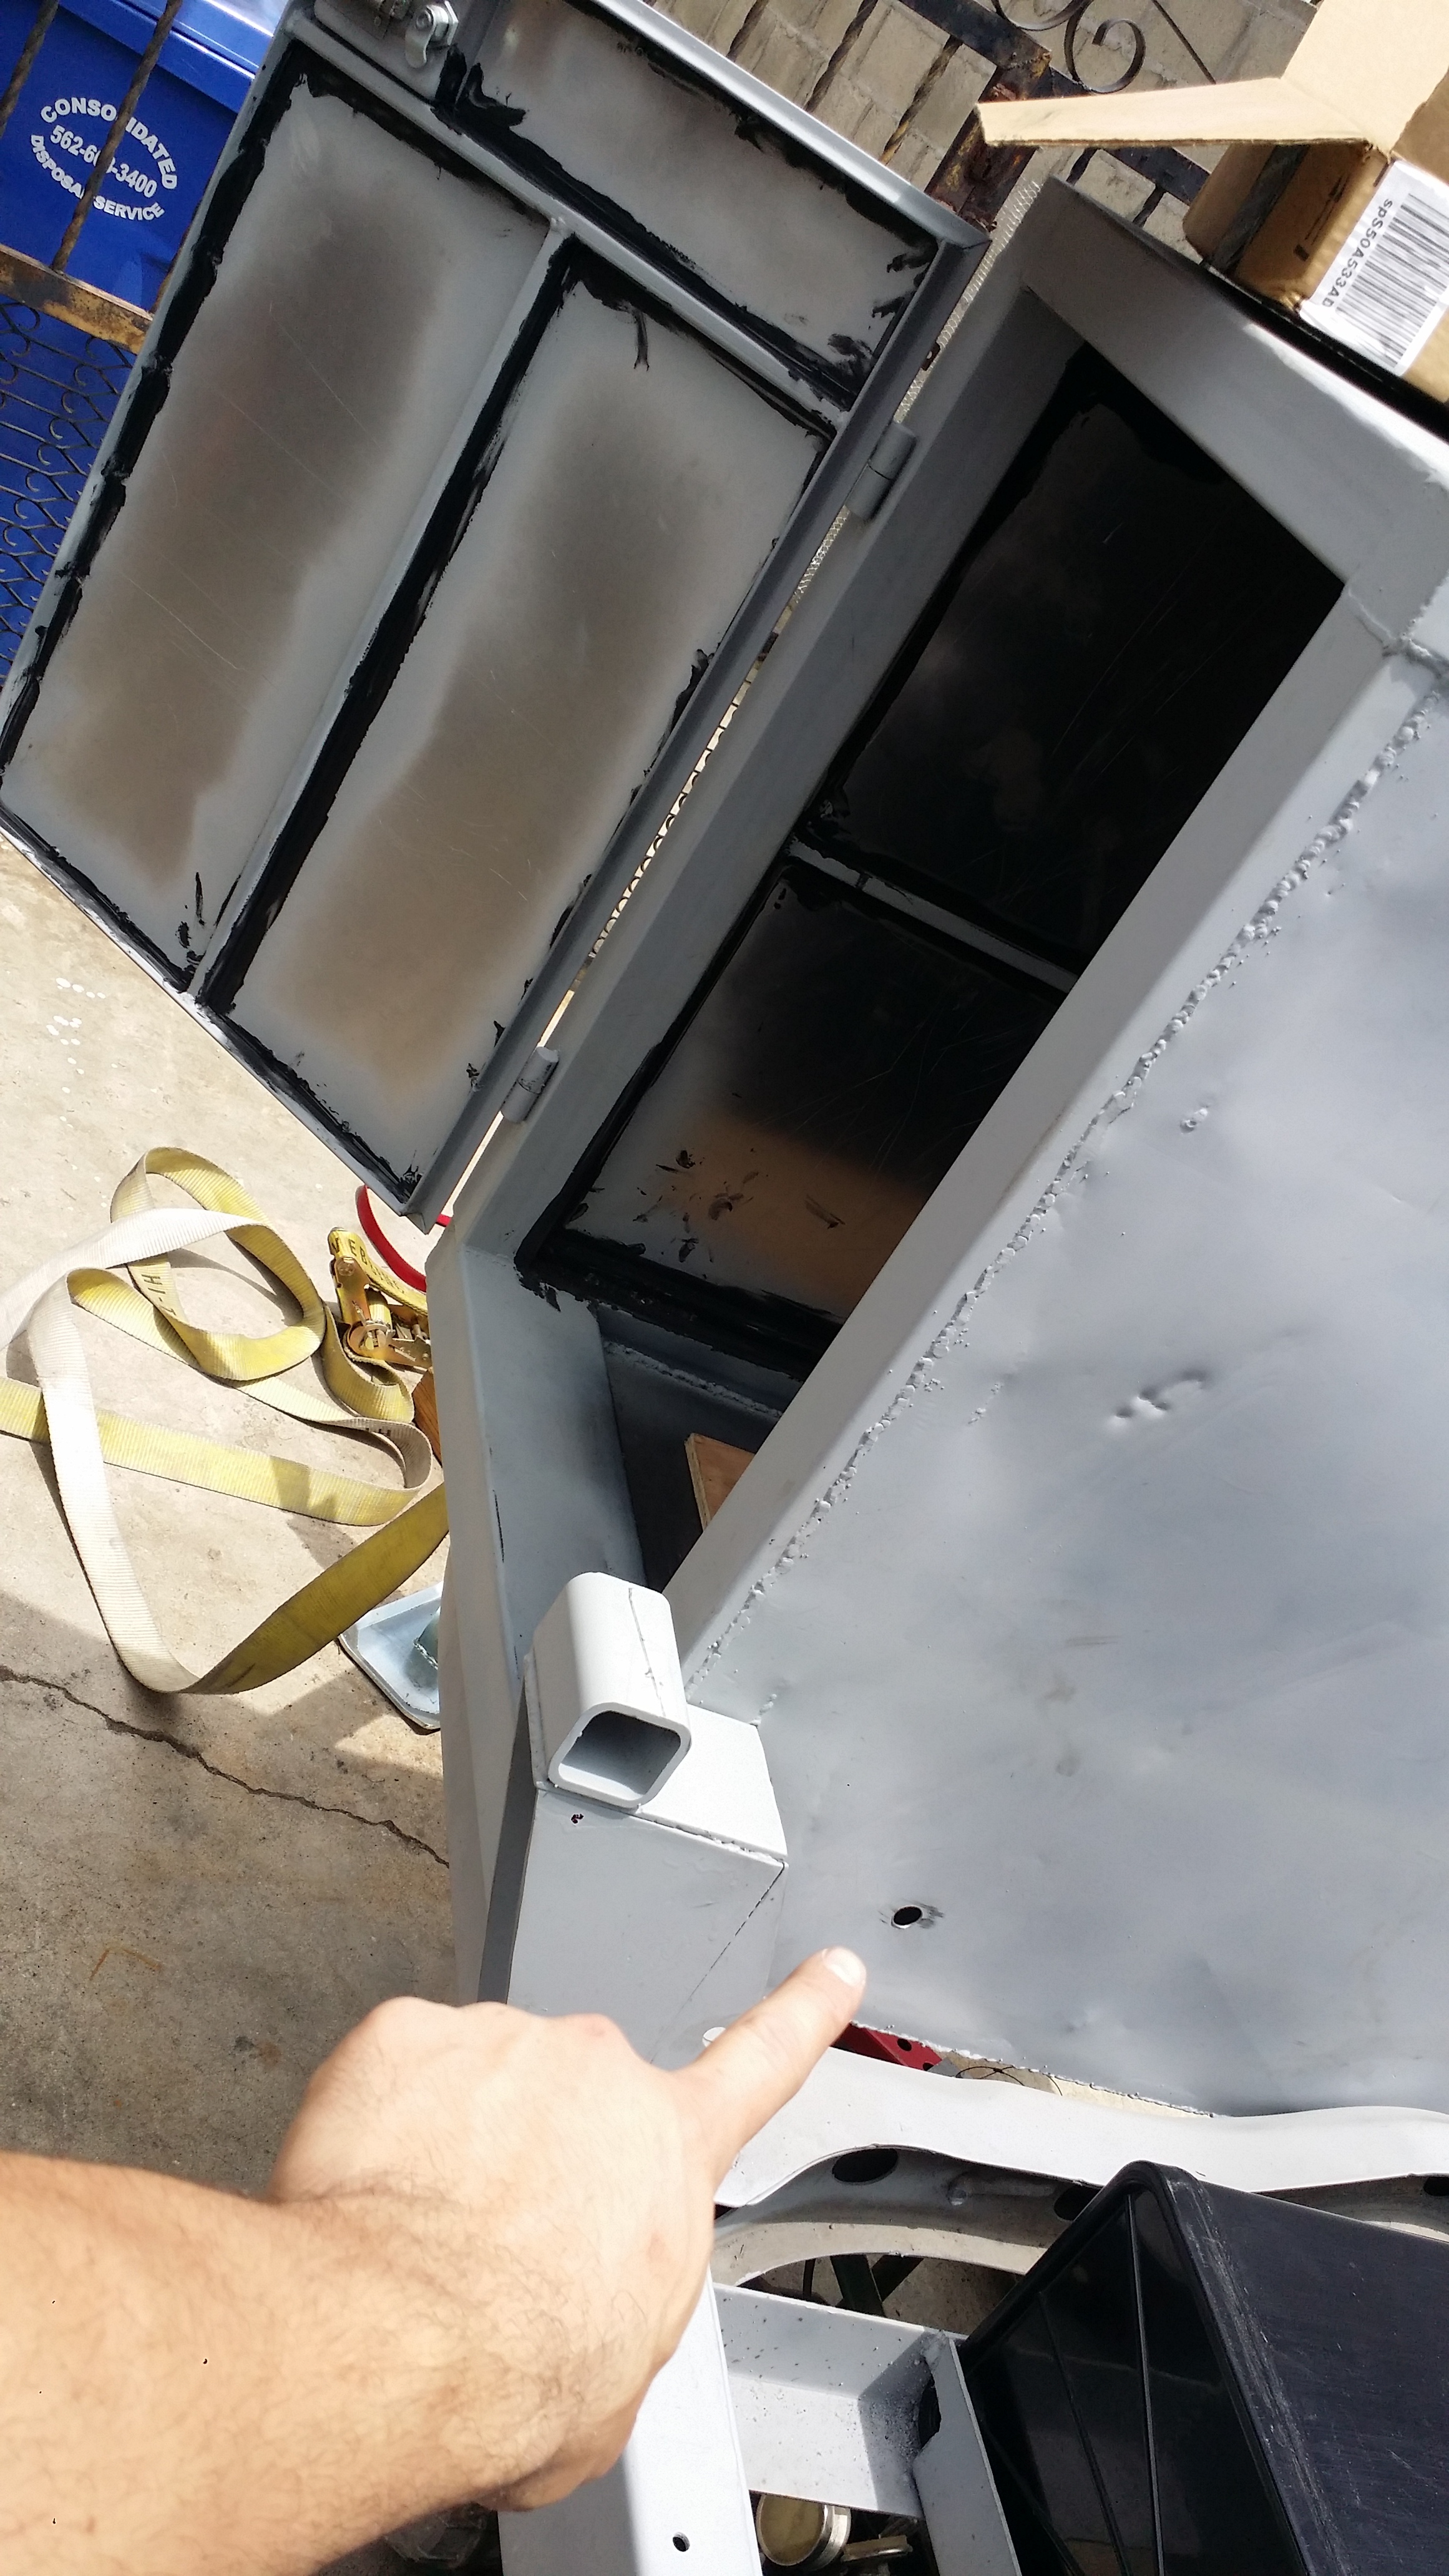
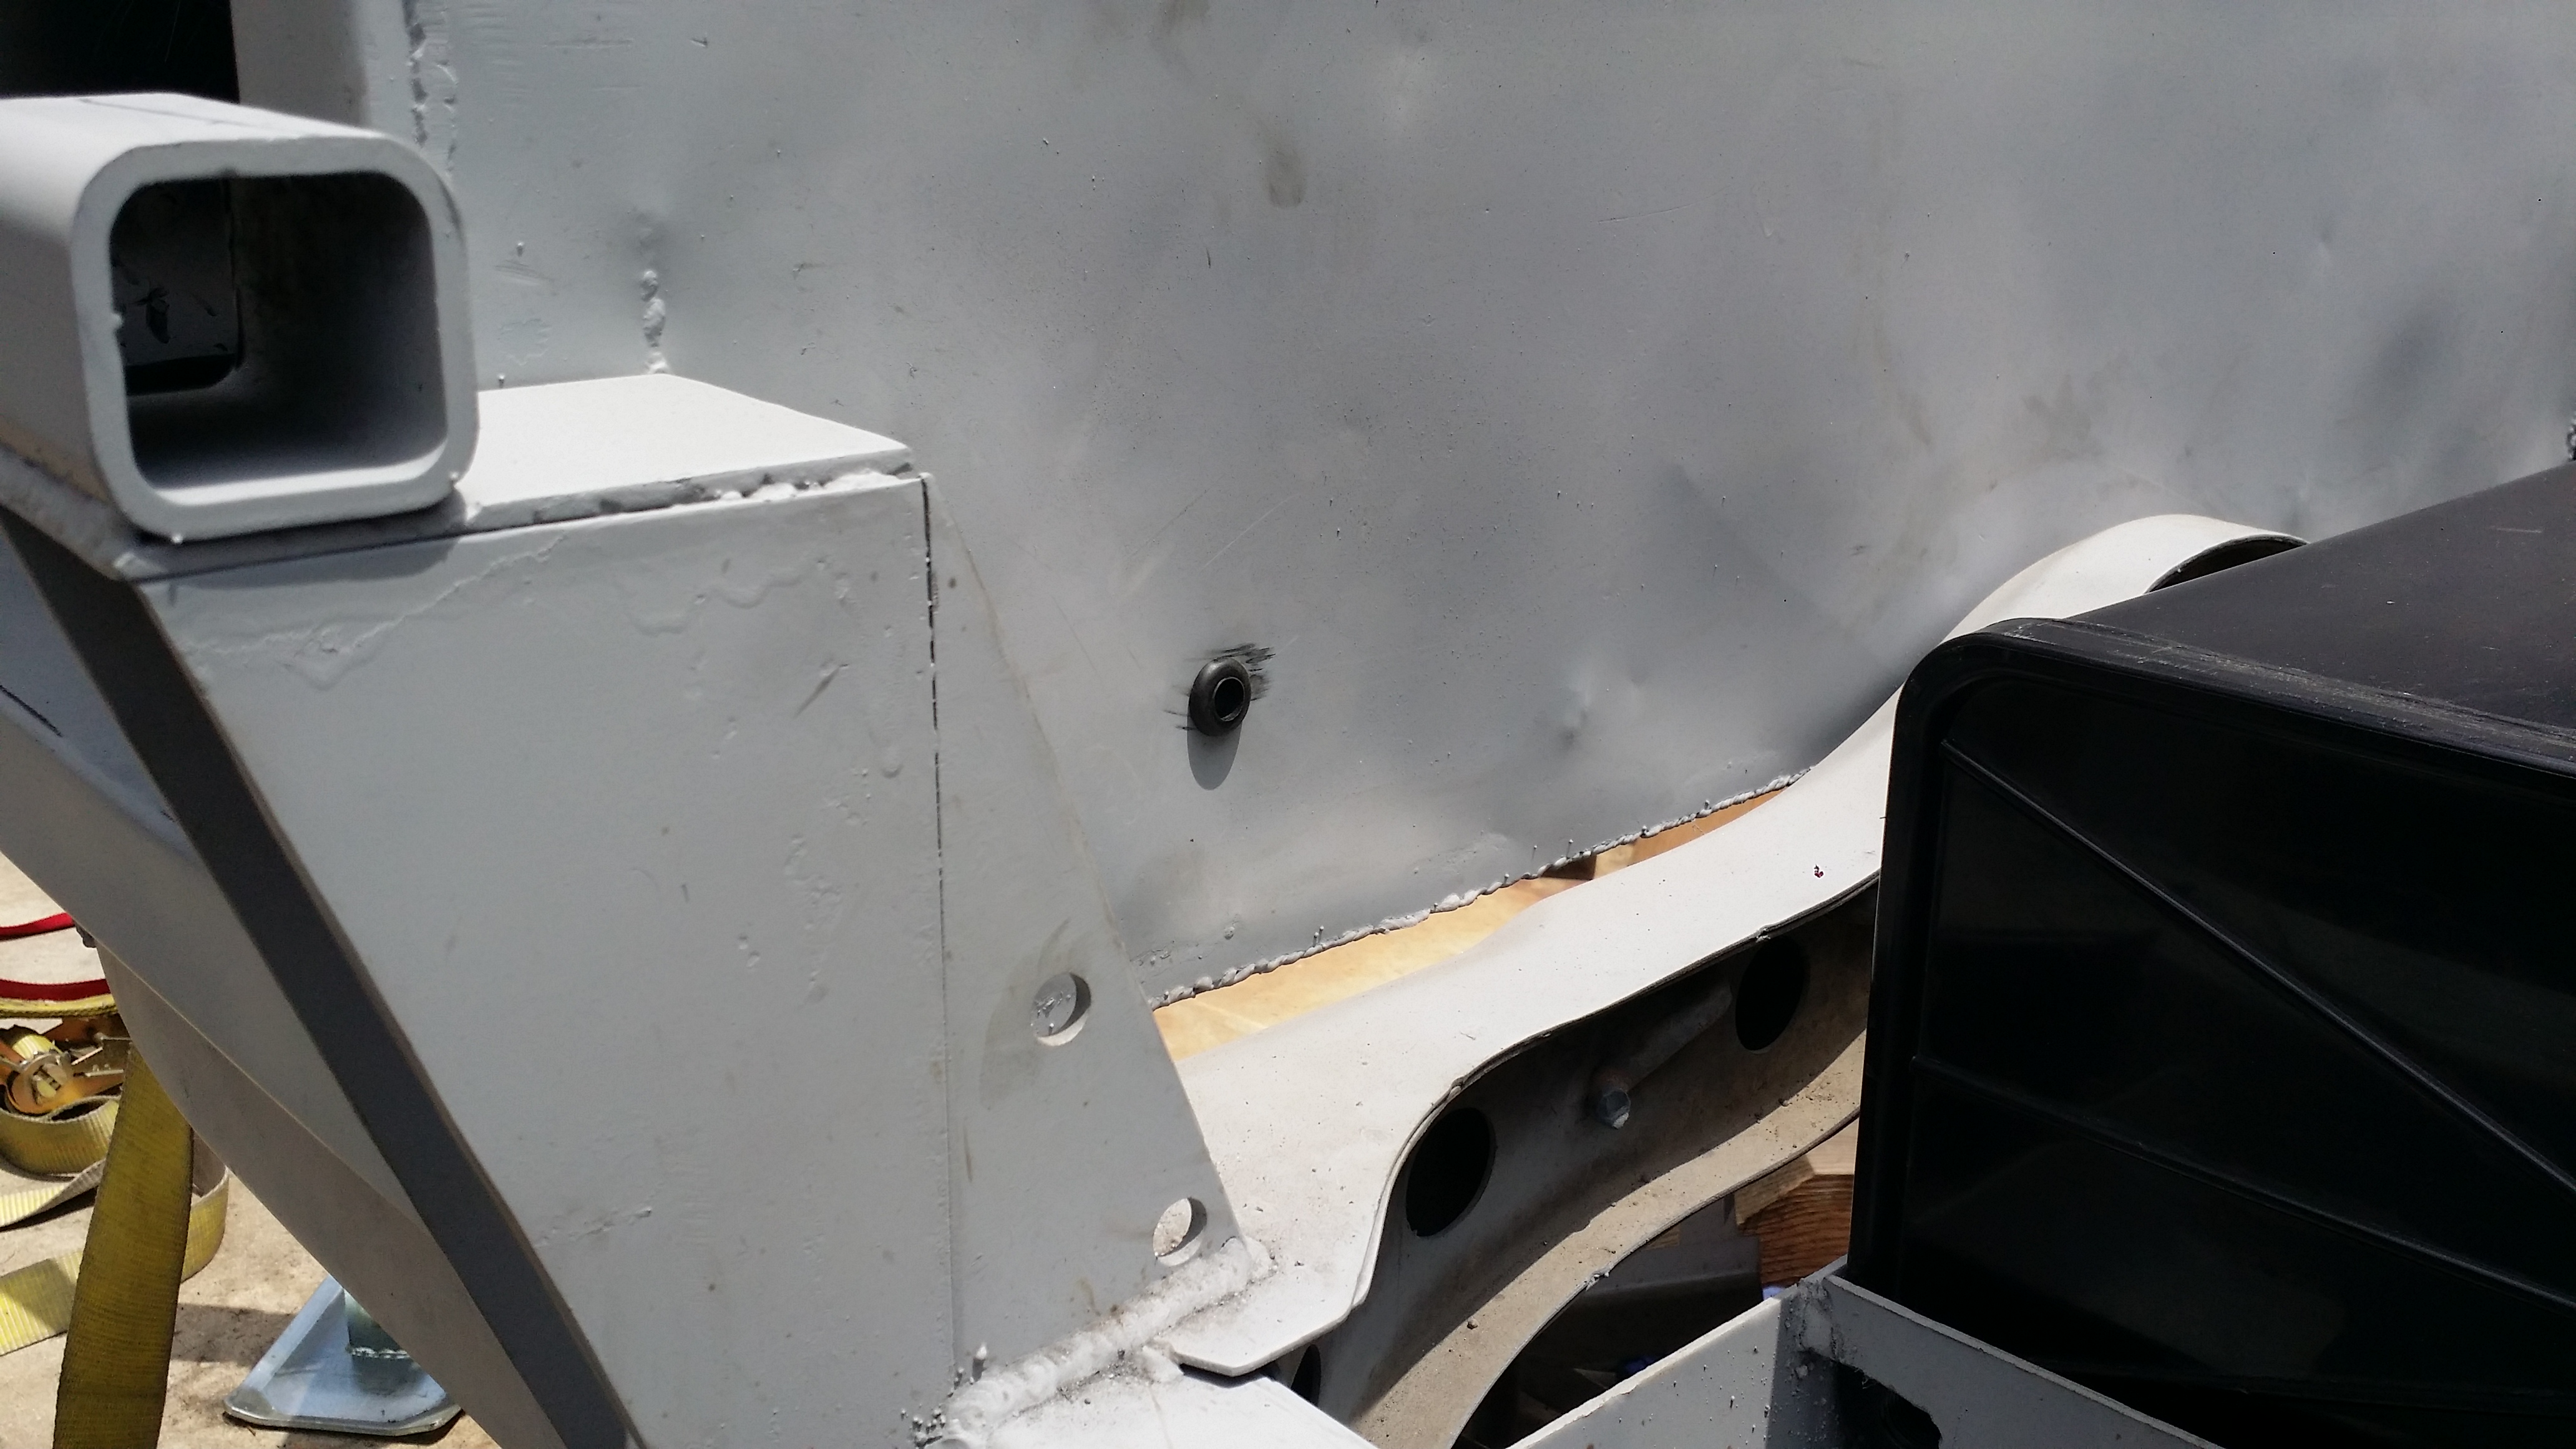
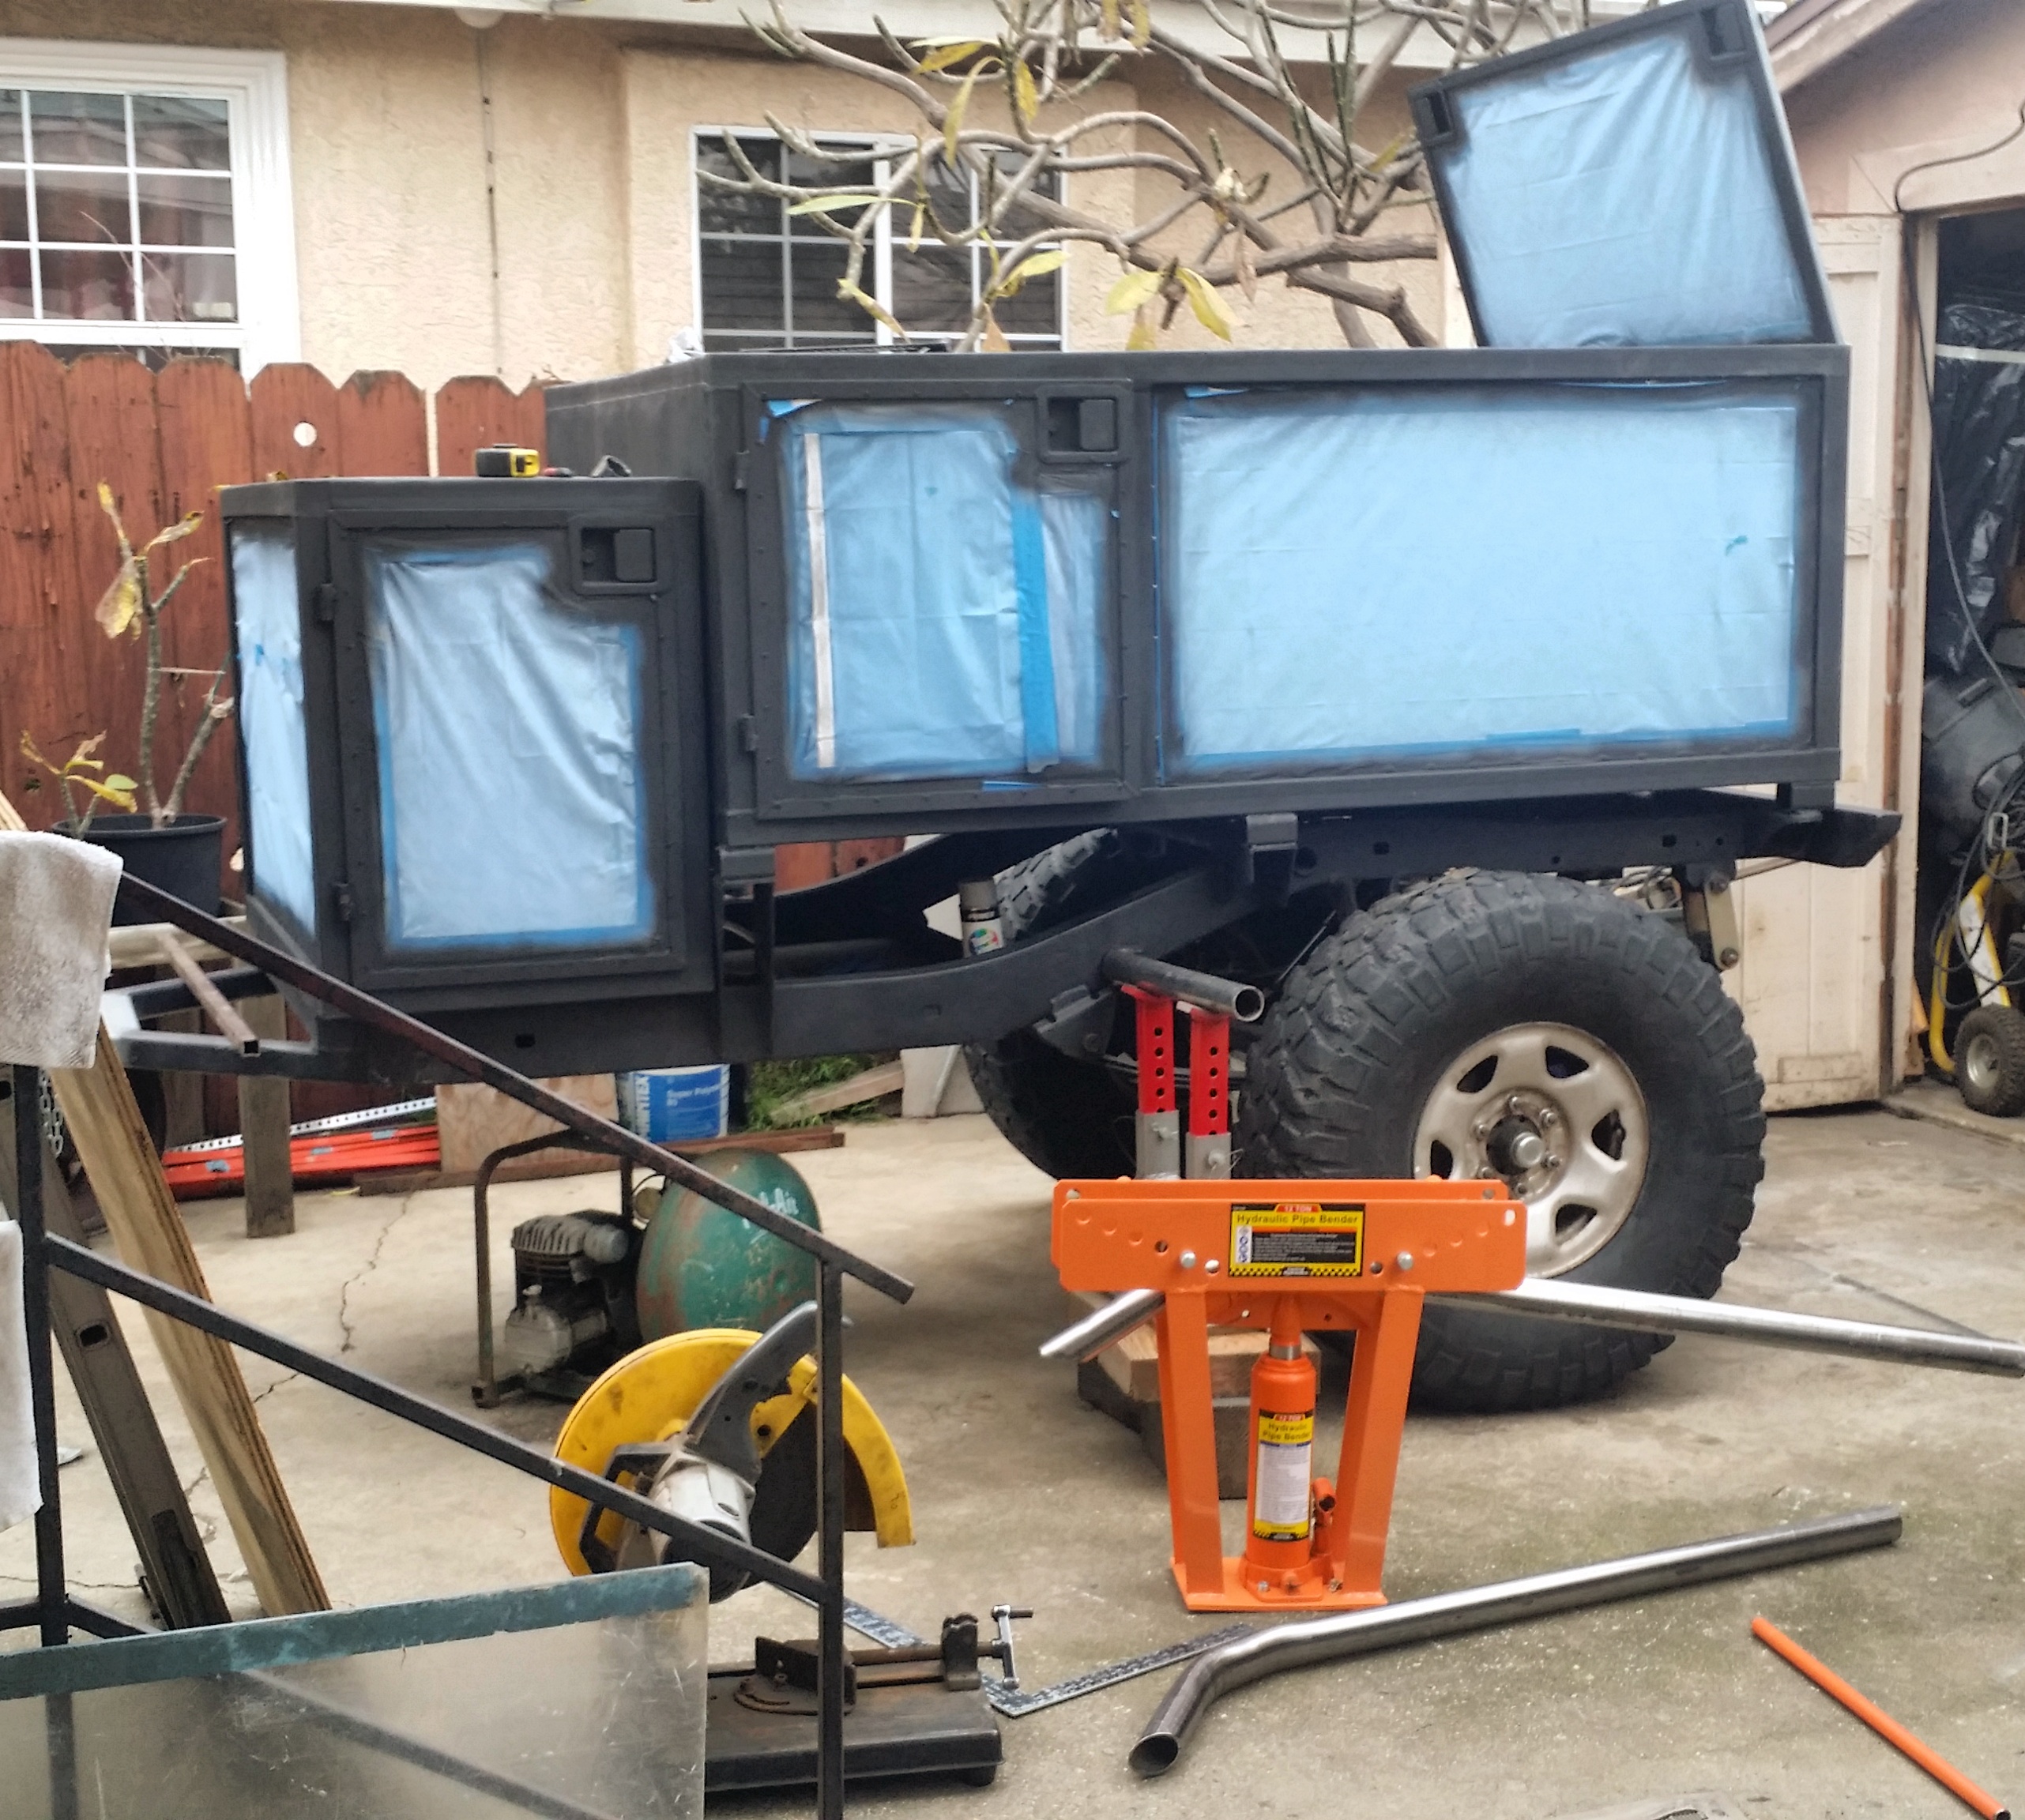
Finally got some work done to the trailer. I took off the rear compartment so I could weld on the front wall for it followed by primering the wall and undercarriage. While the conpartment was off I took the liberty of painting the entire frame matte black since it was already primed a few weeks back. Once the primer on the rear compartment dried on the wall I painted front wall and full undercarriage matte black to make the paint job final. Then I put it back on the trailer frame and welded it into place permanently. Now we're all set for some major progress. Painting and welding has by far been the most time consuming tasks to do on this project. Especially when welding with crappy Flux core wire. Soon it will be fully enclosed!

I'd like to give a shout out to my boy Renato from @all4offroad on Instagram for hooking me up with 9 pairs of flex rock lights for both my 4runner and my trailer build! He worked out a good deal for my girlfriend, Fabiola, who bought these for me for our 8 year anniversary together and he was nice enough to throw in his super bright Tactical LED light into the deal. Gotta tell ya I'm so appreciative of all of this right now.
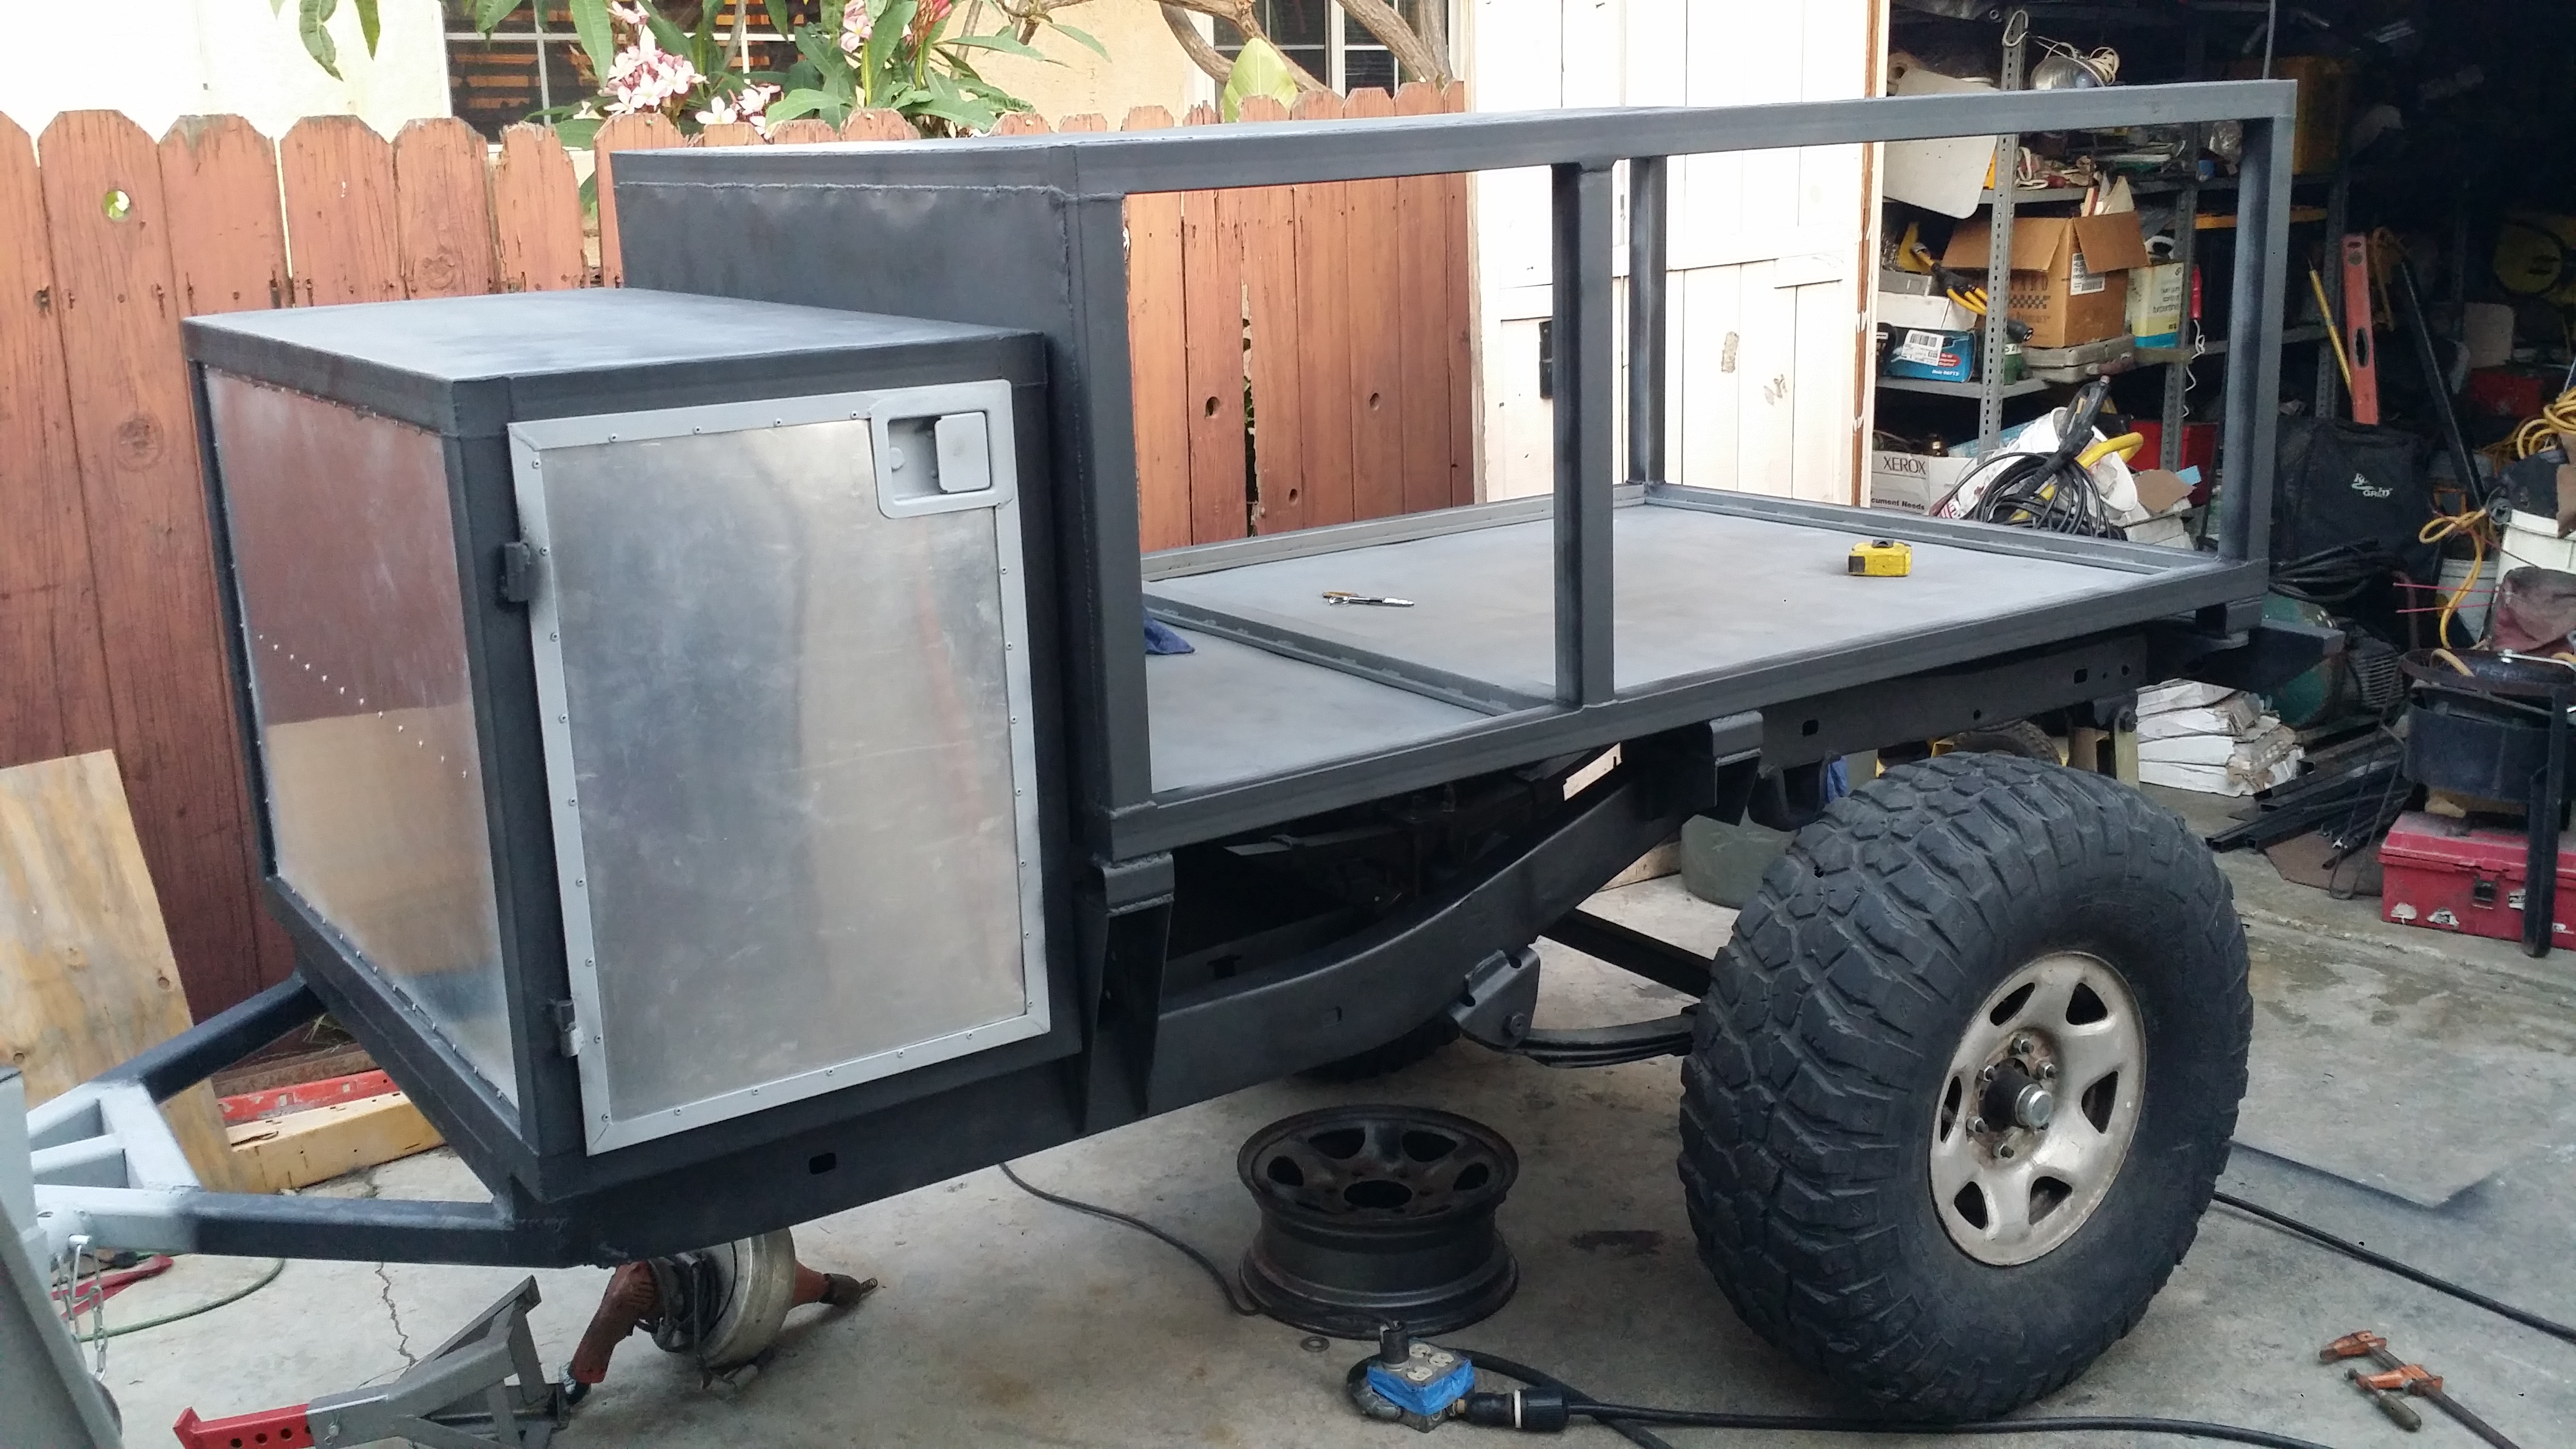
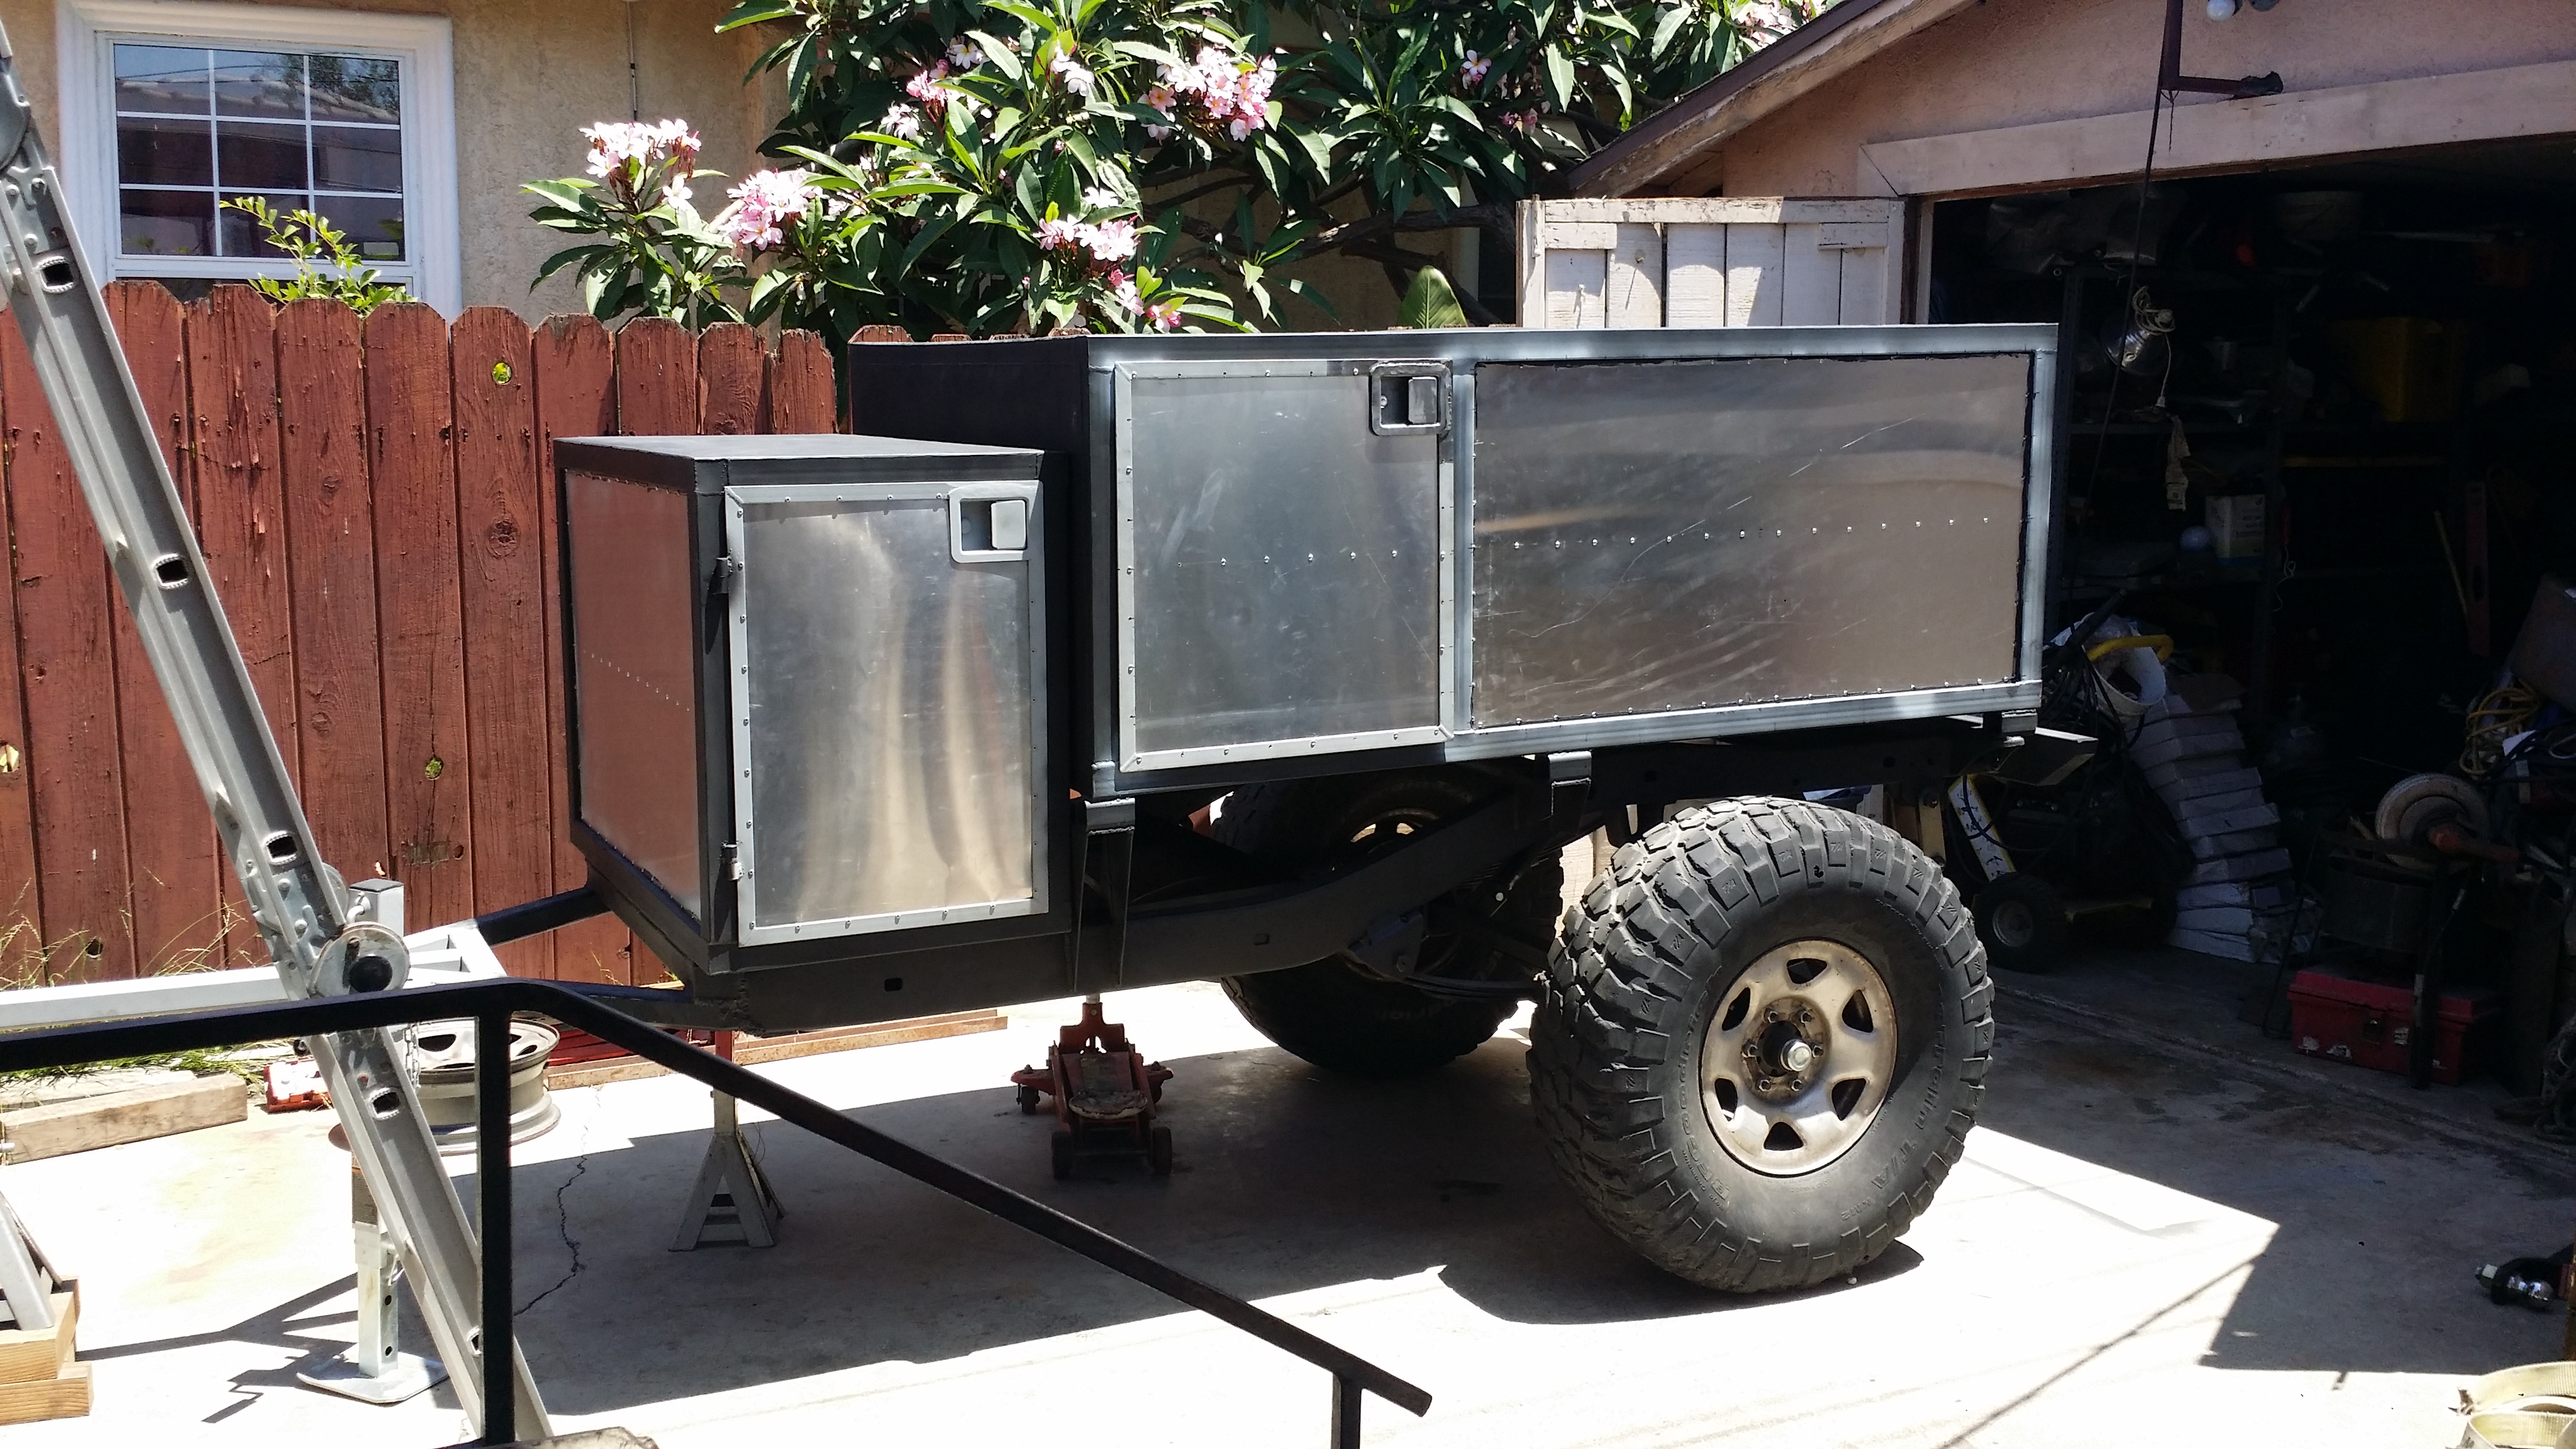
Here are the super heavy duty drawer slide for the 12v Engel Combi 60 Liter fridge/freezer that will be housed in the front of the rear compartment. These are rated to hold up to 500 pounds. Seems a bit overkill for a 75lb electric fridge. Even while all loaded up I'm sure it won't weigh any more than 125lbs. So I know these drawer slides will be more than sufficient to handle the weight of a loaded up fridge. They measure 36" long while closed, 3" tall, and 3/4" thick for each slide.

Dad and I working on the remaining 2 doors to the trailer. This one is gonna be the large rear 46"�24" door that will open upward toward the roof and be held open when small camper shell shocks.
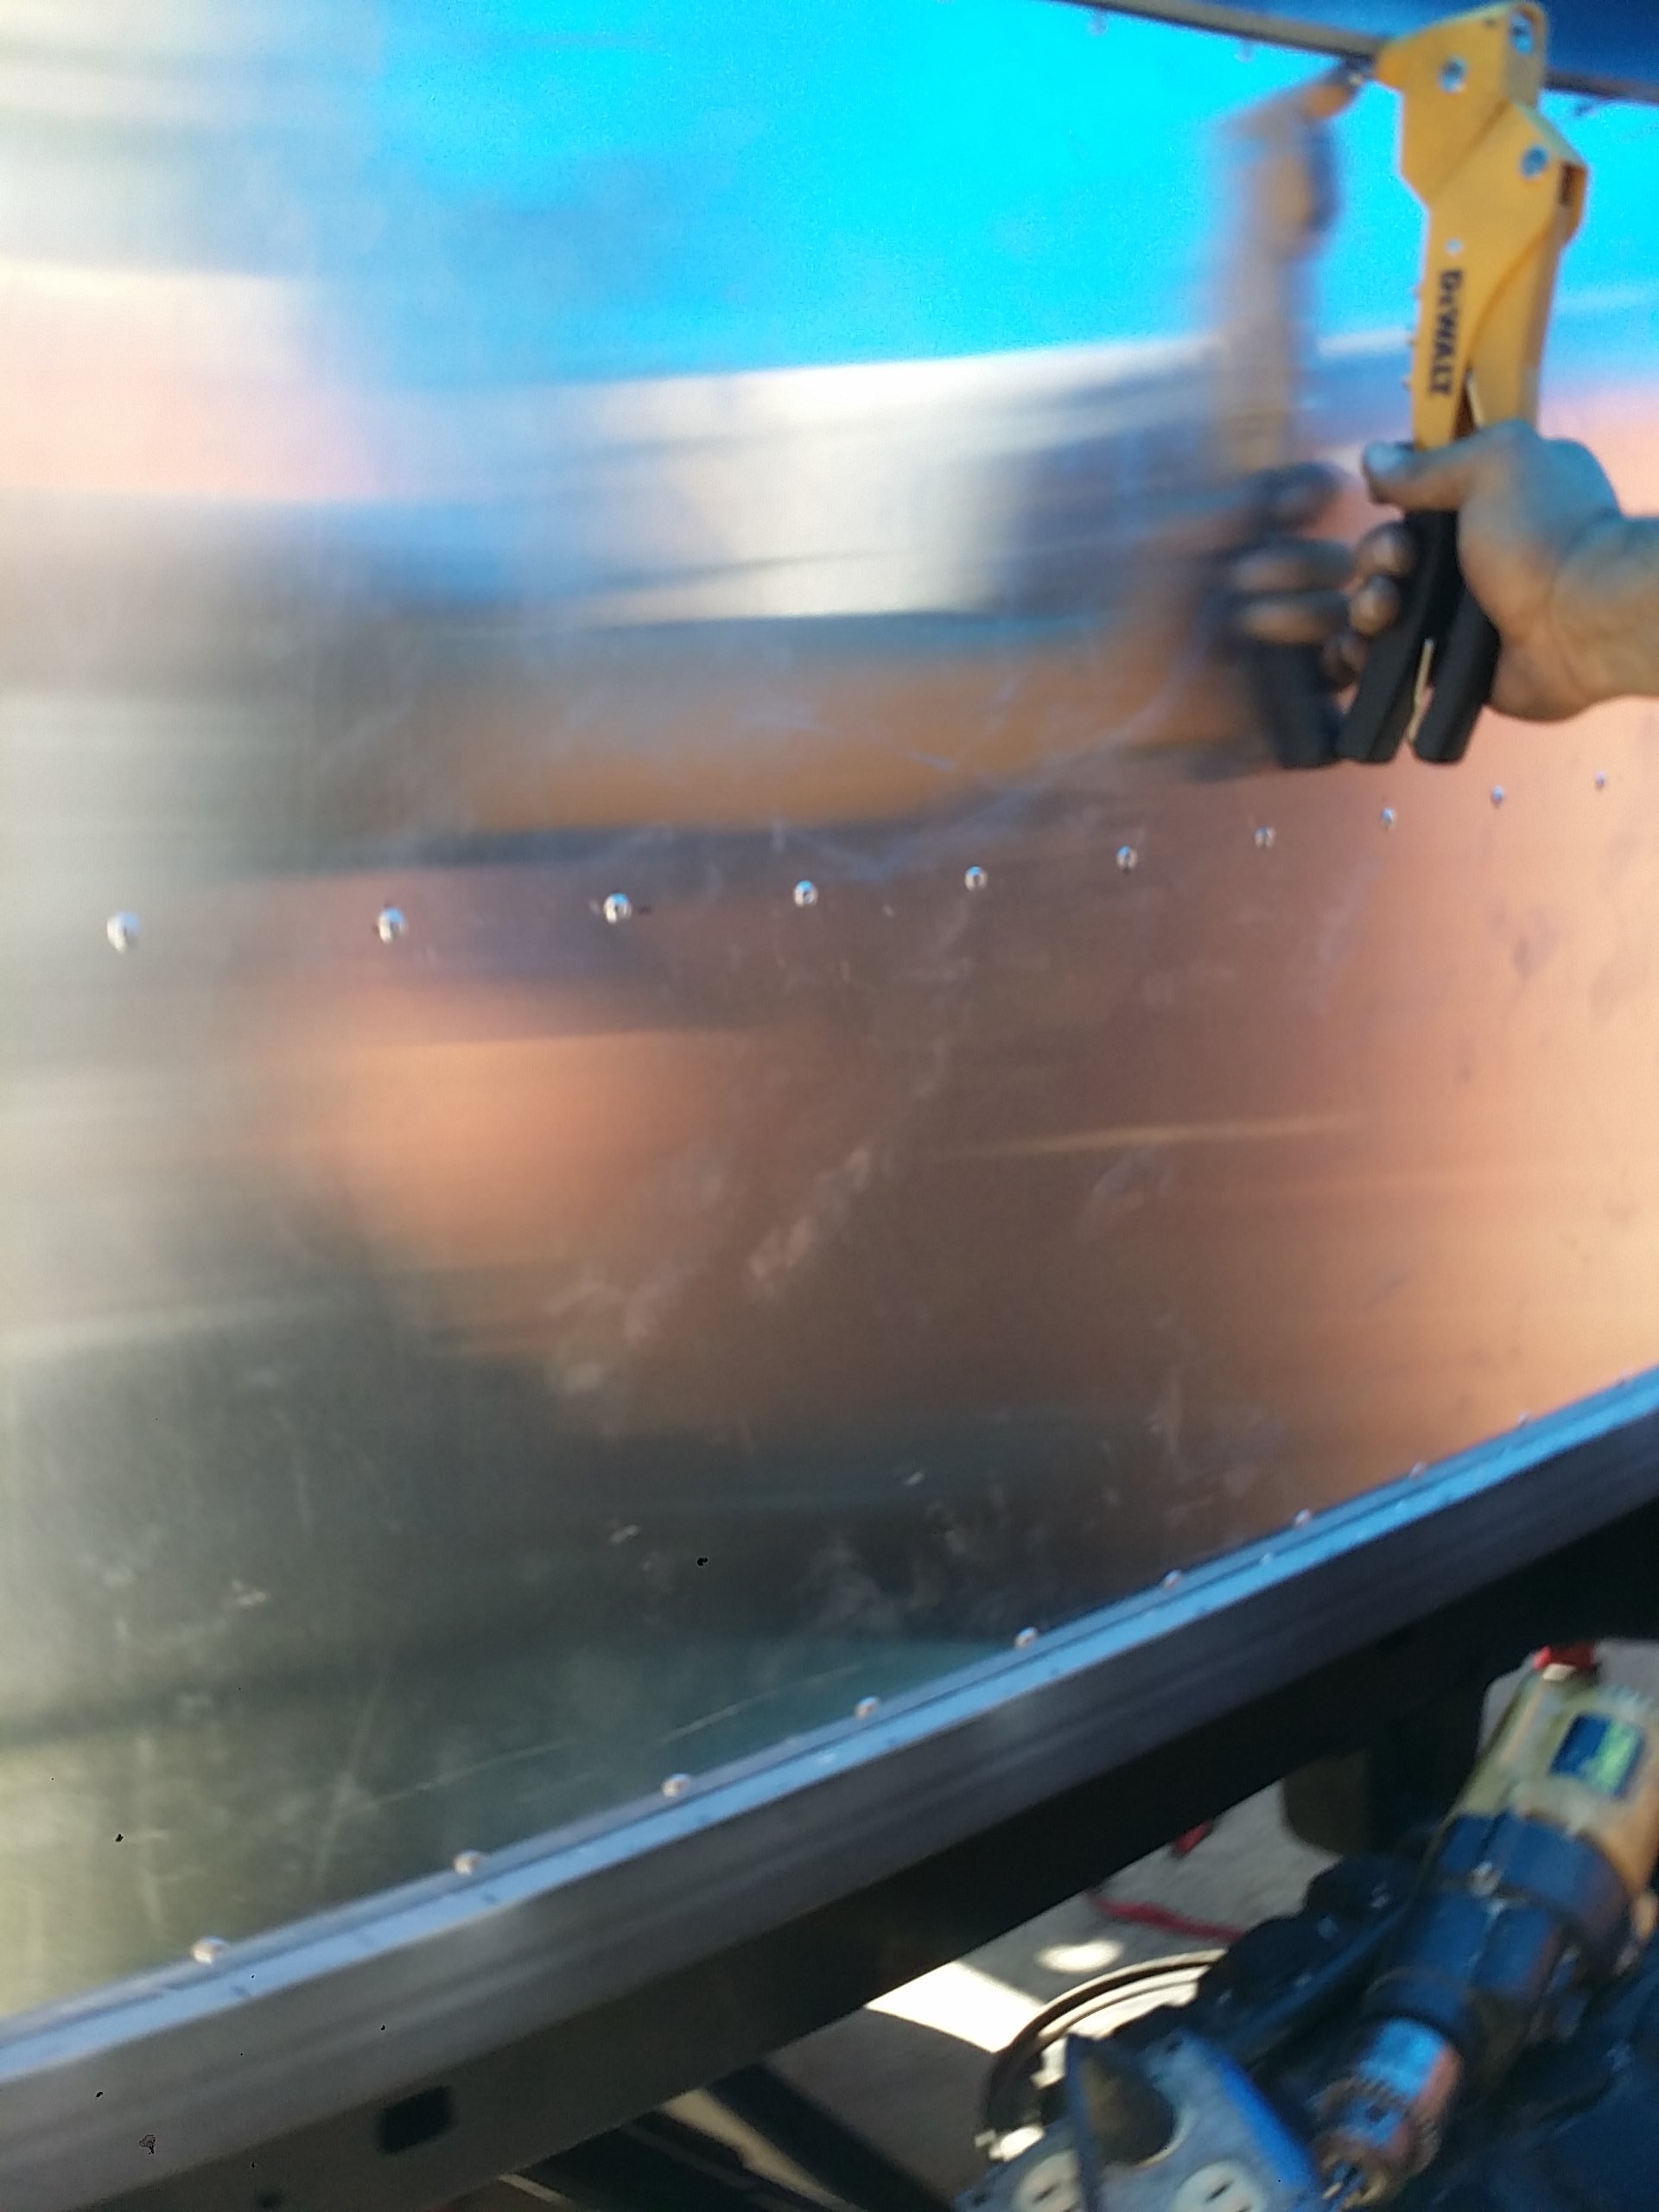
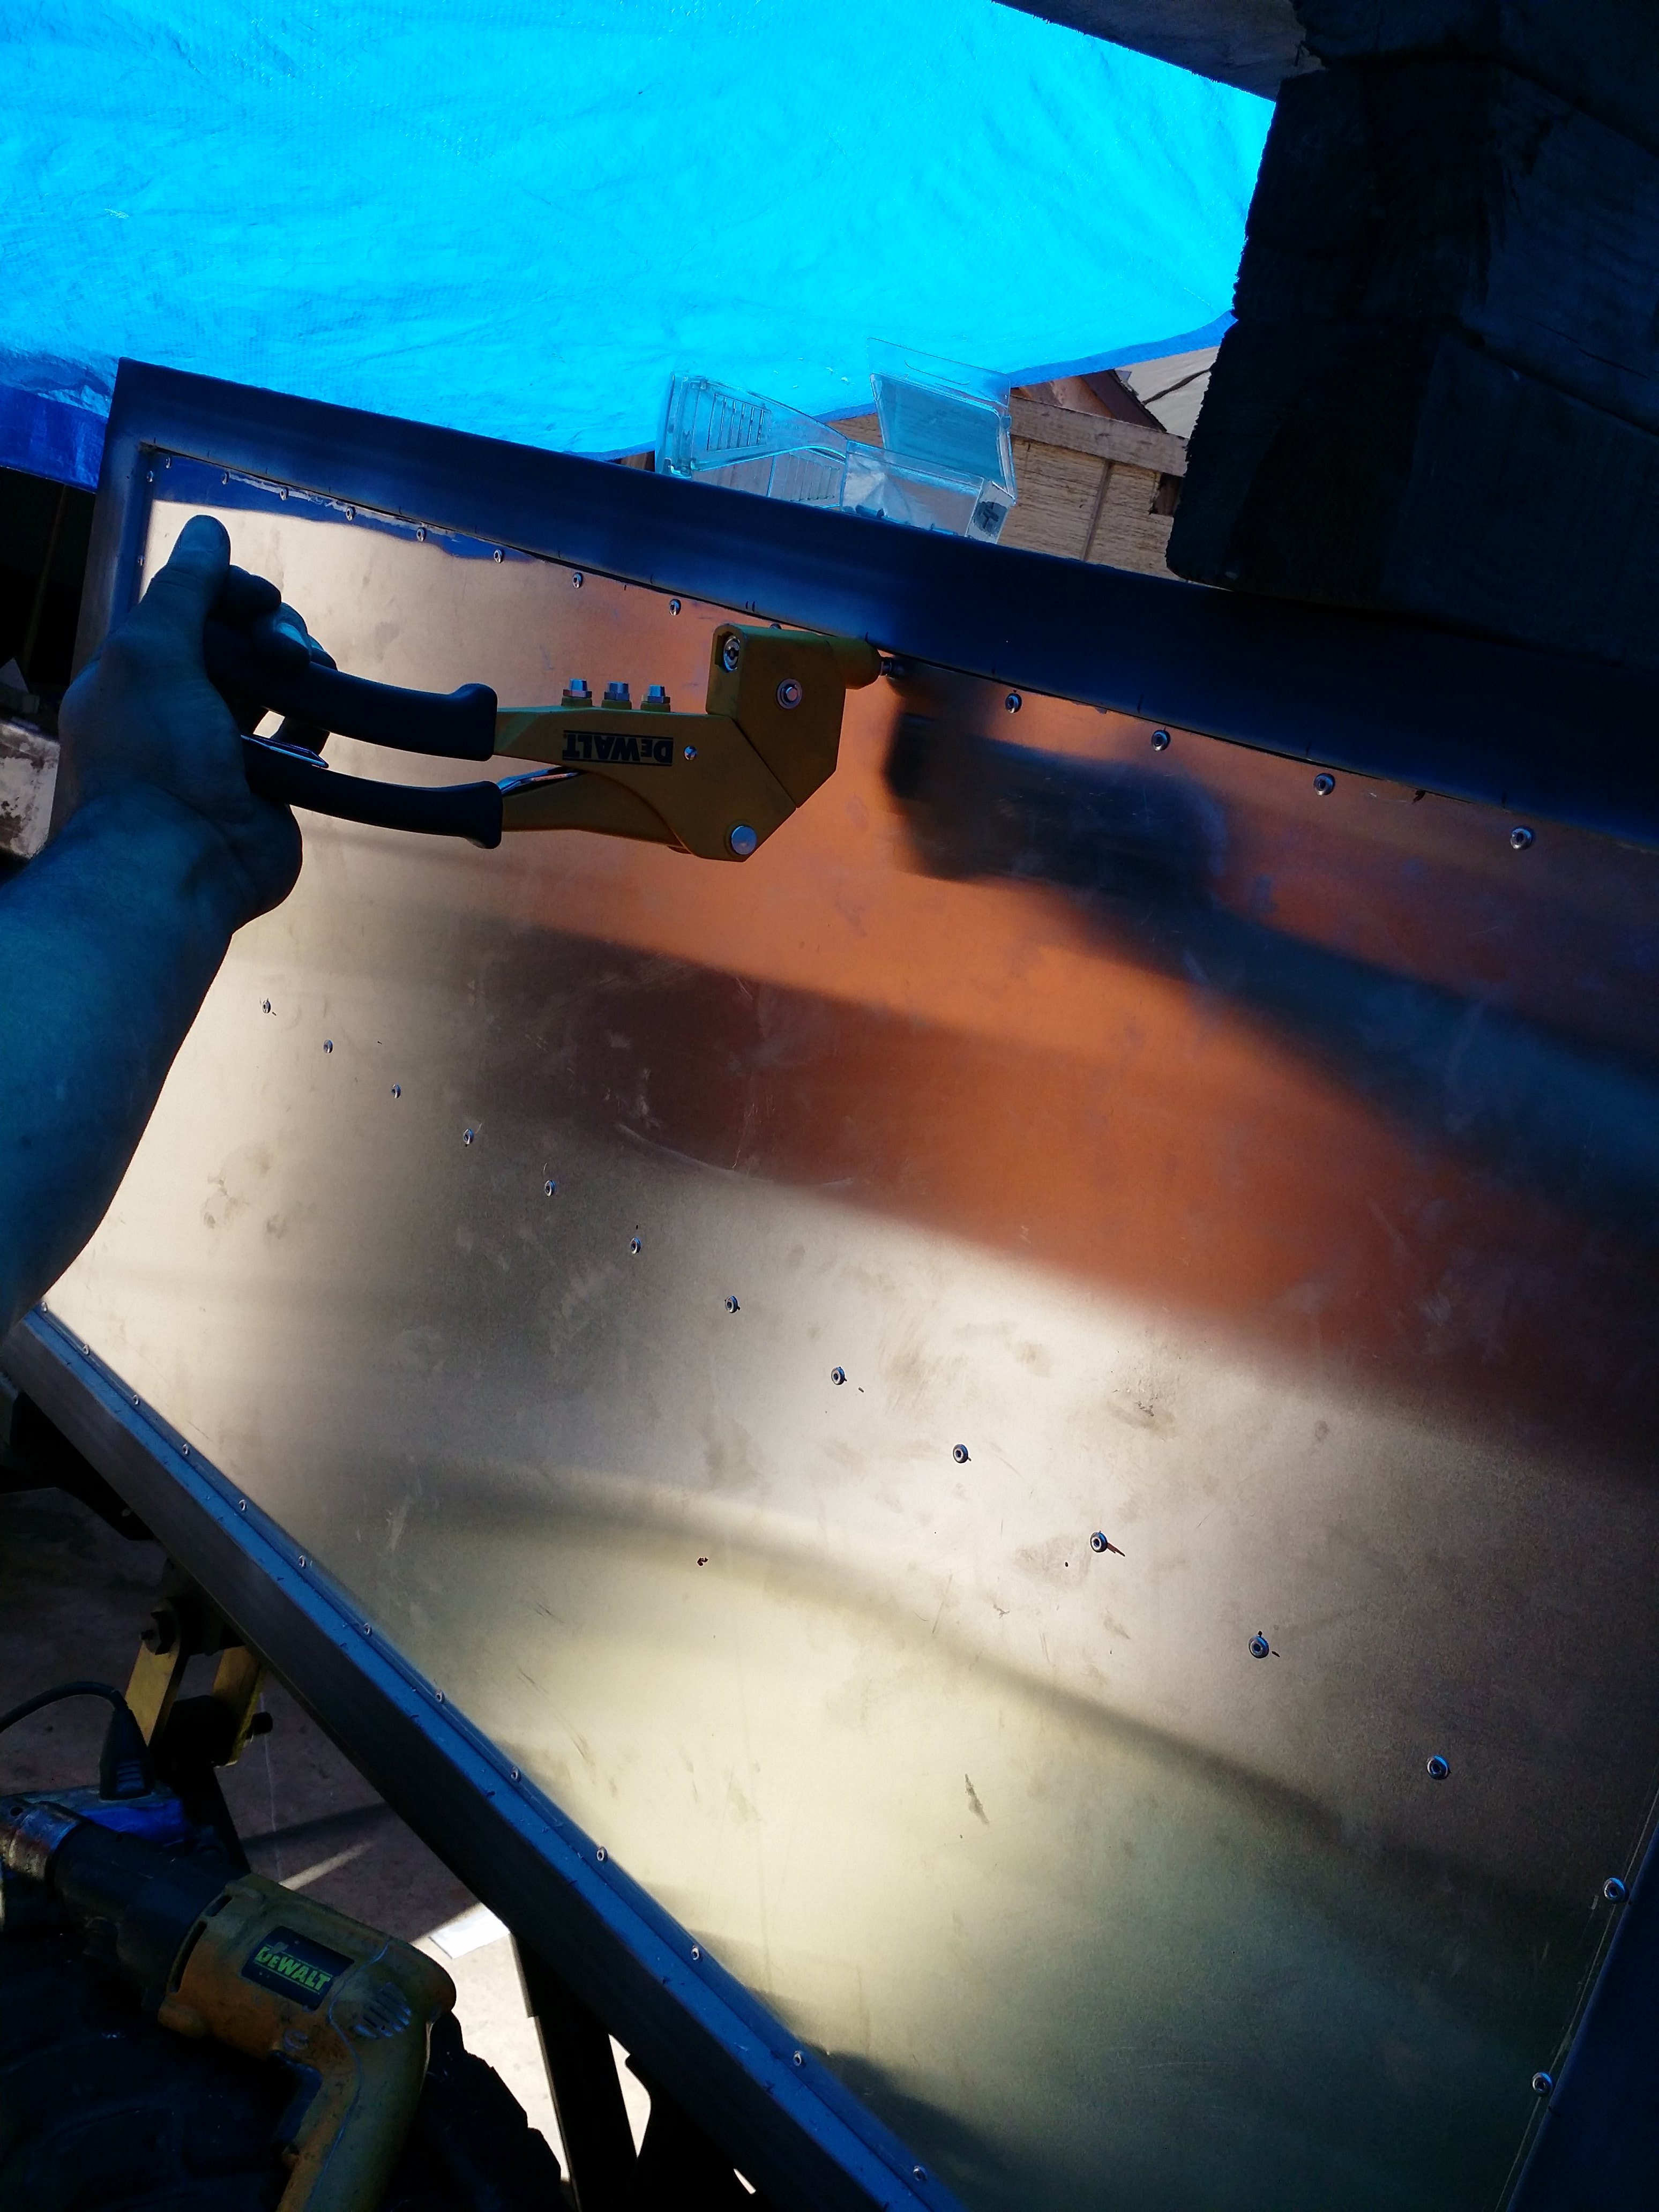
Took a break from the doors to weld on the skeleton or framing along the inner portion of the box that will hold up the rear driver side aluminum wall along with a center support to make it more sturdy but also keep the noise down when on the trail. The aluminium walls be held in place with 5/32" thick aluminum pop rivets just like the entire front compartment was made.
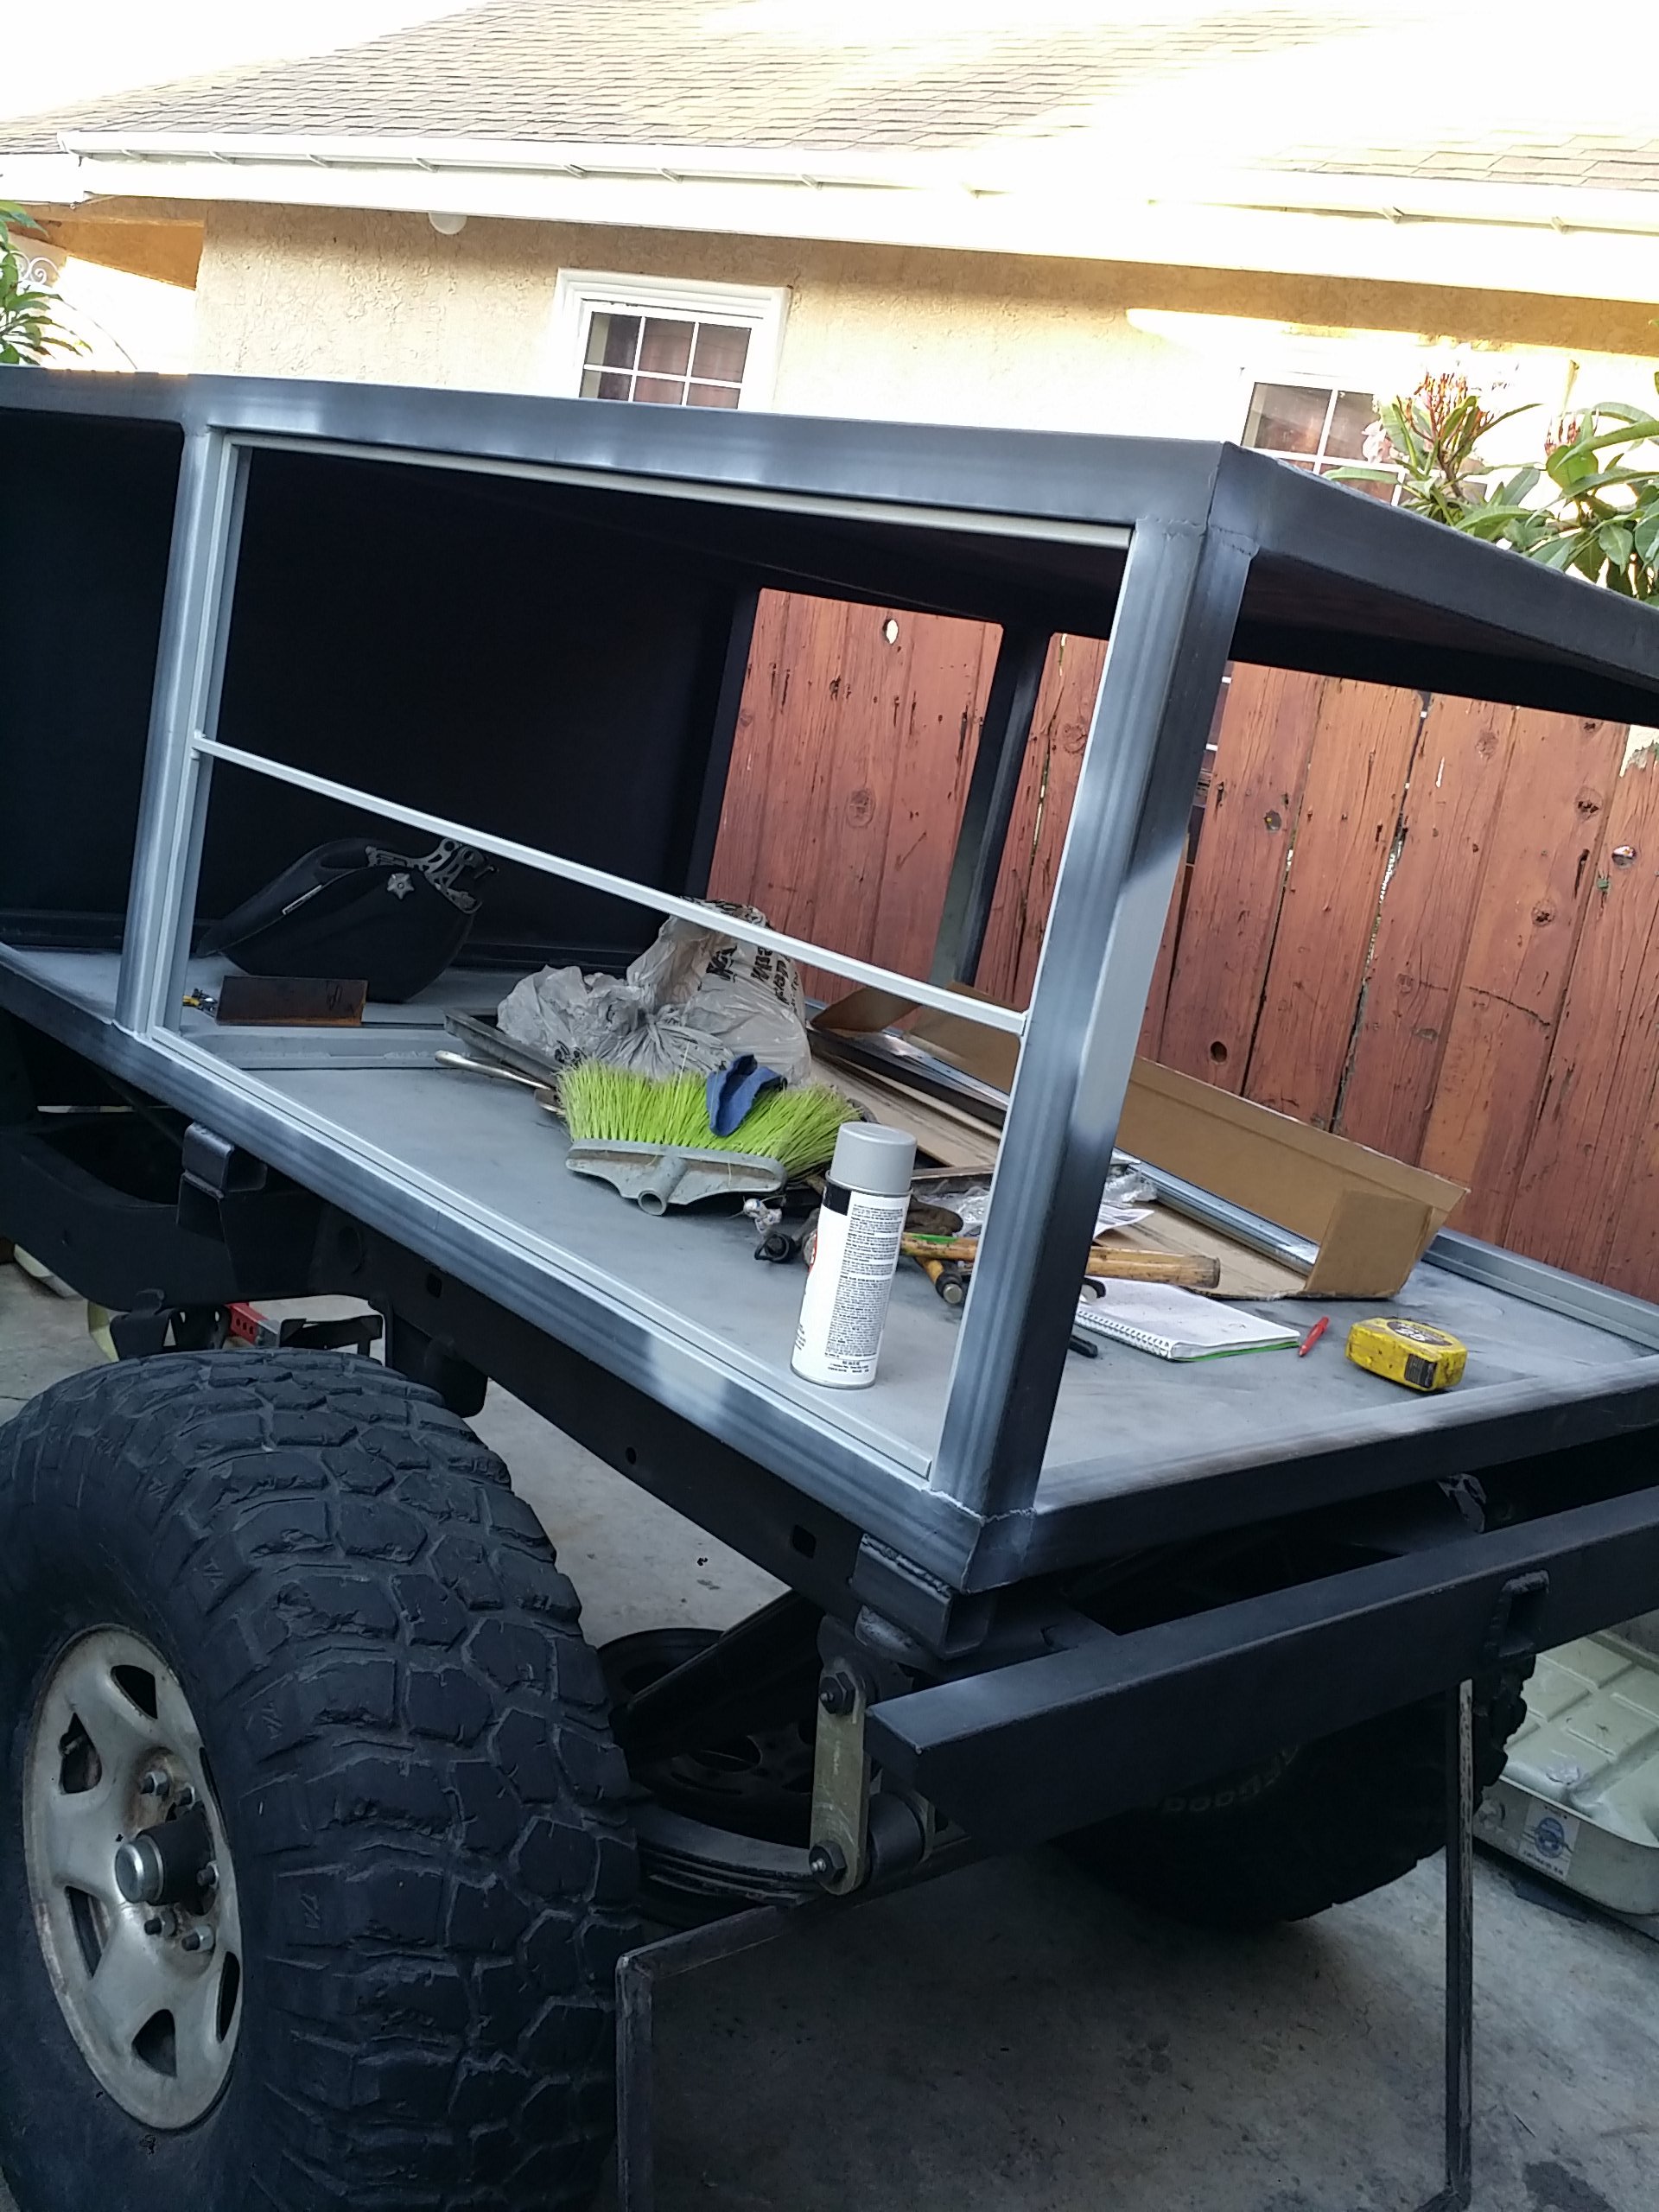
Here's the finished view of that driver side wall
Pop Rivets every 3 inches seem to be the perfect distance to look nice but also to hold the walls up well. and this articulating Dewalt pop rivet gun makes every angle a breeze to get to.
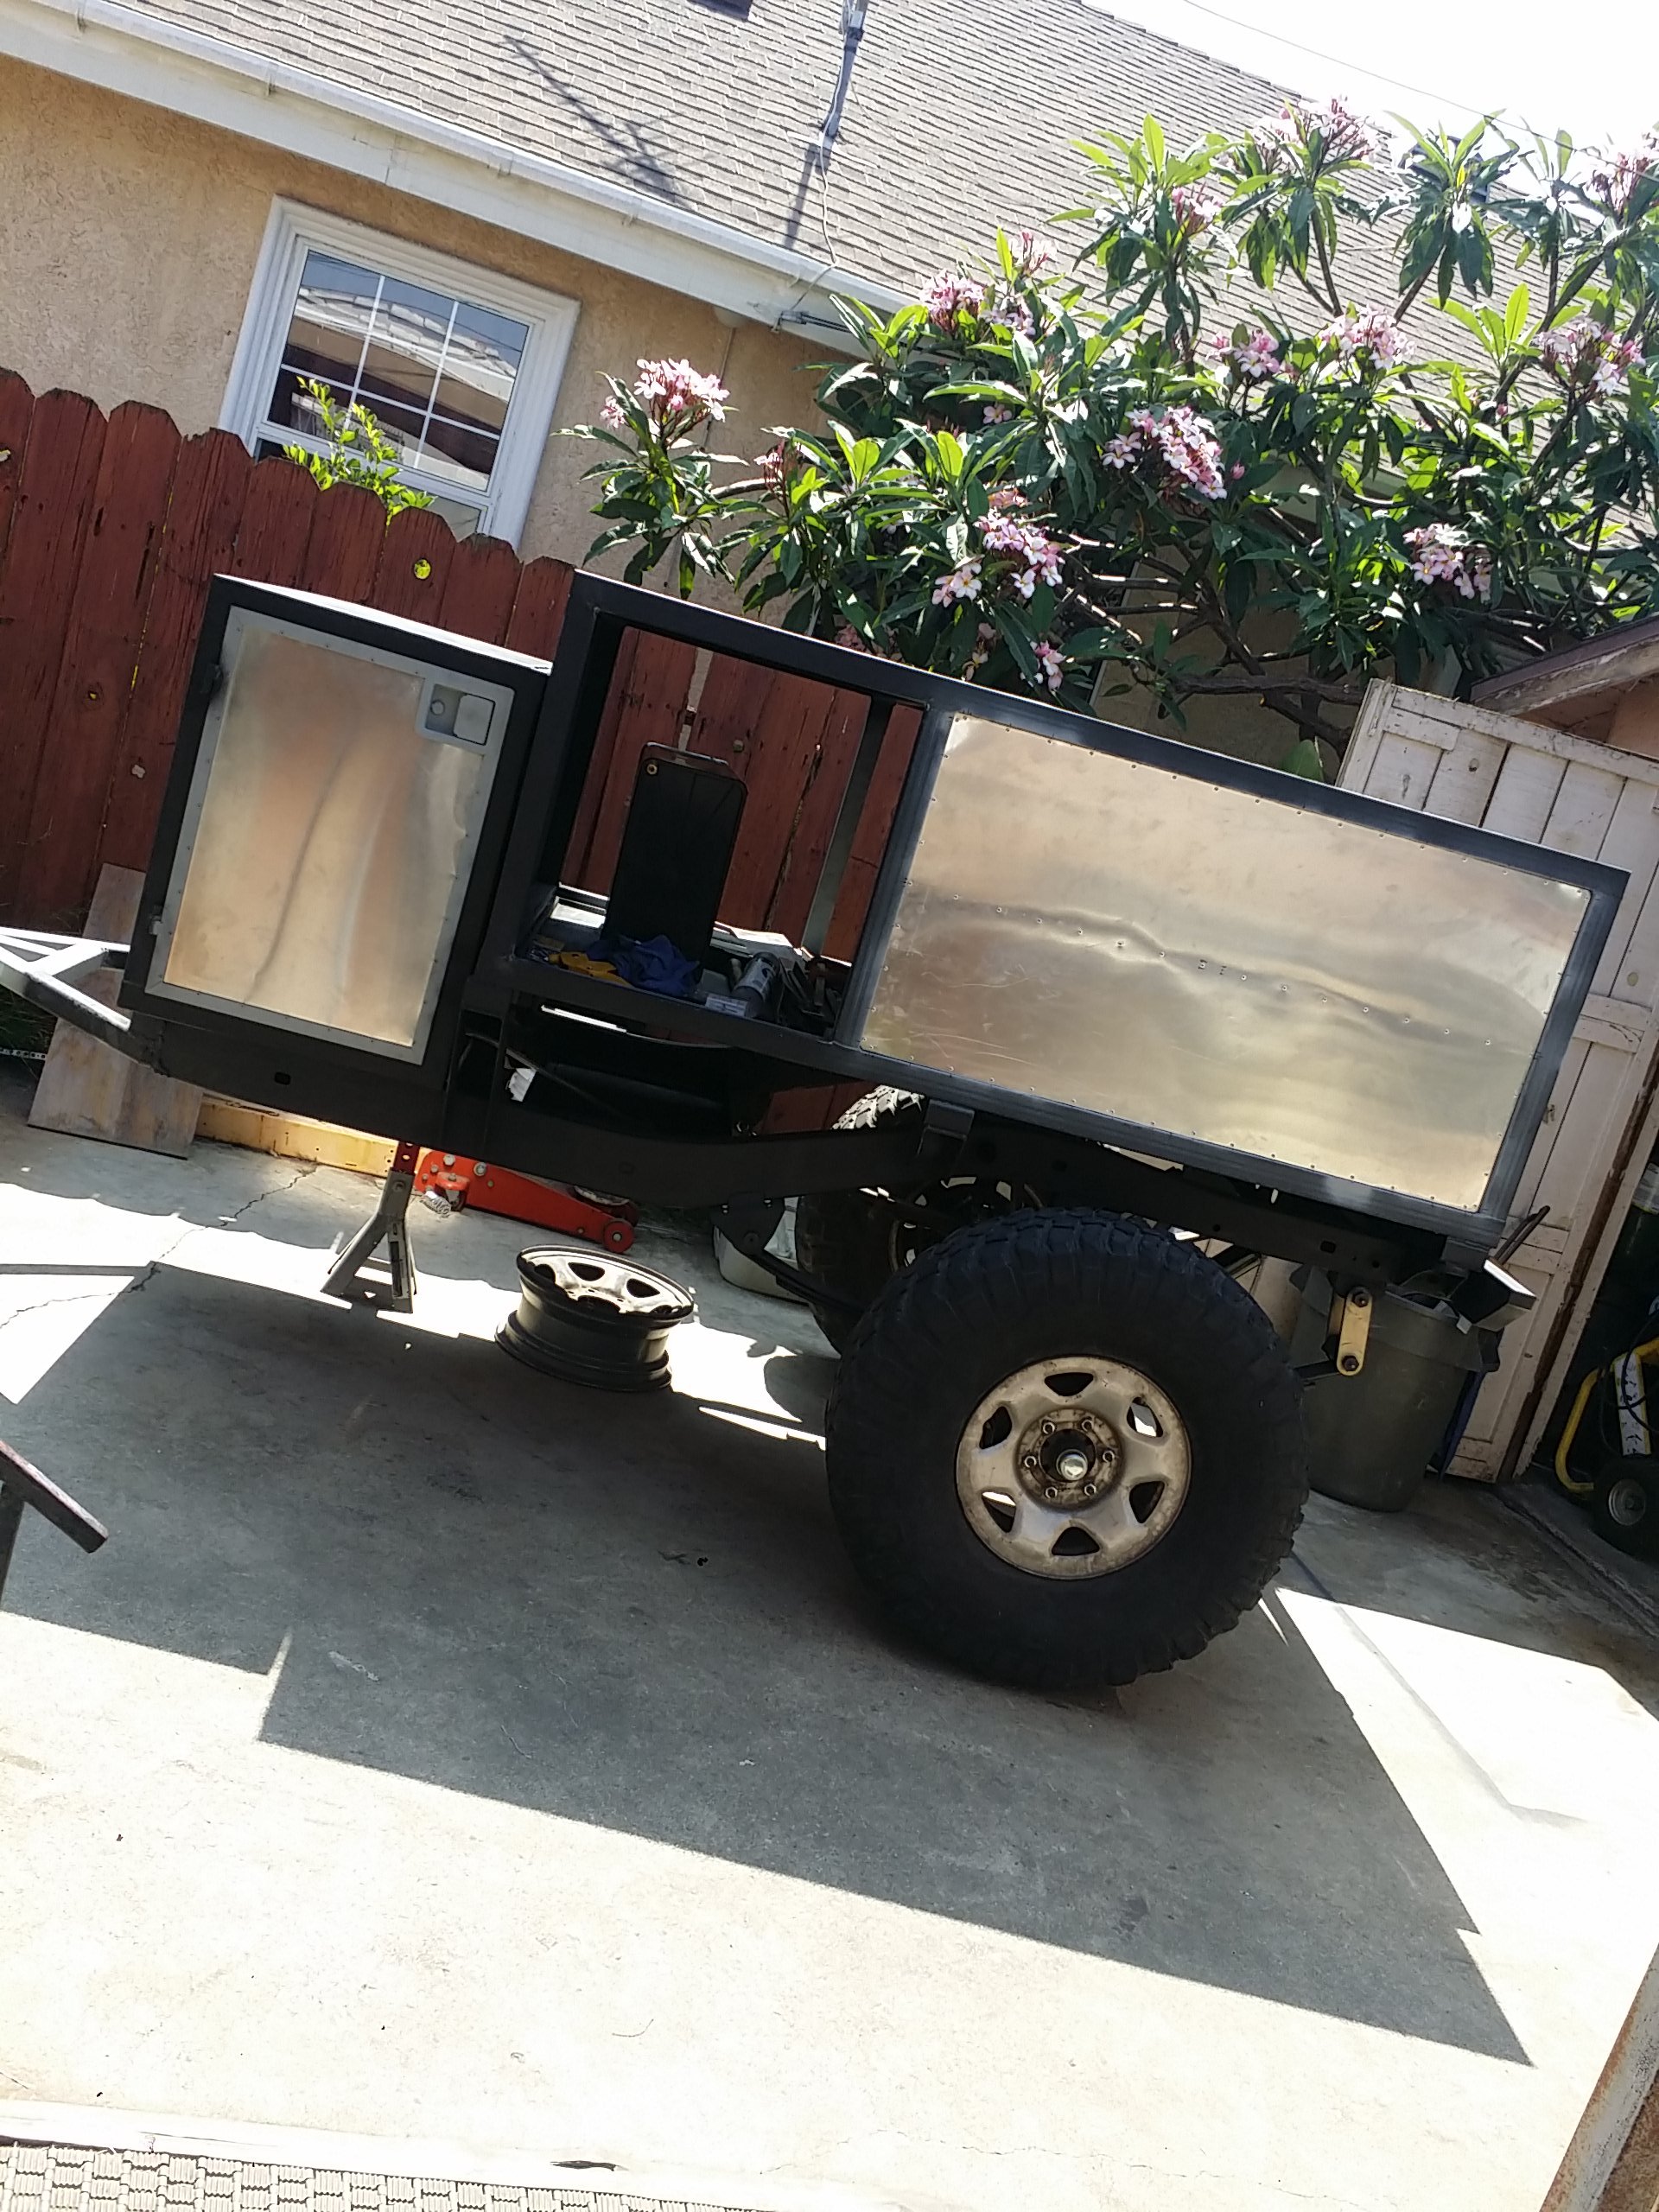
6 hours later the entire passenger side of the trailer is completely framed and aluminum walls are permanently riveted into place and looking really sweet. This trailer is really starting to look more awesome every time I add more stuff on to it! Ohhh the anticipation! Can't wait!
Here is where got around to making the side compartment door that will open up to my future Engel Combi 64 liter Fridge/Freezer. But before I could completely finish it I ran out of pop rivets and paint so I gotta head back to home Depot and buy more supplies. Hoping to have this door and the rear compartment door finished by next weekend so I can start on the fenders, rock sliders and begin on some of the electrical trailer lights.
Also here is a hand held remote controller/relay assembly that i bought from SuperBrightLEDs. My buddy Mark (aka: Chefyota4x4 on Instagram & Yotatech.com) runs this set up and i works amazing. and for only $23 bucks why not right? It come with 2 controllers.
https://www.superbrightleds.com/more...key-fobs/1532/
Here is a quick video of how it works:
I went with a 2 channel relay because i plan to use 2 sets oif lights on he trailer. 1) Rocklights for the floor directly under the trailer, and 2) exterior lighting to light up he immediate camp ground surrounding my trailer with the low power consumption LEDS that i posted up above made by All4Offroad.
Here is 2 videos my friend Chefyota4x4 has made for his rock lights. But ill tell ya these lights definitely don't do it justice because they are brighter hen what this shows.
His SUPER BRIGHT LED and All4Offorad set up working togeher
And i think out of all he pix this one does the lighting most justice in showing how bright they get. check out the link


I'd like to give a shout out to my boy Renato from @all4offroad on Instagram for hooking me up with 9 pairs of flex rock lights for both my 4runner and my trailer build! He worked out a good deal for my girlfriend, Fabiola, who bought these for me for our 8 year anniversary together and he was nice enough to throw in his super bright Tactical LED light into the deal. Gotta tell ya I'm so appreciative of all of this right now.

Here are the super heavy duty drawer slide for the 12v Engel Combi 60 Liter fridge/freezer that will be housed in the front of the rear compartment. These are rated to hold up to 500 pounds. Seems a bit overkill for a 75lb electric fridge. Even while all loaded up I'm sure it won't weigh any more than 125lbs. So I know these drawer slides will be more than sufficient to handle the weight of a loaded up fridge. They measure 36" long while closed, 3" tall, and 3/4" thick for each slide.

Dad and I working on the remaining 2 doors to the trailer. This one is gonna be the large rear 46"�24" door that will open upward toward the roof and be held open when small camper shell shocks.


Took a break from the doors to weld on the skeleton or framing along the inner portion of the box that will hold up the rear driver side aluminum wall along with a center support to make it more sturdy but also keep the noise down when on the trail. The aluminium walls be held in place with 5/32" thick aluminum pop rivets just like the entire front compartment was made.


Here's the finished view of that driver side wall

Pop Rivets every 3 inches seem to be the perfect distance to look nice but also to hold the walls up well. and this articulating Dewalt pop rivet gun makes every angle a breeze to get to.


6 hours later the entire passenger side of the trailer is completely framed and aluminum walls are permanently riveted into place and looking really sweet. This trailer is really starting to look more awesome every time I add more stuff on to it! Ohhh the anticipation! Can't wait!


Here is where got around to making the side compartment door that will open up to my future Engel Combi 64 liter Fridge/Freezer. But before I could completely finish it I ran out of pop rivets and paint so I gotta head back to home Depot and buy more supplies. Hoping to have this door and the rear compartment door finished by next weekend so I can start on the fenders, rock sliders and begin on some of the electrical trailer lights.

Also here is a hand held remote controller/relay assembly that i bought from SuperBrightLEDs. My buddy Mark (aka: Chefyota4x4 on Instagram & Yotatech.com) runs this set up and i works amazing. and for only $23 bucks why not right? It come with 2 controllers.
https://www.superbrightleds.com/more...key-fobs/1532/
Here is a quick video of how it works:
Here is 2 videos my friend Chefyota4x4 has made for his rock lights. But ill tell ya these lights definitely don't do it justice because they are brighter hen what this shows.
His SUPER BRIGHT LED and All4Offorad set up working togeher
And i think out of all he pix this one does the lighting most justice in showing how bright they get. check out the link
Last edited by Redeth005; 07-23-2016 at 10:01 PM.
02-06-2017, 10:11 PM
#94
Registered User
Thread Starter
With the holidays an much rain we have had over the past few months I've received so much call and overtime at the hospital that i work for that my trailer project has just been on the back burner for quite a while.
Maybe now that the weather has been starting to clear and work has finally slowed i'll finally manage to get some sort of work done on the trailer. This past weekend was the first day i was able to get a few hours in for nearly 5 months!
I worked on bending some tube for some light duty sliders/steps. which will also double up as a surface to mount the fenders on to along with he tail lights, license plate holder, and 12"x18" mudflaps. I did not finish fabricating them but i did manage to get the bends perfectly made with the cheapie harbor freight tube bender. I wanted a reasonable thickness to be able to handle a bit of banging but the trailer wont see too much of a difficult time on the trail so i didn't want to go too thick like 3/16". But i also didn't want to use 16 or 18 gauge wither because that's still really thin so i went with a 1/8" thick. round tube.
I did not finish making the sliders because i began getting late. We are expecting a clear sunny weekend this week so I'm really hoping to get the sliders and fenders made. and installed finally and if time allows me to i'll make the mounts for mud flaps and mount those too.
Maybe now that the weather has been starting to clear and work has finally slowed i'll finally manage to get some sort of work done on the trailer. This past weekend was the first day i was able to get a few hours in for nearly 5 months!
I worked on bending some tube for some light duty sliders/steps. which will also double up as a surface to mount the fenders on to along with he tail lights, license plate holder, and 12"x18" mudflaps. I did not finish fabricating them but i did manage to get the bends perfectly made with the cheapie harbor freight tube bender. I wanted a reasonable thickness to be able to handle a bit of banging but the trailer wont see too much of a difficult time on the trail so i didn't want to go too thick like 3/16". But i also didn't want to use 16 or 18 gauge wither because that's still really thin so i went with a 1/8" thick. round tube.

I did not finish making the sliders because i began getting late. We are expecting a clear sunny weekend this week so I'm really hoping to get the sliders and fenders made. and installed finally and if time allows me to i'll make the mounts for mud flaps and mount those too.
02-08-2017, 06:33 PM
#96
Registered User
Thread Starter
Hey buddy, the bender works. It's just a real pain in the butt to get the bend you want and its especially hard to make 100% matching sides. lol mine are gonna be slightly off. but for the most part they are the same.  I definitely would never encourage using this bender for an exo cage though. I would be so hard to make.
I definitely would never encourage using this bender for an exo cage though. I would be so hard to make.
02-11-2017, 08:07 PM
#97
Registered User
Thread Starter
Well in making these sliders i have learned i hate notching tube lol especially if the attachment points are not exactly at 90� angles but instead meeting on a tube going at an angle like these sliders are. by the 2nd set of attachment points i was already good at making them. but they're still a huge pain in the a*s to make. we had to stop making the sliders for today because my hole saw accidentally jumped the tube and got caught into my girls right arm getting caught on her sweater. we're lucky she had a sweater because that's what the hole saw grabbed onto instead of her actual skin. her arm is a bit bruised from where it hit but she's gonna be okay. i feel so guilty though.

Tomorrow's another day. We're expecting it to be nice and sunny outside. I should have both sliders welded together and actually mounted on the trailer. If i get lucky enough to have spare time maybe i'll start working on the fenders and the mudflap mounts.

Tomorrow's another day. We're expecting it to be nice and sunny outside. I should have both sliders welded together and actually mounted on the trailer. If i get lucky enough to have spare time maybe i'll start working on the fenders and the mudflap mounts.
02-12-2017, 09:35 PM
#99
Registered User
Thread Starter
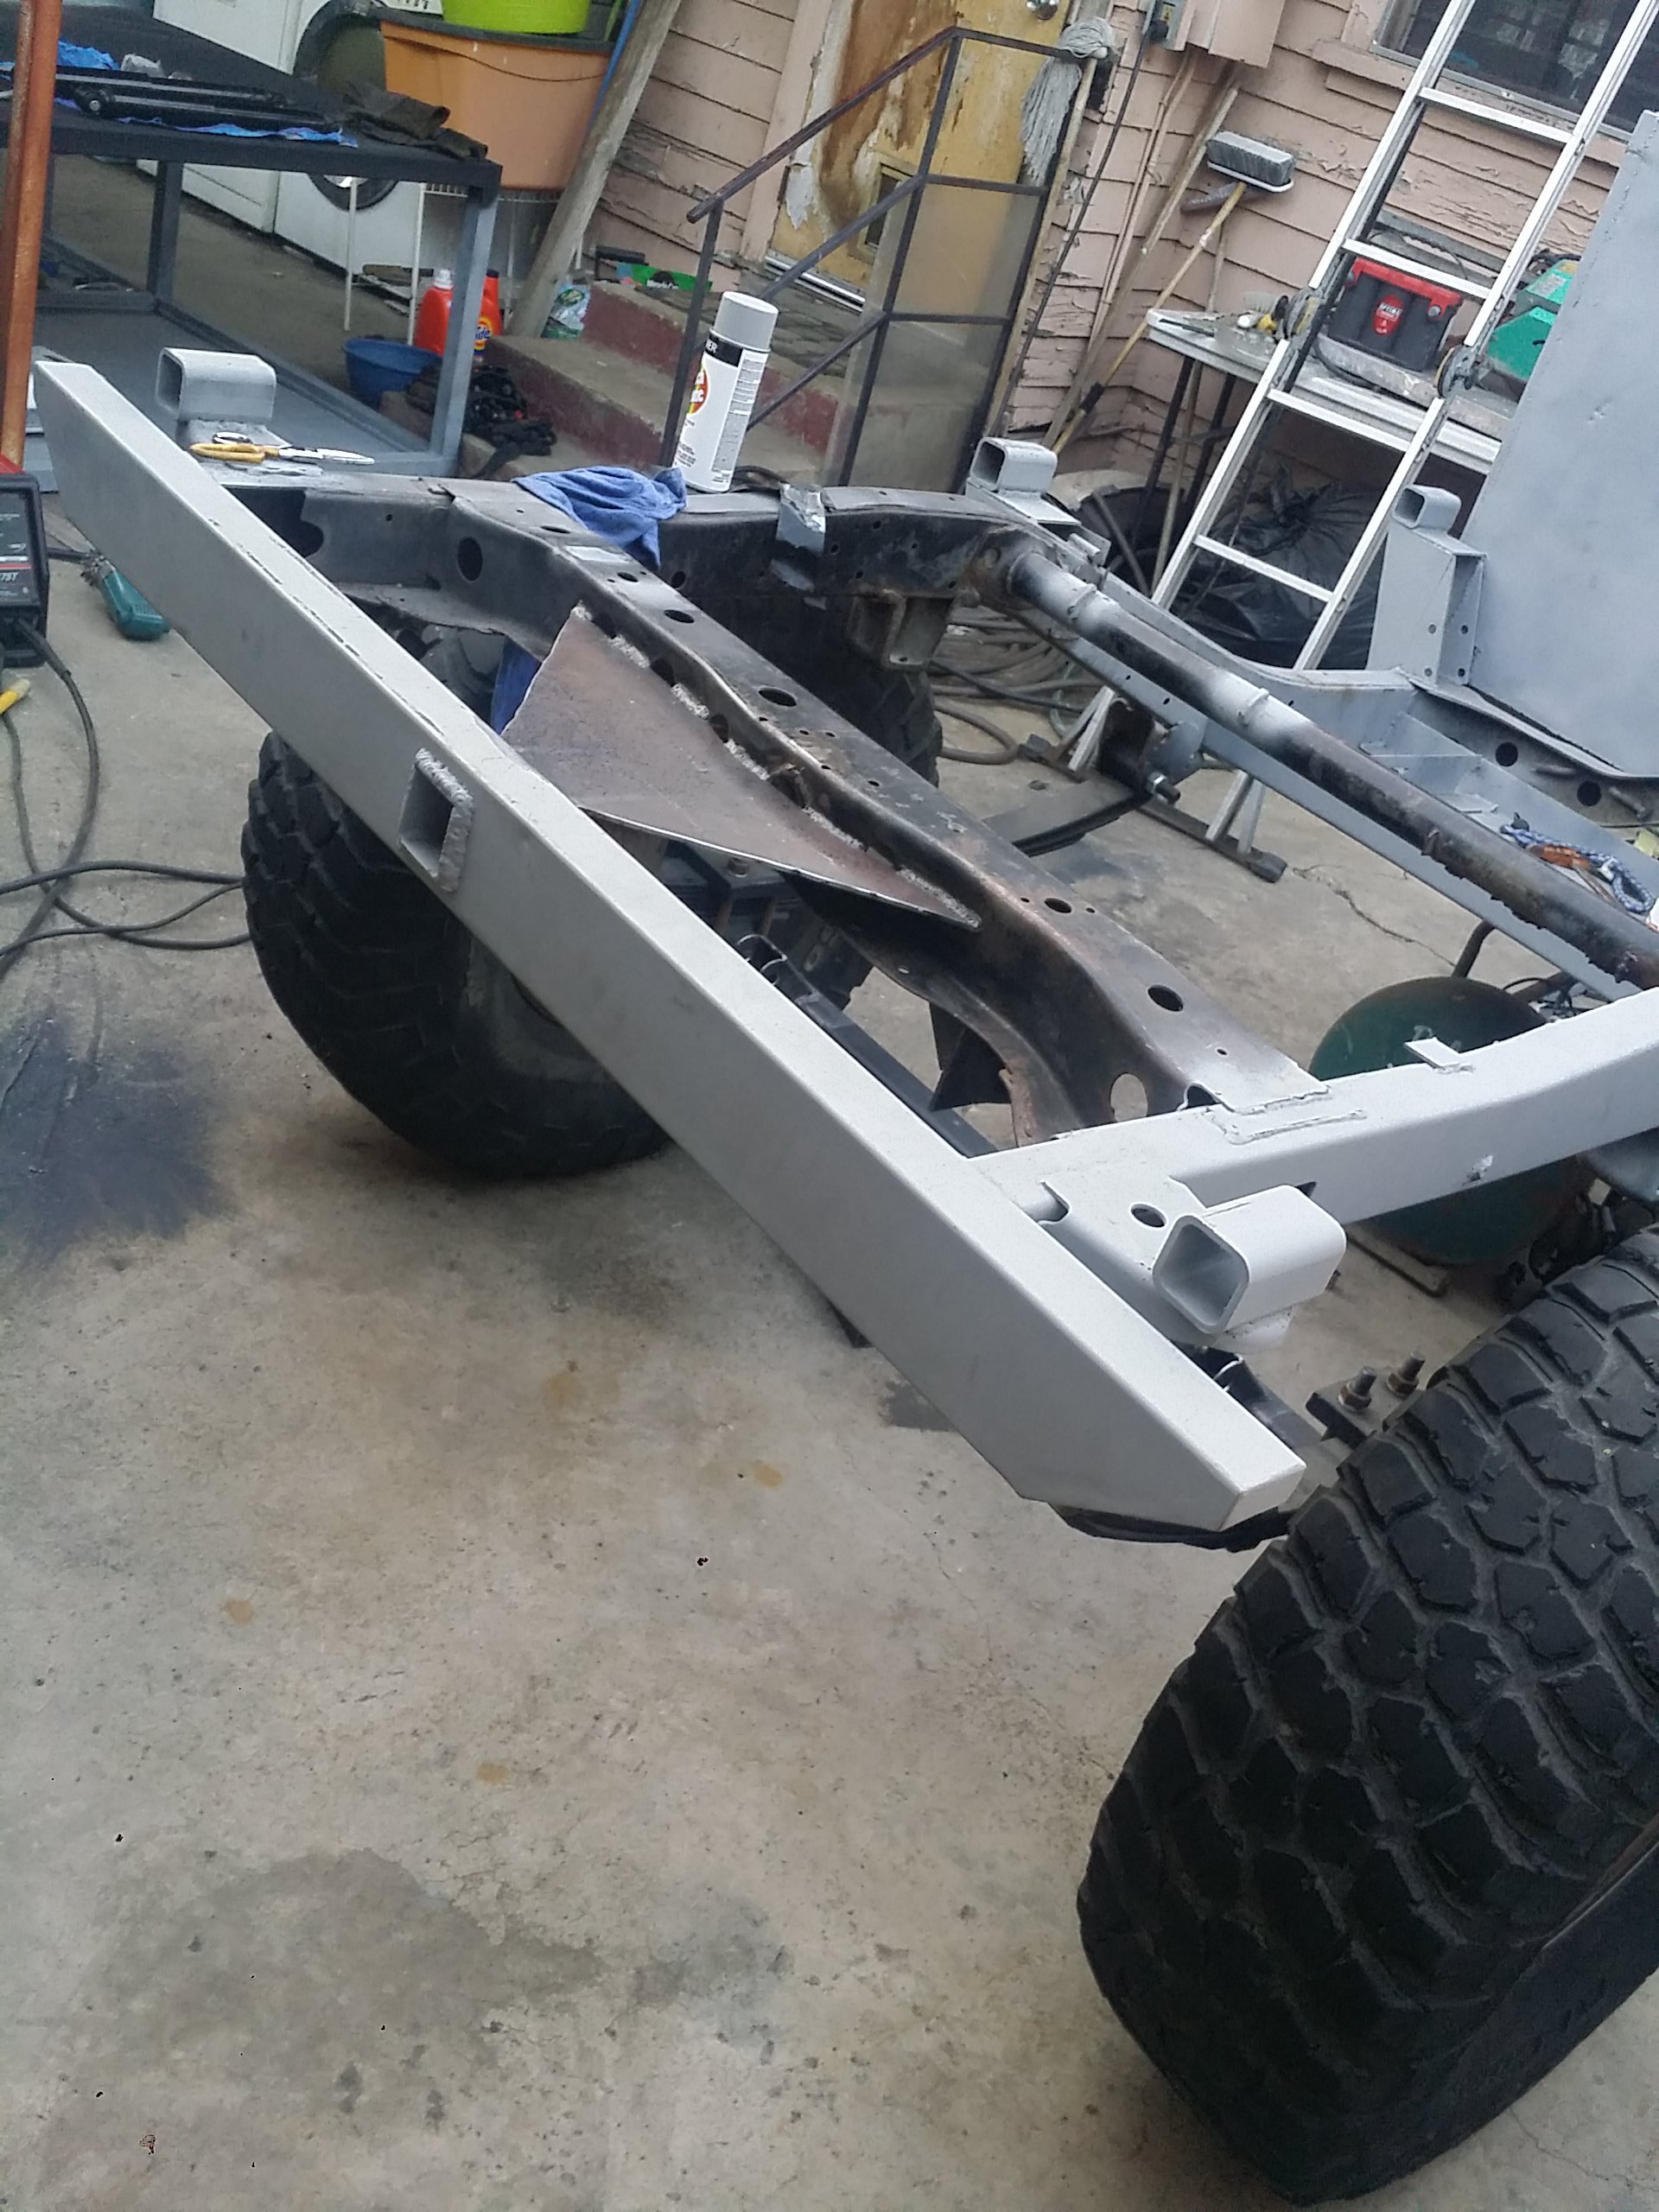
Here i had just tacked together the first set of sliders. Managed to weld everything together and permanently mount them to the chassis. I primed them for the mean time to prevent surface rust. Next weekend I'll start on the fenders.
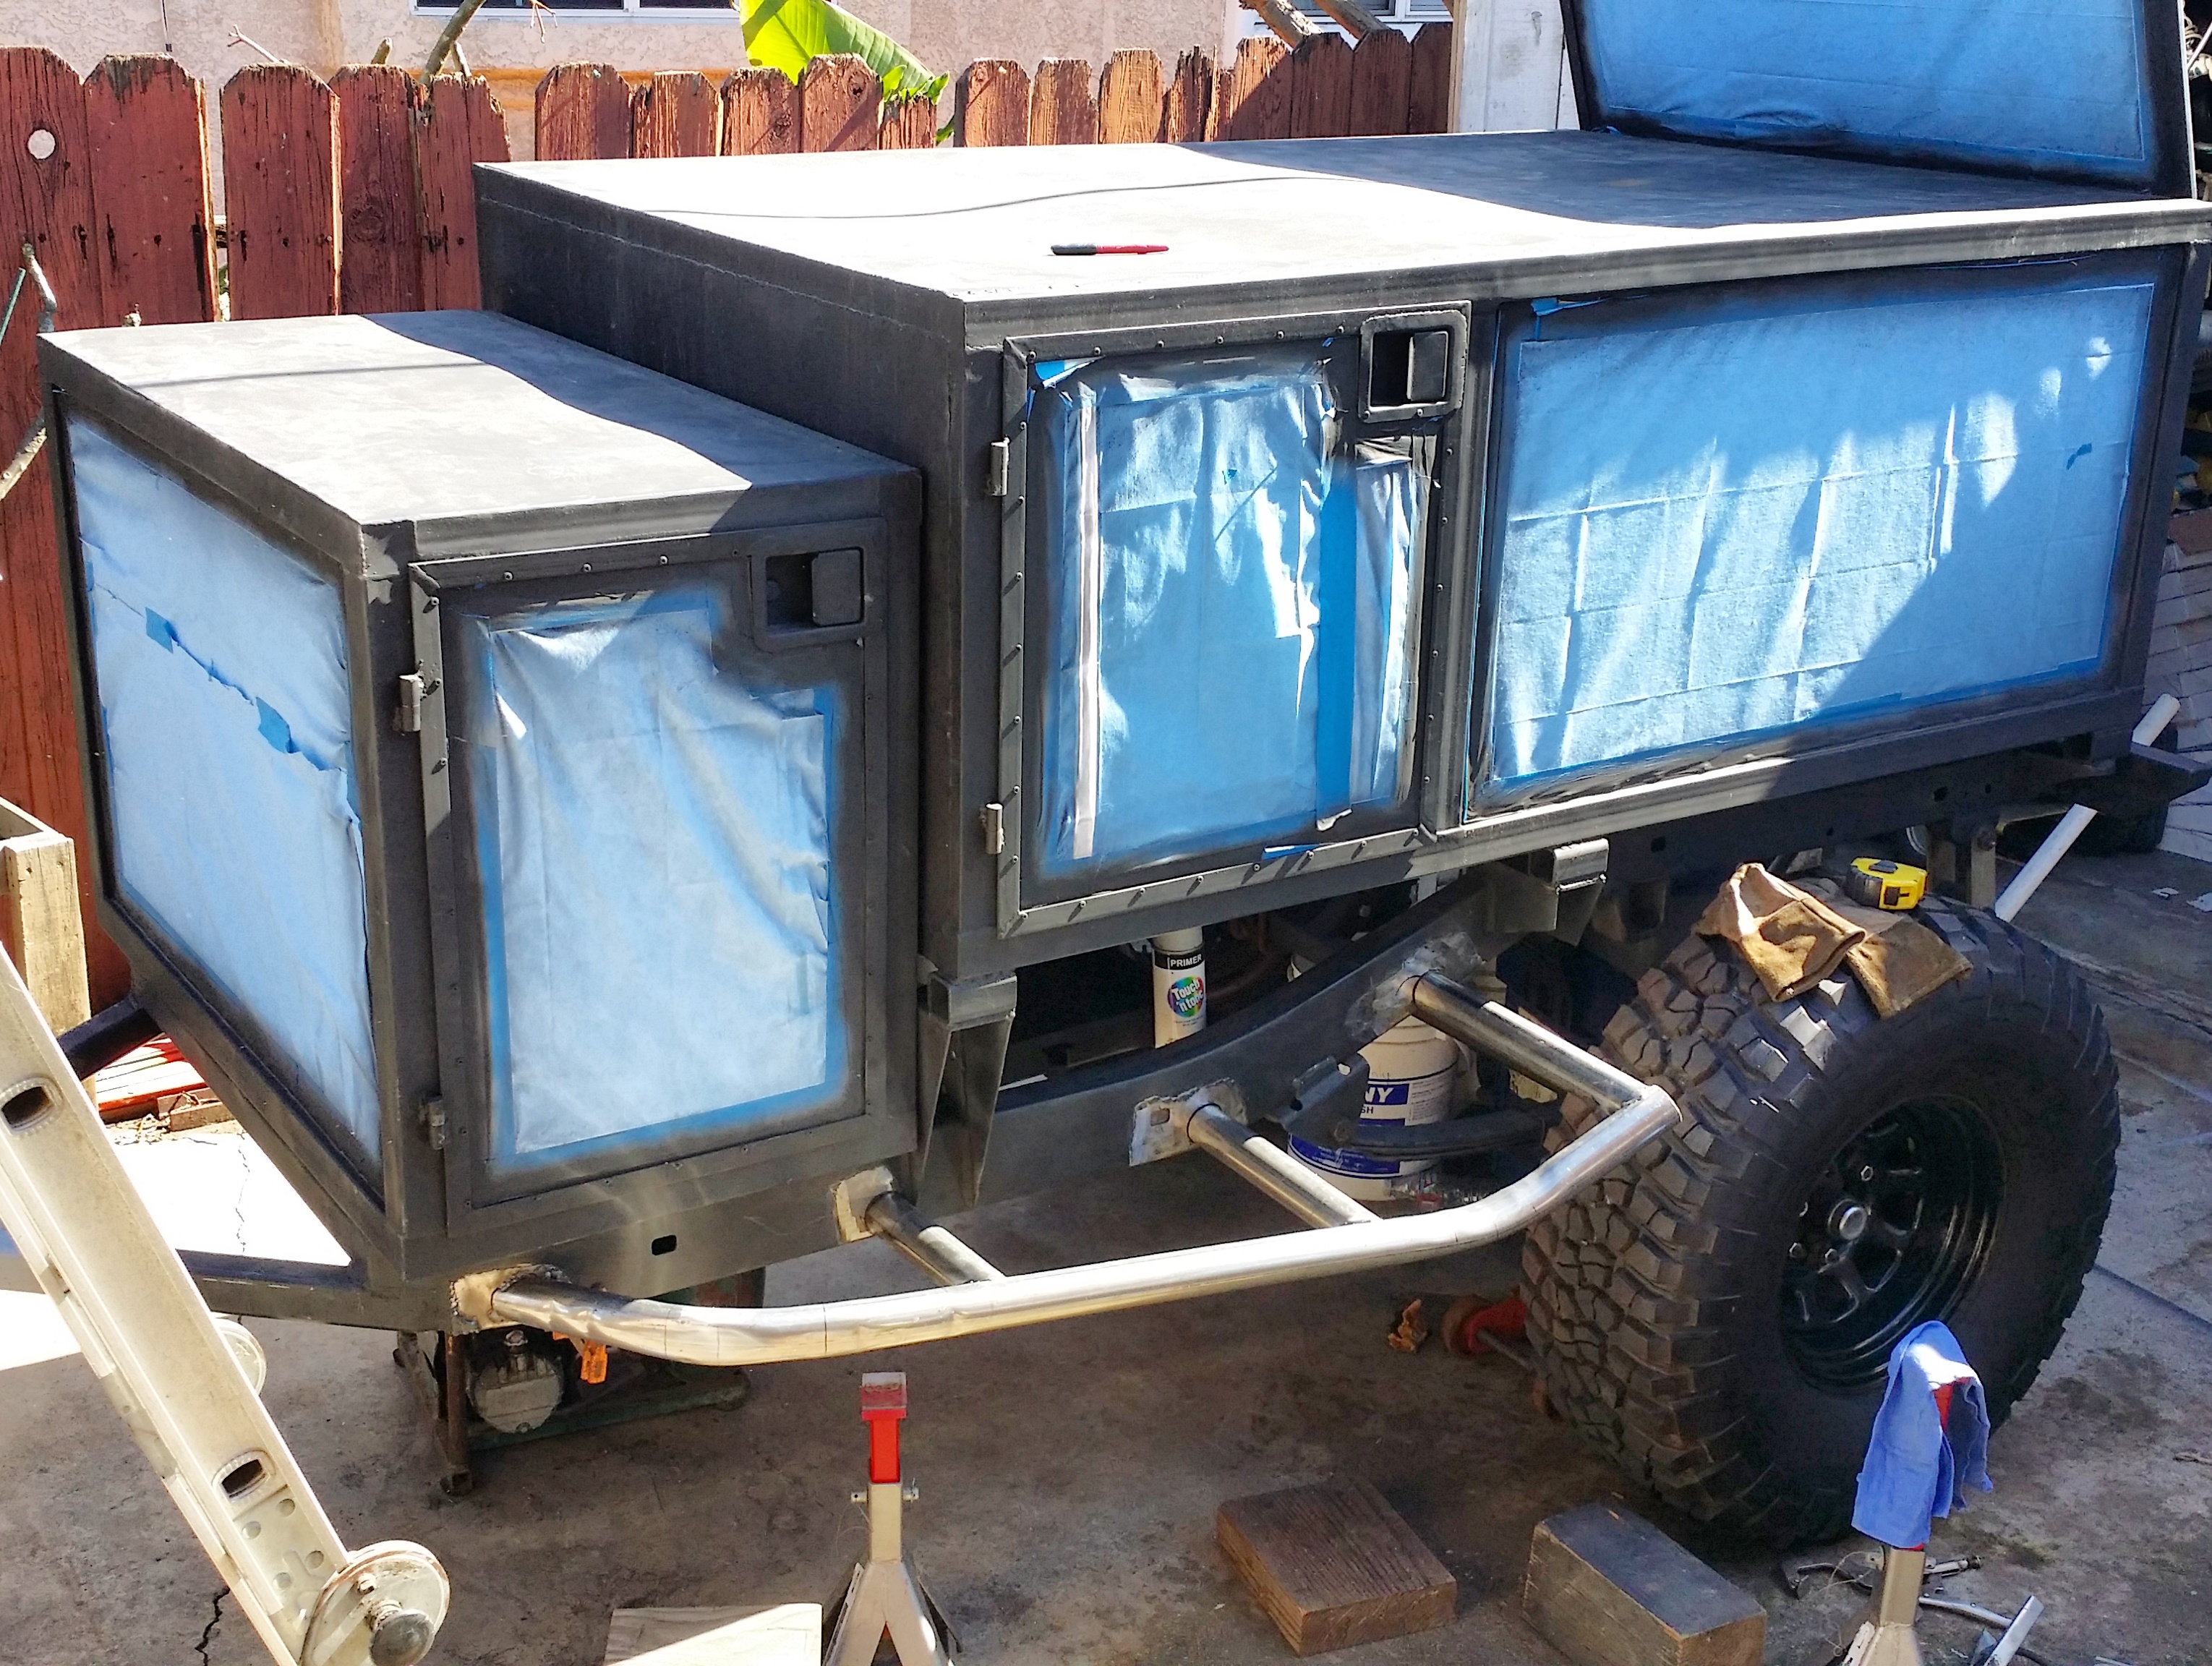
It is coming along nicely. These sliders were pretty difficult for me to make. I applaud fabricators; bending tube and notching has definitely proven to be a challenge for me.

It is coming along nicely. These sliders were pretty difficult for me to make. I applaud fabricators; bending tube and notching has definitely proven to be a challenge for me.
02-12-2017, 09:40 PM
#100
Registered User
Thread Starter
I felt bad bro, Her eyes started to tear up but she was a trooper. She was like "I'm okay just finish making his last one" lol I felt so bad. I had to get her an ice pack to bring the swelling down. Now the only thing she has is a light bruise on her arm and a small scratch


