Redeth's 89 4Runner custom front plate bumper fab.
 09-22-2013, 05:21 AM
#21
Registered User
I couldn't find my winch bumper concept, so I'm posting it now. I guess I thought I posted it already.


This page has a link to the multi-mount winch plate idea. I don't want to leave my winch mounted when not needed, and this will allow me to mount the winch out back if needed.
https://www.yotatech.com/forums/f199...7/index47.html
This page has a link to the multi-mount winch plate idea. I don't want to leave my winch mounted when not needed, and this will allow me to mount the winch out back if needed.
https://www.yotatech.com/forums/f199...7/index47.html
 09-22-2013, 05:55 PM
#22
Registered User
Thread Starter
Dang Rbx that thing is nice. Looks like you took a lot of time into thinking this one up.
I noticed you use that design that sort of looks like clovers in a couple things. Os that like your trademark? Cool to have a theme going. Man. Great job on making the desigb. I'd like to see it on your truck some day.
I noticed you use that design that sort of looks like clovers in a couple things. Os that like your trademark? Cool to have a theme going. Man. Great job on making the desigb. I'd like to see it on your truck some day.
Last edited by Redeth005; 09-23-2013 at 05:53 AM.
09-23-2013, 05:54 AM
#23
Registered User
Thread Starter
Yesterday morning after looking at my center bumper piece and measuring then looking back and forth  and i realized that i was off by 2 inches off the top side.
 cant start off making problems so soon lol. all good i fixed the piece making it 22" at the bottom and changing the top from 24" to 26"
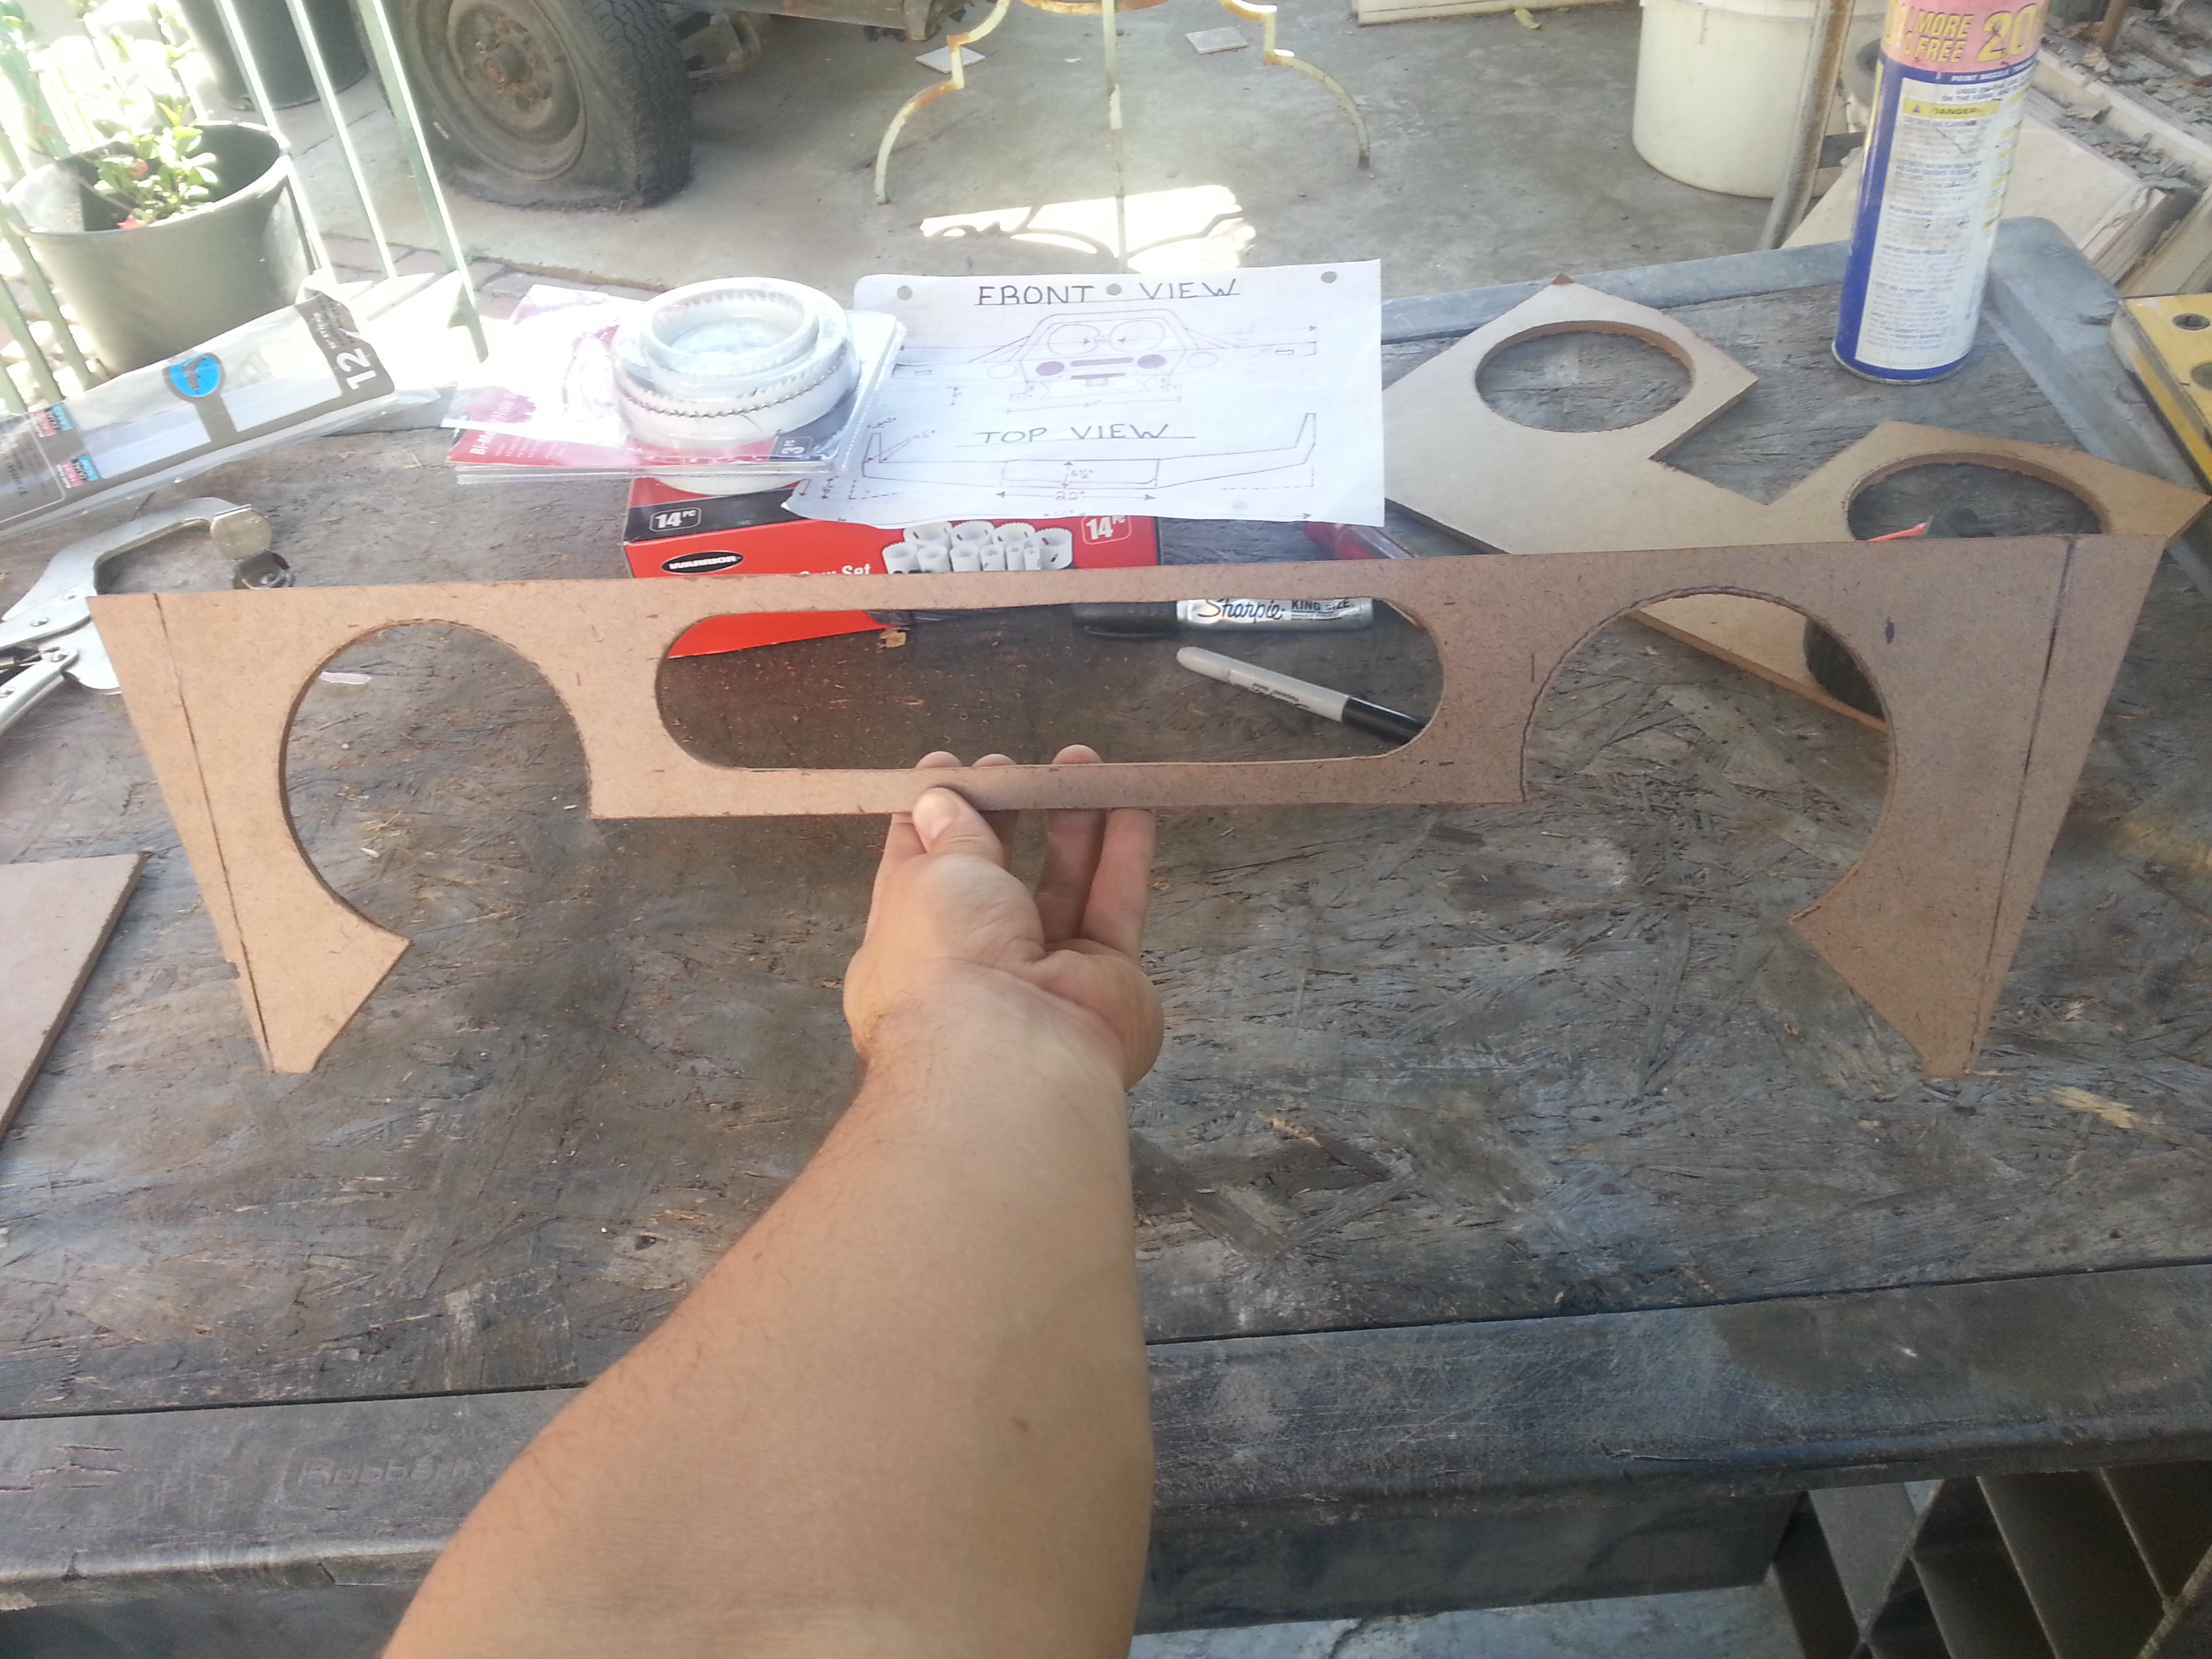
Outlining/centering the LED light holes.

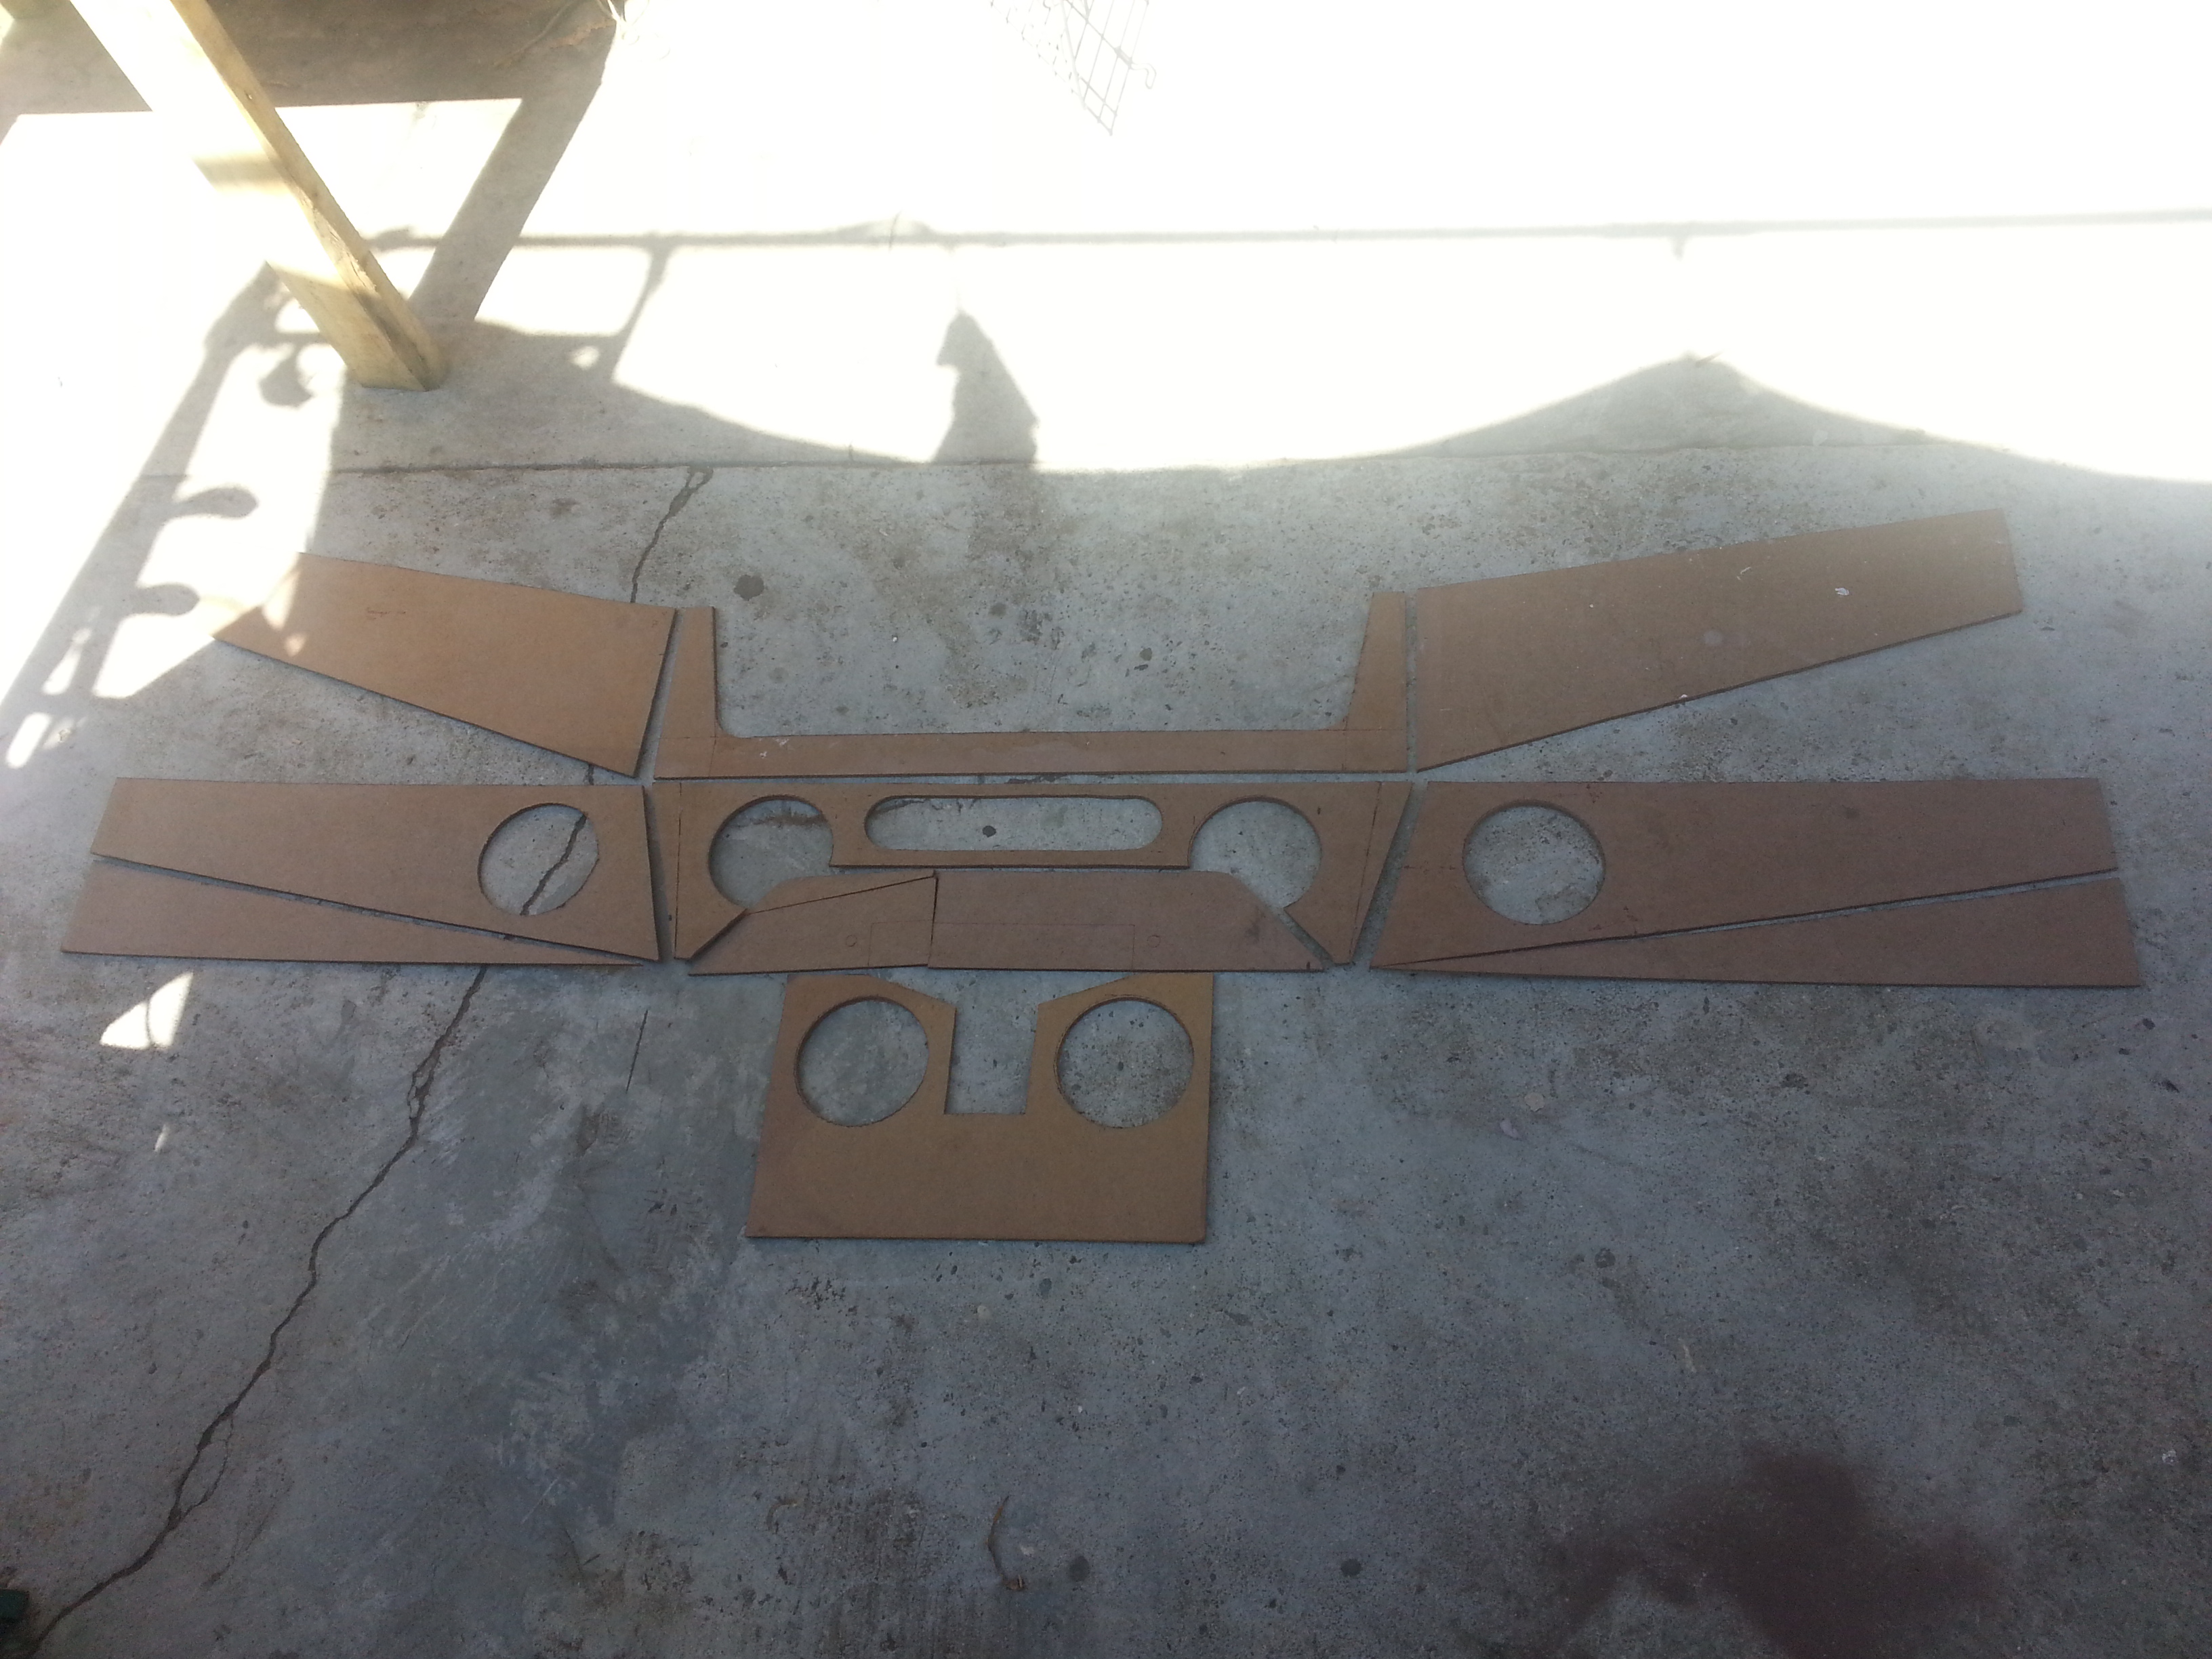
Most of my pieces cut out already.
She be coming along nicely!
Side. I had to measure out the winch to make sure the center top piece cleared the sides. It did
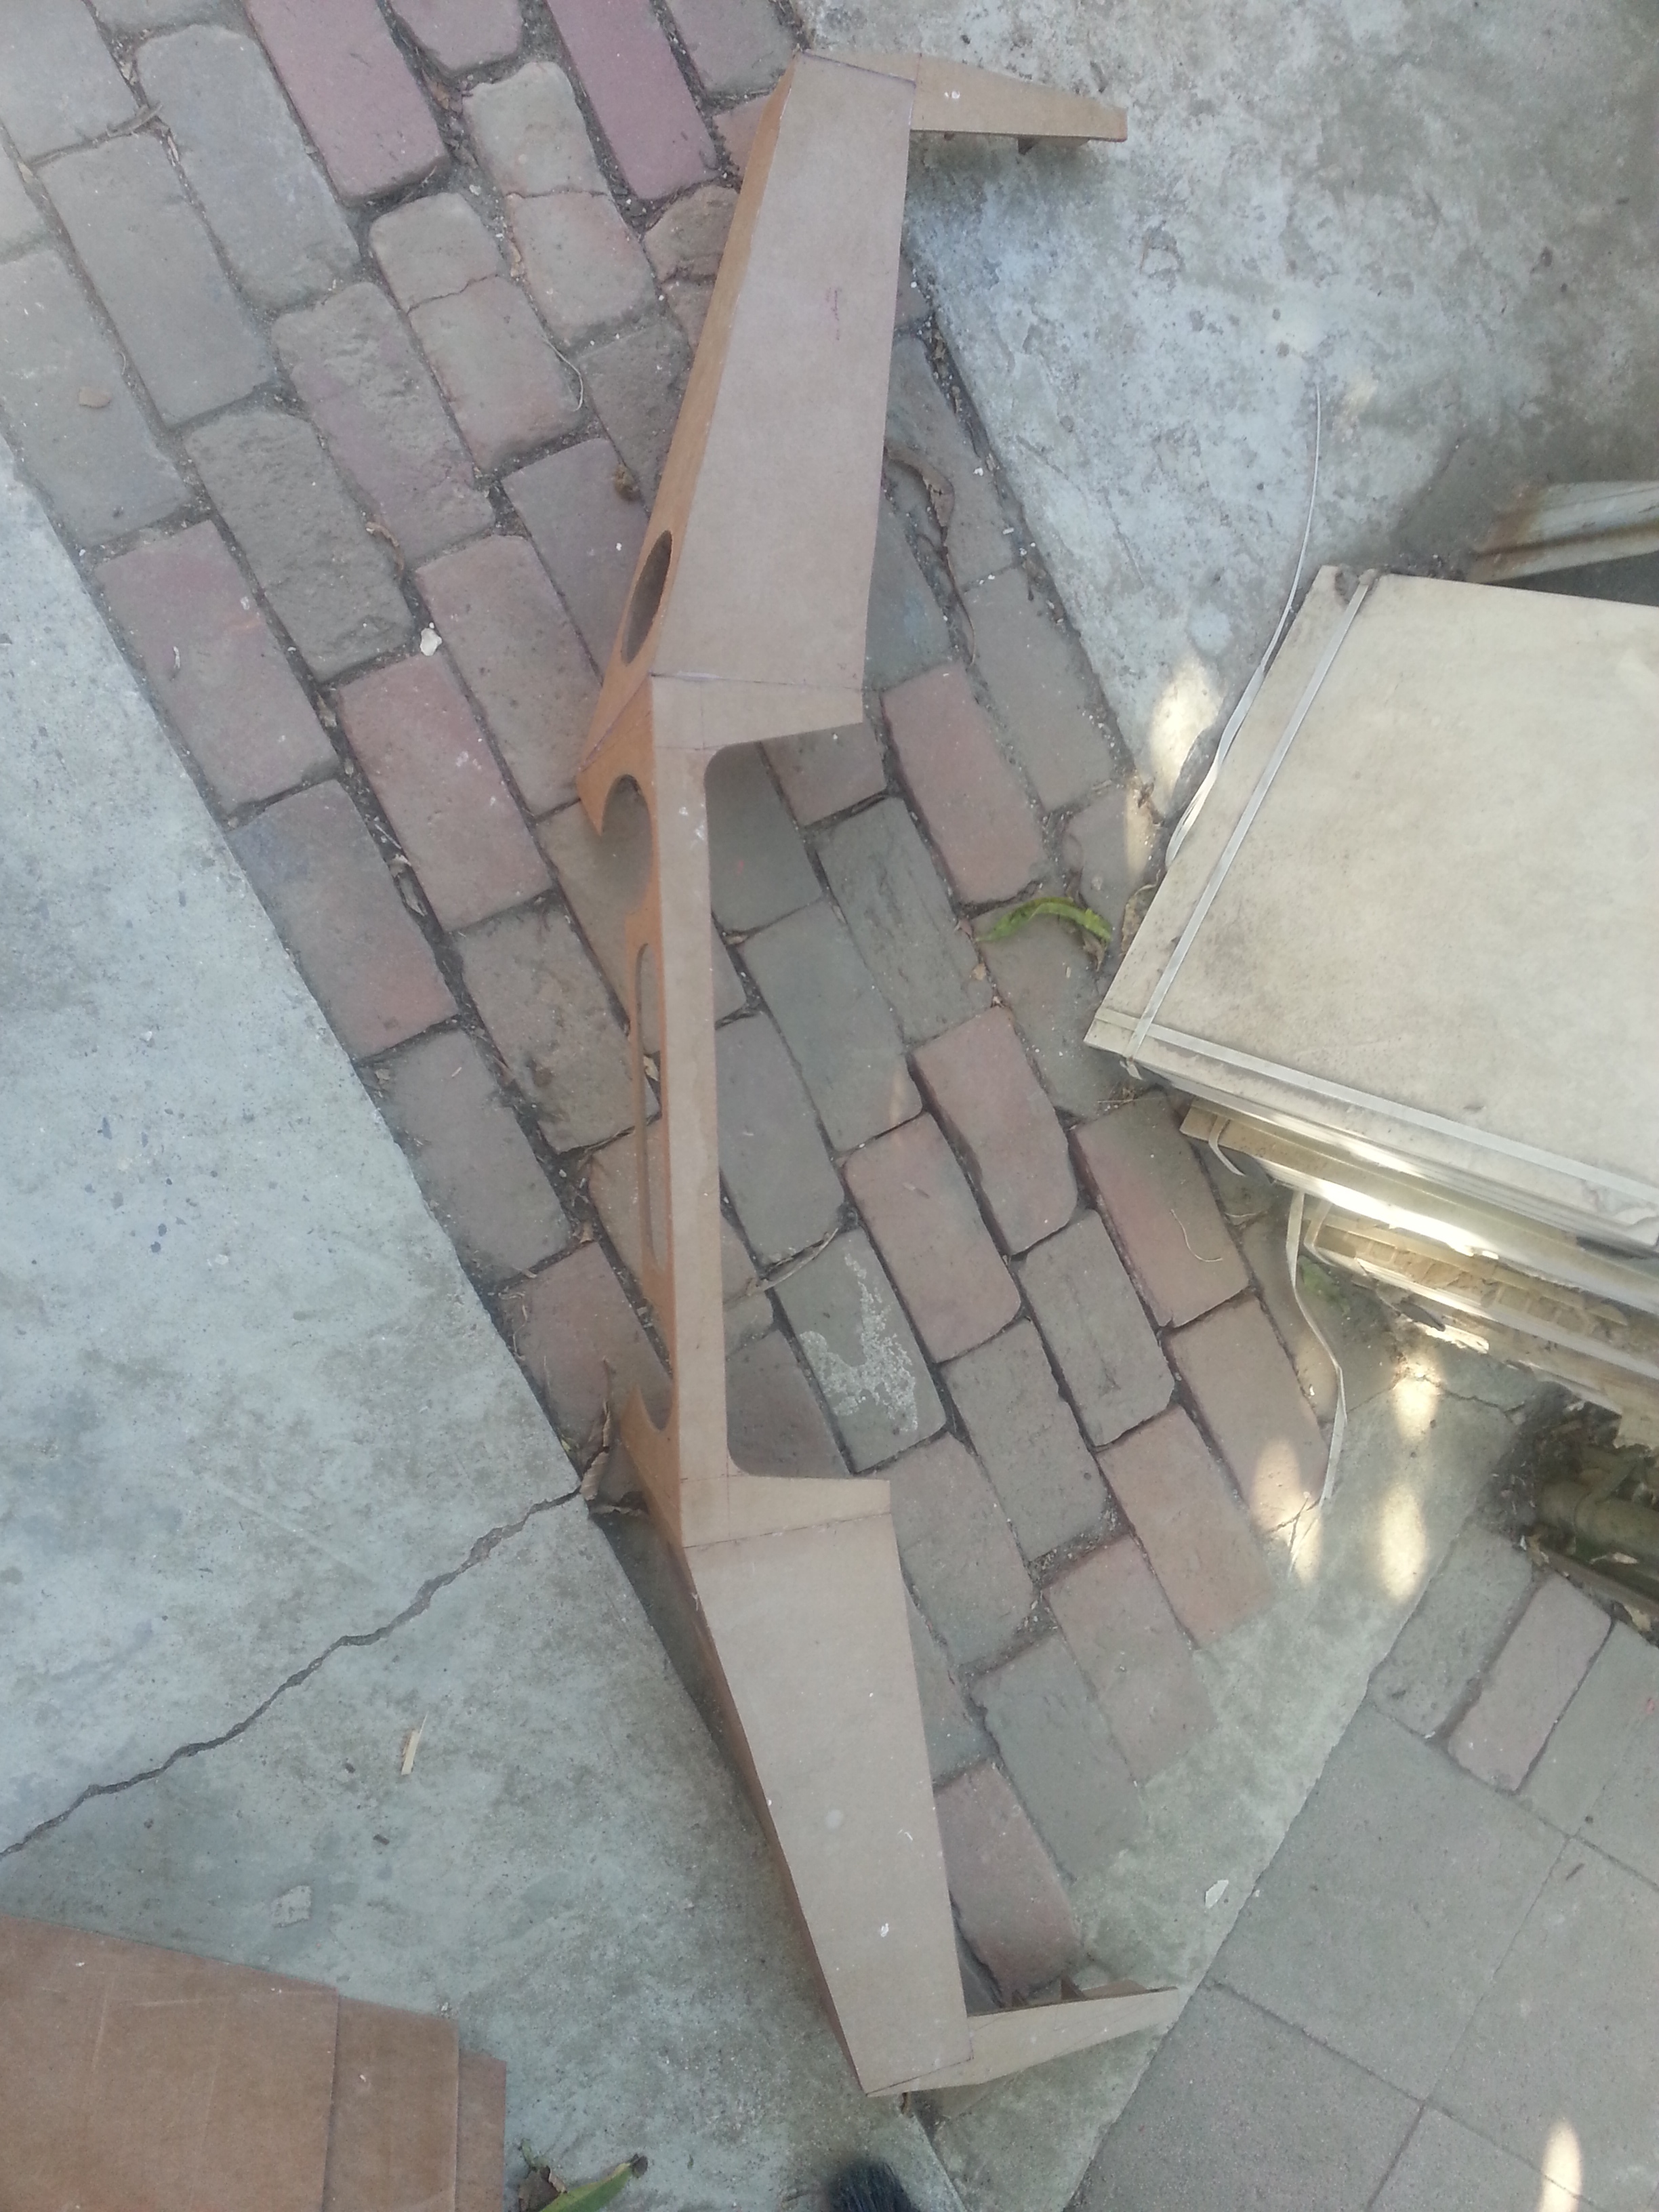
I added the corners that go all the way to the wheelwell.
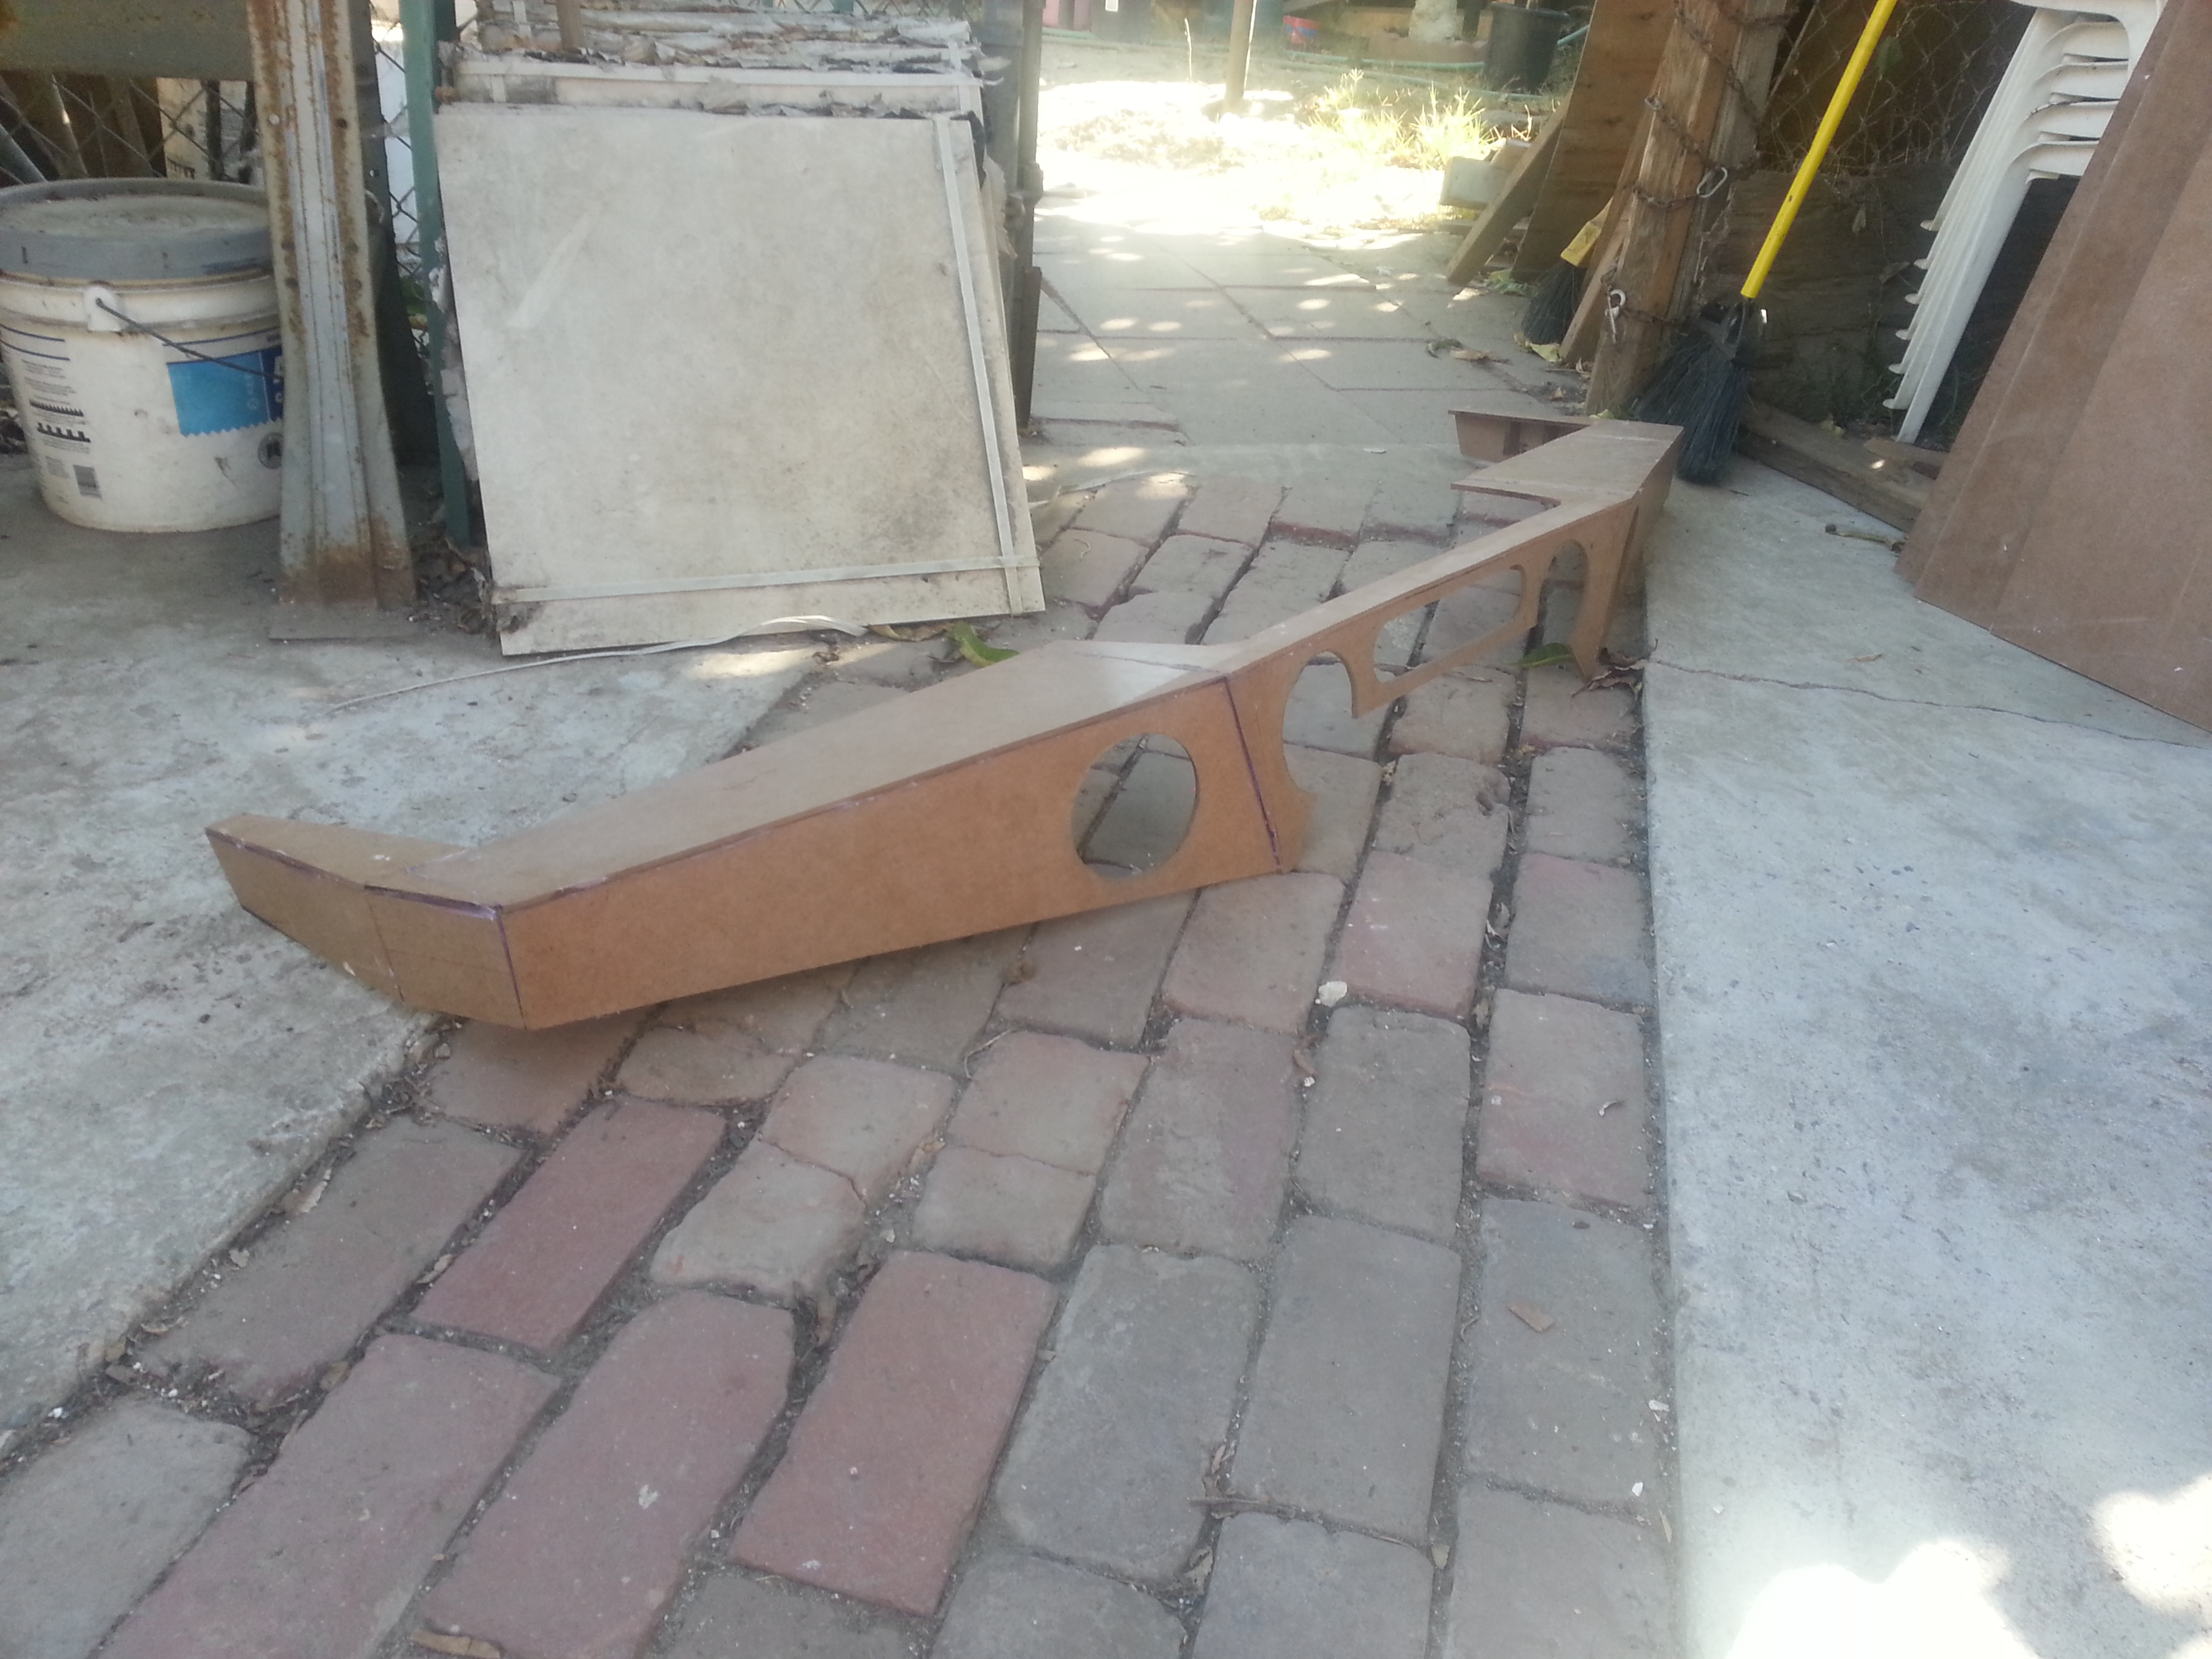
top with the side pieces
Another for the hell of it.
In case you guys are wondering how im holding all this Masonite board together this is what im doing. Using a hot glue gun and a hole bunch of little angled gussets. if it weren't for those this whole thing would just wall apart. This isnt needed when i do the real thing though.
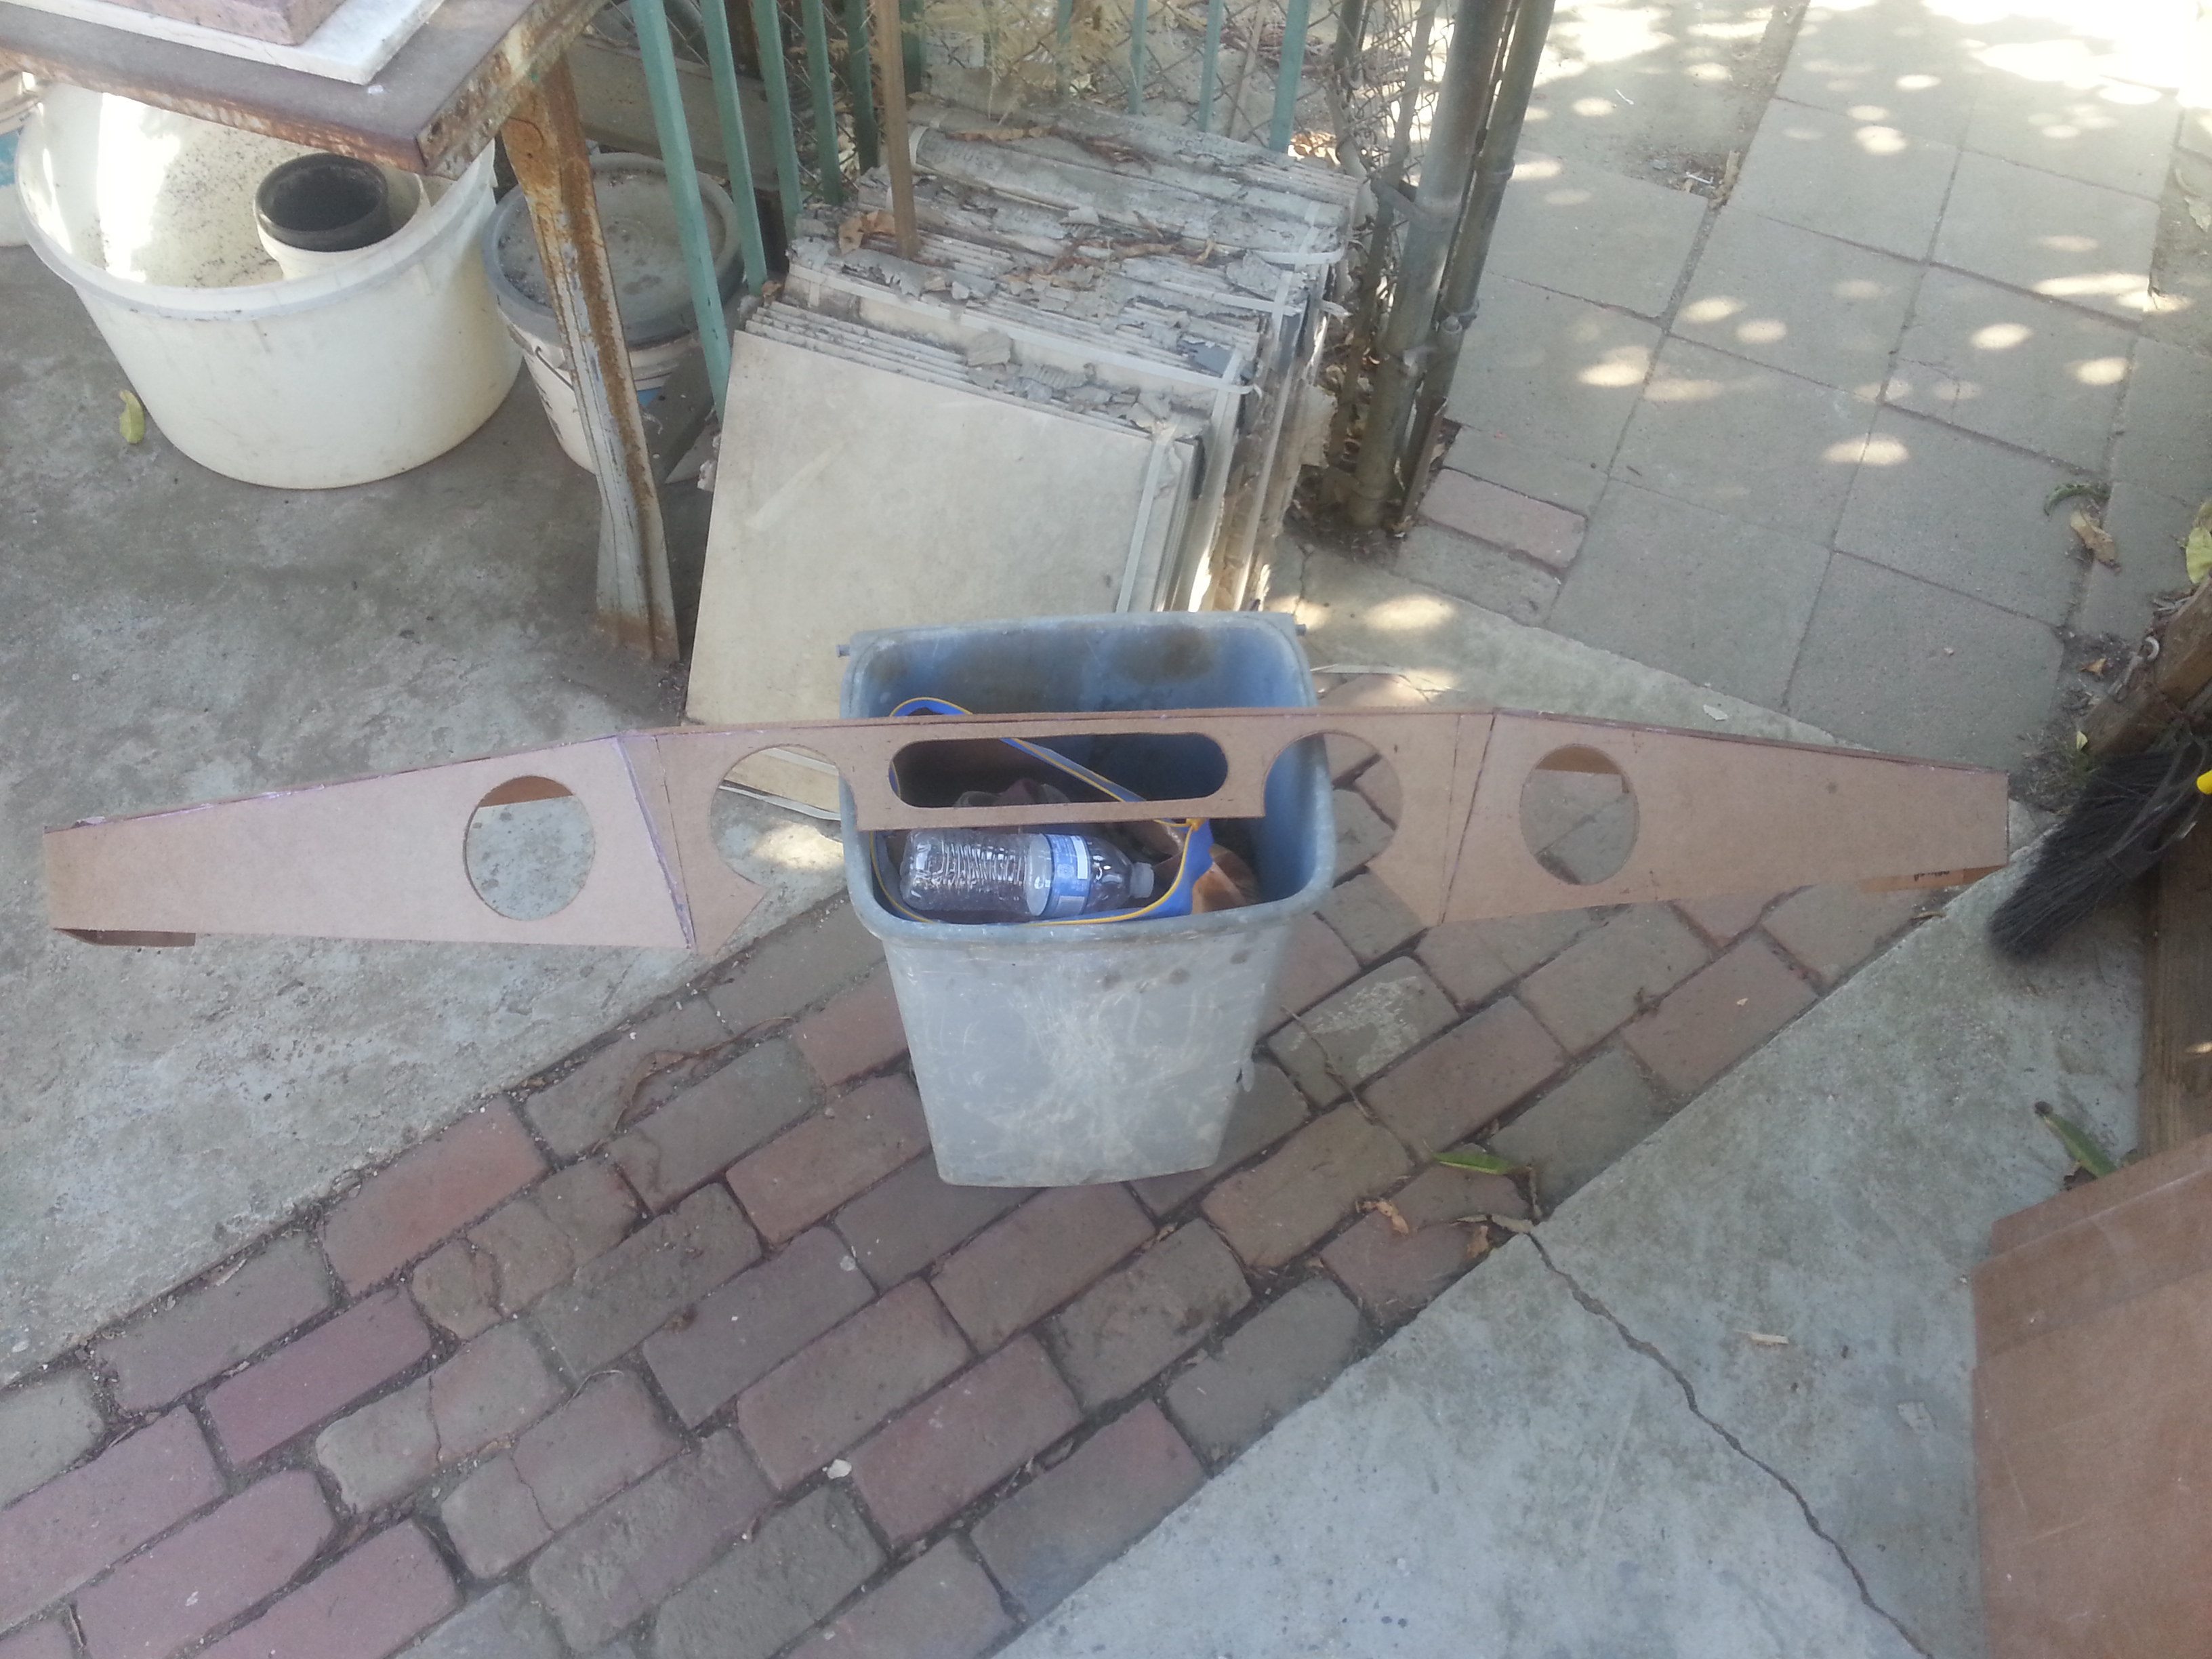
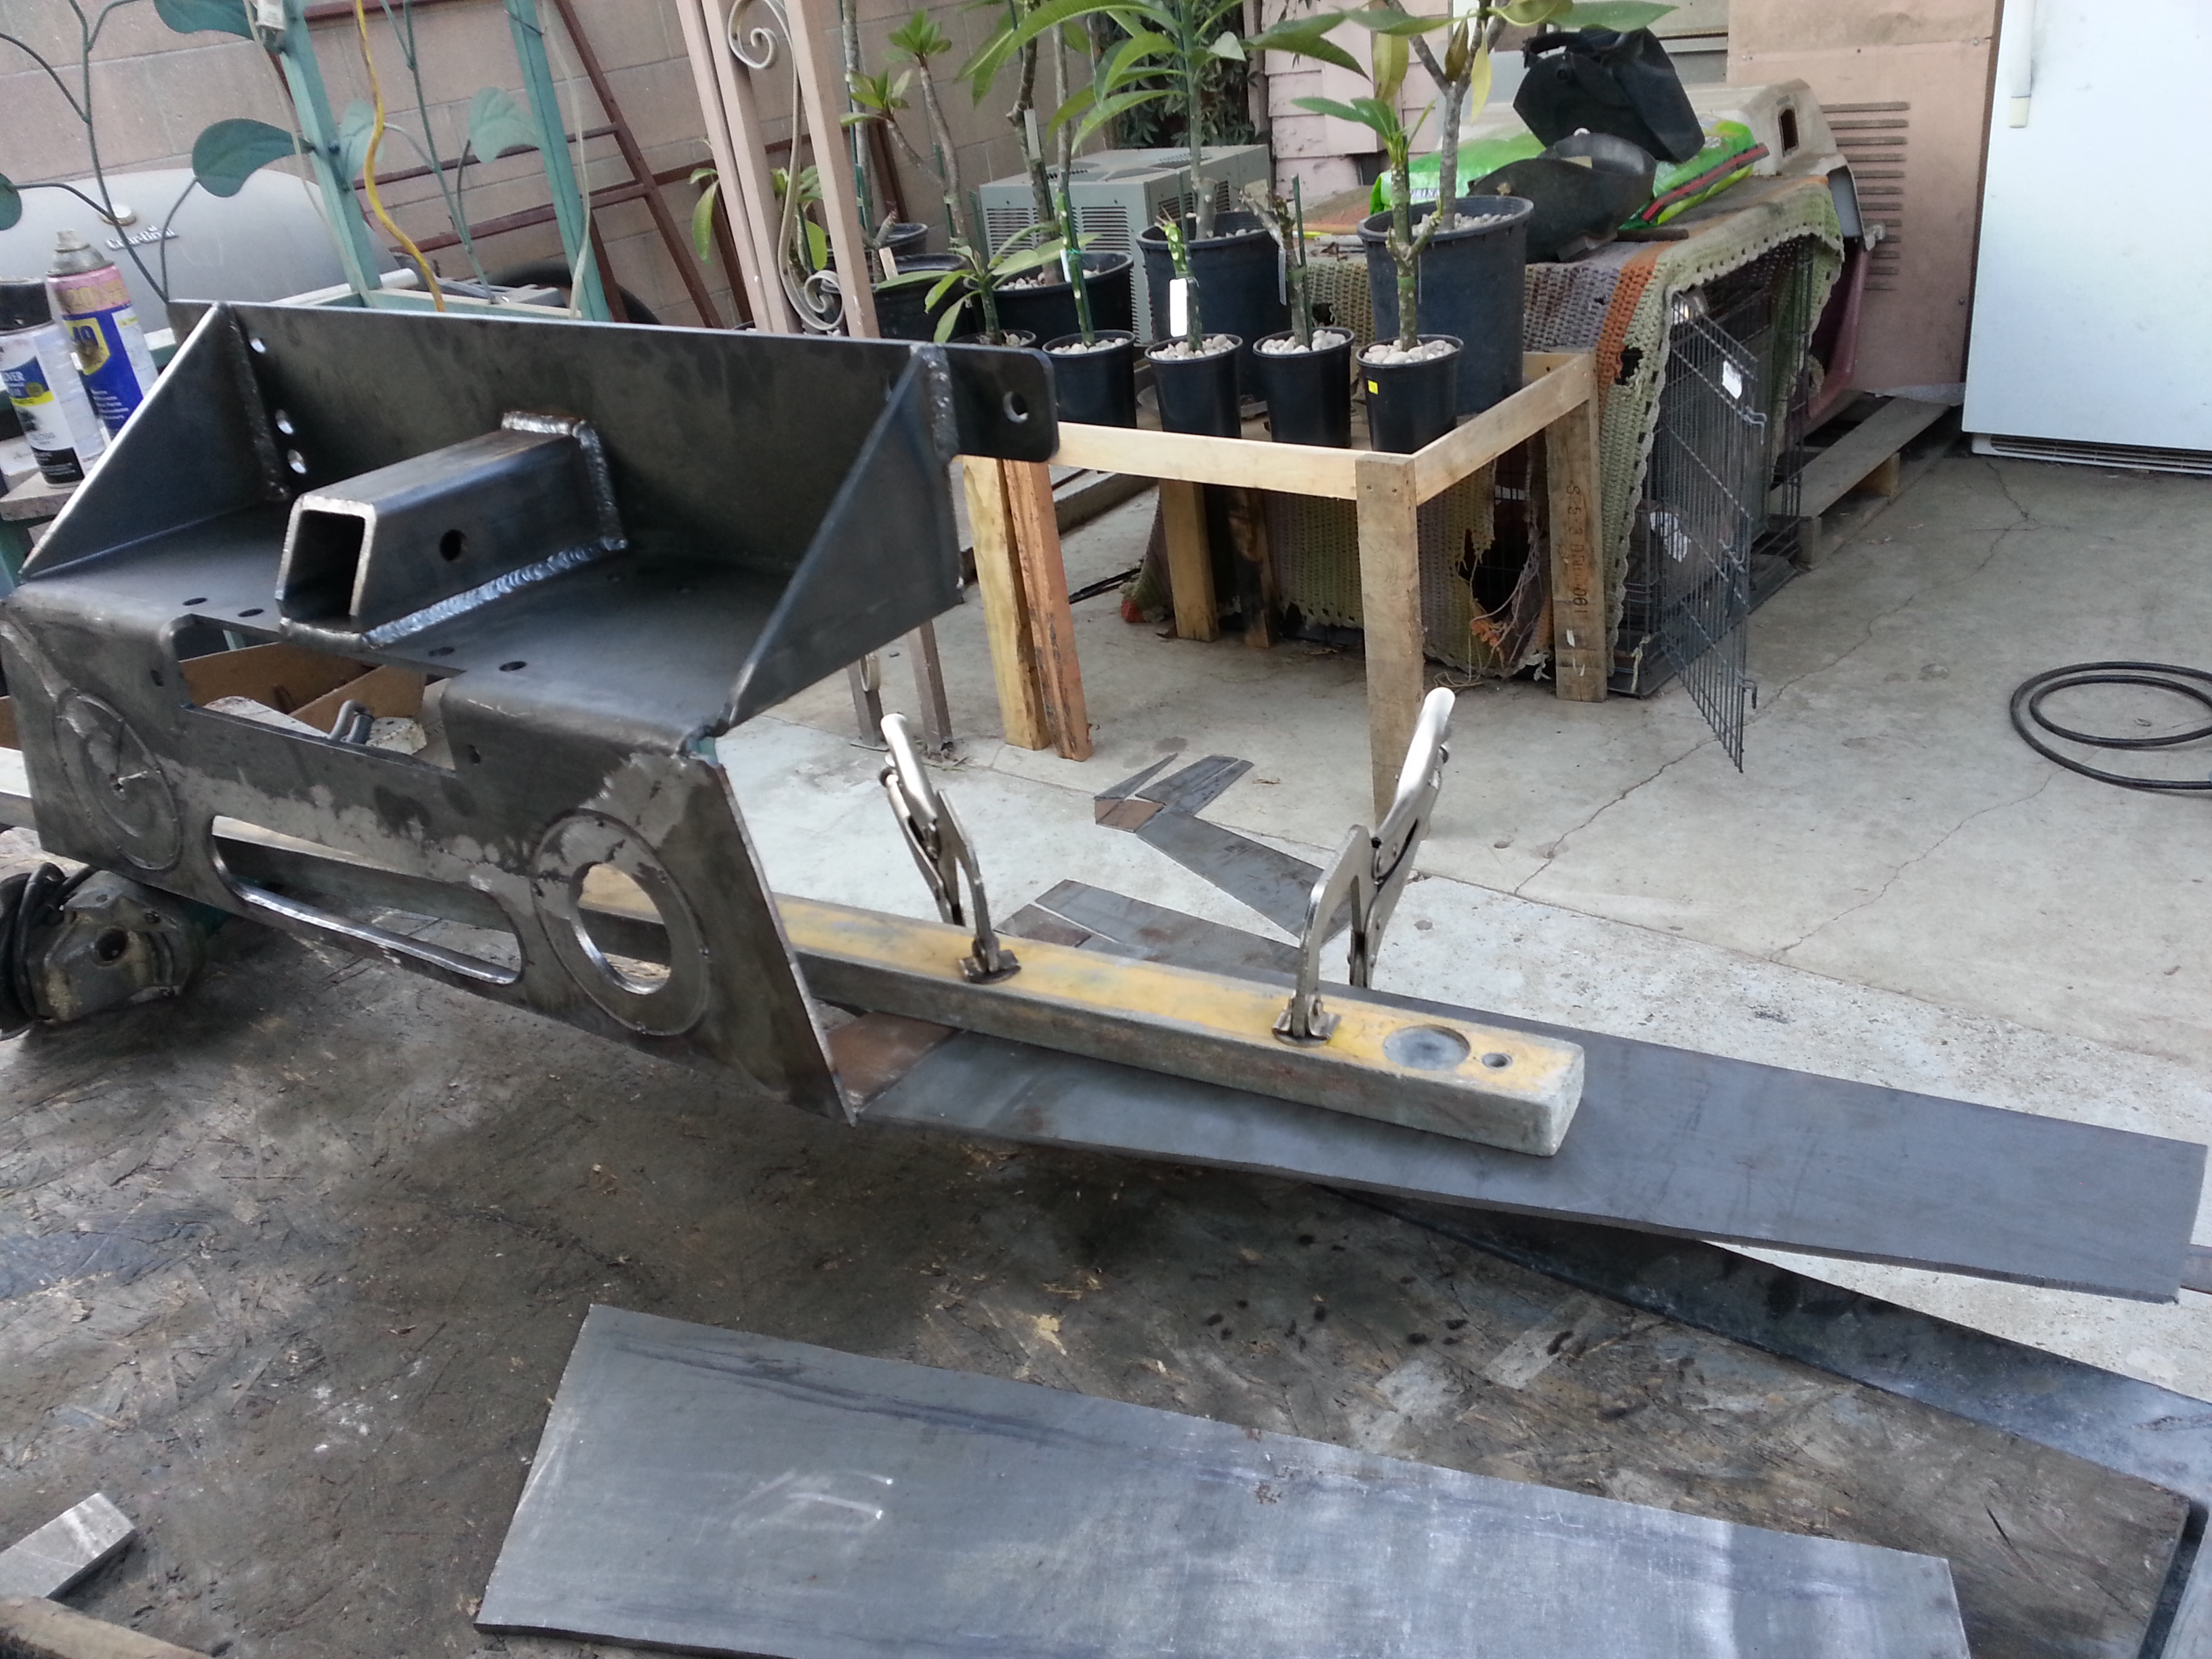
Inner part with the TG winch plate.
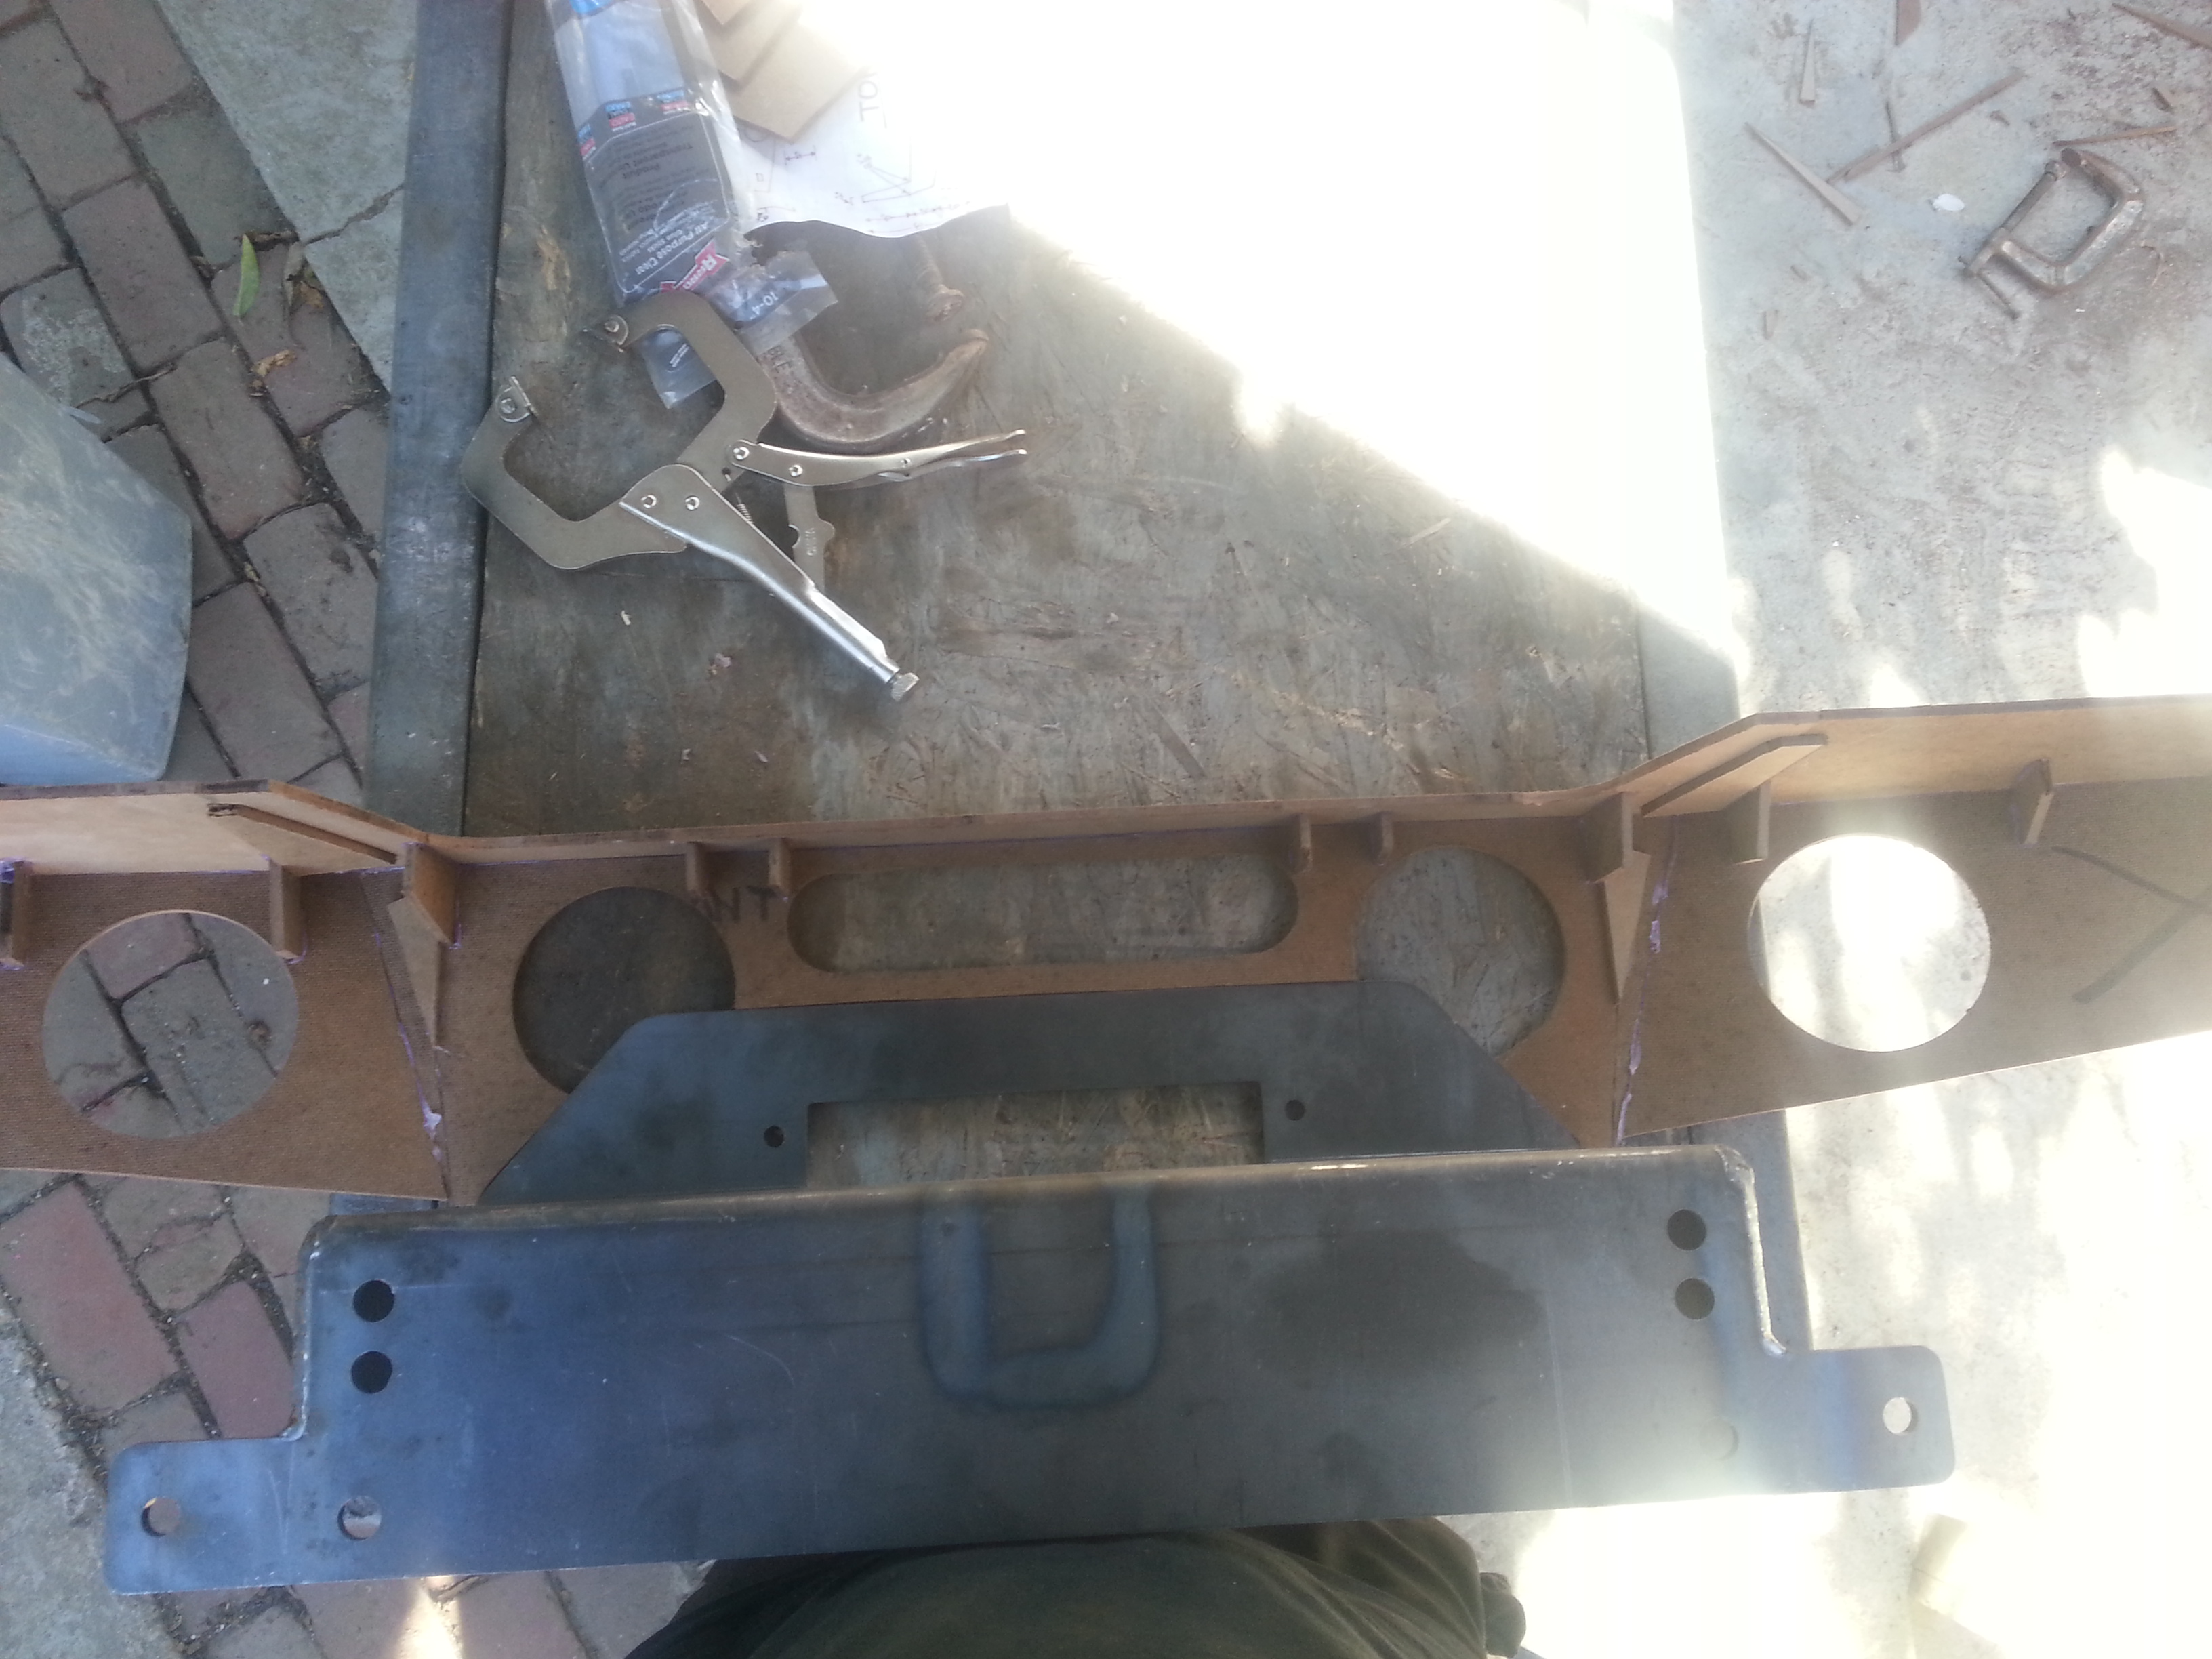
Dont know if you could tell here but i want to add a 7" x 6-3/4" squarish plate that weld on to the TG winch plate sides and on the underside of the top part of the bumper if that makes any sense. I had thought that this bumper will be needing the extra support so i want to add it for this reason. (I'll edit this picture on photobucket and add some arrows so you know where im talking about.
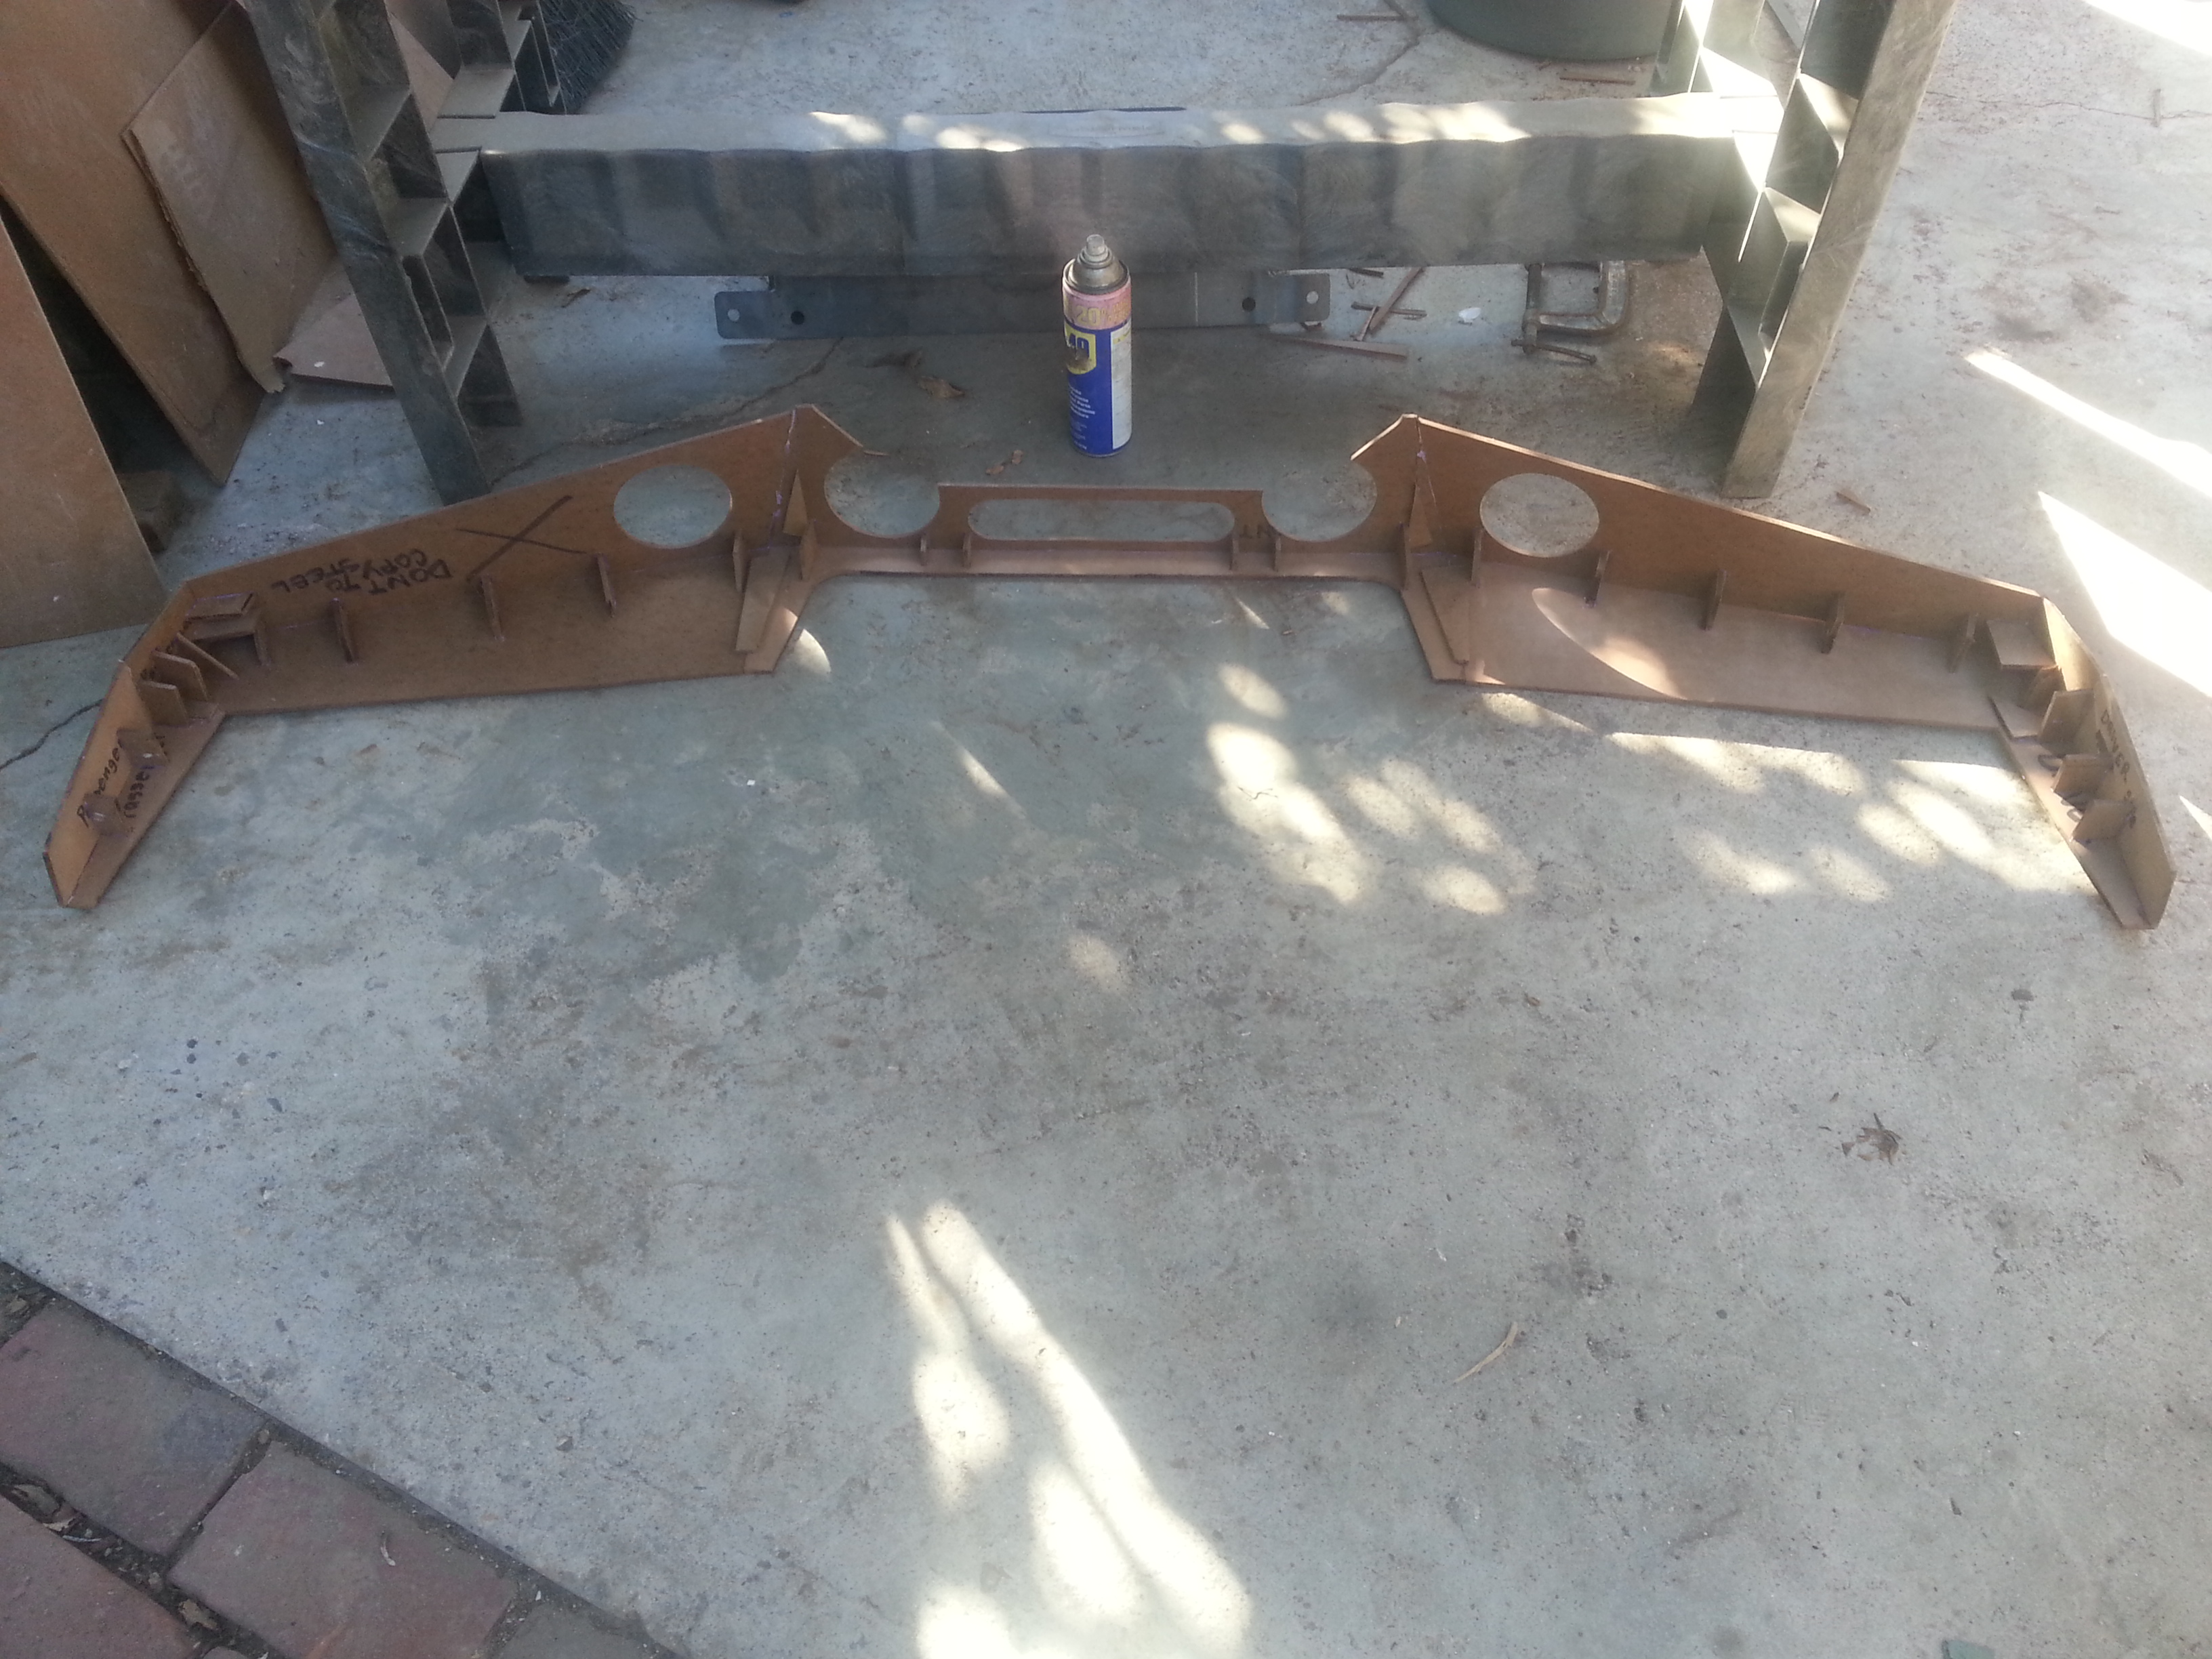
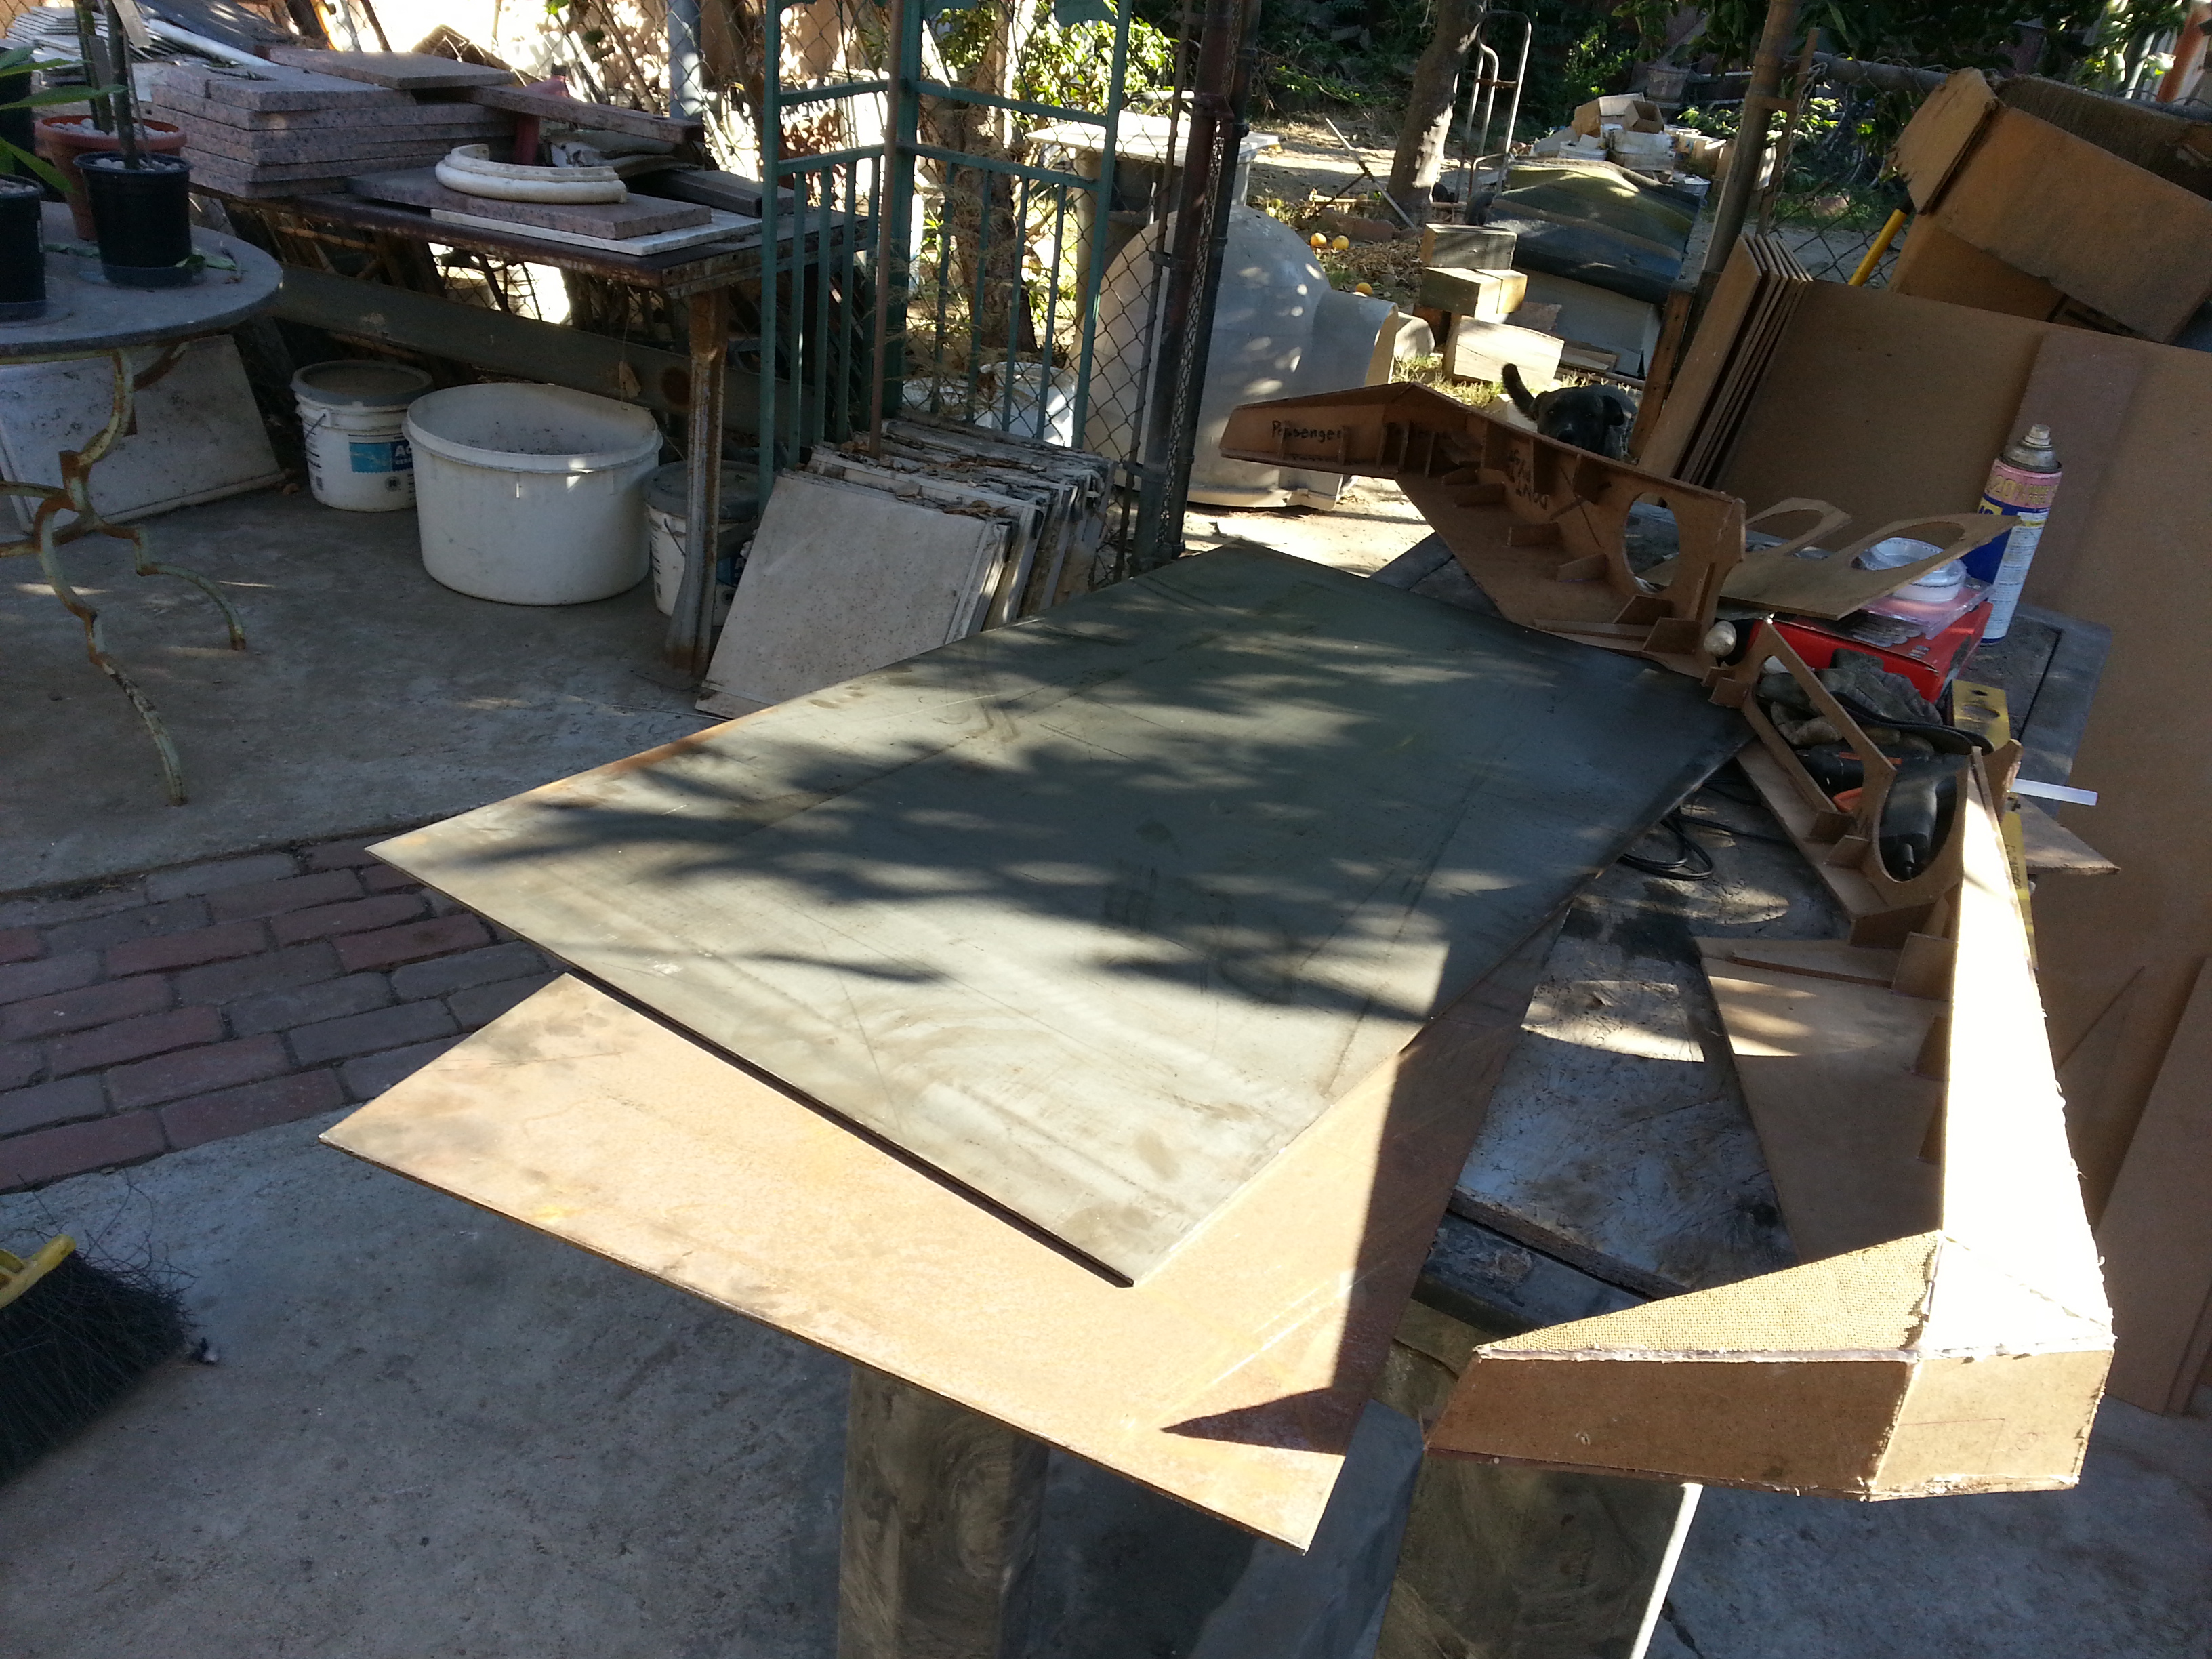
Finally added the bottom parts of the bumper. They just curve under the bumper slightly to give the bumper a nicer look. Kind of looks like a stealth jet to me
and i realized that i was off by 2 inches off the top side. cant start off making problems so soon lol. all good i fixed the piece making it 22" at the bottom and changing the top from 24" to 26"
Outlining/centering the LED light holes.

Most of my pieces cut out already.

She be coming along nicely!

Side. I had to measure out the winch to make sure the center top piece cleared the sides. It did

I added the corners that go all the way to the wheelwell.

top with the side pieces

Another for the hell of it.

In case you guys are wondering how im holding all this Masonite board together this is what im doing. Using a hot glue gun and a hole bunch of little angled gussets. if it weren't for those this whole thing would just wall apart. This isnt needed when i do the real thing though.

Inner part with the TG winch plate.

Dont know if you could tell here but i want to add a 7" x 6-3/4" squarish plate that weld on to the TG winch plate sides and on the underside of the top part of the bumper if that makes any sense. I had thought that this bumper will be needing the extra support so i want to add it for this reason. (I'll edit this picture on photobucket and add some arrows so you know where im talking about.

Finally added the bottom parts of the bumper. They just curve under the bumper slightly to give the bumper a nicer look. Kind of looks like a stealth jet to me

 09-23-2013, 08:43 AM
#25
Registered User
Dang Rbx that thing is nice. Looks like you took a lot of time into thinking this one up.
I noticed you use that design that sort of looks like clovers in a couple things. Os that like your trademark? Cool to have a theme going. Man. Great job on making the desigb. I'd like to see it on your truck some day.
I noticed you use that design that sort of looks like clovers in a couple things. Os that like your trademark? Cool to have a theme going. Man. Great job on making the desigb. I'd like to see it on your truck some day.
I have spent many hours changing the design in hopes i can take a good hit out on the wings without impact to body damage. I will be adding some light protection, with limb lifters, but that's later.
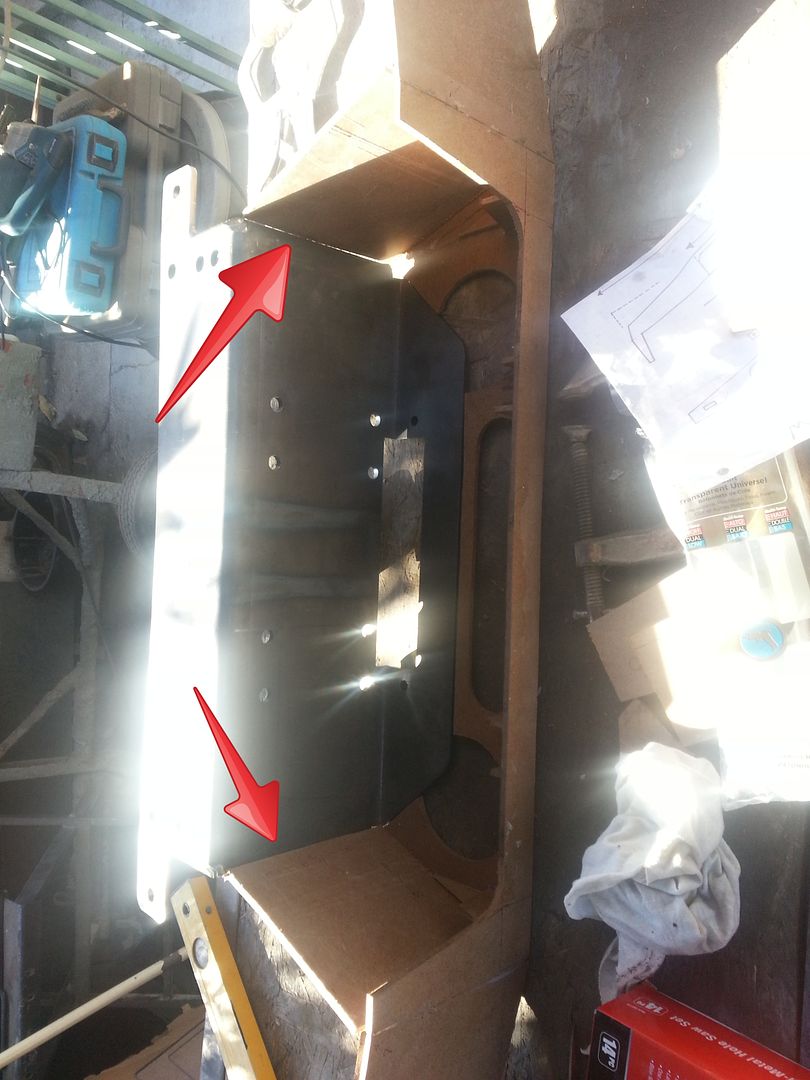
I'd look closely at how you can gusset the area you show above with the red arrows, a triangle welded to the TG plate behind the winch should help. Hopefully in my drawing you can see how I approached the issue. I am probably over building it, but I KNOW, the weakest point is out on the edge of the bumper at the corner lights...
here is the final version that was cut out, I'm using an x-ray view so you can see the construction better.

And the clover you mention is actually called a Calvert Cross from my state flag
 09-23-2013, 09:17 AM
#26
Hey Richard, everything RBX just said about the corners is absolutely true... Remember when I was mentioning all that about your rear bumper when we were talking about over one day? The front is much more dramatic and its need for the perfect angle of support against the corners... A lot of guys put DOM tubing as cross support behind and portion of a bracket coming off the frame. But anyway, I can tell you first hand, even from Pismo, where a Land Cruiser with a 4 X 4 labs huge ass bumper on a 93 or so Land Cruiser went into a ditch that came straight back at him(basically, he went from 25mph to zero in 0 SECONDS, into a wall of sand ),.... And he clearly had damage to the bumper, and at the same time, he took out his radiator!( another side story, and I got some pictures, but he had to drive from Pismo to Garden Grove to meet the owner of a place that actually had that radiator and that would wait for him until late Saturday evening... And then drove back and they worked on it until at least 2 or 3 in the morning (I don't know, because I was crashed out by 130am... Toyo could tell you, but let me just say what a brutal repair to have to do in the dark and pretty damn cold, with and a lot of fog and wind and Sand in your face..... )
I mention that story because it's a perfect example of, how even with a well built bumper, crap can happen and I would think with a $1500 to $2000 dollar bumper like those are, the radiator would be fully protected or at least somewhat... I believe they were friends of the UltimateYota owner, as he did come over there and help them for quite a bit. I'm sure they will post pictures and that's why I brought that up, maybe we can get a good look at where it failed?
I mention that story because it's a perfect example of, how even with a well built bumper, crap can happen and I would think with a $1500 to $2000 dollar bumper like those are, the radiator would be fully protected or at least somewhat... I believe they were friends of the UltimateYota owner, as he did come over there and help them for quite a bit. I'm sure they will post pictures and that's why I brought that up, maybe we can get a good look at where it failed?
Last edited by ChefYota4x4; 09-23-2013 at 09:22 AM.
09-24-2013, 08:22 PM
#29
Registered User
Thread Starter
RBx i see what you're talking about on the support thanks for the idea. It's definitely something to look into. i was thinking possibly adding somehting like what you did for support and possibly bringing in some 1/4" tubing from the sides to the frame. I'm sure that would probably work best.
Mark, remember i did ad support to the sides. I did it like the 4x innovations bumper you have is. with the tubing going to the sides. but the difference is that i connected it in 3 spots on the face of the rear bumper. and 2 on the sides. one on each side about 2" away from the wheel well and connected those 1/4" tubes to the frame as well. I had to have hit that rear bumper over 25x for sure on our last Big Bear Ca trip. and i have to say that thing held up like a champ. but good think you told me about that cuz i had totally forgotten. up until you showed me a picture of how the 4x innovations did theirs.
Mark, remember i did ad support to the sides. I did it like the 4x innovations bumper you have is. with the tubing going to the sides. but the difference is that i connected it in 3 spots on the face of the rear bumper. and 2 on the sides. one on each side about 2" away from the wheel well and connected those 1/4" tubes to the frame as well. I had to have hit that rear bumper over 25x for sure on our last Big Bear Ca trip. and i have to say that thing held up like a champ. but good think you told me about that cuz i had totally forgotten. up until you showed me a picture of how the 4x innovations did theirs.
09-24-2013, 08:50 PM
#30
Registered User
Thread Starter
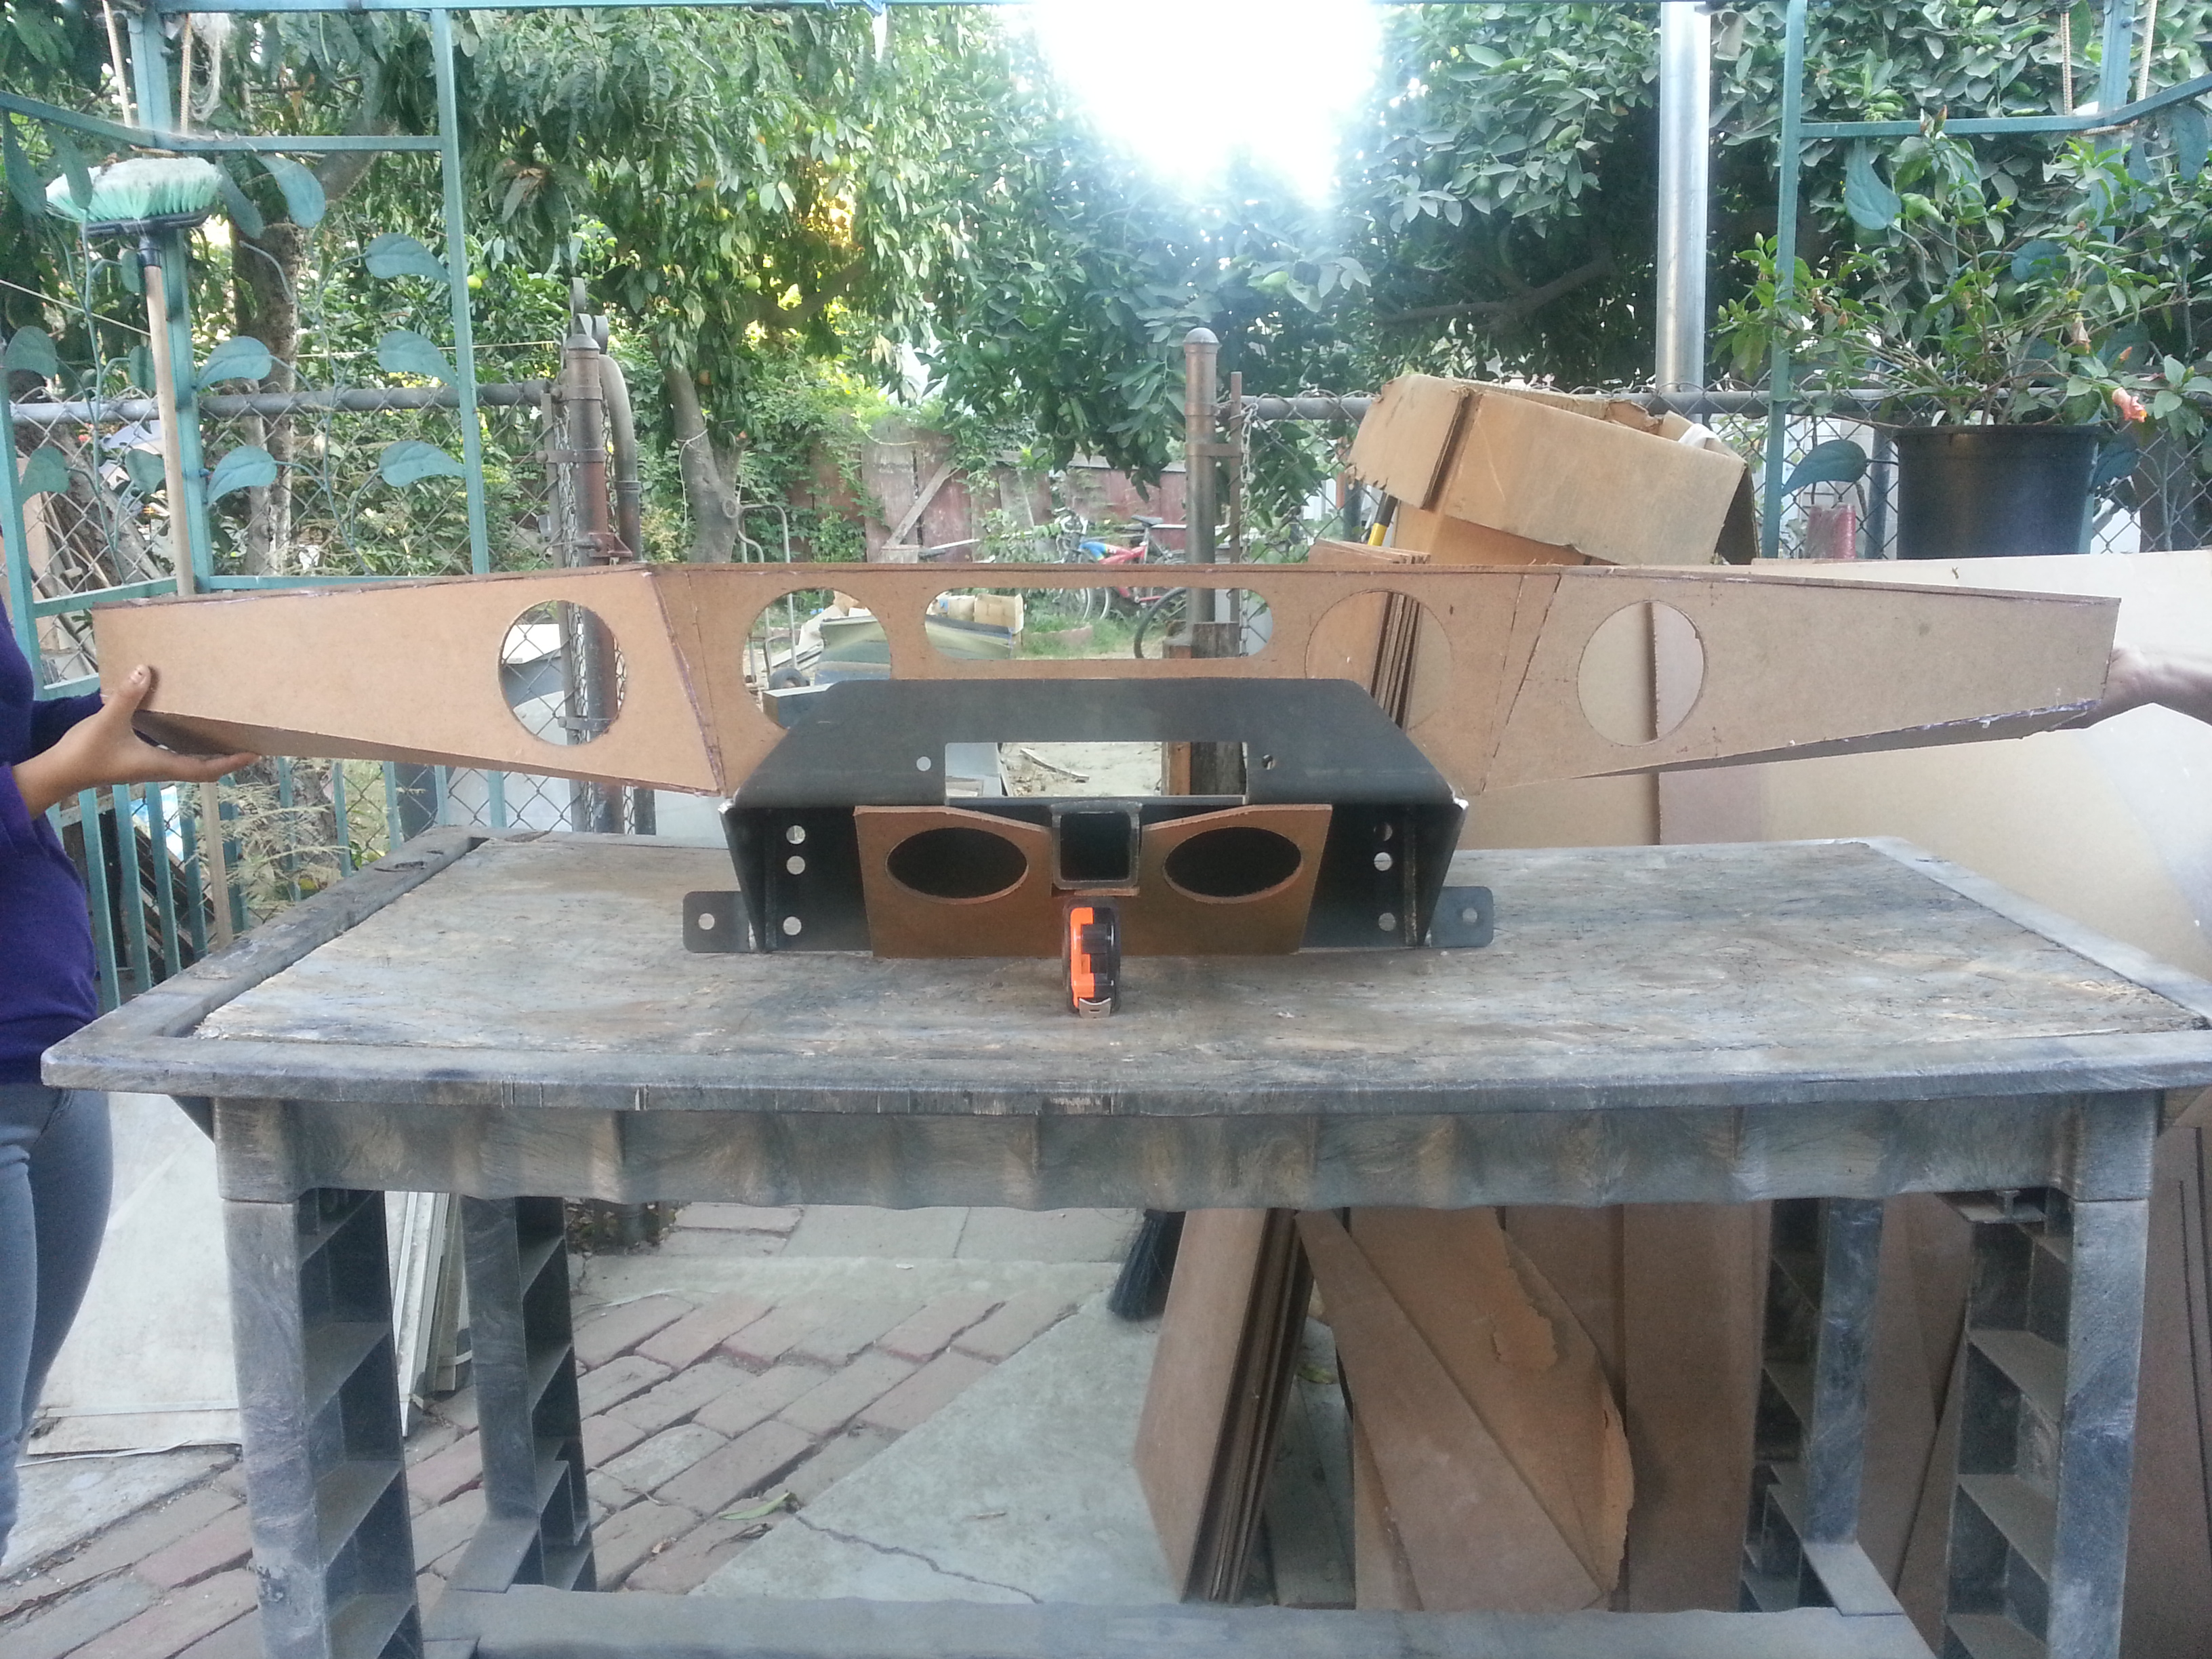
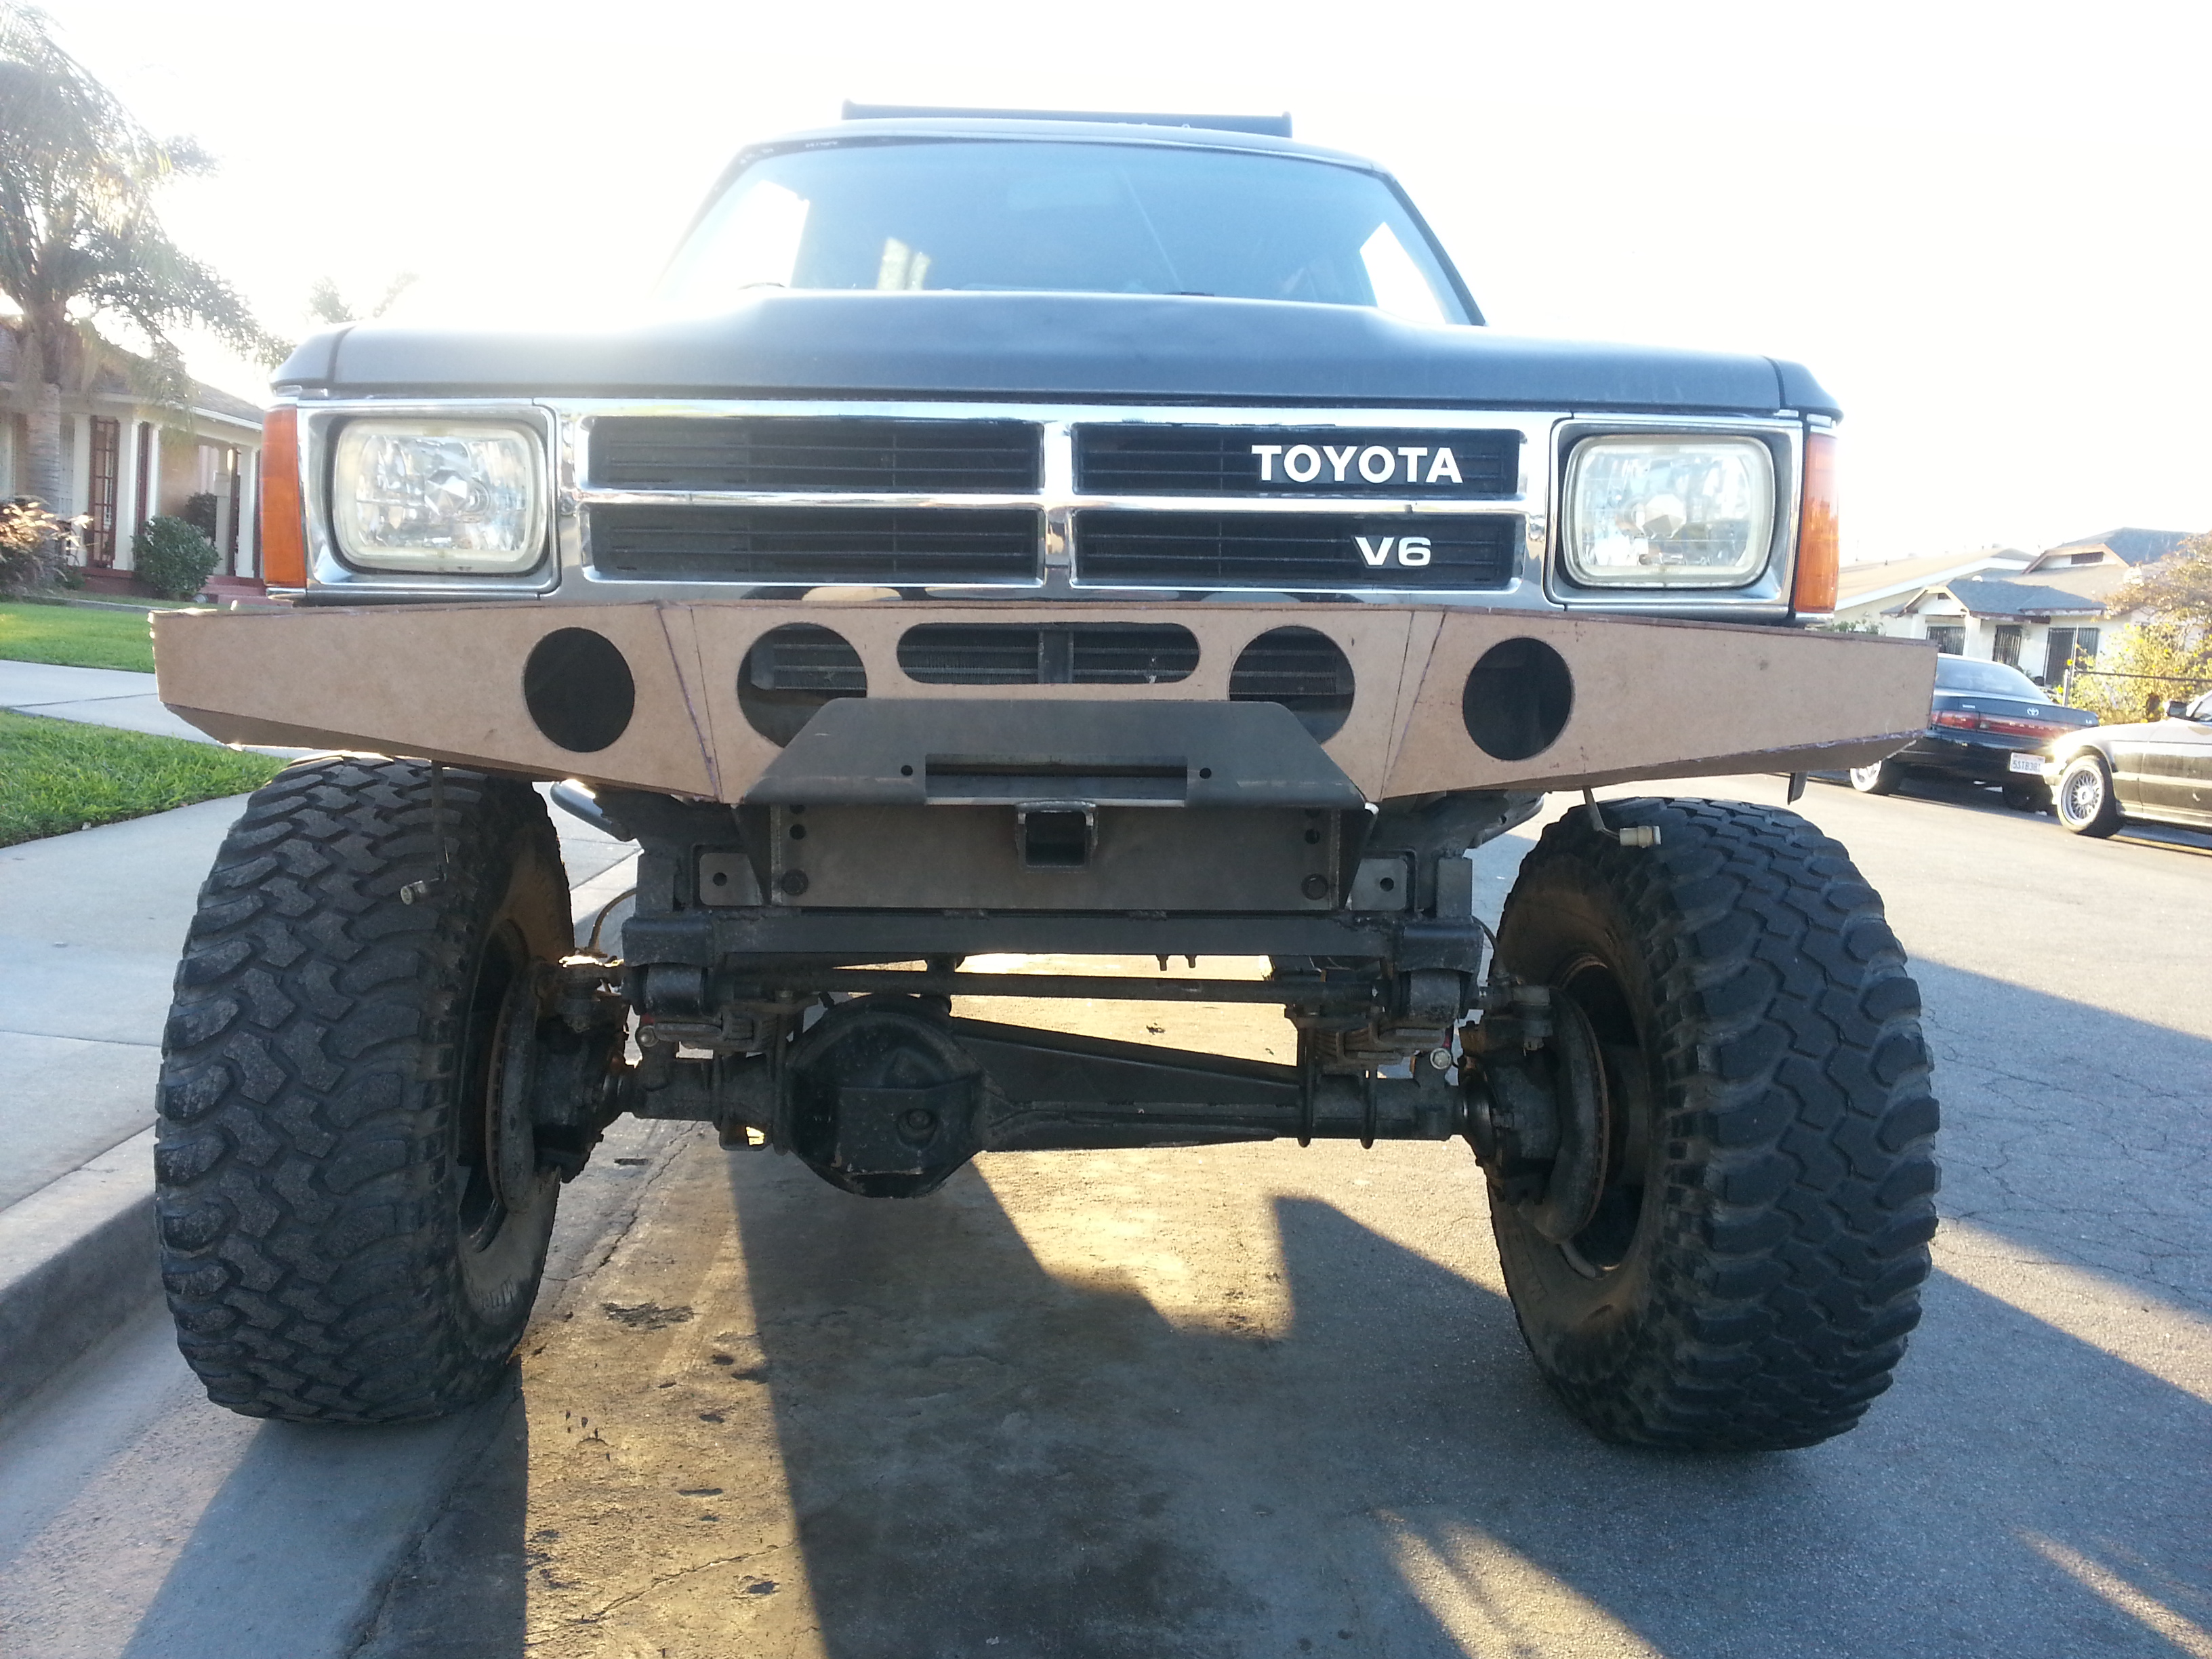
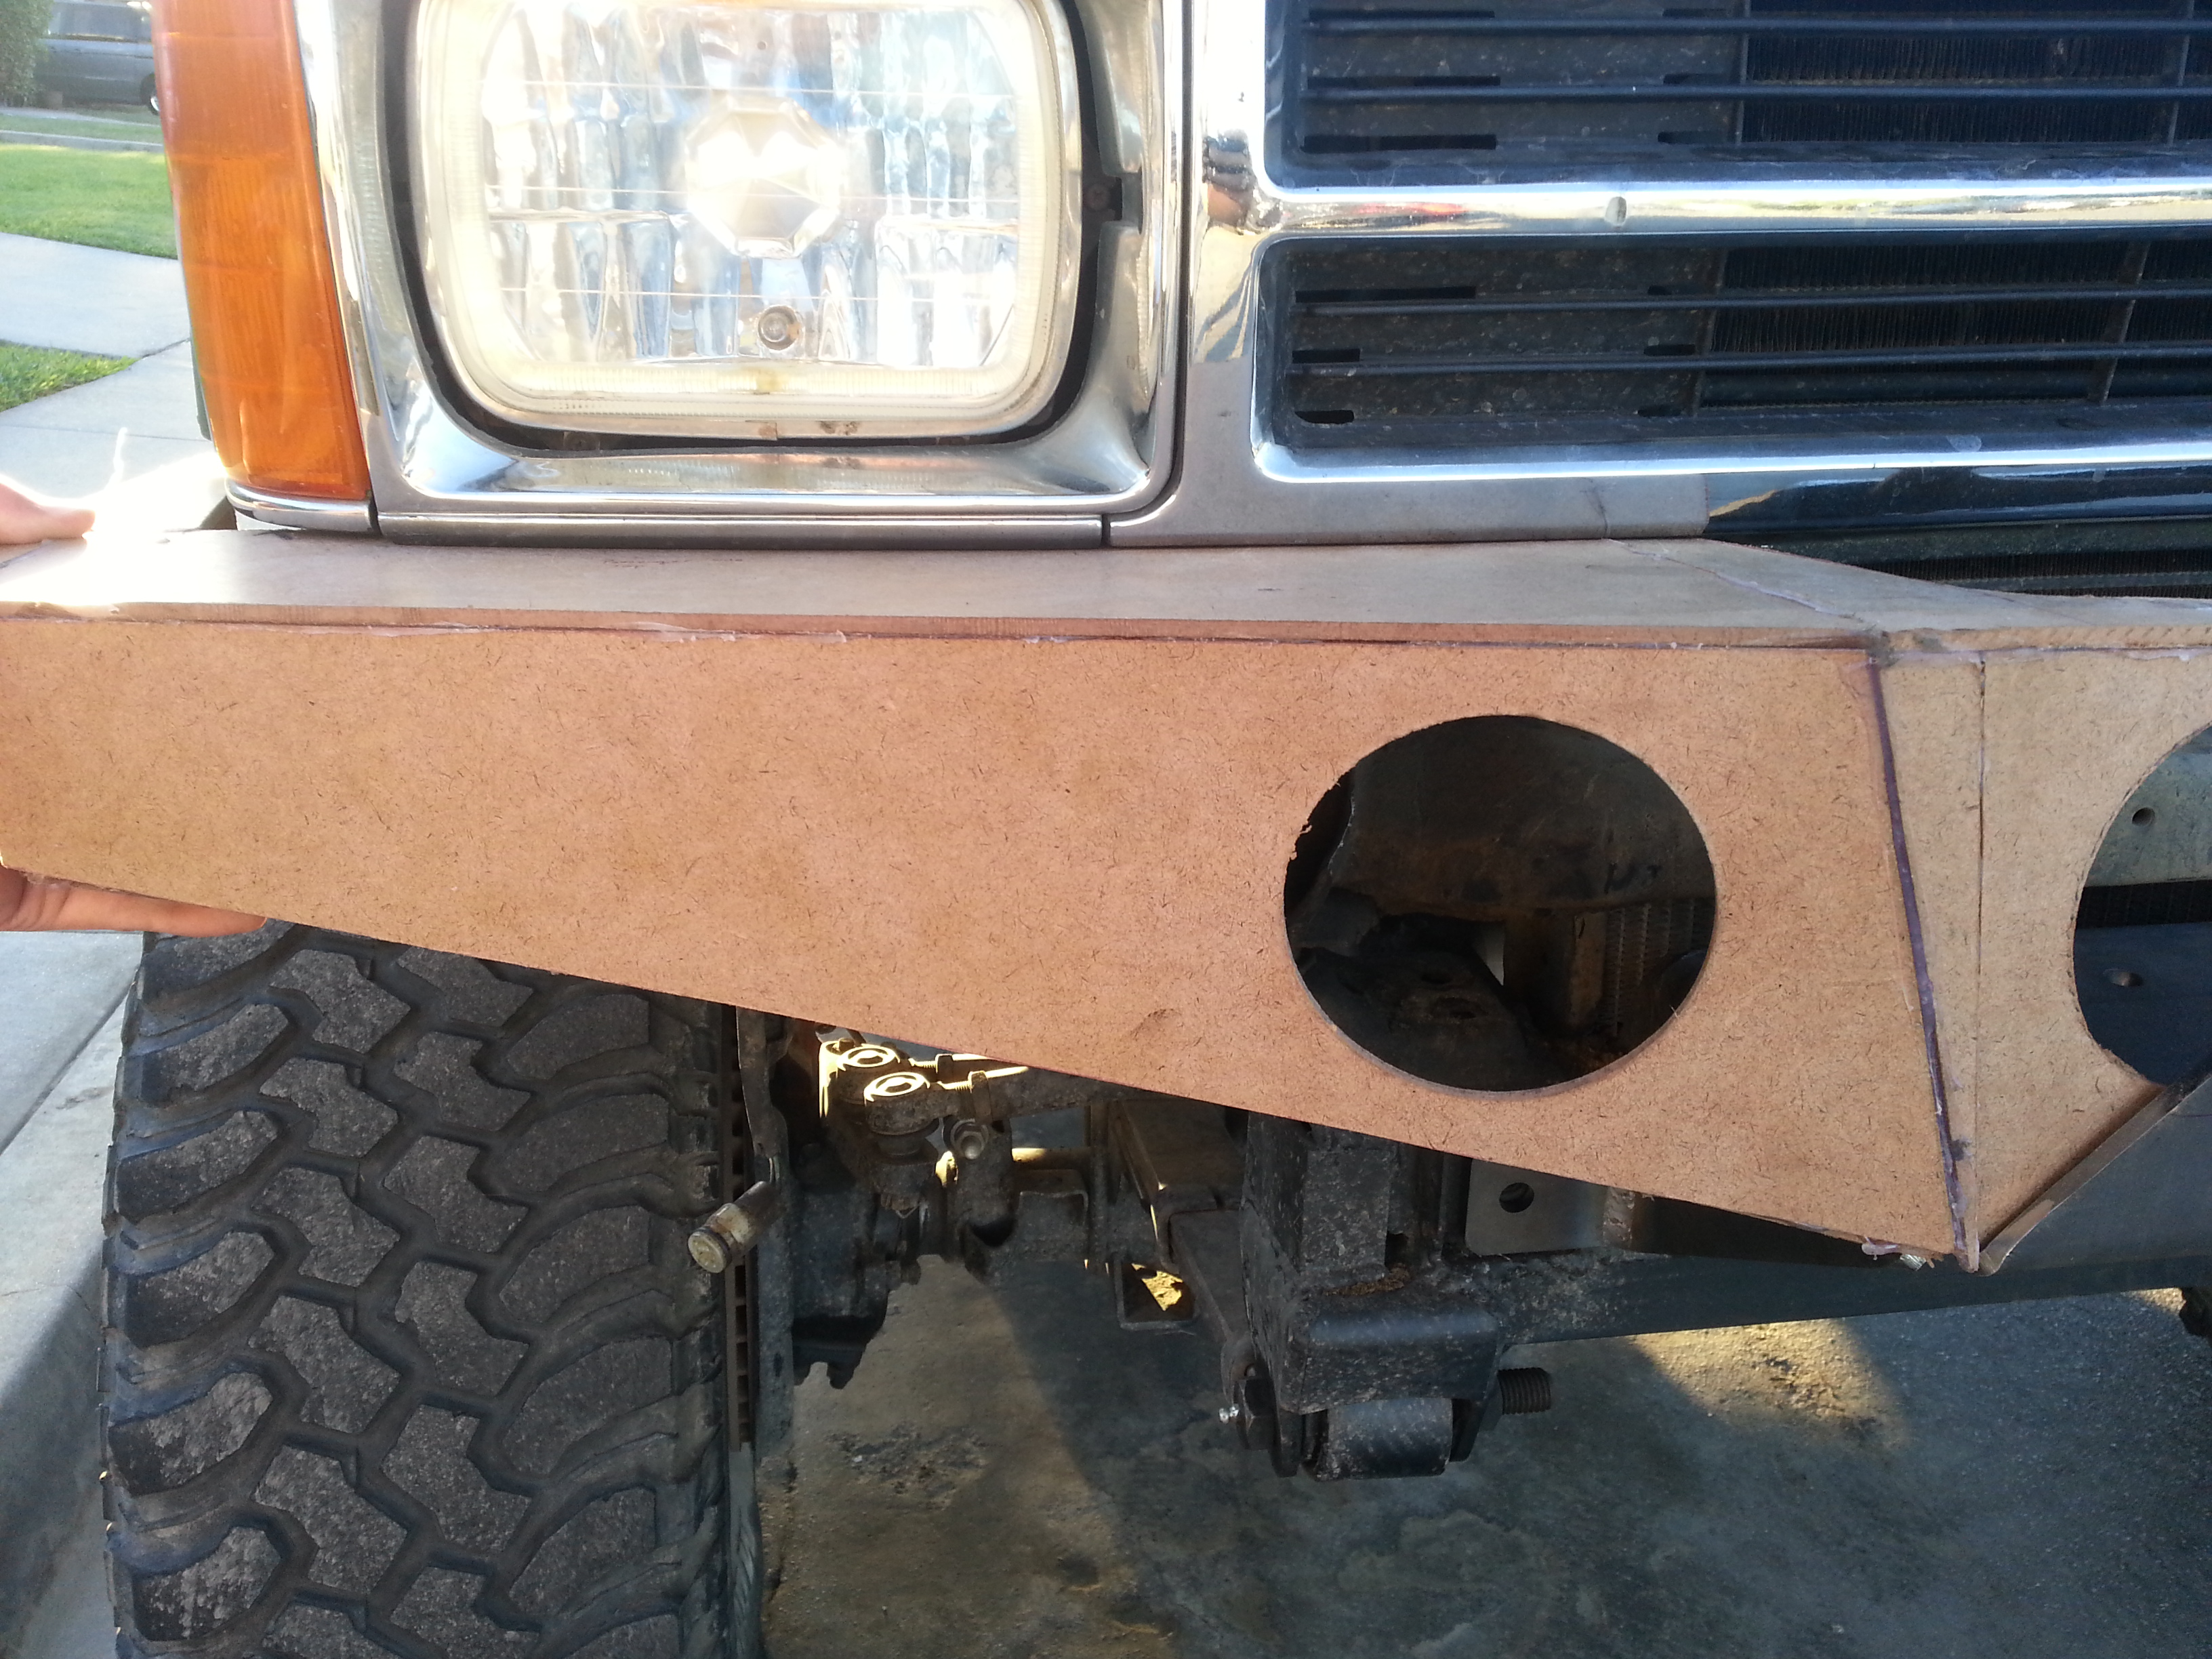
Alright guys I managed to get some type of progress in. Not a lot. but it was just fitting the prototype. Either way it was still fun.
My favorite shot.
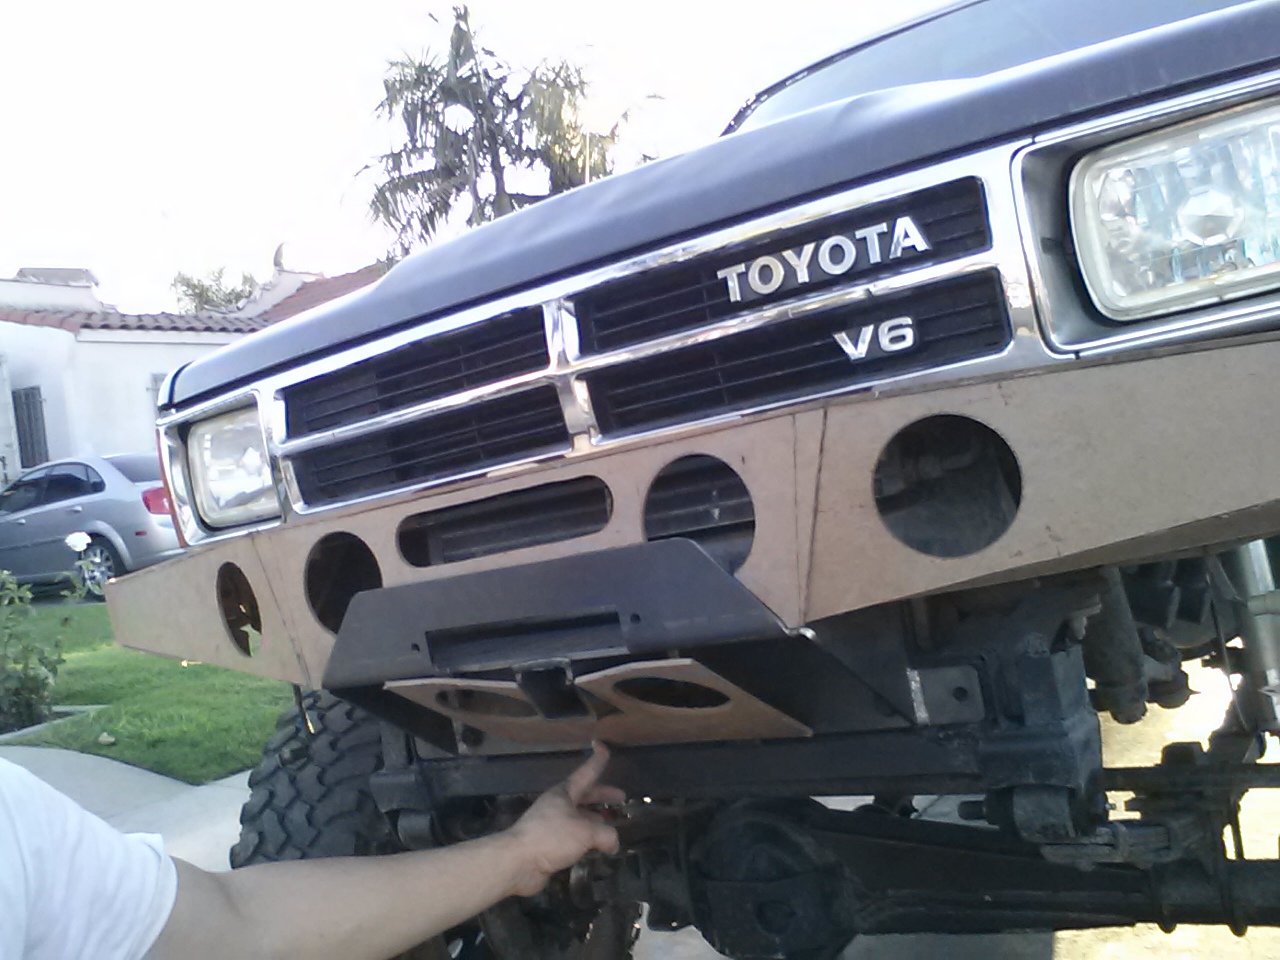

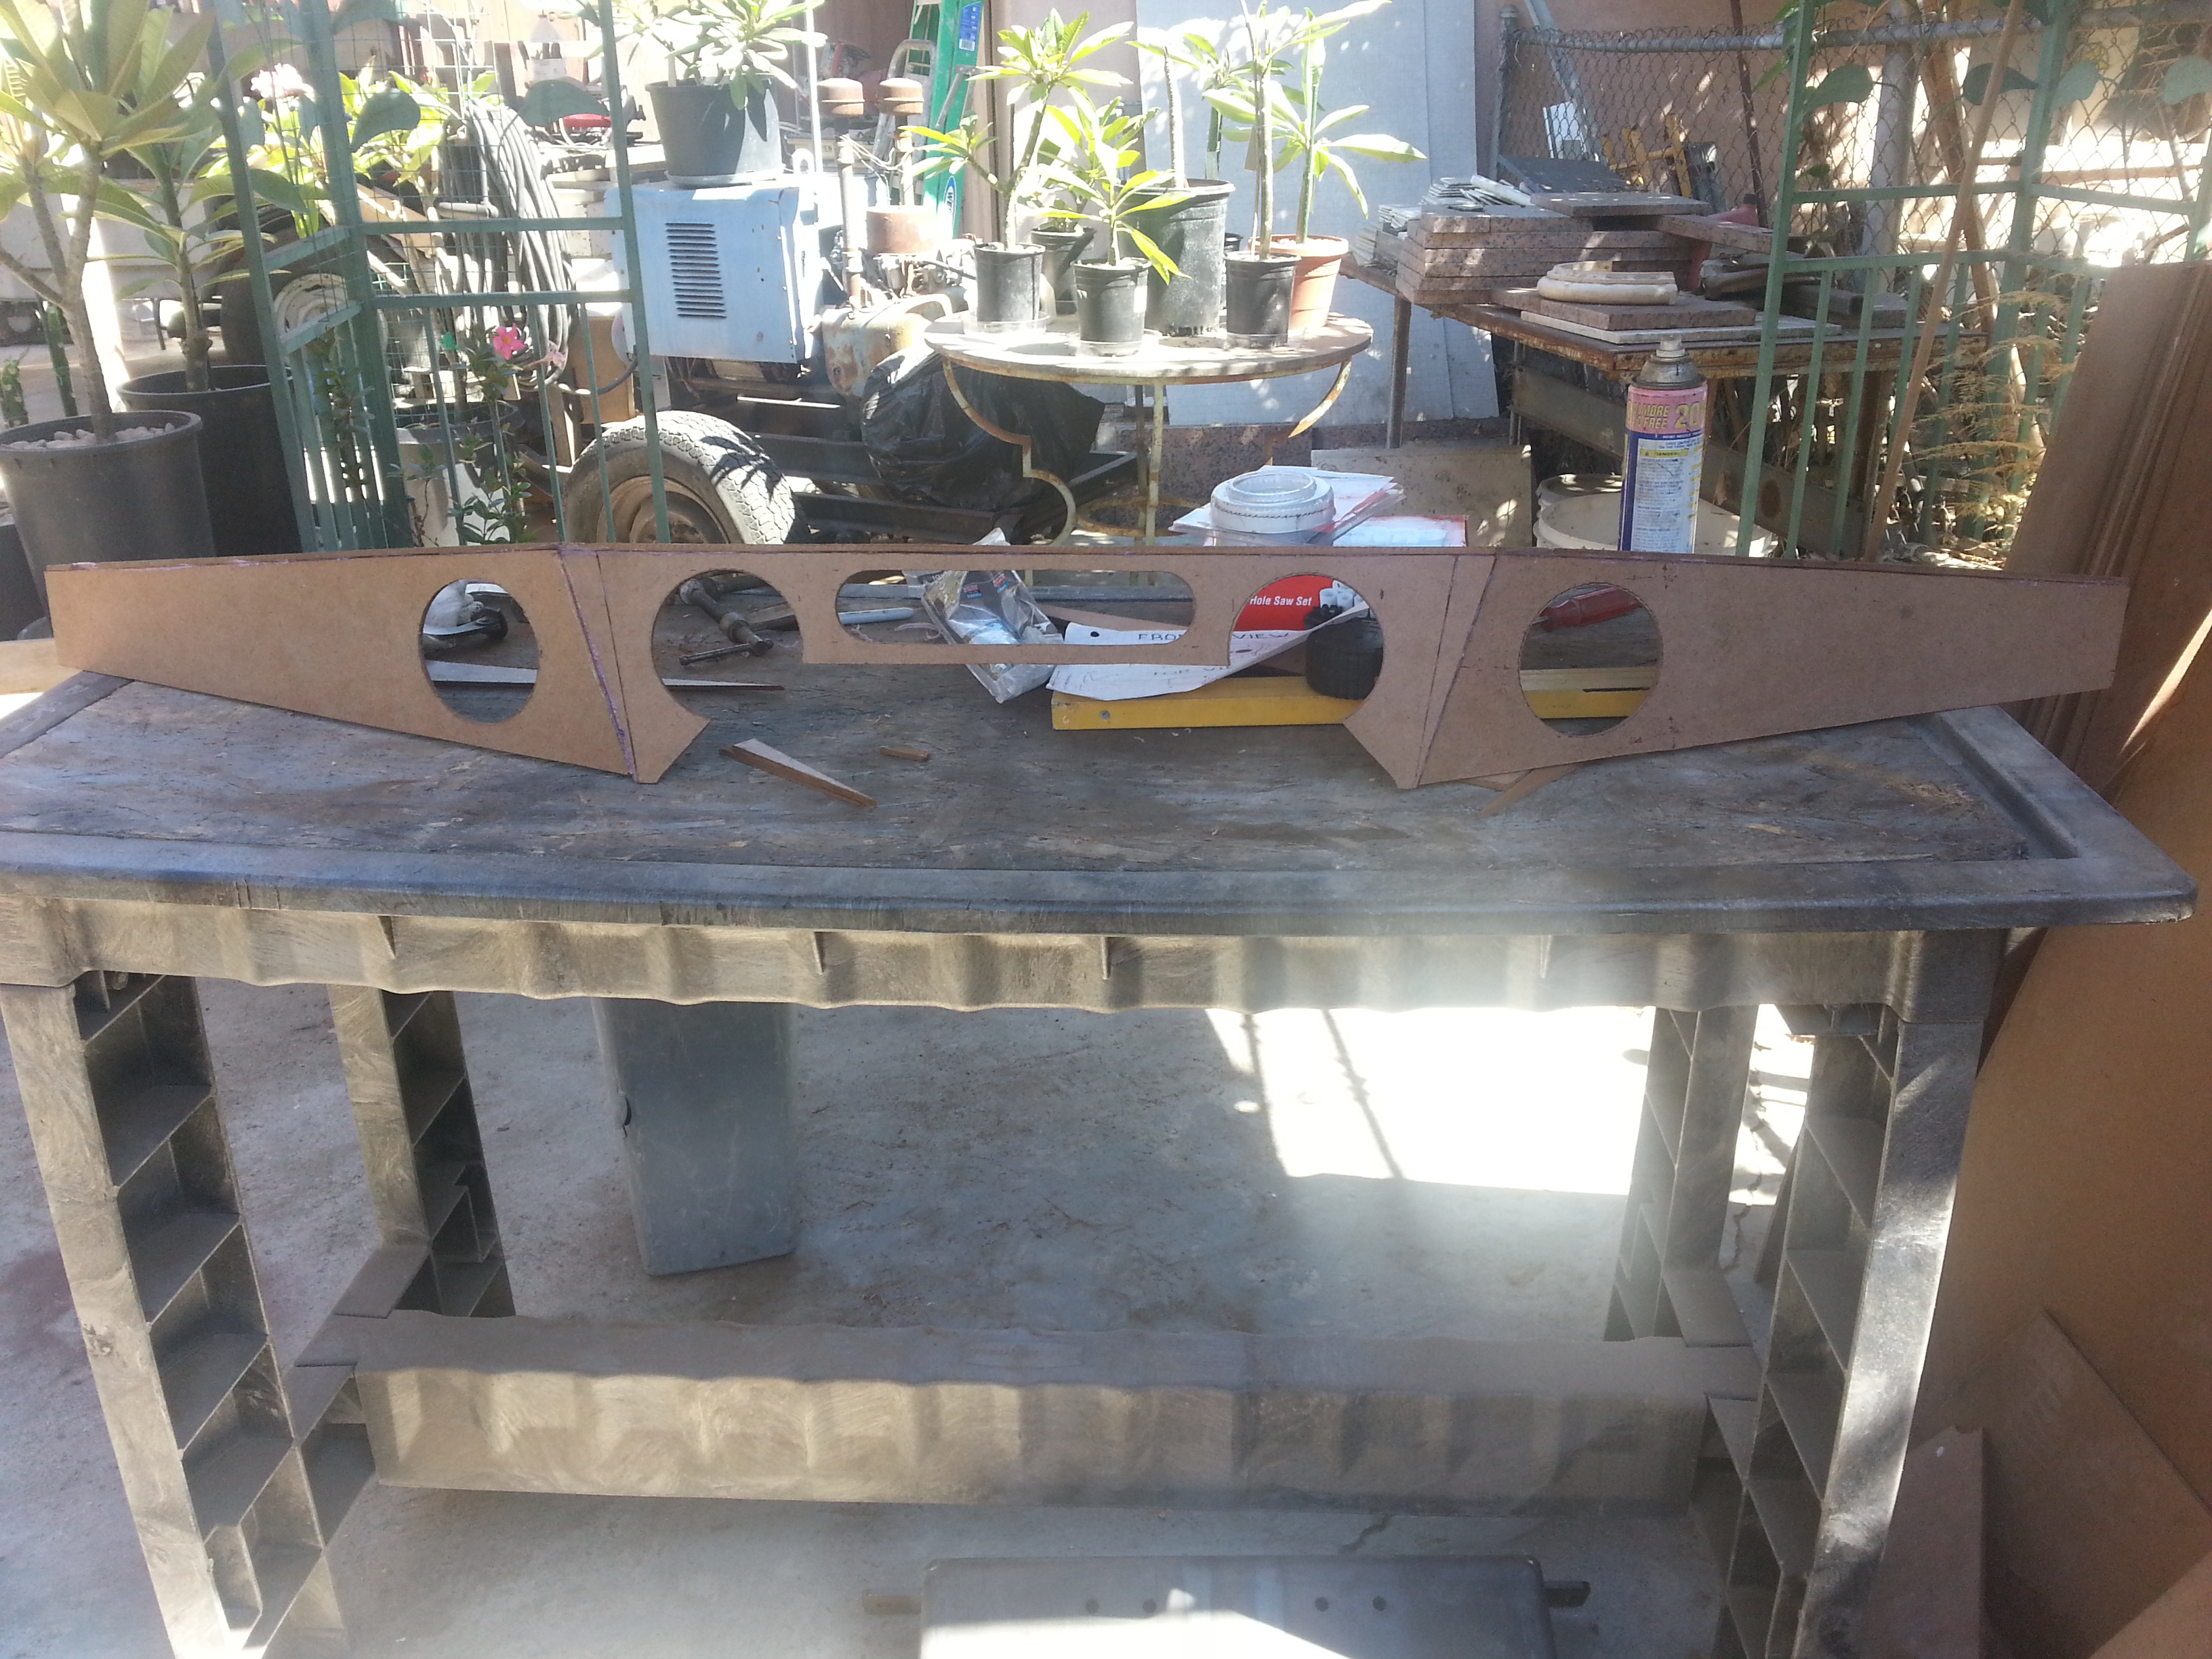
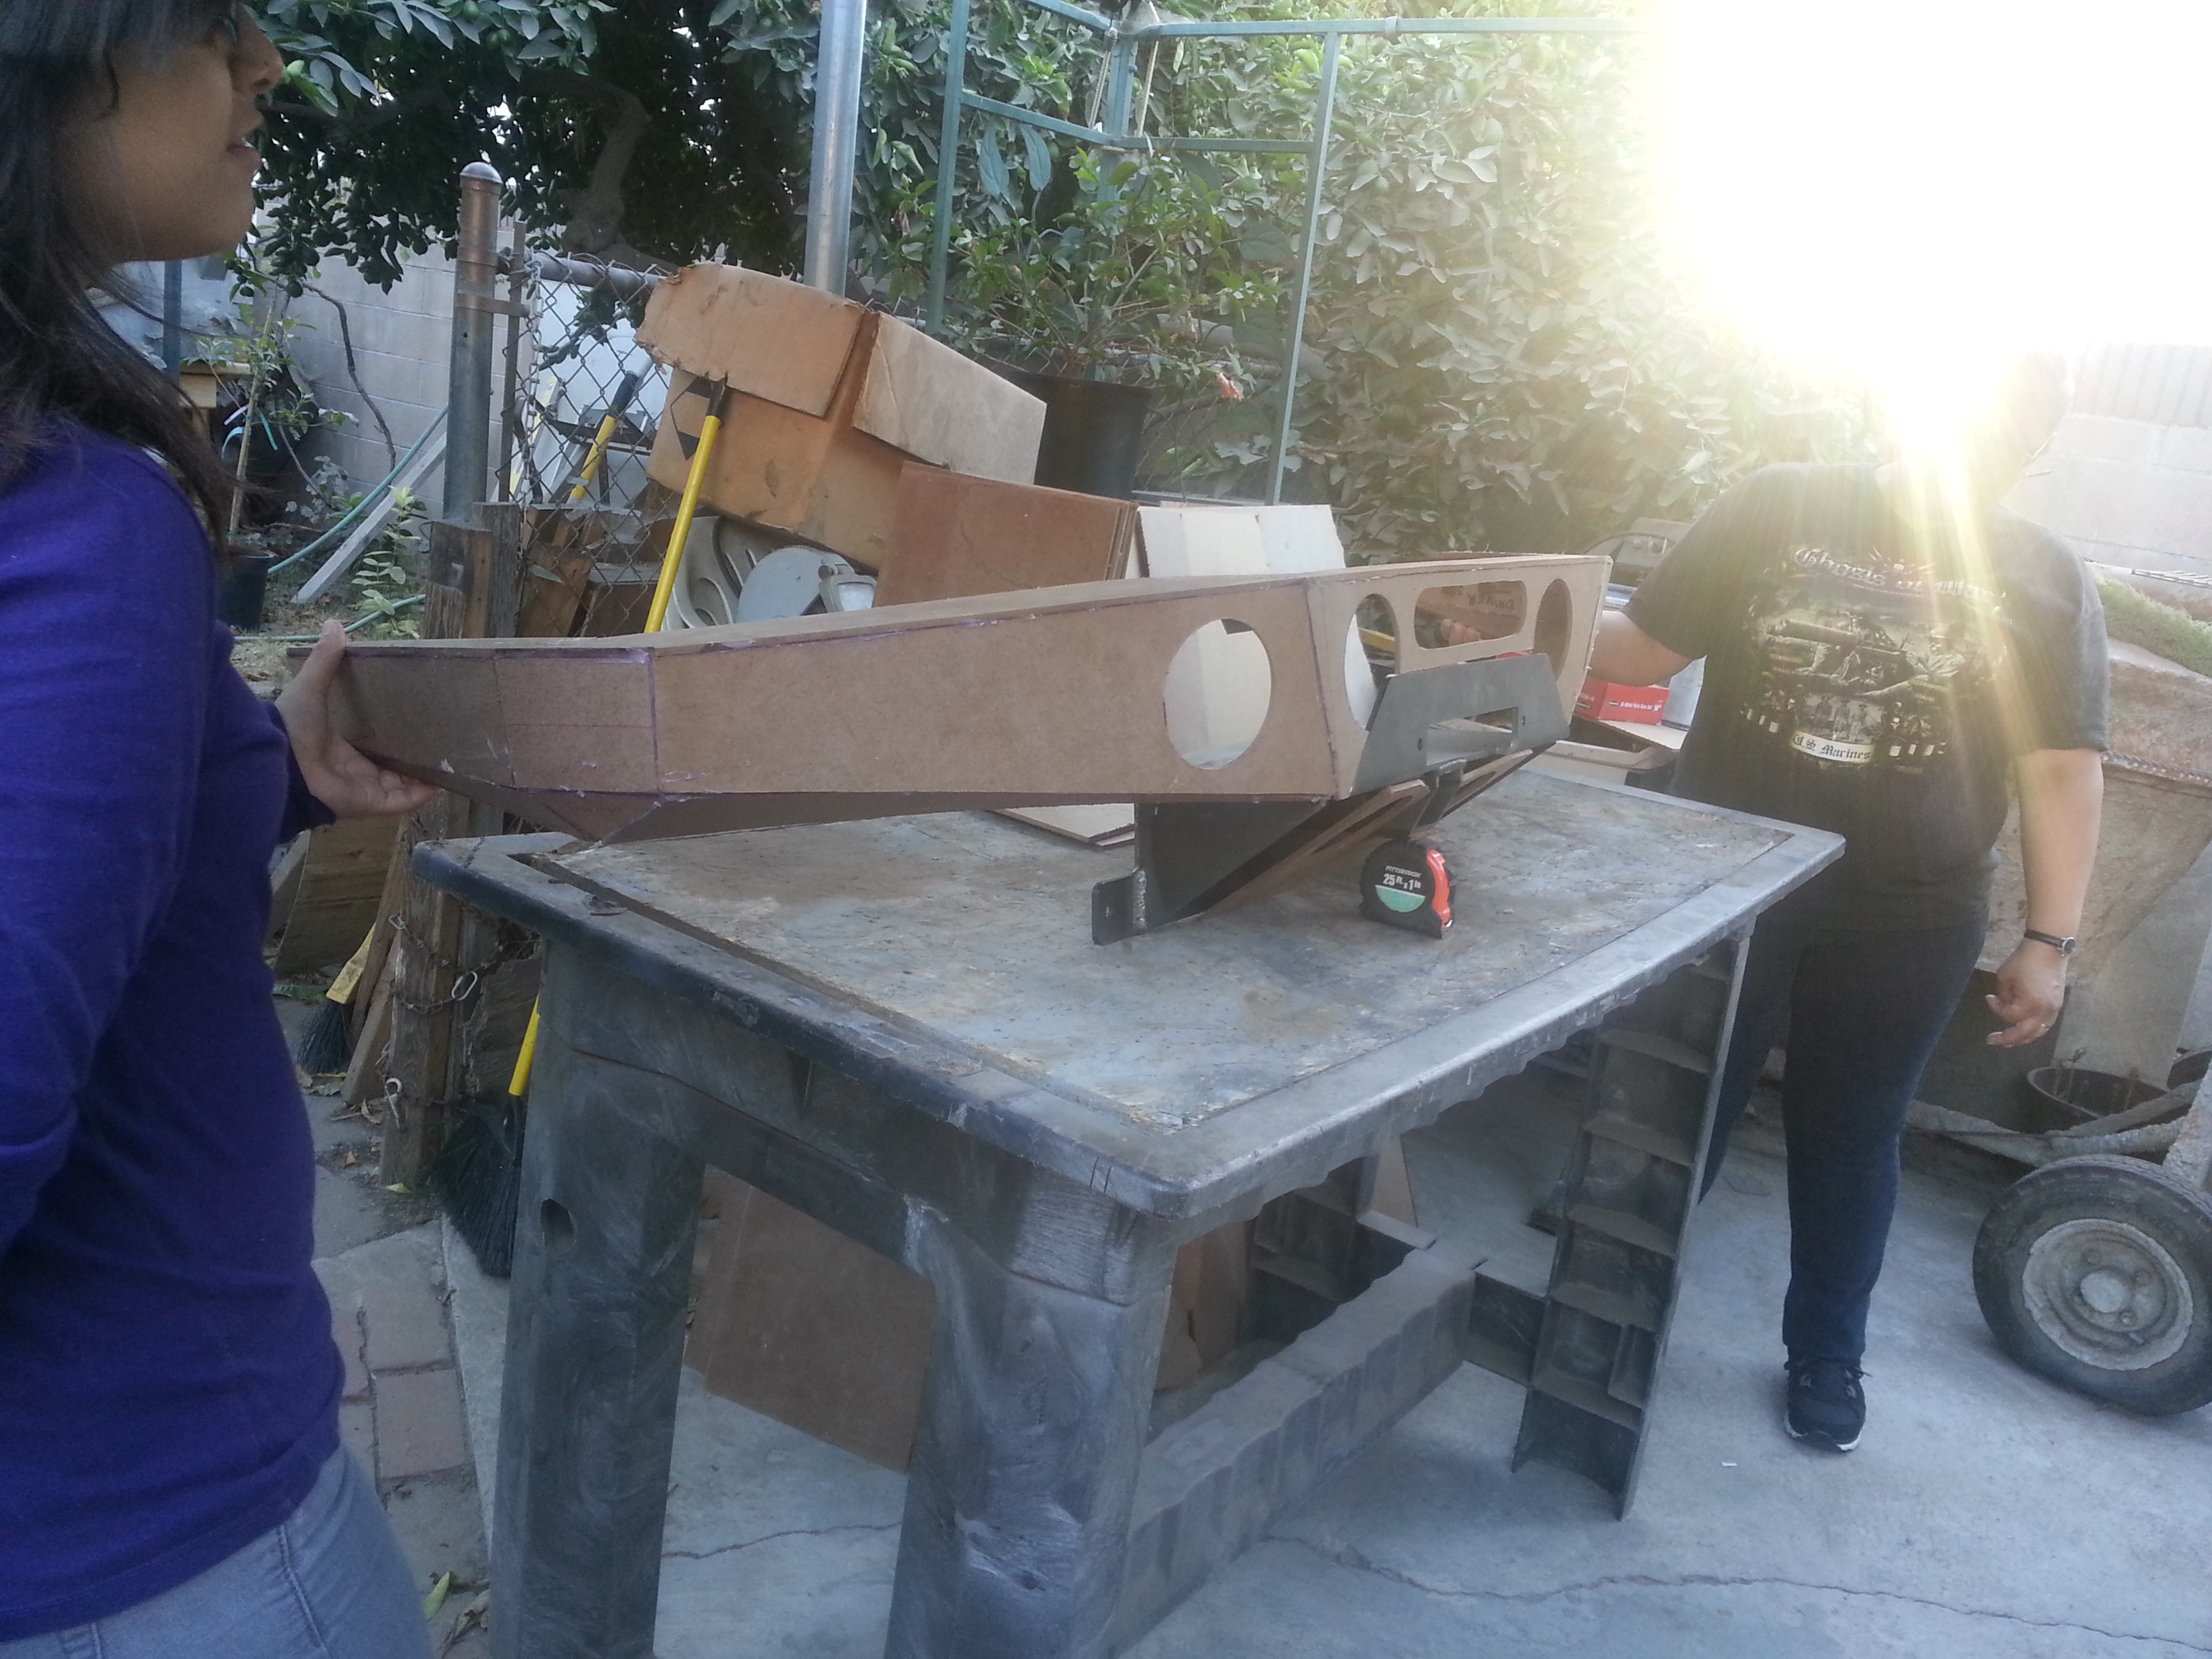
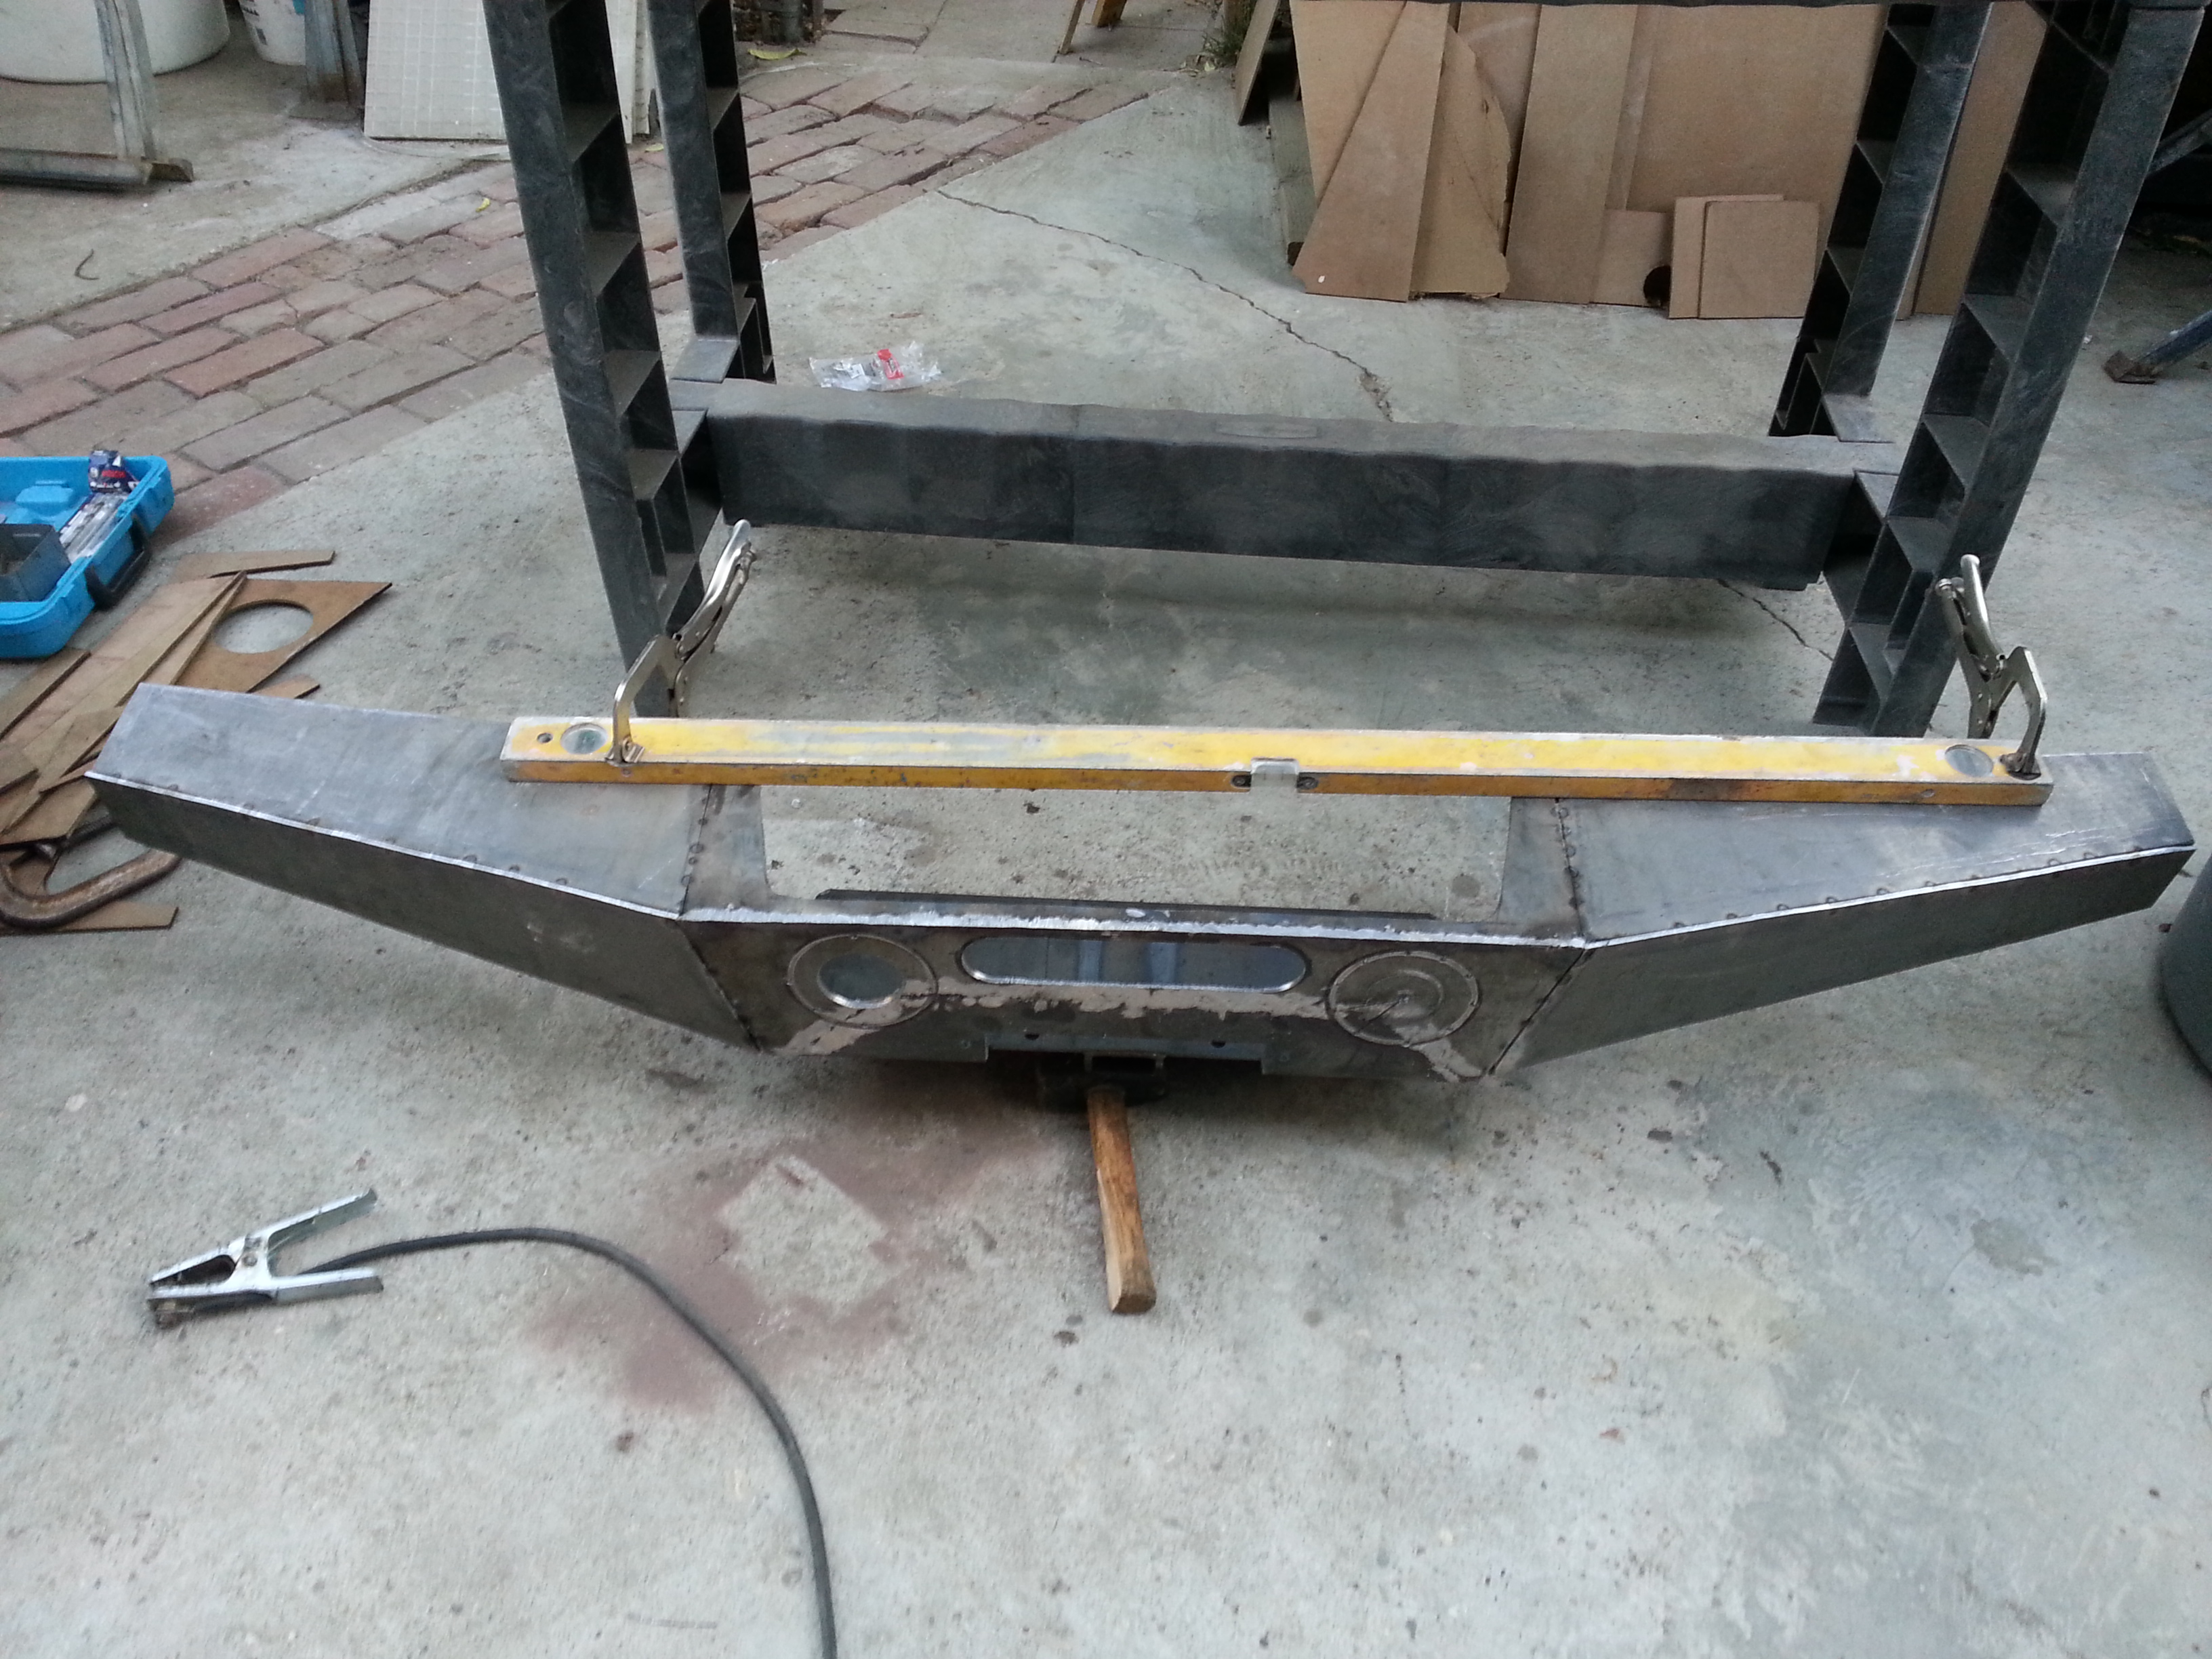
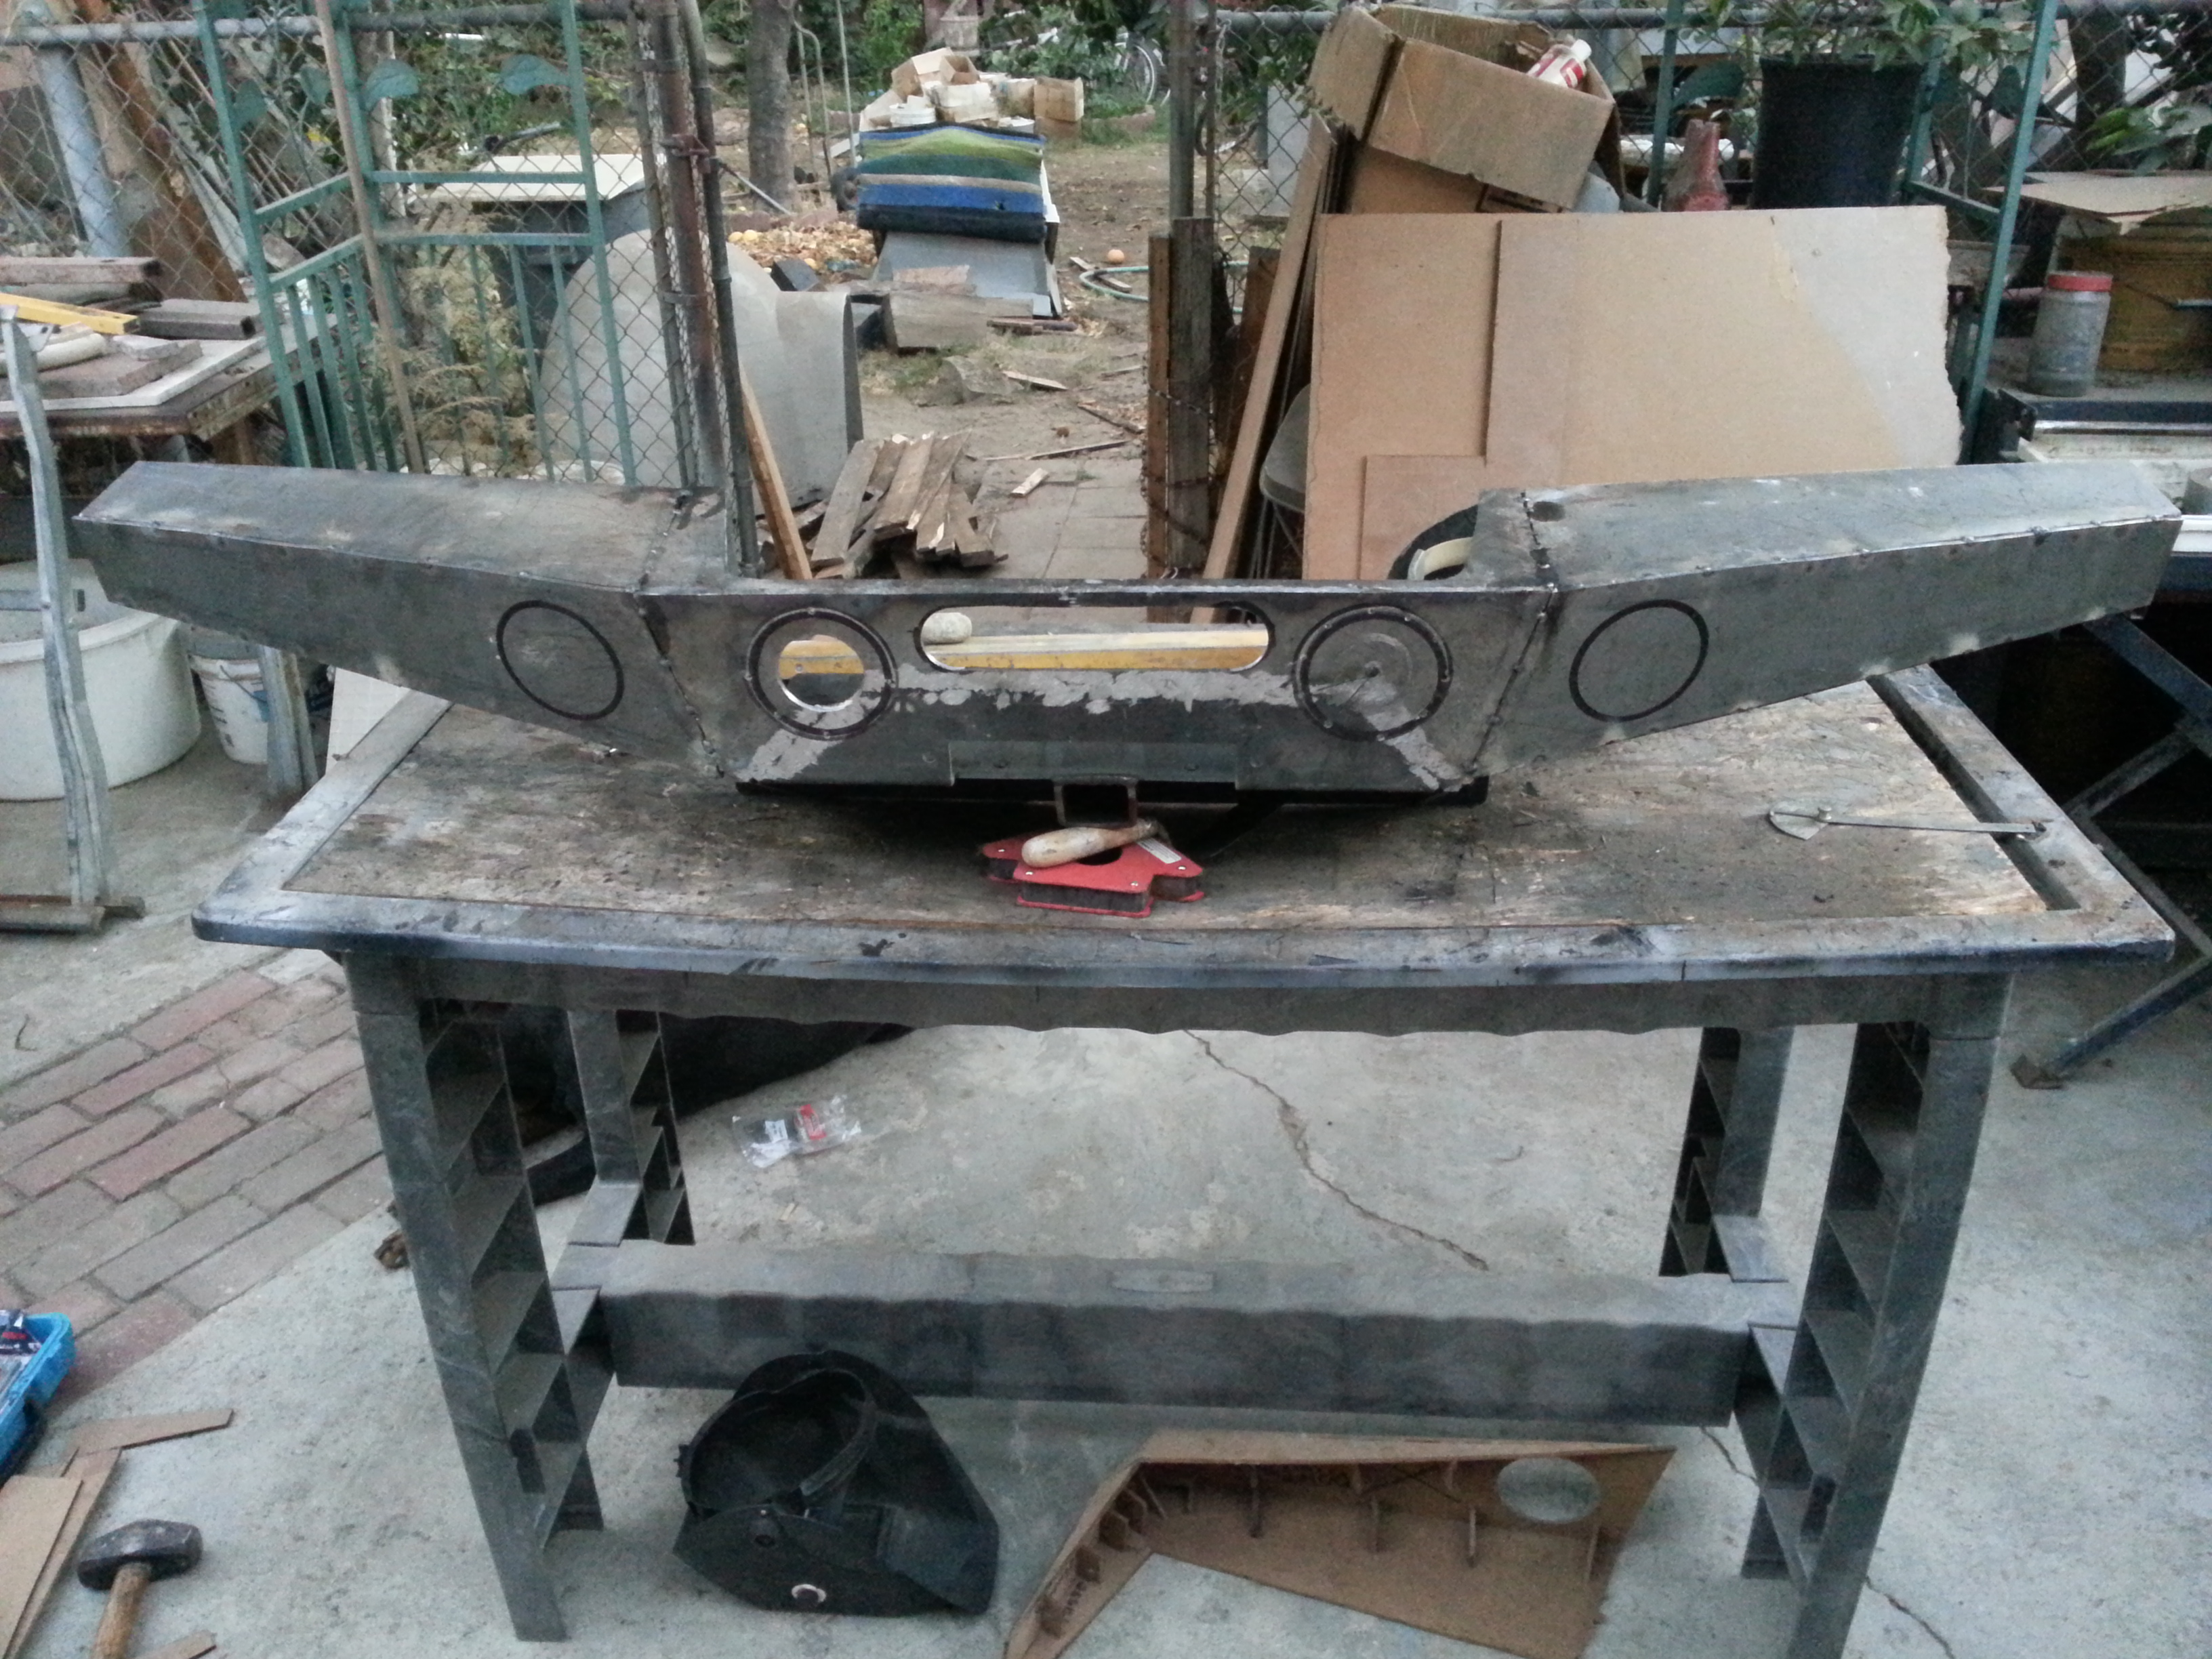
I realized i have too much of a bump on the bottom side of those corners. It has a lot to do with how the bumper is curving like an arch. but even when straightened out you can still see a slight bump.I'm just going to need to make sure that when i do the real thing to tack weld those ends first before actually welding. Also the small square piece that connects the front face to the side is too square. i need to make it more at an angle; i think so at least. Maybe im just being too picky now. but I'll make sure to fix this when the real bumper comes around.
Dont mind the top curve. it isnt going to be like that once it is made of steel. It curves because the sides are to heavy for the center to hold up with just hot glue lol Also see the center holes. This should be plenty of ventilation for that radiator. they are pretty big size so even though the winch is there i'm sure it will get plenty of air.
Corner
Winch spot
Now here are the few problems i ran into:
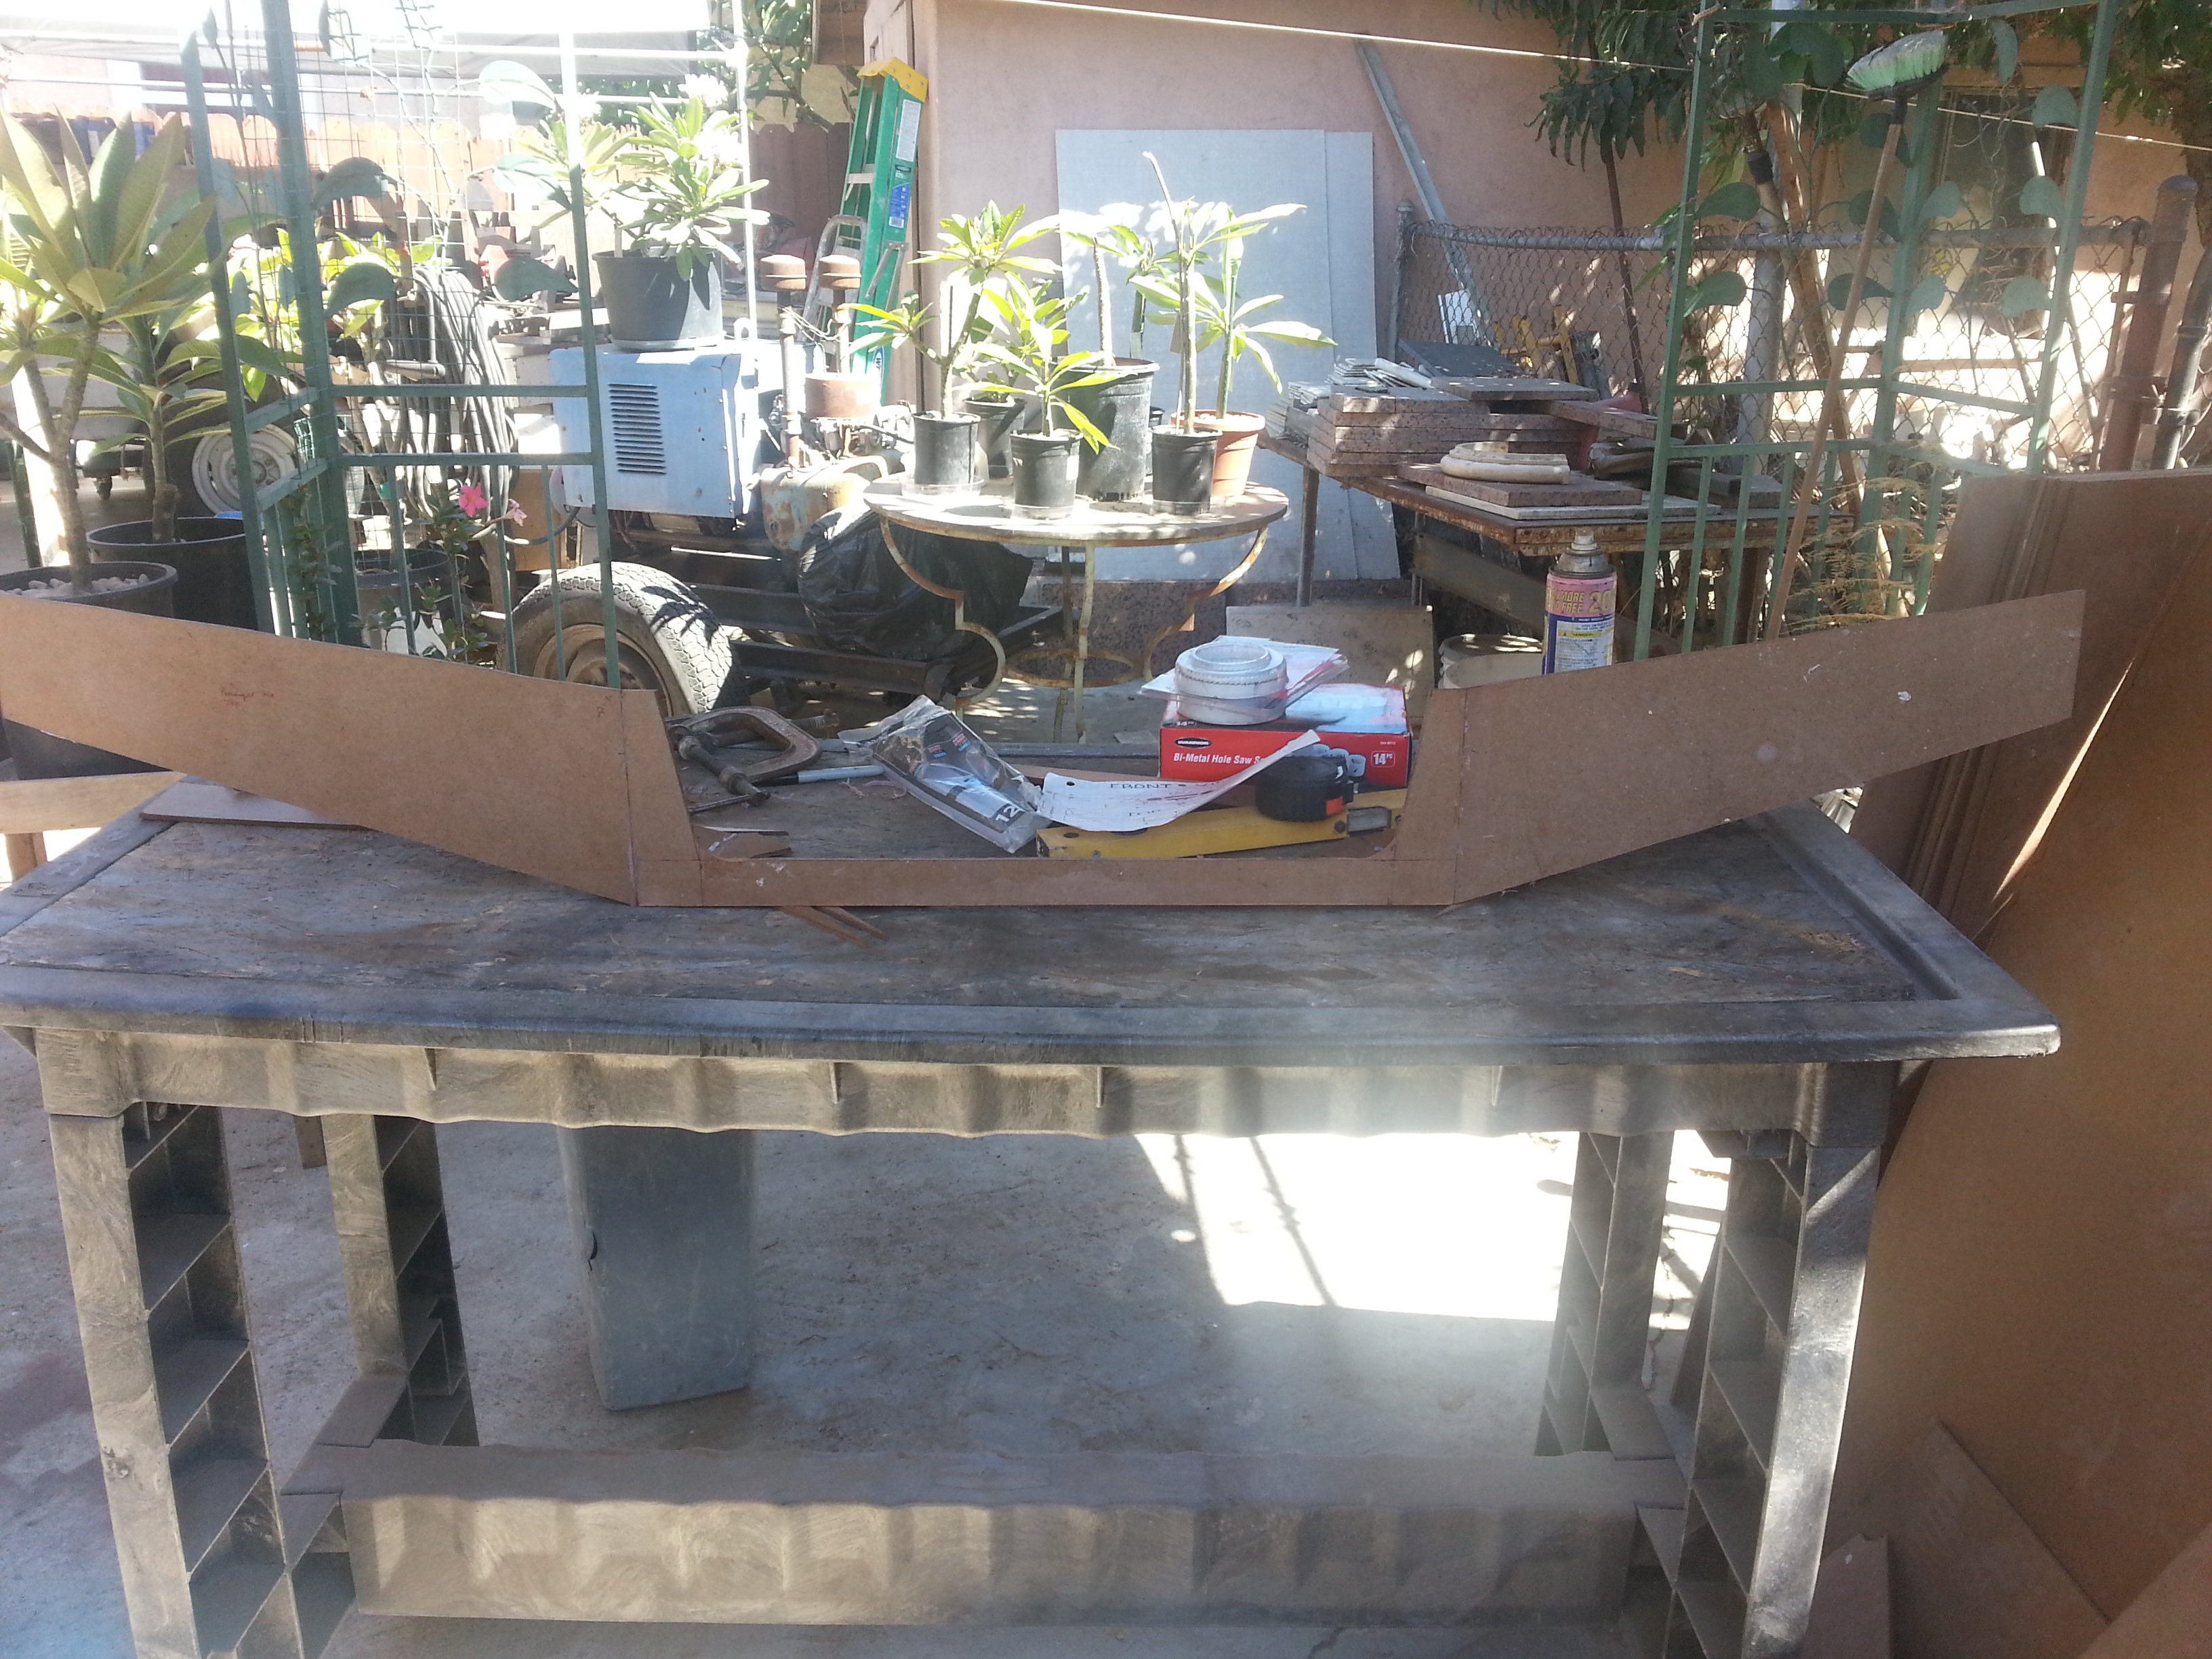
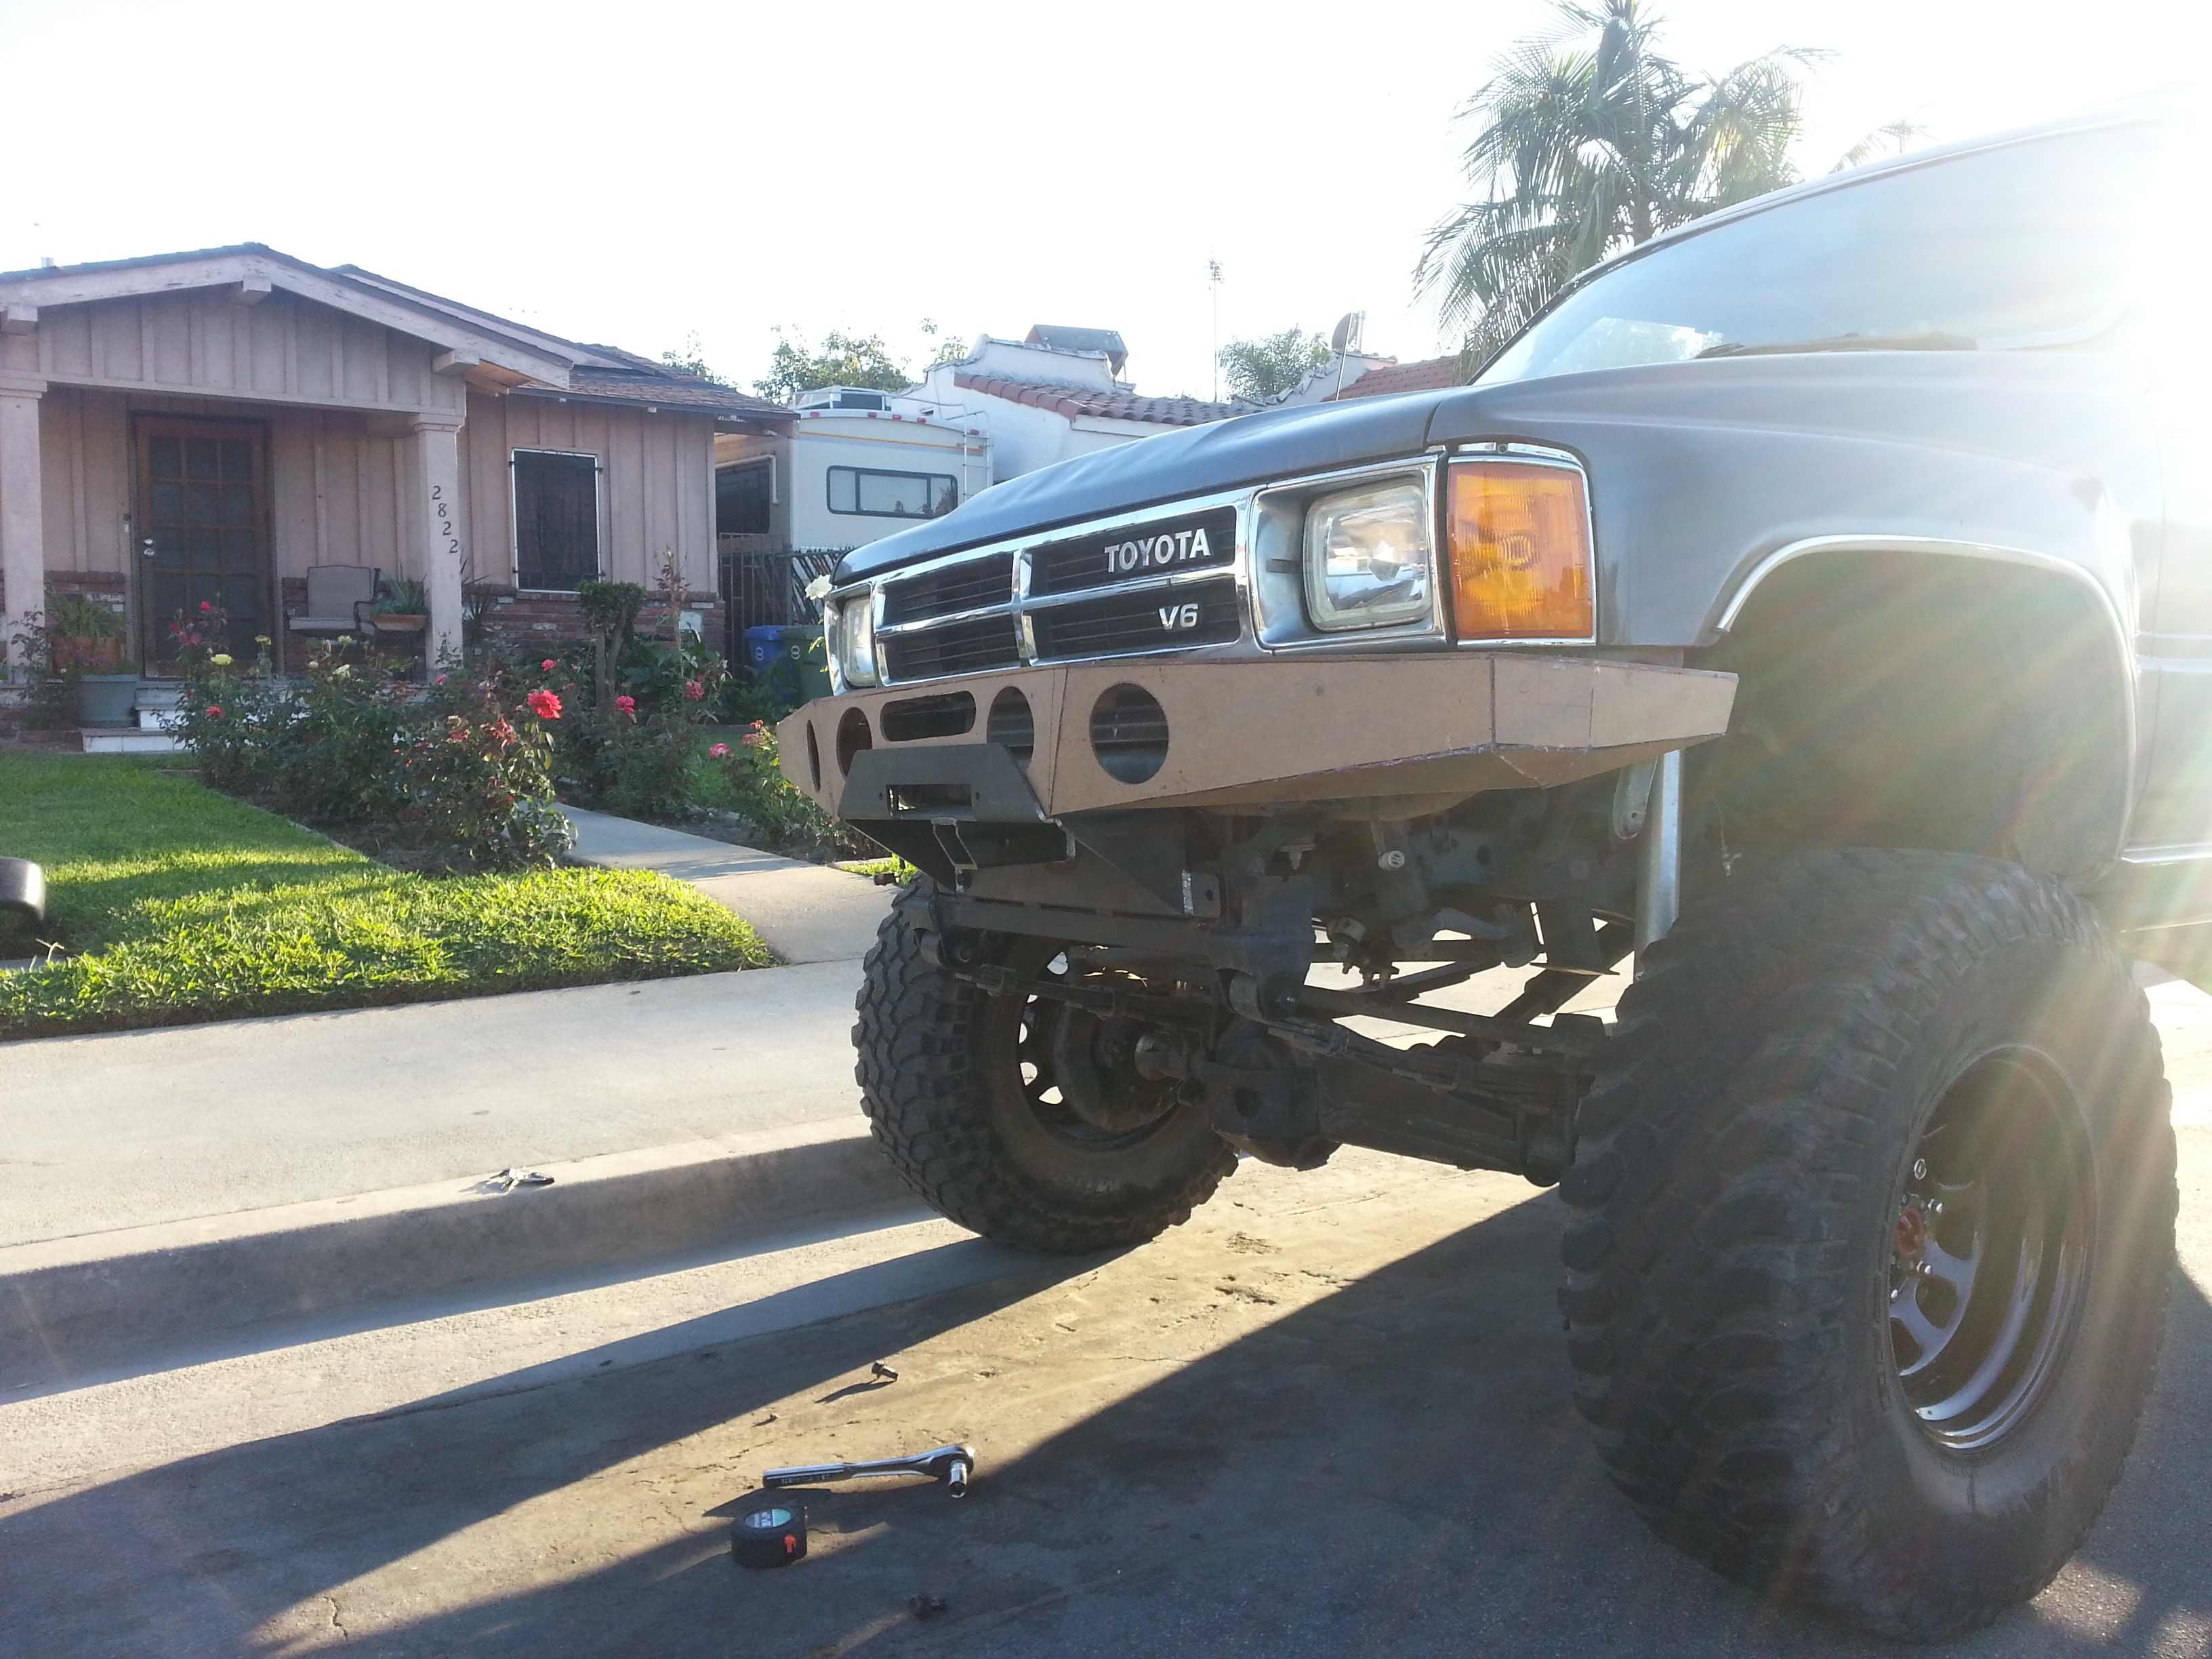
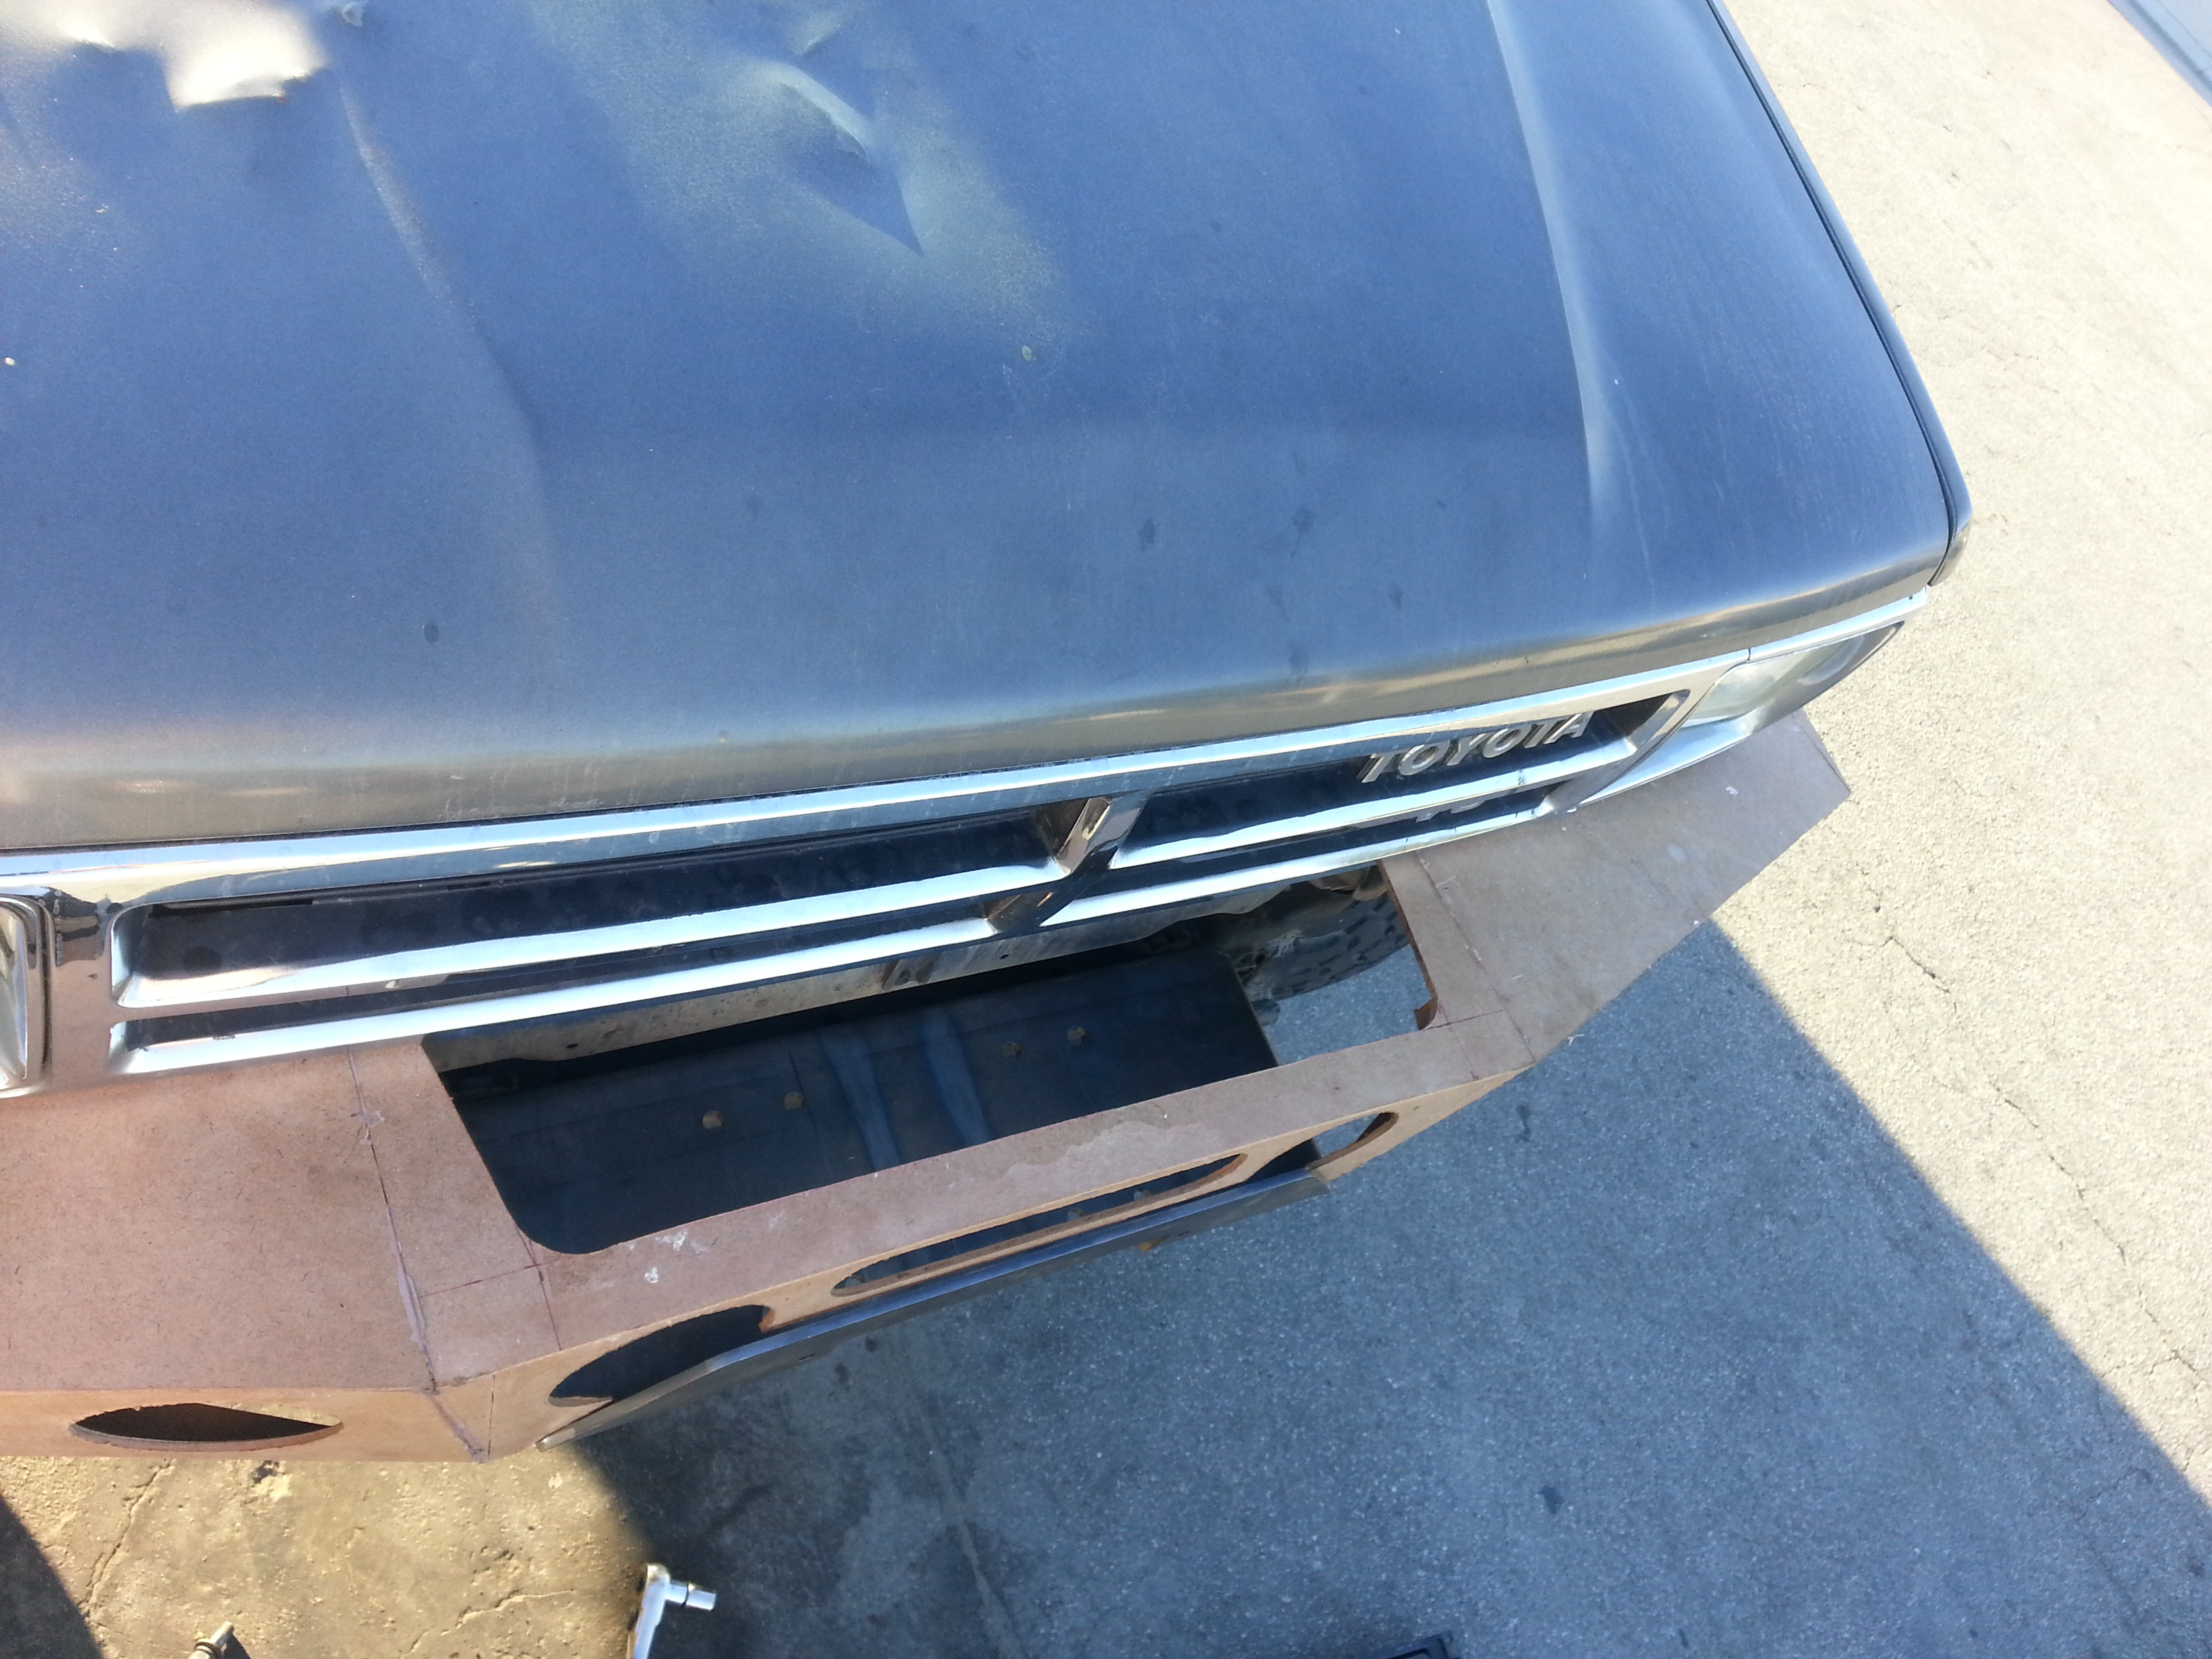
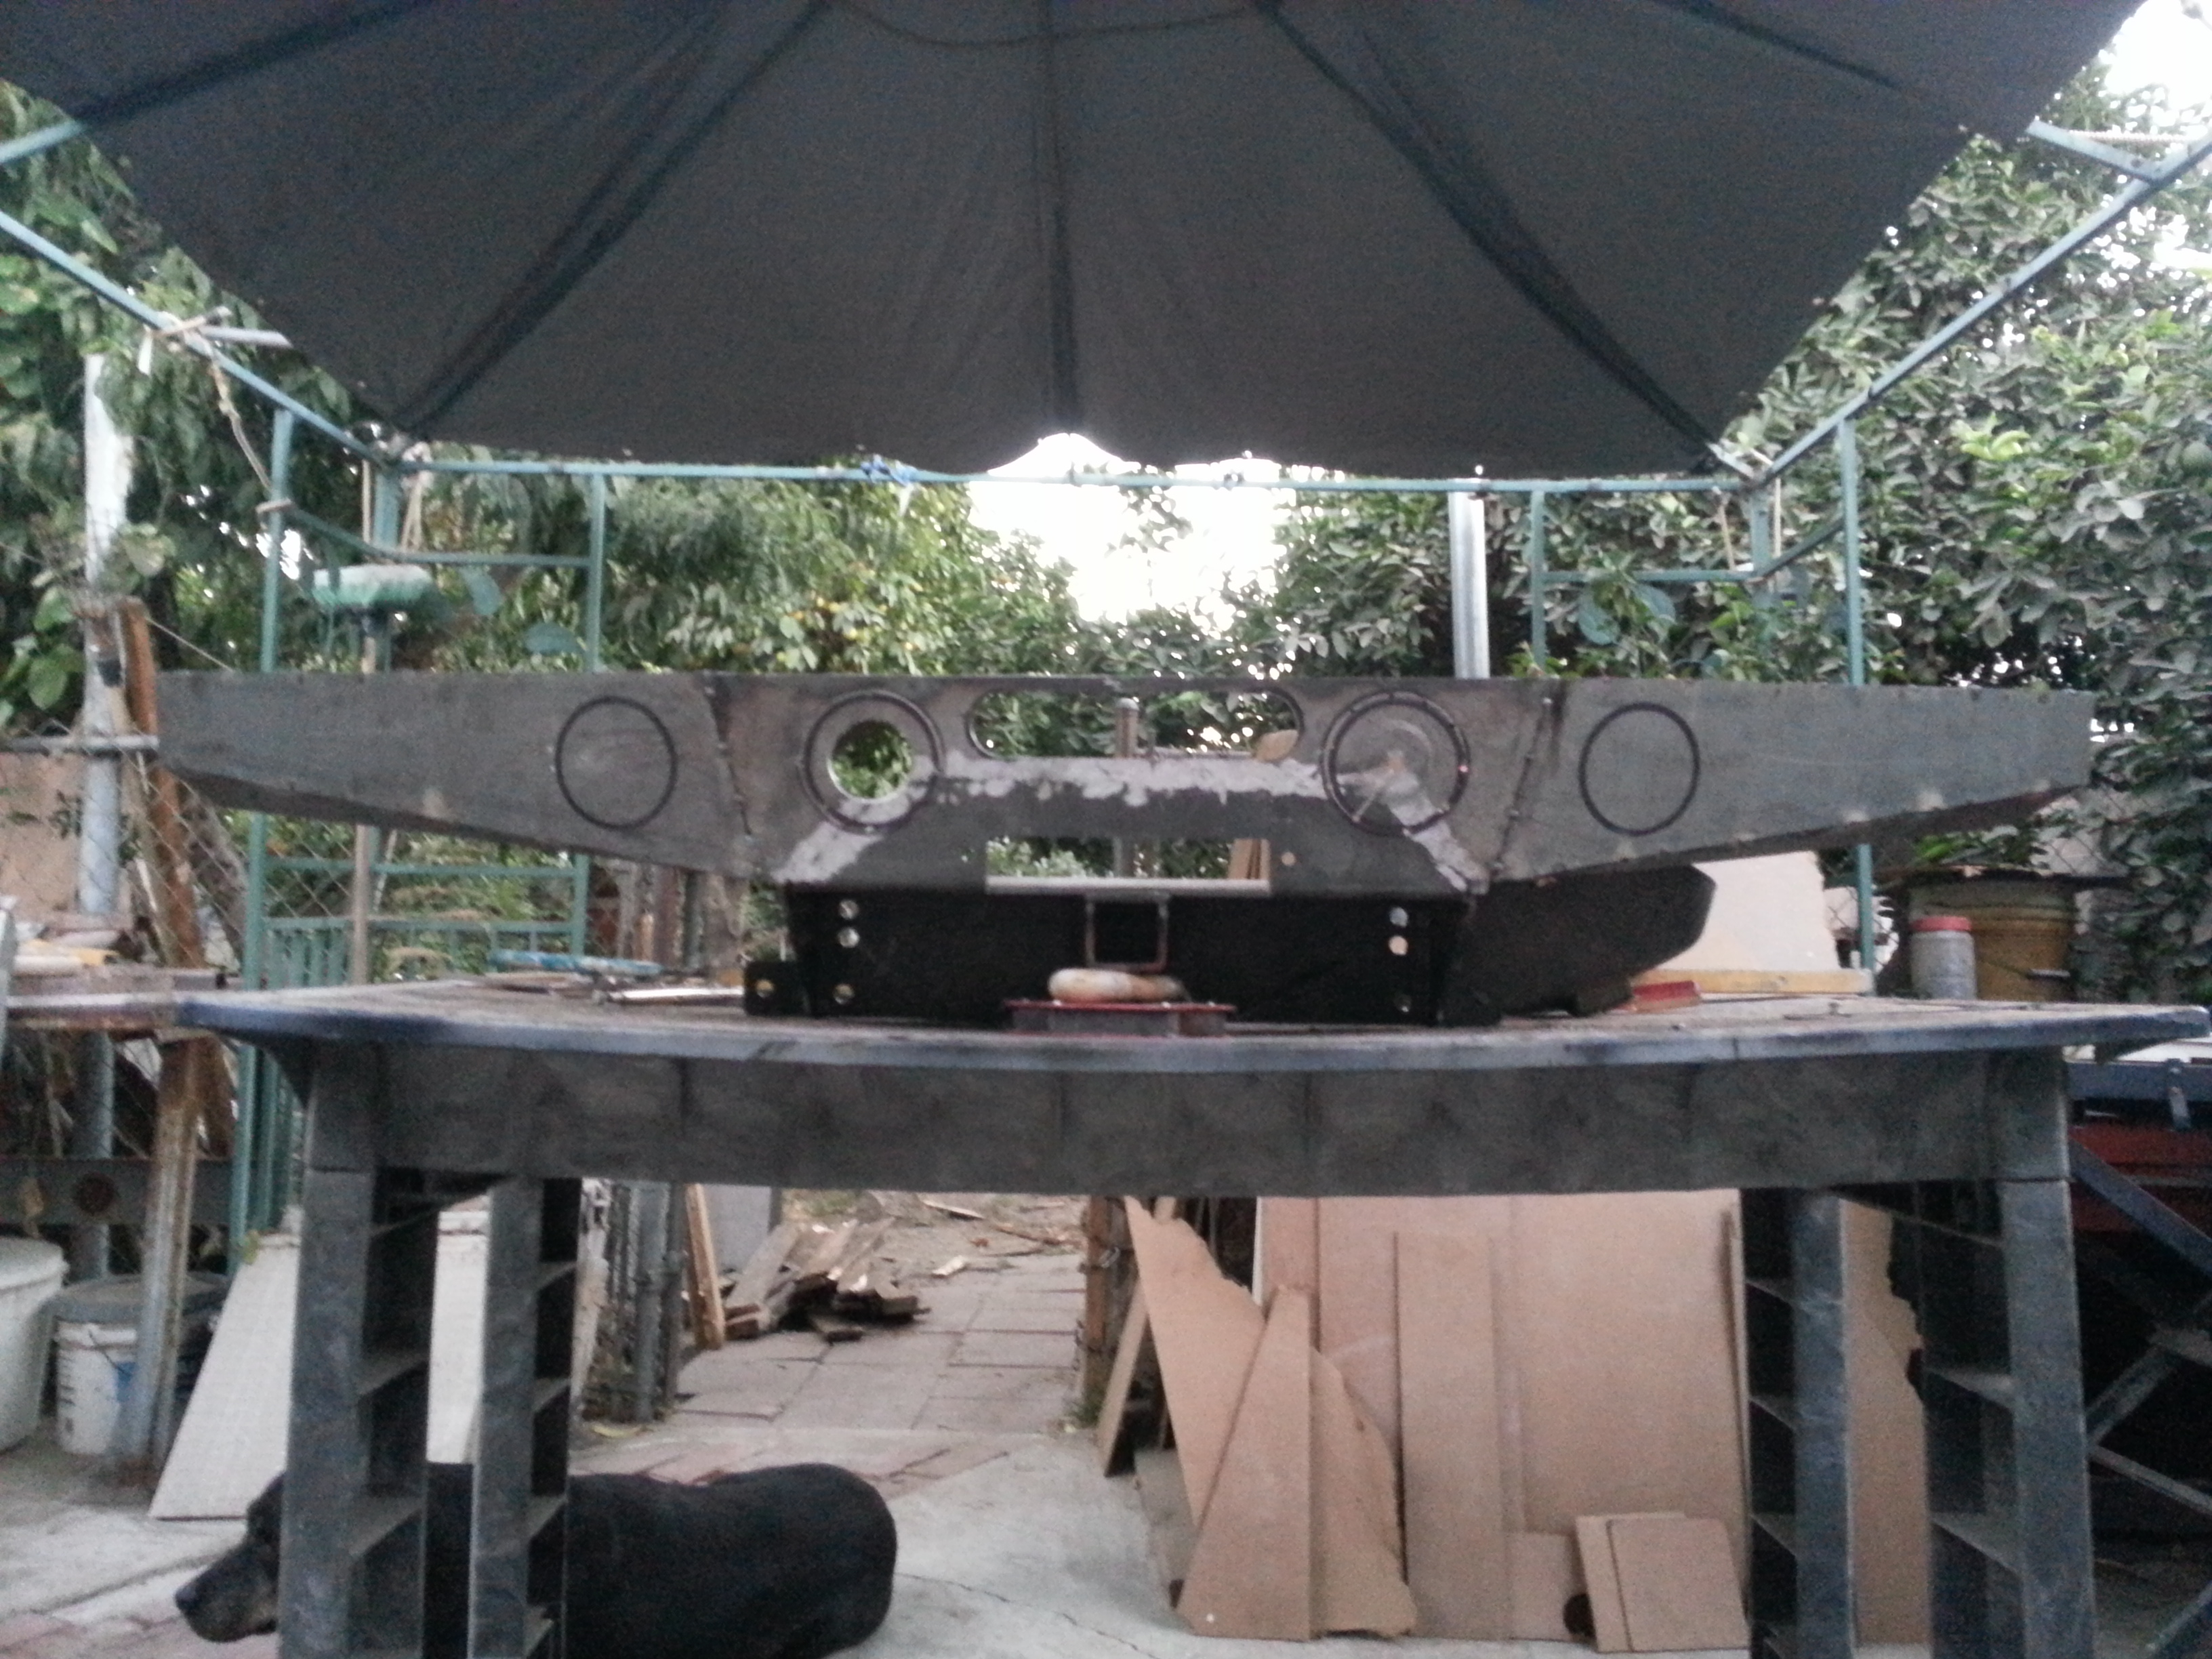
The bumper needs to be shortened a total of 3/4" to be able to clear the screws and clips that hold the grill in place. So that will need to come down some. As you can see in the picture below that bumper is right up against the grill.
The whole overall width of the bumper needs to be shortened 1.5". I thought i had the measurements correct and i drew everything out according to all measurements the tape measure gave me and also based on the stock bumper dimensions, but when i had the stock bumper width at 66" from edge to edge(where the bumper ends go to the wheel wells) it just looks goofy. It's too wide and you can definitely tell. Will need to shorten about 1.5 maybe even 1&3/4 to be flush with the fenders.
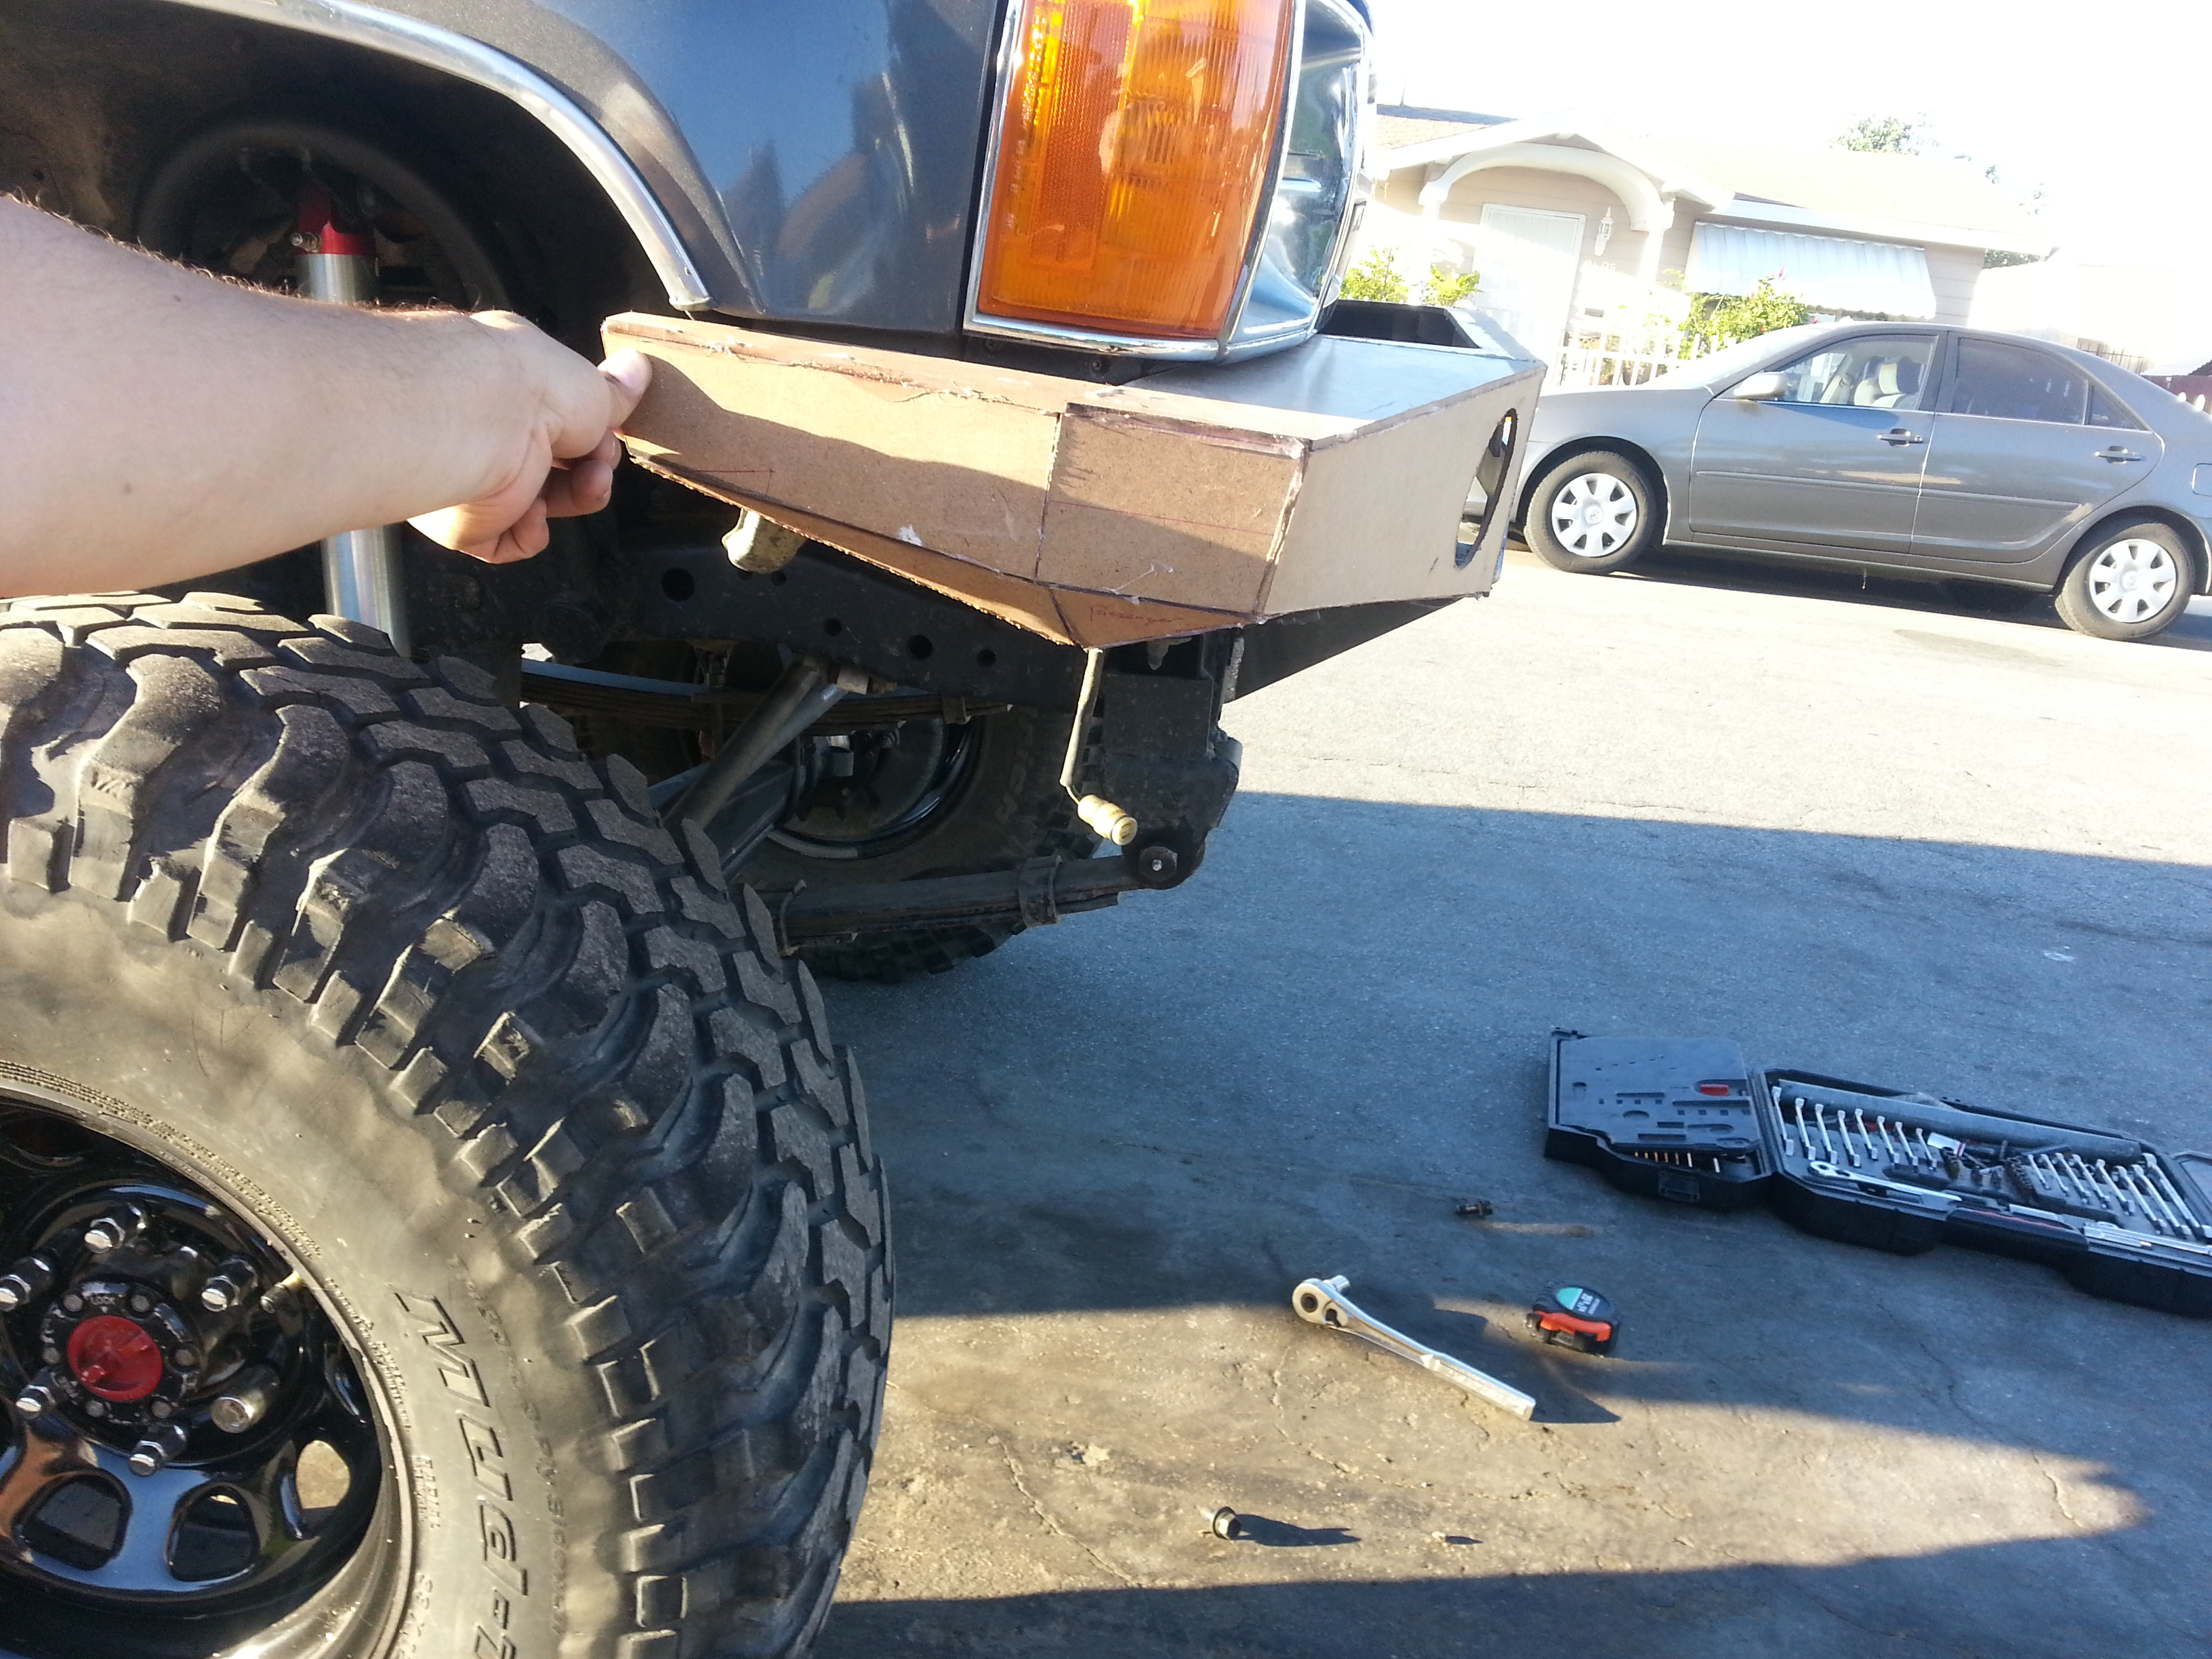
The corner piece had a gap on both sides. i am going to need to bring in this piece about another inch toward the center. I put arrows to show from where to where.
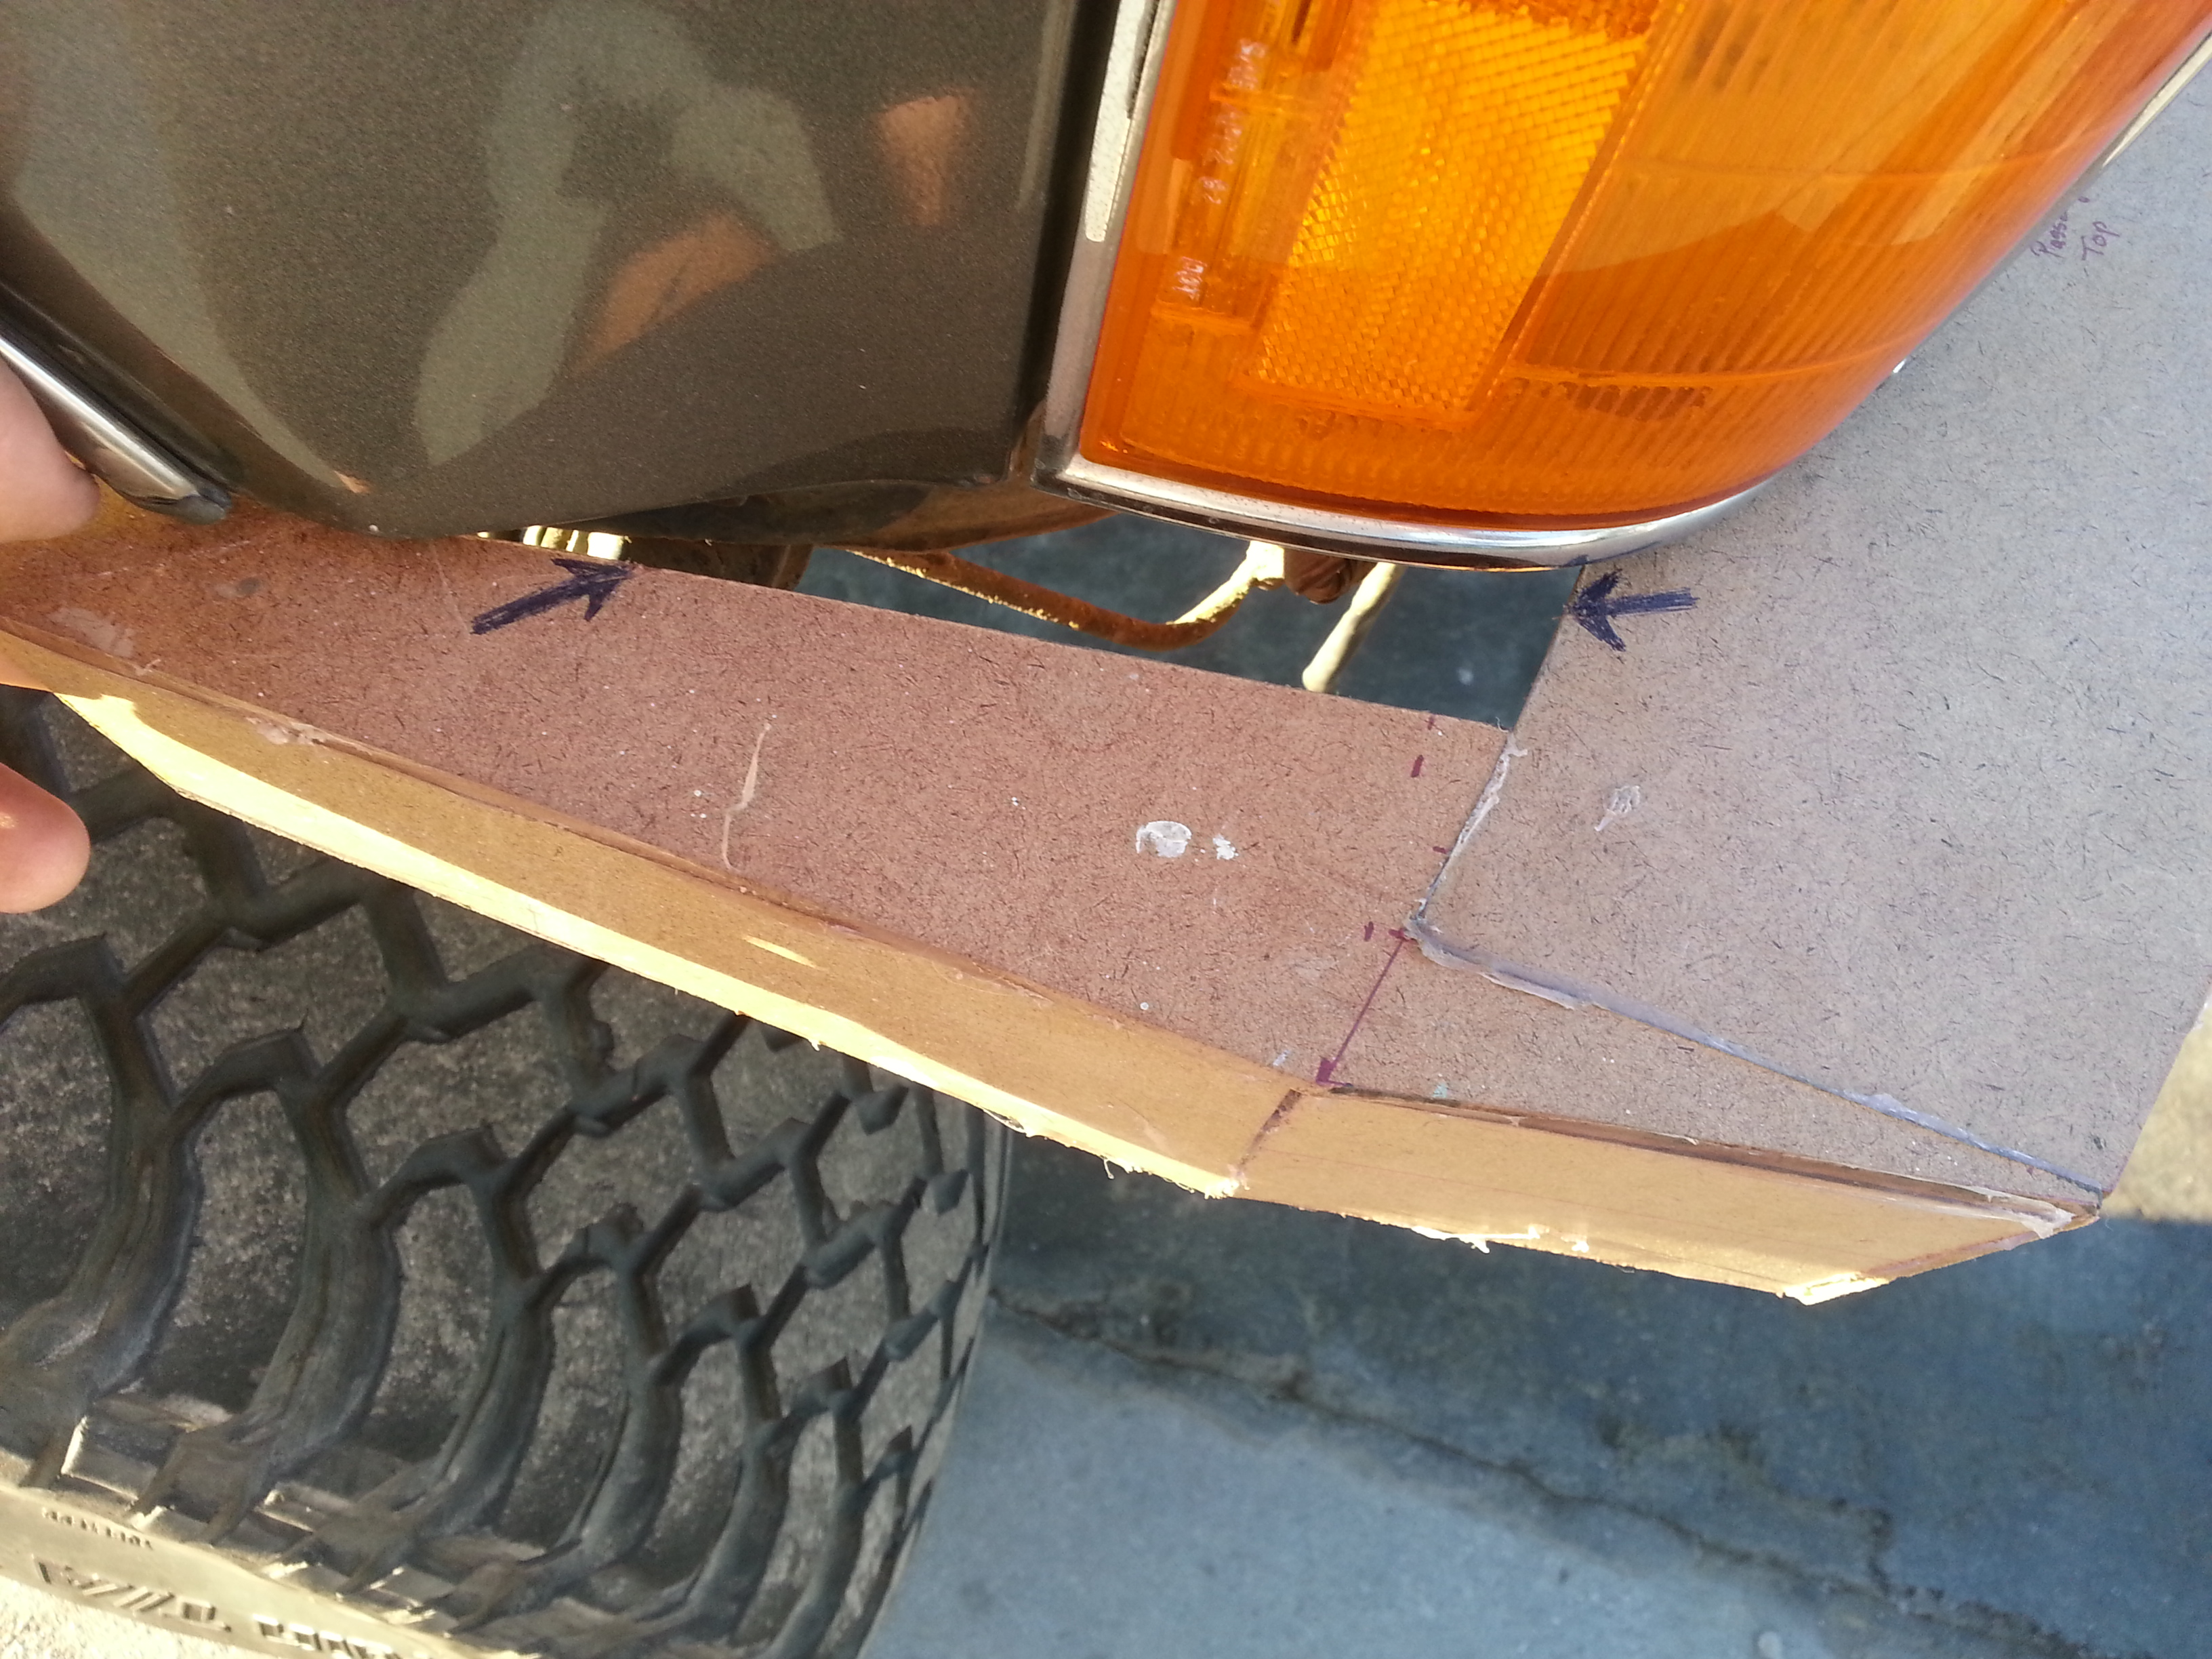
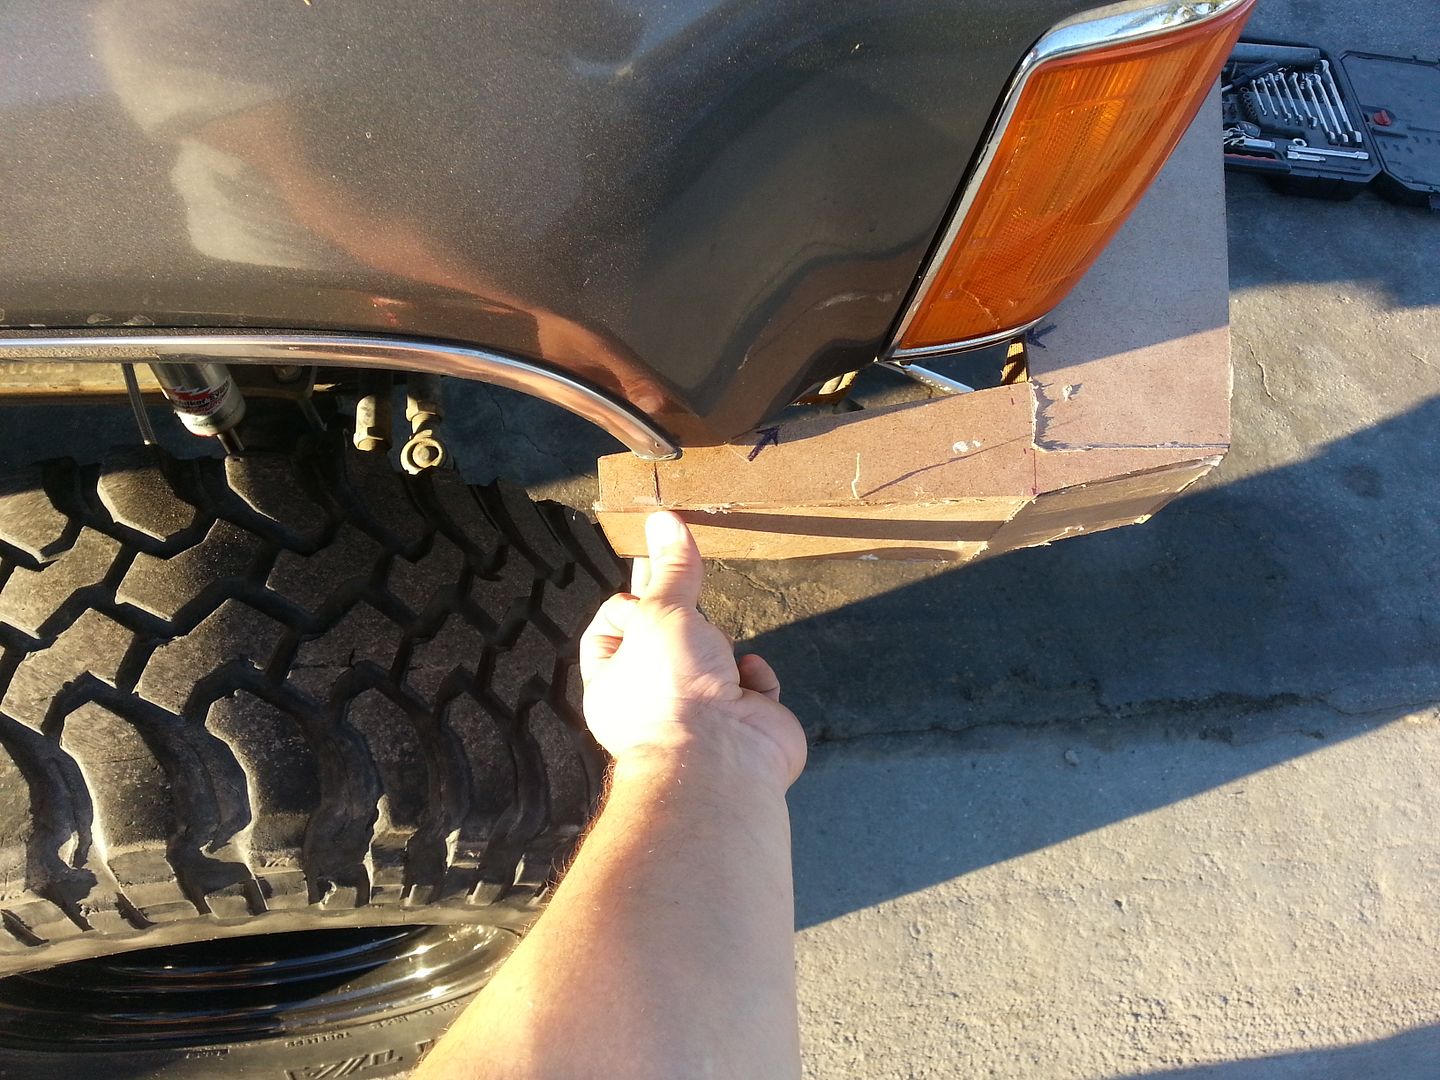
Also going to need to shorten the side piece that goes to the wheel well(where my thumb is at). Drew a line where i'm going to need to cut. this will have to be shortened about 1" on both sides.
Fitting and troubleshooting. This is the main reason i don't start off working with steel. Always gotta make sure everything fits before i buy steel and begin to cut. Steel cost a lot of money and i would hate to have to buy steel twice!
EDIT:
Oh yea also. i don't plan to use that skid plate thing on the front. It restricts me from being able to put the winch bolts through. its too close to the holes. So i might need to either bring the plate down about 0.5" just to clear that hole. or just build an entirely different plate of some sort.
My favorite shot.


I realized i have too much of a bump on the bottom side of those corners. It has a lot to do with how the bumper is curving like an arch. but even when straightened out you can still see a slight bump.I'm just going to need to make sure that when i do the real thing to tack weld those ends first before actually welding. Also the small square piece that connects the front face to the side is too square. i need to make it more at an angle; i think so at least. Maybe im just being too picky now. but I'll make sure to fix this when the real bumper comes around.

Dont mind the top curve. it isnt going to be like that once it is made of steel. It curves because the sides are to heavy for the center to hold up with just hot glue lol Also see the center holes. This should be plenty of ventilation for that radiator. they are pretty big size so even though the winch is there i'm sure it will get plenty of air.

Corner

Winch spot

Now here are the few problems i ran into:
The bumper needs to be shortened a total of 3/4" to be able to clear the screws and clips that hold the grill in place. So that will need to come down some. As you can see in the picture below that bumper is right up against the grill.

The whole overall width of the bumper needs to be shortened 1.5". I thought i had the measurements correct and i drew everything out according to all measurements the tape measure gave me and also based on the stock bumper dimensions, but when i had the stock bumper width at 66" from edge to edge(where the bumper ends go to the wheel wells) it just looks goofy. It's too wide and you can definitely tell. Will need to shorten about 1.5 maybe even 1&3/4 to be flush with the fenders.
The corner piece had a gap on both sides. i am going to need to bring in this piece about another inch toward the center. I put arrows to show from where to where.

Also going to need to shorten the side piece that goes to the wheel well(where my thumb is at). Drew a line where i'm going to need to cut. this will have to be shortened about 1" on both sides.

Fitting and troubleshooting. This is the main reason i don't start off working with steel. Always gotta make sure everything fits before i buy steel and begin to cut. Steel cost a lot of money and i would hate to have to buy steel twice!
EDIT:
Oh yea also. i don't plan to use that skid plate thing on the front. It restricts me from being able to put the winch bolts through. its too close to the holes. So i might need to either bring the plate down about 0.5" just to clear that hole. or just build an entirely different plate of some sort.
Last edited by Redeth005; 09-24-2013 at 09:00 PM.
09-25-2013, 04:46 AM
#31
Registered User
The skid plate you are refering to actually gives the winch mount plate more rigidity if you use it. I am certain that was the concept behind the addicted mount. Also, I don't see any recover points in your design besides the winch mount hitch coupler. Since you are building it, I'd get two other recovery points incorporated close to the frame ends as possible. I am also looking into a slight modification in my design to use a recovery point out on the bumper edge near the tire/fender end. This additional point wouldn't be for hard pull but more a stabizer when the vehicle may need more the one attachment point. I'll try to get an example of this.
09-27-2013, 06:28 PM
#32
Registered User
Thread Starter
Hi NickMiller. I just realized you were following me on my Instagram page. I knew that name sounded familiar when you commented on my pix. haha
RBX I also had that in mind. I wasnt planning on taking it out all together im just going to drop the skid like platedown about 1 inch then keep the same design. im sure it will work then.
------------------------------------------------------------------------------------------------
Alright so i have some good and bad news. Good news is that i finally bought the plate steel. This is 3/16" thick. I believe these 2 sheets should be sufficient enough to make the bumper. Plus i still have 1 sheet (about2.5'x2.5') that i had left over from the rear bumper i made a while back; that one being 1/4" thick. Not bad at all guys. This steel only came out to $61. I was expecting somewhere around $80 for this scrap metal.
The nasty bad news is that i slit my finger! OUCH!!!
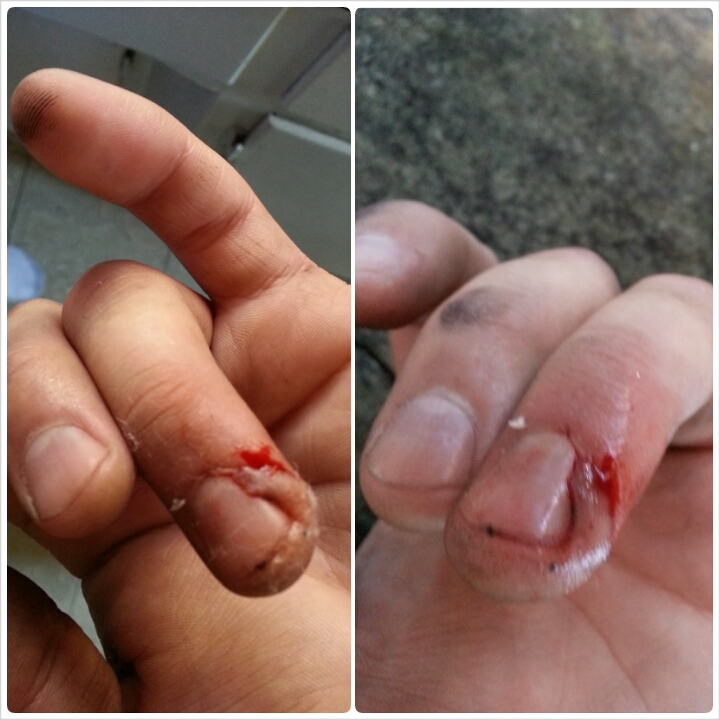
I literally have a flap on my finger! Went to the BOBCO Metal store out here in Los Angeles Ca to buy the steel And as I've previously mentioned before when doing the rear bumper. This Vendor has a scrap metal section that they sell for a heck of a lot cheaper and they have small and big pieces of scrap of different thicknesses.
They have shelves upon shelves and some sheet metal sitting on pallets standing in an upward position.
and while pulling out the 1st piece the bottom side got caught on the pallet that it was sitting on causing my right hand to lose grip as i pulled. Then the sheet slipped out of my right hand followed by my left hand. And as it slipped out of my hand it sliced from where the nail grows all the way down to the front part of the finger. I was able to feel every rigid bumpy dirty sharp edge that cut through. Could have had a chunk taken off. But worst of all is that those metal sheets have surface rust and metal oils or grease. Its just really dirty! Glad I had my tetanus shot within the past 2 years. But dang, my entire arm was throbbing. Felt like I had another heart beating in my hand. Guess I can't do any projects on this truck without getting into some kind of trouble. I always get some sort of deep cut or burn when working with metal. It never fails
I tried sucking whatever bad contaminants i could out with my mouth as an employee went in to the building to search for a first aid. This guy took so damn long and as i was holding the pressure while keeping my hand elevated a fellow customer offered me a temporary fix. He gave me some Toilet paper folded into a square then offered some of that SUPER DUPER THICK STICKY DUCT TAPE. It did the job in stopping the bleeding.
Finished my purchase and called my lil' bro to get the 1st aid kit ready with specific pieces. Upon arriving home i washed my hands as best i could then attempted to remove that super duct tape. Only problem is that the duct tape was that super thick sticky one! So every time i tried to remove it would pull on my skin flap. Then i just cut the damn thing open only to realize that the blood that had soaked into the gauze and toilet paper had dried. And this guy here(me) tried pulling on it thinking it was gonna come loose. Boy was i wrong lol had to soak it in warm water to remove.
Once removed it only got worse. When we had to semi lift up the flap to clean under it. I was only able to lift it so much before i felt the shocking pain going from my fingertip to elbow and back. I guess it didnt help the pain that we were cleaning it with rubbing alcohol but i wanted to make sure i was going to to avoid infection. I'm sure i probably needed stitches but ive had a similar cut like this on my knuckle and just as deep previously and it healed fine over time. So I'm just gonna leave it as is and clean it up 2ce a day or so. Took one of my moms pain medicine and worked out. Surprisingly the work out took my mind off the pain a bunch. lol now it only hurts when i touch it.
Anyway i know you guys dont wanna read about my cuts lol but i just thought it would be a nice cringing story since i know how much you YotaTech people love reading about people's injuries. jk lol That's all for now. Gonna head out for a night with the guys then probably get to work on outlining these metal sheets with my masonite templates.
RBX I also had that in mind. I wasnt planning on taking it out all together im just going to drop the skid like platedown about 1 inch then keep the same design. im sure it will work then.
------------------------------------------------------------------------------------------------
Alright so i have some good and bad news. Good news is that i finally bought the plate steel. This is 3/16" thick. I believe these 2 sheets should be sufficient enough to make the bumper. Plus i still have 1 sheet (about2.5'x2.5') that i had left over from the rear bumper i made a while back; that one being 1/4" thick. Not bad at all guys. This steel only came out to $61. I was expecting somewhere around $80 for this scrap metal.

The nasty bad news is that i slit my finger! OUCH!!!

I literally have a flap on my finger! Went to the BOBCO Metal store out here in Los Angeles Ca to buy the steel And as I've previously mentioned before when doing the rear bumper. This Vendor has a scrap metal section that they sell for a heck of a lot cheaper and they have small and big pieces of scrap of different thicknesses.
They have shelves upon shelves and some sheet metal sitting on pallets standing in an upward position.
and while pulling out the 1st piece the bottom side got caught on the pallet that it was sitting on causing my right hand to lose grip as i pulled. Then the sheet slipped out of my right hand followed by my left hand. And as it slipped out of my hand it sliced from where the nail grows all the way down to the front part of the finger. I was able to feel every rigid bumpy dirty sharp edge that cut through. Could have had a chunk taken off. But worst of all is that those metal sheets have surface rust and metal oils or grease. Its just really dirty! Glad I had my tetanus shot within the past 2 years. But dang, my entire arm was throbbing. Felt like I had another heart beating in my hand. Guess I can't do any projects on this truck without getting into some kind of trouble. I always get some sort of deep cut or burn when working with metal. It never fails
I tried sucking whatever bad contaminants i could out with my mouth as an employee went in to the building to search for a first aid. This guy took so damn long and as i was holding the pressure while keeping my hand elevated a fellow customer offered me a temporary fix. He gave me some Toilet paper folded into a square then offered some of that SUPER DUPER THICK STICKY DUCT TAPE. It did the job in stopping the bleeding.
Finished my purchase and called my lil' bro to get the 1st aid kit ready with specific pieces. Upon arriving home i washed my hands as best i could then attempted to remove that super duct tape. Only problem is that the duct tape was that super thick sticky one! So every time i tried to remove it would pull on my skin flap. Then i just cut the damn thing open only to realize that the blood that had soaked into the gauze and toilet paper had dried. And this guy here(me) tried pulling on it thinking it was gonna come loose. Boy was i wrong lol had to soak it in warm water to remove.
Once removed it only got worse. When we had to semi lift up the flap to clean under it. I was only able to lift it so much before i felt the shocking pain going from my fingertip to elbow and back. I guess it didnt help the pain that we were cleaning it with rubbing alcohol but i wanted to make sure i was going to to avoid infection. I'm sure i probably needed stitches but ive had a similar cut like this on my knuckle and just as deep previously and it healed fine over time. So I'm just gonna leave it as is and clean it up 2ce a day or so. Took one of my moms pain medicine and worked out. Surprisingly the work out took my mind off the pain a bunch. lol now it only hurts when i touch it.
Anyway i know you guys dont wanna read about my cuts lol but i just thought it would be a nice cringing story since i know how much you YotaTech people love reading about people's injuries. jk lol That's all for now. Gonna head out for a night with the guys then probably get to work on outlining these metal sheets with my masonite templates.
Last edited by Redeth005; 09-27-2013 at 06:37 PM.
09-27-2013, 08:17 PM
#33
Oh nooooo! DUDE! You know what I would have said as you walked back there..."NOOOOO, LEMME GIVE YA SOME GLOVES! "... I promise that's not an I told you so.... I can totally relate because I've cut my hands so many times when dealing with steel sheet pans...
I hope you heal up really quick man, but the fingers are something that I never mess with, and more often than not it's best to get it looked at, because if you don't want a bunch of scar tissue building up on your fingertip or around the edges, you definitely want to stitch it..... Or at least find out. The problem with that is that you need to get it done almost right away, because it starts to scab over right quick.
That looks pretty nasty Richard, are you sure you don't want to have a doctor take a look at that?
10-01-2013, 06:33 PM
#35
Registered User
Thread Starter
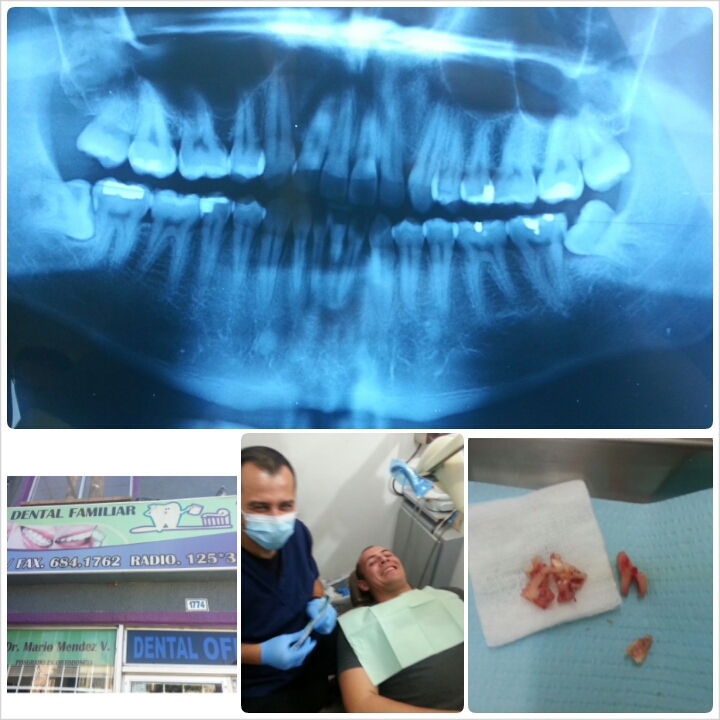
Sorry for not replying sooner guys. I had some major problems this week that didnt allow me to get to my bumper work. My finger is healing well. This weekend my wisdom teeth were killing me. Ive had this horrible pain since last weekend. and this week it was on and off.
The wisdom teeth had been growing out completely side ways and growing into my teeth jacking up the straight teeth i have. I seen a dentist and they quoted me $1600 for just the cleaning and to fix about 6-8 cavities. But that wasnt even to touch my wisdom teeth they would need a specialist to come in and it would be costing me up to 1800 just to have the 2 teeth removed. I couldnt believe it. Where the heck was i gonna get that kind of money?!?
Then i remembered i have family that live in San Diego and they all used to live in Tijuana Mexico aka Baja Ca. So i called them up and agreed to meet up on my aunts day off from work.
I know it has nothing to do with my bumper. but i would like to share the gnarly pix and share with you some of the scenary out there.
Crossed the border to Mexico and headed to the dentist, But before that we made sure to go to grab me some really gooooood mouth watering birrea tacos for breakfast Yum!

Afterward we hit up the dentist.
As you can see my bottom 2 wisdom teeth were growing completely sideways and putting pressure on my other teeth causing pain and making the rest of my bottom teeth crooked. After 1hr and 40 minutes the surgeries were a success. Honestly feel that this dentist was way better then the ones in the US. He was more gentel. And I only paid $400 to have both teeth removed. That would have easily been $1600-2000 in the states. Unfortunately for the way they were growing they had to take the teeth out in pieces. The right one in about 3-4 and the left one in 2.
And how can we leave Mexico without hitting up the raspado shop and getting some authentic raspados(shaved ice ice cream) and the best mexican candy ever! Got me my raspado before the surgery so I could enjoy then the candy afterwards

Due to the fact that i was born over there i was almost held. but the border cop i spoke with was really cool and obviously knew i grew up over here in the US because my spanish isnt the greatest. Guess it helps just talking to people and being down to earth. so happy he let me go. But we were delayed 1.5 hours on top of the 2.5 hours we had already spent in the border line to come back over. Jeez i definitely need to get my passport!
Anyway enough about that. I shall start working on that bumper soon guys i promise.
The wisdom teeth had been growing out completely side ways and growing into my teeth jacking up the straight teeth i have. I seen a dentist and they quoted me $1600 for just the cleaning and to fix about 6-8 cavities. But that wasnt even to touch my wisdom teeth they would need a specialist to come in and it would be costing me up to 1800 just to have the 2 teeth removed. I couldnt believe it. Where the heck was i gonna get that kind of money?!?
Then i remembered i have family that live in San Diego and they all used to live in Tijuana Mexico aka Baja Ca. So i called them up and agreed to meet up on my aunts day off from work.
I know it has nothing to do with my bumper. but i would like to share the gnarly pix and share with you some of the scenary out there.
Crossed the border to Mexico and headed to the dentist, But before that we made sure to go to grab me some really gooooood mouth watering birrea tacos for breakfast Yum!

Afterward we hit up the dentist.
As you can see my bottom 2 wisdom teeth were growing completely sideways and putting pressure on my other teeth causing pain and making the rest of my bottom teeth crooked. After 1hr and 40 minutes the surgeries were a success. Honestly feel that this dentist was way better then the ones in the US. He was more gentel. And I only paid $400 to have both teeth removed. That would have easily been $1600-2000 in the states. Unfortunately for the way they were growing they had to take the teeth out in pieces. The right one in about 3-4 and the left one in 2.

And how can we leave Mexico without hitting up the raspado shop and getting some authentic raspados(shaved ice ice cream) and the best mexican candy ever! Got me my raspado before the surgery so I could enjoy then the candy afterwards

Due to the fact that i was born over there i was almost held. but the border cop i spoke with was really cool and obviously knew i grew up over here in the US because my spanish isnt the greatest. Guess it helps just talking to people and being down to earth. so happy he let me go. But we were delayed 1.5 hours on top of the 2.5 hours we had already spent in the border line to come back over. Jeez i definitely need to get my passport!
Anyway enough about that. I shall start working on that bumper soon guys i promise.
10-01-2013, 07:05 PM
#36
Registered User
Taking the teeth out in two pieces was the only way they could remove mine, too. All 4 of mine grew in sideways, but not to that degree. Mine also weren't touching the other teeth, either. The wisdom tooth on the left looks like it fit right up against the other tooth like a tetris piece. It's definitely not any fun but it's good you got them puppies out before they did any real damage to the bottom row of teeth!
Can't wait to see more progress!
Can't wait to see more progress!
10-02-2013, 07:23 PM
#38
Registered User
Thread Starter
Hi Guys. i was able to get 2 pieces accomplished today.
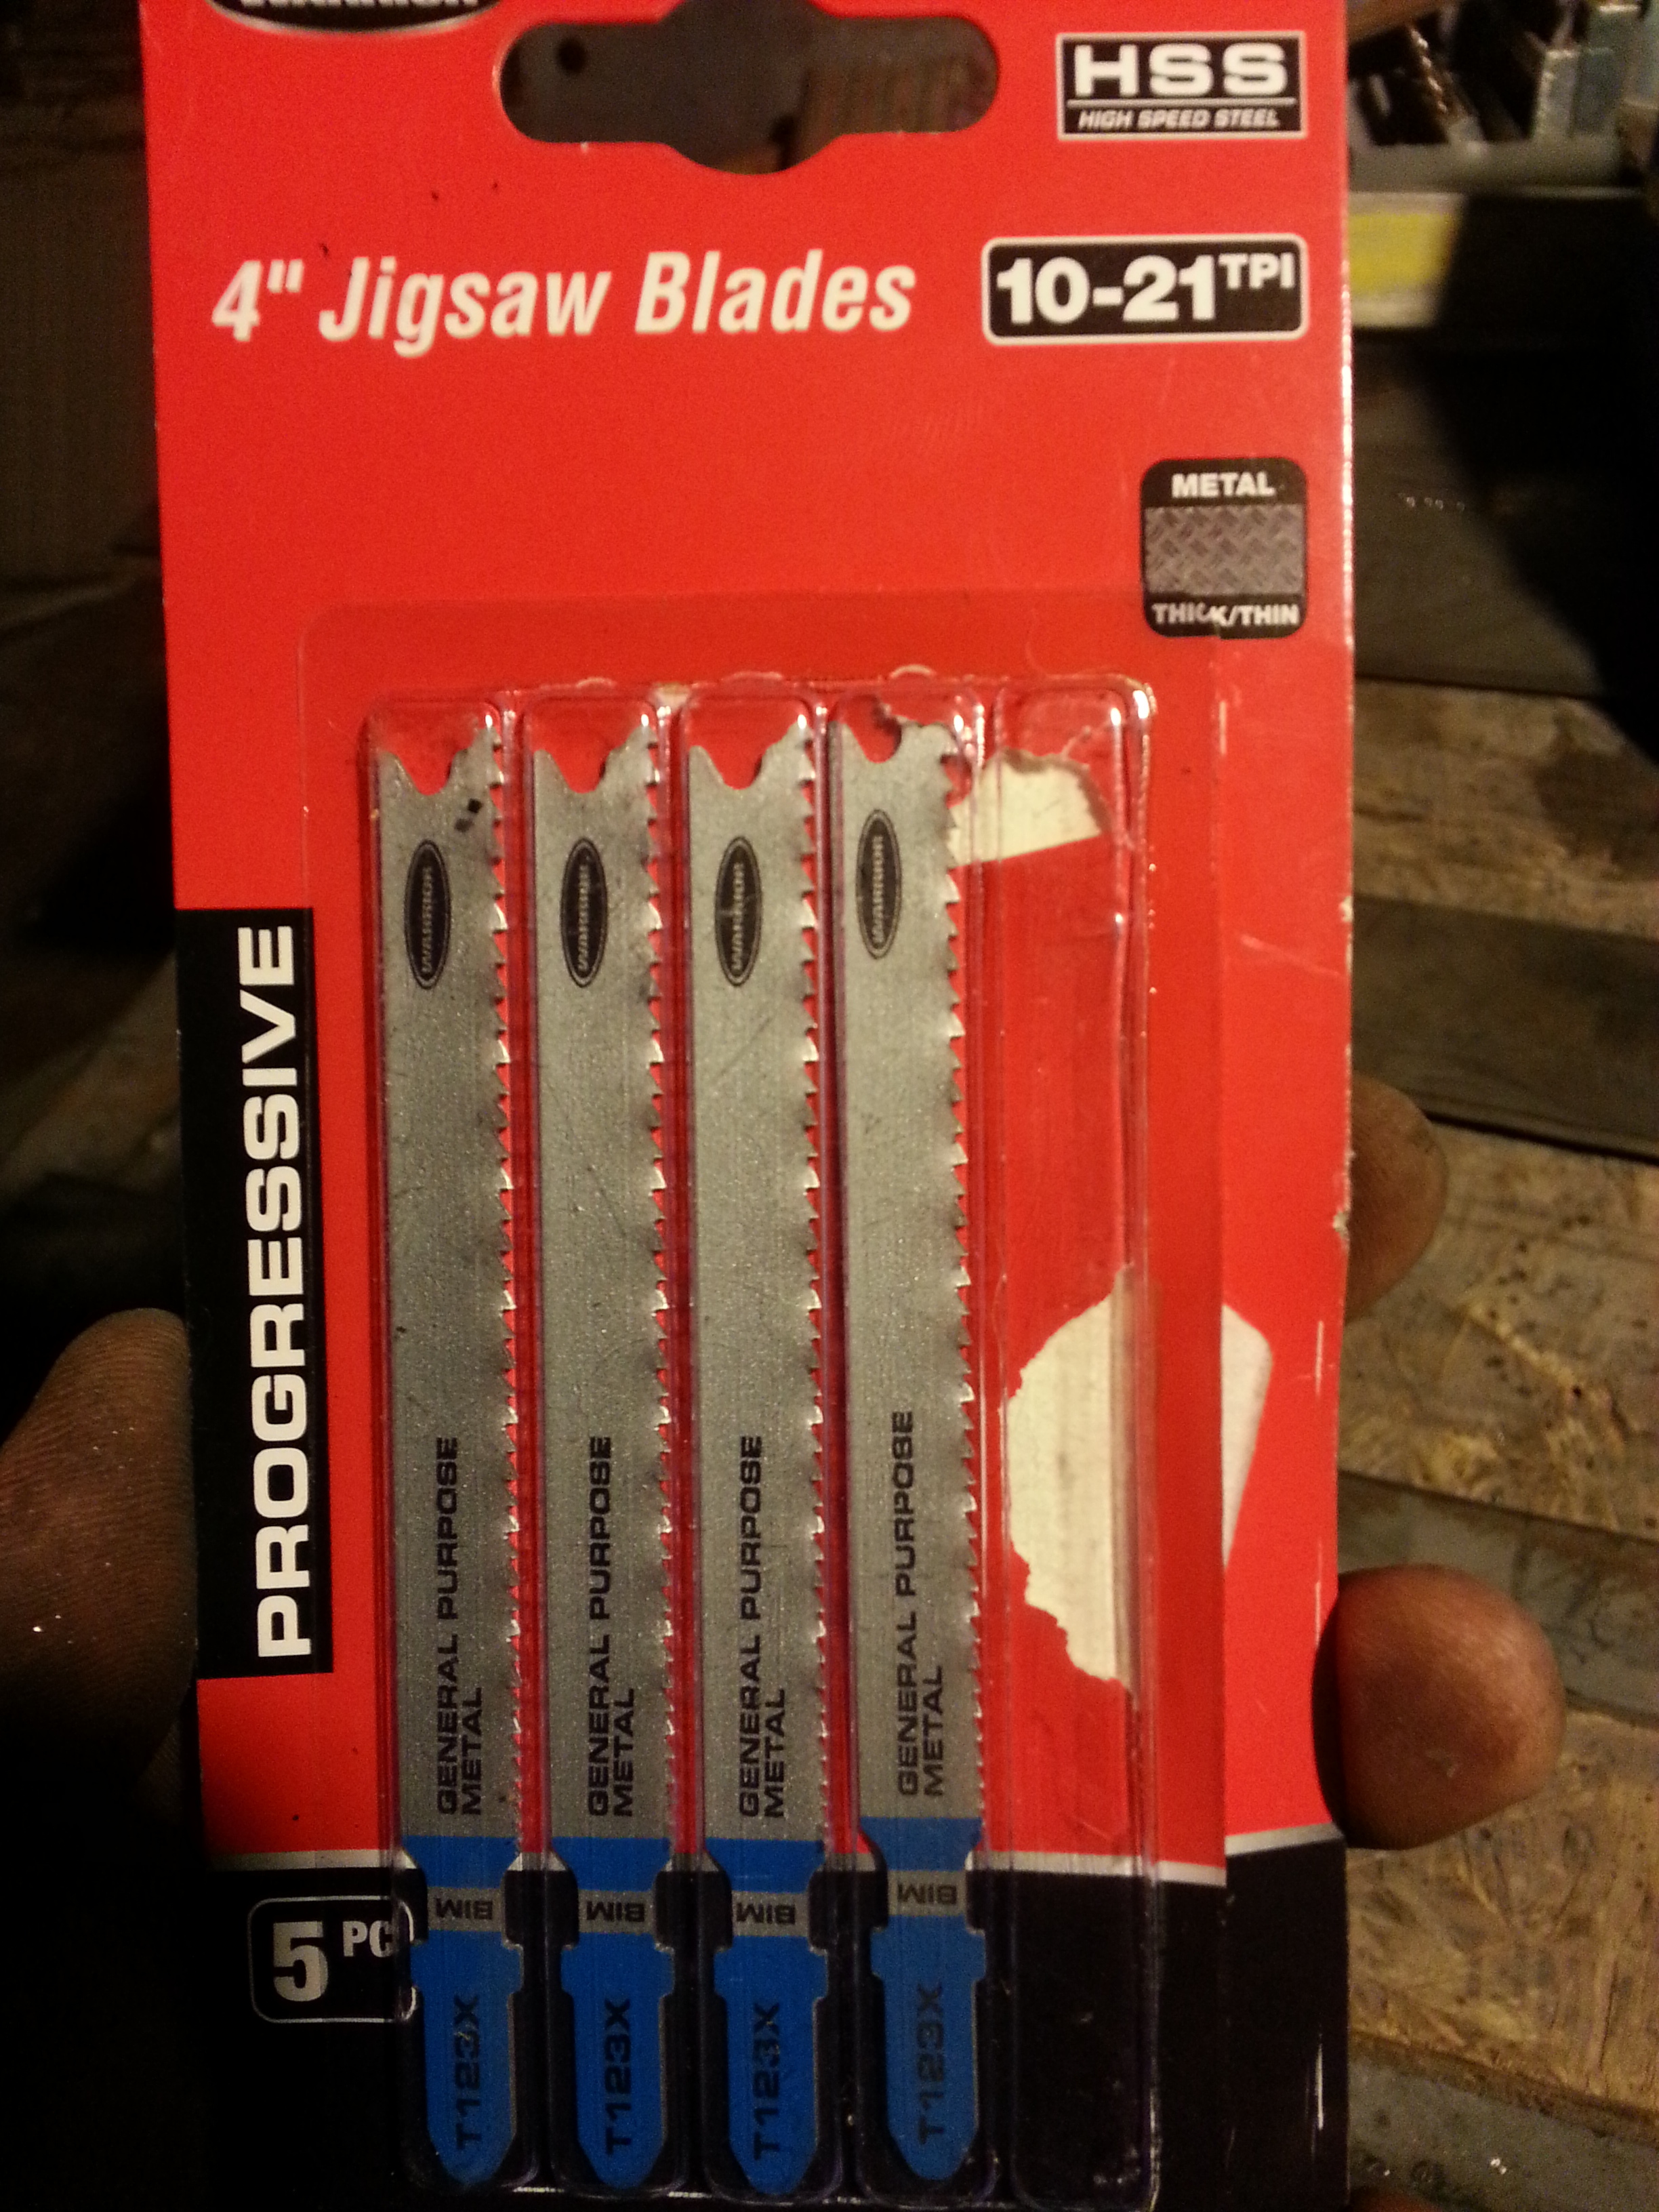
Started off by out lining the 2 center pieces of the bumper with my Masonite templates. We pulled out the acetylene torch to cut the pieces quick like last time but we kinda ran into some problems. We ran out of Acetylene before we could eve start lol So i went out to harbor freight and bought some metal tips for my jigsaw I didn't plan to use this but this is the only alternative i have right now.
These are the tips i bought
Here are my 2 cuts. top and center front bumper pieces. I cut these out first because I want to make sure the top piece will clear my winch if i ever had to take it out. Plus i need to make sure the depth from front to back will be fine when i start off. because i do know it did sit a bit too long when i fitted the bumper to the truck. So once i have these 2 pieces ground down to a smooth surface and tack welded ill have something to start working on building the rest up.
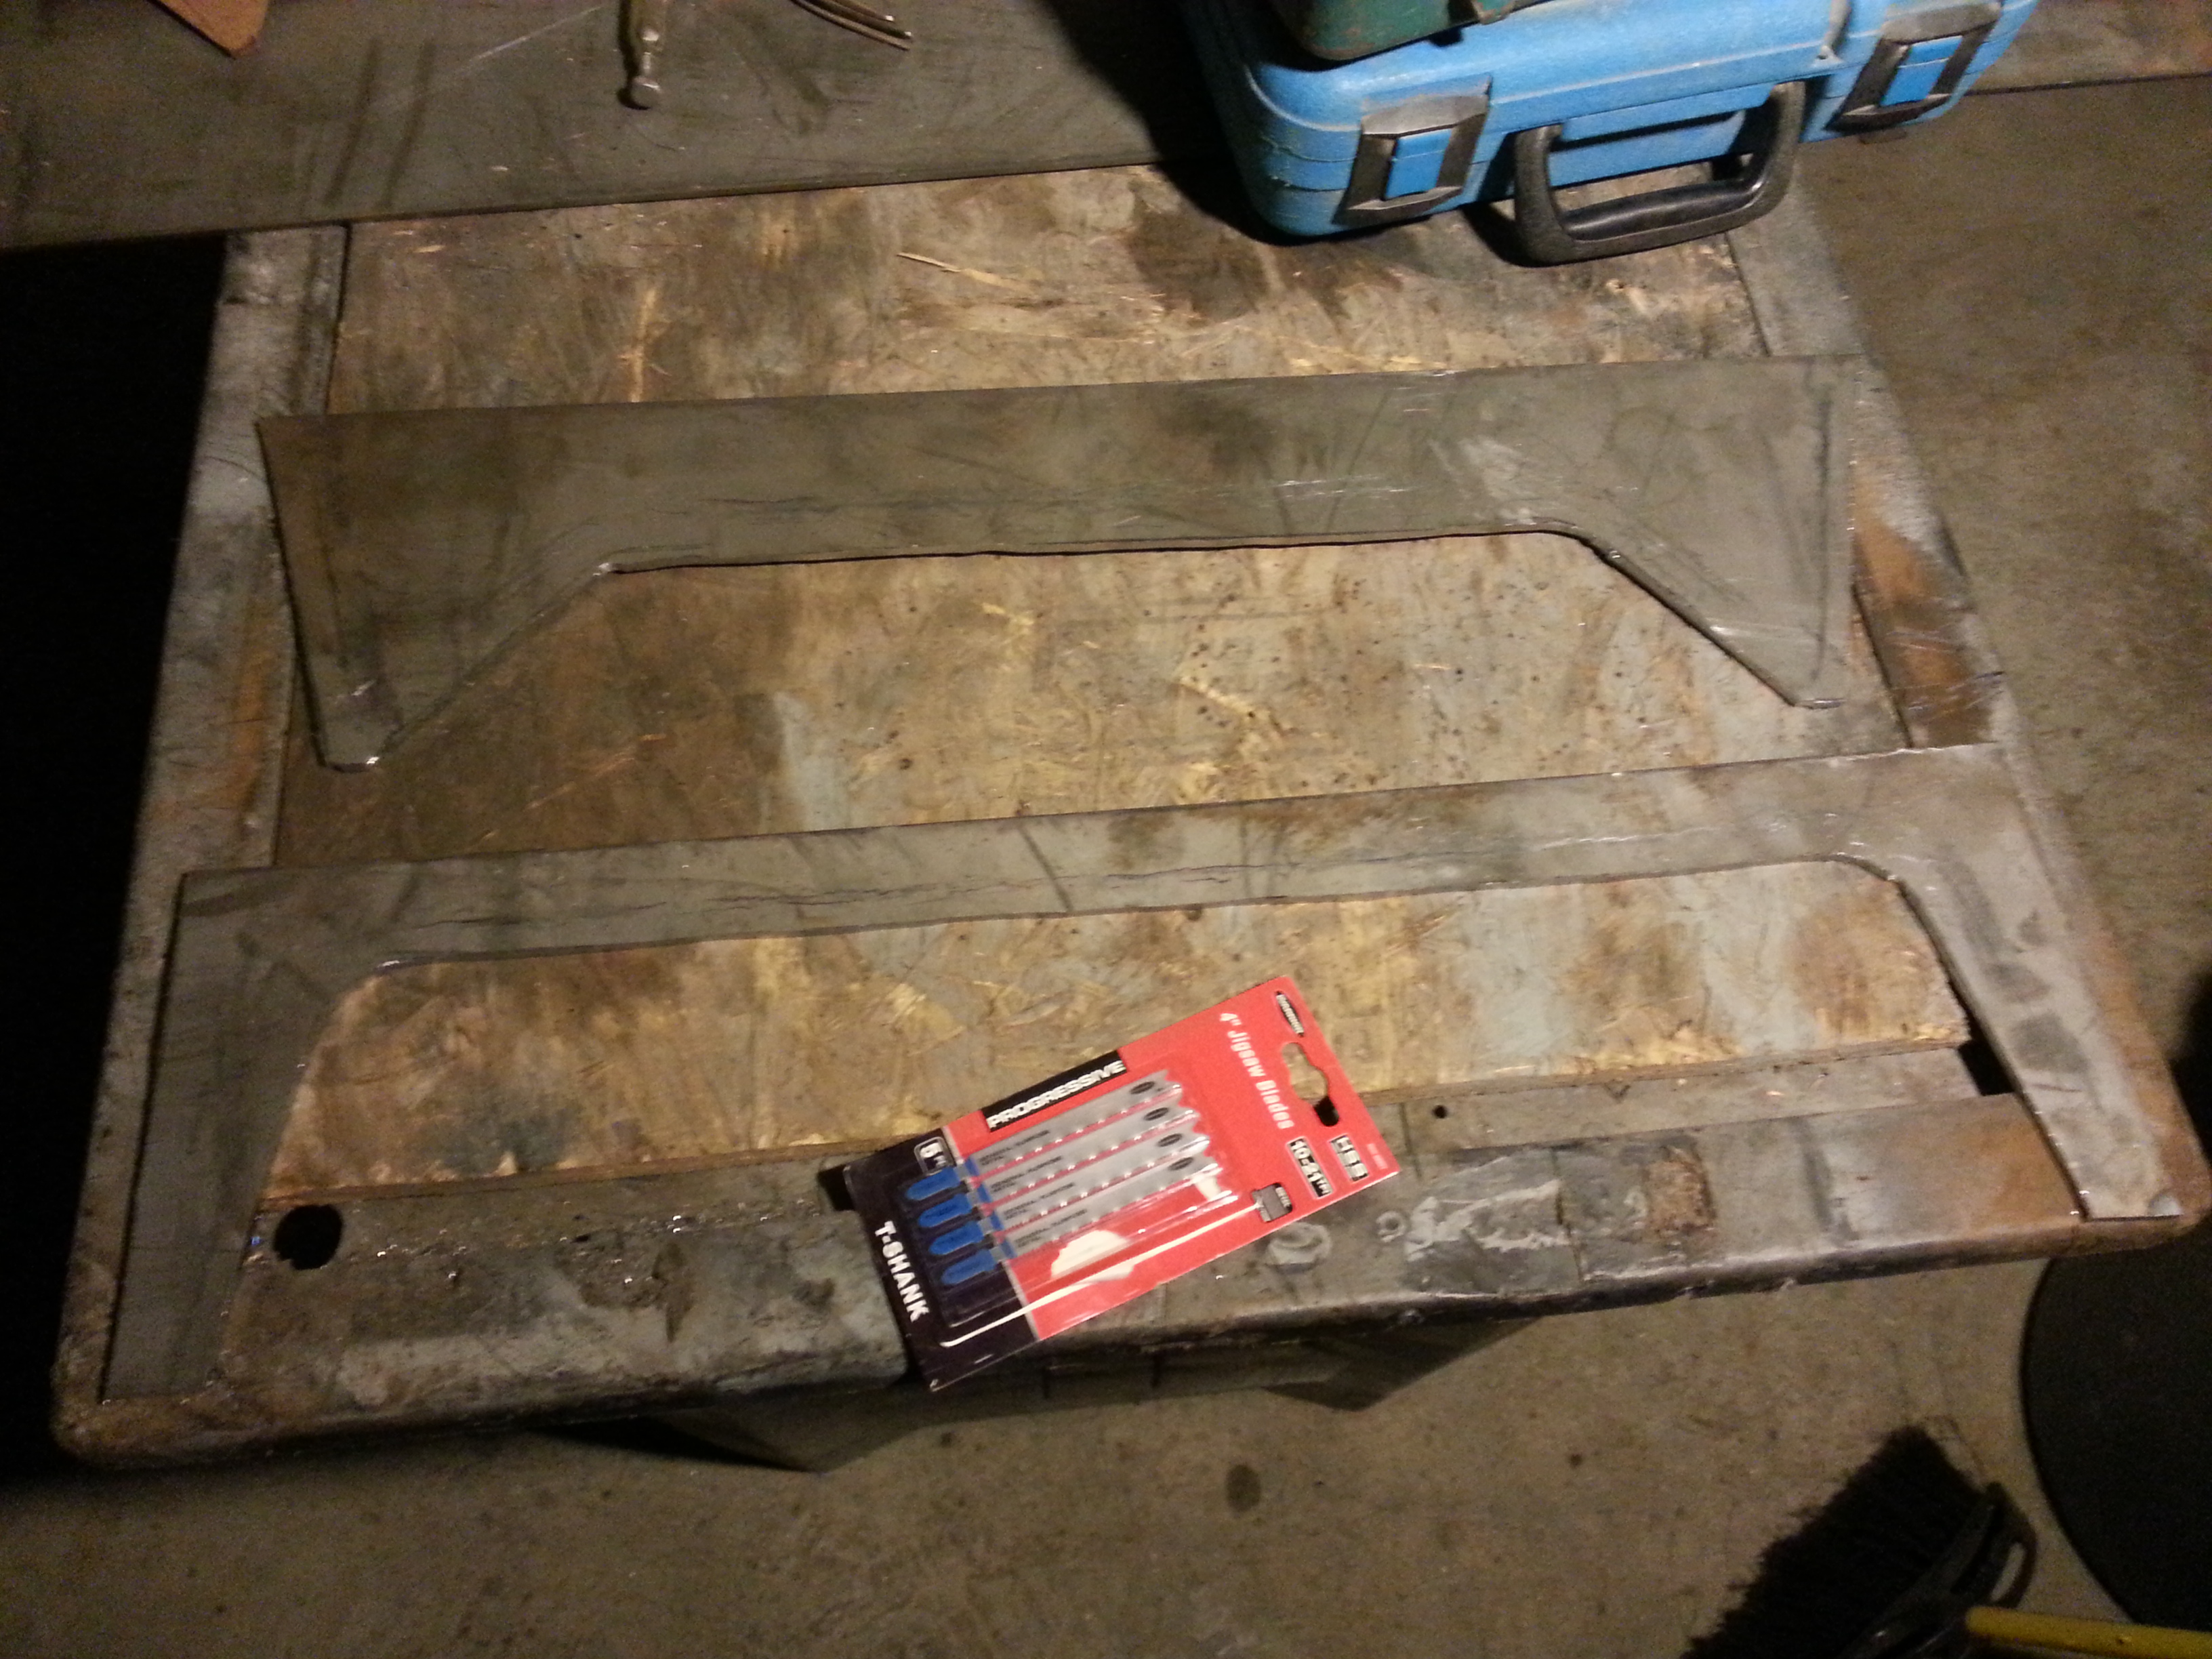
Not much accomplished. Spent too much time at Harbor freight just to buy these dang blades. I'll continue to cut some more tomorrow guys. or at least get that center piece welded together so i can fit that winch for clearance.
Started off by out lining the 2 center pieces of the bumper with my Masonite templates. We pulled out the acetylene torch to cut the pieces quick like last time but we kinda ran into some problems. We ran out of Acetylene before we could eve start lol So i went out to harbor freight and bought some metal tips for my jigsaw I didn't plan to use this but this is the only alternative i have right now.
These are the tips i bought

Here are my 2 cuts. top and center front bumper pieces. I cut these out first because I want to make sure the top piece will clear my winch if i ever had to take it out. Plus i need to make sure the depth from front to back will be fine when i start off. because i do know it did sit a bit too long when i fitted the bumper to the truck. So once i have these 2 pieces ground down to a smooth surface and tack welded ill have something to start working on building the rest up.

Not much accomplished. Spent too much time at Harbor freight just to buy these dang blades. I'll continue to cut some more tomorrow guys. or at least get that center piece welded together so i can fit that winch for clearance.
10-04-2013, 07:33 PM
#39
Registered User
Thread Starter
Got the parts tack welded together but i need to take it apart. the top side wouldnt allow the winch to drop in. Ill take pix tomorrow.im gonna have all day to work on this bumper.
Last edited by Redeth005; 10-04-2013 at 07:35 PM.
10-05-2013, 09:40 PM
#40
Registered User
Thread Starter
Welding bumper together!
I got tons accomplished today. Started the day off at about 1:00pm.
I tack welded the 2 center pieces of the bumper where the winch plate is. After i tack welded i had my dad check up on my work and he didnt have very much to complain about. He just said my welds are getting better.
Dad touching up my tack welds:
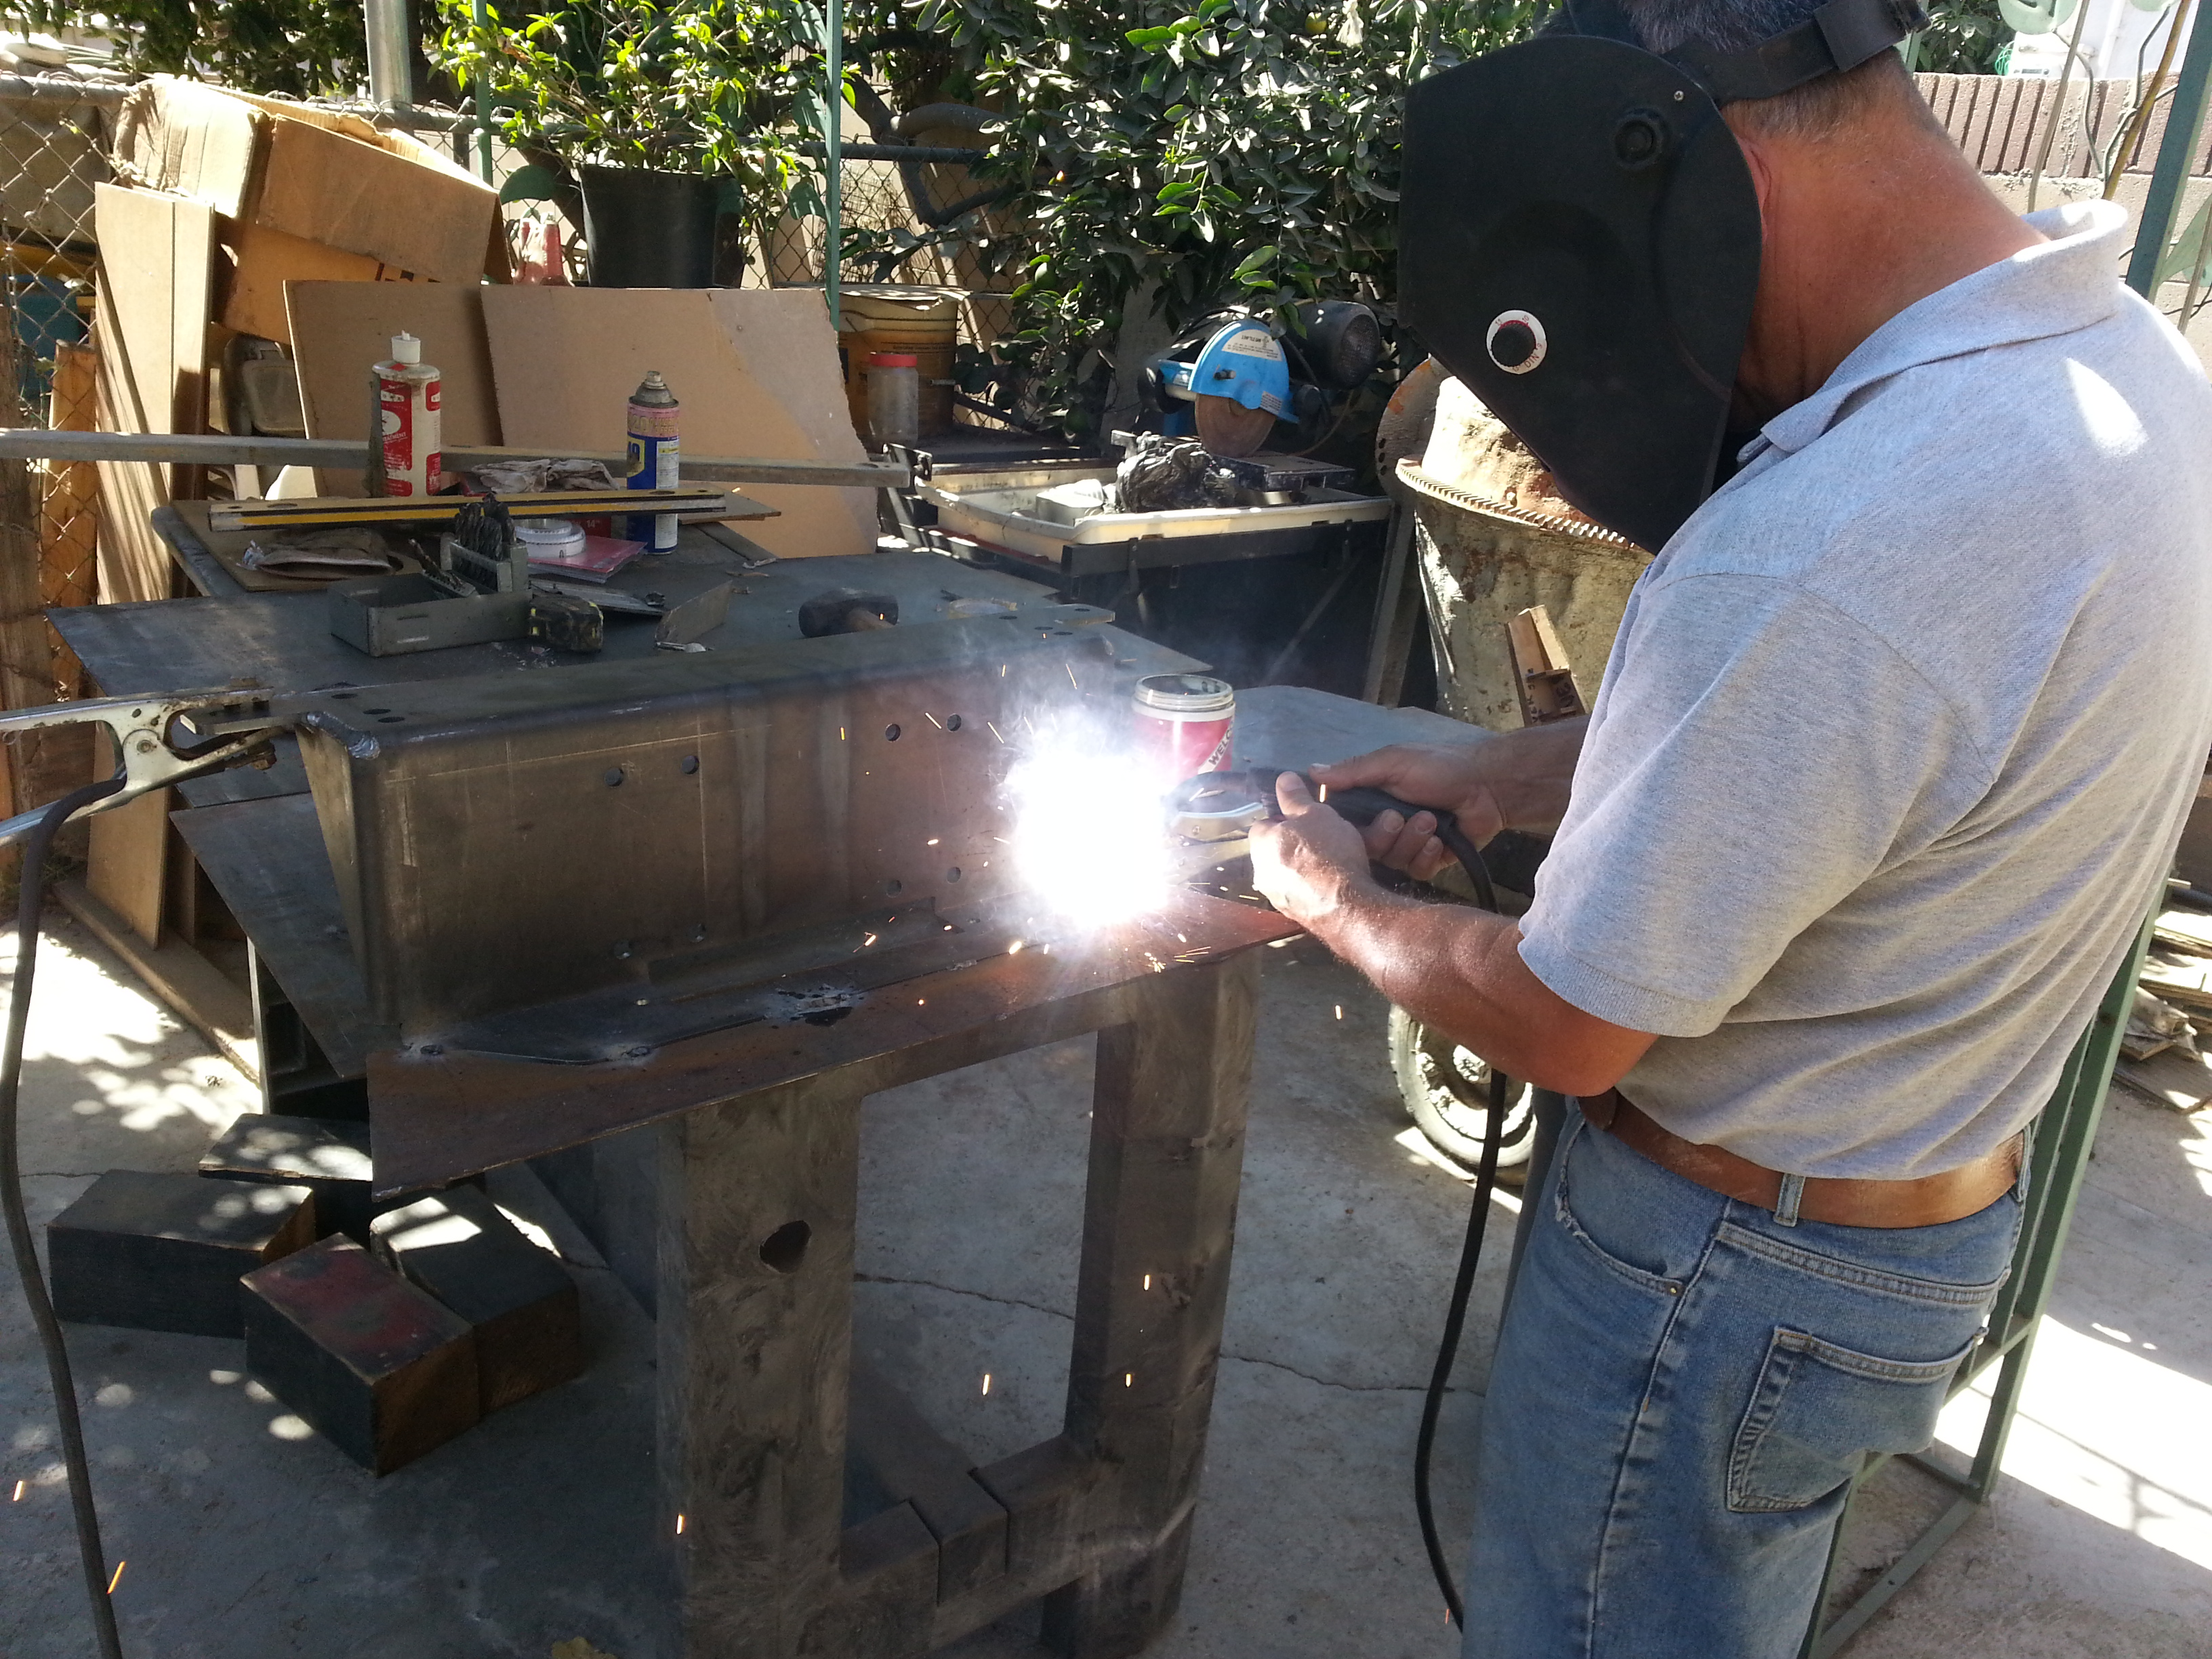
Squaring stuff out to make sure it isn't all thrown off when i add the rest of the pieces.

Completed my welds for the center pieces. I know i know I'm not the greatest welder. I'm still learning getting the technique down. but i have full confidence that my welds will hold, they just look messy thats all lol
I cut up the rest of the pieces to the bumper with the jigsaw.
NOTE:
- Cutting with the acetylene torch like i did for the rear bumper will save your tons of time when cutting out the pieces BUT the down fall to that is that you will spend lots of time grinding the melted metal edges down.
- I found that when cutting with the jig saw, although it took much longer to make all the cuts, it was way cleaner. All the pieces i cut were ready to be welded together right after i cut. practically didnt even need to grind anything.
***That was just a thought. Just in case you didnt know which route to go.***
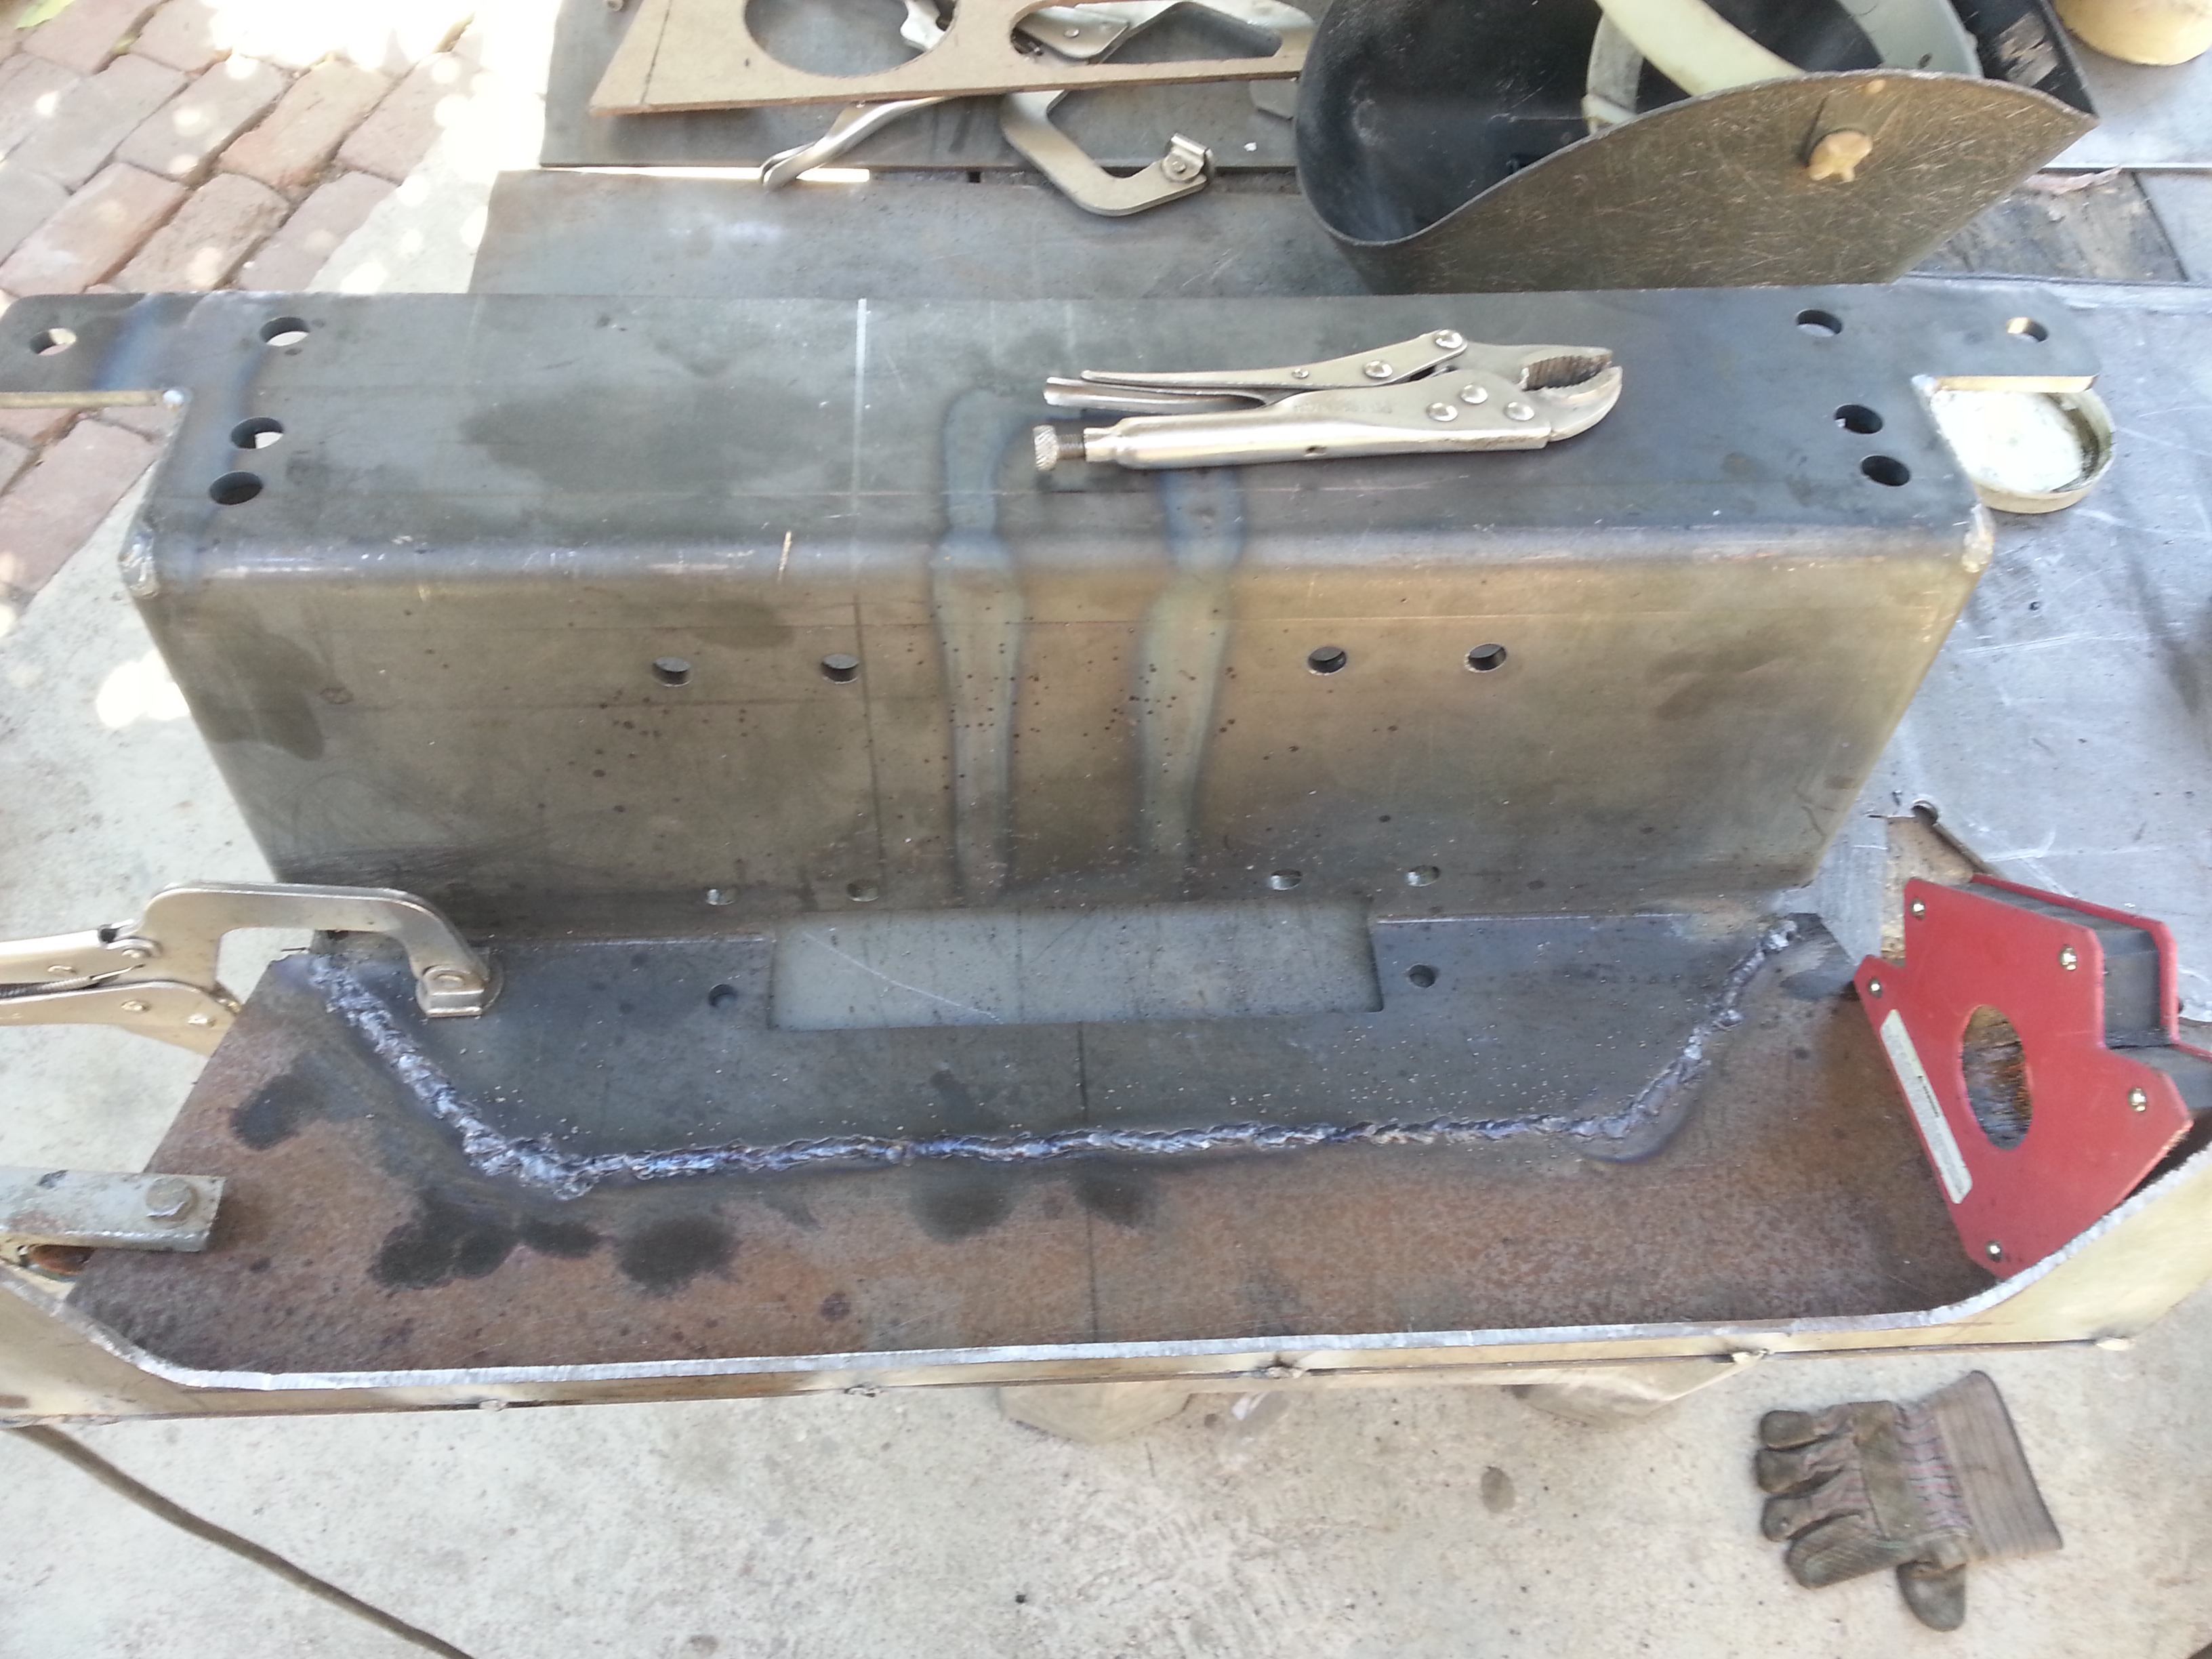
Adding the top side of the bumper:
I ran into some problems with the hole saw today. The smaller size worked fine. as you can see the oval shape in the center came out fine. But when i tried to get the 4&1/4" holes cut they just barely scratched the surface. This hole saw sucks! So i figured i would just cut a smaller hole in the center. then try to cut the circle with the jig saw. but the 1/4" metal on the winch plate is too thick and i wasted 2 jigsaw blades by trying to cut through it. So you will see in the following pictures that the holes didnt get finished. I am going to go fill my dad's Oxygen and Acetylene tanks at a local welding supplies store during the week. Then i'll be able to get those circle holes cut out just fine with no problem at all.
Tack welding it all together
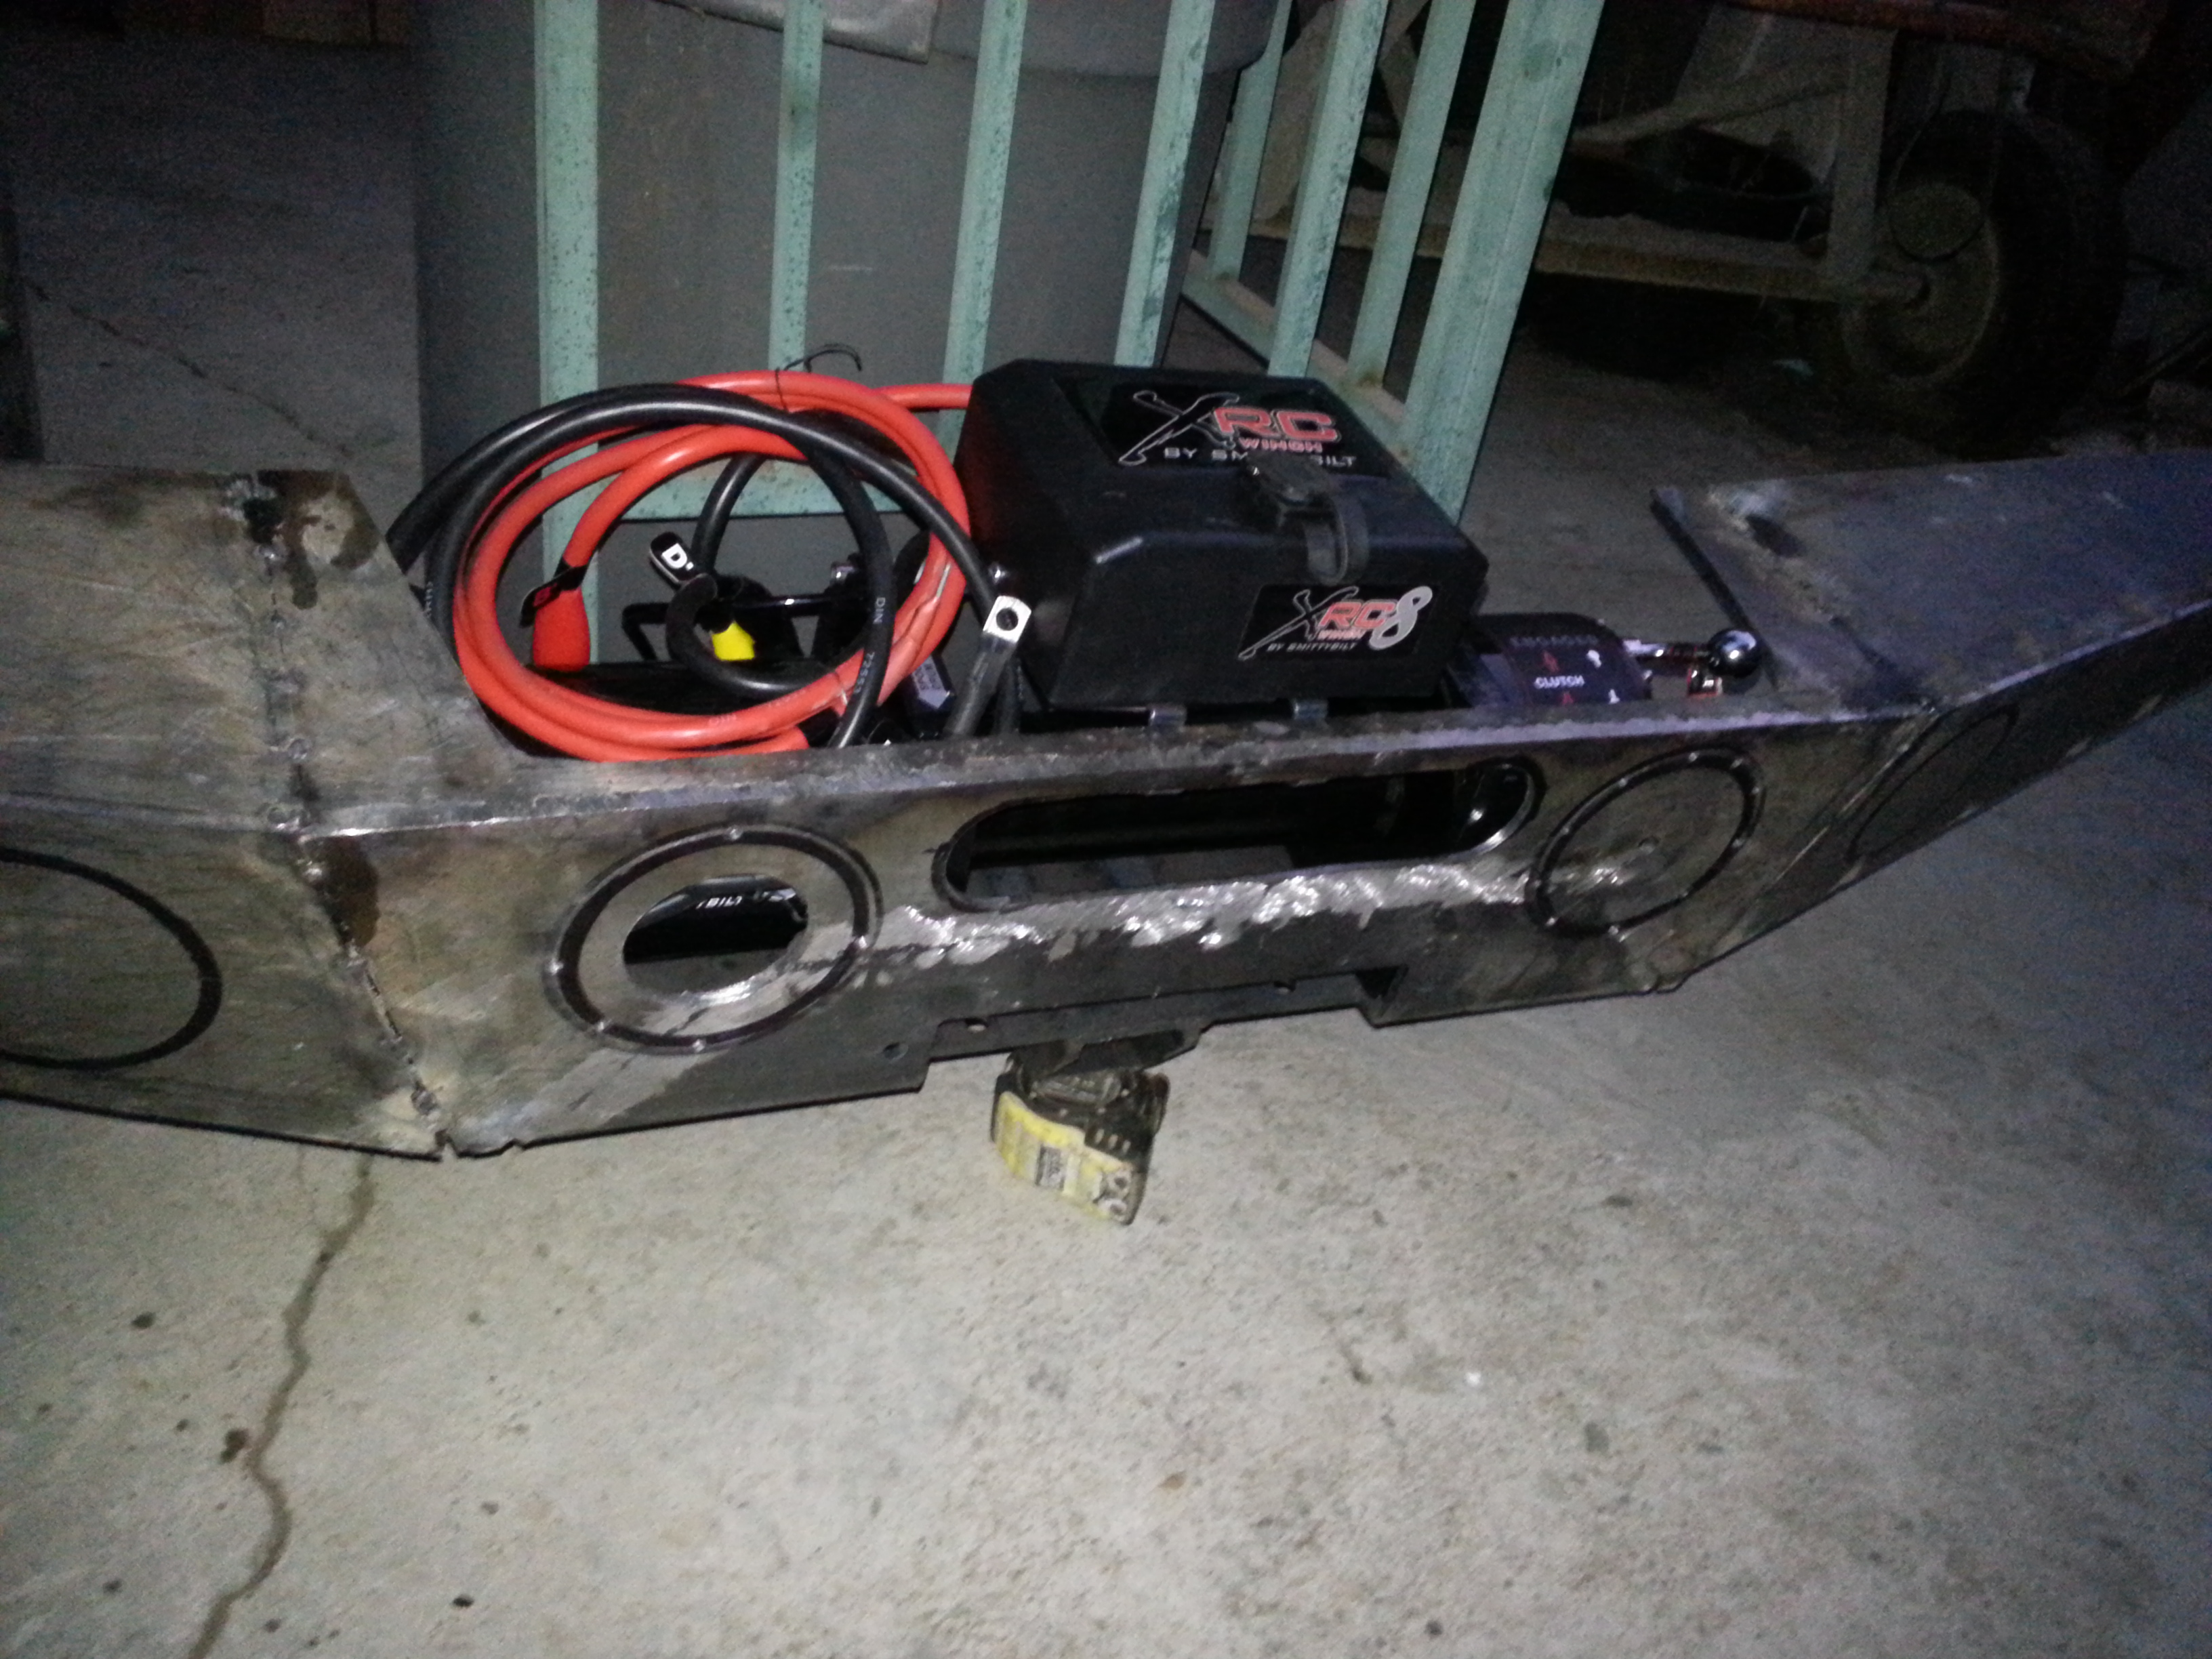
Smittybilt XRC8 Winch fits perfectly!
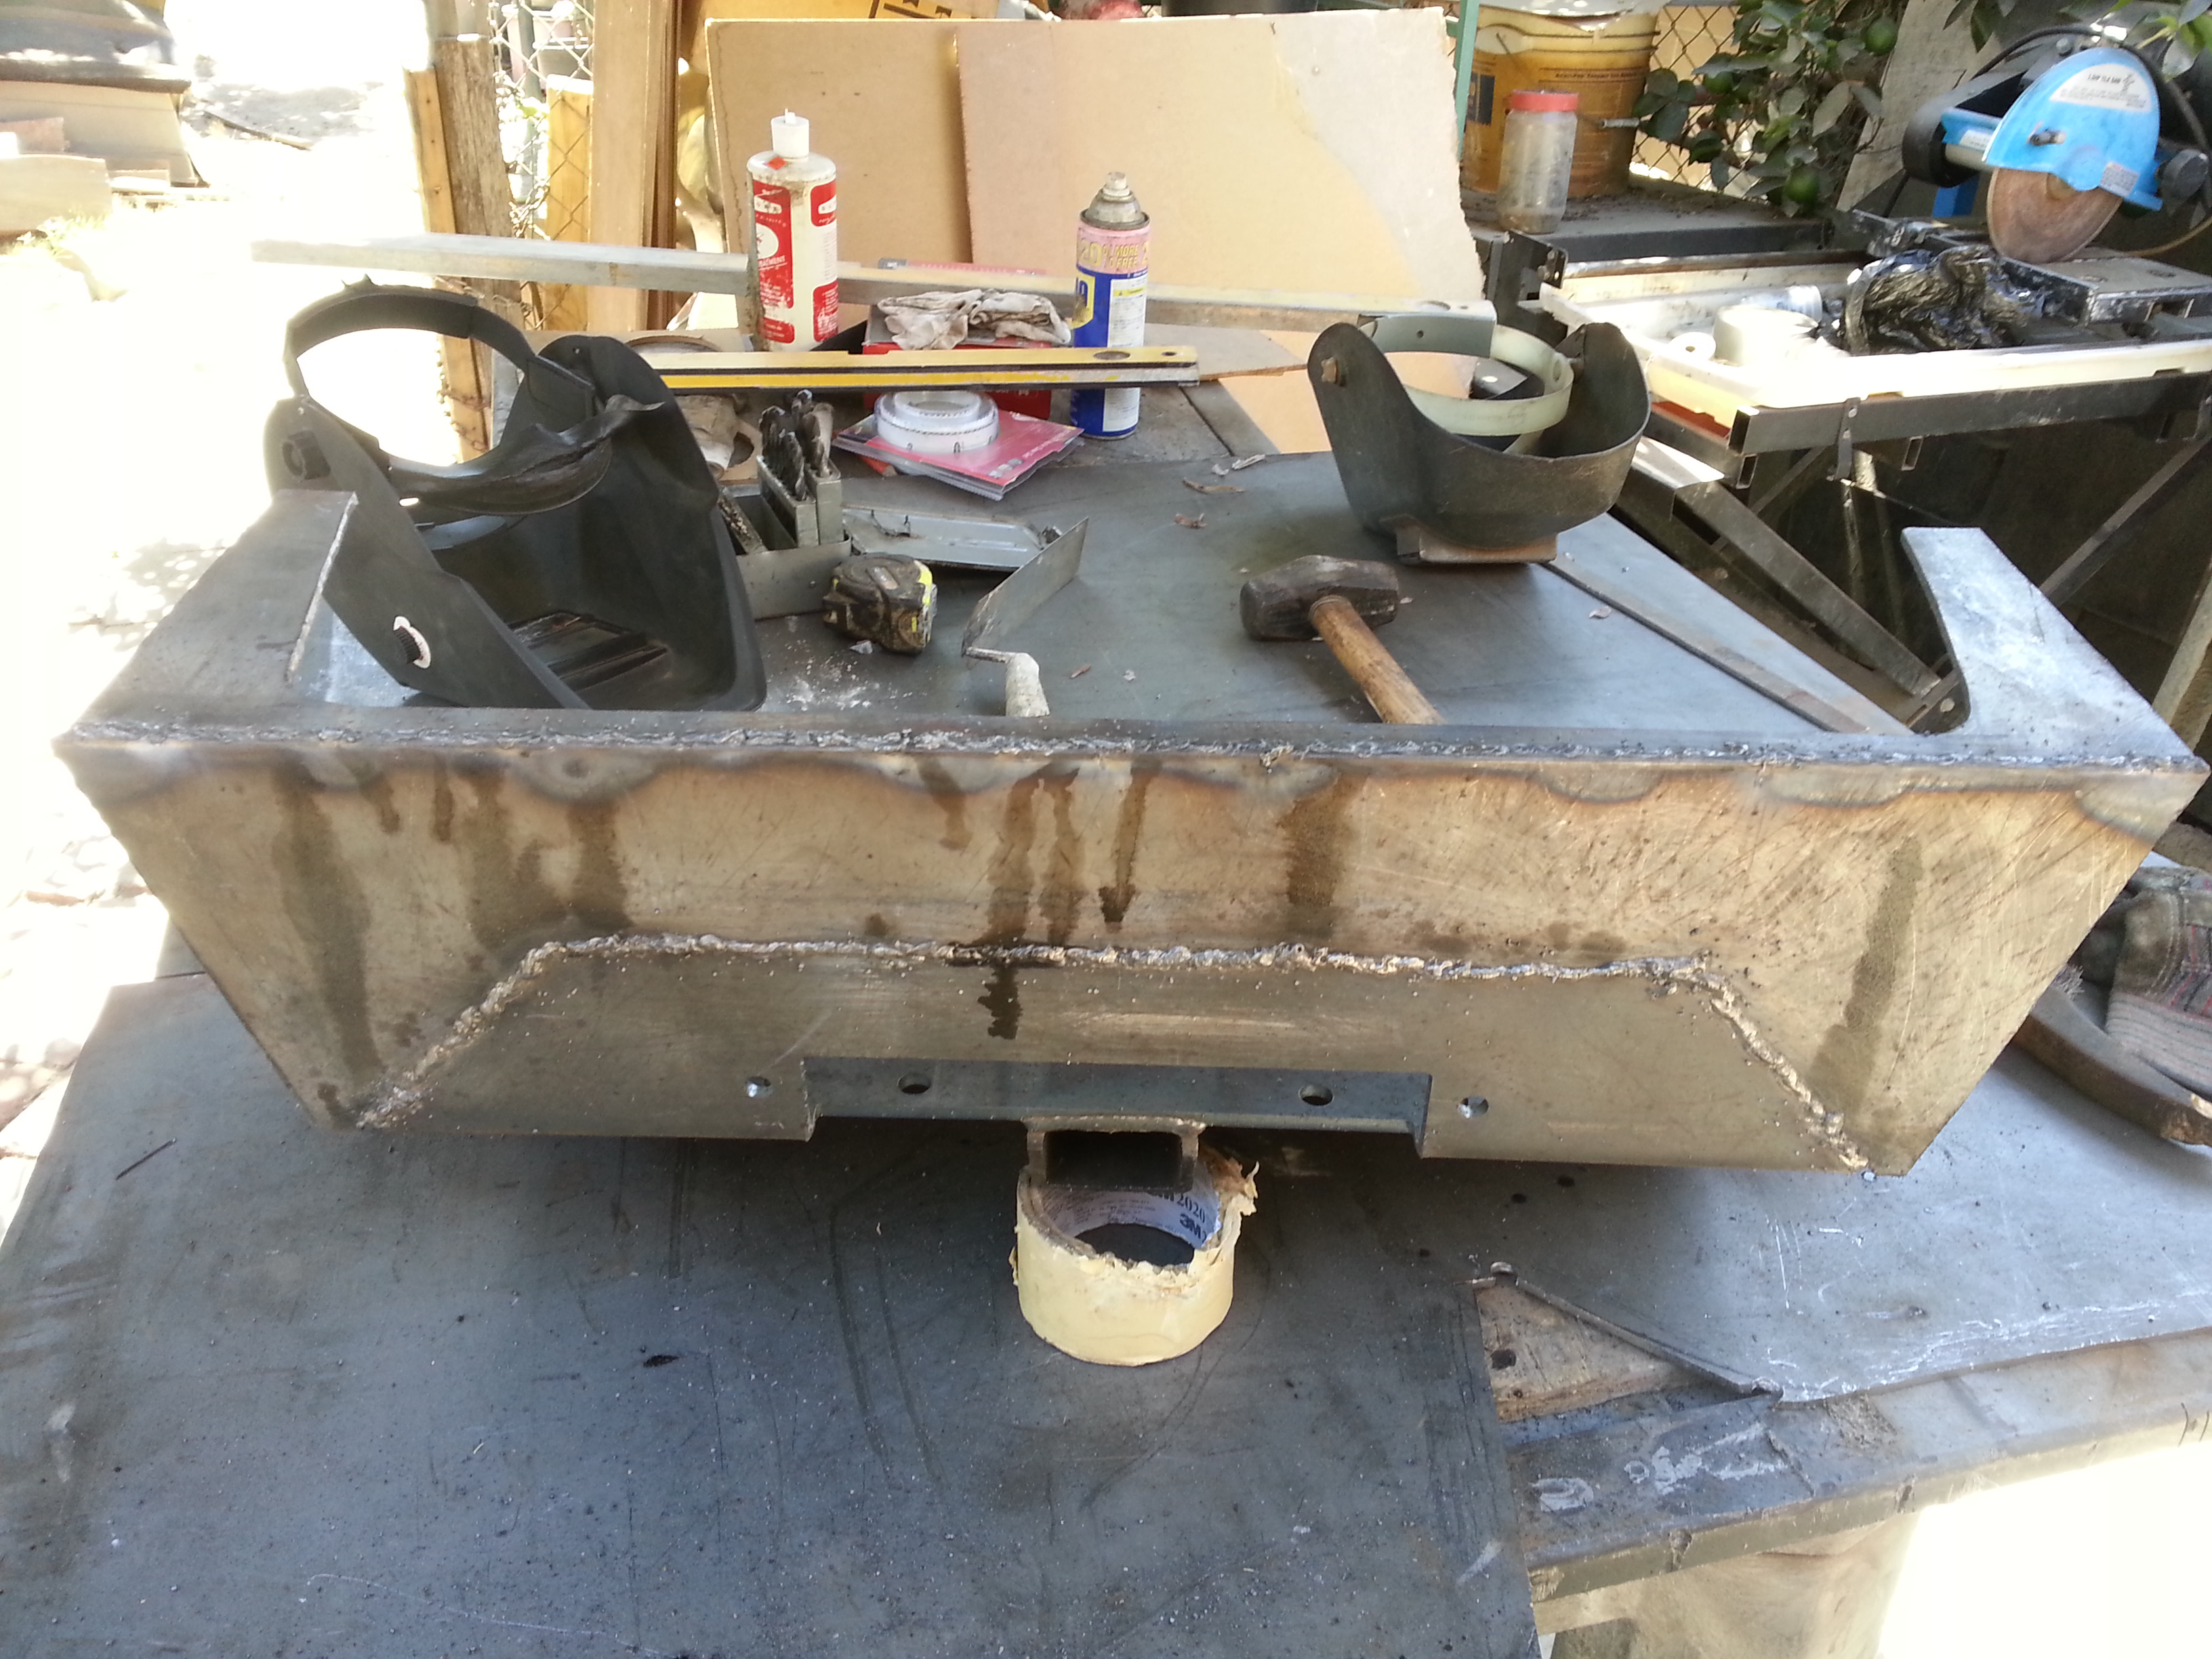
As of right now i just left the bumper tack welded together because i still need to fit the bumper to the truck and i might have to make some alterations to the sides. So I'll just leave it as is to make sure it fits just right before i make the final welds. I still need to add some reinforcement behind the face of the bumper. So dont think it's gonna stay like this lol
Will continue to do some more tomorrow morning.
I tack welded the 2 center pieces of the bumper where the winch plate is. After i tack welded i had my dad check up on my work and he didnt have very much to complain about. He just said my welds are getting better.
Dad touching up my tack welds:

Squaring stuff out to make sure it isn't all thrown off when i add the rest of the pieces.

Completed my welds for the center pieces. I know i know I'm not the greatest welder. I'm still learning getting the technique down. but i have full confidence that my welds will hold, they just look messy thats all lol


I cut up the rest of the pieces to the bumper with the jigsaw.
NOTE:
- Cutting with the acetylene torch like i did for the rear bumper will save your tons of time when cutting out the pieces BUT the down fall to that is that you will spend lots of time grinding the melted metal edges down.
- I found that when cutting with the jig saw, although it took much longer to make all the cuts, it was way cleaner. All the pieces i cut were ready to be welded together right after i cut. practically didnt even need to grind anything.
***That was just a thought. Just in case you didnt know which route to go.***
Adding the top side of the bumper:

I ran into some problems with the hole saw today. The smaller size worked fine. as you can see the oval shape in the center came out fine. But when i tried to get the 4&1/4" holes cut they just barely scratched the surface. This hole saw sucks! So i figured i would just cut a smaller hole in the center. then try to cut the circle with the jig saw. but the 1/4" metal on the winch plate is too thick and i wasted 2 jigsaw blades by trying to cut through it. So you will see in the following pictures that the holes didnt get finished. I am going to go fill my dad's Oxygen and Acetylene tanks at a local welding supplies store during the week. Then i'll be able to get those circle holes cut out just fine with no problem at all.
Tack welding it all together


Smittybilt XRC8 Winch fits perfectly!

As of right now i just left the bumper tack welded together because i still need to fit the bumper to the truck and i might have to make some alterations to the sides. So I'll just leave it as is to make sure it fits just right before i make the final welds. I still need to add some reinforcement behind the face of the bumper. So dont think it's gonna stay like this lol
Will continue to do some more tomorrow morning.
Last edited by Redeth005; 10-05-2013 at 09:46 PM.


