OBA using your A/C Compressor and an air tank.
 08-11-2011, 07:25 AM
#21
Contributing Member
Thread Starter
iTrader: (3)
It's all relative. It isn't any harder....the nice thing is with an A/C system the truck will idle up because of the VSV. You'll have to install that or a hand throttle.....
 08-11-2011, 09:46 AM
#22
Contributing Member
Thread Starter
iTrader: (3)
Continuation...
With the compressor in place and all the system components mounted it was time to run the 3/8" air hose to connect everything. I removed both the A/C lines off the fittings on the truck and used a pipe cutter to cut off BOTH ends(making two large and two small). It's aluminum fittings with rubber o-rings so be careful not to loose the o-rings or crush the fittings. The large fitting(green) will be the "intake" and I used the 90* fitting(yellow) for the "output" to the pencil manifold. The other fitting(red) will be used as a cap.
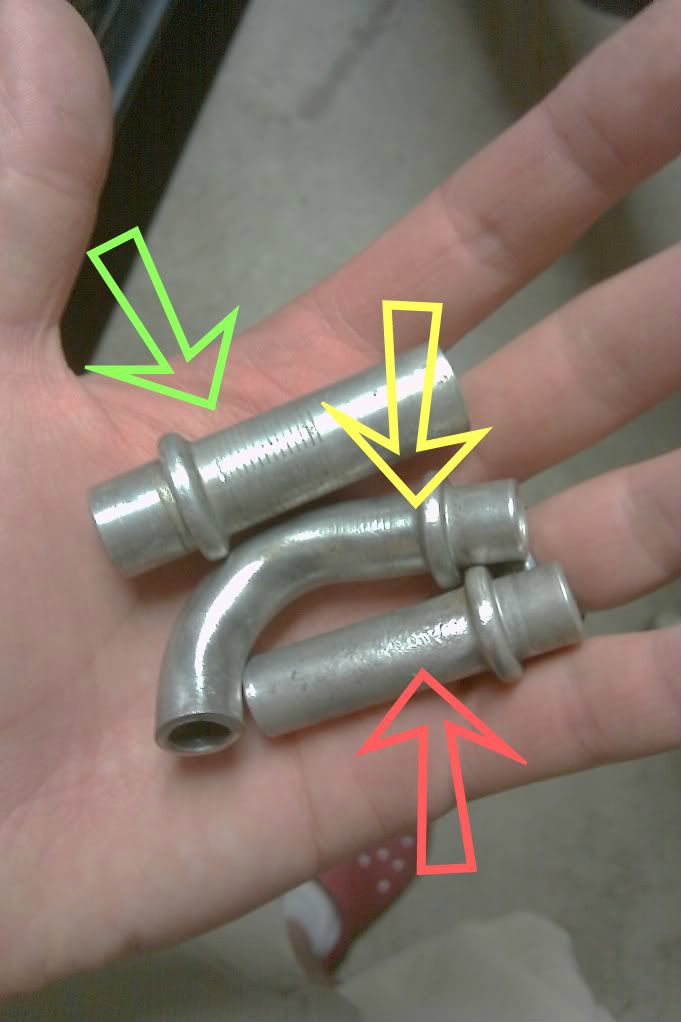
I then crimped two of the fittings(one large and one small) and reinstalled on the vehicle to close off the system. One fitting on the fire wall(green) and one on the radiator core support that feeds into the A/C radiator(not shown).
At this point, it's just connect the dots.
-Hose from the inline oiler to the large fitting on the A/C compressor.
-Hose from the small fitting on the A/C compressor to the check valve on the pencil manifold.
-Hose from the output on the pencil manifold back to the water seperator.
-Hose from the seperator to the tank(where I have the pop off valve).
-Hose from the tank to the bulk head fitting on my rear bumper.
All brass connections/fittings with 1/4" NPT were used and teflon tape applied to threads. I used a combination of 90* fittings, adaptors(1/4"-3/8" NPT), plugs(1/8" and 3/8" NPT), t-fittings, hose barbs and quick disconnects. I also used zipties here, zip ties there....
Being that this is a custom install, there are many ways to get the "basic" system setup using various odd and ends and cheaper pieces parts.
Next up: getting that stored air out to the tires and specifics on the pencil manifold.....
Last edited by BigBluePile; 08-11-2011 at 09:50 AM.
08-11-2011, 10:10 AM
#23
Registered User
BBP what's the purpose of running through the charcoal canister or did I not read something again? Assuming it's for some sort of a makeshift intake air water separator?
08-11-2011, 10:14 AM
#24
Contributing Member
Thread Starter
iTrader: (3)
The manifold is attached to it and is in no way actually "running" through it...I guess I could and use the gas fumes, pressurized by the compressor, as a flame thrower...
 08-11-2011, 10:27 AM
#26
Registered User
ok yeah now that makes sense haha. I figured I saw the same blue hose hooked to the breather filter etc for the OBA just ASSumed it was a part of the install since he did say something about hooking something to that canister didn't realize it was just hose clamped to it. 
 08-12-2011, 11:57 AM
#28
Contributing Member
Thread Starter
iTrader: (3)
Completion.
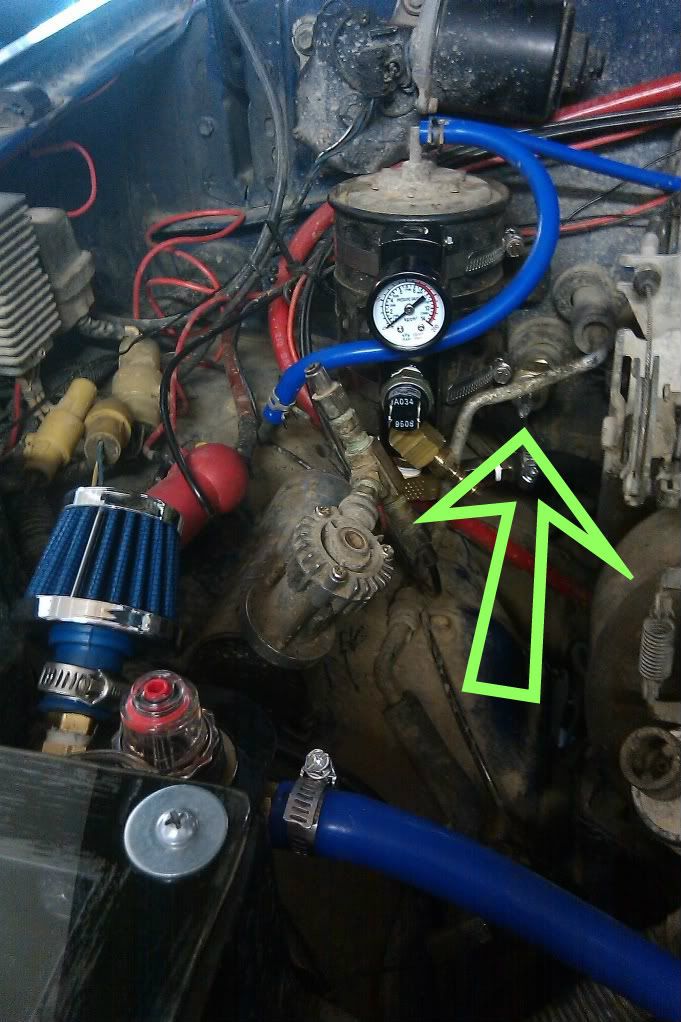
The pencil manifold can be sourced from any where. I got mine off of Amazon but it probably would have been faster to just order it from the vendor...
It's an aluminum body with seven ports: front four 1/4" NPT fittings, end and back 3/8" fittings. Fittings on each end, on the backside and four on the front. It does come with two plugs but I had to get one more for the front(which COULD be used with a hose barb to plumb air hose to the front of the rig).
My setup:
Port #1: 0-150psi micro gauge 1/8" NPT
Port #2: 3/8" plug
Port #3: Viair 85-105psi pressure switch 1/8" NPT
Port #4: 90* fitting output to water seperator/air tank
Port #5: ARB check valve input from A/C compressor
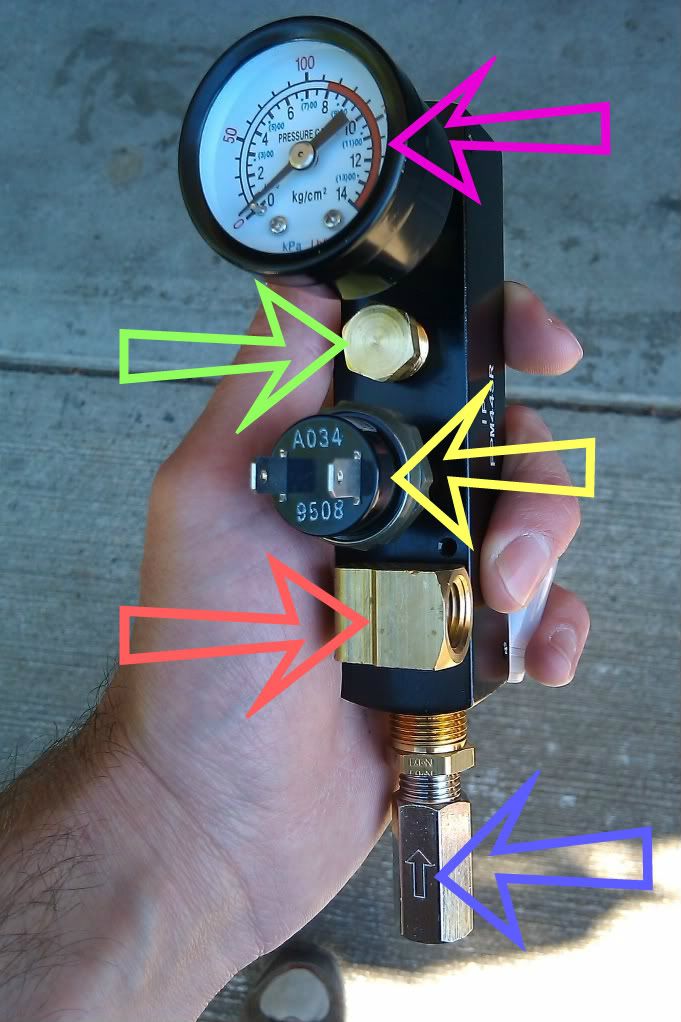
Simple and clean.
Now, at this point I could have just zip tied an air hook up fitting to the under carriage to plug my air hose into but...well...that's too easy. I figured my lovely rear swing out could use another big hole in it.
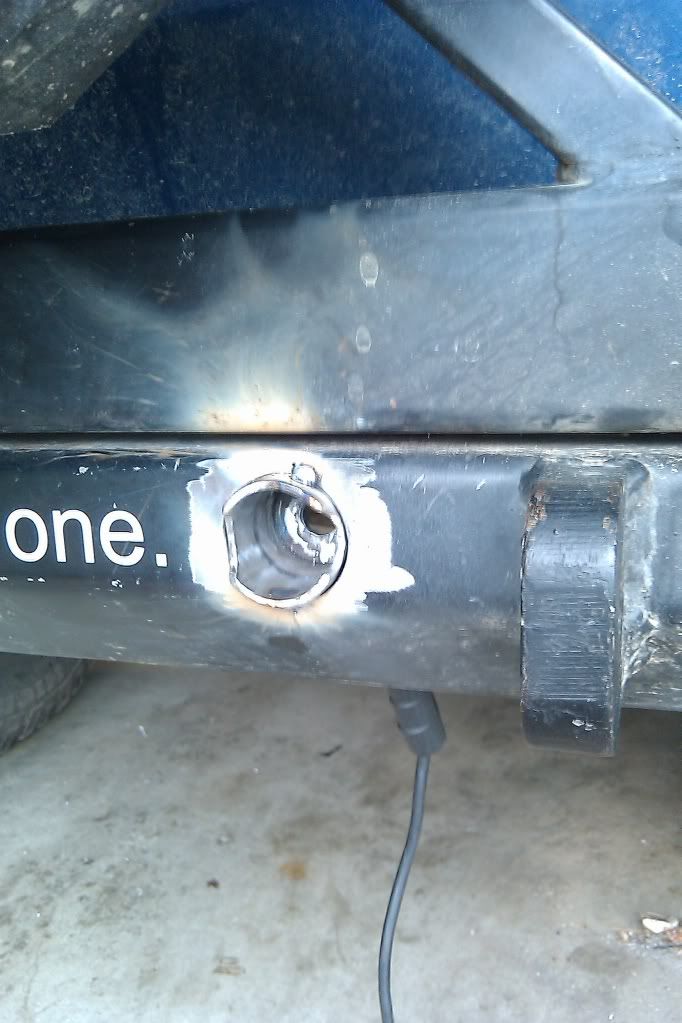
  With an 1.75" hole saw I cut through both sides of the bumper. Using some 1.75" HREW tubing I had layin around(doesn't everybody?? ) I made a small access port.
Inside the the tube I welded in a wall bored out to fit two fittings, one hose barb and one quick disconnect.
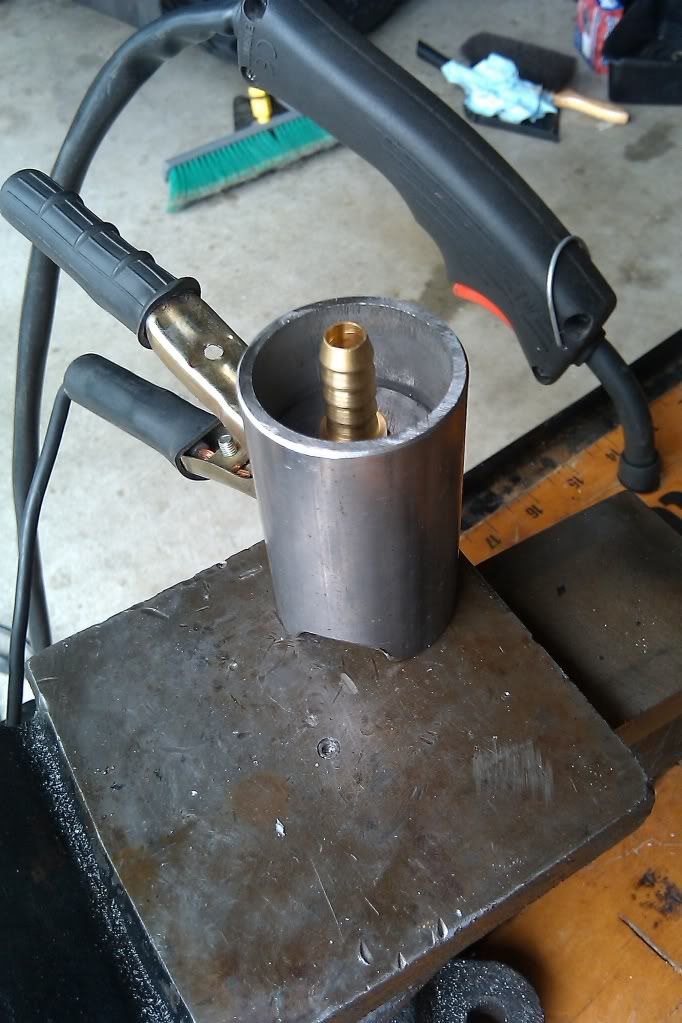

I filed down the end of the quick disconnect to use in a socket and screwed the two pieces together. I then attached the hose from the output on the air tank with a hose clamp.
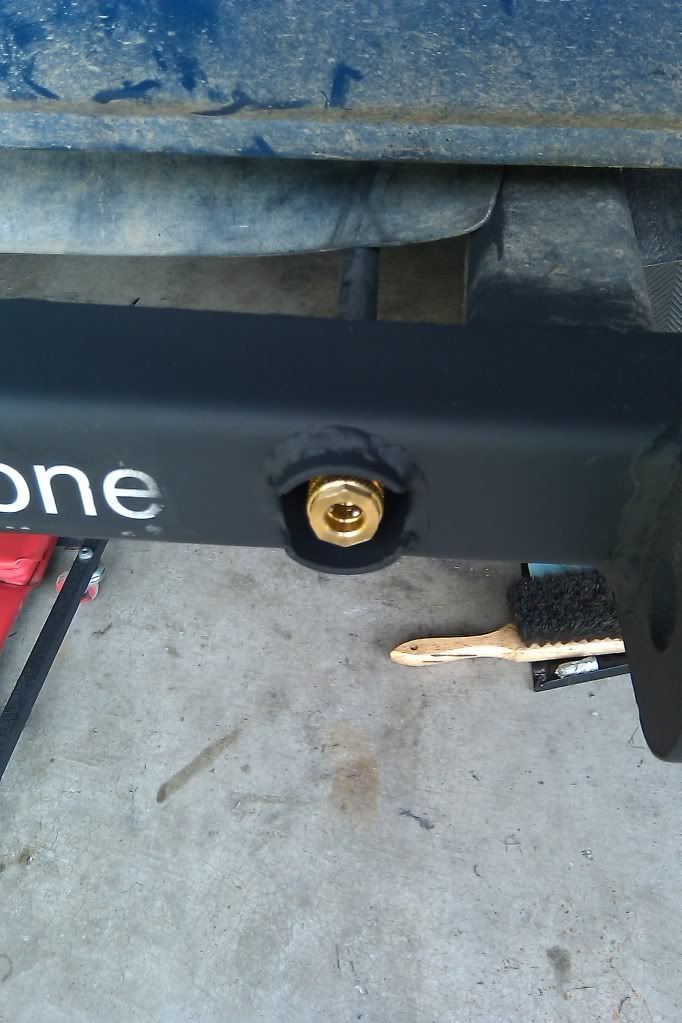
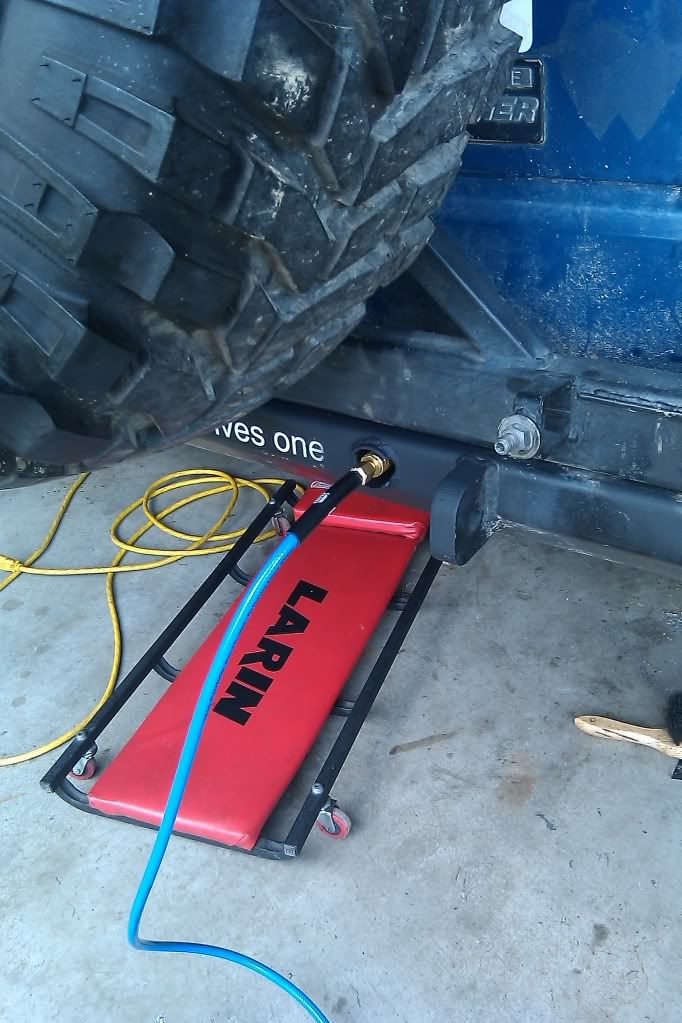
I can easily get my fingers inside to pop the disconnect to remove the hose. Plus, the fitting is protected from any sort of damage. I do have a little lanyard and cap to cover the end fitting.
I fired it up and within a couple minutes I had a full tank and nothing blew apart or popped off. I filled my 35" baja claw from aboot 10psi to 35psi in a short couple of minutes and the A/C compressor cycled a couple of times. Not bad.
I left the tank charged that night at 100psi and after about 8 or so hours it had 50psi contained. As far as I'm concerned, thats a good enough leak rate for me!!!
While it was running I verified that the oiler was working. I have it turned all the way up and it drops about twice a second...probably MORE than is needed.
I have not had a trail run test of this system yet but have been driving the rig daily and nothing has shifted or fallen off. Hopefully, in a couple of weekends I'll get some results out of this.
It's an aluminum body with seven ports: front four 1/4" NPT fittings, end and back 3/8" fittings. Fittings on each end, on the backside and four on the front. It does come with two plugs but I had to get one more for the front(which COULD be used with a hose barb to plumb air hose to the front of the rig).
My setup:
Port #1: 0-150psi micro gauge 1/8" NPT
Port #2: 3/8" plug
Port #3: Viair 85-105psi pressure switch 1/8" NPT
Port #4: 90* fitting output to water seperator/air tank
Port #5: ARB check valve input from A/C compressor
Simple and clean.
Now, at this point I could have just zip tied an air hook up fitting to the under carriage to plug my air hose into but...well...that's too easy.
I figured my lovely rear swing out could use another big hole in it. With an 1.75" hole saw I cut through both sides of the bumper. Using some 1.75" HREW tubing I had layin around(doesn't everybody?? ) I made a small access port.Inside the the tube I welded in a wall bored out to fit two fittings, one hose barb and one quick disconnect.
I filed down the end of the quick disconnect to use in a socket and screwed the two pieces together. I then attached the hose from the output on the air tank with a hose clamp.
I can easily get my fingers inside to pop the disconnect to remove the hose. Plus, the fitting is protected from any sort of damage. I do have a little lanyard and cap to cover the end fitting.
I fired it up and within a couple minutes I had a full tank and nothing blew apart or popped off. I filled my 35" baja claw from aboot 10psi to 35psi in a short couple of minutes and the A/C compressor cycled a couple of times. Not bad.
I left the tank charged that night at 100psi and after about 8 or so hours it had 50psi contained. As far as I'm concerned, thats a good enough leak rate for me!!!
While it was running I verified that the oiler was working. I have it turned all the way up and it drops about twice a second...probably MORE than is needed.
I have not had a trail run test of this system yet but have been driving the rig daily and nothing has shifted or fallen off.
Hopefully, in a couple of weekends I'll get some results out of this.
Last edited by BigBluePile; 08-12-2011 at 11:59 AM.
08-15-2011, 11:50 AM
#33
 08-16-2011, 06:50 AM
#36


