Newbie attempt at a 3rd gen rear tire carrier
 01-25-2010, 05:07 PM
#21
Registered User
Thread Starter
Join Date: Jul 2009
Location: Ontario, Canada
Posts: 246
Likes: 0
Received 0 Likes
on
0 Posts
I measured them today, they ARE only 1/4" thick. It seems really strong. I tried putting it down today and pulled side to side, and the whole truck moved with no play.....
 01-26-2010, 02:06 AM
#23
Registered User
Join Date: Nov 2005
Location: Toronto, ON
Posts: 548
Likes: 0
Received 0 Likes
on
0 Posts
01-26-2010, 05:22 AM
#24
Registered User
Thread Starter
Join Date: Jul 2009
Location: Ontario, Canada
Posts: 246
Likes: 0
Received 0 Likes
on
0 Posts
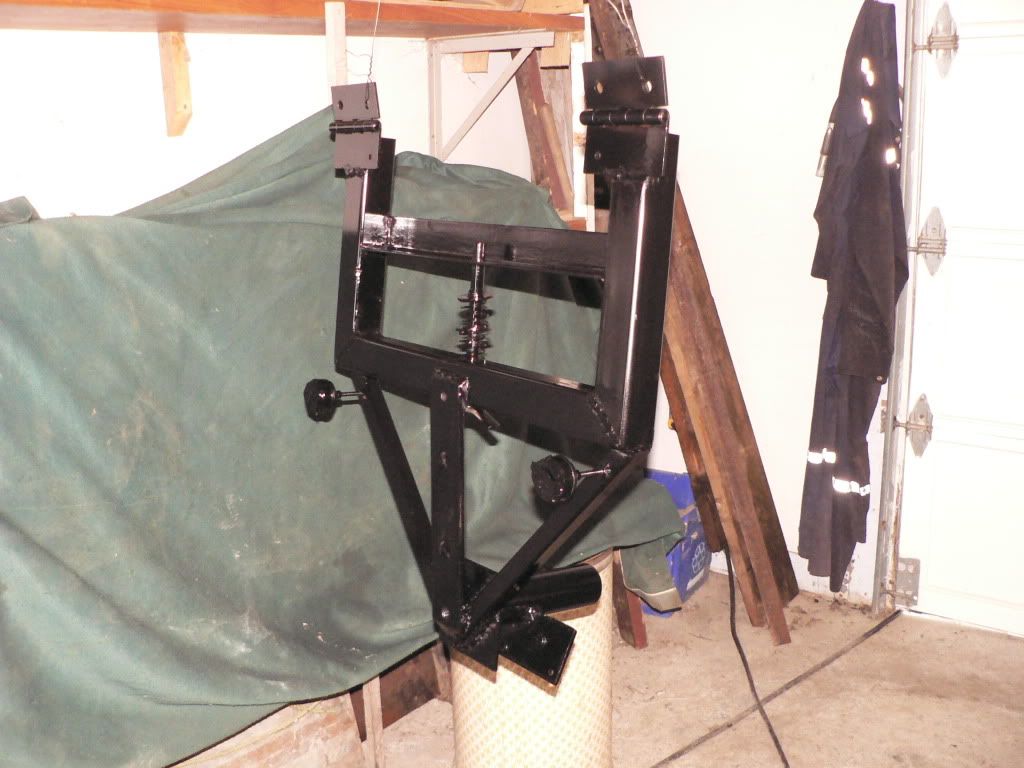
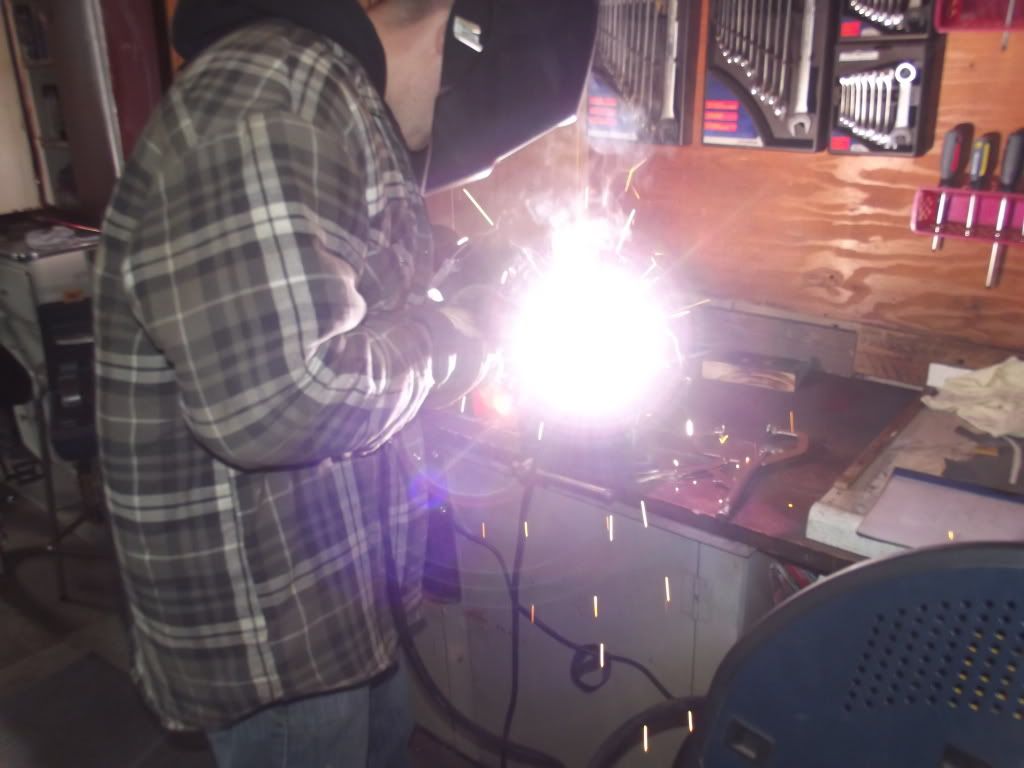
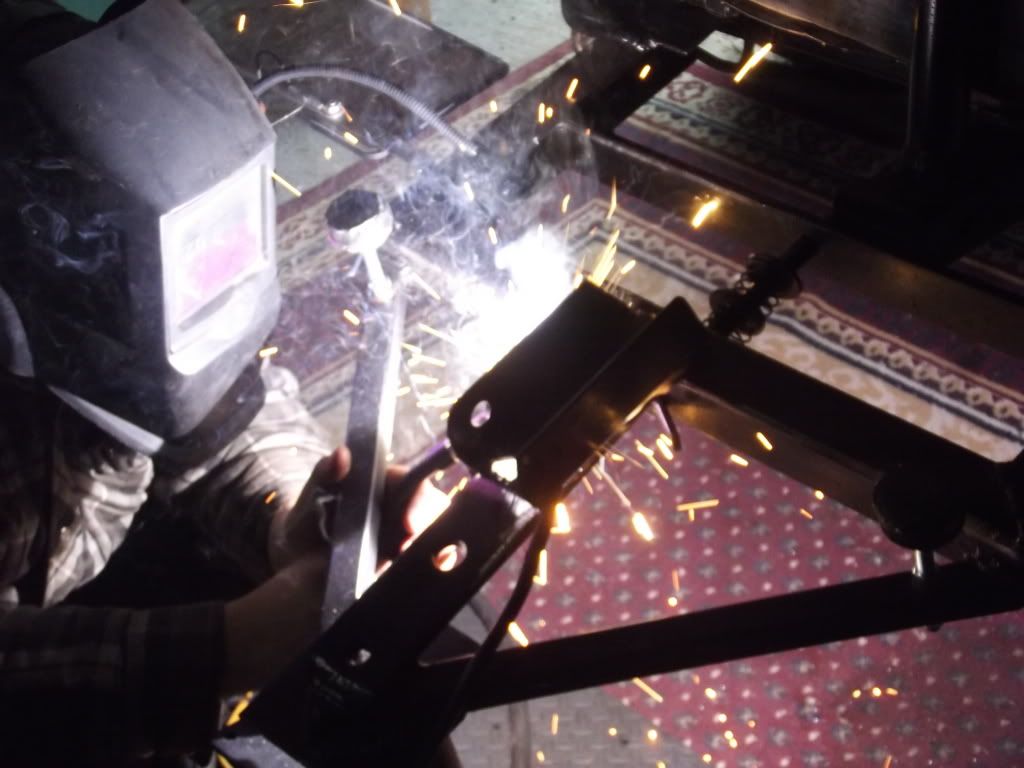
Alright, so the next day, we worked on finishing up some welds, building the locking mechanism, adding the wheel studs, and making up the bumper setup to dampen the rattles.
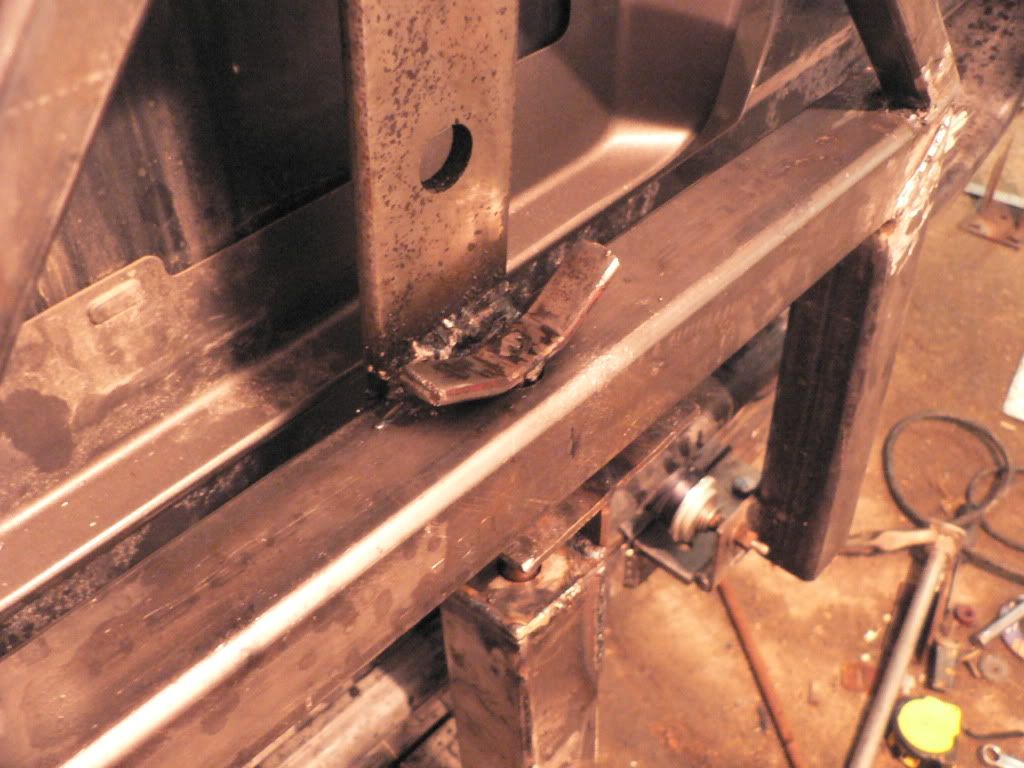
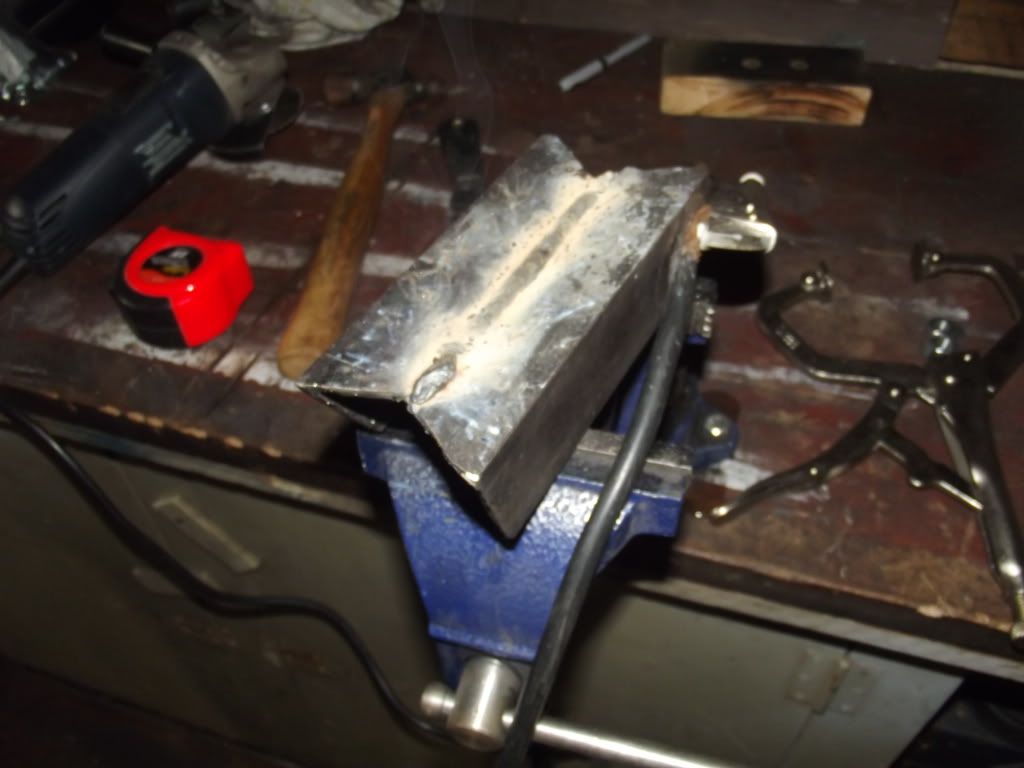
Our first task was to use some more 2"tubing, cap the end, and drill a hole on the top, just big enough to insert our locking pin. We used half inch steel rod and welded a small handle on one end. We then welded the tubing to the center tongue of the hitch, so that it would stand on it's end. We also drilled the same diameter hole into the horizontal portion of the "C" section, so that the locking pin could slide through the "c" section, down into the other 2" tubing. We found that the carrier rattled quite a bit, so we added some 1/8" plating to one side of the center 2" tube, and created a "T" like shape. Once that was welded in place, we drilled another hole through the plating, to line up with the other holes that the locking pin dropped into. This now reduced alot of the rattles.
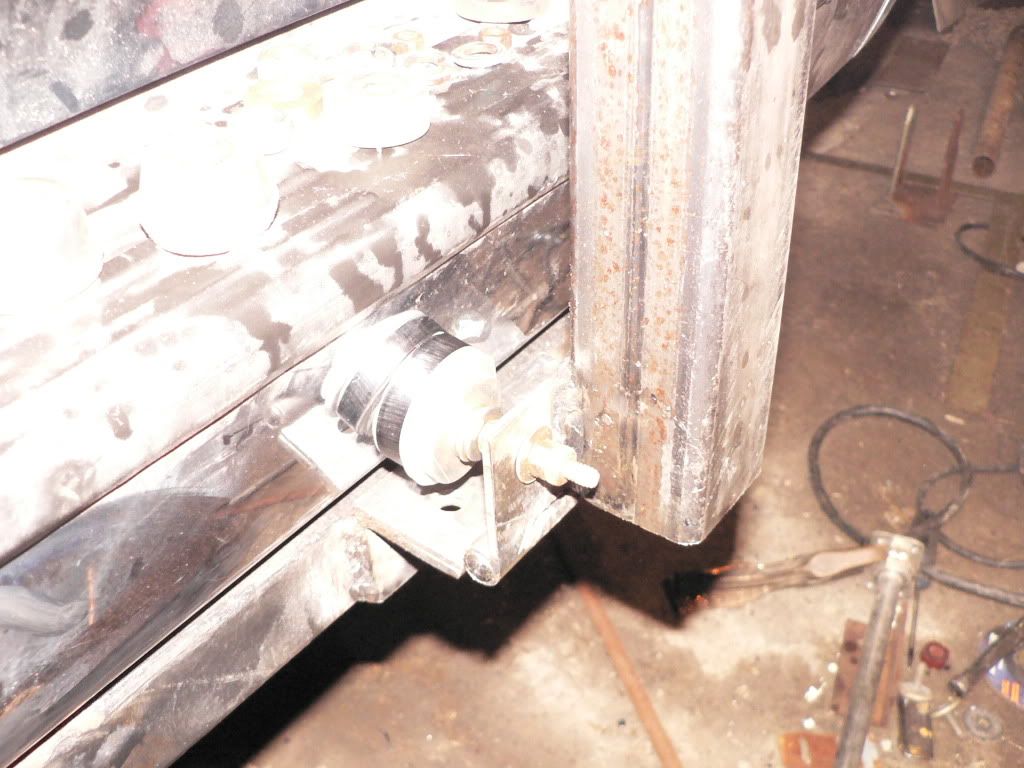
Once we finished with the locking mechanism, we decided to make up some kind of shock absorption system to minimize whatever left over rattles were left over. We used some rubber legs from an old record player, and inserted a bolt through them. We built up some spacing by using some washers and nuts and then bolted them up to the hinges. Once the carrier is lifted into place, the bumpers sit between the carrier and the rear bumper. This puts some pressure on the the carrier, and cuts out most if not all of the rattles. A proper road test will show us if this works effectively, but pushing it toward the truck and hitting the end of the tube where the tire mounts created no rattles.
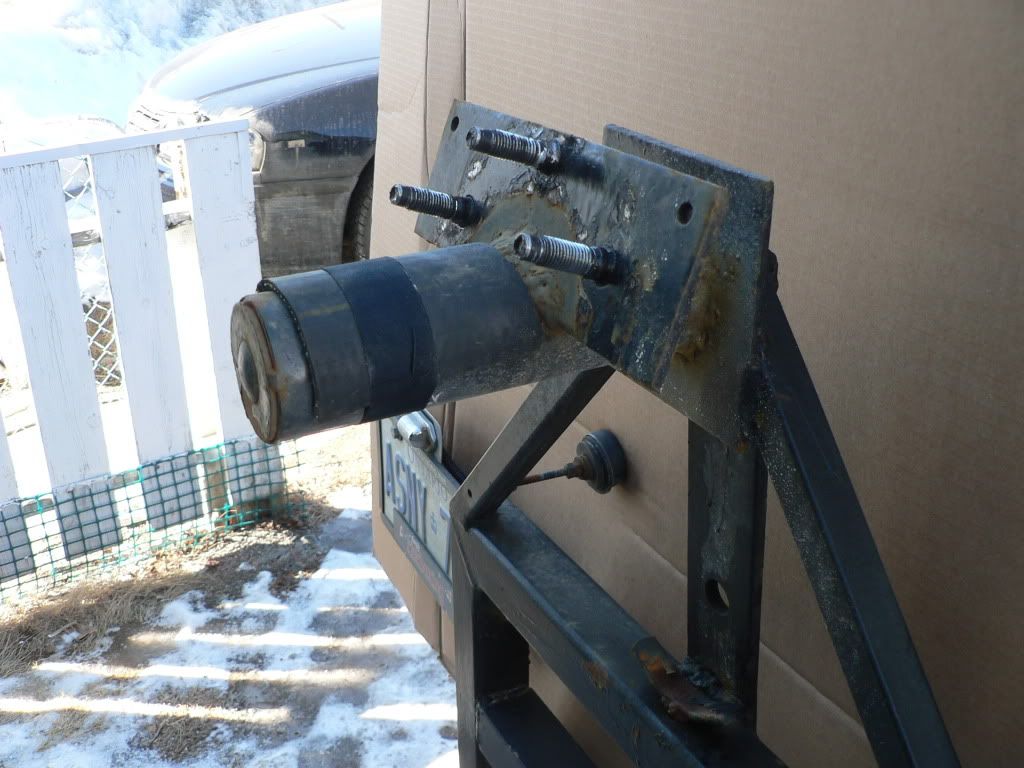
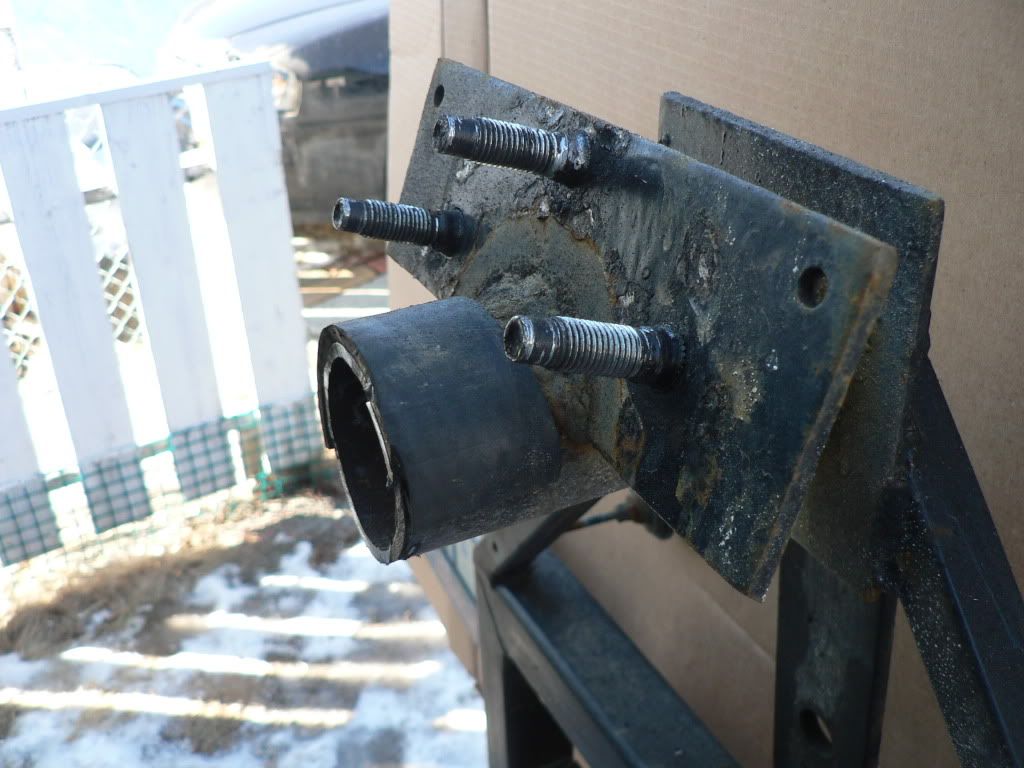
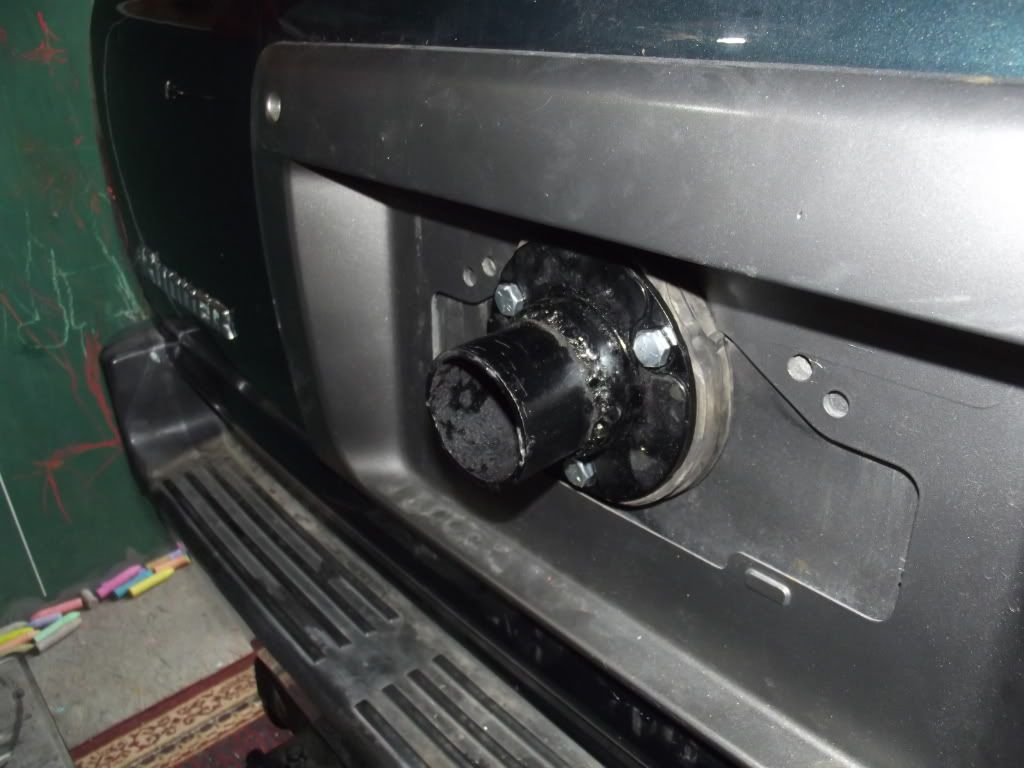
Next on our list was mounted the wheels studs. We drilled holes into the back plate, and inserted the wheels studs. We used an impact gun to draw them into the holes and voila!
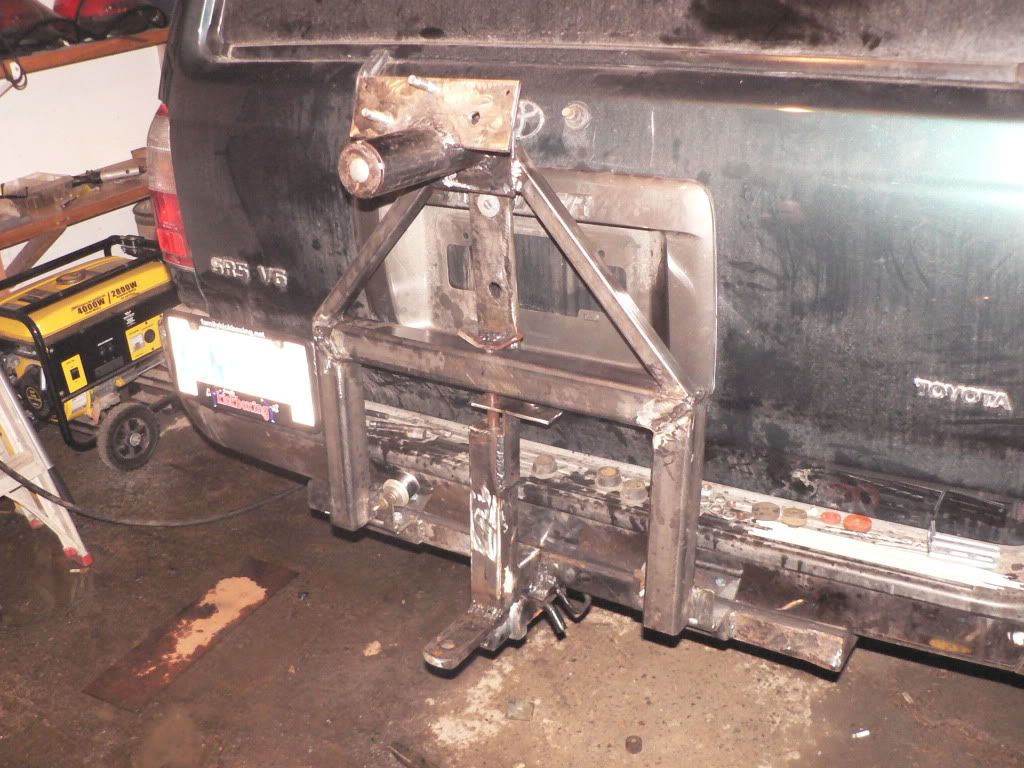
We also decided to mount the licence plate bracket off the carrier. We used an "L" bracket and an aluminum strip to mount the plate. It worked out pretty well.
Next up, clean up all the welds and spatter, and then paint!
Our first task was to use some more 2"tubing, cap the end, and drill a hole on the top, just big enough to insert our locking pin. We used half inch steel rod and welded a small handle on one end. We then welded the tubing to the center tongue of the hitch, so that it would stand on it's end. We also drilled the same diameter hole into the horizontal portion of the "C" section, so that the locking pin could slide through the "c" section, down into the other 2" tubing. We found that the carrier rattled quite a bit, so we added some 1/8" plating to one side of the center 2" tube, and created a "T" like shape. Once that was welded in place, we drilled another hole through the plating, to line up with the other holes that the locking pin dropped into. This now reduced alot of the rattles.
Once we finished with the locking mechanism, we decided to make up some kind of shock absorption system to minimize whatever left over rattles were left over. We used some rubber legs from an old record player, and inserted a bolt through them. We built up some spacing by using some washers and nuts and then bolted them up to the hinges. Once the carrier is lifted into place, the bumpers sit between the carrier and the rear bumper. This puts some pressure on the the carrier, and cuts out most if not all of the rattles. A proper road test will show us if this works effectively, but pushing it toward the truck and hitting the end of the tube where the tire mounts created no rattles.
Next on our list was mounted the wheels studs. We drilled holes into the back plate, and inserted the wheels studs. We used an impact gun to draw them into the holes and voila!
We also decided to mount the licence plate bracket off the carrier. We used an "L" bracket and an aluminum strip to mount the plate. It worked out pretty well.
Next up, clean up all the welds and spatter, and then paint!
01-28-2010, 01:08 PM
#29
Registered User
Thread Starter
Join Date: Jul 2009
Location: Ontario, Canada
Posts: 246
Likes: 0
Received 0 Likes
on
0 Posts
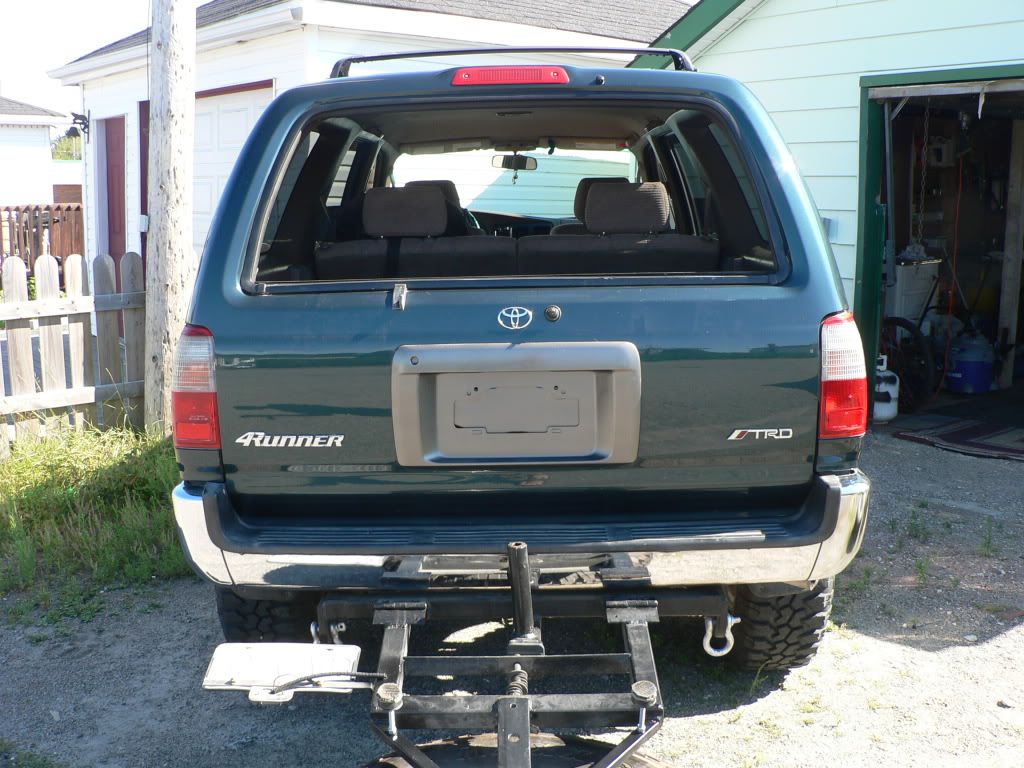
Alright, the last post I put up here, showed what was supposed to be the completed design for the carrier. When I got back to the garage, I noticed that with the center tubing in place, the hatch could not open. We shortened the tubing, but then had some issues with rattles and stability. After much thought, we were not able to come up with a solution. My dad called a welder / fabricator over to look at my carrier setup. He added another angle Iron piece just below the 2" tubing cross member in order to give the carrier more stability. We then opted to move the rubber bumpers up to the middle of the carrier instead of at the bottom. The new location for the bumpers, has them resting on the trim panel for the licence plate on the rear hatch. This gave the carrier much better stability, got rid of the remaining rattles, and actually looked alot better. Next on the agenda was to modify the locking pin. I always had in mind that I wanted a "Quick release" pin, but wasn't sure how to apply it to my setup. The fabricator showed us how to rig it, and it works great!
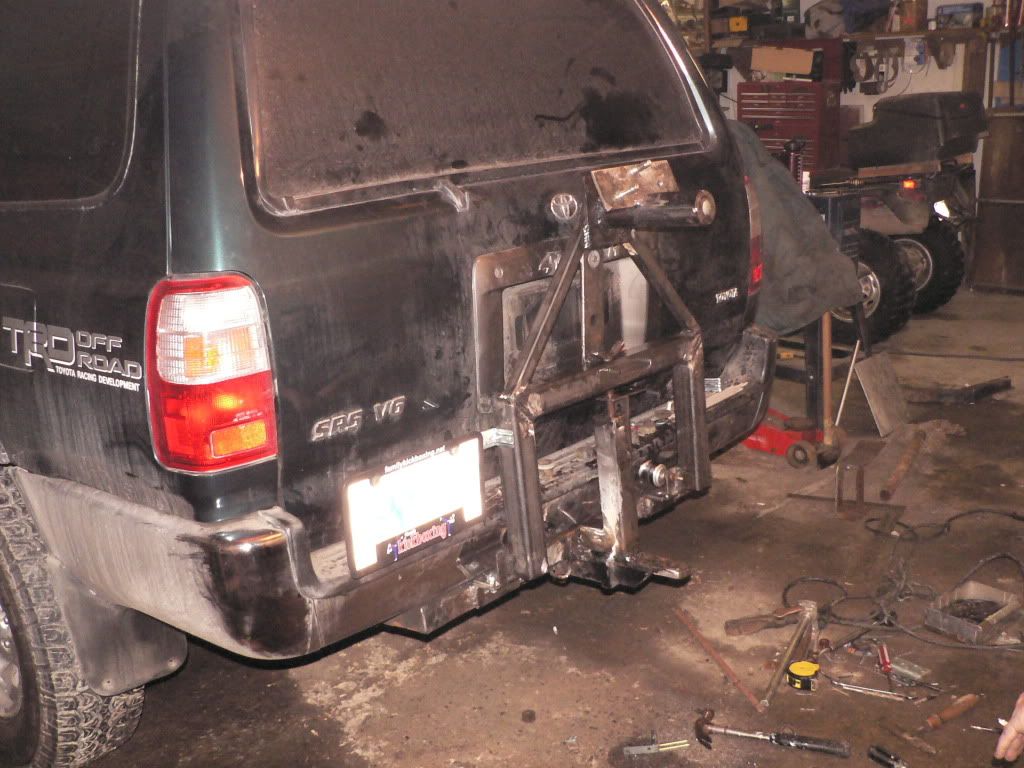
Once everything was dialed in, we prepared the carrier for paint. First, I coated everything with a fresh coat of black rust paint, then coated it with Duplicolor Charcoal basecoat, and then clear coated it. The below pic is of the carrier just before paint was applied.
While I was working on that, my dad decided to revise my license plate bracket. The old one was built with a thin aluminum strip and a 90 degree bracket. My dad opted for a nice piece of Stainless Steel which he bent up in the same dimensions.
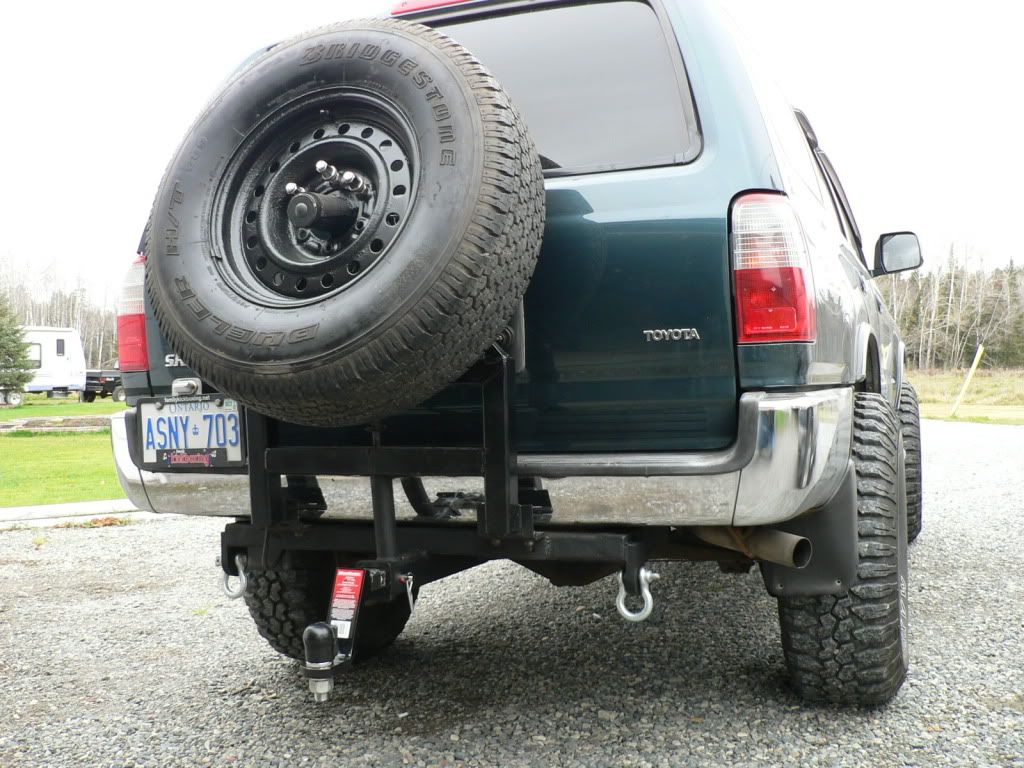
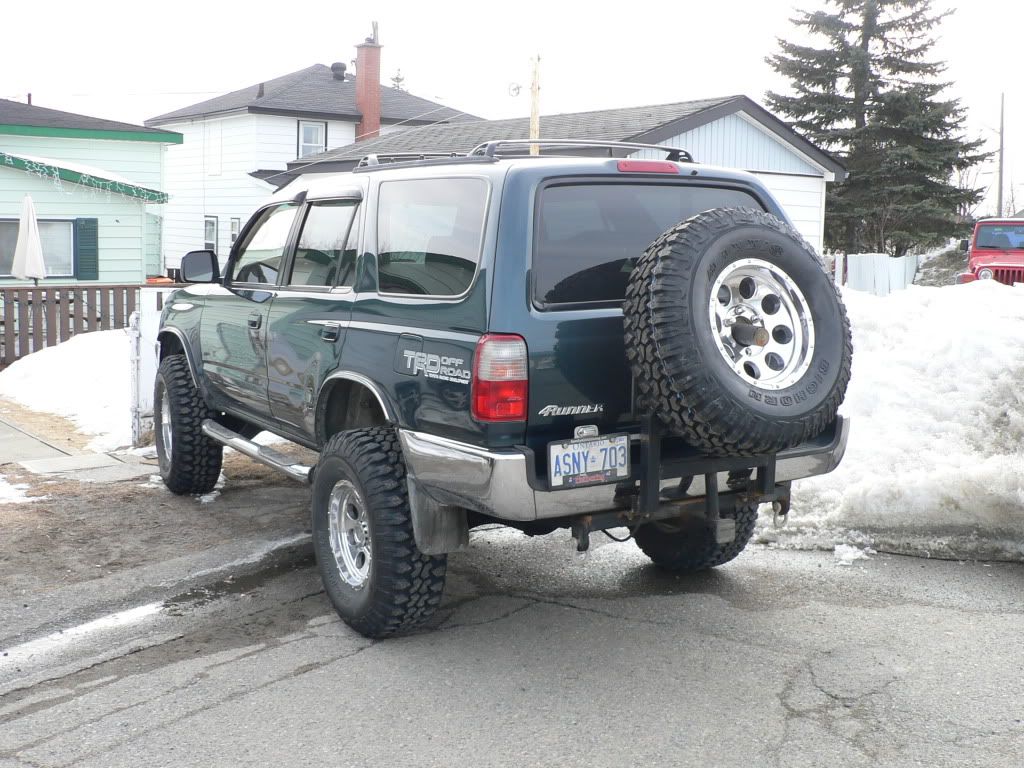
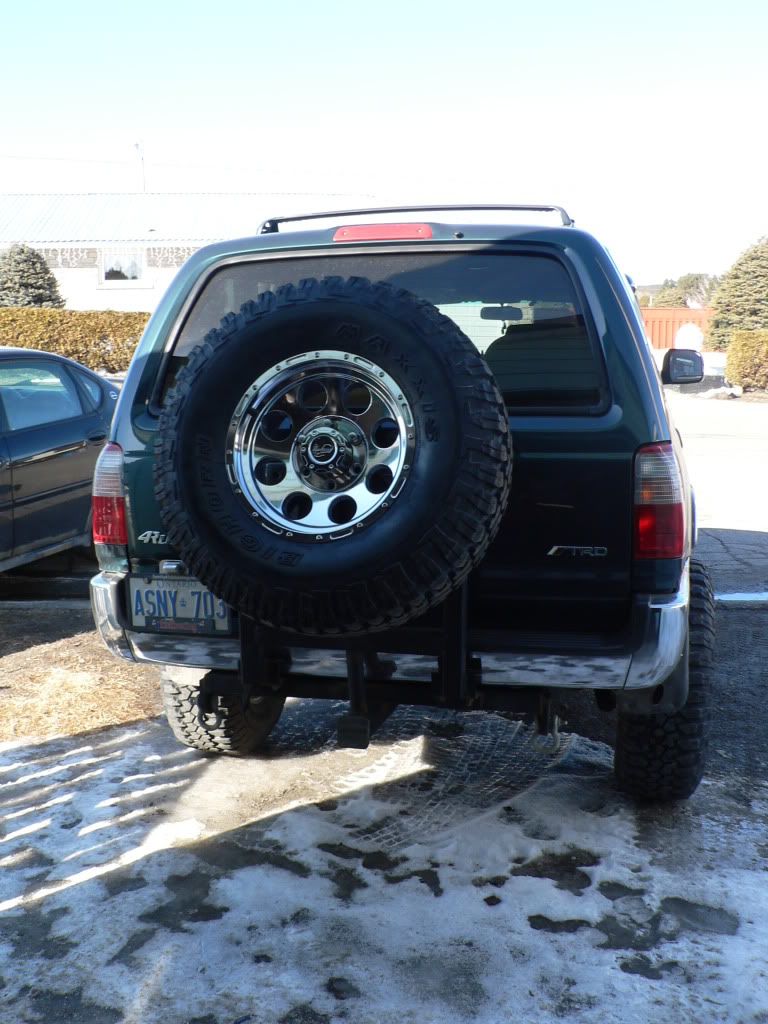
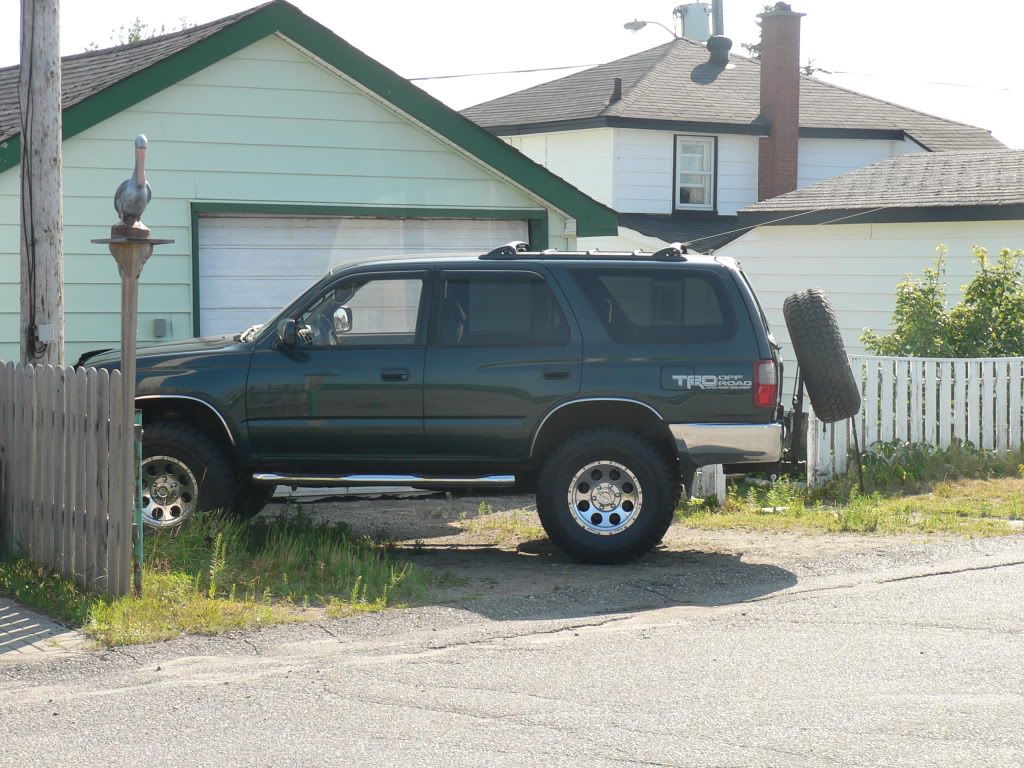
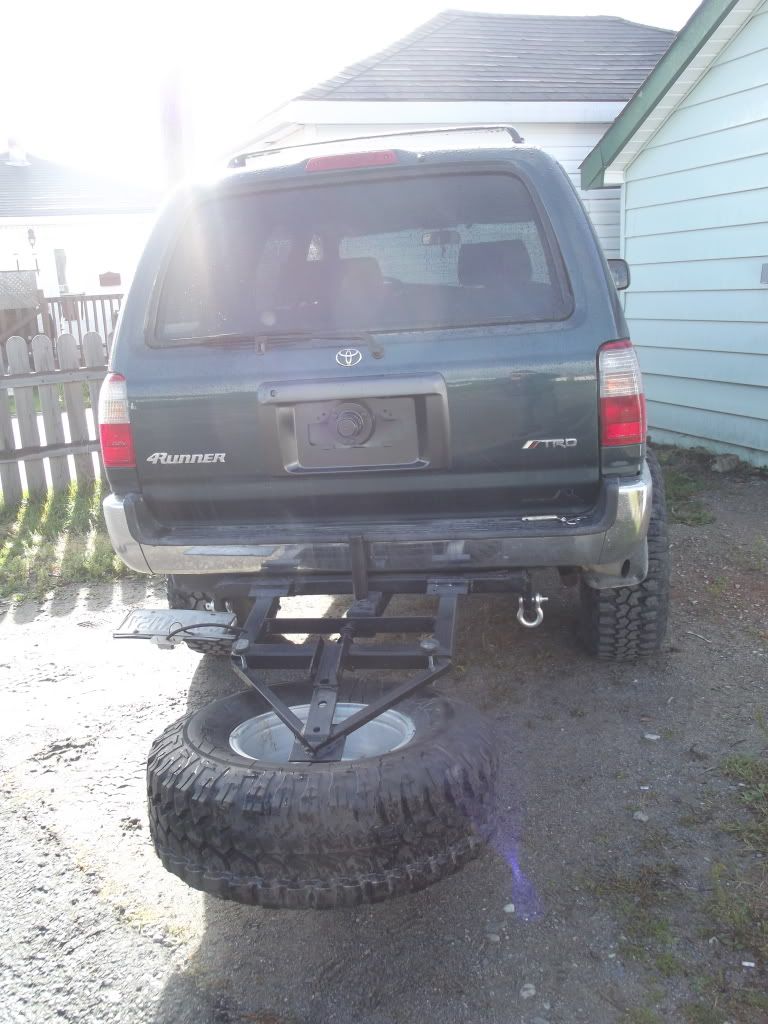
Once all was said and done, the carrier was mounted on the 4Runner. (I took some shots of it with the stock steel wheel, but I'm going to buy a matching aluminum wheel with another mud tire for it in the spring. I run the stock wheels in the winter, and my aftermarket wheels in the summer.)
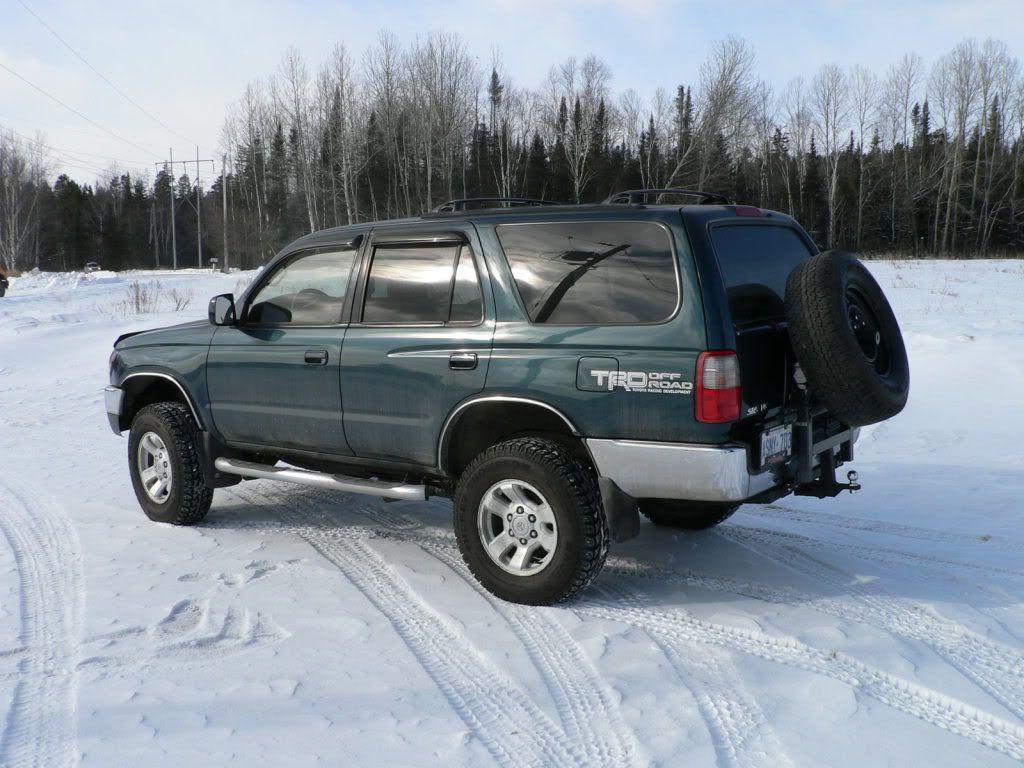
Heres a shot of it with the carrier down, and the hatch open.
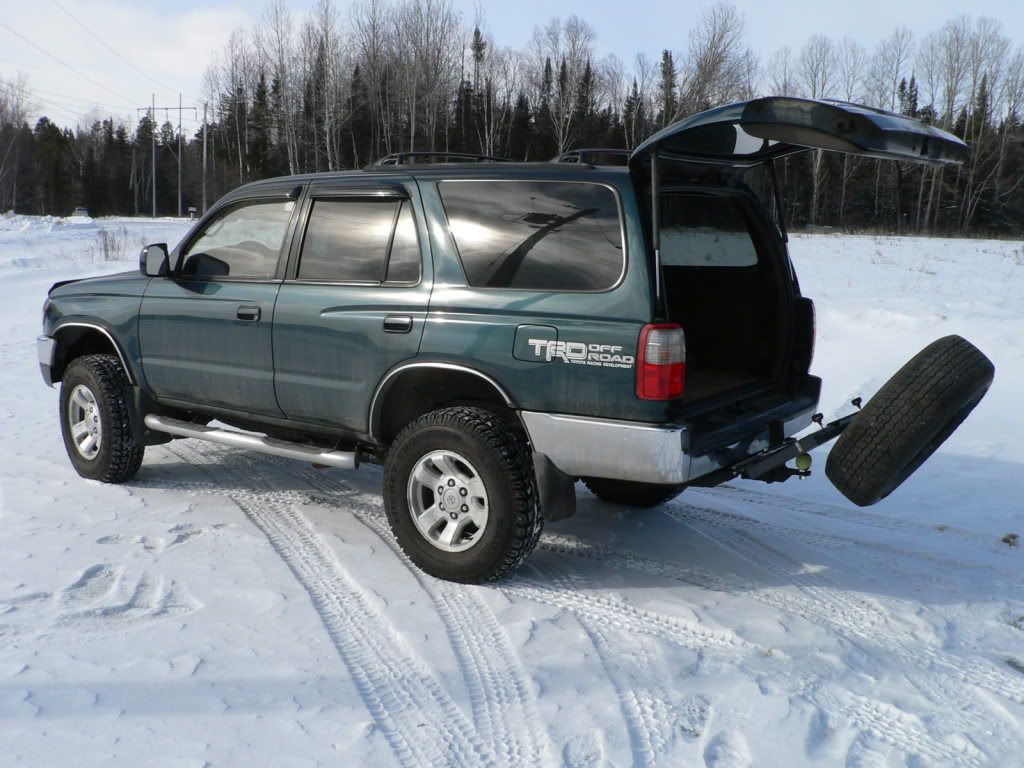
I've since bought a PVC Tow ball cover, so that the carrier rests on that rather than bare metal. I also bought a vinyl cover for the spare, in order to hide that ugly rim that rusted away under my rig for 12 years!
Thanks for checking out my build, and let me know what you guys think! I'd also be happy to answer any questions or concerns any of you may have!
Once everything was dialed in, we prepared the carrier for paint. First, I coated everything with a fresh coat of black rust paint, then coated it with Duplicolor Charcoal basecoat, and then clear coated it. The below pic is of the carrier just before paint was applied.
While I was working on that, my dad decided to revise my license plate bracket. The old one was built with a thin aluminum strip and a 90 degree bracket. My dad opted for a nice piece of Stainless Steel which he bent up in the same dimensions.
Once all was said and done, the carrier was mounted on the 4Runner. (I took some shots of it with the stock steel wheel, but I'm going to buy a matching aluminum wheel with another mud tire for it in the spring. I run the stock wheels in the winter, and my aftermarket wheels in the summer.)
Heres a shot of it with the carrier down, and the hatch open.
I've since bought a PVC Tow ball cover, so that the carrier rests on that rather than bare metal. I also bought a vinyl cover for the spare, in order to hide that ugly rim that rusted away under my rig for 12 years!
Thanks for checking out my build, and let me know what you guys think! I'd also be happy to answer any questions or concerns any of you may have!
Last edited by fightman80; 01-28-2010 at 01:11 PM.
 Let us know in a couple of months/days/whatever how it's holding up!
01-28-2010, 04:07 PM
Let us know in a couple of months/days/whatever how it's holding up!
01-28-2010, 04:07 PM
#31
Contributing Member

I applaud your efforts, and the end result certainly looks nice.
That said, I would NOT trust those two hinges to take the forces & stresses created by the tire/wheel combo. Things may seem stout while shoving on it in the garage, but will not come close to simulating real-world conditions.
Andreas
That said, I would NOT trust those two hinges to take the forces & stresses created by the tire/wheel combo. Things may seem stout while shoving on it in the garage, but will not come close to simulating real-world conditions.
Andreas
01-28-2010, 04:42 PM
#32
Registered User
Thread Starter
Join Date: Jul 2009
Location: Ontario, Canada
Posts: 246
Likes: 0
Received 0 Likes
on
0 Posts
I applaud your efforts, and the end result certainly looks nice.
That said, I would NOT trust those two hinges to take the forces & stresses created by the tire/wheel combo. Things may seem stout while shoving on it in the garage, but will not come close to simulating real-world conditions.
Andreas
That said, I would NOT trust those two hinges to take the forces & stresses created by the tire/wheel combo. Things may seem stout while shoving on it in the garage, but will not come close to simulating real-world conditions.
Andreas
03-28-2010, 05:53 AM
#33
Registered User
Thread Starter
Join Date: Jul 2009
Location: Ontario, Canada
Posts: 246
Likes: 0
Received 0 Likes
on
0 Posts
Well, it's been about 2 months since I last posted in this thread. I've taken the rig all over the place, on some of the roughest roads around, and even off road. So far, the only issue I've had, is the paint I applied is pealing in some spots! I looked over all the welds, and checked things out, and it's still solid. Overall, I'm really happy with the setup, and for under $100.00, the carrier was a mod I'm really happy I did!
05-25-2010, 02:48 PM
#34
Registered User
Join Date: Apr 2010
Location: Kingston, Ontario CANADA
Posts: 815
Likes: 0
Received 0 Likes
on
0 Posts
Nice job. It looks real good. I'm orginally from North Bay, but I have a uncle that was on the Sudbury Regional Police Force for 20+ years. He lived in Copper Cliff and we use to visit him and my aunt a lot when we were kids. Nice mod. Mike.
03-10-2011, 07:32 PM
#35
Registered User
Thread Starter
Join Date: Jul 2009
Location: Ontario, Canada
Posts: 246
Likes: 0
Received 0 Likes
on
0 Posts
Well, it's been over a year, and still no breakage! It's been my Daily Driver ever since, and even taken off road a couple of times. So glad I did this mod!
10-19-2012, 05:47 AM
#38
Registered User
Thread Starter
Join Date: Jul 2009
Location: Ontario, Canada
Posts: 246
Likes: 0
Received 0 Likes
on
0 Posts
Well.... it's been a couple of years now... Tire carrier is still working fine with those hinges! I did have to build another latch point in the center of the rear hatch, but after a mild rear end collision, the tire carrier had NO damage to it, but the rear hatch behind had to be repaired in 2 locations.... 
I have made some revisions since the original design... but mainly just to quiet down some rattles, and improve functionality.
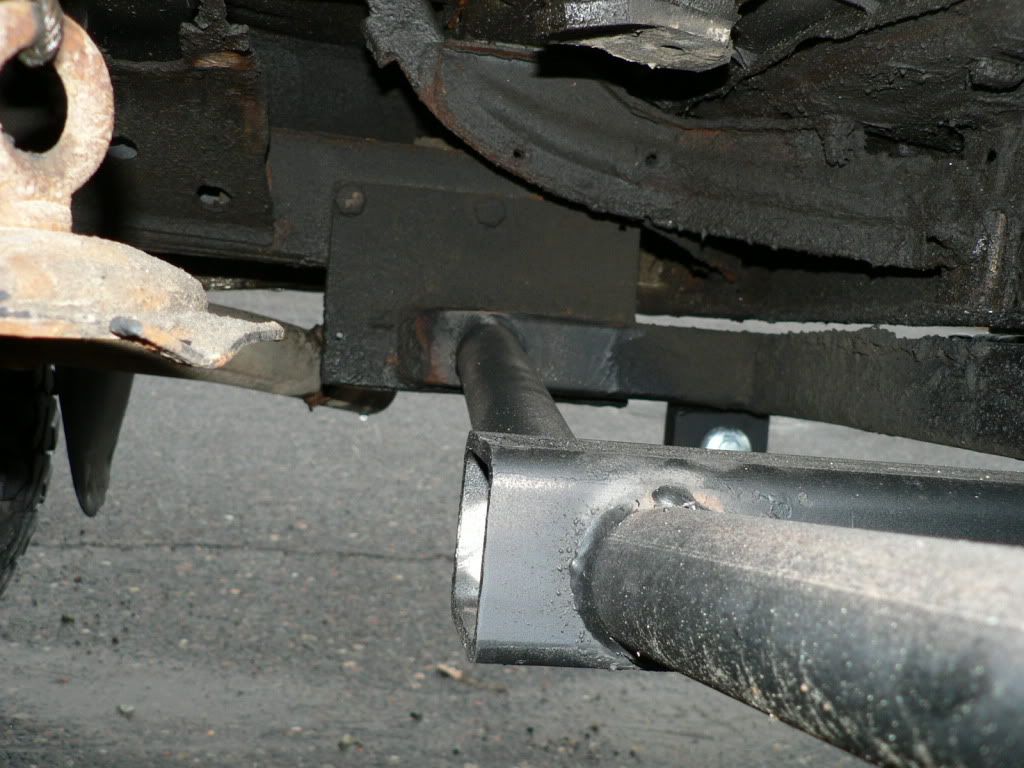
Decided to replace my center receiver on my tire carrier as the old one was seized inside. While we were in the shop we decided to add some D-Ring mounts, and some extra bracing under the truck for the trailer hitch. In the process of adding the new center receiver, we were not able to save the square locking tube, so we decided to make a new one with round tubing.

I wasn't really digging the center tube sticking out of the center of my wheel. It looks alright with a black wheel, but with the Procomp wheel, it stuck out like a sore thumb.
Before:
I decided to mark off where I wanted to cut the tube:
Then took my cut-off wheel and chopped it off!
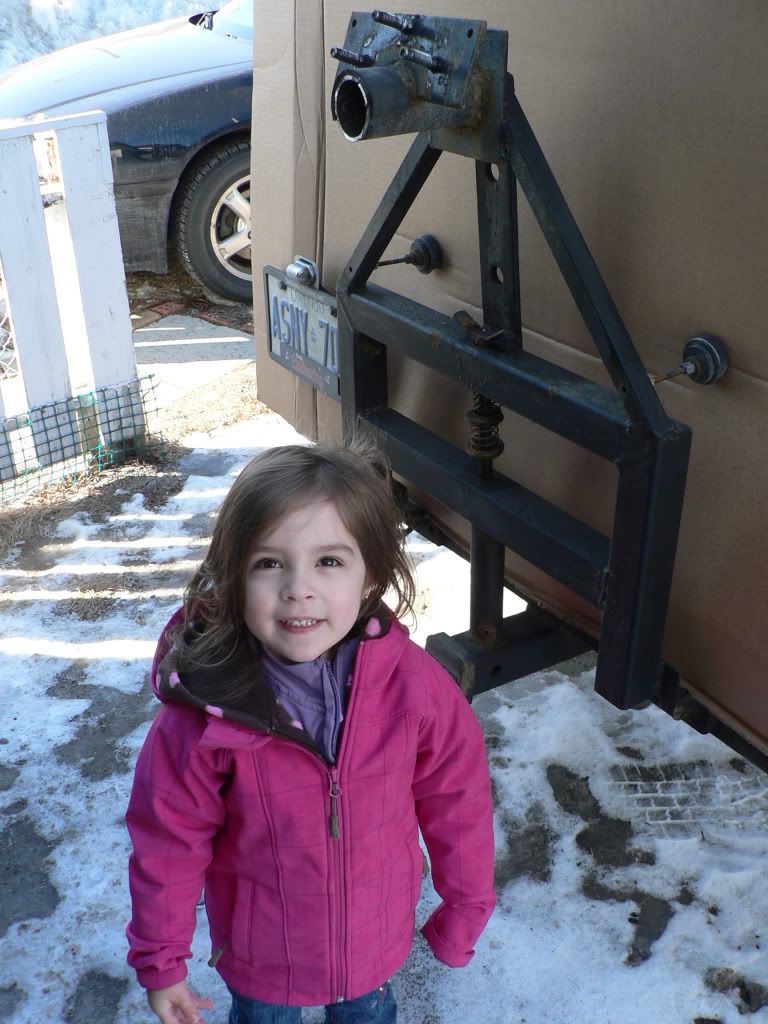
Here's a pic of my little helper again!
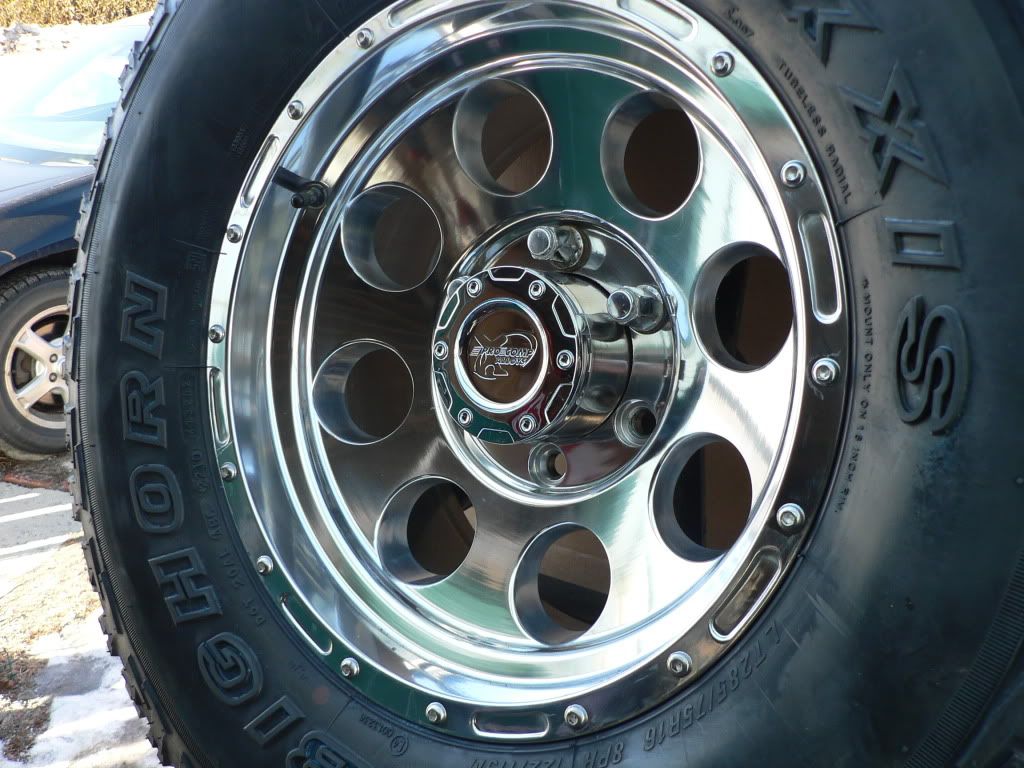
Close-up of the wheel installed with the center hub cap!
Distance shot:
All right,
After a long distance drive and camping trip, I found my tire carrier to be a little worse for wear. Looks like the little bumpers I made up, have finally buckled under the pressure of that 285 70 R16, and snapped!
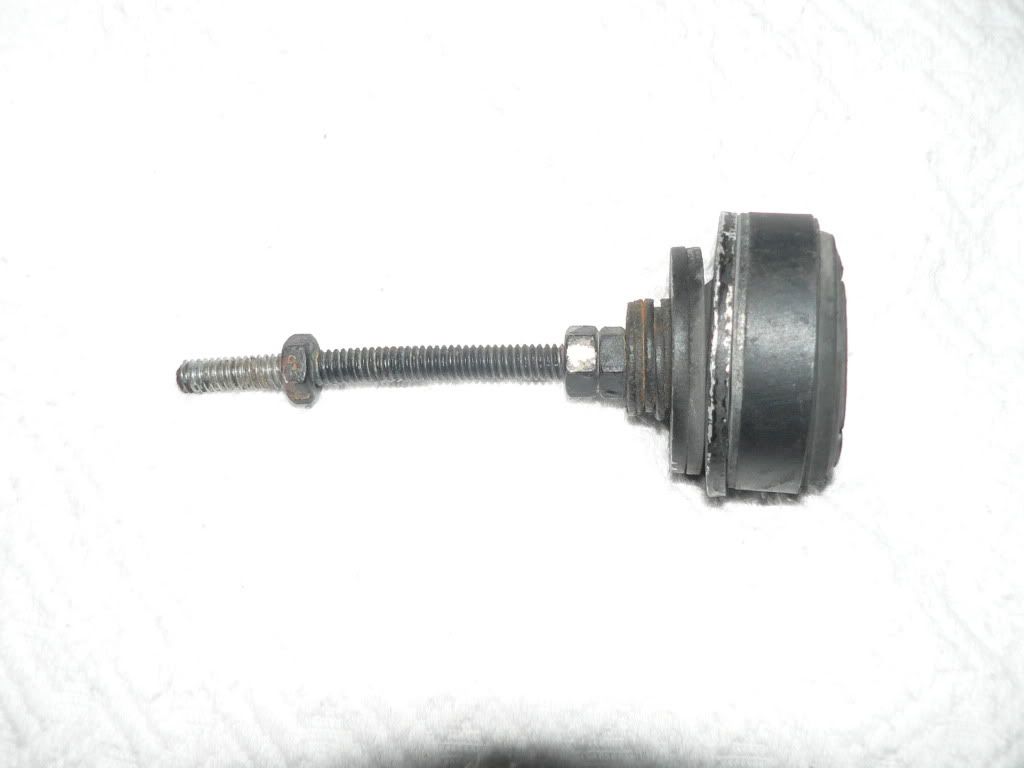
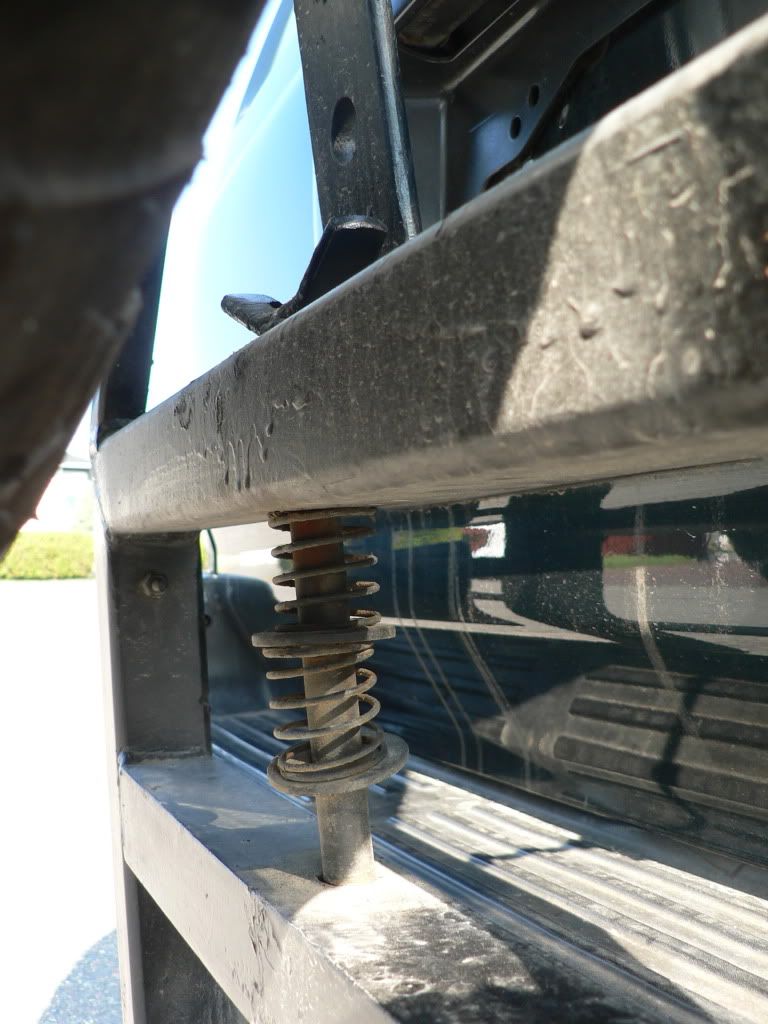
I had made the bumpers out of old record player legs, a long bolt, some washers and a couple of nuts. The bumpers gave me almost a year and a half without any major issues, but now I'm looking to beef them up a little.
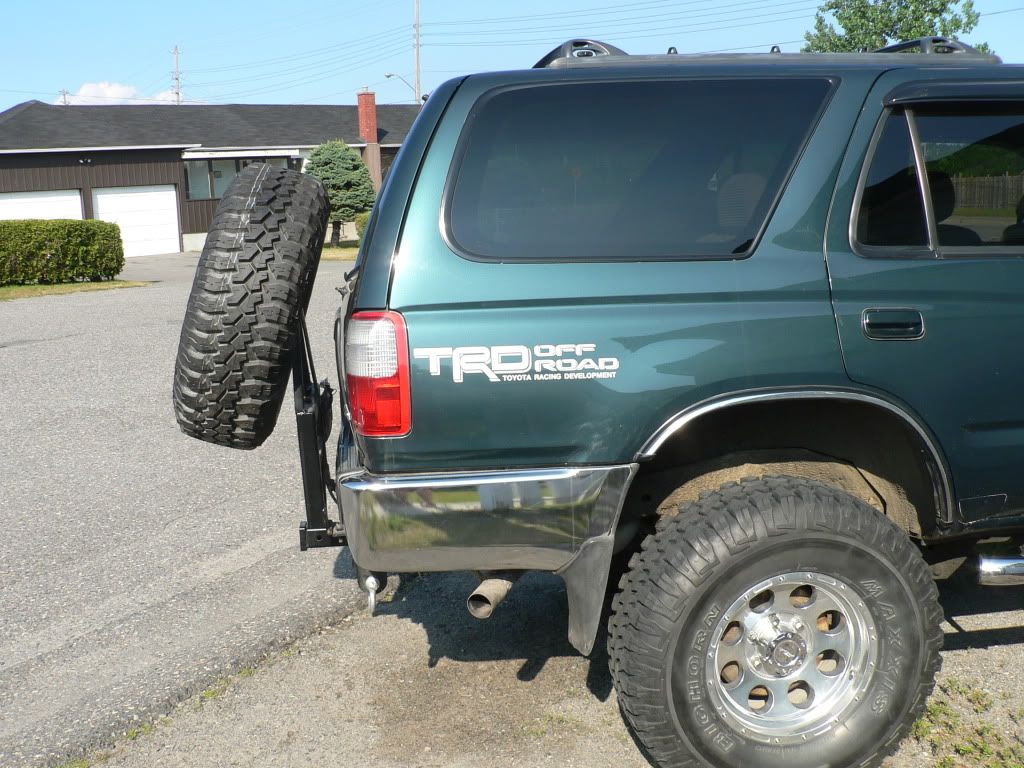
Here are a few pics of my current setup
Side view of the carrier: (note the distance from the rear hatch...I'd like to bring that closer)
Pic of the little bumper I made up:
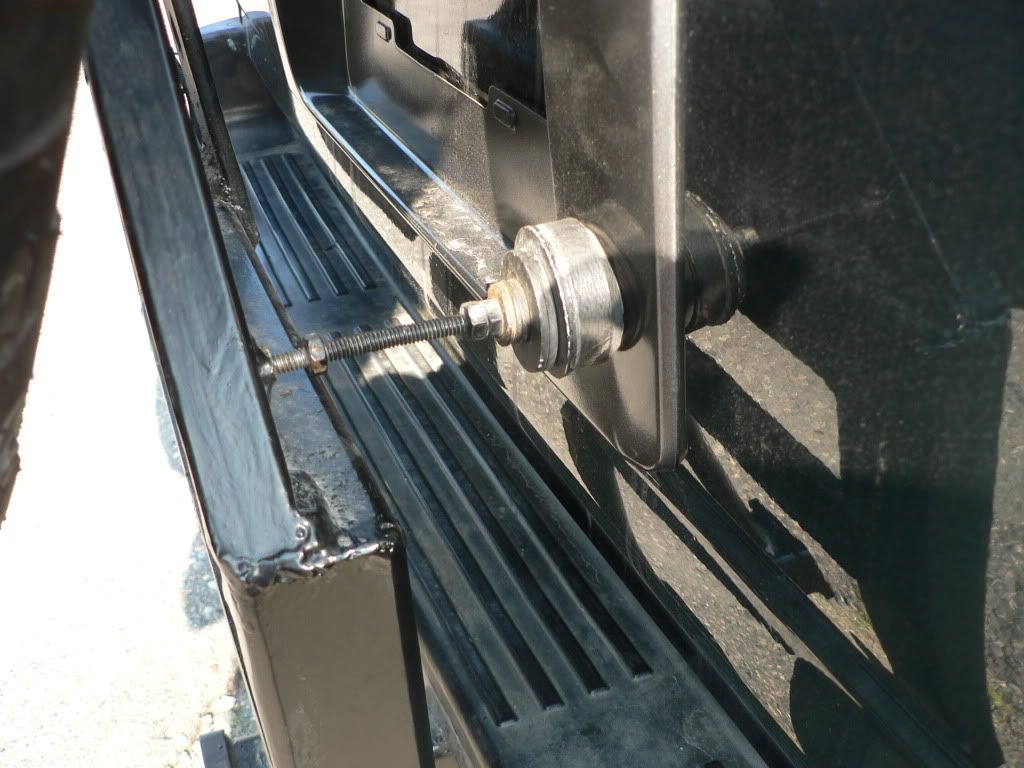
Pic of the little bumper installed on the carrier and doing it's thing:
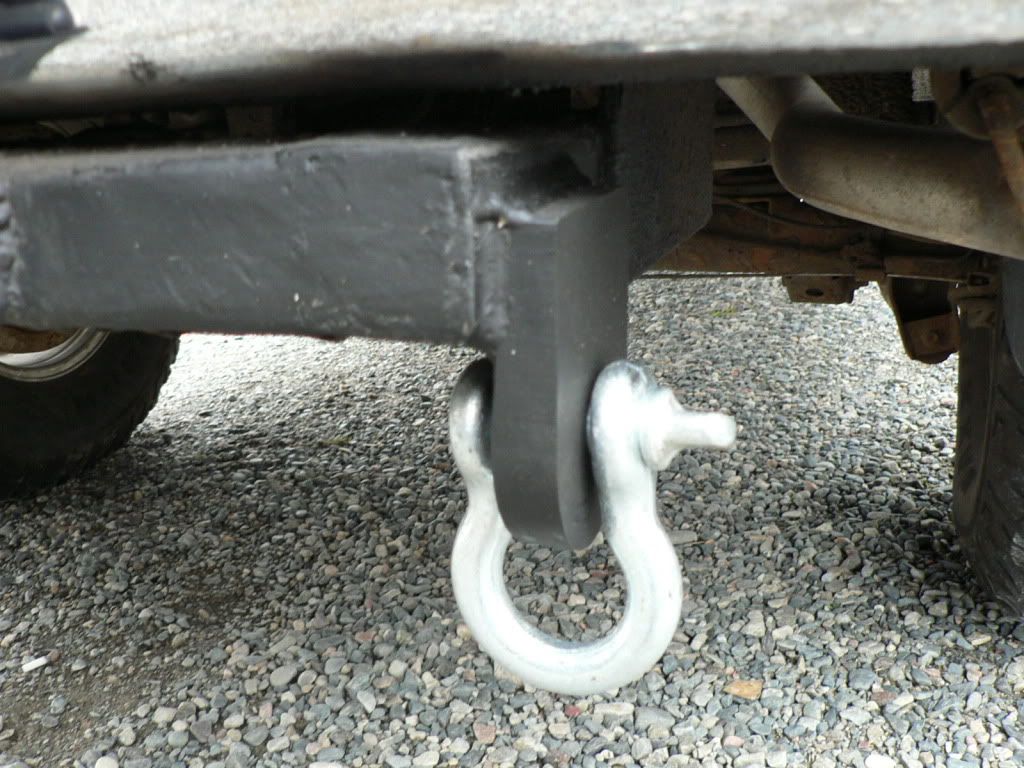
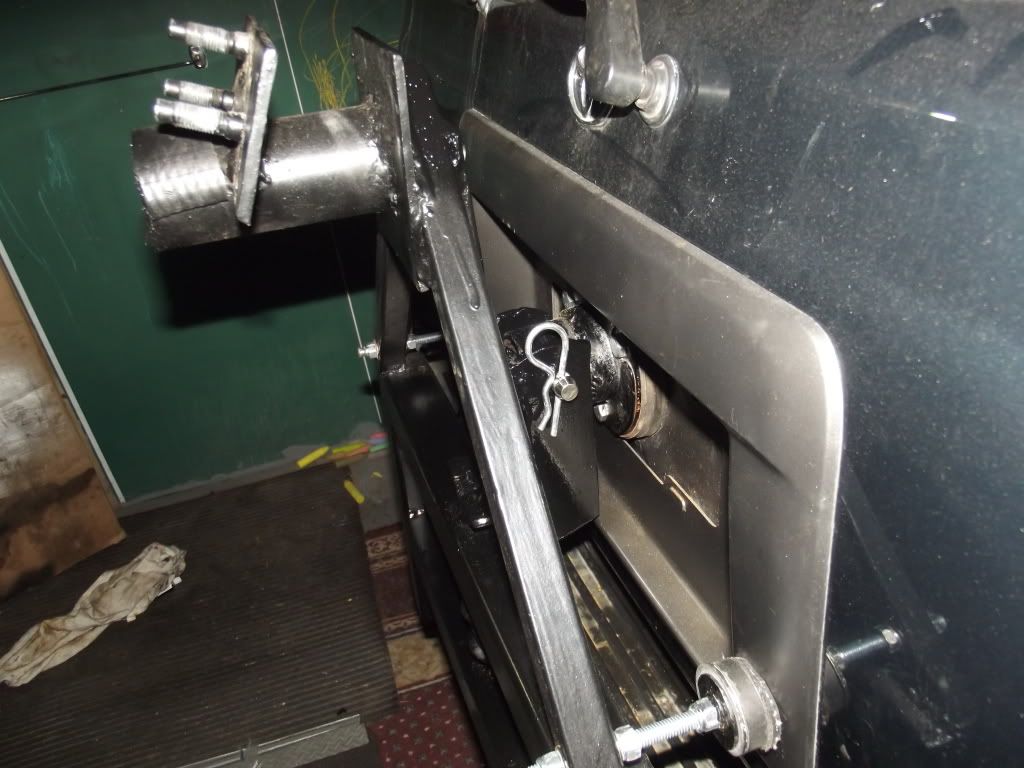
Pic of the locking pin:
The entire assembly lowered down:
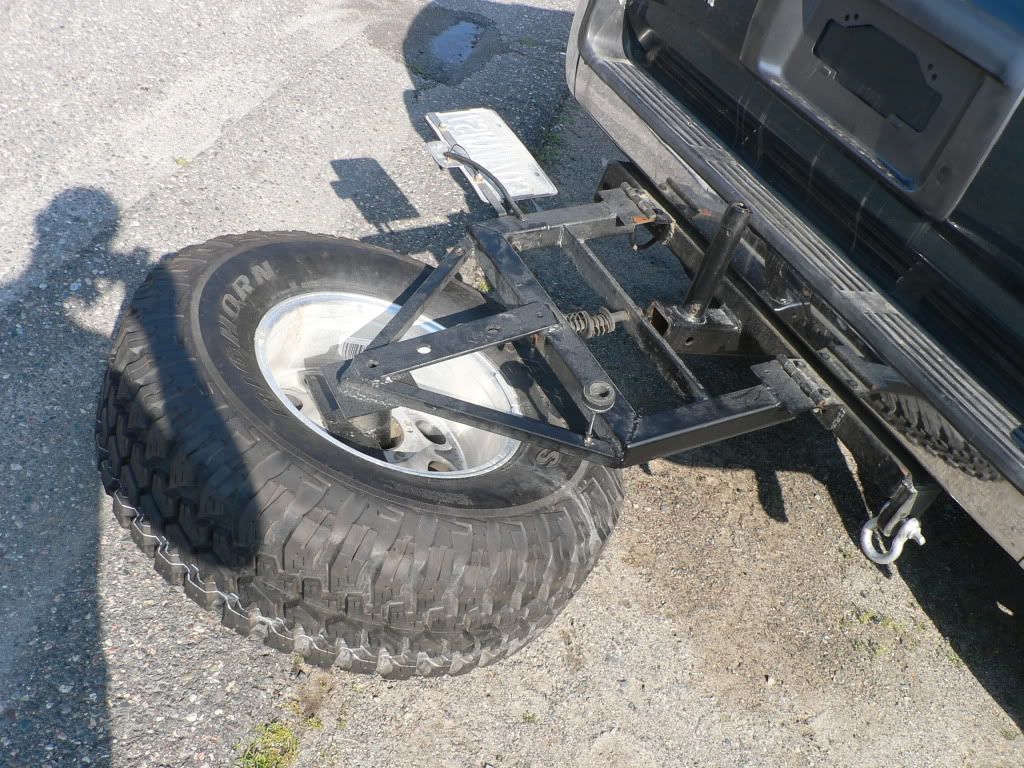
And another shot of the assembly up:
Please keep in mind, my theme for this truck, is kind of a "TRD Edition 4Runner", so I want things to look as stock as possible without costing me a fortune to do. I realize that some have installed the rear tire carrier from the Hilux Surfs in Japan, but I can't afford to go that route. I don't want to cut into the rear bumper, and am not remotely interested in adding any armored bumpers.
I ended up using some 3/8" X 5" carriage bolts and locknuts to replace the tiny bolts and nuts I had before:
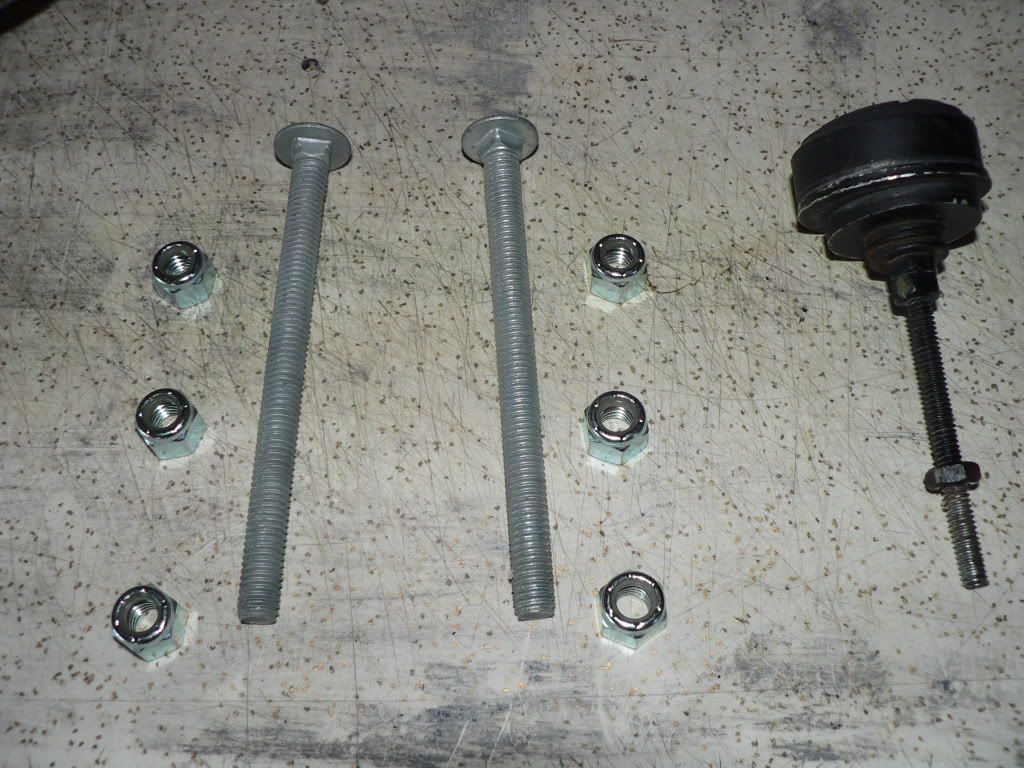
Here's the new bumpstop:
For now, I've placed some rubber on the end of my bumpstop to fill the gap between the bumpstop and the rear hatch. I plan on trying to bring in the carrier closer to the hatch in the next few weeks....so the rubber can then be removed at that time.
Alright, so with the weight of the tire, the tire carrier was just moving way too much. As a result, I decided to make another revision.
I tried to fight it since first building this thing, but finally decided to drill into the rear hatch, and add another mounting point. I want to thank Bigfish for forwarding me some pics of the inside of his rear hatch, as part of my R&D for this project.
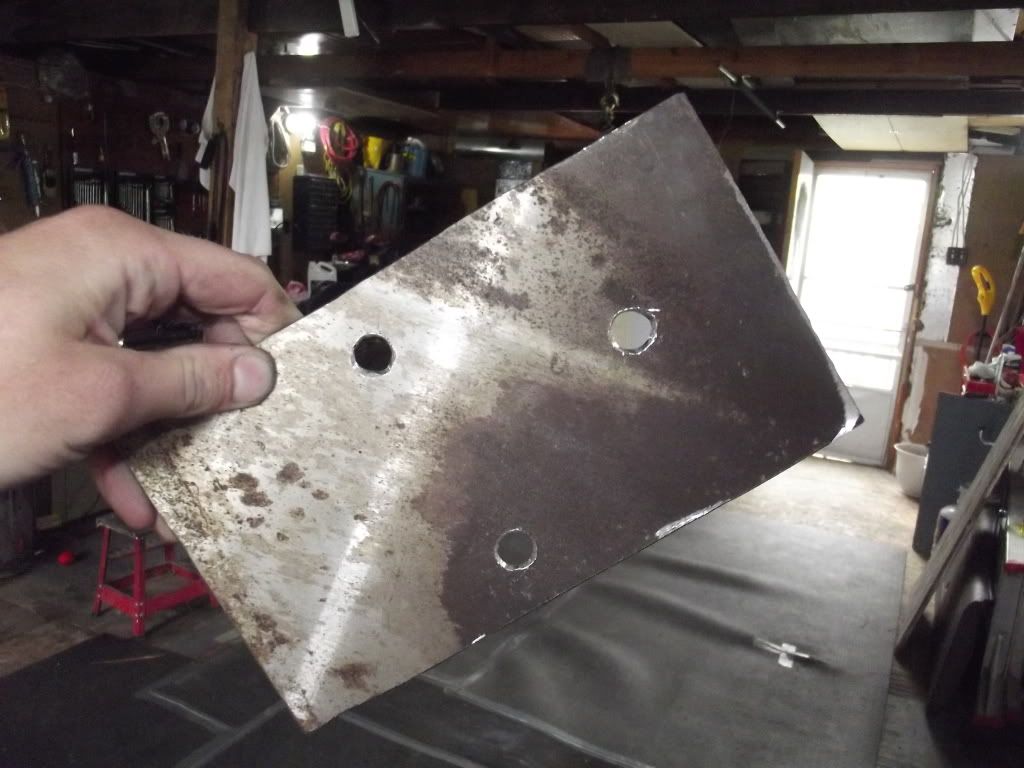
First thing we did was take some measurements and acquire some materials. Turns out, the Tundra Top Plates I never used when I did the Tundra struts....came in handy! (Never throw away good steel pieces!)
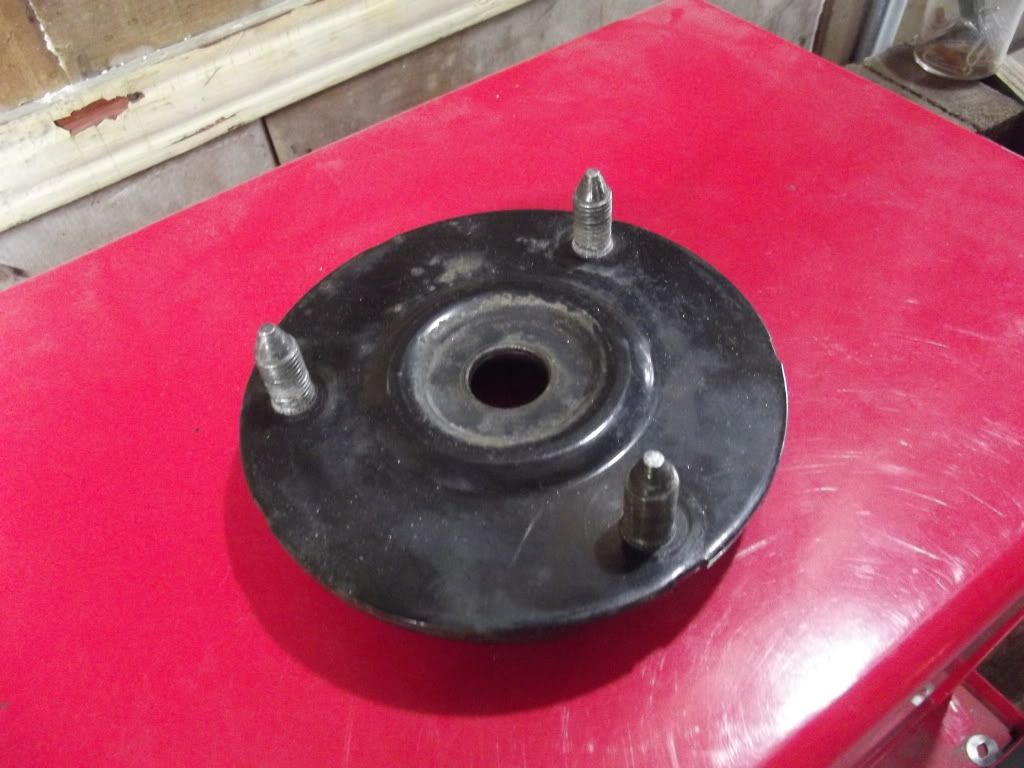
Some angle Iron:

Some tophat Isolators:

A piece of Stainless (all I had lying around) for inside the door panel
Various nuts, bolts, and washers.
We lined up where we wanted the Tundra tophat to sit on the hatch by putting the tire carrier into place. We then marked the locations for the holes to be drilled, and went to work.
Small Pilot hole:
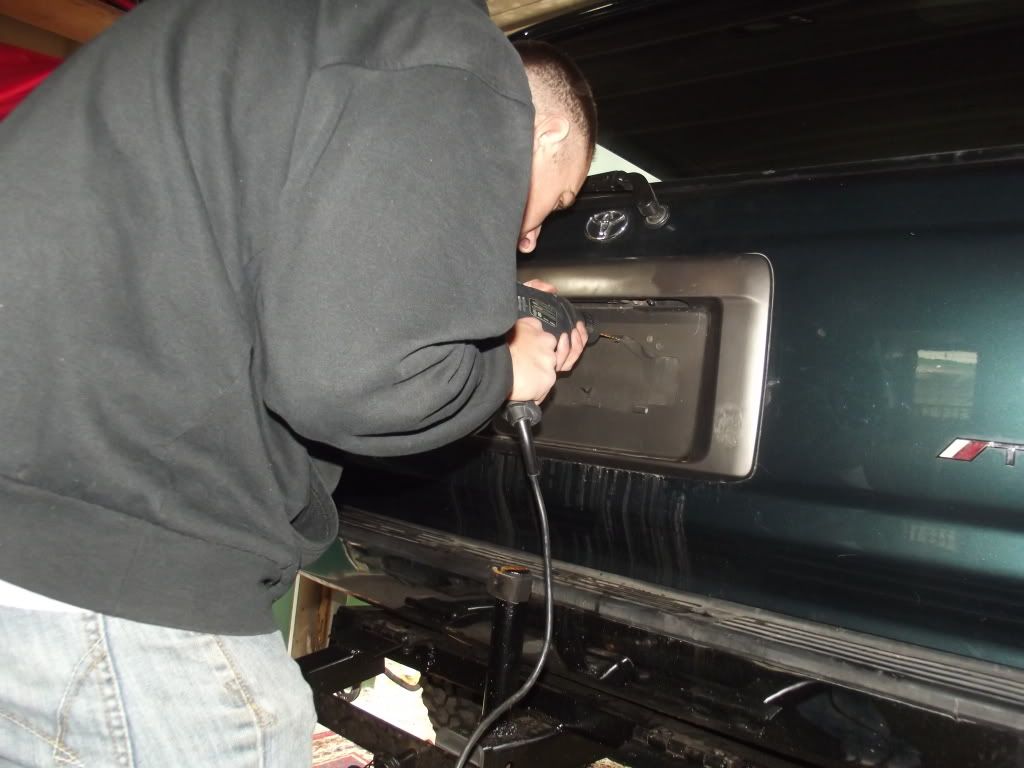
Next size:
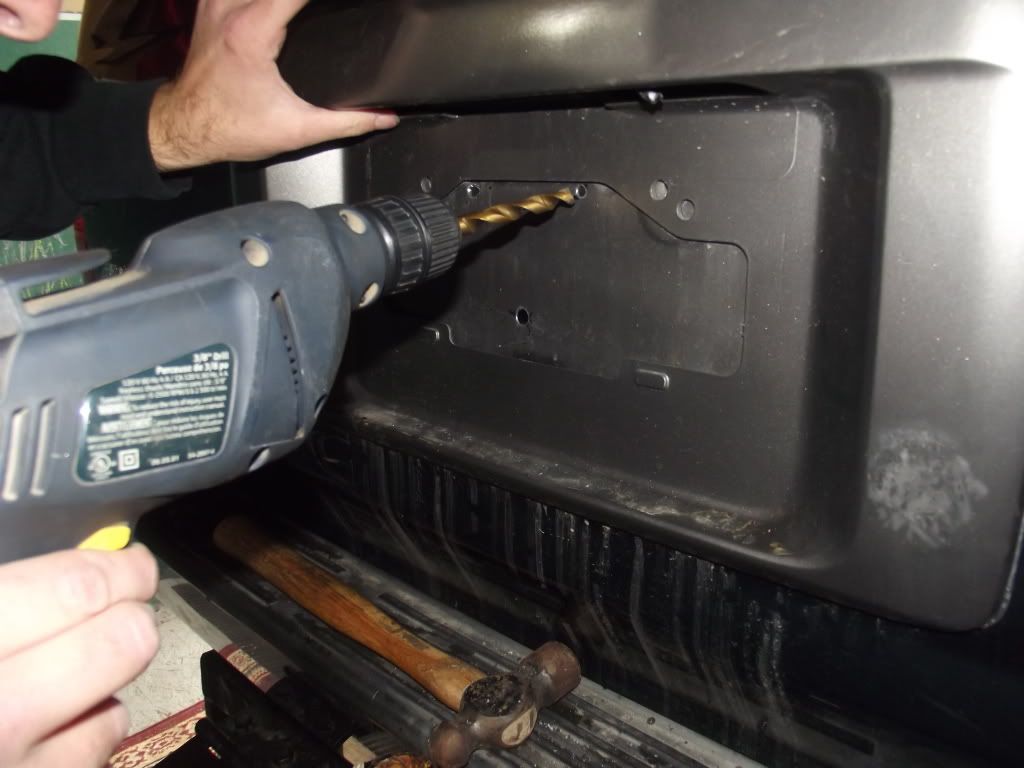
Out came my step bit....at this point...I'm losing my mind because I'm cutting into Virgin Toyota Sheet Metal!
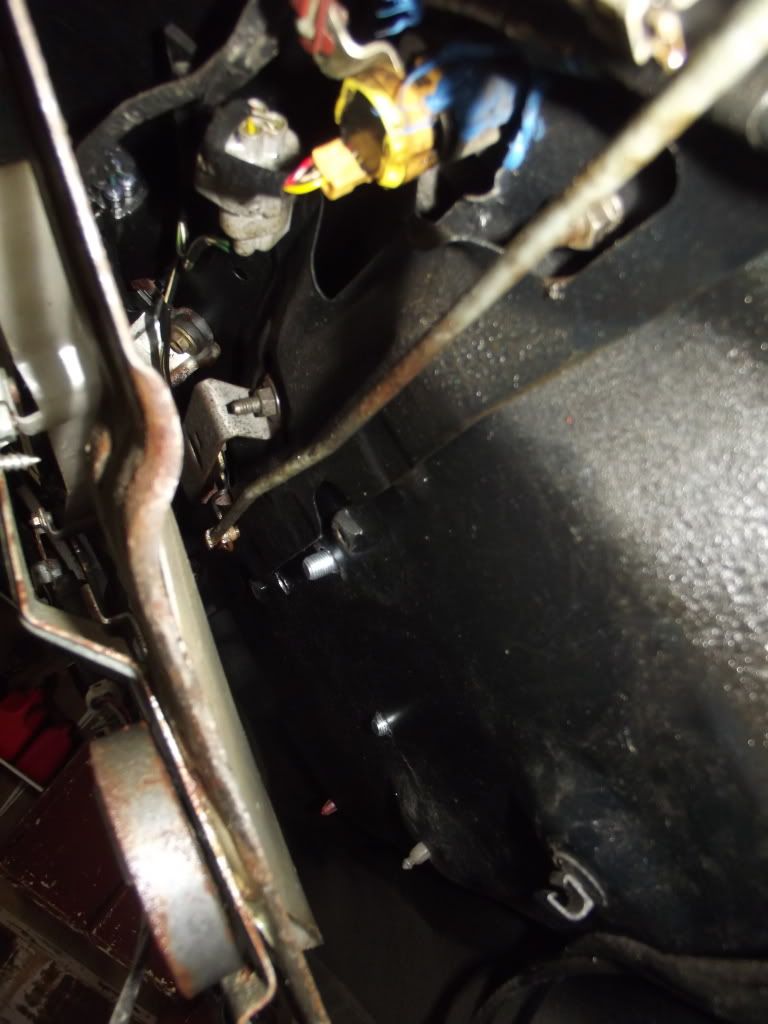
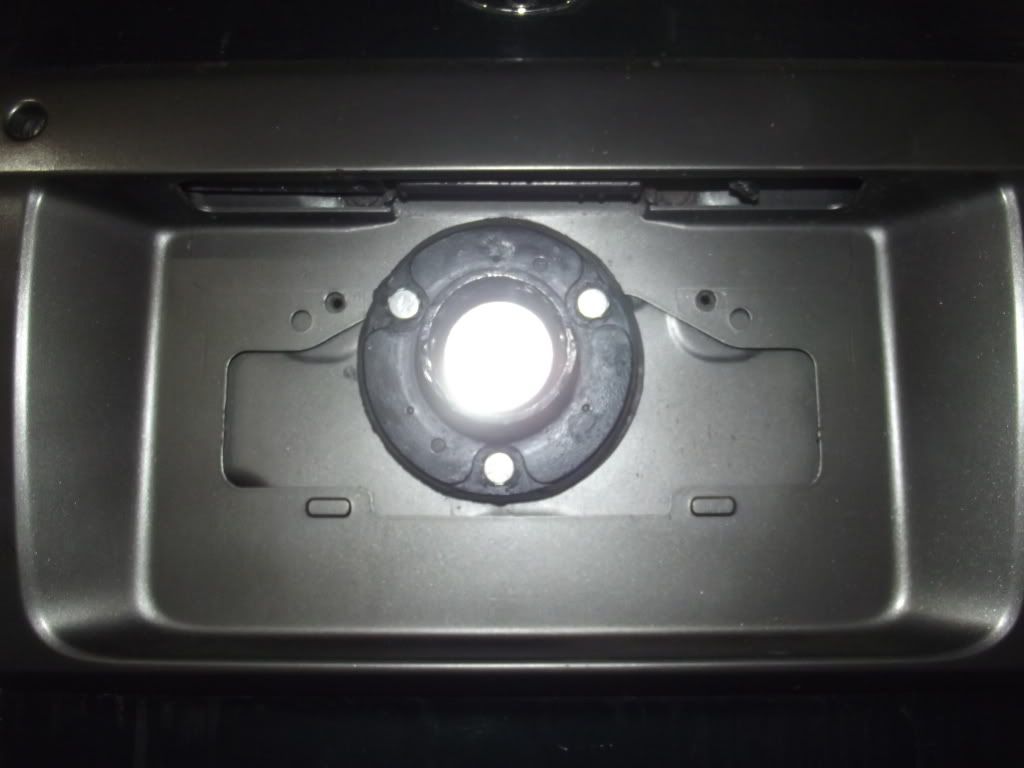
A shot of the tophat plate mocked into place. Note, we pressed the old studs out, and replaced with longer bolts:
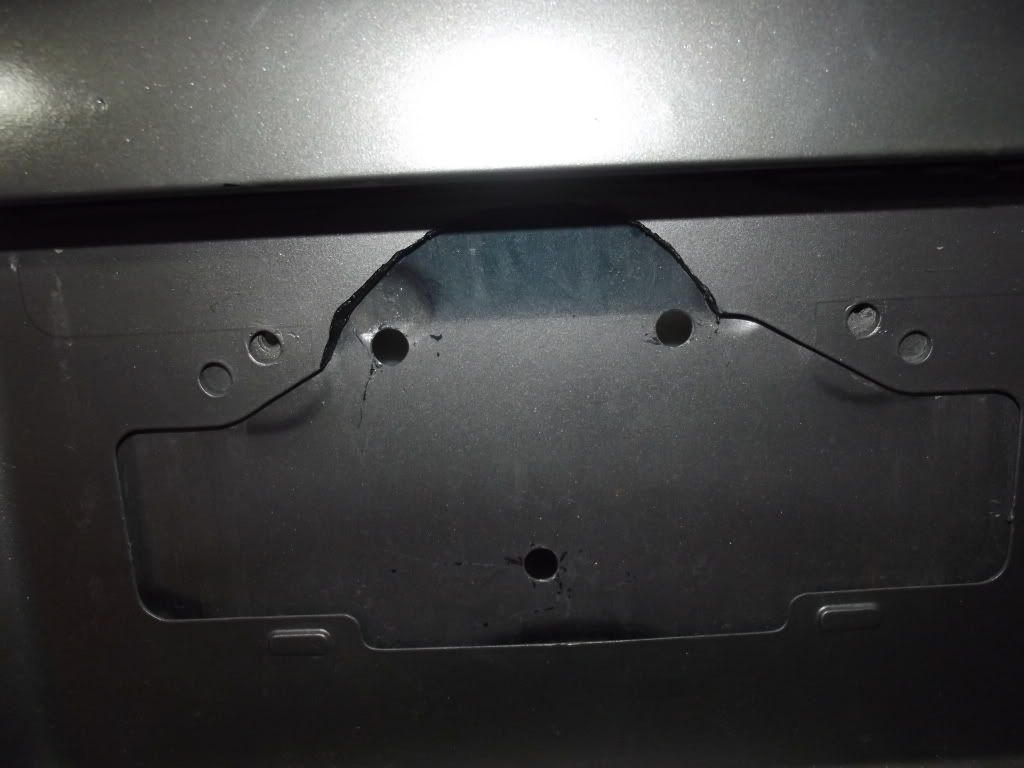
Then we decided to do some trimming for the tophat to sit flush inside the Licence plate trim. We used a hot razor knife to cut/melt through the plastic:
Bolted into place, we also welded a small piece of pipe to extend the tophat:
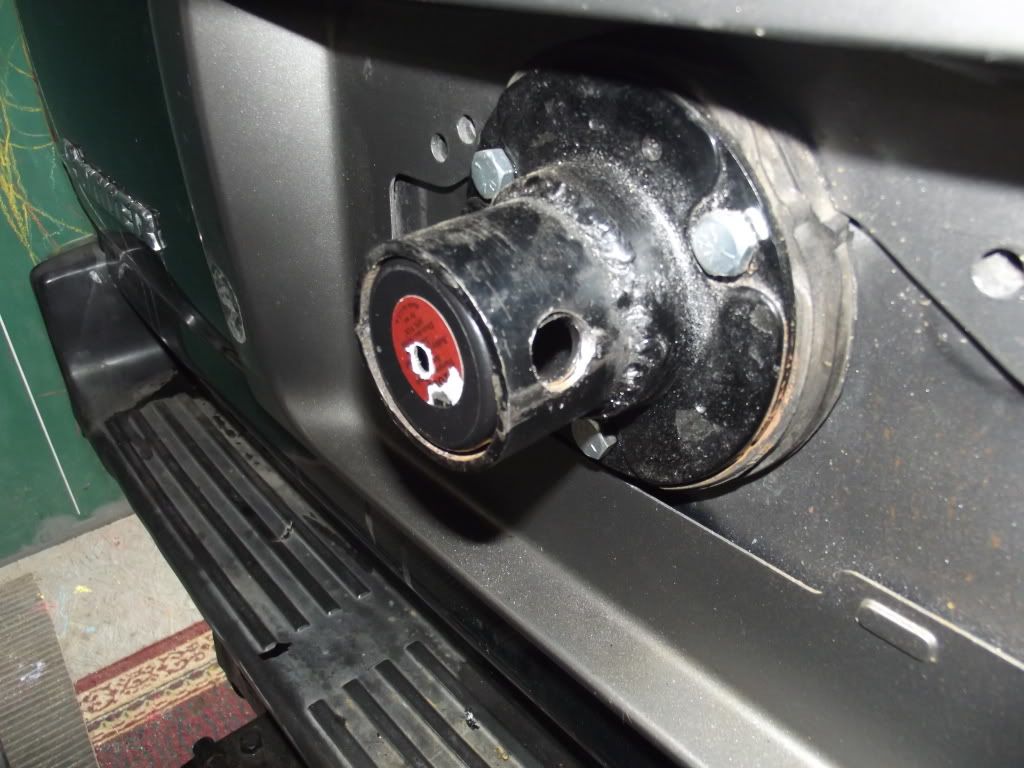
Shot of the inside...it clears the window actuator arms:

Once the tophat piece (mounting point) was in place, we turned our attention to the angle Iron portion of the revision.
We decided to butt 2 angle iron together and have them kind of box in the tube on the tophat mount. Don't mind the weldjob...I'm new at this stuff
The next thing to do was to weld it to the carrier:
Alright, so here are the completion pics.....took me 2 or 3 more hours to finish, but I'm pretty happy with the result so far.
Here's a pic of the new mount point (aka Tundra Top hat) and the angle iron doing what they are intended to do. I drilled out holes in both the angle iron and the center tube so that I could put a Trailer Lock pin through it.
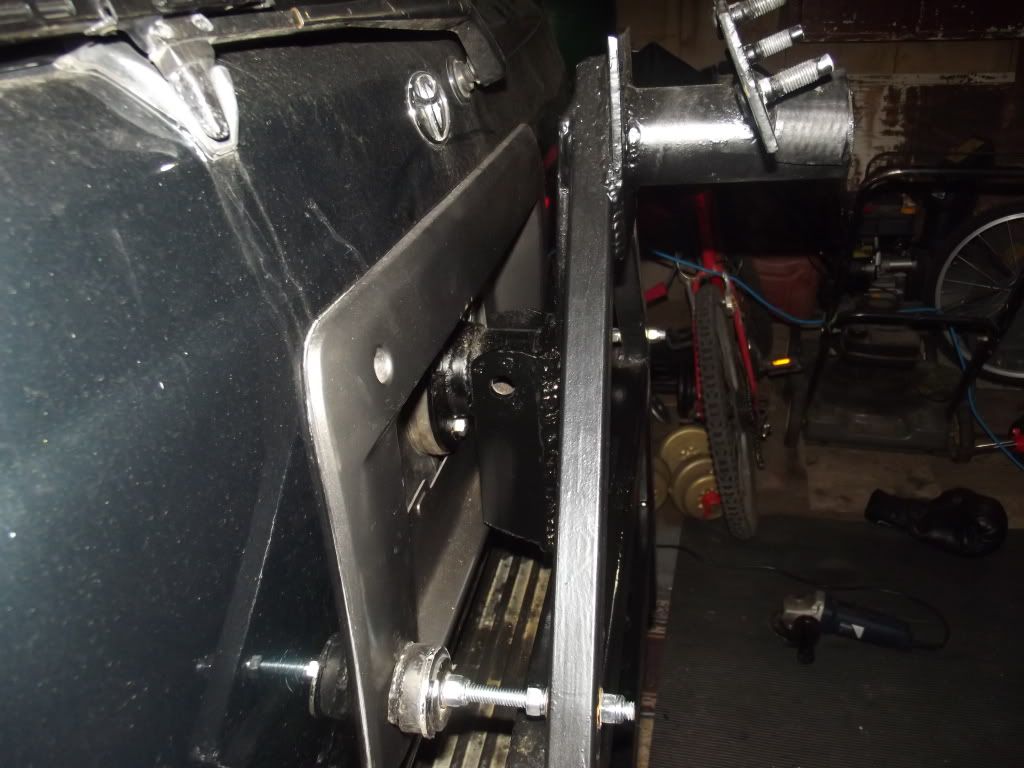
Here's a pic with the lock pin in place:
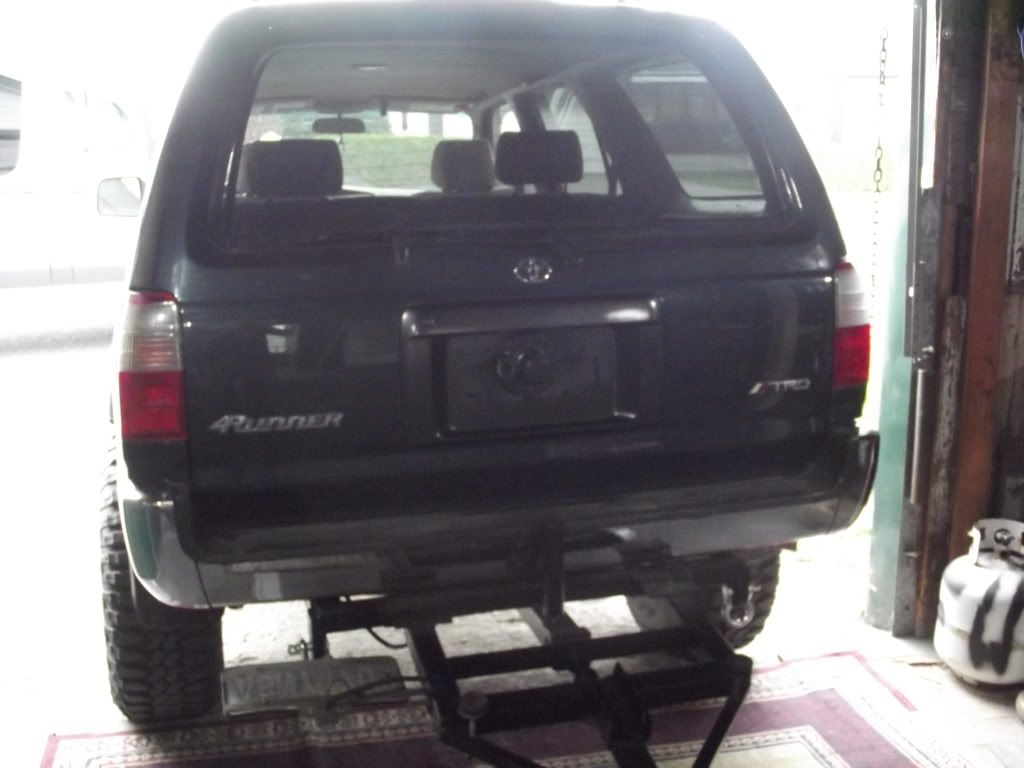
And a crappy shot of the rear with the tire on it.....don't look any different...but shakes alot less. I'll be completely honest, it still does shake a tiny bit, but at least I know that it's not going to come down on the road or on the trail.
I'm going to fuel it up in the morning and take it for a good 30km trip to work and back....and see how it does on the road!
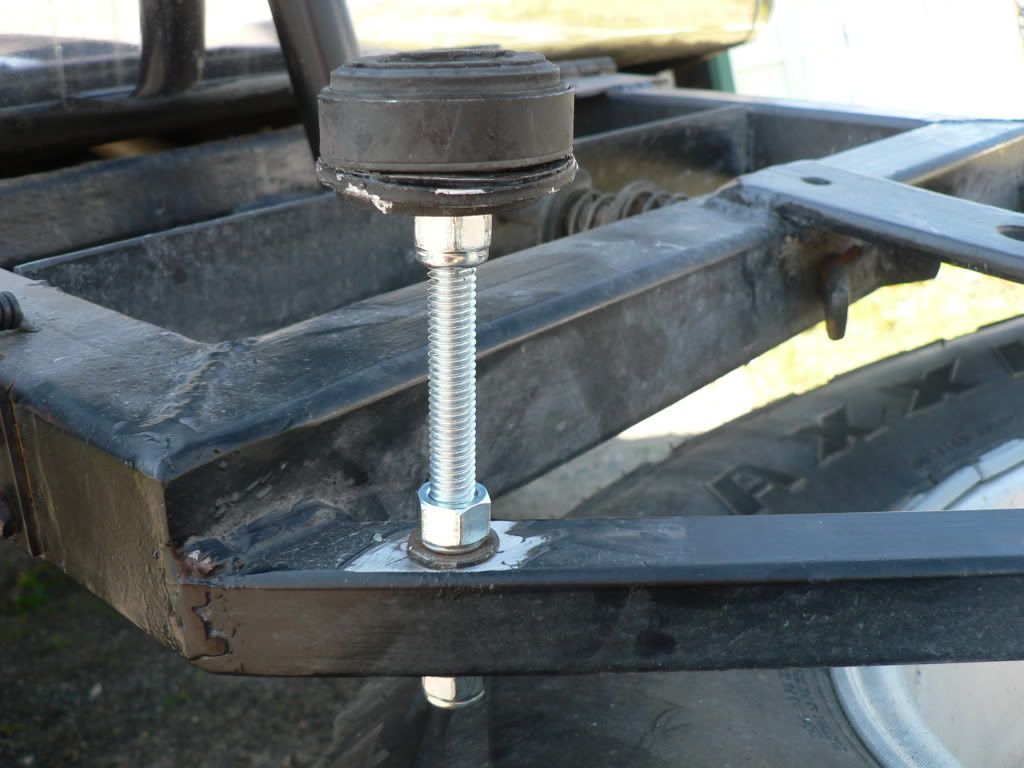
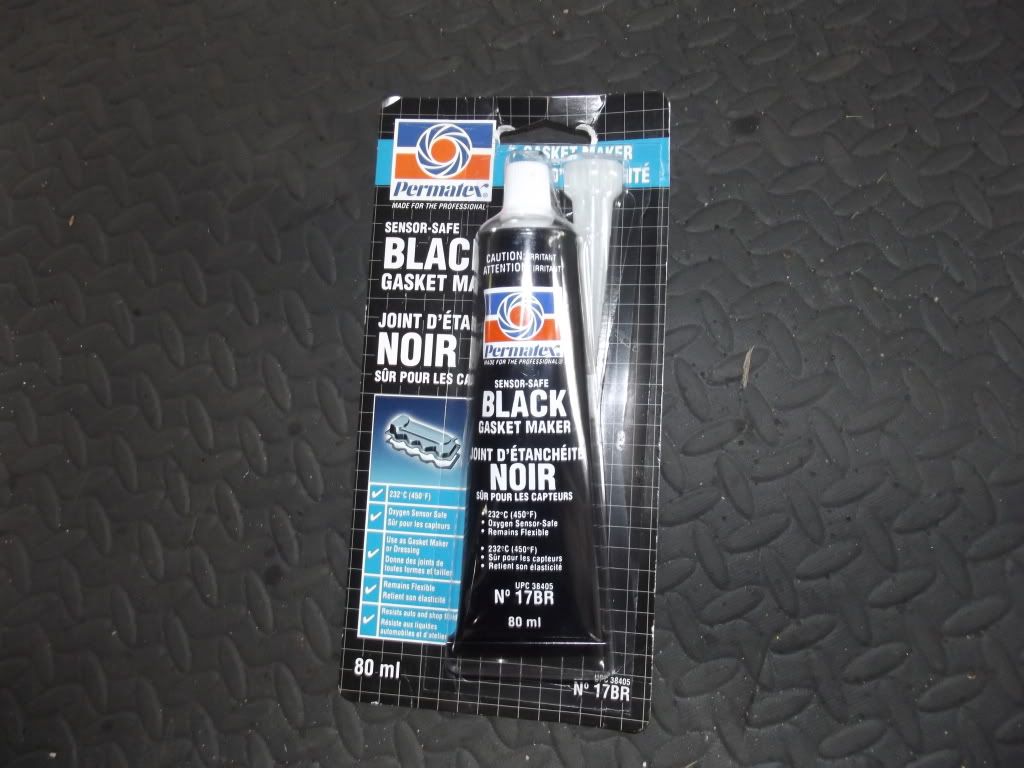
Alright, so today's project involved getting rid of some of the rattles. One thing I did, was grind down the angle iron, so that it wasn't hitting on the New Mounting point. Second thing I did, was make myself a bushing to go inside the center tube of the Mounting point.
I used some Black Permatex, hoping that it's chemical properties would be stronger than simple sillicone.
In order to get started, I tossed in an old paint can cap in order to stop any of the Permatex from working it's way through the Top Stut hole in the old Tundra Top Hat, and into the rear hatch.
Then I added a second paint can cap, to Cap off the end of the tube, and drilled out some holes to allow for the locking pin to go inside.
Next I added the Permatex, but it takes 24hrs to cure....so I'll have to wait and see how that ends up. I also used the permatex inside the center tube that we had welded on the hitch that sits vertically. This way, when the quick release pin is there, it won't rattle around either. (this also stops any water from getting inside the center tube...)
After completing those pieces of the project. I decided to rid myself of that Honda Galaxy Grey I had painted on the licence trim plate. First I sanded it with some Steel whool, then wiped it all down with some Paint Thinner. Next I primed it with some Filler Primer......
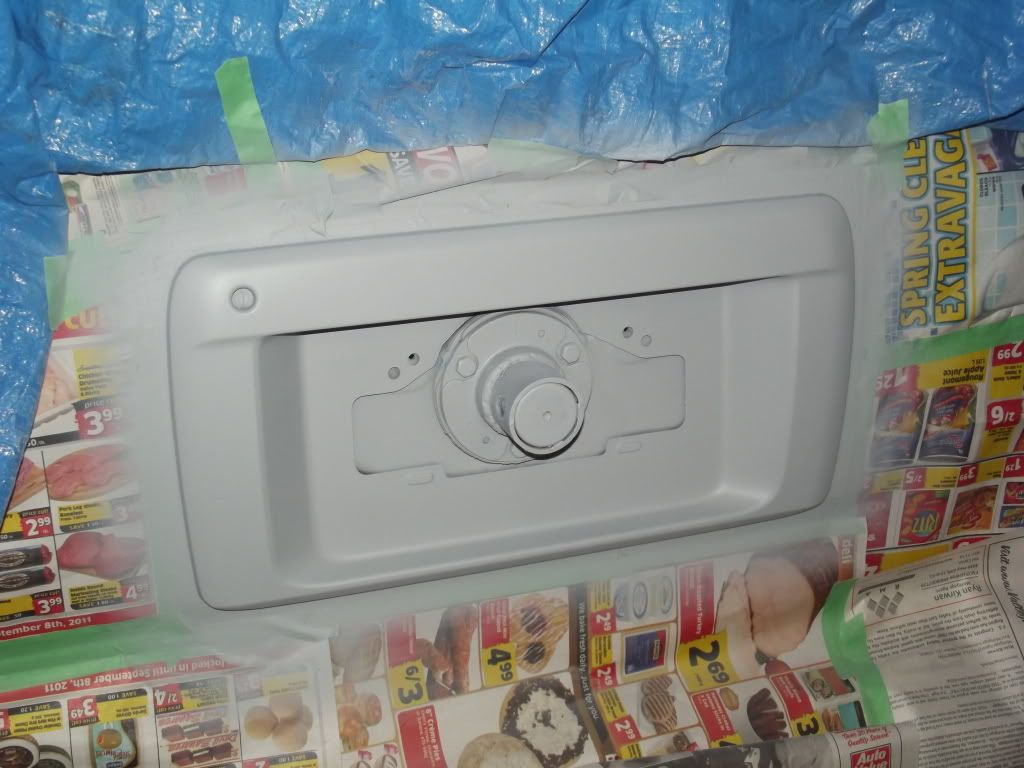
Once that had dried, I wet sanded it with some 1000 Grit Sand paper and then shot it with the base coat Toyota Graphite Mettalic Color:
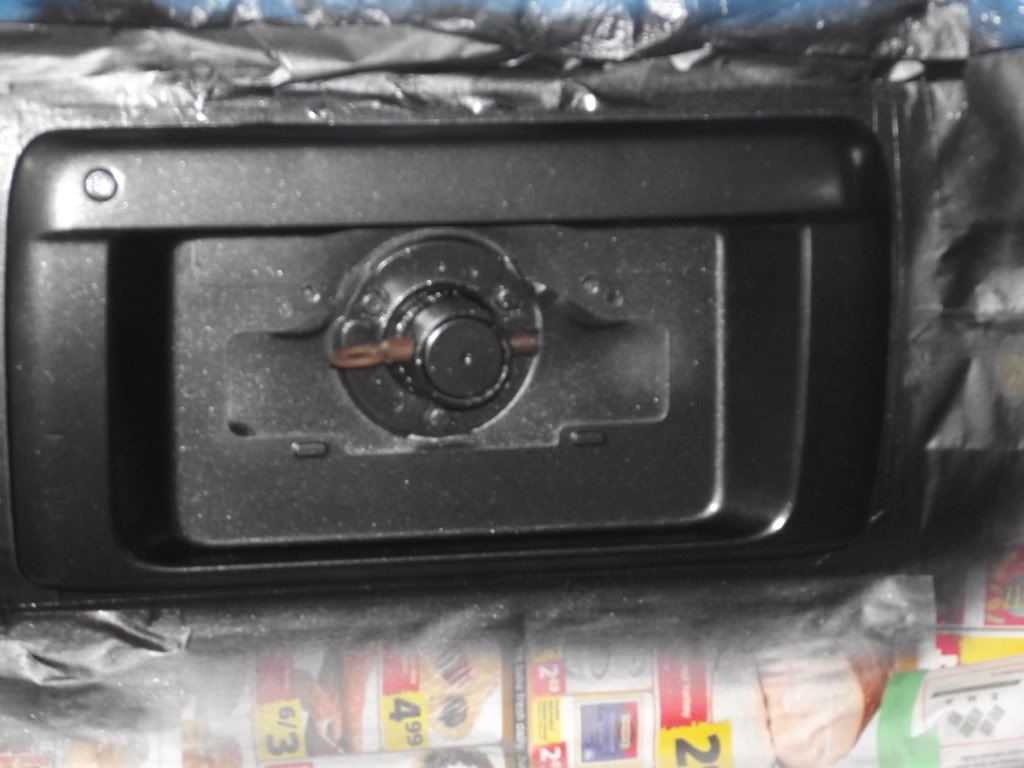
Then Cleared it all:
Once I get some decent weather, I'll post some outdoor pics, to compare...but the Graphite is much nicer looking than that Honda color!
Before:
After:
I like the Graphite!
Not sure about you guys, but I find it looks alot better now!
I have made some revisions since the original design... but mainly just to quiet down some rattles, and improve functionality.
Decided to replace my center receiver on my tire carrier as the old one was seized inside. While we were in the shop we decided to add some D-Ring mounts, and some extra bracing under the truck for the trailer hitch. In the process of adding the new center receiver, we were not able to save the square locking tube, so we decided to make a new one with round tubing.
I wasn't really digging the center tube sticking out of the center of my wheel. It looks alright with a black wheel, but with the Procomp wheel, it stuck out like a sore thumb.
Before:
I decided to mark off where I wanted to cut the tube:
Then took my cut-off wheel and chopped it off!
Here's a pic of my little helper again!
Close-up of the wheel installed with the center hub cap!
Distance shot:
All right,
After a long distance drive and camping trip, I found my tire carrier to be a little worse for wear. Looks like the little bumpers I made up, have finally buckled under the pressure of that 285 70 R16, and snapped!
I had made the bumpers out of old record player legs, a long bolt, some washers and a couple of nuts. The bumpers gave me almost a year and a half without any major issues, but now I'm looking to beef them up a little.
Here are a few pics of my current setup
Side view of the carrier: (note the distance from the rear hatch...I'd like to bring that closer)
Pic of the little bumper I made up:
Pic of the little bumper installed on the carrier and doing it's thing:
Pic of the locking pin:
The entire assembly lowered down:
And another shot of the assembly up:
Please keep in mind, my theme for this truck, is kind of a "TRD Edition 4Runner", so I want things to look as stock as possible without costing me a fortune to do. I realize that some have installed the rear tire carrier from the Hilux Surfs in Japan, but I can't afford to go that route. I don't want to cut into the rear bumper, and am not remotely interested in adding any armored bumpers.
I ended up using some 3/8" X 5" carriage bolts and locknuts to replace the tiny bolts and nuts I had before:
Here's the new bumpstop:
For now, I've placed some rubber on the end of my bumpstop to fill the gap between the bumpstop and the rear hatch. I plan on trying to bring in the carrier closer to the hatch in the next few weeks....so the rubber can then be removed at that time.
Alright, so with the weight of the tire, the tire carrier was just moving way too much. As a result, I decided to make another revision.
I tried to fight it since first building this thing, but finally decided to drill into the rear hatch, and add another mounting point. I want to thank Bigfish for forwarding me some pics of the inside of his rear hatch, as part of my R&D for this project.
First thing we did was take some measurements and acquire some materials. Turns out, the Tundra Top Plates I never used when I did the Tundra struts....came in handy! (Never throw away good steel pieces!)
Some angle Iron:
Some tophat Isolators:
A piece of Stainless (all I had lying around) for inside the door panel
Various nuts, bolts, and washers.
We lined up where we wanted the Tundra tophat to sit on the hatch by putting the tire carrier into place. We then marked the locations for the holes to be drilled, and went to work.
Small Pilot hole:
Next size:
Out came my step bit....at this point...I'm losing my mind because I'm cutting into Virgin Toyota Sheet Metal!
A shot of the tophat plate mocked into place. Note, we pressed the old studs out, and replaced with longer bolts:
Then we decided to do some trimming for the tophat to sit flush inside the Licence plate trim. We used a hot razor knife to cut/melt through the plastic:
Bolted into place, we also welded a small piece of pipe to extend the tophat:
Shot of the inside...it clears the window actuator arms:
Once the tophat piece (mounting point) was in place, we turned our attention to the angle Iron portion of the revision.
We decided to butt 2 angle iron together and have them kind of box in the tube on the tophat mount. Don't mind the weldjob...I'm new at this stuff
The next thing to do was to weld it to the carrier:
Alright, so here are the completion pics.....took me 2 or 3 more hours to finish, but I'm pretty happy with the result so far.
Here's a pic of the new mount point (aka Tundra Top hat) and the angle iron doing what they are intended to do. I drilled out holes in both the angle iron and the center tube so that I could put a Trailer Lock pin through it.
Here's a pic with the lock pin in place:
And a crappy shot of the rear with the tire on it.....don't look any different...but shakes alot less. I'll be completely honest, it still does shake a tiny bit, but at least I know that it's not going to come down on the road or on the trail.
I'm going to fuel it up in the morning and take it for a good 30km trip to work and back....and see how it does on the road!
Alright, so today's project involved getting rid of some of the rattles. One thing I did, was grind down the angle iron, so that it wasn't hitting on the New Mounting point. Second thing I did, was make myself a bushing to go inside the center tube of the Mounting point.
I used some Black Permatex, hoping that it's chemical properties would be stronger than simple sillicone.
In order to get started, I tossed in an old paint can cap in order to stop any of the Permatex from working it's way through the Top Stut hole in the old Tundra Top Hat, and into the rear hatch.
Then I added a second paint can cap, to Cap off the end of the tube, and drilled out some holes to allow for the locking pin to go inside.
Next I added the Permatex, but it takes 24hrs to cure....so I'll have to wait and see how that ends up. I also used the permatex inside the center tube that we had welded on the hitch that sits vertically. This way, when the quick release pin is there, it won't rattle around either. (this also stops any water from getting inside the center tube...)
After completing those pieces of the project. I decided to rid myself of that Honda Galaxy Grey I had painted on the licence trim plate. First I sanded it with some Steel whool, then wiped it all down with some Paint Thinner. Next I primed it with some Filler Primer......
Once that had dried, I wet sanded it with some 1000 Grit Sand paper and then shot it with the base coat Toyota Graphite Mettalic Color:
Then Cleared it all:
Once I get some decent weather, I'll post some outdoor pics, to compare...but the Graphite is much nicer looking than that Honda color!
Before:
After:
I like the Graphite!
Not sure about you guys, but I find it looks alot better now!
Last edited by fightman80; 01-04-2013 at 03:44 PM.


