Short Throw Shift Kit Install Guide for G- and R-series Transmissions
 11-21-2012, 02:01 PM
#1
Registered User
Thread Starter
Short Throw Shift Kit Install Guide for G- and R-series Transmissions
Short Throw Shift Kit Install Guide for G- and R-series Transmissions
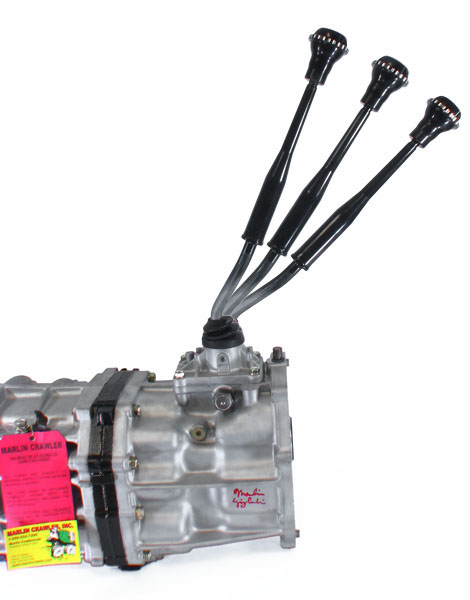
This guide will help you install our Short Throw Kit onto a G52/G54/G58/R150F/R151F transmission. Please carefully read and familiarize yourself with the following procedures before installation.
If you have any questions, visit http://www.MarlinCrawler.com or call us at (559) 25-CRAWL
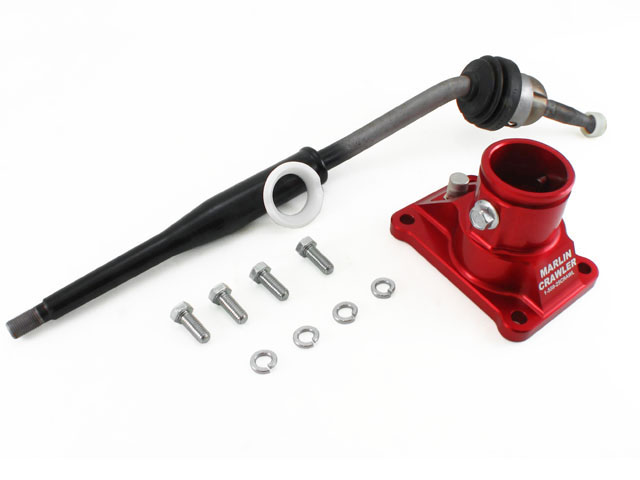
This kit is comprised of the following components:
Prelude: Your transmission will be exposed during this installation process. Be extra careful to clean your interior or workspace to minimize the risk of any debris or foreign object from falling into your transmission. Also, note the direction of your shift handle as our new handle may be installed in two different orientations and only one will match how your handle is now.
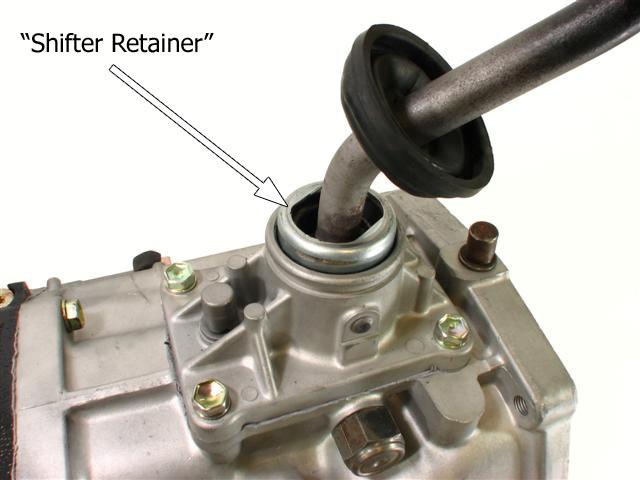
To begin, engage your emergency brake and shift your truck into neutral. (Shifting into netural will make the reassembly process much easier so don't skip this!) Remove your shift handle boot from your shifter base. Push down and rotate the shifter retainer counter-clockwise to unlock the shift handle as shown in the following image:

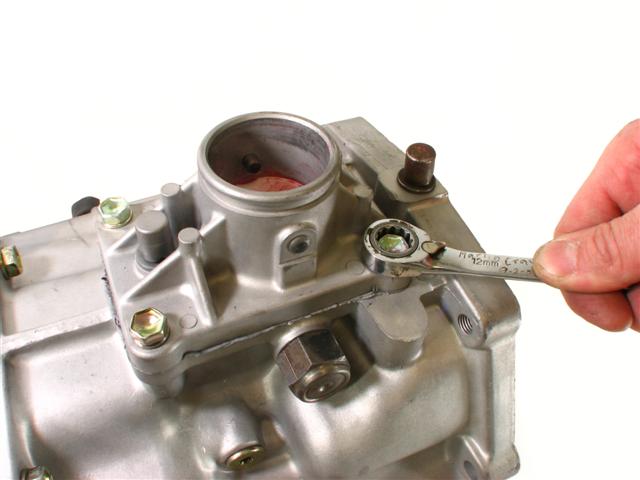
Next simply lift the shift handle up removing it from the base. Remove the four shift base bolts using a 12mm wrench or socket.
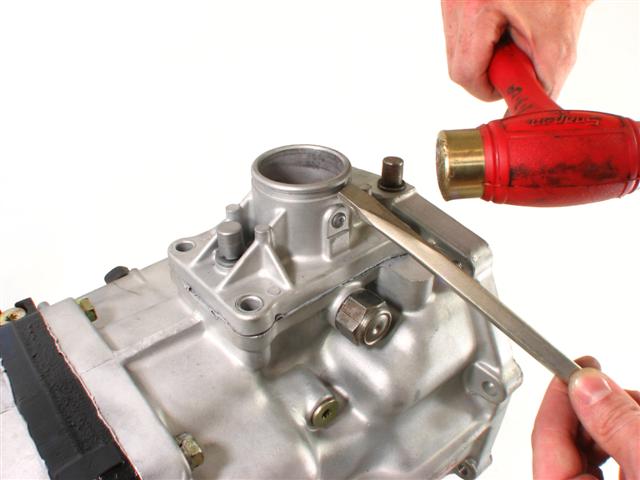
Using a brass drift, brass hammer, and/or flat head screwdriver, gently repeatedly tap on the stock shifter base until its seal is broken. You may also tap on the sides of the shift pivot pins.
This guide will help you install our Short Throw Kit onto a G52/G54/G58/R150F/R151F transmission. Please carefully read and familiarize yourself with the following procedures before installation.
If you have any questions, visit http://www.MarlinCrawler.com or call us at (559) 25-CRAWL
This kit is comprised of the following components:
- (1) Modified Short Throw Handle with Marlin Crawler Heavy Duty Shift Socket and Toyota Boot
- (1) Short Throw Shift Base Assembly
- (1) HD Shifter Seat
- (4) 20mm X 8mm X 1.25mm Base Bolts
- (4) 8mm Lock Washers
Prelude: Your transmission will be exposed during this installation process. Be extra careful to clean your interior or workspace to minimize the risk of any debris or foreign object from falling into your transmission. Also, note the direction of your shift handle as our new handle may be installed in two different orientations and only one will match how your handle is now.
To begin, engage your emergency brake and shift your truck into neutral. (Shifting into netural will make the reassembly process much easier so don't skip this!) Remove your shift handle boot from your shifter base. Push down and rotate the shifter retainer counter-clockwise to unlock the shift handle as shown in the following image:
Next simply lift the shift handle up removing it from the base. Remove the four shift base bolts using a 12mm wrench or socket.
Using a brass drift, brass hammer, and/or flat head screwdriver, gently repeatedly tap on the stock shifter base until its seal is broken. You may also tap on the sides of the shift pivot pins.
Last edited by BigMike; 11-21-2012 at 02:32 PM.
 11-21-2012, 02:02 PM
#2
Registered User
Thread Starter
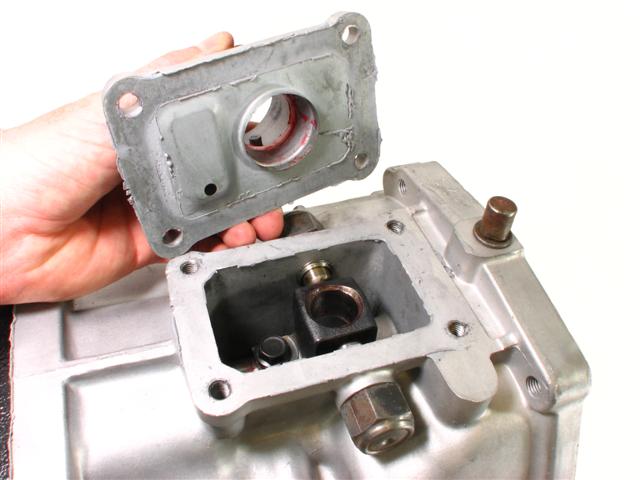
With the seal broken, simply lift the base off the transmission flange. There is an oil slinger between the shifter base and transmission housing. This oil slinger may come off with the shift base (as shown below), or it may remain on the transmission housing.
Be sure to mark which side of the oil slinger is facedown towards the transmission to prevent confusion during reassembly.
If your transmission does not have a factory oil slinger, we highly recommend you use one. Our breather is designed to work in conjunction with this slinger. Without it, its likely oil may splash out the breather. The Toyota part number for this is 33144-35030.
Remove the oil slinger by gently pealing it away from the shift base or transmission housing. The slinger is a type of sheet metal and can be easily bent and formed back into its original shape.
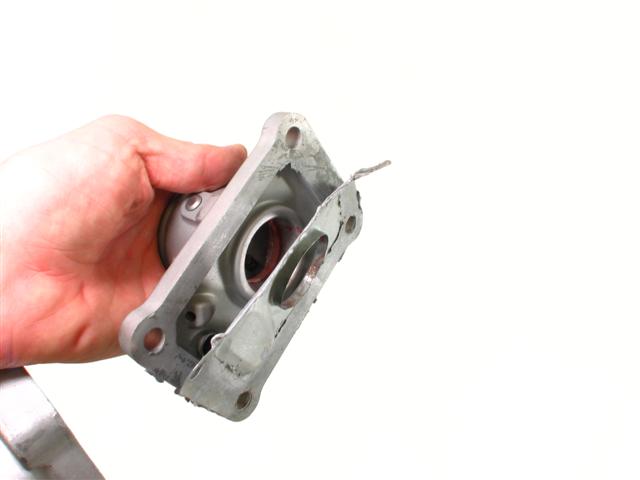
Remove and clean all paper gaskets from both sides of the oil slinger and from the transmission flange. Paper gaskets are used from the factory, however, they commonly leak and are often replaced with silicone. Therefore, you may encounter silicone instead of the original paper gaskets as shown in the images here.
While cleaning the transmission flange, position and move your gasket scraper away from the transmission opening being extra careful not to drop any debris inside the transmission. It may be helpful to place a clean towel or rag inside the transmission opening.
After all gasket material or silicone has been removed, degrease the sealing surfaces of the transmission housing, Short Throw Shifter Base, and both sides of the oil slinger.
This is a very important step to prevent future leaks. Silicone and oil repel each other and a seal cannot be established if any oil residue (including grease) is present. It is therefore imperative that all sealing surfaces are void from all oil and grease!
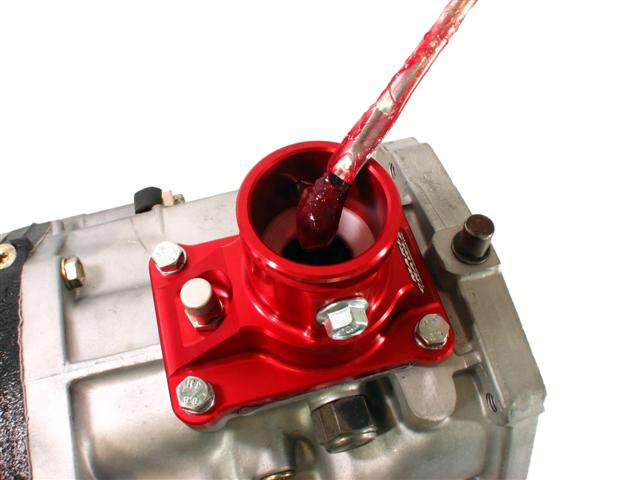
Apply a thin layer of silicone sealant on the flange of the transmission housing as illustrated in yellow in the picture below.
Note how it is unnecessary to apply sealant to the outer parameter of each bolthole since the seal is already established to the inside profile of the bolt pattern.

Be sure to mark which side of the oil slinger is facedown towards the transmission to prevent confusion during reassembly.
If your transmission does not have a factory oil slinger, we highly recommend you use one. Our breather is designed to work in conjunction with this slinger. Without it, its likely oil may splash out the breather. The Toyota part number for this is 33144-35030.
Remove the oil slinger by gently pealing it away from the shift base or transmission housing. The slinger is a type of sheet metal and can be easily bent and formed back into its original shape.
Remove and clean all paper gaskets from both sides of the oil slinger and from the transmission flange. Paper gaskets are used from the factory, however, they commonly leak and are often replaced with silicone. Therefore, you may encounter silicone instead of the original paper gaskets as shown in the images here.
While cleaning the transmission flange, position and move your gasket scraper away from the transmission opening being extra careful not to drop any debris inside the transmission. It may be helpful to place a clean towel or rag inside the transmission opening.
After all gasket material or silicone has been removed, degrease the sealing surfaces of the transmission housing, Short Throw Shifter Base, and both sides of the oil slinger.
This is a very important step to prevent future leaks. Silicone and oil repel each other and a seal cannot be established if any oil residue (including grease) is present. It is therefore imperative that all sealing surfaces are void from all oil and grease!
Apply a thin layer of silicone sealant on the flange of the transmission housing as illustrated in yellow in the picture below.
Note how it is unnecessary to apply sealant to the outer parameter of each bolthole since the seal is already established to the inside profile of the bolt pattern.
11-21-2012, 02:02 PM
#3
Registered User
Thread Starter
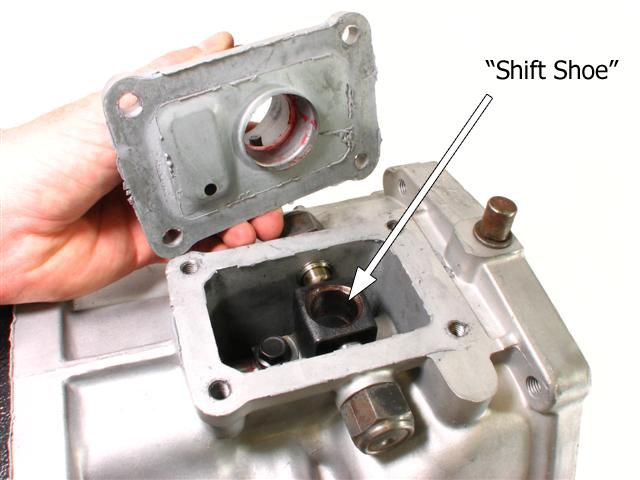
Carefully lay the oil slinger atop the transmission flange, noting which side is facedown (as marked earlier) and its orientation with the shift shoe inside the transmission.
Apply a thin layer of silicone sealant to the Short Throw Shift Base in approximately the same contact location as the flange of the transmission housing, as illustrated in yellow in the following picture:

You may find it is easier to apply silicone to the housing and the base rather than the two sides of the oil slinger. Trying to hold onto the thin slinger with fresh silicone on each side is difficult. Therefore, don't apply any silicone to the oil slinger at all: Add silicone to the transmission flange and the short throw base and simply place the slinger between them.
Lower the Short Throw Shift Base vertically into position. Be extra careful not to carelessly lay the base in place as the slinger may move around needlessly smearing the silicone.
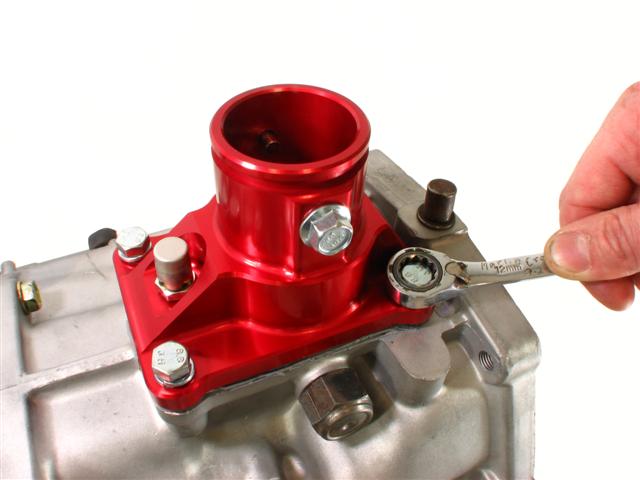
With the Base and slinger installed, proceed to install the four bolts with lock washers. Don't tighten the bolts too much at this time yet.
Please note that for R151F Turbo applications, the shifter base and oil slinger are flipped and positioned 180-degrees from what is shown in these images. Please be sure you have the shift holes aligned with the shift shoe inside the transmission before tightening the base down.
After all four bolts are lightly tightened, torque each one to 12 ft-lbs in a crisscross pattern to prevent the silicone from squishing out sideways.
You are almost done!
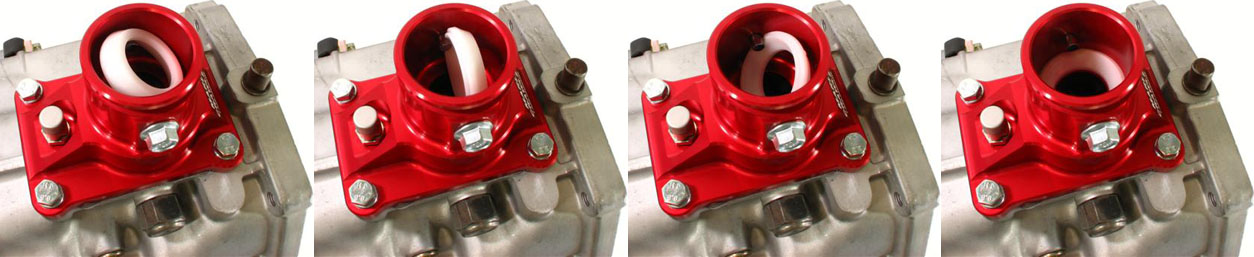
With the base in place, it's time to install our Heavy Duty Shifter Seat. To do this, rest the seat up side down atop each pivot pin, and then rotate the seat around and down into the base as shown in the following image sequence. The concaved radius should be facing up once installed.
Apply a generous amount of grease to the Heavy Duty shift seat. This step is not critical, as oil will eventually splash up and lubricate the seat, but it is recommended for immediate shifting performance.
If you are wondering if this is safe or not, keep in mind that grease is oil based and is safe for all internal transmission parts. If you don't have grease, you may use motor or gear oil as a substitute.
Apply a thin layer of silicone sealant to the Short Throw Shift Base in approximately the same contact location as the flange of the transmission housing, as illustrated in yellow in the following picture:
You may find it is easier to apply silicone to the housing and the base rather than the two sides of the oil slinger. Trying to hold onto the thin slinger with fresh silicone on each side is difficult. Therefore, don't apply any silicone to the oil slinger at all: Add silicone to the transmission flange and the short throw base and simply place the slinger between them.
Lower the Short Throw Shift Base vertically into position. Be extra careful not to carelessly lay the base in place as the slinger may move around needlessly smearing the silicone.
With the Base and slinger installed, proceed to install the four bolts with lock washers. Don't tighten the bolts too much at this time yet.
Please note that for R151F Turbo applications, the shifter base and oil slinger are flipped and positioned 180-degrees from what is shown in these images. Please be sure you have the shift holes aligned with the shift shoe inside the transmission before tightening the base down.
After all four bolts are lightly tightened, torque each one to 12 ft-lbs in a crisscross pattern to prevent the silicone from squishing out sideways.
You are almost done!
With the base in place, it's time to install our Heavy Duty Shifter Seat. To do this, rest the seat up side down atop each pivot pin, and then rotate the seat around and down into the base as shown in the following image sequence. The concaved radius should be facing up once installed.
Apply a generous amount of grease to the Heavy Duty shift seat. This step is not critical, as oil will eventually splash up and lubricate the seat, but it is recommended for immediate shifting performance.
If you are wondering if this is safe or not, keep in mind that grease is oil based and is safe for all internal transmission parts. If you don't have grease, you may use motor or gear oil as a substitute.
11-21-2012, 02:03 PM
#4
Registered User
Thread Starter
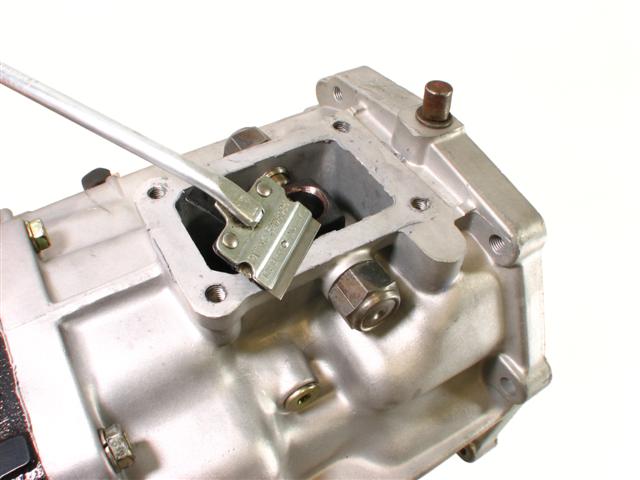
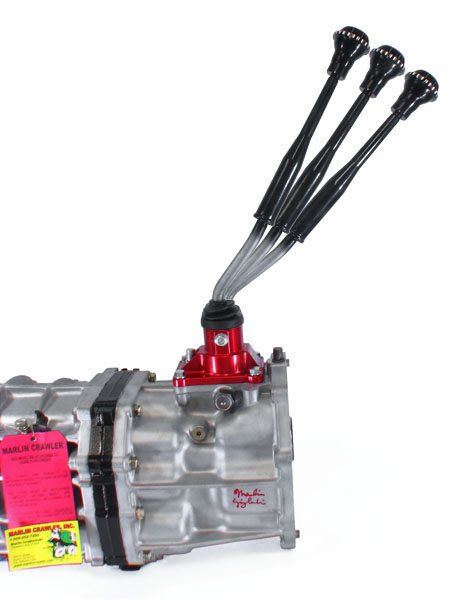
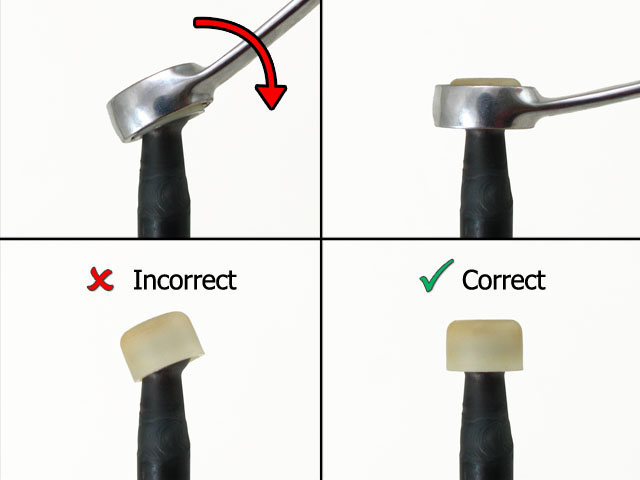
In addition to our Heavy Duty Seat, we have included our Heavy Duty Socket, which you'll find pre-installed and attached to the end of the modified shifter. The socket needs to be positioned so that it is perpendicular to the shifter and ready for direct installation. Please note that we have engineered our H.D. Socket with a tight and a precise fit. Therefore if it is tilted even slightly to the side on the end of the shifter, then you will struggle trying to insert the shifter into the transmission. The handle will insert with very little effort if everything is properly aligned.
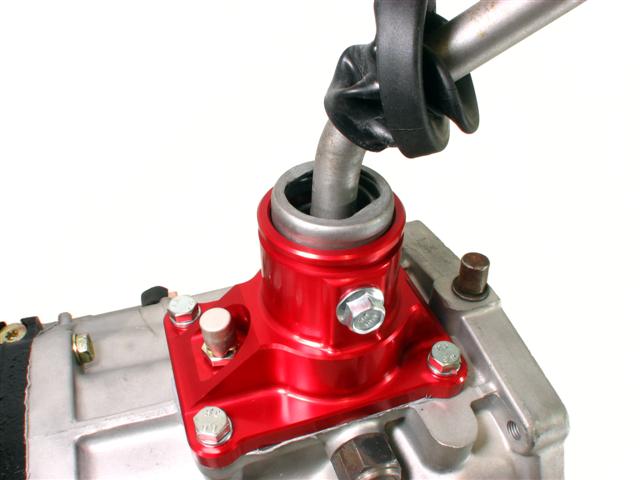
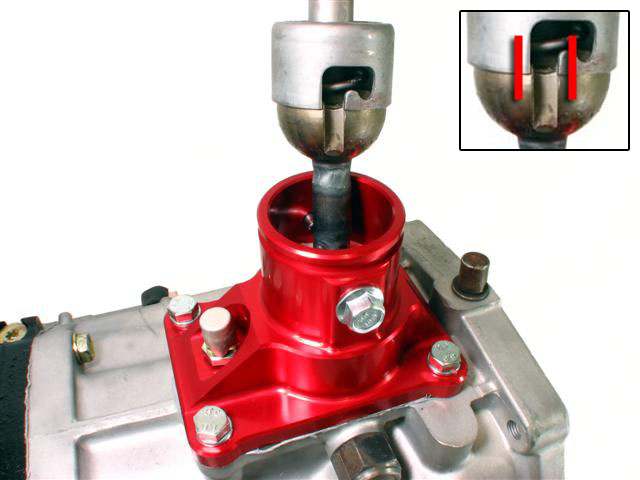
Lower the shift handle down into position in the same orientation as your original handle (remember you noted this before removing your stock lever). Align the slots of the shift handle and shifter retainer with the shift pins of the Short Throw Shifter Base as shown in the following image.

The shift handle will continue to insert into the transmission until the shifter retainer rests (without force) near the top level of the base as shown in the below image. If your retainer is not in this position, then double check the shift socket's alignment with the shift shoe inside the transmission as discussed above.
As mentioned ealier, because the transmission was shifted into neutral, the shift shoe within the transmission will be lined up directly with the hole of the shift base. This makes for a straight and easy insertion of the shift handle.
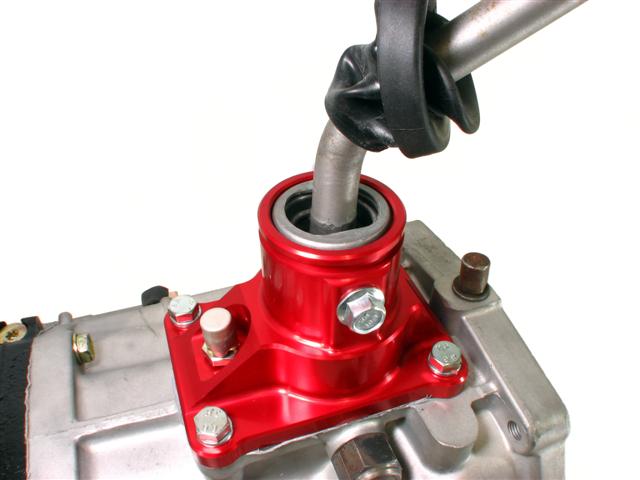
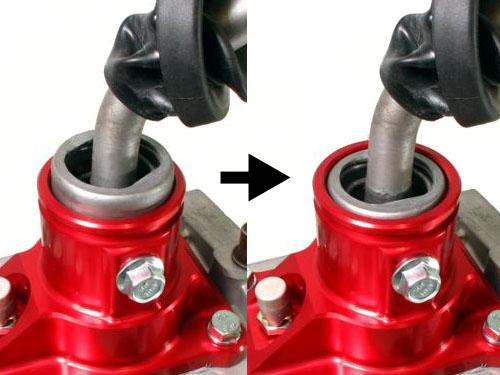
Push the shift handle retainer down until it stops, and then rotate clockwise to the right approximately 35-degrees. The retainer is 'locked' when its two sides are parallel with the transmission, as shown below.
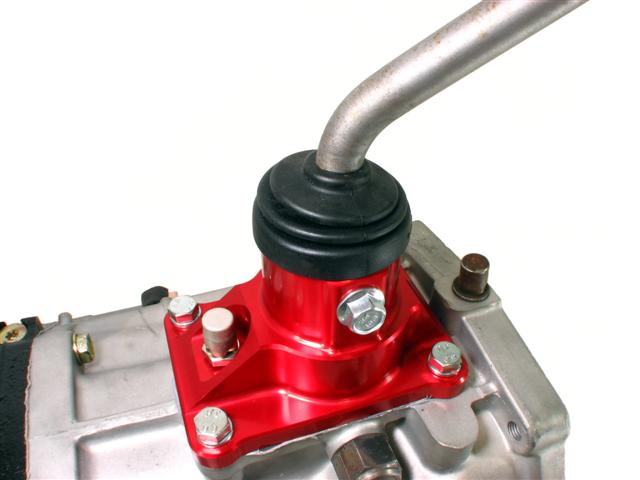
Shift through all forward and reverse gears to ensure proper operation! Finally, push the shift handle boot down and over the top of the Short Throw Shifter Base and you're done!
Closing notes:
There is no break-in procedure; it is ready for use immediately. If you ever need to remove the shift pivots or breather, please use thread lock during reassembly to keep the parts tight and to prevent oil leaks.
Before and after comparison of the 40% reduction in shifter throw:
Ordering information and additional details may be found by visiting our website at:
http://www.marlincrawler.com/transmission/shifter-parts
Also available in PDF format in our Tech Section: http://www.marlincrawler.com/tech/gu...-kit-installer

Lower the shift handle down into position in the same orientation as your original handle (remember you noted this before removing your stock lever). Align the slots of the shift handle and shifter retainer with the shift pins of the Short Throw Shifter Base as shown in the following image.
The shift handle will continue to insert into the transmission until the shifter retainer rests (without force) near the top level of the base as shown in the below image. If your retainer is not in this position, then double check the shift socket's alignment with the shift shoe inside the transmission as discussed above.
As mentioned ealier, because the transmission was shifted into neutral, the shift shoe within the transmission will be lined up directly with the hole of the shift base. This makes for a straight and easy insertion of the shift handle.
Push the shift handle retainer down until it stops, and then rotate clockwise to the right approximately 35-degrees. The retainer is 'locked' when its two sides are parallel with the transmission, as shown below.
Shift through all forward and reverse gears to ensure proper operation! Finally, push the shift handle boot down and over the top of the Short Throw Shifter Base and you're done!
Closing notes:
There is no break-in procedure; it is ready for use immediately. If you ever need to remove the shift pivots or breather, please use thread lock during reassembly to keep the parts tight and to prevent oil leaks.
Before and after comparison of the 40% reduction in shifter throw:
Ordering information and additional details may be found by visiting our website at:
http://www.marlincrawler.com/transmission/shifter-parts
Also available in PDF format in our Tech Section: http://www.marlincrawler.com/tech/gu...-kit-installer
Last edited by BigMike; 11-21-2012 at 02:32 PM. Reason: Added PDF link
12-30-2012, 12:32 AM
#6
Registered User
This is really starting to pull my money trigger finger, after my Ipad mount its a pretty tight area to be shifting, it's not bad but this sure would make it better. Good posting though I will bookmark and stare at it and think
 01-02-2013, 11:13 AM
#7
Registered User
Thread Starter
I think out kit would help a lot!
Trending Topics
05-09-2013, 05:29 PM
#8
Contributing Member
just finished my install. if it weren't for NO clearance to get at the front bolts, this would have been cake. as it was, getting them out required a ratcheting wrench, not a socket wrench (even 1/4" drive with U-joint was 1/2" too tall). i also jerry-rigged the ratcheting 12mm wrench with a short length of 1/4" rope because my hold on it was two-finger at best on the driver's side and nil on the passenger. it also helped tremendously to use a telescoping magnetic pick-up to replace the forward bolts due to the lack of clearance and my fingers' inability to bend sideways.
your note about the socket is very important and could use some highlighting, perhaps. without straightening it, it is indeed impossible to replace the retainer.
took it out for a spin and after a few shifts through all the gears, it's just plain excellent. there's no play whatsoever. this thing is TIGHT and feels new. the throw is at least as short as you pictured, for me (R150F in a '95 PU). great job on the guide. the photos are perfect and the text is well-written.
Last edited by photoleif; 05-10-2013 at 04:04 PM.
05-13-2013, 07:39 AM
#9
Registered User
Thread Starter
photoleif,
Thank you for your detailed report and for trying out our kit! We are very glad you are pleased with it!
Combined with vital22re's mention of the same thing, I will add additional notes to the install guide regarding how tight it may be to get to those front bolts!
Cheers,
BigMike
Thank you for your detailed report and for trying out our kit! We are very glad you are pleased with it!
Combined with vital22re's mention of the same thing, I will add additional notes to the install guide regarding how tight it may be to get to those front bolts!
Cheers,
BigMike
05-13-2013, 09:07 AM
#10
it may also help to lower the tranny, ie- pull the 8 crossmember bolts and lower it 1-2 inches. that should help tremendously in bolt access. the amount of engine rotation should be negligible
another thing of note is that this will raise the entire shifter assembly up, which may interfere with the cup holders or radio/hvac
another thing of note is that this will raise the entire shifter assembly up, which may interfere with the cup holders or radio/hvac
05-13-2013, 09:37 AM
#11
it may also help to lower the tranny, ie- pull the 8 crossmember bolts and lower it 1-2 inches. that should help tremendously in bolt access. the amount of engine rotation should be negligible
another thing of note is that this will raise the entire shifter assembly up, which may interfere with the cup holders or radio/hvac
another thing of note is that this will raise the entire shifter assembly up, which may interfere with the cup holders or radio/hvac
05-13-2013, 10:21 AM
#12
Registered User
Thread Starter
Ok guys,
Install Guide has been updated providing a few more tips, extra explanations, an identifier to what the (before unidentified) "shift shoe" is, as well as a few spelling mistakes.
Check it out here: http://www.marlincrawler.com/tech/gu...-kit-installer
Regards,
BigMike
Install Guide has been updated providing a few more tips, extra explanations, an identifier to what the (before unidentified) "shift shoe" is, as well as a few spelling mistakes.
Check it out here: http://www.marlincrawler.com/tech/gu...-kit-installer
Regards,
BigMike
05-14-2013, 03:33 PM
#13
Contributing Member
Very nice. Thanks BigMike. I only have one lingering concern, and that's that the shift shoe is noted as needing to be perpendicular to the shifter. I know what you're meaning here, but I think for greatest clarity a small photo of just that part and its correct orientation would be best. Perpendicular *is* the right word, granted, but when I first read it, I was thinking about the axis of the shifter and the axis of the shoe, and thus they should be collinear. Not everyone remembers Geometry and thus I think a picture will be worth the proverbial thousand words...or at least a dozen.
My old shifter boot wasn't coming off the old shifter, and I chose to temporarily grease it and that made all the difference. You may consider a tips list somewhere to suggest various hints like doing that, then cleaning it off. Also, rotating the shoe when it's dry is not going to happen without damage to either the shoe or one's thumb, and thus a tip to grease it a bit would be really useful to noobs or those wanting to avoid all possibility of damage.
Thanks again for the updates. I think you really have a superb install guide, among the best in class. If the FSM were written at this level of quality and clarity, a lot of people would feel significantly more comfortable doing their own wrenching.
05-14-2013, 04:20 PM
#14
Registered User
Thread Starter
All great tips Sir, I greatly appreciate the feedback! (otherwise I wouldn't know what to improve!) I will do another revision soon! 
Regards,
BigMike
Regards,
BigMike
05-28-2013, 12:13 PM
#15
Registered User
Thread Starter
Alright guys, I got another revision to offer
Please clear your browser's cache and view it here:
http://www.marlincrawler.com/tech/gu...-kit-installer
or direct here:
http://www.marlincrawler.com/guide/s...-installer.pdf
Make sure you are viewing version 1.2 (listed at the bottom of the last page).
I provided quite a bit more clarity on what the Shifter Retainer is, how to easily reposition our Heavy Duty Shift Socket, how to align the slots of the Retainer with the Shift Handle, and a better illustration and description of the retainer resting and locking into place.
Feedback welcomed!
BigMike
 05-29-2013, 04:07 PM
#17
Contributing Member
hey. these are excellent additions for clarity and user-friendliness. i think you're at a point now where just about anyone can do this, even if they're very hesitant. i did note a typo ("pealing") that cropped up. the note for #8, though factually correct, doesn't caution the user to be gentle with the slinger since otherwise they'll have to go buy a new one. your call on that. the tip for #12, if total noobs are in mind, might be usefully augmented to state that mineral spirits on a shop towel are great for safely removing grease. and as much as i wanted your note #23 to be correct for mine, haha, my experience was that i had to use a shop towel to protect my fingers and then apply a great deal of downward force to get the shifter retainer deep enough to rotate and lock. i think there was a suggestion along these lines for the marlincrawler shift seat (which i purchased from you a while ago) -- use a towel so you don't slice up your fingers. it might be nice to find those instructions and borrow that.
the illustrations for #21 are superb. no one could get it goofed up with those. though you might want to make the x red instead :-D
i'm thinking you're nearing a point of perfection or saturation, depending on one's experience level. again, great work.
the illustrations for #21 are superb. no one could get it goofed up with those. though you might want to make the x red instead :-D
i'm thinking you're nearing a point of perfection or saturation, depending on one's experience level. again, great work.
Last edited by photoleif; 05-29-2013 at 04:08 PM.
05-30-2013, 04:33 PM
#18
Registered User
Thread Starter
Awesome, love the additional suggestions. I updated the file to v1.3. As for #8 and #24, I left those to the installer to decide 1) how to degrease an object and 2) how to push an object.
The red X and care for the slinger are great additions I also removed a redundant mention of the shift shoe from #23.
Regards,
BigMike
The red X and care for the slinger are great additions
I also removed a redundant mention of the shift shoe from #23.Regards,
BigMike
Last edited by BigMike; 05-30-2013 at 04:34 PM.


