1995 5-lug 2WD ExtraCab Zuk mod on SUA and coil spacers write up (Pic heavy)
 10-20-2012, 12:54 PM
#1
Registered User
Thread Starter

Join Date: Sep 2012
Posts: 17
Likes: 0
Received 0 Likes
on
0 Posts
1995 5-lug 2WD ExtraCab Zuk mod on SUA and coil spacers write up (Pic heavy)
So here's what I did over about a week (driving the wife's Sienna for a week  ) while I worked on it. I hope this helps someone else out there, I had a hard time finding anyone who was in my same situation, most info is about 4x4s and Prerunners.
About my truck, it is a 1995 2WD extra cab, so it's a 5 lug with spring under axle (SUA), so it takes a little doing to do the Zuk mod.
Basically I was looking at 400$ for new leaf packs, mine were shot, and the struts and shocks were shot. I new the Zuk mod would net me a couple inches in the back, and I wanted to even up the truck a bit, so I went with coil spacers. (GASP, I know, everyone says they're crap and not to do them, I figure 1" on slightly worn out coils should really be about 3/4" and isn't that big of a deal. They feel great, so no biggie)
Like I said, I know it was hard for me to find this info, so I'm going barney style in hopes this helps someone else out. Being a sprung under vehicle, (axle is under the rear leafs) you can't do the "no weld/no cut" Zuk mod. You have to figure out a way to make coils stay between a round axle and the frame. So I ordered some spring perches with everything else and fabbed some spring "holders". Basically 1" of square tubing, ground down a bit til it fit inside the coils, welded to spring perches and some 1/4" plate 2x5 to attach to the frame.
Here's my step by step with pictures.
1. Ordered front and rear KYB Gas Adjusts, front 1" coil spacer, rear leaf perches, and Black Magic 10" 125# coil springs.


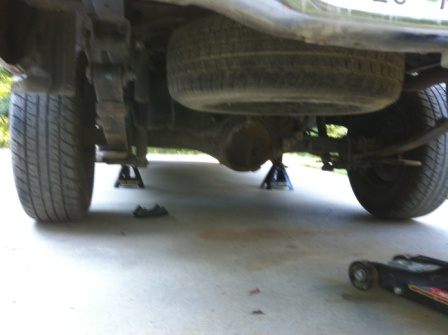
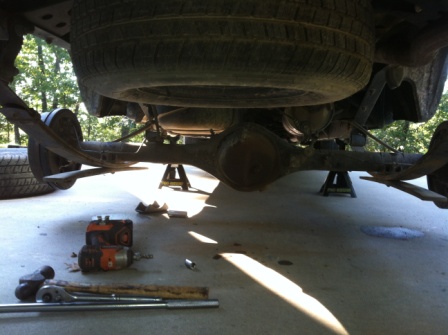
2. Jack up rear, unfasten axle, etc.
3. remove u bolts, grind paint off the axle

That's part 1
) while I worked on it. I hope this helps someone else out there, I had a hard time finding anyone who was in my same situation, most info is about 4x4s and Prerunners.About my truck, it is a 1995 2WD extra cab, so it's a 5 lug with spring under axle (SUA), so it takes a little doing to do the Zuk mod.
Basically I was looking at 400$ for new leaf packs, mine were shot, and the struts and shocks were shot. I new the Zuk mod would net me a couple inches in the back, and I wanted to even up the truck a bit, so I went with coil spacers. (GASP, I know, everyone says they're crap and not to do them, I figure 1" on slightly worn out coils should really be about 3/4" and isn't that big of a deal. They feel great, so no biggie)
Like I said, I know it was hard for me to find this info, so I'm going barney style in hopes this helps someone else out. Being a sprung under vehicle, (axle is under the rear leafs) you can't do the "no weld/no cut" Zuk mod. You have to figure out a way to make coils stay between a round axle and the frame. So I ordered some spring perches with everything else and fabbed some spring "holders". Basically 1" of square tubing, ground down a bit til it fit inside the coils, welded to spring perches and some 1/4" plate 2x5 to attach to the frame.
Here's my step by step with pictures.
1. Ordered front and rear KYB Gas Adjusts, front 1" coil spacer, rear leaf perches, and Black Magic 10" 125# coil springs.
2. Jack up rear, unfasten axle, etc.
3. remove u bolts, grind paint off the axle
That's part 1
 10-20-2012, 12:59 PM
#2
Registered User
Thread Starter
Join Date: Sep 2012
Posts: 17
Likes: 0
Received 0 Likes
on
0 Posts
Part 2
Grinding axles:

4. Fab up spring perch/spring mount. I used 2" square tubing, welded it to spring perches and some plating for upper and lower mounts. This was my first time welding, so it was pretty rough. Lots of grinding...
4. Level the axle, frame, figure out placement of spring perches. I jacked up the frame until it was level and about the estimated height above the axle for the lift I was getting (2" above stock according to Zuk). Then I leveled the new perches and scribed where they were.
5. This was the scary part. The 7.5 axles are pretty thin so I was afraid of burning through with my crappy welding skills. Carefully (took me forever to strike an arc without sticking to the workpiece and having to break off the rods) and with lots of grinding, the perches stuck on and were workable!


6. I removed the bumpstops and drilled matching holes through the top spring mounts to match, and bolted them up to the top of the frame.
7. Hooked the axle back up, put a scissor jack in between, and squeezed the new spring in.
8. Dropped it down, put the new shocks in the back.

Grinding axles:
4. Fab up spring perch/spring mount. I used 2" square tubing, welded it to spring perches and some plating for upper and lower mounts. This was my first time welding, so it was pretty rough. Lots of grinding...
4. Level the axle, frame, figure out placement of spring perches. I jacked up the frame until it was level and about the estimated height above the axle for the lift I was getting (2" above stock according to Zuk). Then I leveled the new perches and scribed where they were.
5. This was the scary part. The 7.5 axles are pretty thin so I was afraid of burning through with my crappy welding skills. Carefully (took me forever to strike an arc without sticking to the workpiece and having to break off the rods) and with lots of grinding, the perches stuck on and were workable!
6. I removed the bumpstops and drilled matching holes through the top spring mounts to match, and bolted them up to the top of the frame.
7. Hooked the axle back up, put a scissor jack in between, and squeezed the new spring in.
8. Dropped it down, put the new shocks in the back.
10-20-2012, 01:01 PM
#3
Registered User
Thread Starter
Join Date: Sep 2012
Posts: 17
Likes: 0
Received 0 Likes
on
0 Posts
Part 3: the front
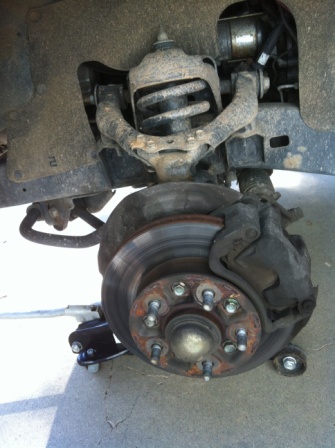
9. Jack up the front, (put in stands of course ), take off the tires, and start on the front.
10. I did one at a time to make sure I could see how to put it back together, the struts were rusted in so I had to sawzall the top nut off.
11. It took forever to figure out how to squeeze in the spring compressor. I used an internal one (the external had no way to fit on around the control arms etc., believe me i tried), and had to pry open the spring to fit it in, and then wiggle it up to the top. After unhooking all the ball joints and tie rod end, and all kinds of crap, and compressing and trying to fit the spring in over 10 times, and taking it out and using a different spring compressor, finally victory. The spring spacers in, then since the ball joints were original too, and the rubber boots were totally junked, I replaced them too for good measure.
12. So still on the driver side, I started over with an internal spring compressor, new upper and lower ball joints, and spring spacer.
13. Pry open the bottom links of the spring, squeeze in an internal spring compressor, (it's like a puzzle). Compress the spring.
14. Remove the sway bar. Remove bolts holding the brake lines. Use a pitman arm puller to pop out the tie rod end, upper and lower pitman arms. Loosen the upper control arm, and the lower control arm. Push down on the lower arm until the top of the spring falls out.
15. Put in the spring spacer. Replace the upper and lower ball joints.
16. Start putting everything back in reverse order. Torque it all to specs.
17. Put in the new struts. Repeat for the other side.
18. Put the wheels back on.
Whew! The hardest part was figuring out how to get the spring compressor inside the spring. Maybe some smart people out there can tell me how I was doing it wrong. Maybe a different spring compressor...
I learned a lot, it was fun welding, hopefully with more practice I can strike an arc better, not have to grind as much.
Before and after pics are in my build thread.
9. Jack up the front, (put in stands of course
), take off the tires, and start on the front.10. I did one at a time to make sure I could see how to put it back together, the struts were rusted in so I had to sawzall the top nut off.
11. It took forever to figure out how to squeeze in the spring compressor. I used an internal one (the external had no way to fit on around the control arms etc., believe me i tried), and had to pry open the spring to fit it in, and then wiggle it up to the top. After unhooking all the ball joints and tie rod end, and all kinds of crap, and compressing and trying to fit the spring in over 10 times, and taking it out and using a different spring compressor, finally victory. The spring spacers in, then since the ball joints were original too, and the rubber boots were totally junked, I replaced them too for good measure.
12. So still on the driver side, I started over with an internal spring compressor, new upper and lower ball joints, and spring spacer.
13. Pry open the bottom links of the spring, squeeze in an internal spring compressor, (it's like a puzzle). Compress the spring.
14. Remove the sway bar. Remove bolts holding the brake lines. Use a pitman arm puller to pop out the tie rod end, upper and lower pitman arms. Loosen the upper control arm, and the lower control arm. Push down on the lower arm until the top of the spring falls out.
15. Put in the spring spacer. Replace the upper and lower ball joints.
16. Start putting everything back in reverse order. Torque it all to specs.
17. Put in the new struts. Repeat for the other side.
18. Put the wheels back on.
Whew! The hardest part was figuring out how to get the spring compressor inside the spring. Maybe some smart people out there can tell me how I was doing it wrong. Maybe a different spring compressor...
I learned a lot, it was fun welding, hopefully with more practice I can strike an arc better, not have to grind as much.
Before and after pics are in my build thread.
Last edited by cwk; 10-20-2012 at 01:08 PM.
11-05-2012, 12:09 PM
#5
Registered User
Thread Starter
Join Date: Sep 2012
Posts: 17
Likes: 0
Received 0 Likes
on
0 Posts
If anyone is interested, check out my build thread I got new to me tires and wheels on craigslist, much better ride with slightly bigger tires, doesn't make to lift look so goofy.
12-05-2012, 08:31 AM
#6
Registered User

Join Date: Dec 2012
Posts: 2
Likes: 0
Received 0 Likes
on
0 Posts
thanks for the write up. how did the front end feel after installing new front shocks? my entire front end on my 5lug is soft as hell and i'm not sure if i should only change out shocks or coil springs as well. (coil springs for 5lug tacomas are so damn hard to find too)
12-05-2012, 09:01 AM
#7
Registered User
Thread Starter
Join Date: Sep 2012
Posts: 17
Likes: 0
Received 0 Likes
on
0 Posts
I would just do the shocks man. Mine felt WAY better after the shocks and the spacer lift. You can see from the picks the 1" spacer lift on the front ended up being more like 3/4" lift on the front, and stiffened it up a little bit.
All in all, the the shocks stopped the swaying and bouncing on the road, and the lift made it slightly stiffer. The ride is much improved. Don't think stiff means rough though. It's not really stiff, just stiffer than before if that makes sense.
The springs themselves seemed fine and were hard as CRAP to crank down with the spring compressor, so I would just not worry about the springs or just do a 1" spacer. Anything more than 1" is going to mess up you ride and geometry.
I definitely like the KYB Gas Adjusts, something like that or the more expensive Bilsteins would do you great.
Last edited by cwk; 12-05-2012 at 09:04 AM.
Trending Topics
12-05-2012, 01:46 PM
#8
Registered User
Join Date: Dec 2012
Posts: 2
Likes: 0
Received 0 Likes
on
0 Posts
thanks for the tip. i've got the 1.5" daystar spacers and yeah it took me 4 hours to install those spacers because the spring took a ton of force and angles to fit back in. definitely going to upgrade shocks in the next few days becuase my stock shocks are leaking oil. i'm currently looking at the KYB GR2, gas-a-just, and the Bilstein HD's. GR2 is twin tube while the others are monotube and better. i'll most likely sway towards bilsteins and hope that it stiffens the front end up so i dont bottom out and wheel rub on dips while going 5mph.
thanks again for the info and great write-up!
thanks again for the info and great write-up!
12-05-2012, 06:43 PM
#9
Registered User
Thread Starter
Join Date: Sep 2012
Posts: 17
Likes: 0
Received 0 Likes
on
0 Posts
Cool man, good luck with the shocks. It definitely took me a while to put the spacers in, wiggling around that stupid spring compressor and messing around with the jack.
Glad it helped someone!
Glad it helped someone!
 11-01-2013, 02:05 AM
#11
Registered User
Thread Starter
Join Date: Sep 2012
Posts: 17
Likes: 0
Received 0 Likes
on
0 Posts
I lost very little mpg, you might lose more. I was getting 25 on a steady basis now it's usually 24, unless I've got the bed full of tools then its 21.
My speedo is 10% low, so 60mph is actually 66mph (60*1.1). I tracked over 1000 miles with my cruise control on and GPS average speed, plus checking mile markers and speed.
My odometer is off by 14%, not sure why they're different. So when it reads 250, it's 250*1.14=285. I don't worry about the overall odo, just the trip meter.
Coil springs still riding good. Highly recommended!
01-01-2014, 07:32 PM
#12
Registered User

Join Date: Dec 2013
Posts: 20
Likes: 0
Received 0 Likes
on
0 Posts
Hey, would you mind making me those mounts? I'll purchase them from you. I have a 1990 2wd pickup.
Also, why did you lose out on the mpg? Lifting the rear makes your mpg go lower?
Also, why did you lose out on the mpg? Lifting the rear makes your mpg go lower?
I lost very little mpg, you might lose more. I was getting 25 on a steady basis now it's usually 24, unless I've got the bed full of tools then its 21.
My speedo is 10% low, so 60mph is actually 66mph (60*1.1). I tracked over 1000 miles with my cruise control on and GPS average speed, plus checking mile markers and speed.
My odometer is off by 14%, not sure why they're different. So when it reads 250, it's 250*1.14=285. I don't worry about the overall odo, just the trip meter.
Coil springs still riding good. Highly recommended!
My speedo is 10% low, so 60mph is actually 66mph (60*1.1). I tracked over 1000 miles with my cruise control on and GPS average speed, plus checking mile markers and speed.
My odometer is off by 14%, not sure why they're different. So when it reads 250, it's 250*1.14=285. I don't worry about the overall odo, just the trip meter.
Coil springs still riding good. Highly recommended!
03-31-2014, 07:26 AM
#13
Registered User
Thread Starter
Join Date: Sep 2012
Posts: 17
Likes: 0
Received 0 Likes
on
0 Posts
I apologize for the 3 month later response, I actually don't have access to a welder anymore, that was my landlord's machine.
You probably have done it already by now, but if you haven't just buy the parts and look at welding shops, they should only charge you for an hours work to do all four.
You probably have done it already by now, but if you haven't just buy the parts and look at welding shops, they should only charge you for an hours work to do all four.
03-31-2014, 07:28 AM
#14
Registered User
Thread Starter
Join Date: Sep 2012
Posts: 17
Likes: 0
Received 0 Likes
on
0 Posts
OH and the MPG, after tracking for more time I realized I didn't lose out as much as I thought. It ends up about the same, maybe .5-1 mile per gal difference. Not sure, maybe just the bigger tires and higher truck for more drag?
I think that right after I did this mod I drove for a couple months with my tools in the back, but now I never have them with me (new job with no manual labor)
I think that right after I did this mod I drove for a couple months with my tools in the back, but now I never have them with me (new job with no manual labor)

Thread
Thread Starter
Forum
Replies
Last Post
icentropy
86-95 Trucks & 4Runners
10
07-11-2015 07:21 AM
crashburnoveride
86-95 Trucks & 4Runners
1
07-10-2015 06:39 AM


