TACODOC's 2005 Tacoma Build-Up Thread


 08-26-2011, 05:22 PM
#42
Registered User
Thread Starter
Join Date: Jan 2010
Location: SoCal
Posts: 62
Likes: 0
Received 0 Likes
on
0 Posts
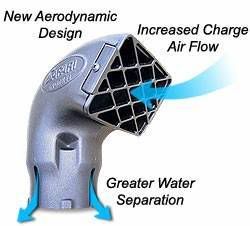
Safari Snorkel Install
Thanks to Kurt at Cruiser Outfitters for helping to make this project possible.
If you need a Safari Snorkel SS135HFD, Kurt is the man to talk to!
See my full write up at Cruiser Outfitters! http://www.cruiseroutfitters.com/tec...o_snorkel.html

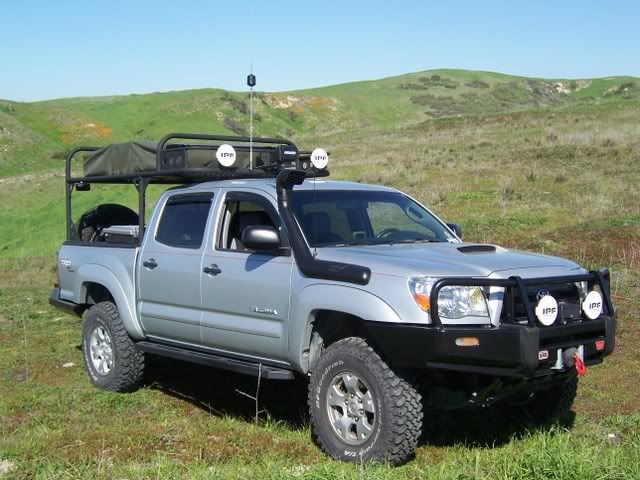
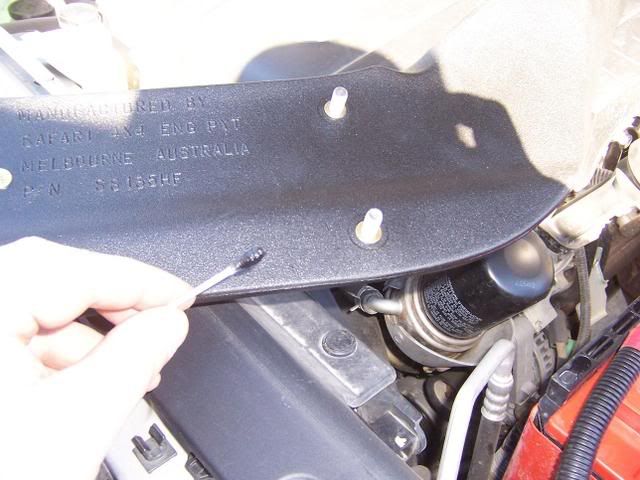
Safari Snorkel SS135HFD
Modified for 2005+ Toyota Tacoma 1GRFE 4.0 Liter-V6
ITEM - DESCRIPTION - QTY - PART NO.
1 BODY-SNORKEL - 1 - 315-133-500
2 1/2" AIR RAM ASSEMBLY - 1 - 000-135-650
3 BRACKET-UPPER MOUNTING - 1 - 315-032-500
4 BOLT-HEX 6mm x 1.0mm x 14mm - 3 - 000-002-100
5 SCREW - S/T 4.2mm x 13mm - 3 - 000-951
6 BODY CLIP - PLASTIC - 3 - 000-960
7 HOSE-AIR ENTRY - 1 - 315-024-500
8 STUD - S/S 8mm x 1.25mm x 25mm O/L - 1 - 000-110
9 WASHER-BODY 8mm x 30mm - 5 - 000-311
10 NUT-NYLOC 8mm x 1.25mm - 5 - 000-205
11 CLAMP-HOSE 70/90mm - 2 - 000-908
12 TEMPLATE - 1 - 315-017-500
13 HOSE CLAMP-SIZE 56 (BLACK) - 1 - 000-914/B
14 JOINER - STEEL - 70mm O.D x 40 - 1 - 315-025-400
15 POP RIVET - 5.0mm x 12mm - 3 - 000-958-300
16 HOSE - RUBBER - 70mm ID x 25mm - 1 - 000-804-100
17 SLEEVE - AIR INLET (SS) - 1 - 315-025-500
PARTS NOT INCLUDED IN THE SS135HFD KIT:
3 foot section of 3 inch Exhaust Pipe (1)
3x3 inch Heavy Duty Rubber Plumbing connector (1)
3 inch hose clamps (2)
4 inch hose clamp (1)
Black Silicone Sealant (RTV)
Silicone spray lubricant
Primer
Touch up paint
NOTE: These parts are all available at your hardware store or auto shop.
Fitment To: Passenger Side Fender / A-Pillar
Fitting Time: 8 Hours (Depending on Skill Level)
Special Tools:
• 92mm hole saw
• 3/8 Drill with assorted drill bits
• Hack saw/air hack saw
• Round file
• Tube bender
Prior to commencing the installation, it is the Installer's responsibility to verify that all components and particularly the template placement (Item 14) are correct!
Ensure you have all parts and tools accounted for before you begin work!
STEP 1
Open hood. Remove the OEM air intake duct from inner fender/engine intake using a screwdriver and 10mm socket/ratchet. Leave intake air filter in place.
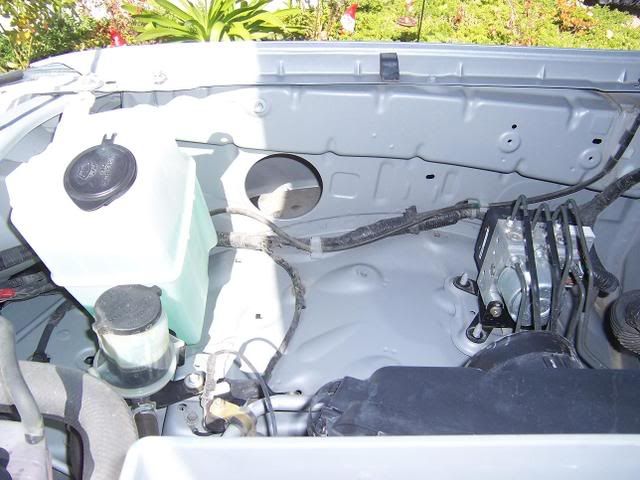
STEP 2
Remove the RHS inner fender liner and the engine air intake duct from engine bay in accordance with the factory service manual.
There are 6 plastic inserts and 2 10mm screws retaining the fender well liner to the inner fender well and fender flare.
From the inside of the engine compartment, remove the plastic inserts carefully using a flat tip screwdriver, popping them out toward the tire. Using a 10mm socket, remove the screws from the edge of the flare and remove the last 2 plastic clips hidden under them.
Fold the liner back out of your way as shown (this will all be re-installed in reverse order later).
STEP 3
Hold the snorkel up to the fender where you want the snorkel to mount, paying special attention to the indentation in the snorkel for the antenna.
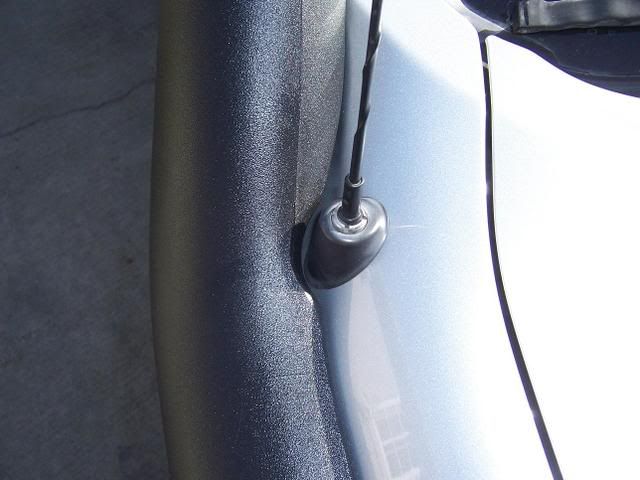
Attach the studs and then mark them with paint.
CAREFULLY (have a buddy help out if possible) hold the snorkel back up where you just had it and lightly touch the painted studs to the sheet metal.
Pay close attention to the antenna indentation mentioned earlier as well as the rake of the snorkel at the windshield and the level appearance of the snorkel on the fender.
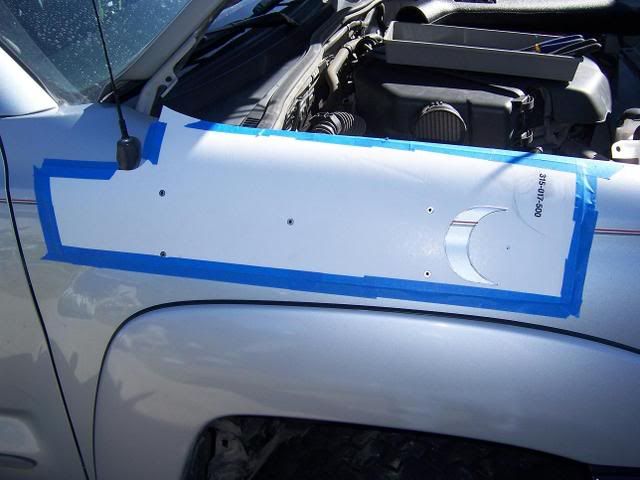
Using the stud marks you have chosen, align your template and firmly tape it on.
Mark all holes and cut-outs with a black marker.
This will mark the location for attaching the template to drill the 5 holes and the use of the 92mm hole saw.
NOTE: This is all necessary as this template is cut out to fit the contours of a HILUX fender and not a TACOMA (see picture for detail).
STEP 4
Using a spring loaded punch, mark the exact location for drilling your 6 pilot holes.
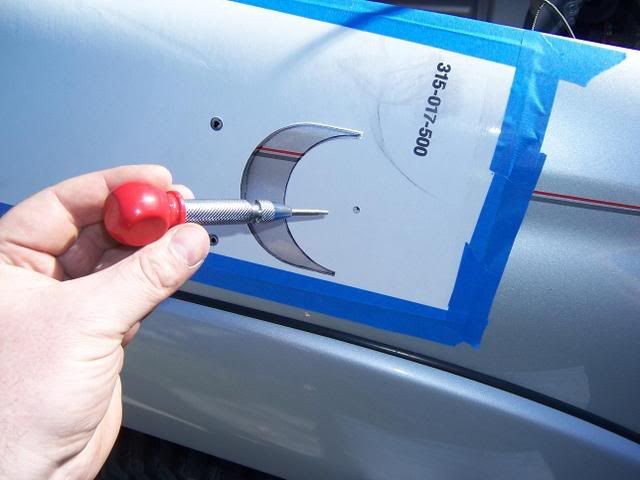
STEP 5
Using a small drill bit, drill pilot holes.
Drill the 5 snorkel mounting stud hole positions to 16mm.
Using the 92mm holesaw, drill the main hole.
Enlarge the main hole with hacksaw as per template cut away section.
Test fit snorkel to fender.
Use round file to adjust any mounting stud holes that are not true for smooth fit (this is not a cause for alarm as studs may protrude slightly irregularly).
De-burr and paint all holes. Allow sufficient drying time.
STEP 6
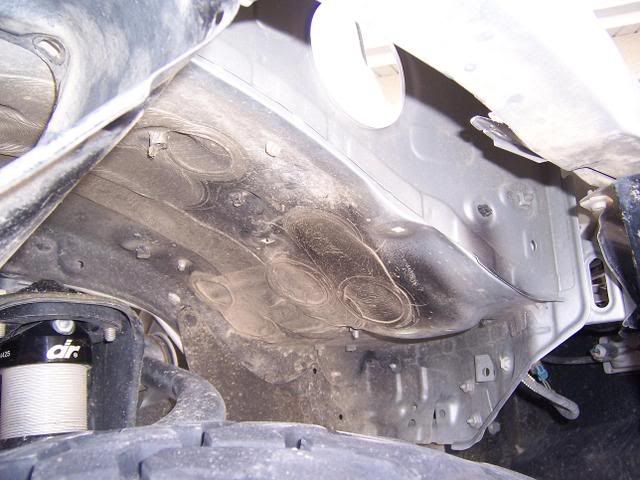
Test fit and trim down the Hose – Air Entry.
It is beneficial to fit this air entry hose to the entire snorkel body assembly and then do a test fit before final install of the snorkel body to the fender.
Pay close attention to the tight fit inside the fender and take your time.
I trimmed about 5 inches+ off mine (an inch at a time!) where it mounts to the snorkel inside the fender. Trim the oval end, DO NOT trim round end!
This is necessary as it is a tight turn inside the fender for the air entry hose to fit through the inner fender well air intake opening.
Once you are satisfied with fit and length, move on to next step.
NOTE: Save a 2 inch wide piece of the air entry hose for use later on the intake.

STEP 7
Carefully mount snorkel to fender using supplied washers and locking nuts.
Start at the front nut and tighten evenly as you go, using a cross pattern.
Install air entry hose on snorkel inside fender and tighten hose clamp for water tight fit.
Re-install inner fender liner, replacing all plastic inserts and the 2 10mm screws at the fender flares.
STEP 8
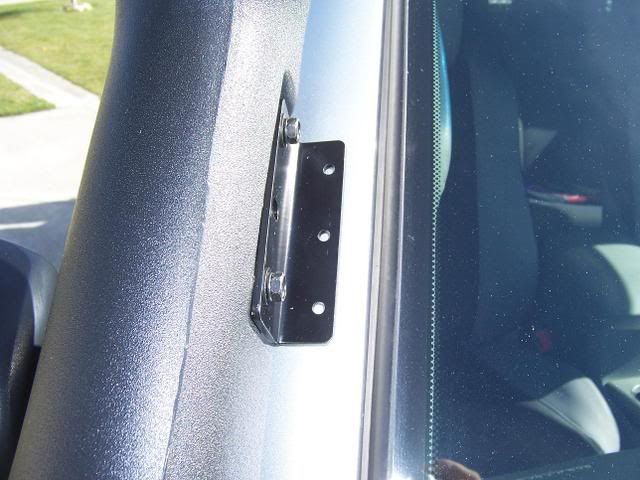
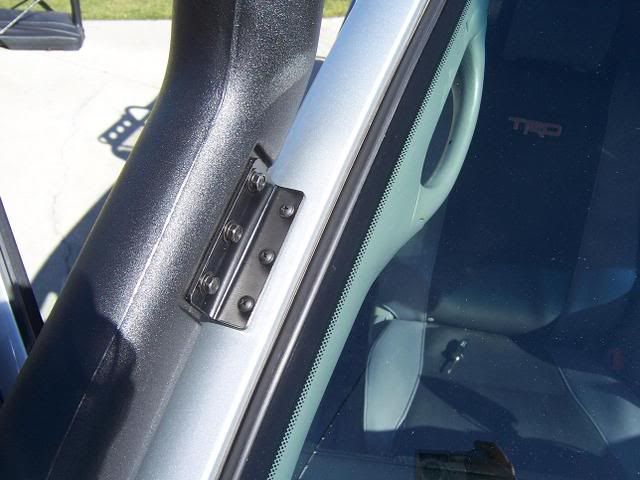
Mount upper bracket to snorkel body using supplied 10mm bolts.
Using bracket as a template, carefully mark 3 screw locations on A-pillar with black marker.
Punch, drill pilot holes and finally drill these out to 8mm.
De-burr and paint. Allow sufficient drying time.
Insert plastic body inserts.
Install all 3 10mm bolts and all 3 screws at A-pillar. DO NOT OVERTIGHTEN!
STEP 9
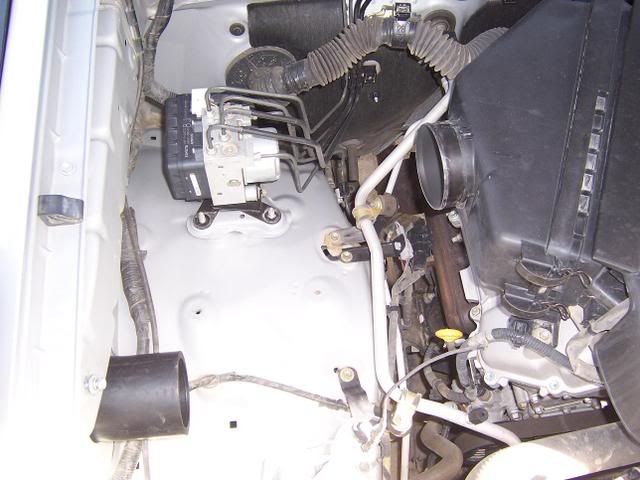
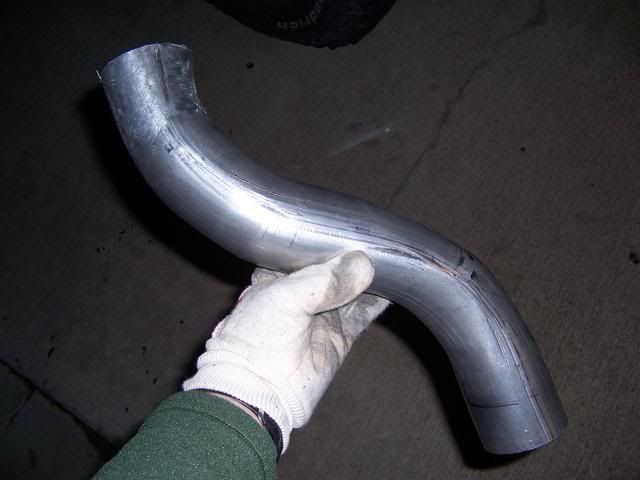
Measure the distance from the rubber snout to the opening on the air filter assembly.
Using a tube bender, carefully bend the 3 inch pipe (Intake Connector) and cut to desired length as shown below.
DO NOT cut the pipe too short, it must insert fully at both ends!
STEP 10
Remove the air cleaner housing and inspect. There are 2 small holes, waterproof these holes by applying the black silicone sealant (RTV). Replace the housing.
Using the 2 inch piece left over from the air entry hose (Step 6), slide this over the end of the Intake Connector and then apply the 3x3 heavy duty rubber plumbing connector over this as shown.
Using the bare metal and of the Intake Connector, lubricate with silicone spray and insert it into the rubber snout at the fender.
Rotate the Intake Connector to the desired angle and, lubricating with silicone spray, insert the rubber connection at the air cleaner housing.
Ensure that angles are good for airflow and then install and tighten the remaining hose clamps (this assembly requires 4 total including the one hidden inside the fender).
NOTE: It is YOUR responsibility to ensure a watertight seal at the 4 clamps – these are the ONLY possible source of leaks so if done right you have no worries!
STEP 11
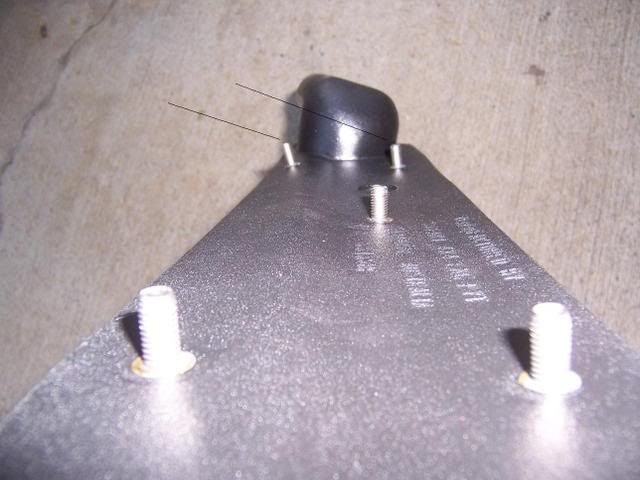
Position the air inlet sleeve (Item No.17, looks like a large washer) onto the snorkel body and secure into position using black silicone (RTV).
The air inlet sleeve functions as a diverter for any ingested water (see pic).
Install air ram assembly and fasten with the black hose clamp provided.
If you need a Safari Snorkel SS135HFD, Kurt is the man to talk to!
See my full write up at Cruiser Outfitters! http://www.cruiseroutfitters.com/tec...o_snorkel.html
Safari Snorkel SS135HFD
Modified for 2005+ Toyota Tacoma 1GRFE 4.0 Liter-V6
DETAILED PARTS LIST
ITEM - DESCRIPTION - QTY - PART NO.
1 BODY-SNORKEL - 1 - 315-133-500
2 1/2" AIR RAM ASSEMBLY - 1 - 000-135-650
3 BRACKET-UPPER MOUNTING - 1 - 315-032-500
4 BOLT-HEX 6mm x 1.0mm x 14mm - 3 - 000-002-100
5 SCREW - S/T 4.2mm x 13mm - 3 - 000-951
6 BODY CLIP - PLASTIC - 3 - 000-960
7 HOSE-AIR ENTRY - 1 - 315-024-500
8 STUD - S/S 8mm x 1.25mm x 25mm O/L - 1 - 000-110
9 WASHER-BODY 8mm x 30mm - 5 - 000-311
10 NUT-NYLOC 8mm x 1.25mm - 5 - 000-205
11 CLAMP-HOSE 70/90mm - 2 - 000-908
12 TEMPLATE - 1 - 315-017-500
13 HOSE CLAMP-SIZE 56 (BLACK) - 1 - 000-914/B
14 JOINER - STEEL - 70mm O.D x 40 - 1 - 315-025-400
15 POP RIVET - 5.0mm x 12mm - 3 - 000-958-300
16 HOSE - RUBBER - 70mm ID x 25mm - 1 - 000-804-100
17 SLEEVE - AIR INLET (SS) - 1 - 315-025-500
PARTS NOT INCLUDED IN THE SS135HFD KIT:
3 foot section of 3 inch Exhaust Pipe (1)
3x3 inch Heavy Duty Rubber Plumbing connector (1)
3 inch hose clamps (2)
4 inch hose clamp (1)
Black Silicone Sealant (RTV)
Silicone spray lubricant
Primer
Touch up paint
NOTE: These parts are all available at your hardware store or auto shop.
Fitment To: Passenger Side Fender / A-Pillar
Fitting Time: 8 Hours (Depending on Skill Level)
Special Tools:
• 92mm hole saw
• 3/8 Drill with assorted drill bits
• Hack saw/air hack saw
• Round file
• Tube bender
Prior to commencing the installation, it is the Installer's responsibility to verify that all components and particularly the template placement (Item 14) are correct!
Ensure you have all parts and tools accounted for before you begin work!
STEP 1
Open hood. Remove the OEM air intake duct from inner fender/engine intake using a screwdriver and 10mm socket/ratchet. Leave intake air filter in place.
STEP 2
Remove the RHS inner fender liner and the engine air intake duct from engine bay in accordance with the factory service manual.
There are 6 plastic inserts and 2 10mm screws retaining the fender well liner to the inner fender well and fender flare.
From the inside of the engine compartment, remove the plastic inserts carefully using a flat tip screwdriver, popping them out toward the tire. Using a 10mm socket, remove the screws from the edge of the flare and remove the last 2 plastic clips hidden under them.
Fold the liner back out of your way as shown (this will all be re-installed in reverse order later).
STEP 3
Hold the snorkel up to the fender where you want the snorkel to mount, paying special attention to the indentation in the snorkel for the antenna.
Attach the studs and then mark them with paint.
CAREFULLY (have a buddy help out if possible) hold the snorkel back up where you just had it and lightly touch the painted studs to the sheet metal.
Pay close attention to the antenna indentation mentioned earlier as well as the rake of the snorkel at the windshield and the level appearance of the snorkel on the fender.
Using the stud marks you have chosen, align your template and firmly tape it on.
Mark all holes and cut-outs with a black marker.
This will mark the location for attaching the template to drill the 5 holes and the use of the 92mm hole saw.
NOTE: This is all necessary as this template is cut out to fit the contours of a HILUX fender and not a TACOMA (see picture for detail).
STEP 4
Using a spring loaded punch, mark the exact location for drilling your 6 pilot holes.
STEP 5
Using a small drill bit, drill pilot holes.
Drill the 5 snorkel mounting stud hole positions to 16mm.
Using the 92mm holesaw, drill the main hole.
Enlarge the main hole with hacksaw as per template cut away section.
Test fit snorkel to fender.
Use round file to adjust any mounting stud holes that are not true for smooth fit (this is not a cause for alarm as studs may protrude slightly irregularly).
De-burr and paint all holes. Allow sufficient drying time.
STEP 6
Test fit and trim down the Hose – Air Entry.
It is beneficial to fit this air entry hose to the entire snorkel body assembly and then do a test fit before final install of the snorkel body to the fender.
Pay close attention to the tight fit inside the fender and take your time.
I trimmed about 5 inches+ off mine (an inch at a time!) where it mounts to the snorkel inside the fender. Trim the oval end, DO NOT trim round end!
This is necessary as it is a tight turn inside the fender for the air entry hose to fit through the inner fender well air intake opening.
Once you are satisfied with fit and length, move on to next step.
NOTE: Save a 2 inch wide piece of the air entry hose for use later on the intake.
STEP 7
Carefully mount snorkel to fender using supplied washers and locking nuts.
Start at the front nut and tighten evenly as you go, using a cross pattern.
Install air entry hose on snorkel inside fender and tighten hose clamp for water tight fit.
Re-install inner fender liner, replacing all plastic inserts and the 2 10mm screws at the fender flares.
STEP 8
Mount upper bracket to snorkel body using supplied 10mm bolts.
Using bracket as a template, carefully mark 3 screw locations on A-pillar with black marker.
Punch, drill pilot holes and finally drill these out to 8mm.
De-burr and paint. Allow sufficient drying time.
Insert plastic body inserts.
Install all 3 10mm bolts and all 3 screws at A-pillar. DO NOT OVERTIGHTEN!
STEP 9
Measure the distance from the rubber snout to the opening on the air filter assembly.
Using a tube bender, carefully bend the 3 inch pipe (Intake Connector) and cut to desired length as shown below.
DO NOT cut the pipe too short, it must insert fully at both ends!
STEP 10
Remove the air cleaner housing and inspect. There are 2 small holes, waterproof these holes by applying the black silicone sealant (RTV). Replace the housing.
Using the 2 inch piece left over from the air entry hose (Step 6), slide this over the end of the Intake Connector and then apply the 3x3 heavy duty rubber plumbing connector over this as shown.
Using the bare metal and of the Intake Connector, lubricate with silicone spray and insert it into the rubber snout at the fender.
Rotate the Intake Connector to the desired angle and, lubricating with silicone spray, insert the rubber connection at the air cleaner housing.
Ensure that angles are good for airflow and then install and tighten the remaining hose clamps (this assembly requires 4 total including the one hidden inside the fender).
NOTE: It is YOUR responsibility to ensure a watertight seal at the 4 clamps – these are the ONLY possible source of leaks so if done right you have no worries!
STEP 11
Position the air inlet sleeve (Item No.17, looks like a large washer) onto the snorkel body and secure into position using black silicone (RTV).
The air inlet sleeve functions as a diverter for any ingested water (see pic).
Install air ram assembly and fasten with the black hose clamp provided.
Last edited by TACODOC; 08-26-2011 at 05:27 PM.


 10-09-2011, 05:54 PM
#46
Registered User
Thread Starter
Join Date: Jan 2010
Location: SoCal
Posts: 62
Likes: 0
Received 0 Likes
on
0 Posts
Bags and bags of trash cleaned up on public lands by volunteers!!!
SoCal Desert Rendezvous 2011, Bradshaw Trail
http://www.expeditionportal.com/foru...ezvous-Cleanup!
Pics by Suntinez and TACODOC!
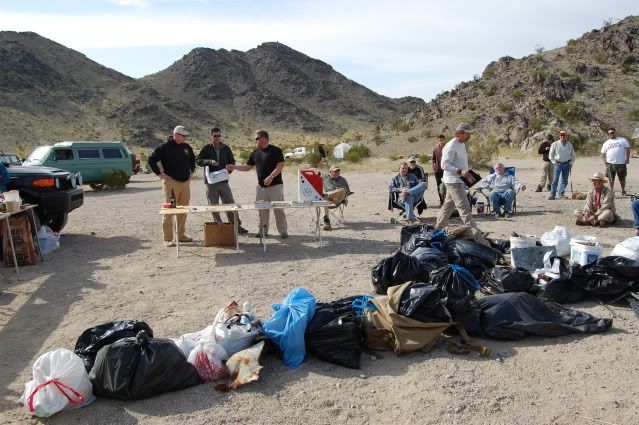
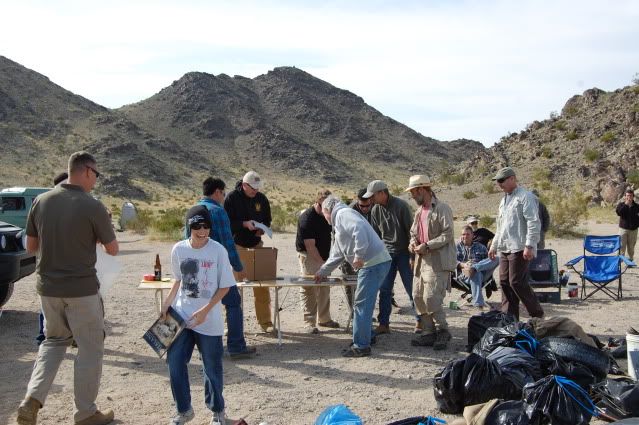
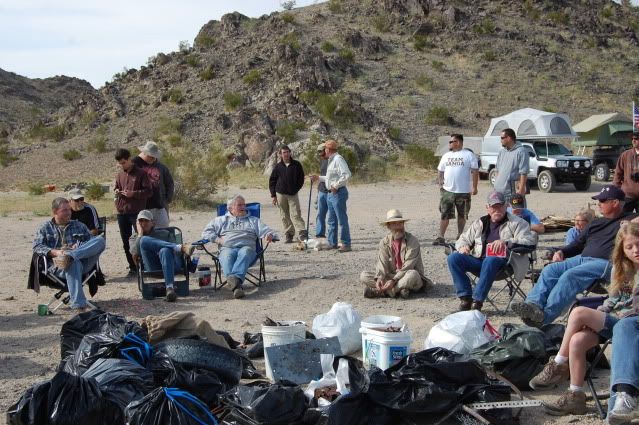
SoCal Desert Rendezvous 2011, Bradshaw Trail
http://www.expeditionportal.com/foru...ezvous-Cleanup!
Pics by Suntinez and TACODOC!
10-09-2011, 05:56 PM
#47
Registered User
Thread Starter
Join Date: Jan 2010
Location: SoCal
Posts: 62
Likes: 0
Received 0 Likes
on
0 Posts
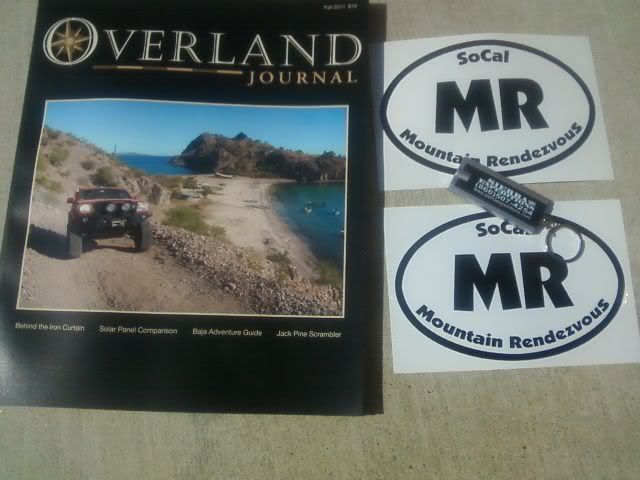
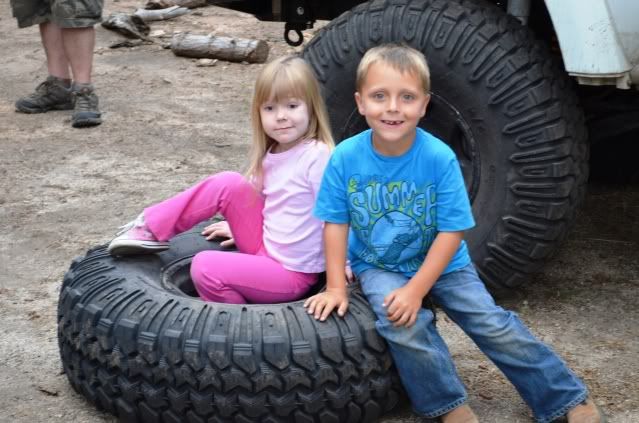
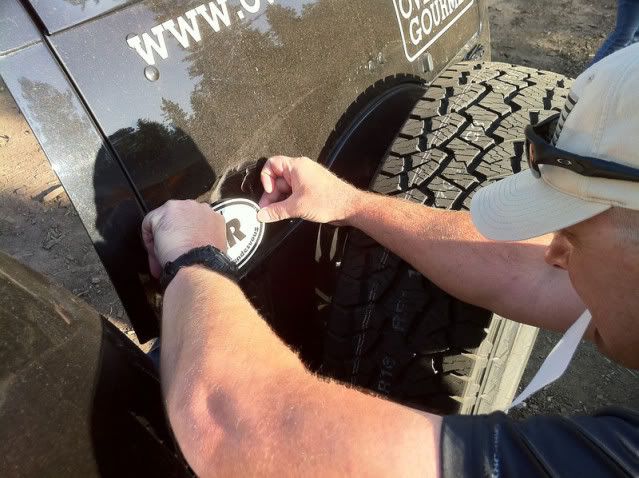
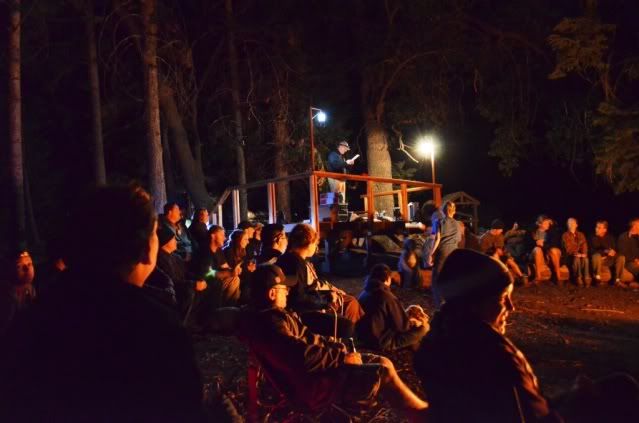
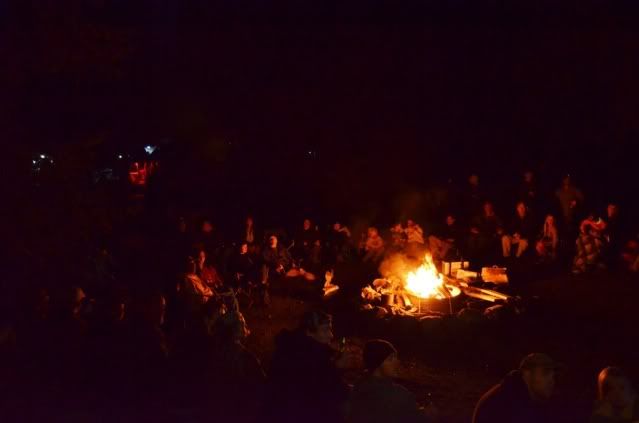
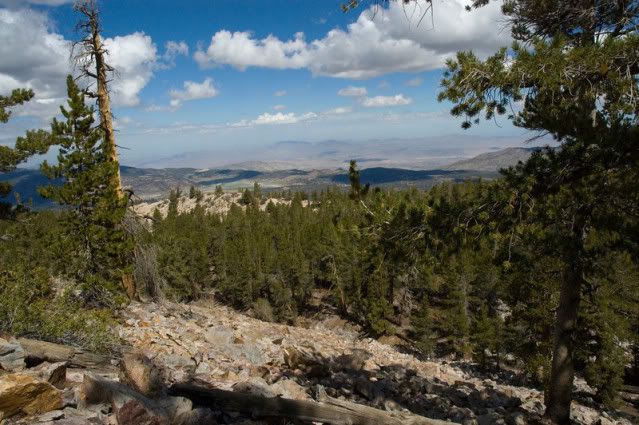
SoCal Mountain Rendezvous 2011, Camp Tahquitz - near Big Bear, CA
What a great event!
Savannah had a great time and made new friends
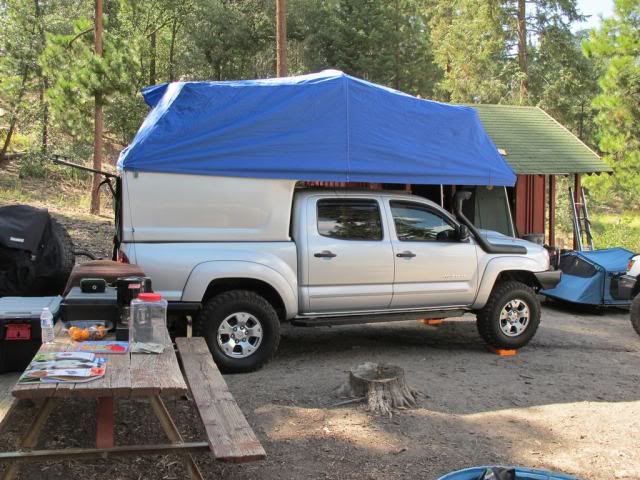
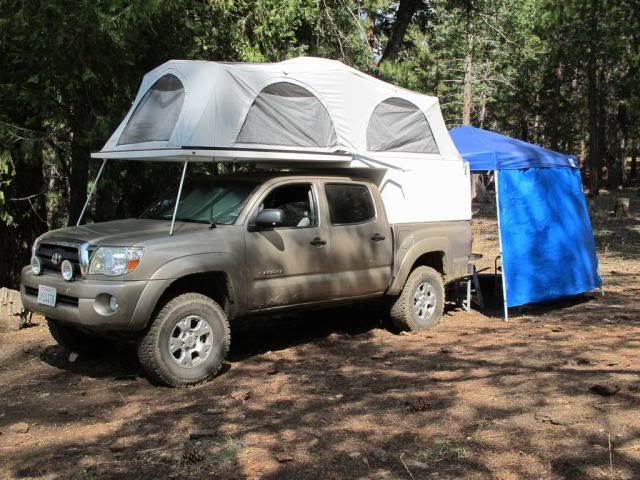
Our setup, ready for rain
gfiero's setup
ETAV8R's setup
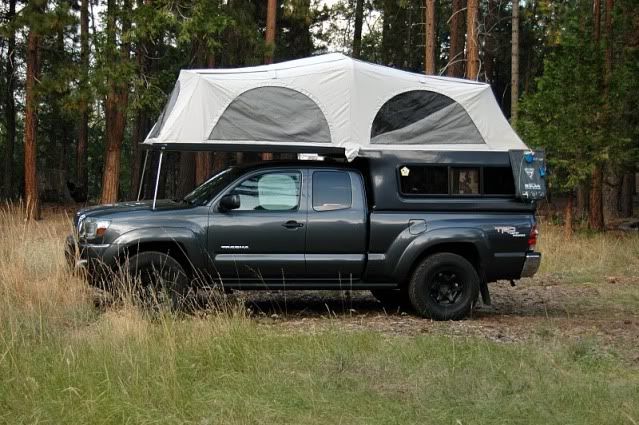
HMR
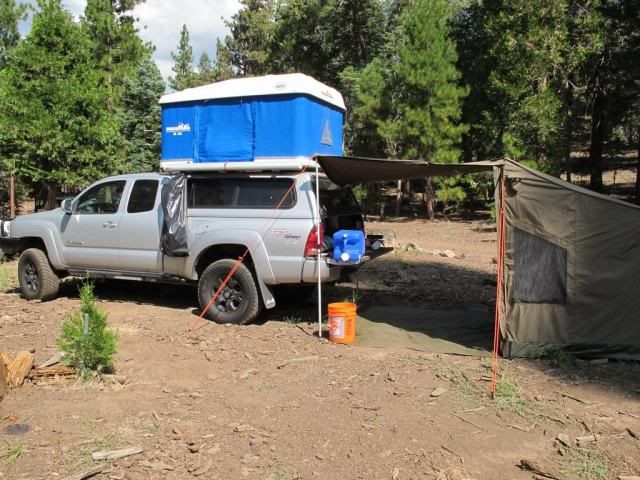
Jeff Wannamog's sweet FWC
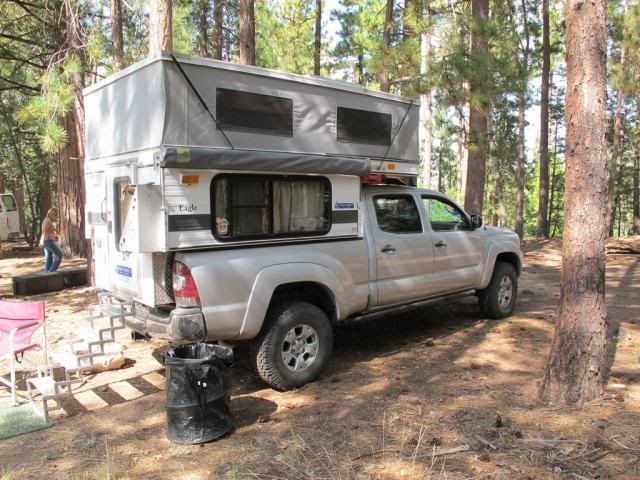
Overland Gourmet
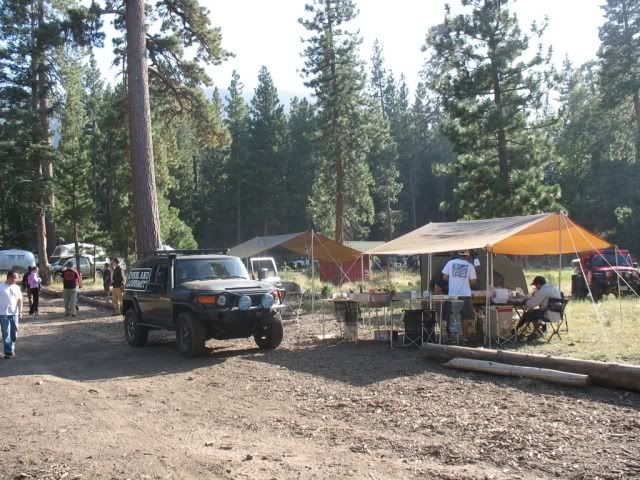
Zach with the goods

Tagging the OG FJC
Oztent central
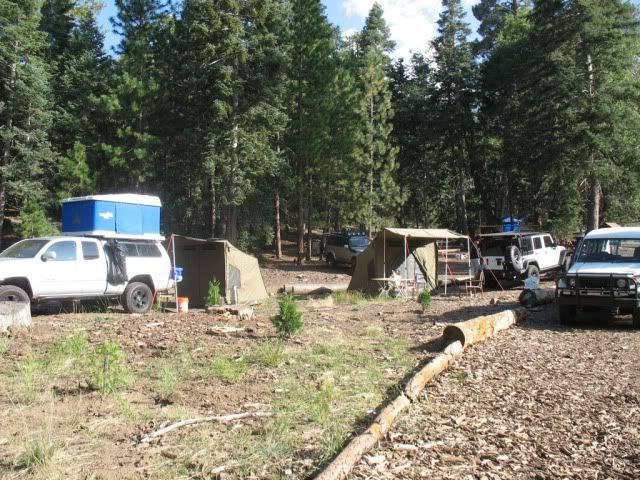
desertrover's Mog

Raffle time!
View from the mountain
Pics shamelessly pirated from the pic thread
Big thanks to all of the community members and industry supporters that made this great event possible, and for all the great pics here!
In no particular order I would like to say a big THANK YOU to:
Gordon!
Zach and Overland Gourmet!
Suntinez!
XJ Mike!
HMR!
Wil and Sierra Expeditions!
FishPOET!
Scott Brady, Brian McVickers and Expeditions West!
Mario and Adventure Trailers!
Dave, Yosh and Trasharoo
Overland Journal
Viking Winchlines
Sierra 4x4 Trailers
Hannibal USA
And all the great PEOPLE who brought food to the POTLUCK and all those who helped with the prep and the serving line for the OG Tacos, it was a HUGE success!
The BSA leaders liked the event and how CLEAN it was afterward. They have graciously offered the use of the property for SoCal Mountain Rendezvous 2012!
Big thanks to all of YOU who attended and made it such a great time :bigbossHL:
Pic thread:
http://www.expeditionportal.com/foru...ure-Thread-***
Event thread:
http://www.expeditionportal.com/foru...endezvous-2011
What a great event!
Savannah had a great time and made new friends
Our setup, ready for rain
gfiero's setup
ETAV8R's setup
HMR
Jeff Wannamog's sweet FWC
Overland Gourmet
Zach with the goods
Tagging the OG FJC
Oztent central
desertrover's Mog
Raffle time!
View from the mountain
Pics shamelessly pirated from the pic thread
Big thanks to all of the community members and industry supporters that made this great event possible, and for all the great pics here!
In no particular order I would like to say a big THANK YOU to:
Gordon!
Zach and Overland Gourmet!
Suntinez!
XJ Mike!
HMR!
Wil and Sierra Expeditions!
FishPOET!
Scott Brady, Brian McVickers and Expeditions West!
Mario and Adventure Trailers!
Dave, Yosh and Trasharoo
Overland Journal
Viking Winchlines
Sierra 4x4 Trailers
Hannibal USA
And all the great PEOPLE who brought food to the POTLUCK and all those who helped with the prep and the serving line for the OG Tacos, it was a HUGE success!
The BSA leaders liked the event and how CLEAN it was afterward. They have graciously offered the use of the property for SoCal Mountain Rendezvous 2012!
Big thanks to all of YOU who attended and made it such a great time :bigbossHL:
Pic thread:
http://www.expeditionportal.com/foru...ure-Thread-***
Event thread:
http://www.expeditionportal.com/foru...endezvous-2011
10-18-2011, 12:25 PM
#48
Registered User
Thread Starter
Join Date: Jan 2010
Location: SoCal
Posts: 62
Likes: 0
Received 0 Likes
on
0 Posts
Something wicked this way comes!
A little love from Icon Vehicle Dynamics... stay tuned!  http://www.iconvehicledynamics.com/s...-%252b-Tacoma/
http://www.iconvehicledynamics.com/s...-%252b-Tacoma/
10-25-2011, 07:33 PM
#49
Registered User
Thread Starter
Join Date: Jan 2010
Location: SoCal
Posts: 62
Likes: 0
Received 0 Likes
on
0 Posts
Icon 2.0 Remote Reservoir: Field Install
We threw these on at the Overland Rally in Hollister.
Out with the old and in with the new... OME's with almost 50K and still good.
Totally stoked with this upgrade!
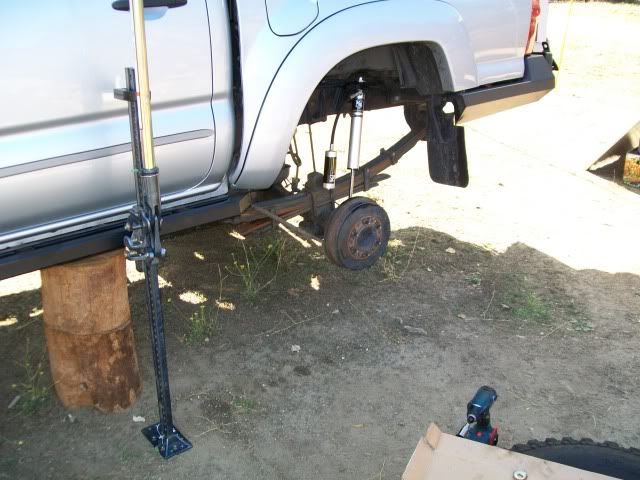
Bottle jack to get that bottom bolt in
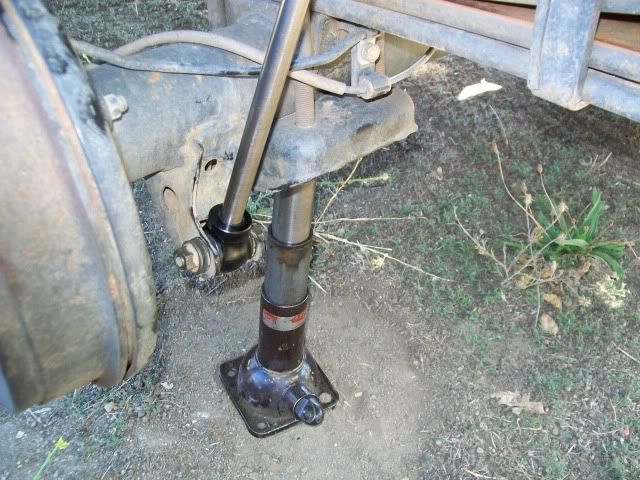
Hi-Lift and blocks for safety
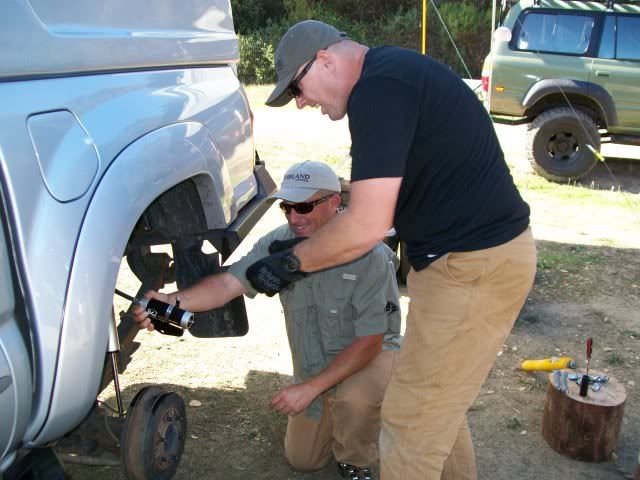
Big thanks to Chris (Tacovendor) for lending a hand and just being a really COOL guy to work with - THANKS CHRIS!!!
Drilling frame for resi mounts

Mission accomplished!
And a BIG thanks to Jeremy at Icon Vehicle Dynamics!!!
Out with the old and in with the new... OME's with almost 50K and still good.
Totally stoked with this upgrade!
Bottle jack to get that bottom bolt in
Hi-Lift and blocks for safety
Big thanks to Chris (Tacovendor) for lending a hand and just being a really COOL guy to work with - THANKS CHRIS!!!
Drilling frame for resi mounts
Mission accomplished!
And a BIG thanks to Jeremy at Icon Vehicle Dynamics!!!
11-08-2011, 06:31 PM
#52
Registered User
Thread Starter
Join Date: Jan 2010
Location: SoCal
Posts: 62
Likes: 0
Received 0 Likes
on
0 Posts
 11-10-2011, 06:12 PM
#53
Registered User
Thread Starter
Join Date: Jan 2010
Location: SoCal
Posts: 62
Likes: 0
Received 0 Likes
on
0 Posts
Well, I'm at 100K now and I've had the Icon (formerly Donahoe Racing) 2.5 coilovers on the truck for approximately 80K... pretty impressive performance and longevity IMO. The only issue they have had is a small shaft seal leak on the drivers side CO and decreasing response due to needing to to be re-charged.
Next step will be removing the stock upper control arms in preparation for some new for 2011 Icon Tubular Control Arns.
Stay tuned!
Next step will be removing the stock upper control arms in preparation for some new for 2011 Icon Tubular Control Arns.
Stay tuned!
Last edited by TACODOC; 11-18-2011 at 04:32 PM.
11-18-2011, 04:35 PM
#54
Registered User
Thread Starter
Join Date: Jan 2010
Location: SoCal
Posts: 62
Likes: 0
Received 0 Likes
on
0 Posts
Phase II:
COILOVER REBUILD AND UPGRADE: The original Donahoe Racing 2.5 inch coilovers have almost 80K on them, very impressive considering the weight of my truck (5,400 lbs) and the punishing terrain I've taken it across over those 80K. So those came off along with the OEM upper control arms and the old shocks were taken in to Icon for a rebuild.
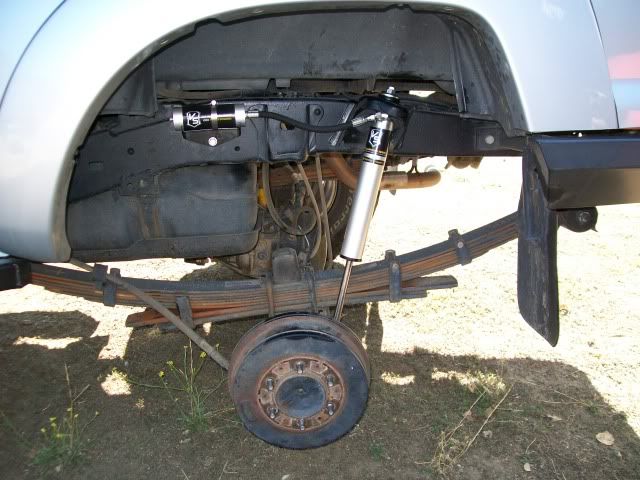
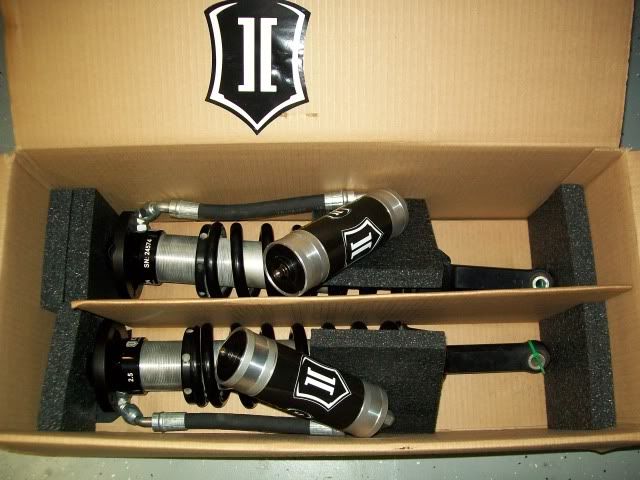
Here's how the coilovers look after rebuild - recapped and upgraded to VS Series 2.5 remote reservoirs!
ICON TUBULAR UPPER CONTROL ARMS: New for 2011 are the 2005+ Tacoma / 2007+ FJ Cruiser Tubular Uniball Upper Control Arms, these are a direct replacement Uniball Upper Control Arm to replace the weak OEM upper arm and is intended to maximize wheel travel, correct caster, and add strength to Independent Front Suspension components.
The Icon 2005+ Tacoma / 2007+ FJ Cruiser Tubular Uniball Upper Control Arm System - 58450 Fits:
2005+ Toyota Tacoma 2wd / 4wd
2007+ Toyota FJ Cruiser 2wd / 4wd
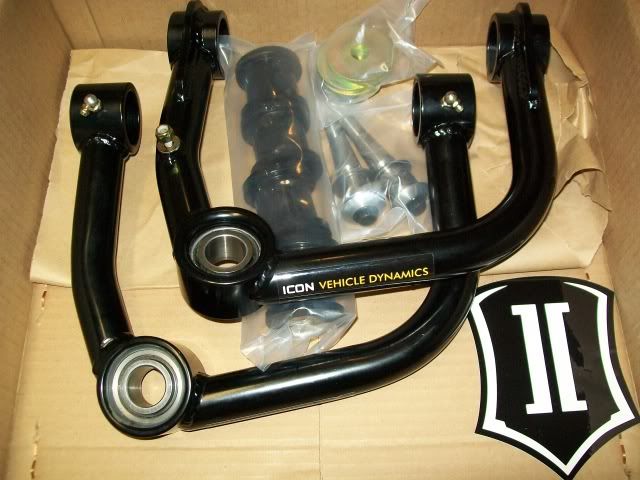
The ICON 2005+ Tacoma / 2007+ FJ Cruiser Tubular Uniball Upper Control Arm System - 58450 are built with the following specifications:
-1026 DOM Seamless Tubing
-CNC Bent Tubing
-CNC Machined Bushing Housings and Sleeves
-4130 CNC Machined Uni-ball Cup
-17-4 High Grade Stainless Steel Uni-ball Adapter Pin
-High Precision CNC Machined Pin Provides OEM Like Fitment
-Professionally Precision Welded
-1" Teflon Lined Uniball
With the combined Icon Vehicle Dynamics 58450 Upper Control Arm and Icon coil over shock package you can obtain 2�+ of lift and 2 of extra droop wheel travel on your 2wd or 4wd Truck. The Tubular Uniball Upper Control Arm System (Part 58450) replaces the OEM factory upper ball joints with a 1" Teflon Lined Uniball. Icon Vehicle Dynamics has designed the arms to maximize droop wheel travel, correct castor, and increase the durability of suspension components when you install Icon coil over shocks or other manufacturers lift systems.
I'll have her all put back together this weekend!
Here's how the coilovers look after rebuild - recapped and upgraded to VS Series 2.5 remote reservoirs!
ICON TUBULAR UPPER CONTROL ARMS: New for 2011 are the 2005+ Tacoma / 2007+ FJ Cruiser Tubular Uniball Upper Control Arms, these are a direct replacement Uniball Upper Control Arm to replace the weak OEM upper arm and is intended to maximize wheel travel, correct caster, and add strength to Independent Front Suspension components.
The Icon 2005+ Tacoma / 2007+ FJ Cruiser Tubular Uniball Upper Control Arm System - 58450 Fits:
2005+ Toyota Tacoma 2wd / 4wd
2007+ Toyota FJ Cruiser 2wd / 4wd
The ICON 2005+ Tacoma / 2007+ FJ Cruiser Tubular Uniball Upper Control Arm System - 58450 are built with the following specifications:
-1026 DOM Seamless Tubing
-CNC Bent Tubing
-CNC Machined Bushing Housings and Sleeves
-4130 CNC Machined Uni-ball Cup
-17-4 High Grade Stainless Steel Uni-ball Adapter Pin
-High Precision CNC Machined Pin Provides OEM Like Fitment
-Professionally Precision Welded
-1" Teflon Lined Uniball
With the combined Icon Vehicle Dynamics 58450 Upper Control Arm and Icon coil over shock package you can obtain 2�+ of lift and 2 of extra droop wheel travel on your 2wd or 4wd Truck. The Tubular Uniball Upper Control Arm System (Part 58450) replaces the OEM factory upper ball joints with a 1" Teflon Lined Uniball. Icon Vehicle Dynamics has designed the arms to maximize droop wheel travel, correct castor, and increase the durability of suspension components when you install Icon coil over shocks or other manufacturers lift systems.
I'll have her all put back together this weekend!
11-20-2011, 07:19 PM
#55
Registered User
Thread Starter
Join Date: Jan 2010
Location: SoCal
Posts: 62
Likes: 0
Received 0 Likes
on
0 Posts
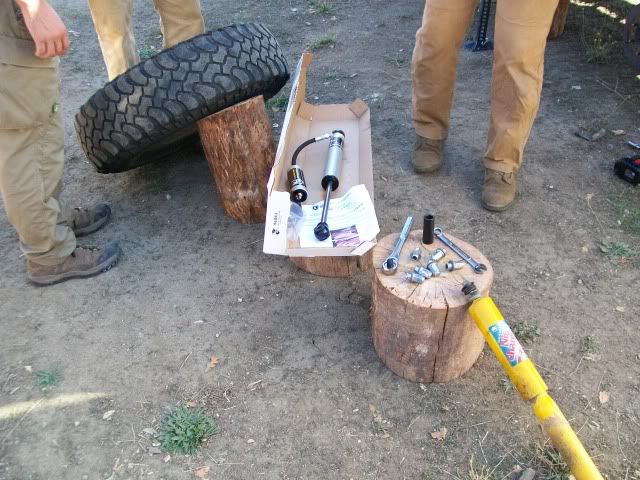
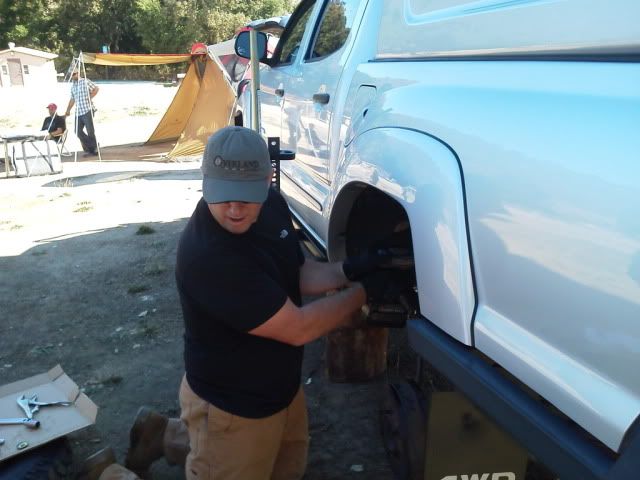
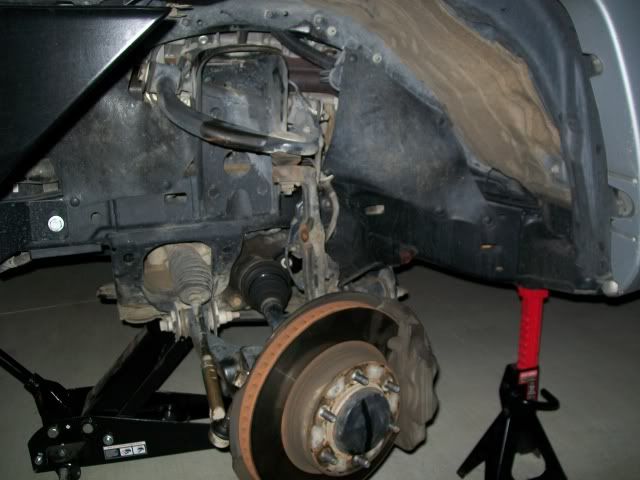
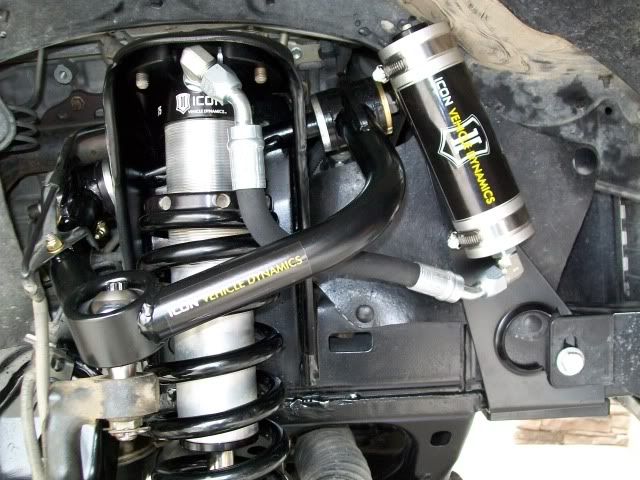
Installed the UCA's and shocks today, these things are amazingly high quality.
Area prepped
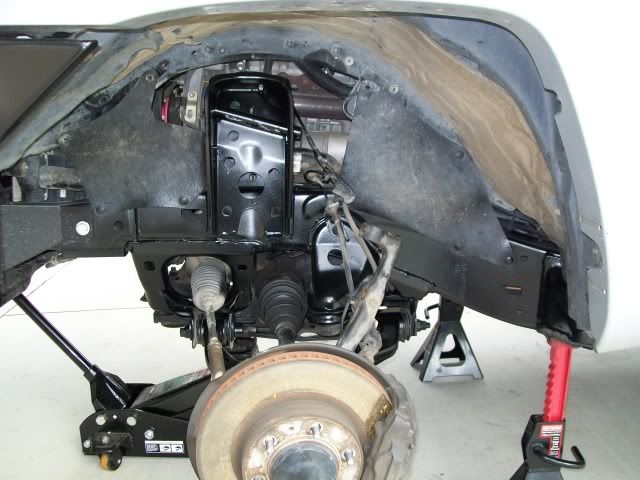
First some grease on the bushings. It's nice that these UCA mounts have zerks.
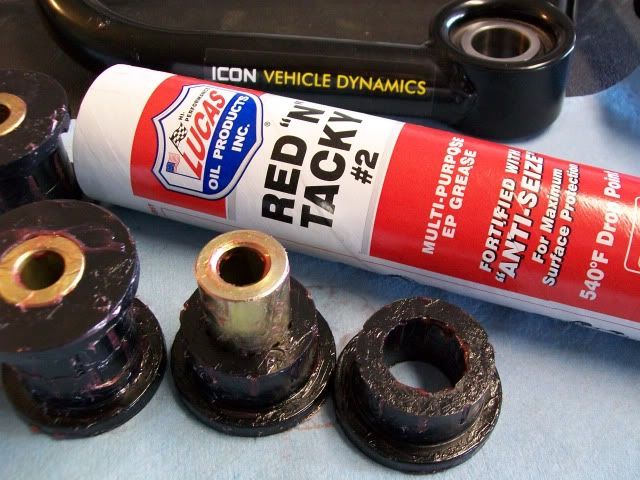
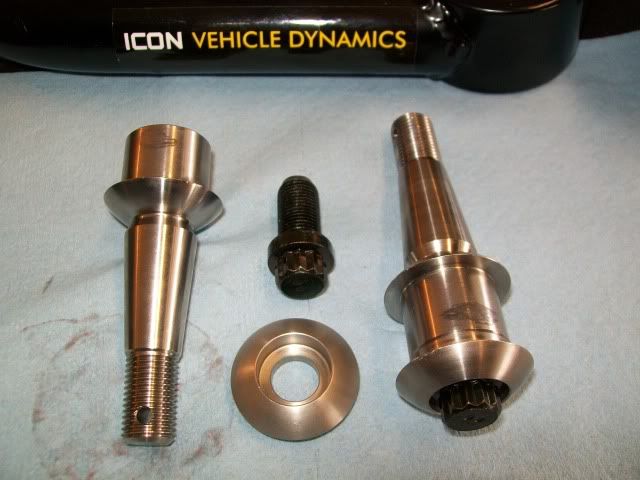
High quality tapers. These UCA's are completely rebuildable.
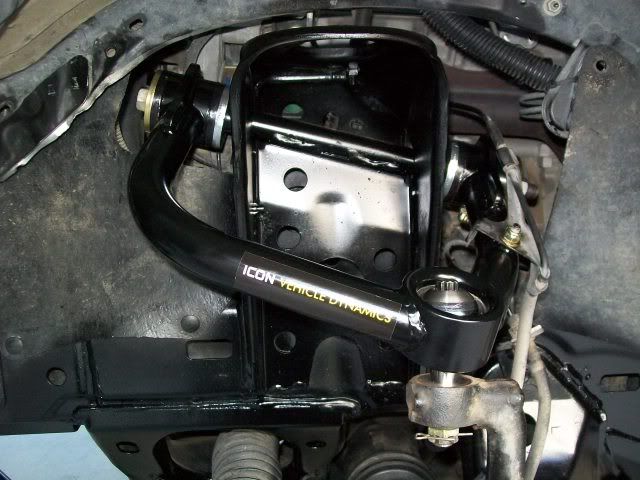
Arms installed, notice the sheet metal had to be bent back about 1/2 inch on both sides to clear the looong bolt. It was easy.
Shocks ready to go on with all the tools needed and red loctite
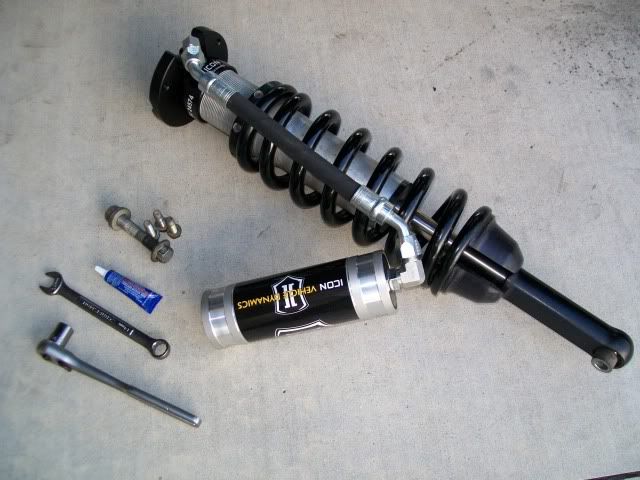
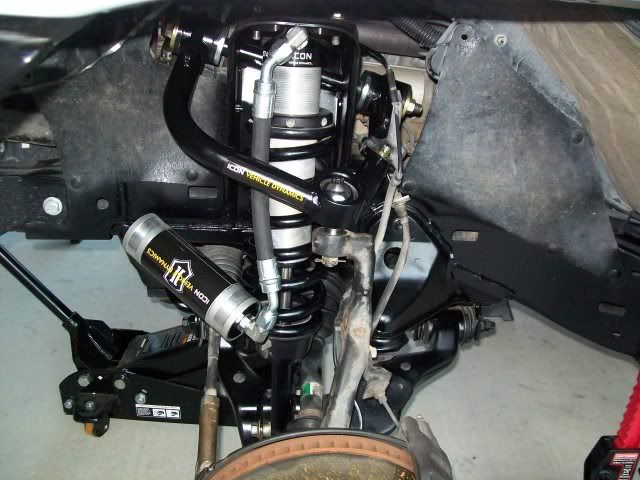
Shocks installed
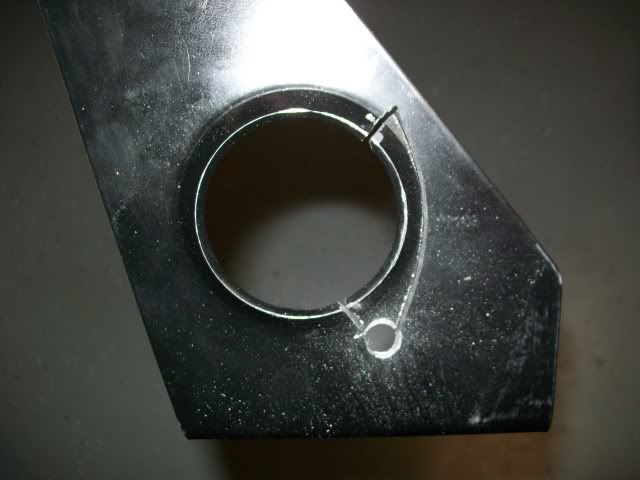
Modifying the remote reservoir brackets to fit with the ARB
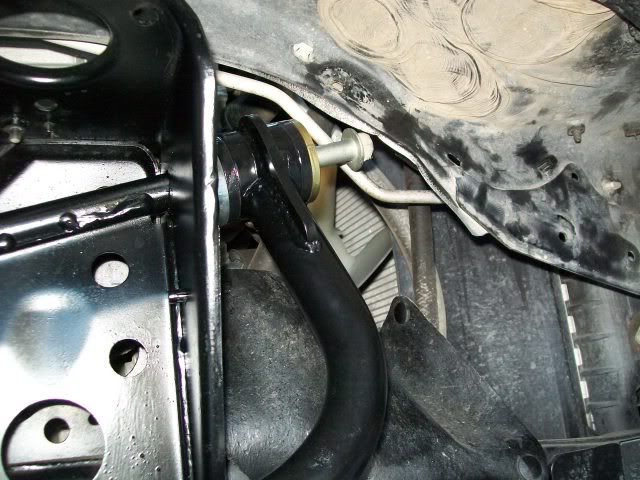
Next up is mounting the brackets and attach the remote reservoirs, re-install swaybar, skids and tires and it's alignment time.
Here's how the bracket looked after I modded it to work with the ARB
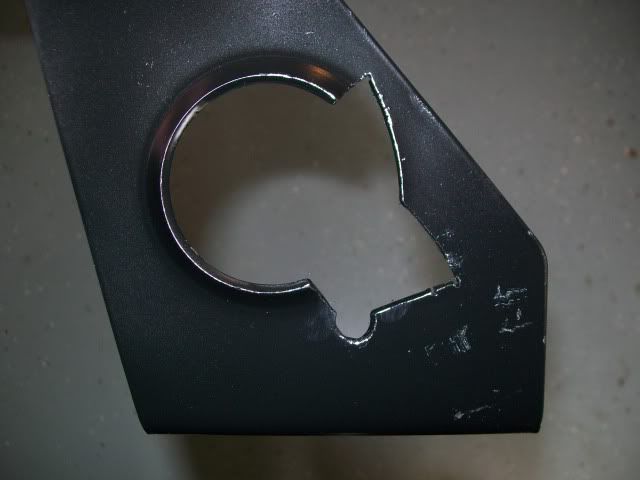
Bracket mounted. Note how the cutout was made to allow the ARB bracket bolt to pass through and how the Icon bracket is sandwiched between the frame, the ARB bracket and the sway bar relocation blocks underneath.
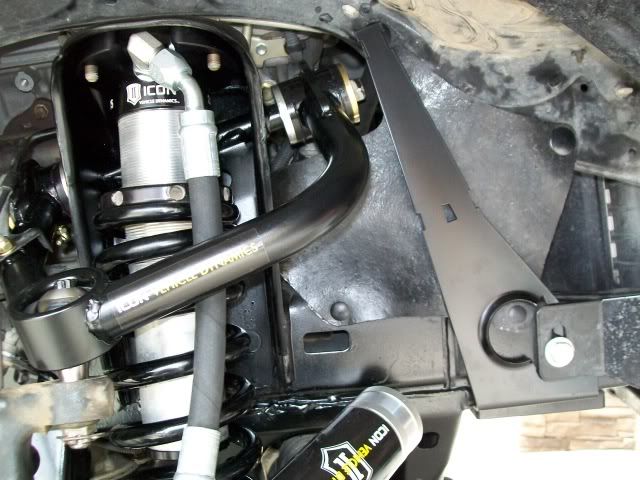
Icon 2.5 Reservoir mounted with hose clamps. Coilover set for 3 inches of lift.
Took it down for an alignment after I had everything back together. Obviously it was way out of spec - see the numbers, before and actual (after).
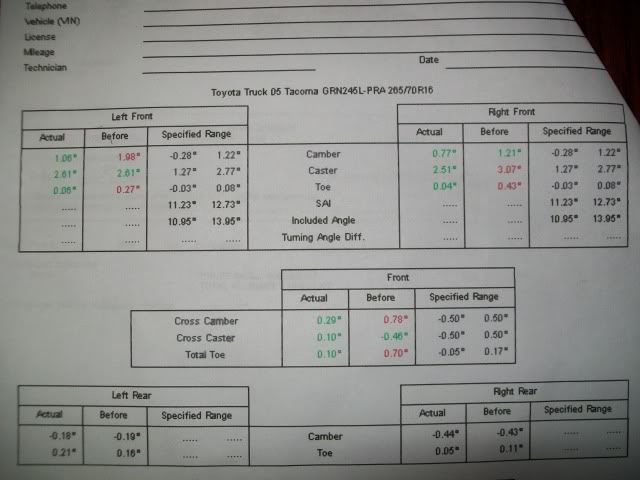
The ride is noticeably more plush now, and the annoying vibration in the steering wheel at 45-50mph is gone now. This setup should give a much higher level of performance than I have known previously and I'm very excited to hit the trail!
Area prepped
First some grease on the bushings. It's nice that these UCA mounts have zerks.
High quality tapers. These UCA's are completely rebuildable.
Arms installed, notice the sheet metal had to be bent back about 1/2 inch on both sides to clear the looong bolt. It was easy.
Shocks ready to go on with all the tools needed and red loctite
Shocks installed
Modifying the remote reservoir brackets to fit with the ARB
Next up is mounting the brackets and attach the remote reservoirs, re-install swaybar, skids and tires and it's alignment time.
Here's how the bracket looked after I modded it to work with the ARB
Bracket mounted. Note how the cutout was made to allow the ARB bracket bolt to pass through and how the Icon bracket is sandwiched between the frame, the ARB bracket and the sway bar relocation blocks underneath.
Icon 2.5 Reservoir mounted with hose clamps. Coilover set for 3 inches of lift.
Took it down for an alignment after I had everything back together. Obviously it was way out of spec - see the numbers, before and actual (after).
The ride is noticeably more plush now, and the annoying vibration in the steering wheel at 45-50mph is gone now. This setup should give a much higher level of performance than I have known previously and I'm very excited to hit the trail!

 12-15-2011, 08:39 AM
#57
Registered User
Thread Starter
Join Date: Jan 2010
Location: SoCal
Posts: 62
Likes: 0
Received 0 Likes
on
0 Posts
YOTATECH EXCLUSIVE!
I'd like to announce my new website: www.tacodoc.com
The site is dedicated to 4WD Toyota Tech and Overland Adventure. Here I will feature tech, trips, events, contributors articles and builds as well as exclusive content from leading outfitters and overland industry news.
We are committed to Tread Lightly and promoting trips, meets, and events in CA, NV, AZ, Baja and beyond � stay tuned!
I haven't posted this anywhere but here on YotaTech (yet) since the site is in it's infancy and I'm testing the waters but I'd like to hear your feedback - feel free to shoot me a PM with your comments!
Thanks,
Doc
09-22-2012, 03:52 PM
#58
Registered User
Thread Starter
Join Date: Jan 2010
Location: SoCal
Posts: 62
Likes: 0
Received 0 Likes
on
0 Posts
The Mountain Rendezvous is really gaining alot of steam this year and looks to be our best outing to date. Between raising some cash for the Boy Scouts, the Mountain Challenge, the raffle, the meal sponsored by Tembo Tusk and laid down by OVG and happy hour this is going to be HUGE!
2012 SoCal Mountain Rendezvous thread on Expedition Portal: http://www.expeditionportal.com/foru...endezvous-2012
Big thanks to the Long Beach Council of the Boy Scouts of America, Tembo Tusk, Overland Gourmet, Adventure Trailers, Bundu Gear, Overland Journal, Trasharoo, Iron Pig Offroad, Sportsmobile, Triple Aught Design, Snow Peak, Demello Offroad, Ursa Minor Vehicles, Allpro Offroad, Expedition Portal and Viking Offroad for jumping onboard to help us make this happen!

Some positive press for the upcoming Rendezvous and Tacodoc.com courtesy of Overland Gourmet: http://overlandgourmet.com/2012/09/s...ndezvous-2012/[/B]
CHECK OUT THE RENDEZVOUS CONSPIRACY ON FACEBOOK! http://www.facebook.com/RendezvousConspiracy
See you in the Mountains!
2012 SoCal Mountain Rendezvous thread on Expedition Portal: http://www.expeditionportal.com/foru...endezvous-2012
Big thanks to the Long Beach Council of the Boy Scouts of America, Tembo Tusk, Overland Gourmet, Adventure Trailers, Bundu Gear, Overland Journal, Trasharoo, Iron Pig Offroad, Sportsmobile, Triple Aught Design, Snow Peak, Demello Offroad, Ursa Minor Vehicles, Allpro Offroad, Expedition Portal and Viking Offroad for jumping onboard to help us make this happen!
Some positive press for the upcoming Rendezvous and Tacodoc.com courtesy of Overland Gourmet: http://overlandgourmet.com/2012/09/s...ndezvous-2012/[/B]
CHECK OUT THE RENDEZVOUS CONSPIRACY ON FACEBOOK! http://www.facebook.com/RendezvousConspiracy
See you in the Mountains!
Last edited by TACODOC; 09-22-2012 at 04:17 PM.
09-22-2012, 03:53 PM
#59
Registered User
Thread Starter
Join Date: Jan 2010
Location: SoCal
Posts: 62
Likes: 0
Received 0 Likes
on
0 Posts
Rhino Teaser
In the booth with the masking just pulled off... flares, doors, sliders and tailgate treatment. 
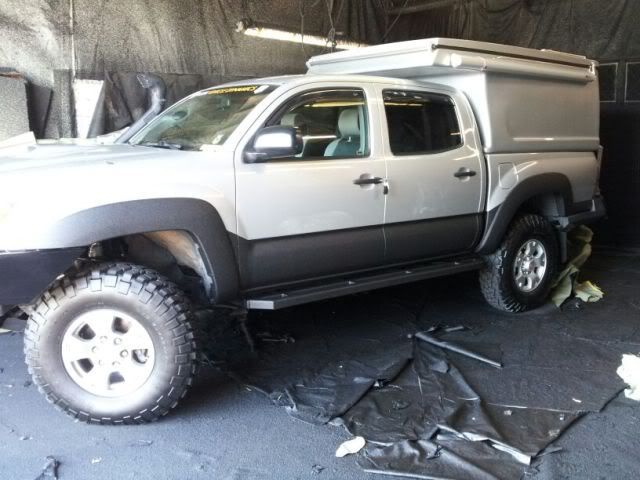

The truck is sprayed with Rhino Liner HardLine: http://liners.rhinolinings.com/en/products/hardline
My decision was based on a few factors, cost obviously a top concern but I also wanted something that could be easily touched up at the dealer. For the sliders my main issue was corrosion proofing, painting them each year was a PITA. If/when they get scratched or gouged I'll touch up the wound with Rust Oleum semi-gloss black, I just wanted 99% of those suckers rust proofed. The frame is coated all along from the front cab mount to the rear wheel well.
I learned a few things along the way like the fact that the UV topcoat needs to be re-sprayed every so often, the Solar Max coating is crazy $$$ like about 10 times as much as HardLine. And you can basically refresh the appearance of HardLine or any of their products with Rhino Shine as needed so spending 10 times as much for the same functional effect was just silly IMO. All of this advice was given to me by the owner who has been a Rhino dealer for over 10 years and knows the product very well, Rhino is based in San Diego BTW so anyone in SoCal may consider that factor as it was important to me to support a local company.
Last edited by TACODOC; 09-22-2012 at 04:01 PM.
09-22-2012, 03:56 PM
#60
Registered User
Thread Starter
Join Date: Jan 2010
Location: SoCal
Posts: 62
Likes: 0
Received 0 Likes
on
0 Posts
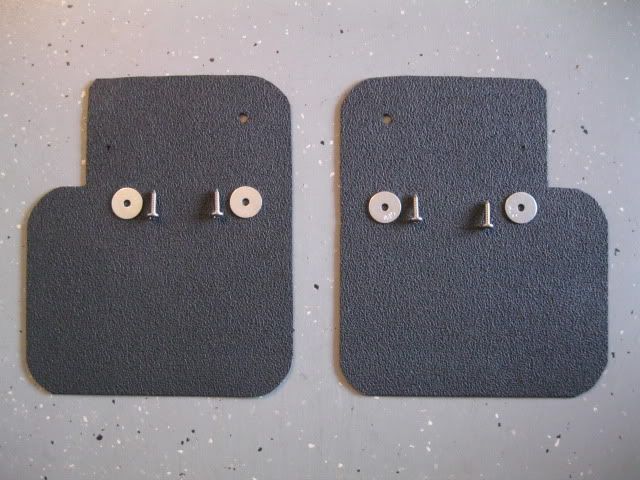
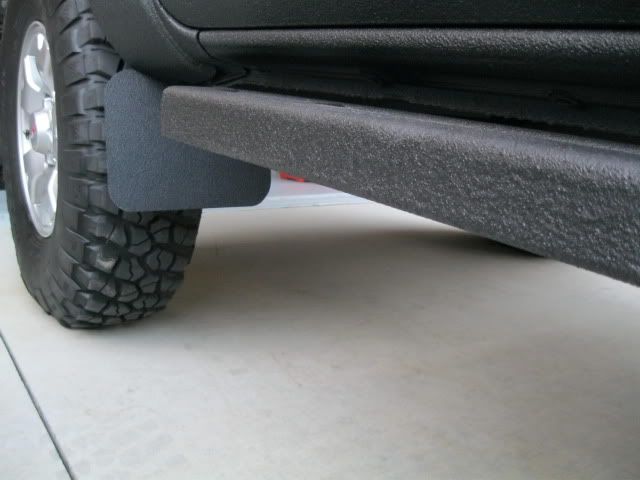
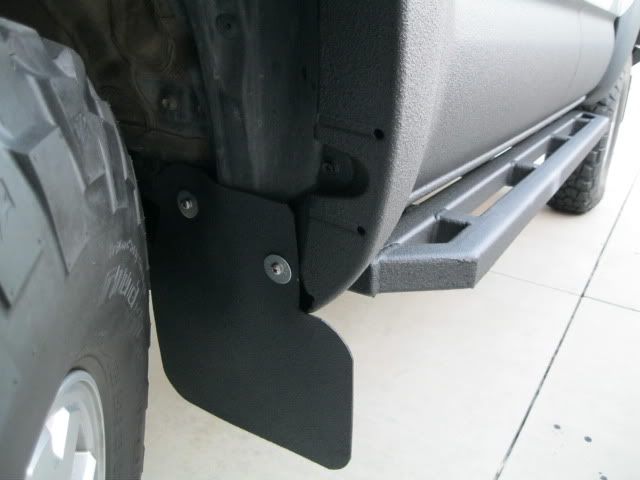
Front Mudflap Mod
I'm tired of sand and rocks and mud hammering my rockers and sliders/steps... Check these out :costumed-smiley-007
Reno Taco sells these on TW:
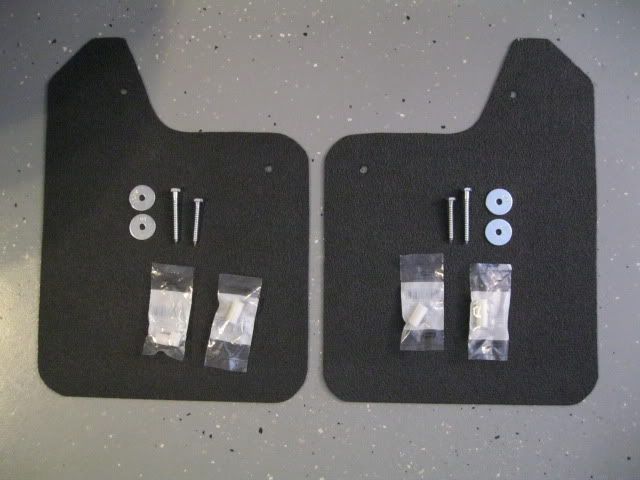
They werent going to work for me (too big) so I modified them to be more off-road friendly. We'll see how they hold up.
Reno Taco sells these on TW:
They werent going to work for me (too big) so I modified them to be more off-road friendly. We'll see how they hold up.


