TPF racing's '04 tacoma build! Picture heavy!
 06-06-2012, 08:53 AM
#1
Registered User
Thread Starter
Join Date: Jun 2003
Location: Las Vegas
Posts: 342
Likes: 0
Received 0 Likes
on
0 Posts
TPF racing's '04 tacoma build! Picture heavy!
We've got a couple of threads on various forums but figured I'd do one here for you guys to follow also if interested. The thread will be updated mulitple times per week typically with updated pictures of the whole build process.
The deal here is... The owner of the truck is a friend of mine located on the east coast. I'm doing the build 99% solo in my garage. We will be racing the truck when finished.
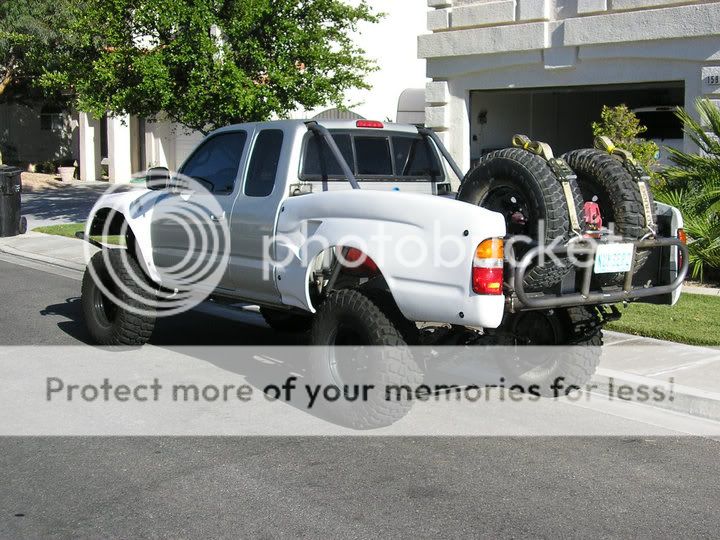
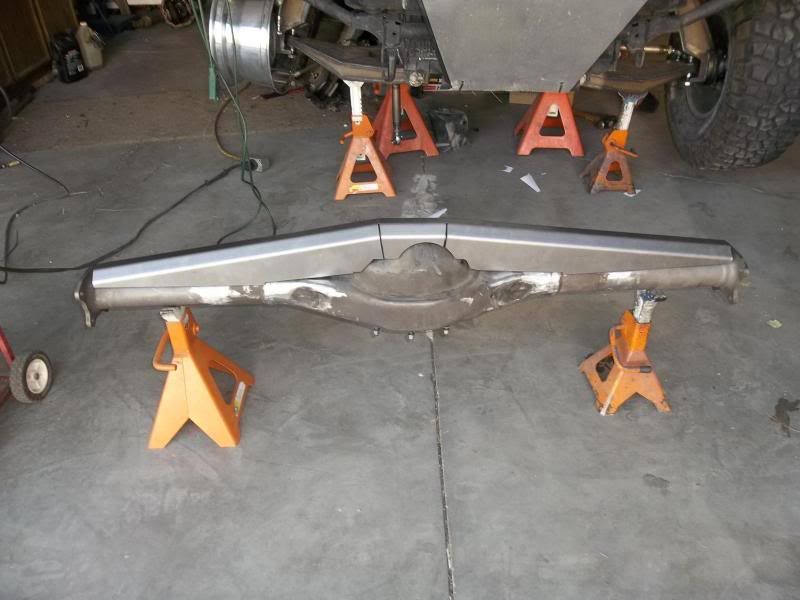
Stats on the truck. '04 tacoma prerunner platform. When finished it will run a custom front suspension built by MCM Fab here in Vegas. Shocks up front will be 2.5" king coilovers and 3" king bypasses. 3.4L V6 will stay relatively stock with just an UMP filter system and headers. Transmission is getting swapped from auto to manual 5 sp. All fiberglass is fiberwerx product including inside dash and center console setup. Brake system is being relocated inside the cab with use of an aftermarket pedal assembly. 32 gallon jaz fuel cell is in the rear. Rear suspension is currently 62" allpro leaf springs using a total chaos spring hanger and shackle kit. Shocks will be 18" king 3" bypass in the rear. Rear axle is a currie housing with 35 spline axles slid into a strange built nodular 3rd with 6.0 gears and a spool. The truck will be sitting on 35" tires but is currently shown on 33's in the pictures to follow.
BTW, this isn't a dream build or dream list, this is happening and a majority of the parts needed for the build and listed above are already on hand and ready to go.
I want to say thanks to Superduty Headquarters (SDHQ) for help and sponsorship.
those are my words above... The following is written by the truck's owner Jason and tells a bit about the history of the project and how it's come about and where it's going.
If you're on facebook look us up and add us... "tpf racing" should get you to the goods!
Enough words, how about some pictures!

The truck when he bought it back in '09.
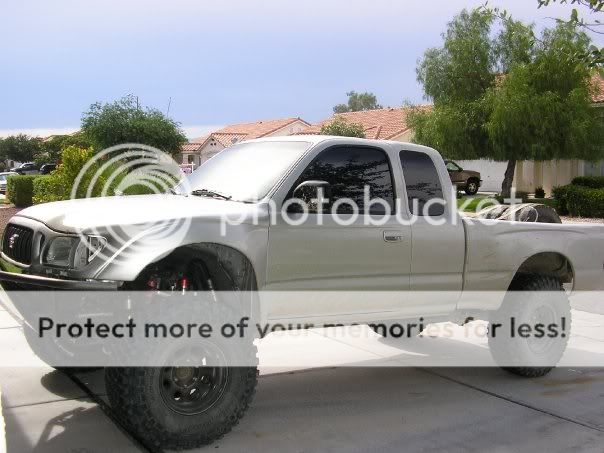
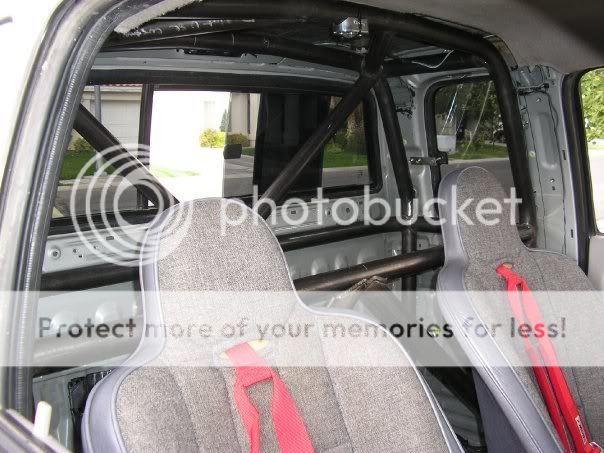
At the time thinking it was going to be a play truck he had a basic cage built in the cab to protect him and his wife/passengers.
He also wanted to customize it a bit to make it more his own so he changed out the fiberglass body work.

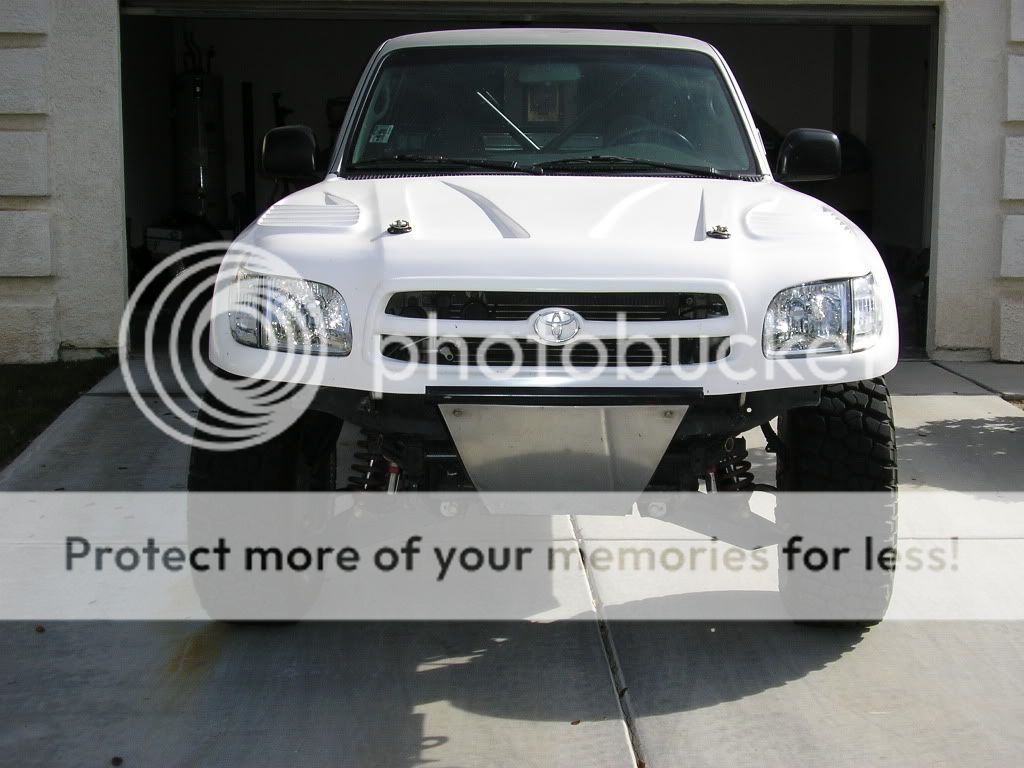
The new front clip forced the old bumper to have to be cut up some so we took it off and built something new.

At this point he came into a set of leaf springs so the truck came to my house and over the coarse of a couple weekends we built a rear cage, installed the new leafs, mounted a fuel cell and hung his bedsides off the cage. At this point the truck was still his daily driver.


The deal here is... The owner of the truck is a friend of mine located on the east coast. I'm doing the build 99% solo in my garage. We will be racing the truck when finished.
Stats on the truck. '04 tacoma prerunner platform. When finished it will run a custom front suspension built by MCM Fab here in Vegas. Shocks up front will be 2.5" king coilovers and 3" king bypasses. 3.4L V6 will stay relatively stock with just an UMP filter system and headers. Transmission is getting swapped from auto to manual 5 sp. All fiberglass is fiberwerx product including inside dash and center console setup. Brake system is being relocated inside the cab with use of an aftermarket pedal assembly. 32 gallon jaz fuel cell is in the rear. Rear suspension is currently 62" allpro leaf springs using a total chaos spring hanger and shackle kit. Shocks will be 18" king 3" bypass in the rear. Rear axle is a currie housing with 35 spline axles slid into a strange built nodular 3rd with 6.0 gears and a spool. The truck will be sitting on 35" tires but is currently shown on 33's in the pictures to follow.
BTW, this isn't a dream build or dream list, this is happening and a majority of the parts needed for the build and listed above are already on hand and ready to go.
I want to say thanks to Superduty Headquarters (SDHQ) for help and sponsorship.
those are my words above... The following is written by the truck's owner Jason and tells a bit about the history of the project and how it's come about and where it's going.
I'm a 37 year old active military guy with a little over 15 years in. My first experience with desert racing was the 1980 Mint 400, and have been a huge fan of the sport ever since. Grew up taking annual family trips to Vegas for Mint tech on Fremont and camping for the race. After high school and a few years of college, I joined the Air Force and moved east and lost a bit of touch with the desert racing scene.
Through a crazy whirlwind of events I ended up stationed back in Vegas in 2005 an reconnected with the sport. In 2009, my wife I and bought a 2004 Tacoma to be my daily driver and weekend play toy. I had a bit of a pipe dream of slow building the truck over a period of years to have it be race legal by the time I would be eligible to retire. In 2010 I got moved to Washington, DC of all places. After some hard thinking, I decided to leave the truck in Vegas with a friend to continue slow building as the truck wouldn't do much good as a daily driver around DC. In spring 2011 I got tagged for a 6 month deployment. With the extra money made and saved on that trip, we decided to fast track our plan and pursue the racing goal sooner rather than later.
As a result, we formed TaxPayer Funded Racing in 2011 with the goal of having the truck ready for it's first race in Fall 2012. The build has been primarily financed by "extra" money I make on deployments and TDY's. We are planning on making the HDRA Parhump race in Ocober of this year our debut. We'll be racing in the leaf sprung Class 2000. My wife and I will be making the cross country commute from DC for race weekends and hope to get in a pair of races this year leading to a full season next year.
Having grown up around racing in the early 80's, I have always respected and admired the rugged, never say die attitude that marked the era. We are approaching our plan with the same mentality, intending to build a solid and reliable truck that can go the distance. Considering the cost and logistics of the cross country commute, we certainly want to do everything we can to get the most fun for our money and have long, productive race weekends. For me personally it's been a 30 year journey from fan to participant and we are excited to be a part of the action regardless of how this all turns out. Appreciate the support and advice from some of the great friends we've made over the last few years and look forward to getting dirty this fall!
If you are so inclined, feel free to check us out and follow our progress on Facebook as we'll be documenting our journey with pictures, video content, etc.
Enough words, how about some pictures!
The truck when he bought it back in '09.
At the time thinking it was going to be a play truck he had a basic cage built in the cab to protect him and his wife/passengers.
He also wanted to customize it a bit to make it more his own so he changed out the fiberglass body work.
The new front clip forced the old bumper to have to be cut up some so we took it off and built something new.
At this point he came into a set of leaf springs so the truck came to my house and over the coarse of a couple weekends we built a rear cage, installed the new leafs, mounted a fuel cell and hung his bedsides off the cage. At this point the truck was still his daily driver.
 06-06-2012, 09:04 AM
#2
Registered User
Thread Starter
Join Date: Jun 2003
Location: Las Vegas
Posts: 342
Likes: 0
Received 0 Likes
on
0 Posts
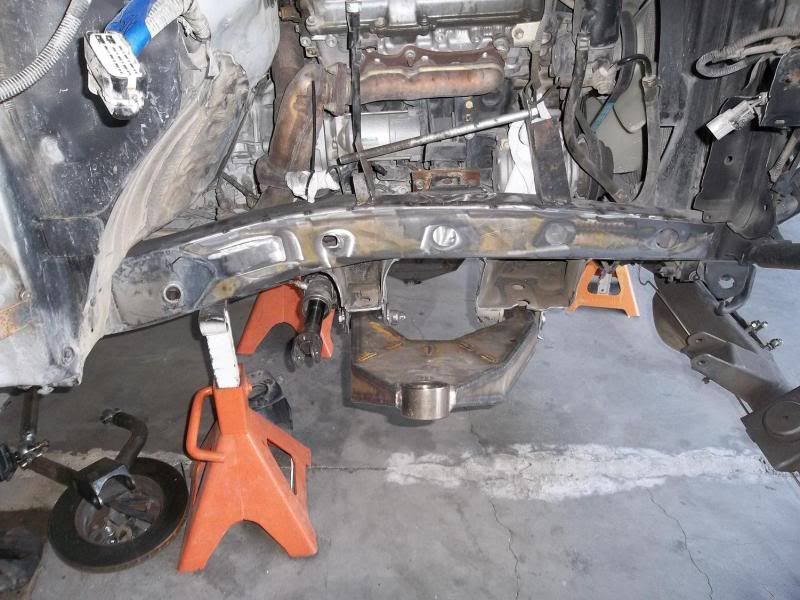
At this point he started using the truck and having fun. As it's shown above it was sitting on a camburg suspension up front with a bolt in Sway a way coilover, bypass and bumps.
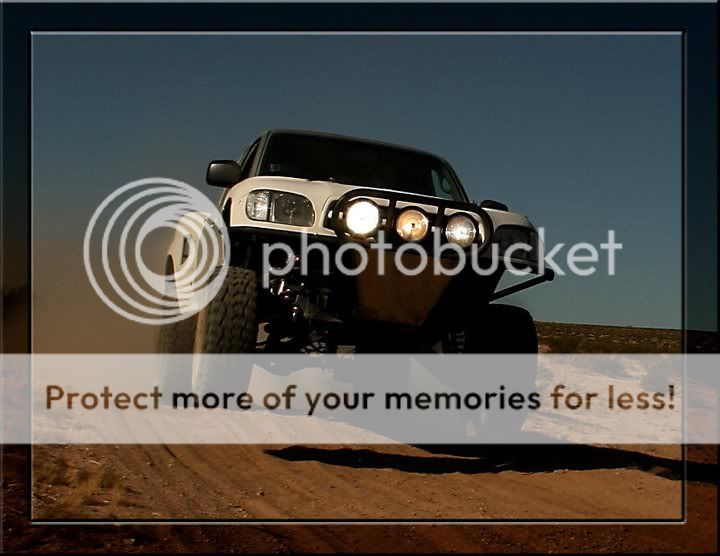
As life happens though, as you read above, he ended up getting relocated to Washington DC. He decided best to leave the truck with me and we'd slowly build it over time. Well that slow build moved to a fast track race truck as seen here in the following pictures bringing you up to where we're at now. We had a MAJOR delay with the front suspension but sometimes good things come to those that wait...
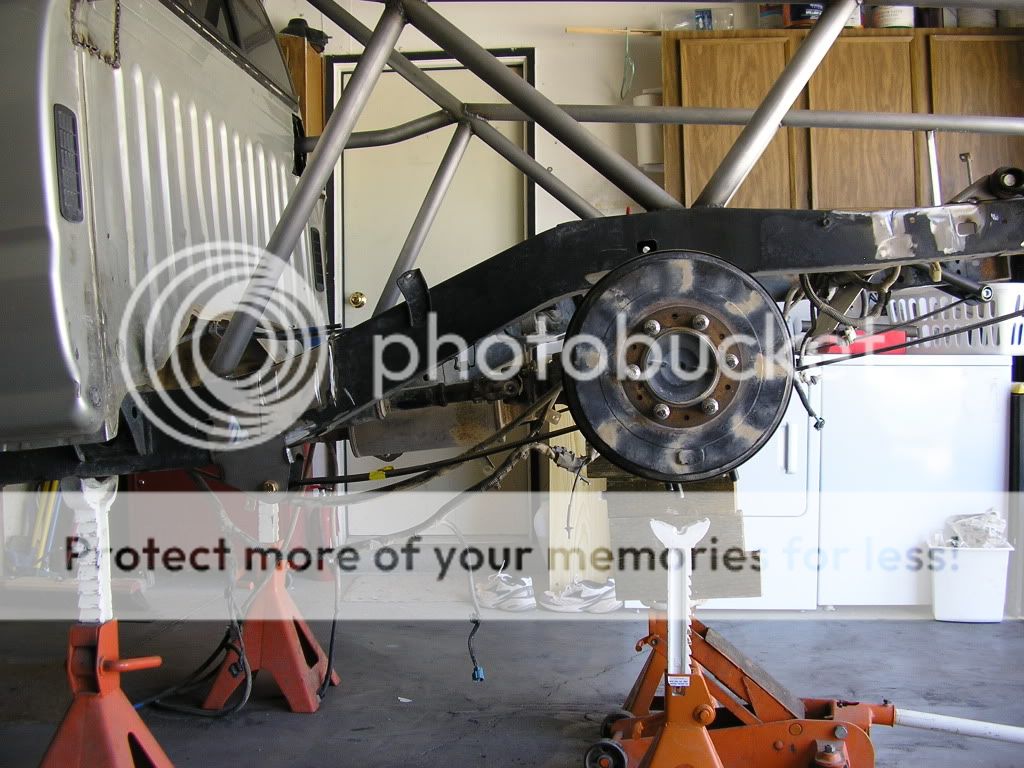
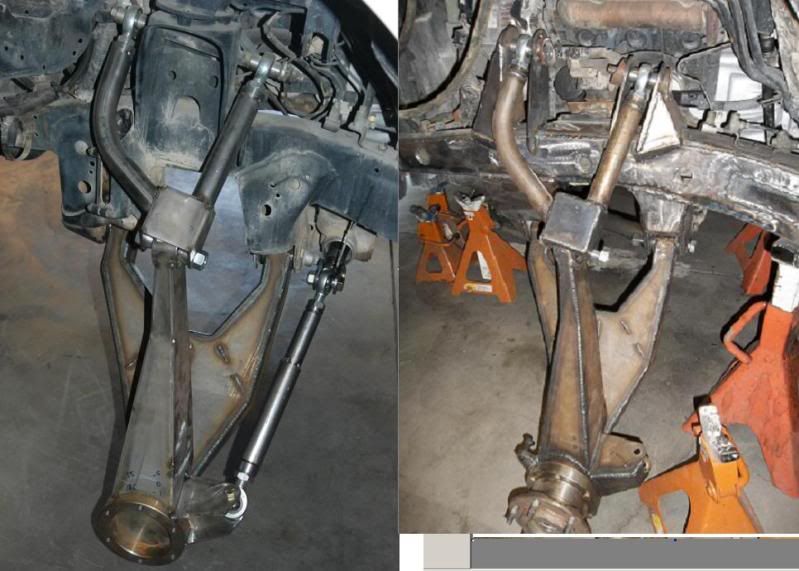
So with Jason on the east coast, the truck got dropped off at MCM fab for a custom front suspension kit. Developement took longer then anticipated but the results speak for themselves. We should be right about 18" of travel up front when all said and done.

One of the cool things about this kit is it's designed around the stock wheel bearings. A lot of people upgrade to crazy expensive hub setups but if you look at the factory toyota stuff it's already MASSIVE so we're running with it. Time will tell if it was the right choice but we're all pretty confident.

As life happens though, as you read above, he ended up getting relocated to Washington DC. He decided best to leave the truck with me and we'd slowly build it over time. Well that slow build moved to a fast track race truck as seen here in the following pictures bringing you up to where we're at now. We had a MAJOR delay with the front suspension but sometimes good things come to those that wait...
So with Jason on the east coast, the truck got dropped off at MCM fab for a custom front suspension kit. Developement took longer then anticipated but the results speak for themselves. We should be right about 18" of travel up front when all said and done.
One of the cool things about this kit is it's designed around the stock wheel bearings. A lot of people upgrade to crazy expensive hub setups but if you look at the factory toyota stuff it's already MASSIVE so we're running with it. Time will tell if it was the right choice but we're all pretty confident.
06-06-2012, 09:34 AM
#3
Registered User
Thread Starter
Join Date: Jun 2003
Location: Las Vegas
Posts: 342
Likes: 0
Received 0 Likes
on
0 Posts
And that brings us to current... Well sorta... The truck returned to me about 2 weeks ago almost to the day. Basically I got the truck back Tues before memorial day weekend.
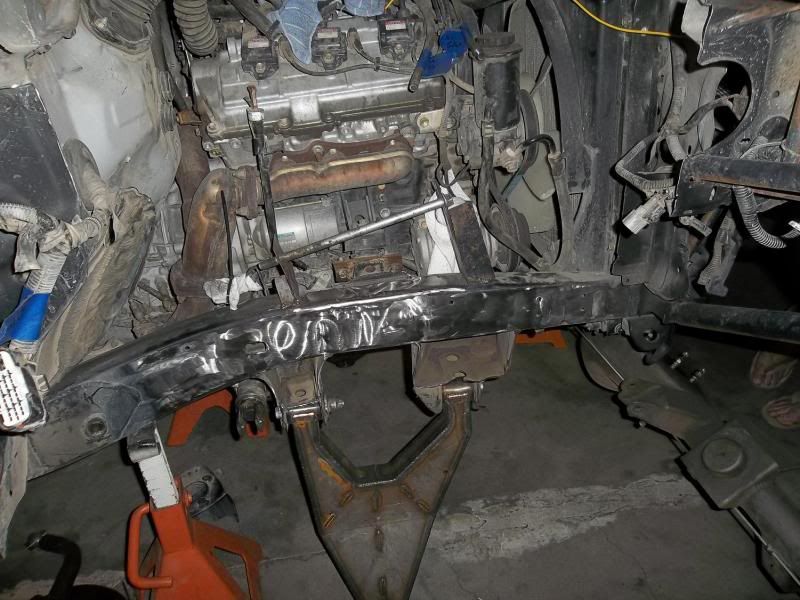
Here's the truck as it sat delivered back to my house. My personal truck which is also home built is parked behind it. It's sitting goofy cause there's no front shocks on the truck so it's sitting on the bumpstops here.


Here it is sitting roughly at ride height in my garage.

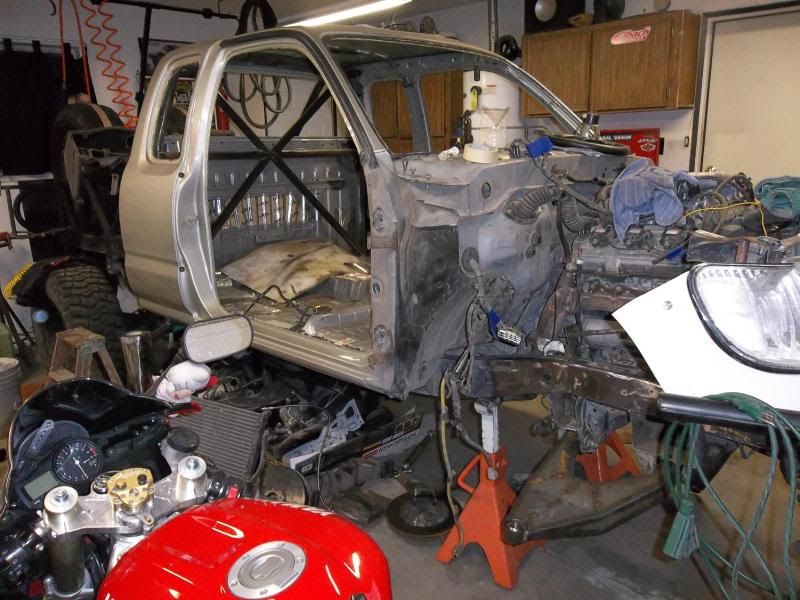
And now the fun begins!!!
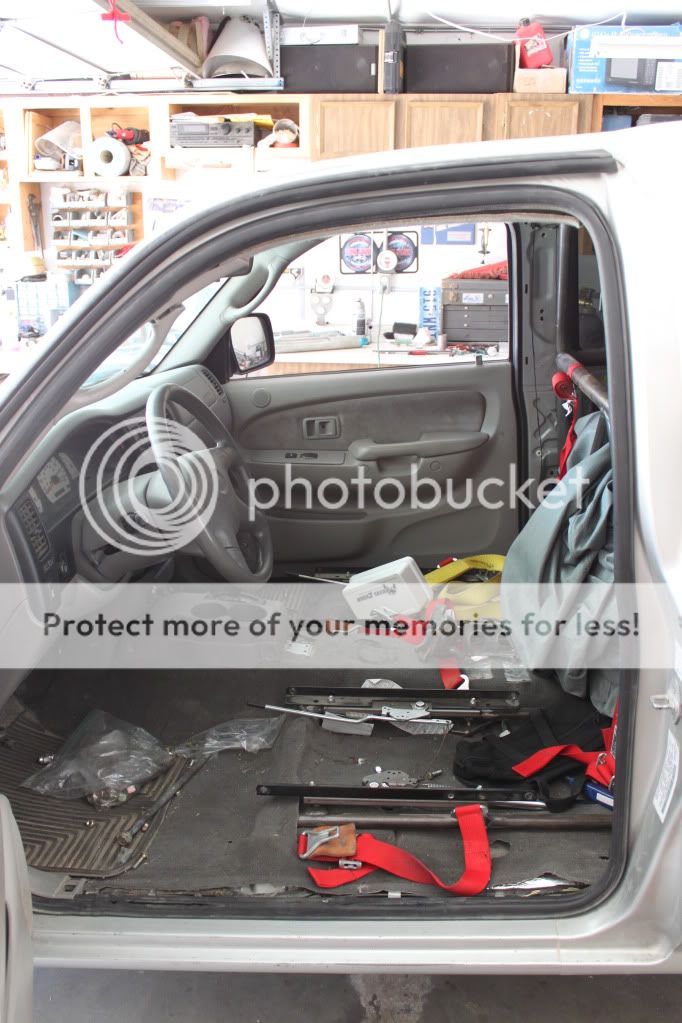

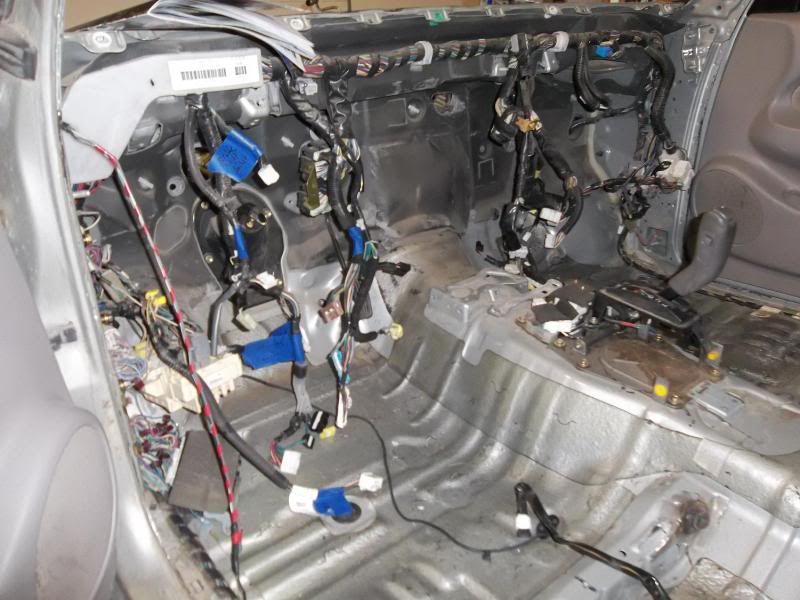
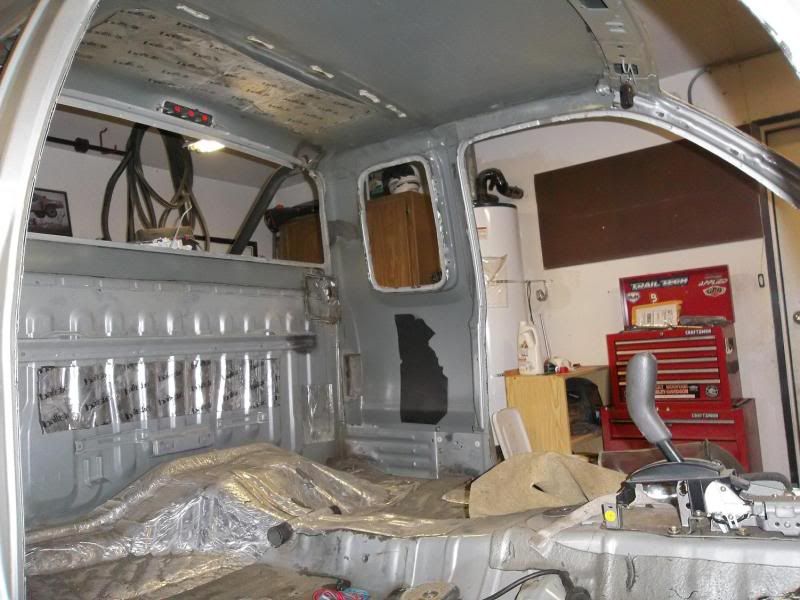
Nice interior huh????!!!!
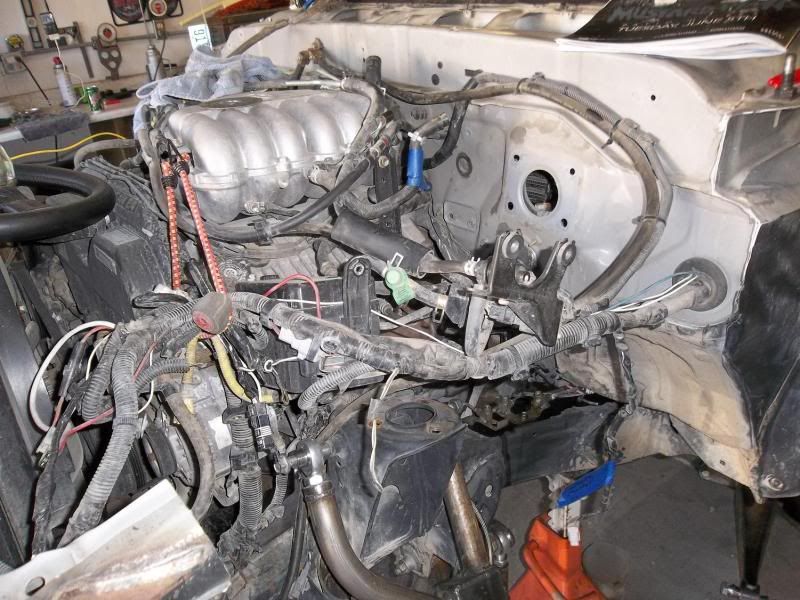
Let's move to the front...

chop chop


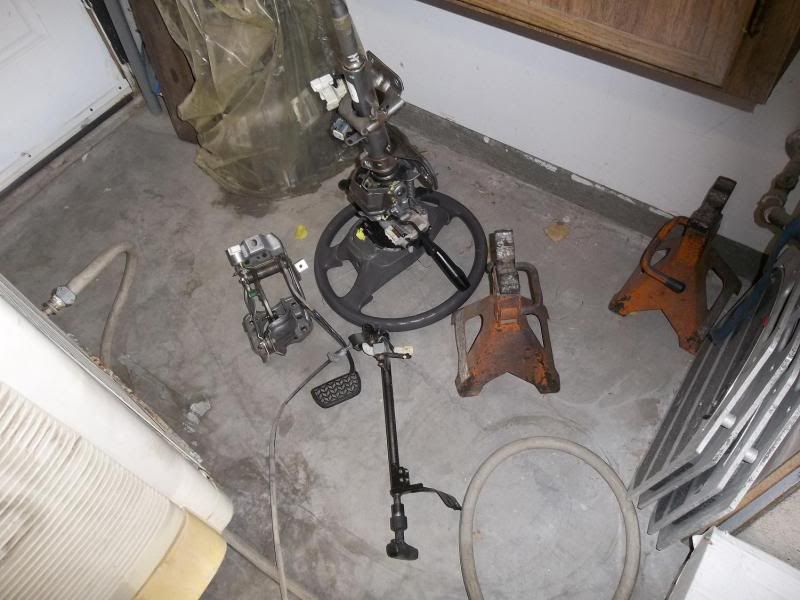
Windshield wiper system is gone.
Brakes? Don't need no stinkin brakes!
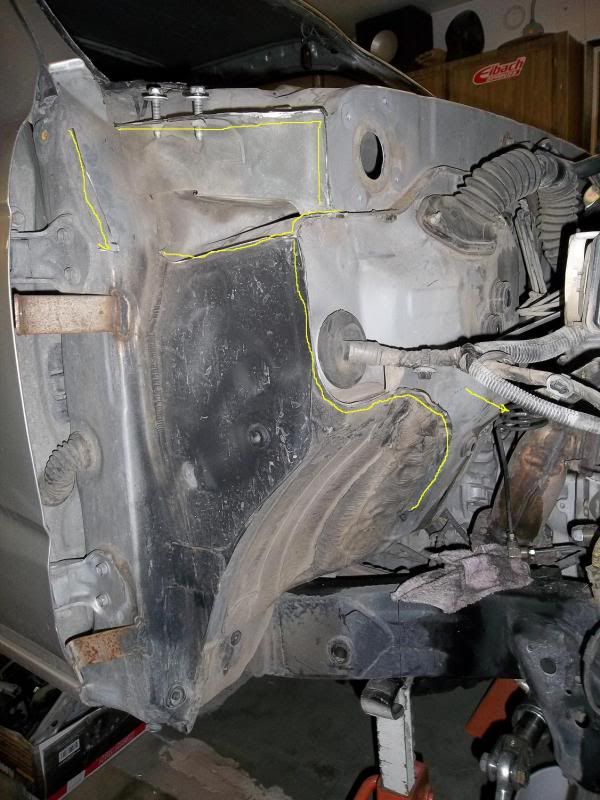
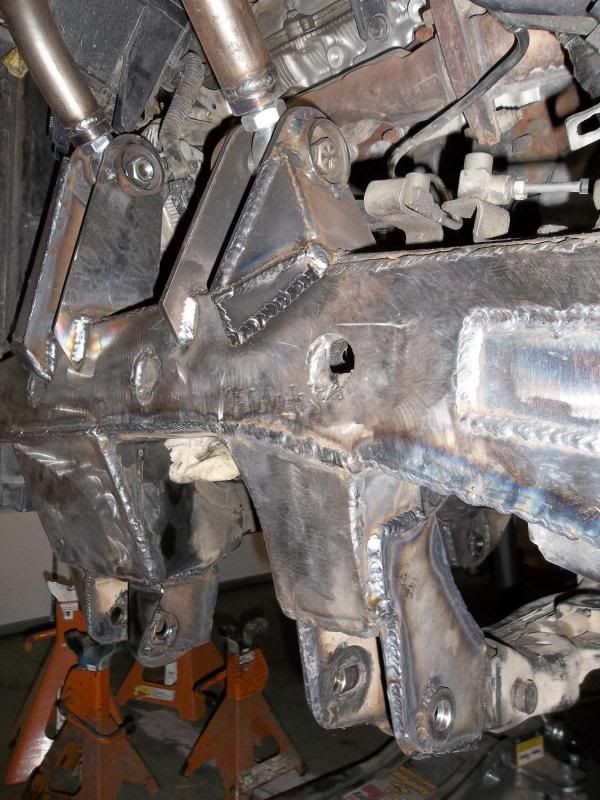
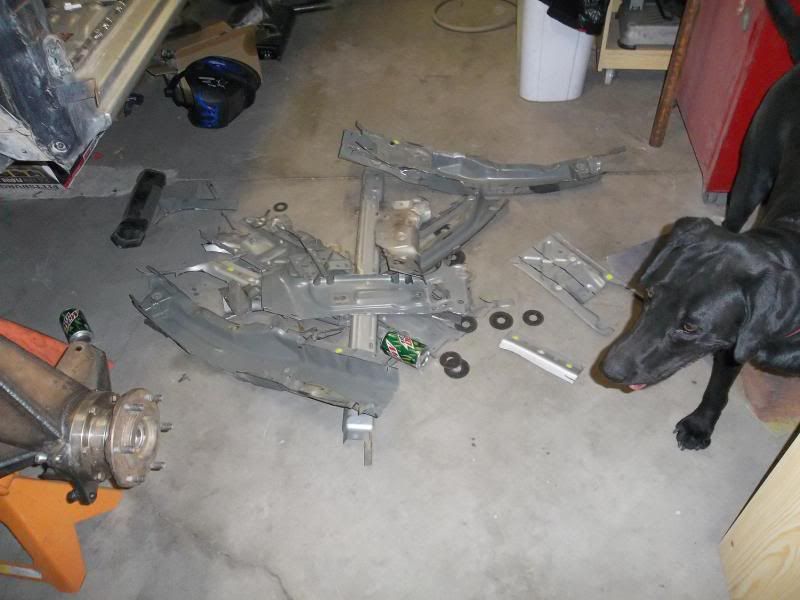
Upper control arm mounts? Frame brackets? Pfft, all in my way!!! Get rid of all of it, I'll build it bigger and better knowing the abuse it's going to see!
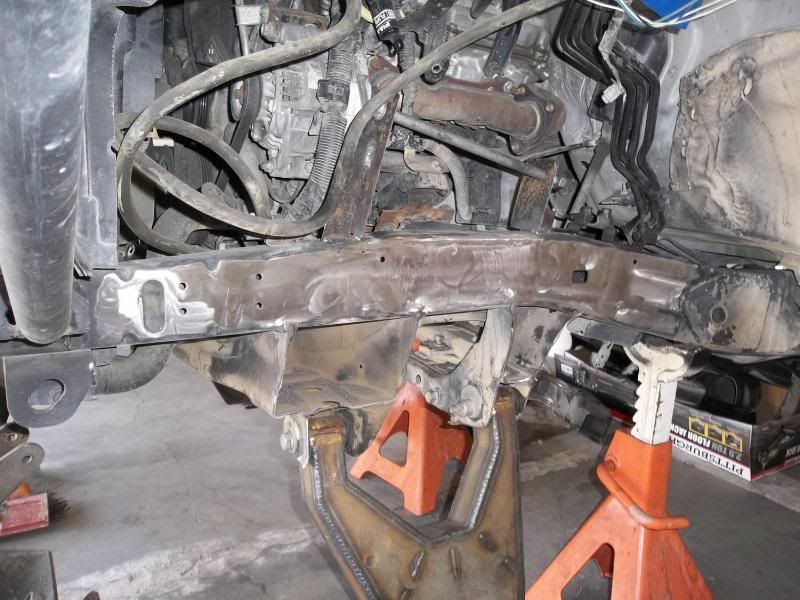
The frame rails will be plated.
Because of class rules I'm having to go a few steps backwards. I had to cut out a little of the existing in cab cage that Jason had built cause it wasn't using legal sized material. I also got annoyed having to walk around the doors so that was an easy fix.
And that's where I'm at right now. Those last two pictures were taken last night. This entire 3rd post is progress over the last couple weeks of spare time. I'll keep this updated with pictures pretty regularly if wanted.
Here's the truck as it sat delivered back to my house. My personal truck which is also home built is parked behind it. It's sitting goofy cause there's no front shocks on the truck so it's sitting on the bumpstops here.
Here it is sitting roughly at ride height in my garage.
And now the fun begins!!!
Nice interior huh????!!!!
Let's move to the front...
chop chop
Windshield wiper system is gone.
Brakes? Don't need no stinkin brakes!
Upper control arm mounts? Frame brackets? Pfft, all in my way!!! Get rid of all of it, I'll build it bigger and better knowing the abuse it's going to see!
The frame rails will be plated.
Because of class rules I'm having to go a few steps backwards. I had to cut out a little of the existing in cab cage that Jason had built cause it wasn't using legal sized material. I also got annoyed having to walk around the doors so that was an easy fix.
And that's where I'm at right now. Those last two pictures were taken last night. This entire 3rd post is progress over the last couple weeks of spare time. I'll keep this updated with pictures pretty regularly if wanted.
06-07-2012, 06:24 AM
#6
Registered User
Thread Starter
Join Date: Jun 2003
Location: Las Vegas
Posts: 342
Likes: 0
Received 0 Likes
on
0 Posts
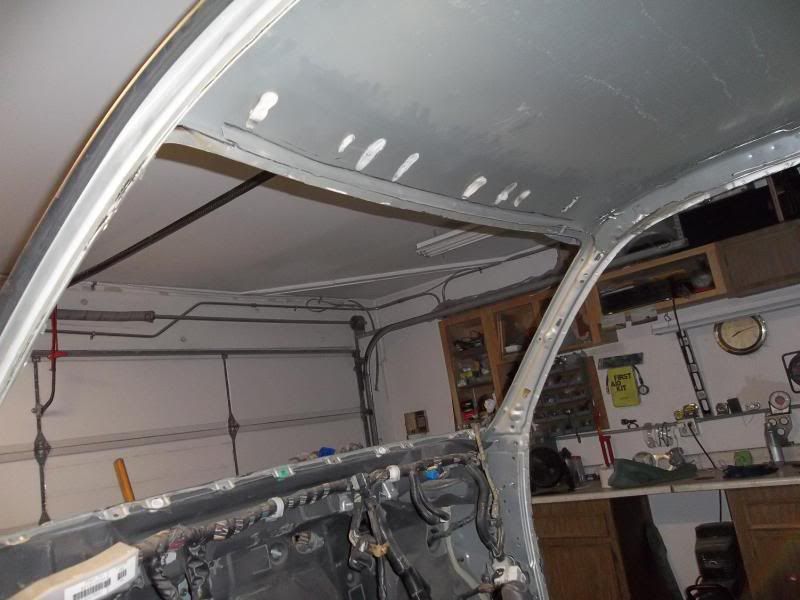
Didn't make the progress I've typically been making lately last night but I'm kinda slowing down a little bit right now to make sure all my plate work is correct and works the first time.
They're just tacked in place and not cleaned up yet but you get the idea...
I also made the templates last night to start on the new upper control arm mounts. The first two will get it located where I want it and then once I have those in place I'll build the templates for the rest of the UCA mount structure.
I also have the templates to box in the mega sized holes in the end of the crossmembers and I also laid under it for a bit last night to come up with a game plan for strengthening the lower control arm mounts and that whole area in general.
06-07-2012, 09:24 AM
#7
Registered User
Thread Starter
Join Date: Jun 2003
Location: Las Vegas
Posts: 342
Likes: 0
Received 0 Likes
on
0 Posts
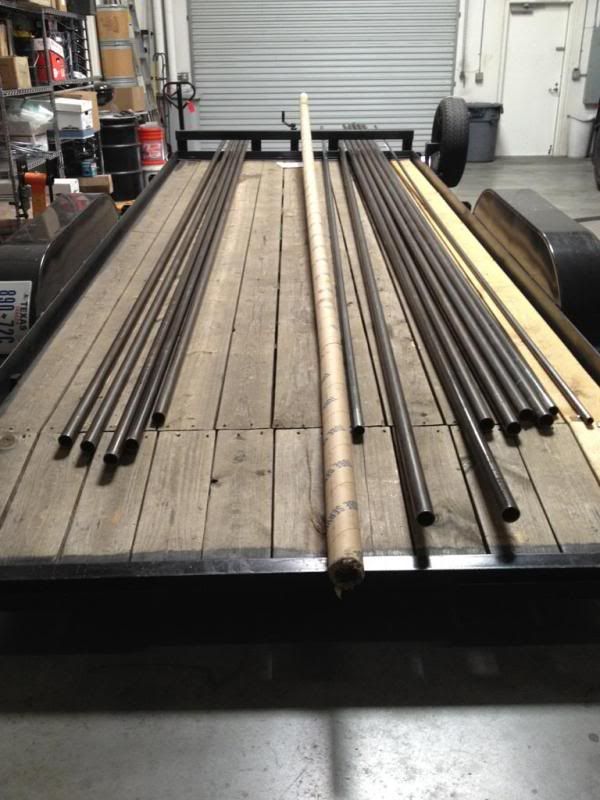
Got this delivery this morning.... Should be enough to finish the cage and gives me a bit extra to screw up with and do practice/setup bends also.
Trending Topics
06-11-2012, 08:56 AM
#8
Registered User
Thread Starter
Join Date: Jun 2003
Location: Las Vegas
Posts: 342
Likes: 0
Received 0 Likes
on
0 Posts
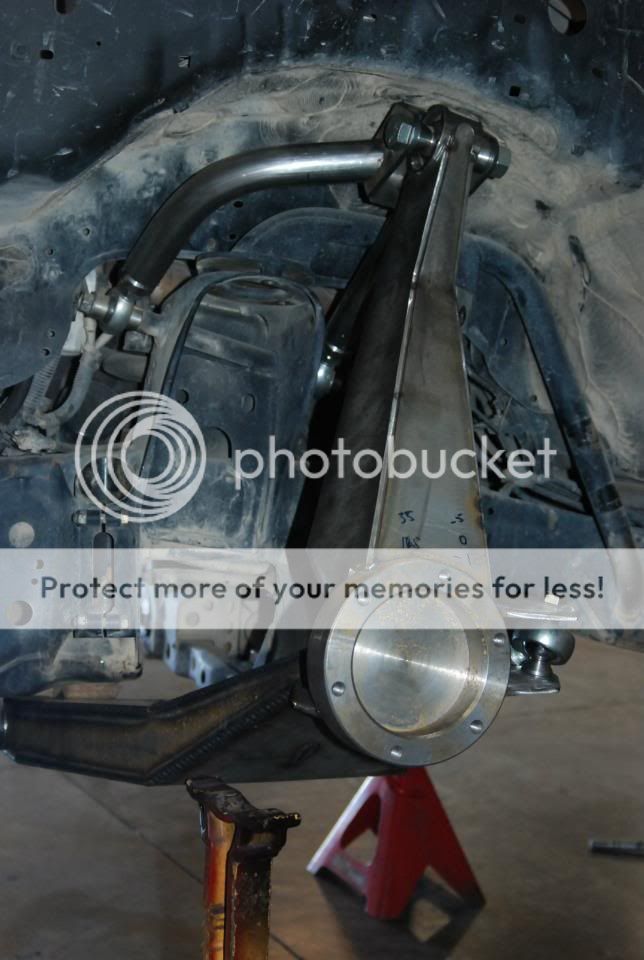
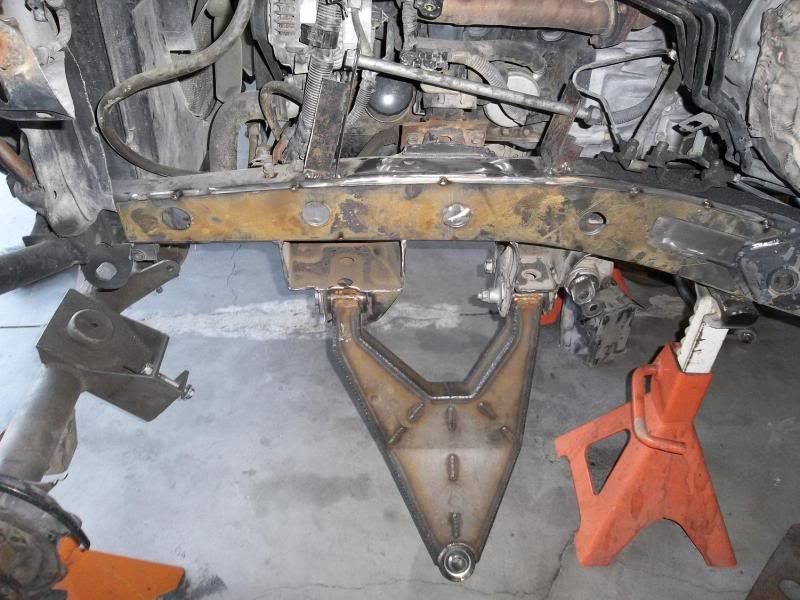
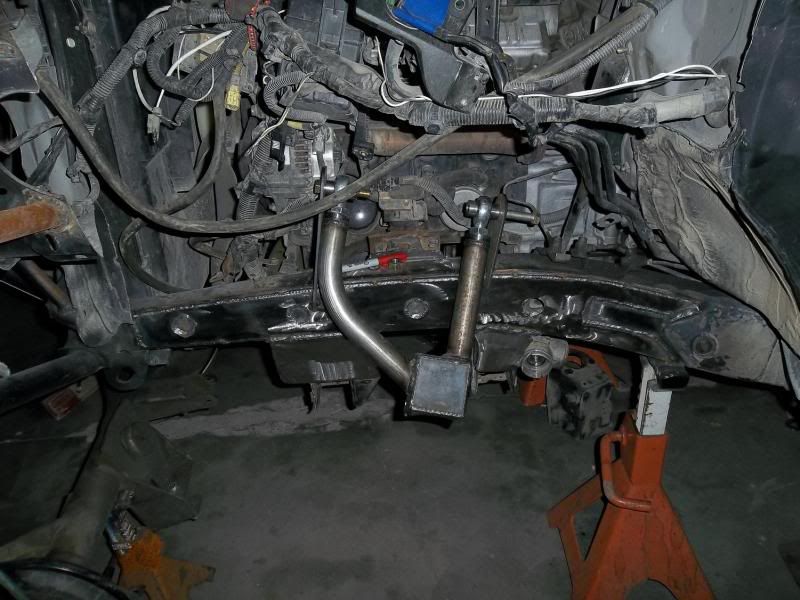
Welded frame plates up over the weekend. Got the huge holes from the end of the crossmembers that I cut off the frame plated up and also got the first tabs locating the upper control arms tacked in place.
06-15-2012, 10:28 AM
#9
Registered User
Thread Starter
Join Date: Jun 2003
Location: Las Vegas
Posts: 342
Likes: 0
Received 0 Likes
on
0 Posts
Progress hasn't stopped but the pictures have kinda gone on vacation for a bit. I'm still working on it though. Right now I've got the upper arms all mocked up but I've run into an alignment issue with a few ways of dealing with it. I'm waiting right now for Matt from MCM to swing by and look at what I've got going on to give me some input on what he thinks our best option is. Not a big deal, maybe an evening's worth of setback but I need to address it now before moving on. So till he can swing by the front is on pause. I'm now planning to put some attention towards the rear axle. I've got a lot of brackets that need to be cut down off it and the truss for it was ordered and should be at my house next week. I need to talk with a local guy here that supposedly can make sure the axle is straight still after the truss work and get any info he's got to provide before I go too far forward with that too. If that turns into a waiting game I'll just turn my attention to the cab and start cutting out the inner sheet metal to start prepping for cage work. I got my hands on a 2" bender die so I can always start moving forward on that. So basically I've ran into a few hiccups with some decisions and direction needed to be figured out but no biggie, we'll get it all taken care of in the long run!
Khris
Khris

 07-06-2012, 08:04 AM
#11
Registered User
Thread Starter
Join Date: Jun 2003
Location: Las Vegas
Posts: 342
Likes: 0
Received 0 Likes
on
0 Posts
Not sure if anyone is still following this but I'll keep posting... Here's a picture from memorial day weekend about 5 weeks ago.
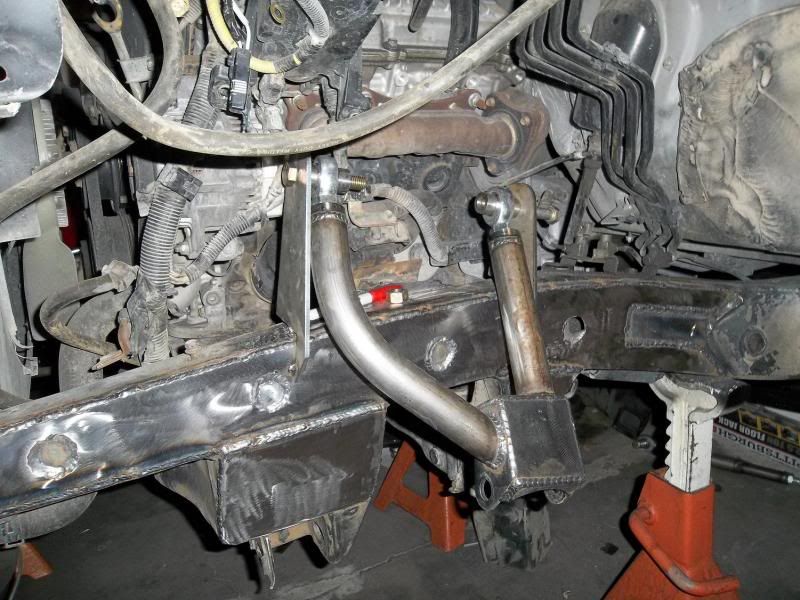
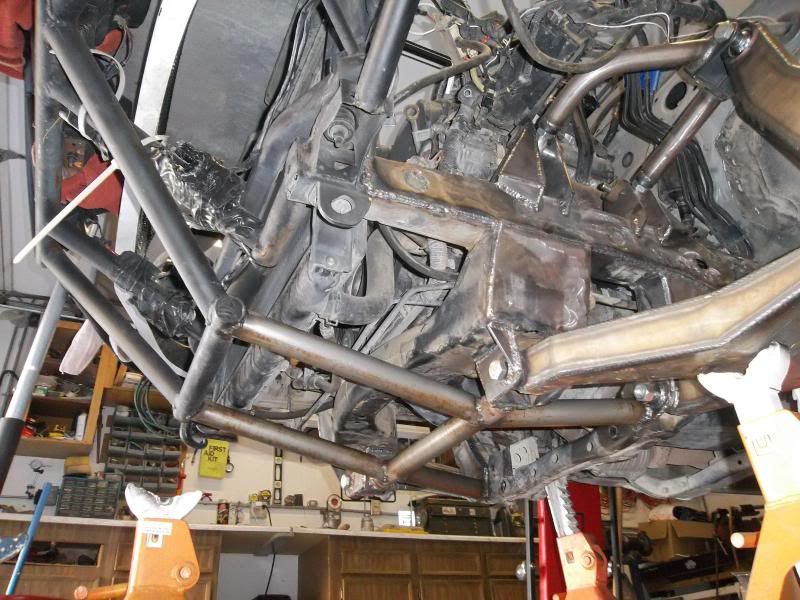
Here it is as of last night. Pass side looks the same... The two center facing tabs of the upper control arm mounts will get boxed in something similar to the outside but I'm holding off till I get the shock in place to make sure there's no clearance issues. The crossmembers hanging way down are going to get tied into each other with some tubing so they can work together strength wise. This truck is going to get hammered on hard so I'm trying to build it solid the first time and putting in the work hopefully rather then later having to straighten everything out and then just go back and redo what I'm doing right now anyways. LOL

Here it is as of last night. Pass side looks the same... The two center facing tabs of the upper control arm mounts will get boxed in something similar to the outside but I'm holding off till I get the shock in place to make sure there's no clearance issues. The crossmembers hanging way down are going to get tied into each other with some tubing so they can work together strength wise. This truck is going to get hammered on hard so I'm trying to build it solid the first time and putting in the work hopefully rather then later having to straighten everything out and then just go back and redo what I'm doing right now anyways. LOL
 07-08-2012, 05:08 PM
#14
Registered User
Thread Starter
Join Date: Jun 2003
Location: Las Vegas
Posts: 342
Likes: 0
Received 0 Likes
on
0 Posts
Well, if you scroll back up to that last cab shot with the doors off where it looks like my garage is a disaster zone... See that cage work inside the cab. It's gone. I cut it out this morning. After looking at options and reading the class rules for how the cage had to be built we could've cut some corners and saved me a little work and left that there which actually would've resulted in complete overkill. The issue is that cage was built when it was just going to be a play truck and it was built out of 1.75" x .120 wall tubing. Well race rules call out all cab tubing because of the trucks weight needs to be 2" diameter. So I talked to some of the race tech guys and they said basically if I duplicated that wall structure at the b-pillar right behind the seats and move forward from there with the 2" we'd be fine. But after some more thought that would mean I've got 2 duplicate walls like 16" apart which is insane overkill basically. So this morning I cut that back wall's worth of cage out. It's fine though cause it gives me room to work inside like I'd wanted to also. Tieing back into the existing cage work might end up being a bit of a chore but in the long run I think it's the right way to go but will just be a little added work and challenge to get it all fitting how I hope it goes.
My computer is fighting me and I'm having issues uploading pics today. I'll get some more up probably by mid week as I'm hoping to have all the inner sheet metal cut out of the cab by then anyways.
My computer is fighting me and I'm having issues uploading pics today. I'll get some more up probably by mid week as I'm hoping to have all the inner sheet metal cut out of the cab by then anyways.
07-10-2012, 07:17 AM
#15
Registered User
Thread Starter
Join Date: Jun 2003
Location: Las Vegas
Posts: 342
Likes: 0
Received 0 Likes
on
0 Posts
Well I'd say the interior is officially not original!
Was gonna knock out the whole inside last night but got side tracked for a few hours. I'll finish it up tonight...
Was gonna knock out the whole inside last night but got side tracked for a few hours. I'll finish it up tonight...
07-10-2012, 08:05 PM
#17
Registered User
Thread Starter
Join Date: Jun 2003
Location: Las Vegas
Posts: 342
Likes: 0
Received 0 Likes
on
0 Posts
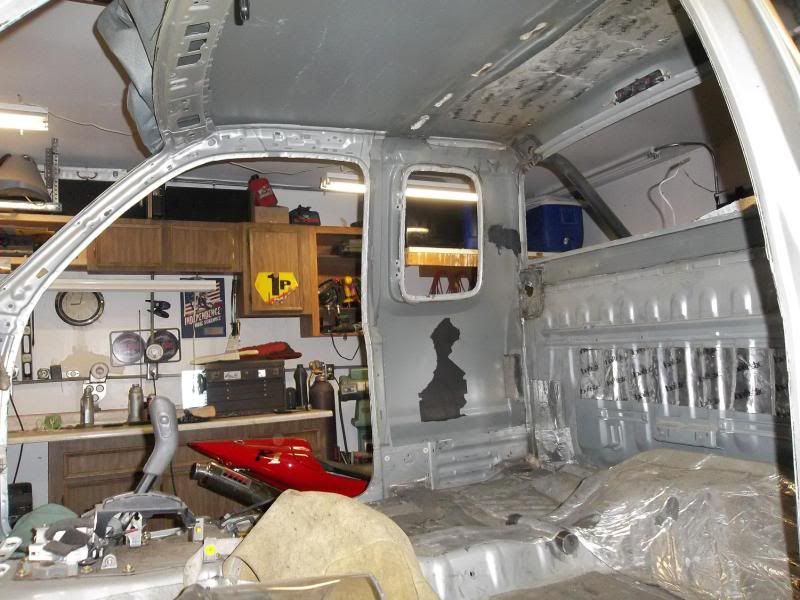
LOL, thanks! It's a lot of work and a lot of commitment to cut up a perfectly good running very nice truck and have faith that in the end it's all going to work out! If I hadn't already had 2 previous builds on much cheaper platforms I probably wouldn't be doing this. I can say that last night and tonight for sure were hands down the 2 crappiest parts of the whole build so far and likely to be the worst part. I finished up cutting out the inner sheet metal. If you guys have never hacked up a truck like this you'd probably be shocked at how many various layers of metal there are between the outside of your cab and the inner sheet metal you see when you pull the plastic paneling off the inside of your cab. At one point there was seriously 5 layers of sheet metal to remove!
I got the rest of it gutted tonight though. At least I think I did... I "should" start throwing tubing back into the cab this weekend so there's a chance for more to still come out if it seems like i'll be able to tuck the cage in even tighter but really all that's left is the A-pillar at this point.
Both last night and tonight it was triple digits in the garage and by the time I was done my t-shirt was soaked along with my welding sleeves I was wearing to protect me from sparks and the hat I was wearing was solid drenched. Pretty nasty when you mix up the amount of metal dust stuck to me! LOL Good times!!! NOT!!! And to think, this is all for fun as a hobby! HAHAHA
I was doing some mental thinking/planning in my head and realistically I'm hoping to have most of the cage done within about 4-6 weeks. Remember this whole build is being done in my spare time. This isn't my 40hr paycheck job, this is being done after hours just like probably ever other build on this forum. All I know is I can't wait to get this thing to the start line of the first race! I'm gonna have some serious smiles that day!!!!
 07-15-2012, 07:43 AM
#19
Registered User
Join Date: Jul 2012
Location: Washington DC
Posts: 18
Likes: 0
Received 0 Likes
on
0 Posts
Figured I should jump on board on this, thanks to Khris for posting all the pics and updating this gig!
Quick update on our future plans....intended to have the truck ready for it's first race in October but a race venue/date change forced us to reconsider our plans. Our new plan is to have the truck ready for a Make a Wish charity run in November in Laughlin, Nevada. After that we'll have about a month to race prep and we'll attempt our first race in Barstow, California the first weekend of December.
Quick update on our future plans....intended to have the truck ready for it's first race in October but a race venue/date change forced us to reconsider our plans. Our new plan is to have the truck ready for a Make a Wish charity run in November in Laughlin, Nevada. After that we'll have about a month to race prep and we'll attempt our first race in Barstow, California the first weekend of December.
07-15-2012, 09:11 AM
#20
Registered User
Thread Starter
Join Date: Jun 2003
Location: Las Vegas
Posts: 342
Likes: 0
Received 0 Likes
on
0 Posts
LOL, oh you found it here finally. I wondered how long it would take you! LOL I've got a build thread on mine in here and figured since they have an actual dedicated build area it just made sense. This is the forum I found most of my info from while doing my engine swap! Tons of helpful great info there and guys that really know their stuff!


