Gizler00's 1999 4Runner Build Thread
 03-24-2017, 05:37 PM
#21
Registered User
I'll definitely hit you up on a couple questions when I get ready. I won't have any trouble finding one to cut up down here. Really appreciate the offer though! Mine is on the driver's side by the way. I'm putting a bumper together right now for mine. When I bought it, I knew it was rusty but I used that to get it for a steal. I got detracted somehow when I was looking it over and didn't pay any attention to the two stickers on the front bumper. When I realized they were covering up rust holes, I just laughed. First time I had seen that trick.
 03-25-2017, 03:16 PM
#23
Super Moderator
Staff
iTrader: (1)
Join Date: Aug 2008
Location: Anderson Missouri
Posts: 11,788
Likes: 0
Received 21 Likes
on
19 Posts
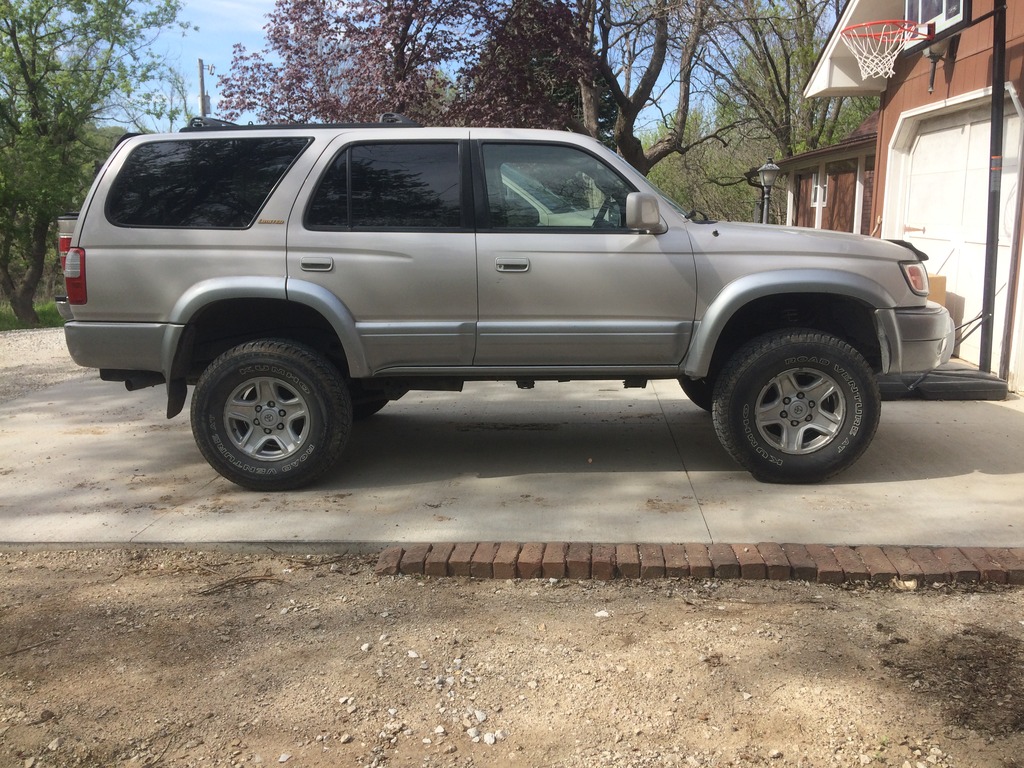
The 3rd gens are some great trucks. Looks like you found a nice one and with the e-locker, great score on that. Great job on getting the patch panel in. You will like the '99 the more you own and drive it. I have had mine for 13 years and never let me down. Congrats!!!
03-28-2017, 08:37 AM
#24
I'll definitely hit you up on a couple questions when I get ready. I won't have any trouble finding one to cut up down here. Really appreciate the offer though! Mine is on the driver's side by the way. I'm putting a bumper together right now for mine. When I bought it, I knew it was rusty but I used that to get it for a steal. I got detracted somehow when I was looking it over and didn't pay any attention to the two stickers on the front bumper. When I realized they were covering up rust holes, I just laughed. First time I had seen that trick.
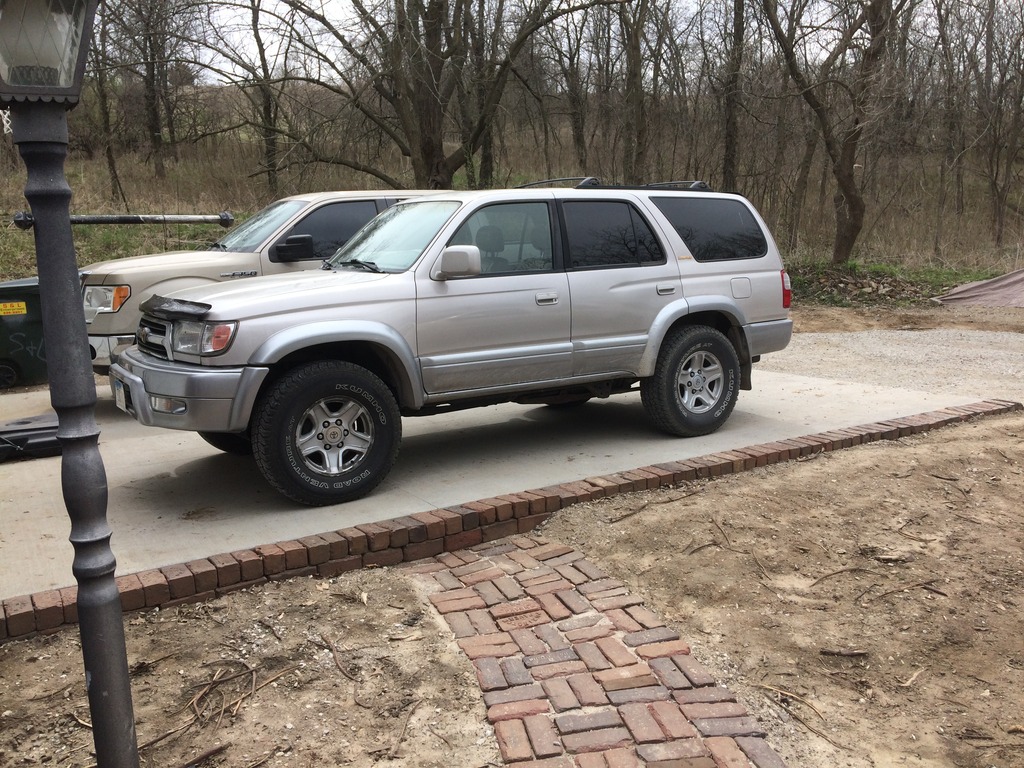
Thanks Terry! I really did not want to buy one unless it had the e-locker. I looked at quite a few before I settled on one. But as always, its so weird how Toyota has their options. There are some SR5's that have the e-locker and most that do not. There were also quite a few limiteds that I looked at that did not have the e-locker. Really no rhyme or reason to what trim packages come with what options. Always puzzles me.
04-04-2017, 05:51 AM
#25
So a week after getting this runner, the starter started to click upon cranking, leading me to realize that it was time for some new contacts. Unfortunately my local Auto/Electrical place has since closed up, I had to order them online. I really wish these places were still able to survive in todays throwaway society, but its just not a reality.
I had already become familiar with this procedure while doing some work for a friend a few years back. I remembered that the hardest part was getting the starter out of its "hole" once unbolted.
Everyday I have the opportunity to work at the shop where I teach. Its nice and climate controlled, has hoists so you can work in the air. But there is Usually something lacking when working like that. Might sound crazy, but for me, sometimes taking on a project at home, on the ground, builds a better connection with the vehicle. Maybe I am crazy, maybe I have been using a hoist so long that I sort of missed doing some repairs rolling around in the dirt.
Fast forward to yesterday.....The starter became more and more unreliable because of the contacts. Since I already received them last week, I just had to find the time to make it happen.
Its been a rough few weeks at work for me, and our lives are crazy with our twins, so..........I kindly asked the wife if she was ok with me tearing into the 4Runner after the kids went to bed.
Lucky for me, she was good with it. I think she realized that I needed some time to just do nothing but think about the task at hand.
So.......I put her up in jack stands and went to work!
As always.......This repair job can seem very intimidating to some. Especially if you are not very mechanically inclined.
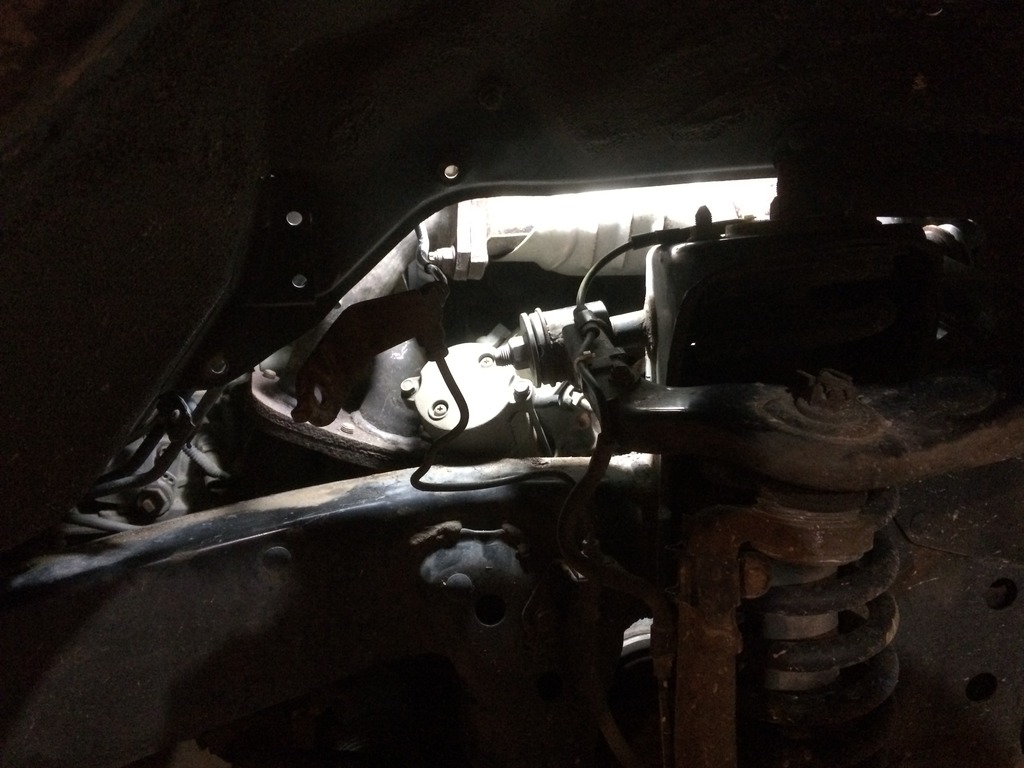
Here it is. Hiding, Lurking behind everything in its way.......
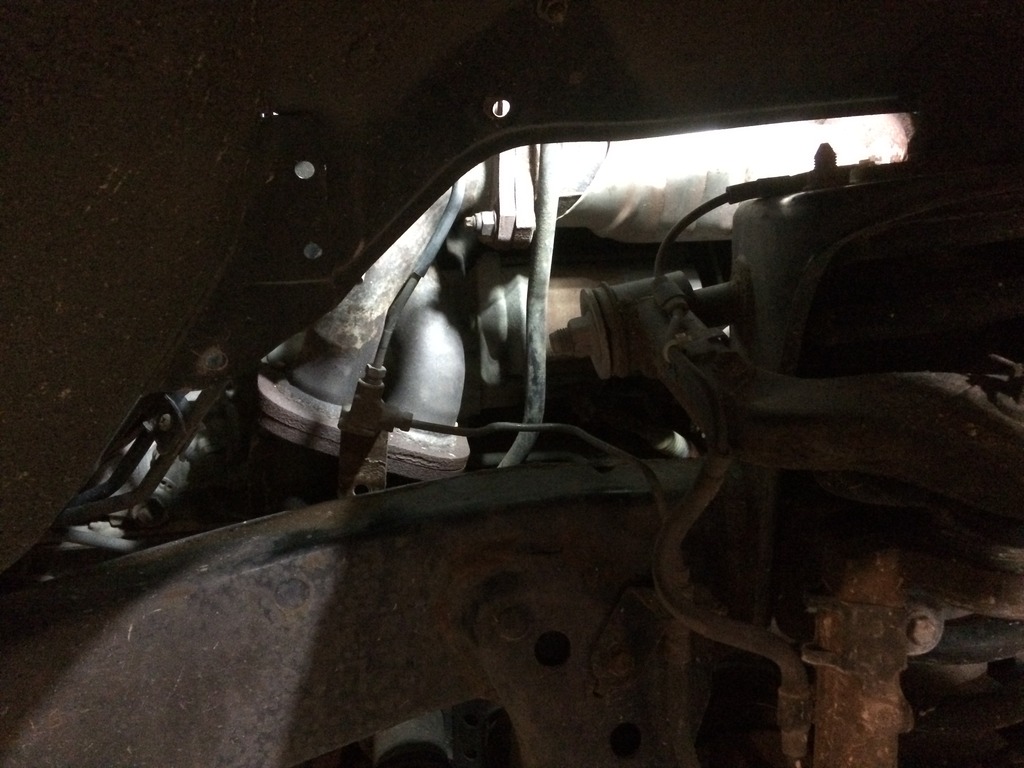
First thing you need to do is disconnect the battery. You always want to do this, but especially on this job. You will have to snake a wrench, or 1/4' ratchet in there, and I can guarantee that it will arc off everything around it if the battery is still connected.
Next you need to remove the 12mm bolt that is holding the Transmission dipstick to the head, then gently twist it back and forth until it comes out. Then you need to remover the 12mm bolt that holds on the brake line that goes to the passenger wheel. Some people remove this line and open up the brake system. I just bend it out of the way. Removing the line just makes more unnecessary work that does not need to be done.
Now, you have to remove the 12v supply to the starter an the remote line from the ignition. I ended up taking the remote line off after the starter was unbolted. I just simply could not get my XXL hand in there in such a way to remove it while bolted to the block.
After you get those two parts removed, you can them move underneath the truck to loosen the two 14mm bolts. I ended up using all 1/2' drive sockets and ratchets to remove these. I know some people remove the bracket that holds the exhaust downpipe, but again.....I do not. Just more unnecessary work.
It took a shallow 14mm with a swivel, and a few small extensions. I was able to use a breaker bar to pop everything loose, and then remove the bolts with my fingertips. The top bolt takes a little more work. I actually used a 1/2' Breaker bar with a deep 14mm socket and broke it loose from the fenderwell then moved back underneath to hand thread it out.
Now..........The hard part. Its like trying to figure out a rubiks cube!! I always forget how it comes out and have to mess with it for some time. About 25 minutes of hand wrestling it in the frame rail, it finally gave up and decided to come out. I failed to get pictures of this, if I only had a third hand or a photographer...... Haha.
But, it has to come out with the actual starter motor facing down and the solenoid straight up. It seems as though it will not fit between the UCA and the Manifold flange, but I assure you that it will.
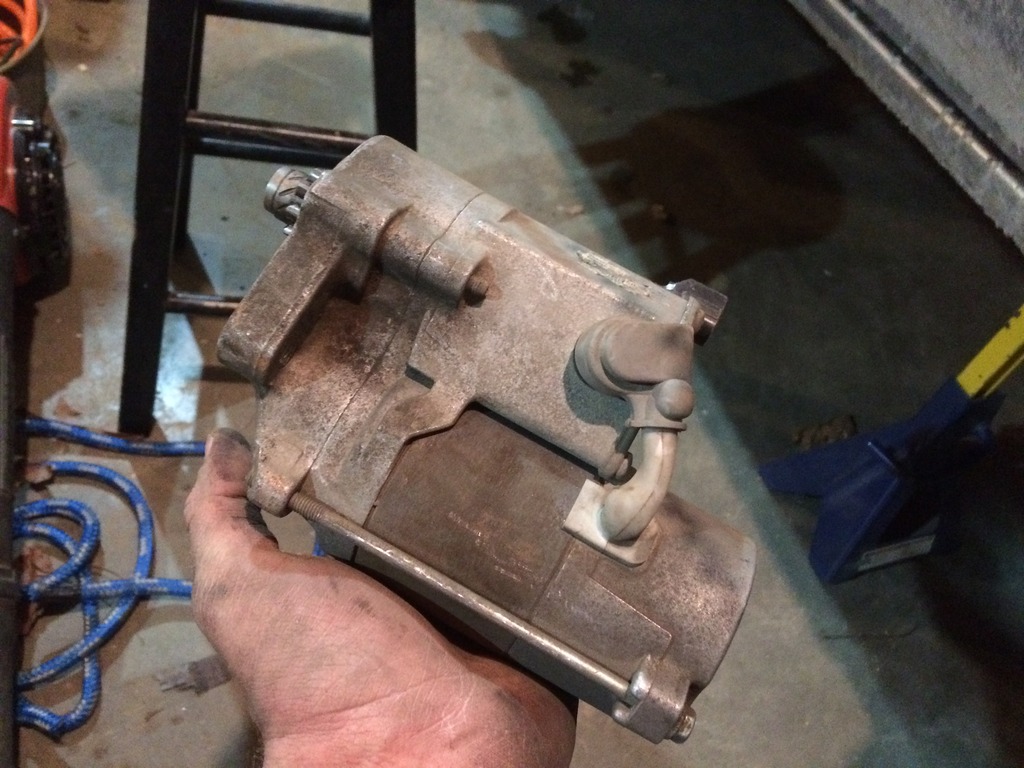
Once you have it out, it will literally take you 5 minutes to swap everything out.
I just clamp it in a vise and go to work. There are three Slotted (phillips) head screws that hold the solenoid cap on. These are usually on fairly tight, but if you put the screwdriver on and give the end of it a quick hit, or two, they will break free from the shock.
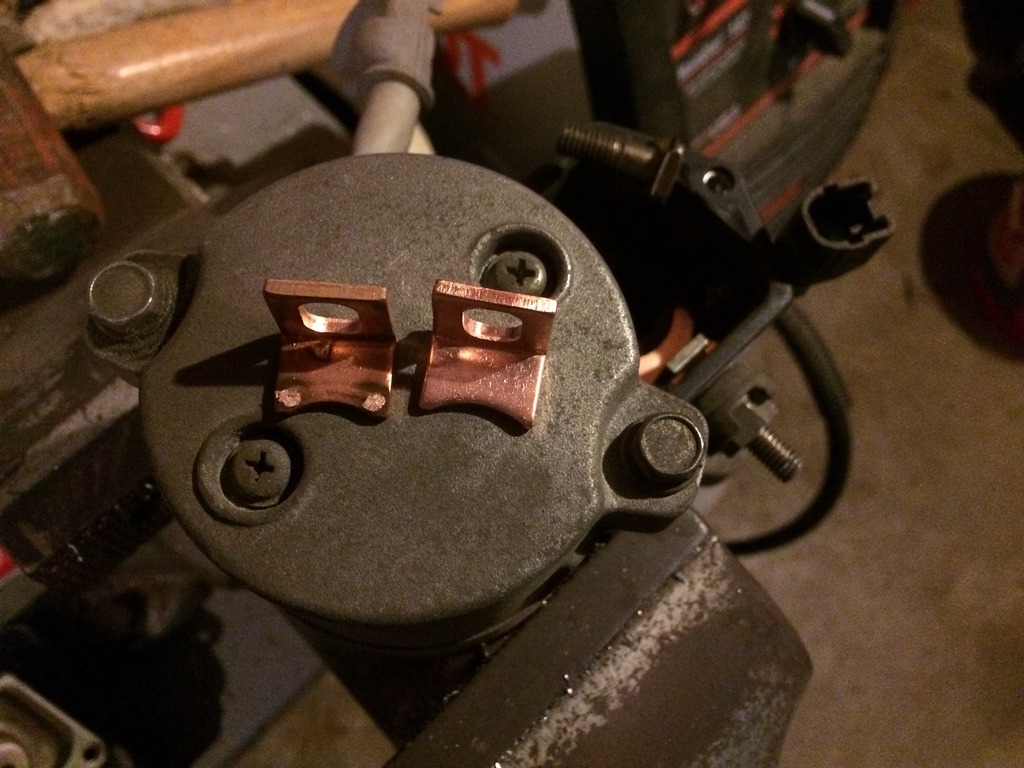
Now that its off, you can see the plunger and the contacts. Sometimes they look so back its crazy, and other times, like this time, they do not look horrible....but bad enough.
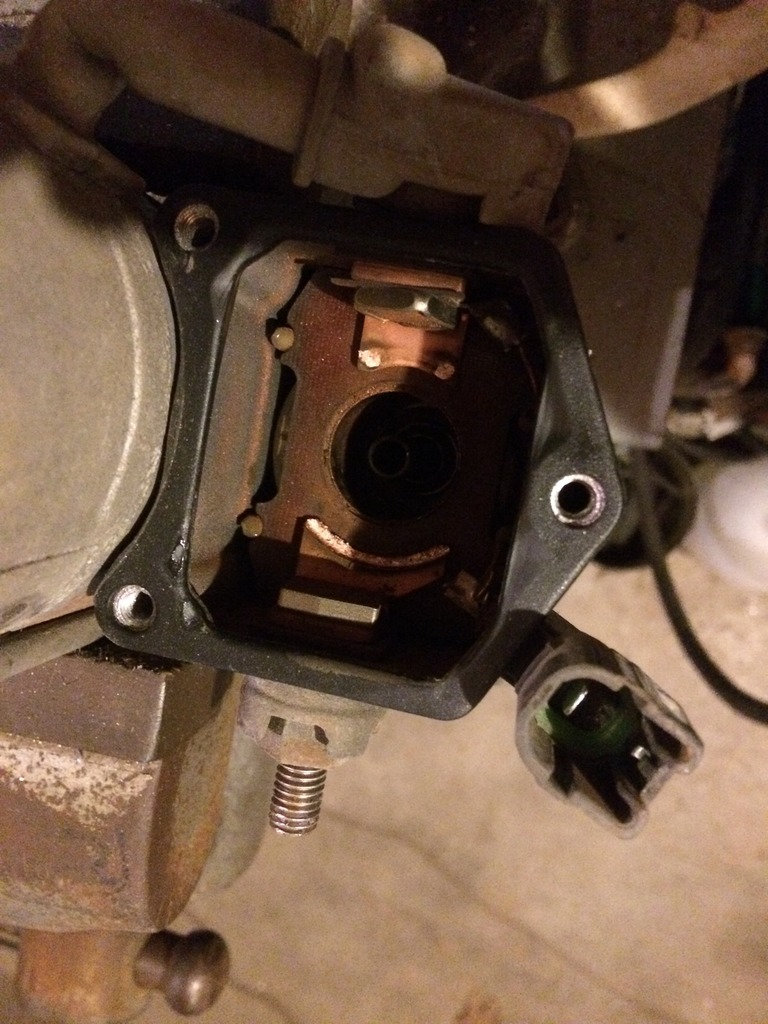
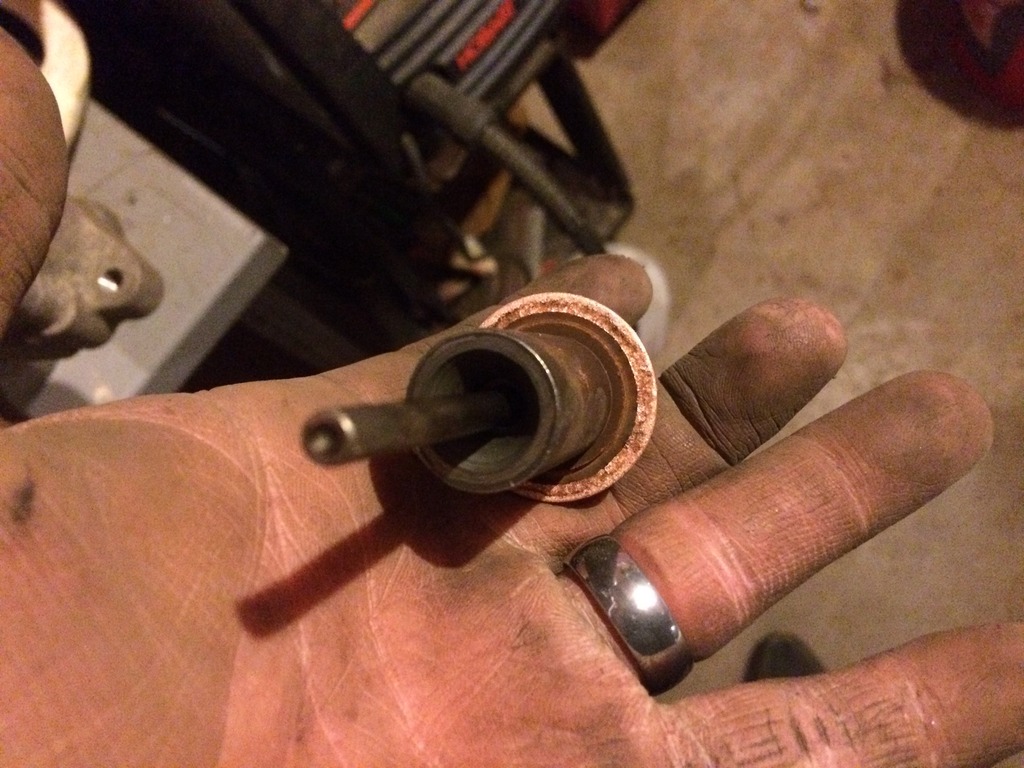
You can clearly see the difference in from the old plunger to the new, and then i have some side by side comparisons of the contacts.
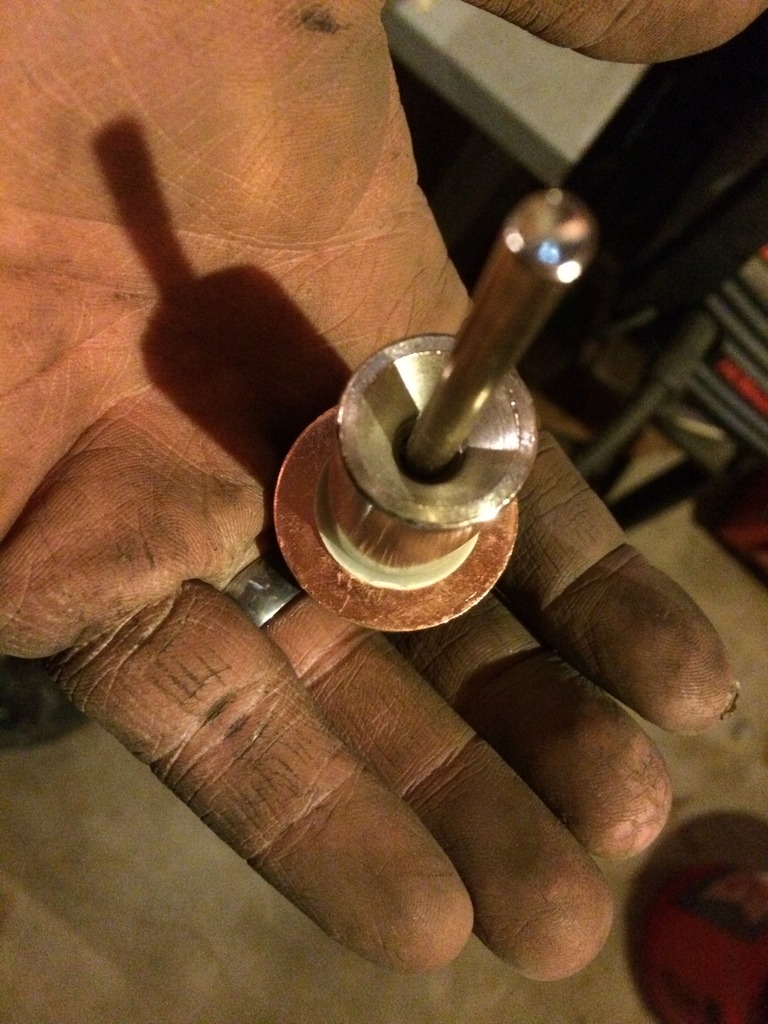
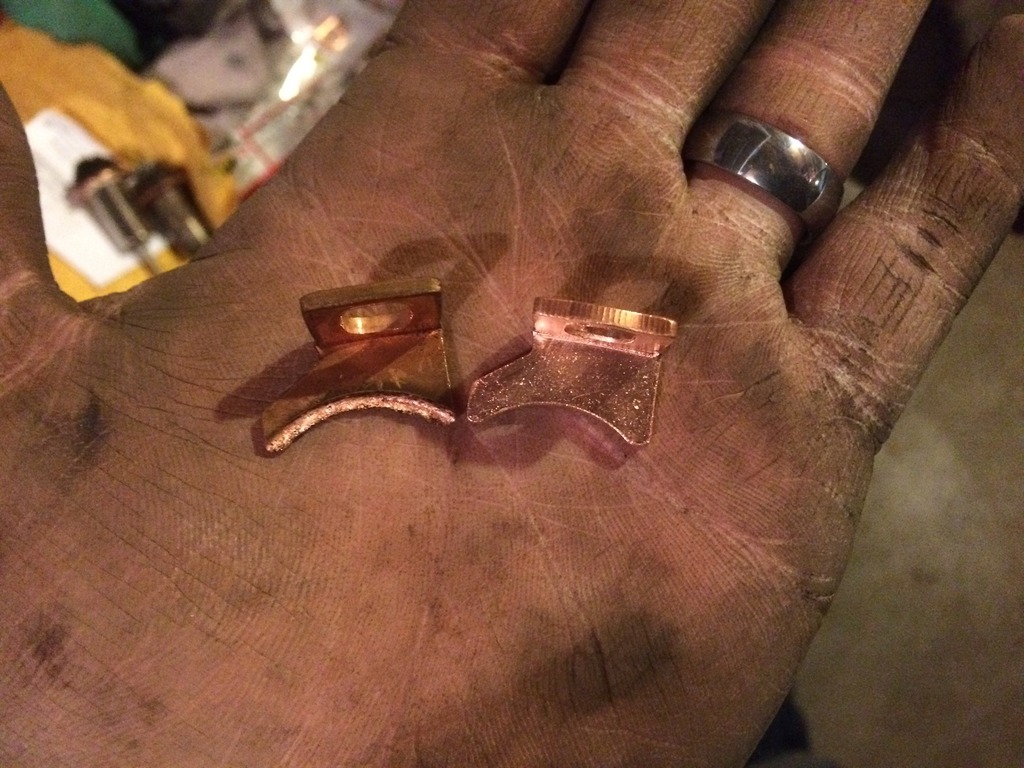
The contacts simply unbolt from the side of the solenoid housing. Be careful and take note of the washers and all the plastic parts that fit on the studs to seal up the solenoid.
After you put all the contacts/plunger back together.....you can attempt to reinsert the starter..
Now the funny thing is, It takes so long to get it out and then it literally slid right back in in less than a minute. Haha....That one will make you scratch you head every time.
Here it is on its way back in. See you again in another 150,000 miles.....
The rest of the installation is simply the reverse of the removal. Hardest part of the installation is trying to hold the starter with one hand and start the upper bolt with the other. This step helps to have another person there to help hold it while you thread the bolts back in by hand.
Wasn't to bad.....I did not time myself, but it took me about 1.5 hours to do everything. I was in no hurry.
Hope this provides some info for anyone having the same issue.
Oh yeah....The Contacts and Plunger were a whopping $13.95......Please fellow yotatech members.....do not pay to have this done, and do not put a new starter in. These ones with last the life of the vehicle and then some.
I had already become familiar with this procedure while doing some work for a friend a few years back. I remembered that the hardest part was getting the starter out of its "hole" once unbolted.
Everyday I have the opportunity to work at the shop where I teach. Its nice and climate controlled, has hoists so you can work in the air. But there is Usually something lacking when working like that. Might sound crazy, but for me, sometimes taking on a project at home, on the ground, builds a better connection with the vehicle. Maybe I am crazy, maybe I have been using a hoist so long that I sort of missed doing some repairs rolling around in the dirt.
Fast forward to yesterday.....The starter became more and more unreliable because of the contacts. Since I already received them last week, I just had to find the time to make it happen.
Its been a rough few weeks at work for me, and our lives are crazy with our twins, so..........I kindly asked the wife if she was ok with me tearing into the 4Runner after the kids went to bed.
Lucky for me, she was good with it. I think she realized that I needed some time to just do nothing but think about the task at hand.
So.......I put her up in jack stands and went to work!
As always.......This repair job can seem very intimidating to some. Especially if you are not very mechanically inclined.
Here it is. Hiding, Lurking behind everything in its way.......

First thing you need to do is disconnect the battery. You always want to do this, but especially on this job. You will have to snake a wrench, or 1/4' ratchet in there, and I can guarantee that it will arc off everything around it if the battery is still connected.
Next you need to remove the 12mm bolt that is holding the Transmission dipstick to the head, then gently twist it back and forth until it comes out. Then you need to remover the 12mm bolt that holds on the brake line that goes to the passenger wheel. Some people remove this line and open up the brake system. I just bend it out of the way. Removing the line just makes more unnecessary work that does not need to be done.
Now, you have to remove the 12v supply to the starter an the remote line from the ignition. I ended up taking the remote line off after the starter was unbolted. I just simply could not get my XXL hand in there in such a way to remove it while bolted to the block.
After you get those two parts removed, you can them move underneath the truck to loosen the two 14mm bolts. I ended up using all 1/2' drive sockets and ratchets to remove these. I know some people remove the bracket that holds the exhaust downpipe, but again.....I do not. Just more unnecessary work.
It took a shallow 14mm with a swivel, and a few small extensions. I was able to use a breaker bar to pop everything loose, and then remove the bolts with my fingertips. The top bolt takes a little more work. I actually used a 1/2' Breaker bar with a deep 14mm socket and broke it loose from the fenderwell then moved back underneath to hand thread it out.
Now..........The hard part. Its like trying to figure out a rubiks cube!! I always forget how it comes out and have to mess with it for some time. About 25 minutes of hand wrestling it in the frame rail, it finally gave up and decided to come out. I failed to get pictures of this, if I only had a third hand or a photographer...... Haha.
But, it has to come out with the actual starter motor facing down and the solenoid straight up. It seems as though it will not fit between the UCA and the Manifold flange, but I assure you that it will.

Once you have it out, it will literally take you 5 minutes to swap everything out.
I just clamp it in a vise and go to work. There are three Slotted (phillips) head screws that hold the solenoid cap on. These are usually on fairly tight, but if you put the screwdriver on and give the end of it a quick hit, or two, they will break free from the shock.
Now that its off, you can see the plunger and the contacts. Sometimes they look so back its crazy, and other times, like this time, they do not look horrible....but bad enough.


You can clearly see the difference in from the old plunger to the new, and then i have some side by side comparisons of the contacts.


The contacts simply unbolt from the side of the solenoid housing. Be careful and take note of the washers and all the plastic parts that fit on the studs to seal up the solenoid.
After you put all the contacts/plunger back together.....you can attempt to reinsert the starter..
Now the funny thing is, It takes so long to get it out and then it literally slid right back in in less than a minute. Haha....That one will make you scratch you head every time.
Here it is on its way back in. See you again in another 150,000 miles.....

The rest of the installation is simply the reverse of the removal. Hardest part of the installation is trying to hold the starter with one hand and start the upper bolt with the other. This step helps to have another person there to help hold it while you thread the bolts back in by hand.
Wasn't to bad.....I did not time myself, but it took me about 1.5 hours to do everything. I was in no hurry.
Hope this provides some info for anyone having the same issue.
Oh yeah....The Contacts and Plunger were a whopping $13.95......Please fellow yotatech members.....do not pay to have this done, and do not put a new starter in. These ones with last the life of the vehicle and then some.
Last edited by Gizler00; 04-04-2017 at 05:59 AM. Reason: Spelling errors
04-07-2017, 05:44 AM
#26
Couple questions for my Fellow Yotatech people....
I am going to purchase a lift soon. I was looking at the SS 1.2 but its a little pricey for what I can afford right now. Plus, some of the components that come with it, I can fab up myself at the shop.
So.......I was looking at this: http://toyteclifts.3dcartstores.com/...er_p_1378.html
I have had good luck with Bilsteins in the past. I actually have a set of 5100's on my f-150 that have been great the last 6 years. And if I wanted to, I could upgrade to Coilovers later on. But its not a necessity right now.
I am just looking fro 3" of lift and then will add my own bumpers later. then ultimately some 285/75/16's
At this point I want to get it up in the air enough to do some wheeling, but still have it streetable for DD. Right now, I do not want to make it as extreme as my 85 was. Maybe down the road, but not right now.
My parents live in Moab and we drive out there once a year. I want this to be able to make the drive, have some fun wheeling while we are there, and then make the drive home.
What are your thoughts on that lift?
04-17-2017, 05:31 PM
#27
Registered User
Join Date: Oct 2016
Posts: 142
Likes: 0
Received 0 Likes
on
0 Posts
Two things for you:
Great start on the runner! Getting those starters out of the wheel well can be tricky, having a 2" body lift helps...something to consider!
Second, I have experience lifting and have read extensively on lifting IFS rigs. One thing that seems to be a common issue (more so with someone looking to do some wheeling) are suspension lifts that are 3" or exceed 3" in the front. The upper ball joints are extremely likely to hit the coil spring when the suspension is flexed/drooping due to the increased angle of the upper control arms. It's best to keep it at 2.5" or less. In my opinion, the best way to lift these trucks are with a combination of a small suspension lift and a small body lift. I have a 2.5" suspension and 2" body. Both are small enough where minimum extensions need to be made. I didn't need to touch the shifter or any lines, just needed the bumper brackets for the body lift, longer shocks (Bilstein 5100s) and decided to go with extended sway bar links to help reduce body roll.
04-17-2017, 06:24 PM
#28
Registered User
I've lifted two 3rd gens 3". The first one was the love of my life. Nothing but the best for it. I started withe the Toytec 2.5" lift kit because I thought it would level it out. For it you would use a spacer placed between the coil and top plate in the front coilover and a taller spring in the back. This didn't set it up level and was a real chore to install on my own. When it didn't set level, I contacted toytec and they sent me the remaining components of the 3" lift for only the difference in the original price of the 3" kit which made me a toytec fan for life. They were super helpful and even rush shipped me the parts without any charge and without me even asking them to. It was a great package. Half the lift under the coil and half over it which was a great balance.
On my current rig, which was a budget job, I went with a rough country kit which was all done over the coilover. It was half the work but was obviously a lesser quality job. I liked the back coils more but didn't like the front setup as well. It was much cheaper and easier but I would go with the Toytec kit if I was married to this rig as my one and only.
The long and short of it. If I wanted cheap and easy, the rough country is a great kit. If you plan on handing it down to your son, go with one of the Toytec options and have a shop lined up to do your coilover work if you don't buy complete coilovers. Trying to do it on your shop bench is difficult if not dangerous if you go that route. I always ran 265/75-R16s but I'm sure you could fit 285s so long as you opt for the 3" kit.
04-18-2017, 08:03 AM
#29
Two things for you:
Great start on the runner! Getting those starters out of the wheel well can be tricky, having a 2" body lift helps...something to consider!
Second, I have experience lifting and have read extensively on lifting IFS rigs. One thing that seems to be a common issue (more so with someone looking to do some wheeling) are suspension lifts that are 3" or exceed 3" in the front. The upper ball joints are extremely likely to hit the coil spring when the suspension is flexed/drooping due to the increased angle of the upper control arms. It's best to keep it at 2.5" or less. In my opinion, the best way to lift these trucks are with a combination of a small suspension lift and a small body lift. I have a 2.5" suspension and 2" body. Both are small enough where minimum extensions need to be made. I didn't need to touch the shifter or any lines, just needed the bumper brackets for the body lift, longer shocks (Bilstein 5100s) and decided to go with extended sway bar links to help reduce body roll.
Great start on the runner! Getting those starters out of the wheel well can be tricky, having a 2" body lift helps...something to consider!
Second, I have experience lifting and have read extensively on lifting IFS rigs. One thing that seems to be a common issue (more so with someone looking to do some wheeling) are suspension lifts that are 3" or exceed 3" in the front. The upper ball joints are extremely likely to hit the coil spring when the suspension is flexed/drooping due to the increased angle of the upper control arms. It's best to keep it at 2.5" or less. In my opinion, the best way to lift these trucks are with a combination of a small suspension lift and a small body lift. I have a 2.5" suspension and 2" body. Both are small enough where minimum extensions need to be made. I didn't need to touch the shifter or any lines, just needed the bumper brackets for the body lift, longer shocks (Bilstein 5100s) and decided to go with extended sway bar links to help reduce body roll.
I have always thought about a 1" body lift simply for clearance purposes.
I've lifted two 3rd gens 3". The first one was the love of my life. Nothing but the best for it. I started withe the Toytec 2.5" lift kit because I thought it would level it out. For it you would use a spacer placed between the coil and top plate in the front coilover and a taller spring in the back. This didn't set it up level and was a real chore to install on my own. When it didn't set level, I contacted toytec and they sent me the remaining components of the 3" lift for only the difference in the original price of the 3" kit which made me a toytec fan for life. They were super helpful and even rush shipped me the parts without any charge and without me even asking them to. It was a great package. Half the lift under the coil and half over it which was a great balance.
On my current rig, which was a budget job, I went with a rough country kit which was all done over the coilover. It was half the work but was obviously a lesser quality job. I liked the back coils more but didn't like the front setup as well. It was much cheaper and easier but I would go with the Toytec kit if I was married to this rig as my one and only.
The long and short of it. If I wanted cheap and easy, the rough country is a great kit. If you plan on handing it down to your son, go with one of the Toytec options and have a shop lined up to do your coilover work if you don't buy complete coilovers. Trying to do it on your shop bench is difficult if not dangerous if you go that route. I always ran 265/75-R16s but I'm sure you could fit 285s so long as you opt for the 3" kit.
On my current rig, which was a budget job, I went with a rough country kit which was all done over the coilover. It was half the work but was obviously a lesser quality job. I liked the back coils more but didn't like the front setup as well. It was much cheaper and easier but I would go with the Toytec kit if I was married to this rig as my one and only.
The long and short of it. If I wanted cheap and easy, the rough country is a great kit. If you plan on handing it down to your son, go with one of the Toytec options and have a shop lined up to do your coilover work if you don't buy complete coilovers. Trying to do it on your shop bench is difficult if not dangerous if you go that route. I always ran 265/75-R16s but I'm sure you could fit 285s so long as you opt for the 3" kit.
I am actually an Automotive Tech instructor and perform all the work at the shop where I teach or at home. Definitely good advice on taking the struts elsewhere is you do not have the proper tools. I have a wall mounted strut compressor here in the shop, so I have been able to swap coils, and struts out regularly. We are usually installing a lot of Lowering kits for the students. They all seem to want to drag their cars around town. haha.
But definitely going with just 3" and some 285's
I will get some pictures up when I get moving along on this project. I am going to order some new upper BJ's. I want to replace them while I am in there.
04-18-2017, 05:56 PM
#30
Contributing Member
Just caught your thread Gizler00, very nice start! Am jealous of your ability to replace metal bits so neatly, awesome.
04-18-2017, 09:33 PM
#32
Registered User
Thanks for the info. I have lifted many vehicles in the past and also had a pretty extensive build with my old 85 4runner. But I do not want to go to extreme with this one. Just 3" and make it capable enough to tackle wherever I point it, yet be subtle enough to still DD every day.
I have always thought about a 1" body lift simply for clearance purposes.
Thanks for the info. I ended up ordering some stuff through Toytec last week. I picked up a set of Bilstein 5100's, toytec 3" coils, diff drop, and snagged a set of LC coils for the rear.
I am actually an Automotive Tech instructor and perform all the work at the shop where I teach or at home. Definitely good advice on taking the struts elsewhere is you do not have the proper tools. I have a wall mounted strut compressor here in the shop, so I have been able to swap coils, and struts out regularly. We are usually installing a lot of Lowering kits for the students. They all seem to want to drag their cars around town. haha.
But definitely going with just 3" and some 285's
I will get some pictures up when I get moving along on this project. I am going to order some new upper BJ's. I want to replace them while I am in there.
04-19-2017, 05:36 AM
#33
You know what I'm talking about on those coilovers. I had an appointment to have my spacers installed at a local shop one Saturday before I was going out of town and they called me 15 minutes before closing time and said they didn't get around to them. I had somewhere to be so I went up there, got them, rented some cheap spring compressors and did it on my shop bench. I feel like I was one round of the nut before breaking the all-thread they were made of. Without moving them I could see little bits of metal randomly popping off of the threads. When I took them back, I told them that they shouldn't be used again and offered to pay for them but they wouldn't let me do it. I sure do hope they took my advice and scrapped them. I'll never do that again.
04-28-2017, 08:23 AM
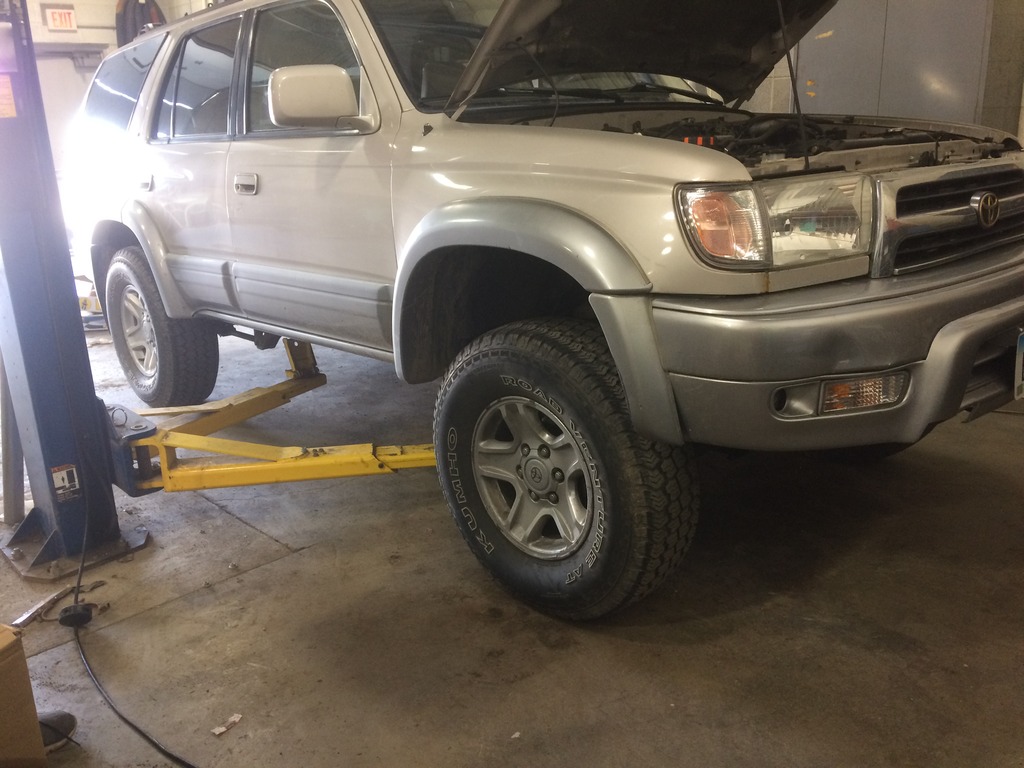
#34
Finally collected all my parts to install the Lift. I will say that this was one of the easiest installs I have done to date. The fact that the rear has coils makes the entire process go so extremely fast. I am used to tearing into, or tearing out, leaf packs, and u bolts.......
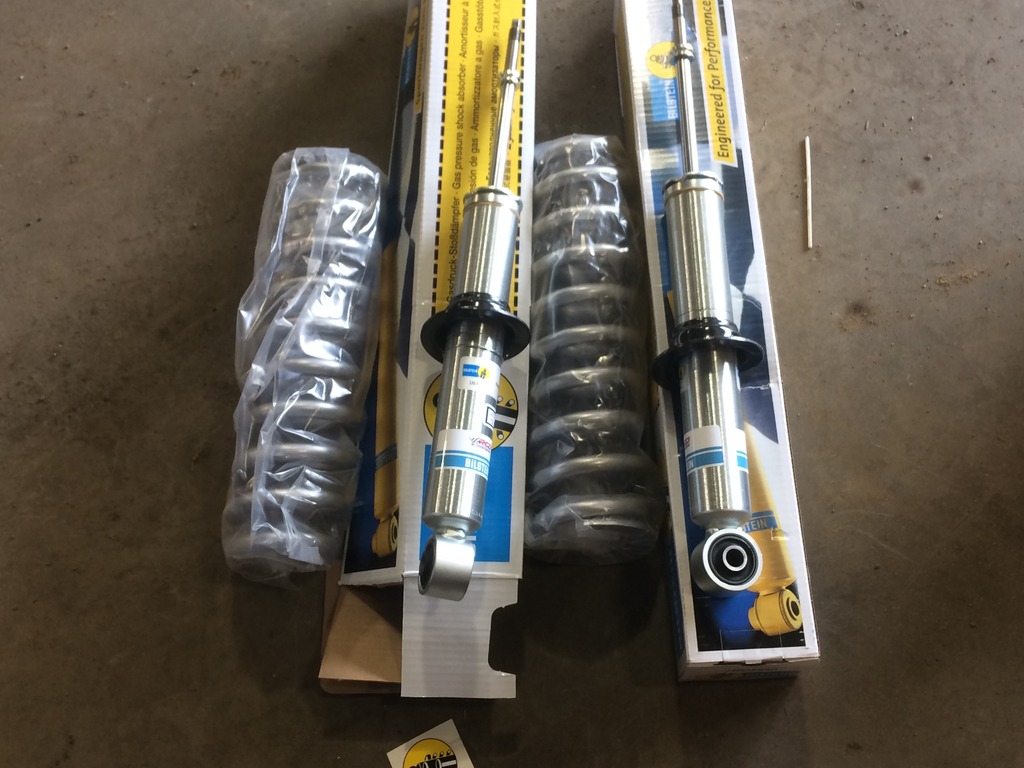
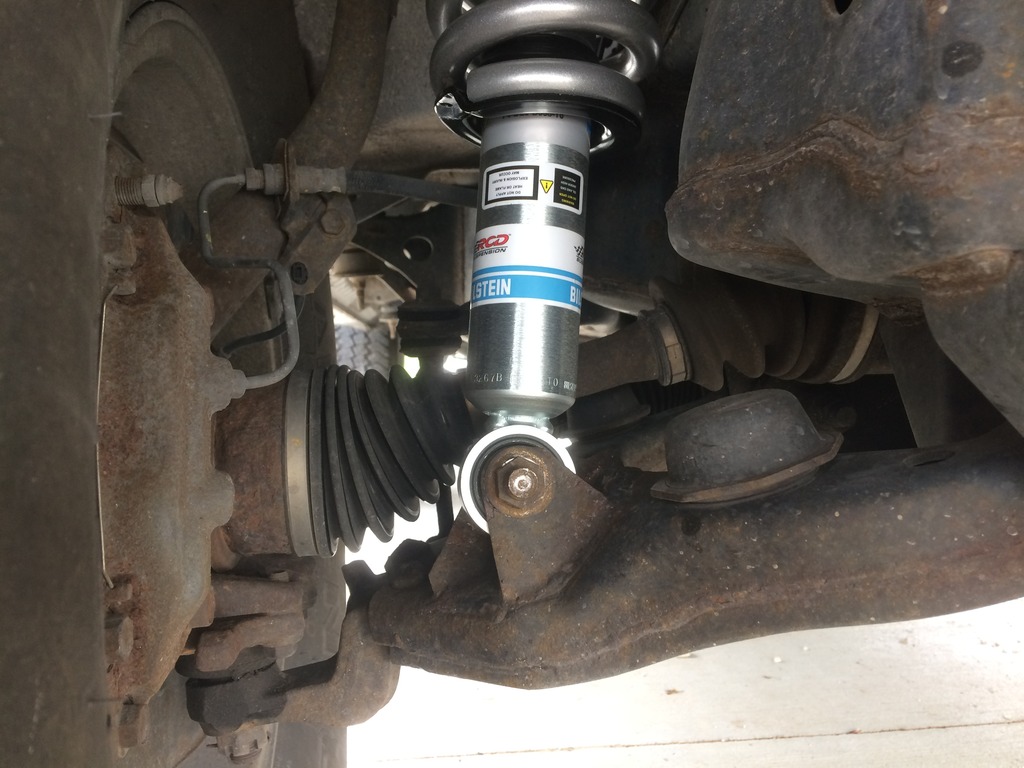
So Anyhow........As I stated before, I went with the Bilstein 5100's up front coupled with the Toytec/eibach 3" lift springs. And in the rear, I went with some Used 97 Lexus LX450 springs that were color coded Blue Yellow White, and Green Yellow White, and some Stock rear LC monroe shocks.
Here is a shot of the new front setup. Only thing not pictured are the new strut mounts I purchased.
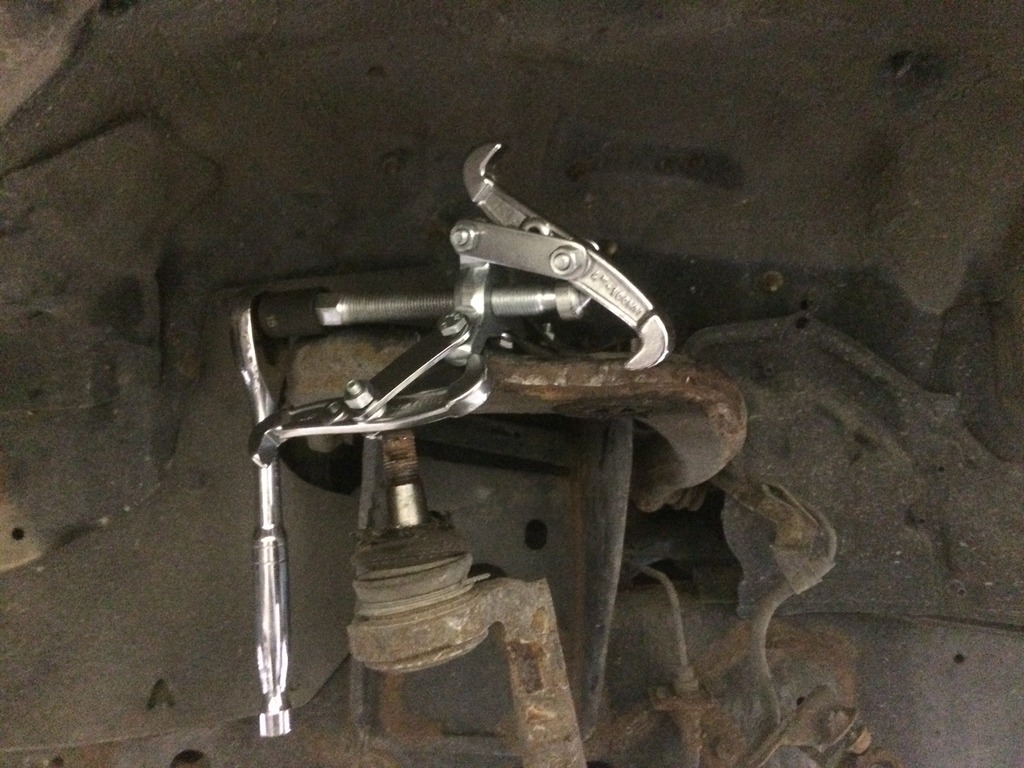
Just before disassembly. You do not have to take the upper BJ apart. I took the drivers side apart then realized that I did not need to and left the passenger side together. In the event that you do want to remove them, a 3-jaw puller does the trick.
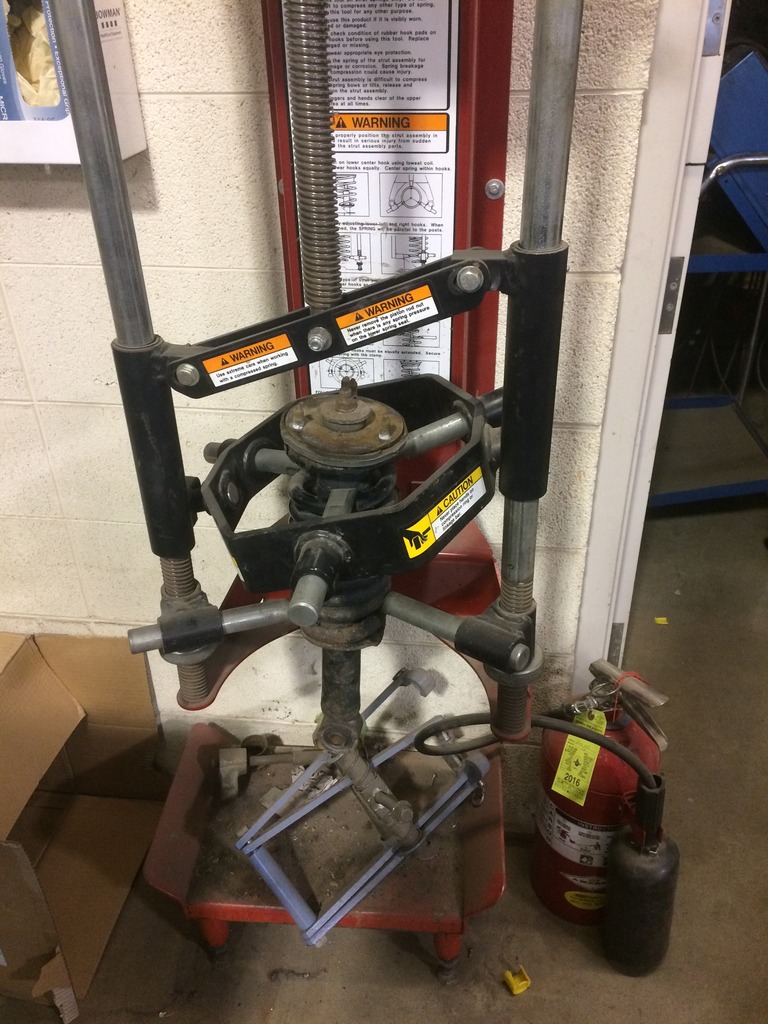
You need a spring compressor to disassemble these or you will have to pay someone who has one to do it for you. Luckily, I am an Auto Tech instructor and have access to everything I need. Here is a shot of one of the struts in the compressor.
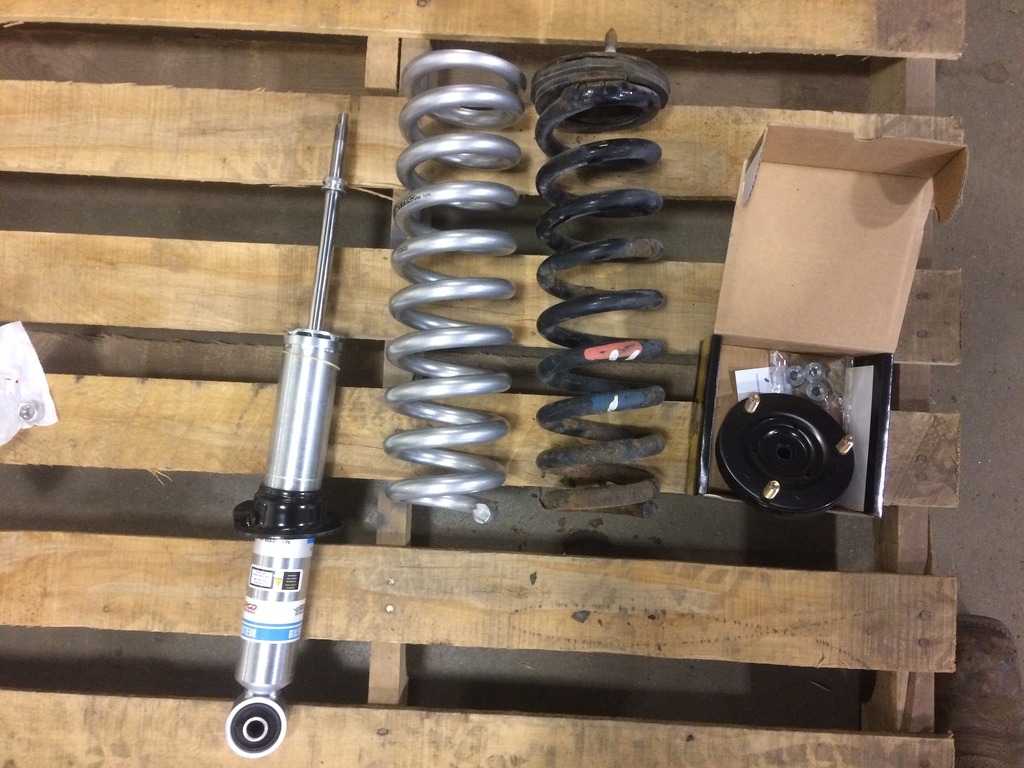
Heres what they look like apart. And next to a complete stock strut
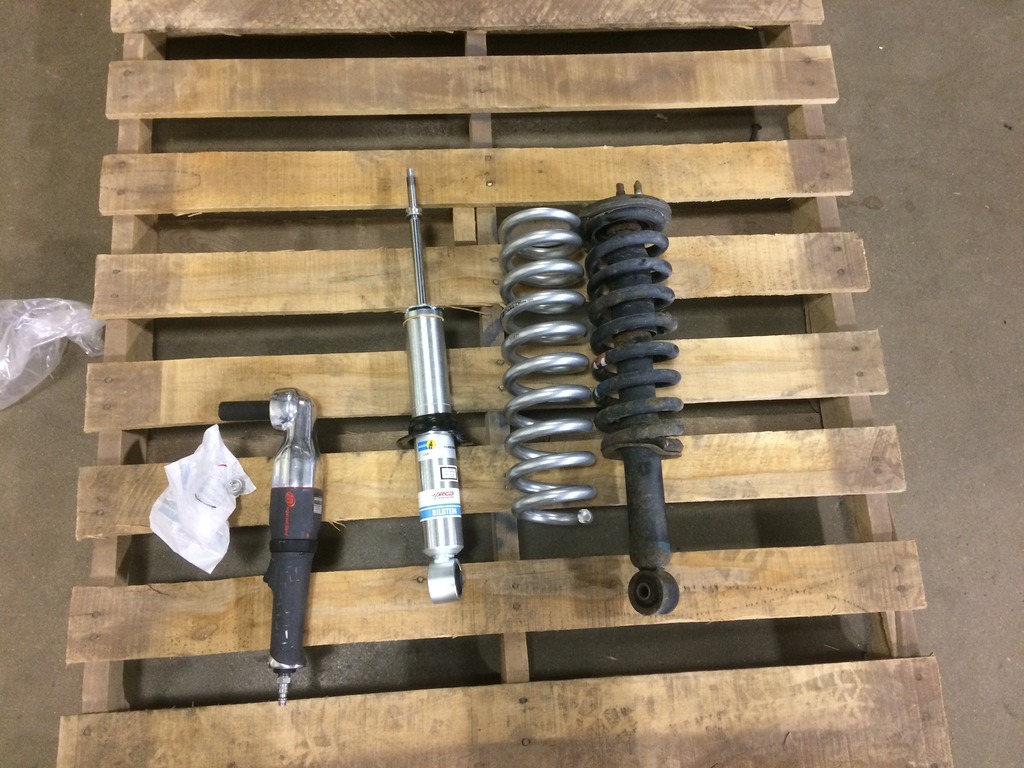
Here you can see a comparison of the springs. They appear to be the same length, but the Toytec is much stiffer.
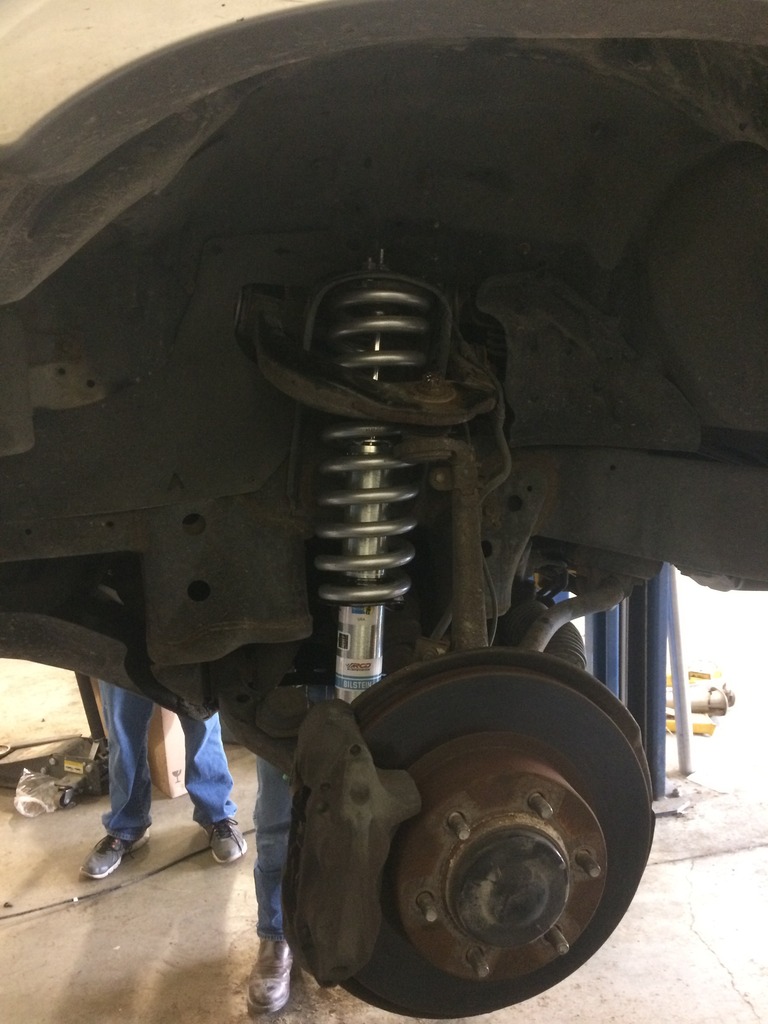
Installed. I went with the lowest setting on the bilteins and achieved 3" with it.
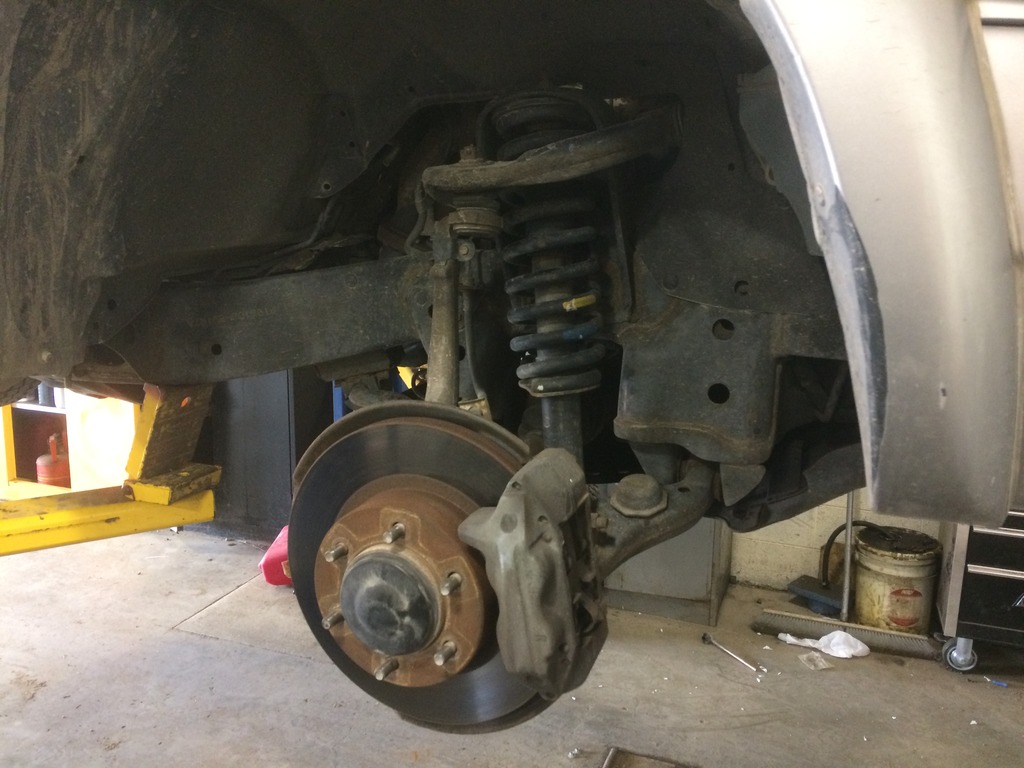
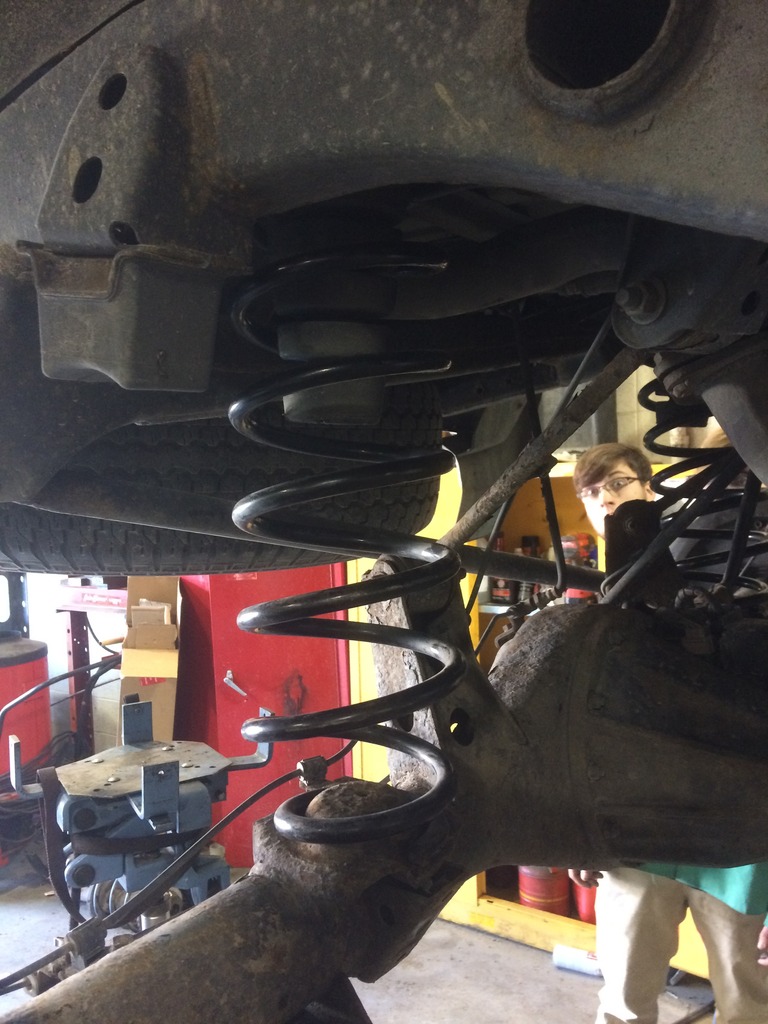
Great picture that shows just how saggy the rear was. This is with the front installed and the back still stock.
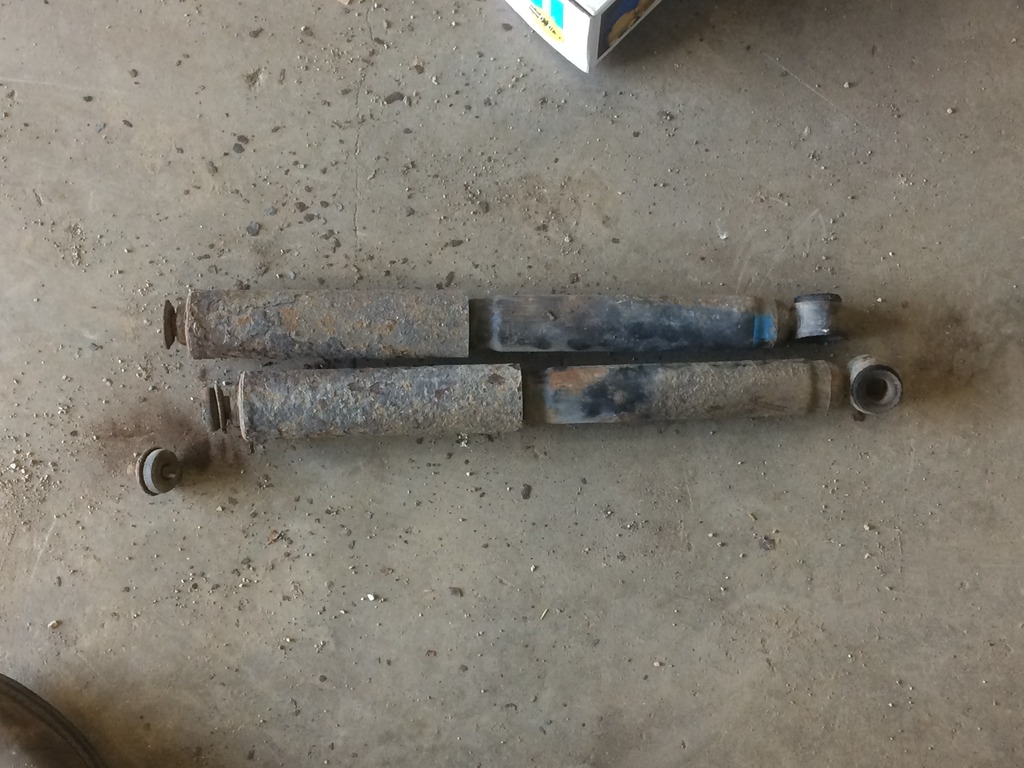
I recommend cutting the rear shocks out. The stud nuts were so covered in dirt/grime and were frozen on. Plus there is hardly any room to get a good purchase on anything to break them free. So I cut the heads off with a sawzall.
I failed to get pictures of this, but I loosened and removed the lower link front bolts and let them hang. Without doing this, even with the shocks removed, you will not have enough flex to get the springs out.
After the links were disconnected, the rear springs basically fell out! They were so worn out it wasnt even funny.
New springs in!
Now this took some time and finesse, because they were much longer than the stock ones. I actually had to use Benchtop spring compressors to compress the springs enough to get them into the proper location while I had some students pulling up on one side of the axle and some on the opposite side pushing down.
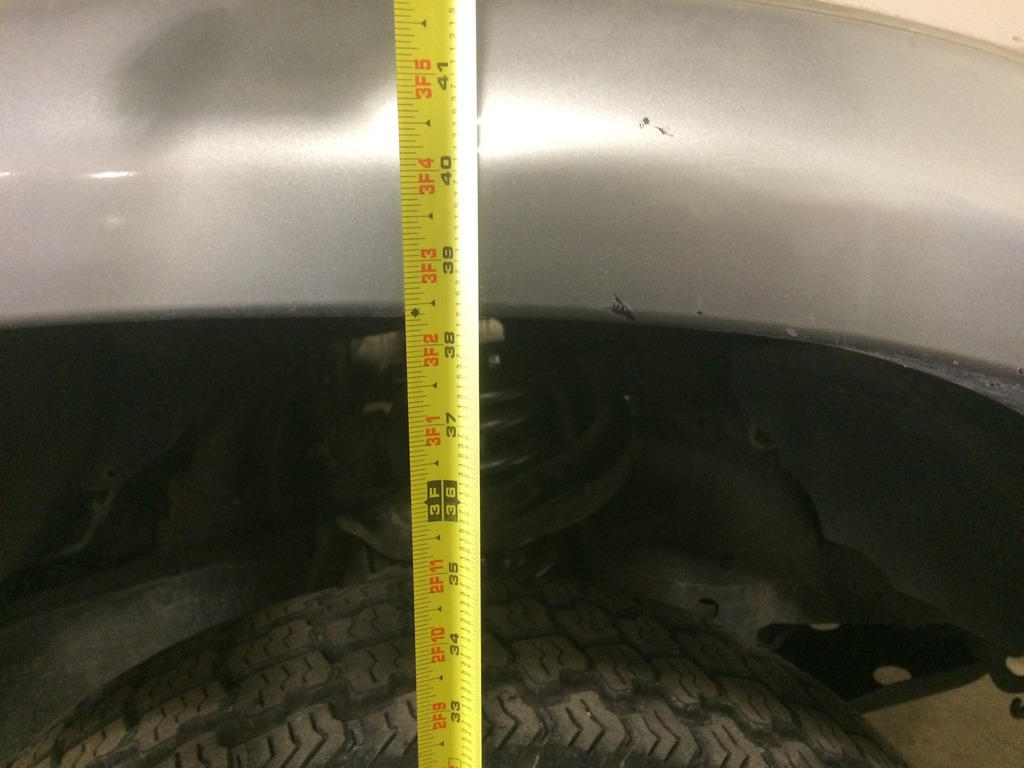
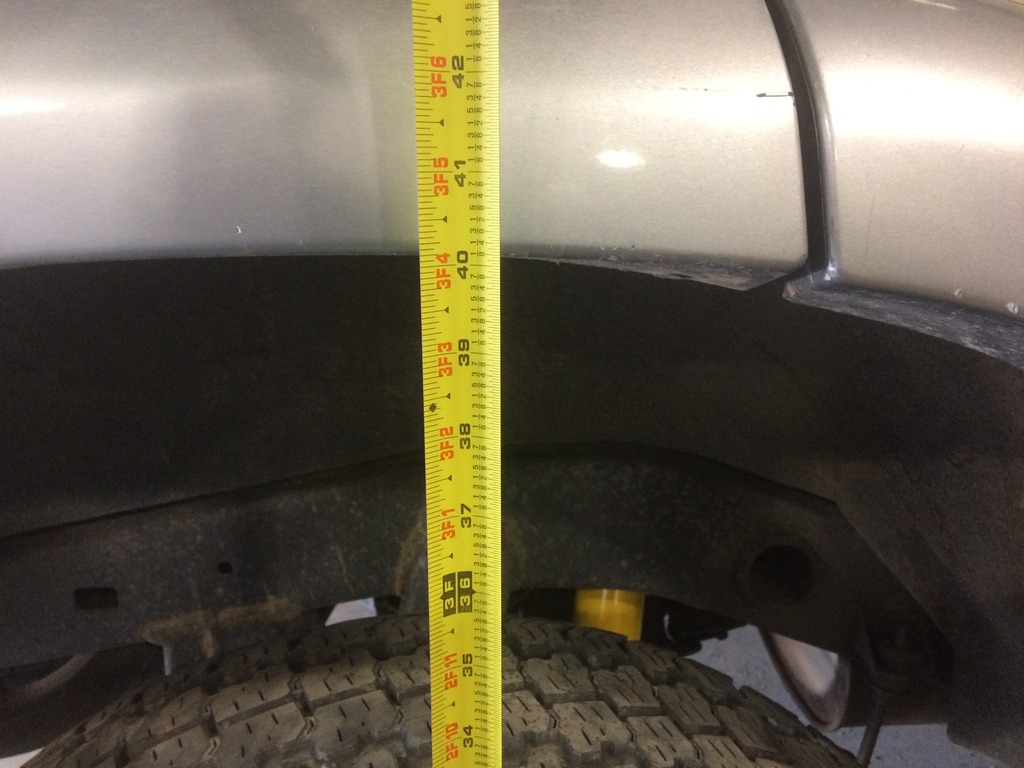
I also failed to get before measurements but here are the afters.
Here are a few pictures of after.
The CV angle is not that bad. But I did install a 1" diff spacer this morning.
This is before the spacer. I will have to get one of after.
Finally a picture that I put together to show the actual difference of before and after. Its hard to tell until you see this.

So.... Now a list of stuff I need.
285/75/16's
Longer sway bar ends
and Extended Brake lines.
So Anyhow........As I stated before, I went with the Bilstein 5100's up front coupled with the Toytec/eibach 3" lift springs. And in the rear, I went with some Used 97 Lexus LX450 springs that were color coded Blue Yellow White, and Green Yellow White, and some Stock rear LC monroe shocks.
Here is a shot of the new front setup. Only thing not pictured are the new strut mounts I purchased.

Just before disassembly. You do not have to take the upper BJ apart. I took the drivers side apart then realized that I did not need to and left the passenger side together. In the event that you do want to remove them, a 3-jaw puller does the trick.


You need a spring compressor to disassemble these or you will have to pay someone who has one to do it for you. Luckily, I am an Auto Tech instructor and have access to everything I need. Here is a shot of one of the struts in the compressor.

Heres what they look like apart. And next to a complete stock strut

Here you can see a comparison of the springs. They appear to be the same length, but the Toytec is much stiffer.

Installed. I went with the lowest setting on the bilteins and achieved 3" with it.

Great picture that shows just how saggy the rear was. This is with the front installed and the back still stock.

I recommend cutting the rear shocks out. The stud nuts were so covered in dirt/grime and were frozen on. Plus there is hardly any room to get a good purchase on anything to break them free. So I cut the heads off with a sawzall.

I failed to get pictures of this, but I loosened and removed the lower link front bolts and let them hang. Without doing this, even with the shocks removed, you will not have enough flex to get the springs out.
After the links were disconnected, the rear springs basically fell out! They were so worn out it wasnt even funny.
New springs in!

Now this took some time and finesse, because they were much longer than the stock ones. I actually had to use Benchtop spring compressors to compress the springs enough to get them into the proper location while I had some students pulling up on one side of the axle and some on the opposite side pushing down.
I also failed to get before measurements but here are the afters.


Here are a few pictures of after.


The CV angle is not that bad. But I did install a 1" diff spacer this morning.
This is before the spacer. I will have to get one of after.

Finally a picture that I put together to show the actual difference of before and after. Its hard to tell until you see this.


So.... Now a list of stuff I need.
285/75/16's
Longer sway bar ends
and Extended Brake lines.
Last edited by Gizler00; 04-28-2017 at 12:02 PM. Reason: Picture was not working
04-28-2017, 11:17 AM
#35
Looks great Mark, it's got to be nice having access to the shop and all the tools, alot less knuckle busting when you have the right tools for the job, lol! How does the ride feel compared to before?
PS: I couldn't see you last pic before and after, it said it couldn't be found, maybe it's just me....
PS: I couldn't see you last pic before and after, it said it couldn't be found, maybe it's just me....
04-28-2017, 12:09 PM
#36
Looks great Mark, it's got to be nice having access to the shop and all the tools, alot less knuckle busting when you have the right tools for the job, lol! How does the ride feel compared to before?
PS: I couldn't see you last pic before and after, it said it couldn't be found, maybe it's just me....
PS: I couldn't see you last pic before and after, it said it couldn't be found, maybe it's just me....
Thanks Buddy! It is definitely a blessing sometimes to have access to all the stuff I need to complete a project or a repair.
The ride is unbelievable compared to before. 100 times better. The stock setup was so clapped out and beat down that it was hitting the bump stops in the rear when going over speed bumps. So A lot of the improvement is because the stock setup was so worn out....But.....I have the bilsteins on my f150 and they ride great on there also.
I fixed the last two pictures. For some reason Photobucket would not let them show up.
04-29-2017, 07:29 AM
#38
There are a few I'm trying to decide between.
Kenda klever
Hercules Ironman AT
Hercules Ironman MT
I don't mind an MT, but I would like one that has some decent siping as it will be driven on the road more than off.
Which is where I'm trying to find an AT that performs off road well. I'm comes the BFG KO2......but they are $$$$
04-29-2017, 01:05 PM
#39
Contributing Member
Cooper's gotten more popular with their a/t tires and sipes to boot. Don't have personal experience with them, just throwing another brand at you to look at.


