carignad's 1999 4runner build up thread
 07-17-2012, 06:56 PM
#1
Registered User
Thread Starter

Join Date: Apr 2009
Posts: 49
Likes: 0
Received 0 Likes
on
0 Posts
carignad's 1999 4runner build up thread
So here I find myself with a little spare time and a few spare dollars to get a slow start on my 'runner. Ive got some big plans for her, but lets start out with the small stuff first and as more time and more money come up, we can get some real work done on it.
First off, I got into an accident a few months back and busted up my drivers side fender and headlight pretty good. Shortly after that, having suffered the infamous strawberry milkshake, the transmission quit on me about 6,000 miles after the flush.
I got to work on working up a Satoshi mod grill, but tweaked it a bit. Heres that build up:
This is the grill that I started with. Money was definitely a factor here, so I was trying to work with what I had. I knew from the start that the break on the top left corner was going to be a problem. Also, the center emblem was broken away from the small plastic fins

I cut out the center plastics and was left with these three pieces...awesome...

So I tried my hand at fiberglass for the first time. Turns out that the small, bottom part of the frame didnt bond so well. Very ugly, very messy and a good learning experience.

Here is where I glassed that upper left hand break back to the main body

Since I pretty well failed at getting that bottom rail to bond to the main body, I decided to use a piece of small aluminum angle that I picked up at Home Depot for really cheap (~$10). I had to notch the ends and bend them in in order to create that bottom lip

I secured the aluminum to the plastic with some self tapping sheet metal screws

Next, the plastic on the insides all along the side was completely destroyed, so again my first time, I tried my hand at some bondo work. I got a more or less decent mold made up using some cardboard and filled in probably about 3 or 4 layers of bondo.


So I sanded it all down nice and smooth, going up from 80 to 120 and finally to 250 grit sandpaper and gave it a couple good coats of flat black. Here it is prepped for paint

And all done

Im going to flash forward a bit and skip a few pics. The next few steps were to take some expanded aluminum rain gutter covers (also from Home Depot) and create the wire mesh "grill" part. The gutter covers were a little too narrow, so I had to use one and a half and zip tie them together, but looking at the grill as a whole, its barely noticeable. This is a kinda grainy picture and please dont mind the ugly ass couch and my daughters rubber ducky haha!

Instead of going with the calssic FJ toyota emblem to make this a full blown "Satoshi" mod, I decided to order up some older style 4runner grill emblems. I sourced the "Toyota" and the "V6" badges and was able to just use the provided screws to secure it to the expanded aluminum. The holes were just big enough to allow the screw through and the mesh is sturdy enough to hold the badges in place really well.
This picture is just a quick placement, not a full install, just to see how it would look

So thats it for that! Ive been puttering around, waiting to have the money to fix this damn thing and doing some other cheaper, easier mods as well. I didnt take any pics, but Ive done the deckplate mod as well as the ISR mod. I have an OME "heavy" suspension system kit that I got from www.rocky-road.com I havent had the chance to get the front installed yet, but I did get the rear done last winter. I had a whole bunch of pictures of that, but they seem to have mysteriously dissapeared, along with some awesome wheeling pics. But as soon as I get the truck rolling again, the front suspension will be done as well. I also had a few holes in my muffler a year or so back, so it wouldnt pass inspection, so I decided to go nuts and get a flowmaster muffler installed too. With the deckplate, ISR mods and the flowmaster, she sounds wicked mean!
First off, I got into an accident a few months back and busted up my drivers side fender and headlight pretty good. Shortly after that, having suffered the infamous strawberry milkshake, the transmission quit on me about 6,000 miles after the flush.
I got to work on working up a Satoshi mod grill, but tweaked it a bit. Heres that build up:
This is the grill that I started with. Money was definitely a factor here, so I was trying to work with what I had. I knew from the start that the break on the top left corner was going to be a problem. Also, the center emblem was broken away from the small plastic fins
I cut out the center plastics and was left with these three pieces...awesome...
So I tried my hand at fiberglass for the first time. Turns out that the small, bottom part of the frame didnt bond so well. Very ugly, very messy and a good learning experience.
Here is where I glassed that upper left hand break back to the main body
Since I pretty well failed at getting that bottom rail to bond to the main body, I decided to use a piece of small aluminum angle that I picked up at Home Depot for really cheap (~$10). I had to notch the ends and bend them in in order to create that bottom lip
I secured the aluminum to the plastic with some self tapping sheet metal screws
Next, the plastic on the insides all along the side was completely destroyed, so again my first time, I tried my hand at some bondo work. I got a more or less decent mold made up using some cardboard and filled in probably about 3 or 4 layers of bondo.
So I sanded it all down nice and smooth, going up from 80 to 120 and finally to 250 grit sandpaper and gave it a couple good coats of flat black. Here it is prepped for paint
And all done
Im going to flash forward a bit and skip a few pics. The next few steps were to take some expanded aluminum rain gutter covers (also from Home Depot) and create the wire mesh "grill" part. The gutter covers were a little too narrow, so I had to use one and a half and zip tie them together, but looking at the grill as a whole, its barely noticeable. This is a kinda grainy picture and please dont mind the ugly ass couch and my daughters rubber ducky haha!
Instead of going with the calssic FJ toyota emblem to make this a full blown "Satoshi" mod, I decided to order up some older style 4runner grill emblems. I sourced the "Toyota" and the "V6" badges and was able to just use the provided screws to secure it to the expanded aluminum. The holes were just big enough to allow the screw through and the mesh is sturdy enough to hold the badges in place really well.
This picture is just a quick placement, not a full install, just to see how it would look
So thats it for that! Ive been puttering around, waiting to have the money to fix this damn thing and doing some other cheaper, easier mods as well. I didnt take any pics, but Ive done the deckplate mod as well as the ISR mod. I have an OME "heavy" suspension system kit that I got from www.rocky-road.com I havent had the chance to get the front installed yet, but I did get the rear done last winter. I had a whole bunch of pictures of that, but they seem to have mysteriously dissapeared, along with some awesome wheeling pics. But as soon as I get the truck rolling again, the front suspension will be done as well. I also had a few holes in my muffler a year or so back, so it wouldnt pass inspection, so I decided to go nuts and get a flowmaster muffler installed too. With the deckplate, ISR mods and the flowmaster, she sounds wicked mean!
 07-17-2012, 07:19 PM
#2
Registered User
Thread Starter
Join Date: Apr 2009
Posts: 49
Likes: 0
Received 0 Likes
on
0 Posts
So that little misfit that I call my 4runner was sitting out in the yard, not doing anything and collecting pollen, so I figured, what the hell, Im gonna do something to that thing today. I decided on doing a spray on bed liner to do some detail work on her and give it a little bit of a distinctive look.
Here she goes. Keep in mind please that this is my first time doing any body paint work
I got it taped off pretty well and sanded down the parts I was going to paint with some 80 grit sandpaper to rough up the clear coat a bit and to give a good bonding surface for the paint. As you can see in the picture, that front fender was taken off and is awating replacement

I wanted to do a little curve on the hood and holy s**t did that take forever to do free hand!!

This one is a good one because it shows the pattern of how I went over the rear wheel wells. At first, I was going to make a larger loop over them, but I was having difficulty making a good symmetrical curve. In the end, I just followed the slight indented curve that is in the fender already. Even following that was kind of a pain in the a**

Here it is after the paint was all dried and the prep work stripped off. I think it came out pretty decent for never having done anything like this before

You'll notice that I painted the entire front fender. My reasoning behind that was that when I do end up replacing the drivers side, I would be very hard pressed to find one in a matching color, so Ill just paint over all of it and not have to worry about the whole mess in the end.
I was a little crooked on the right side, going up from the toyota emblem


Here is how the hood turned out. Ive got overspray like its, nobody's business on there, but Im going to be taking a clay bar to it in order to get all that off and make it look all purdy

Here is a shot of the passenger side. It gives a good look at what my little misfit is going to look like when its whole again

all in all, I think this came out pretty decent for a beginner job. The paint I used was Rustoleum Bed Liner that came in a regular rattle can. I used 2 full cans to do this, but could definitley use another to get really really good coverage. For 8 bucks a can, this was a quick, cheap and easy thing to do. It looks great, the texture is really good and it was a breeze to do. Most definitely would recommend this to someone who wants something to make them stand out and be a little different or unique out on the trail. And it does a pretty good job of keeping those little rocks from coming up and chipping the hell out of your paint. Lets be honest though, if your running trails, how worried are you about your paint?
Here she goes. Keep in mind please that this is my first time doing any body paint work
I got it taped off pretty well and sanded down the parts I was going to paint with some 80 grit sandpaper to rough up the clear coat a bit and to give a good bonding surface for the paint. As you can see in the picture, that front fender was taken off and is awating replacement
I wanted to do a little curve on the hood and holy s**t did that take forever to do free hand!!
This one is a good one because it shows the pattern of how I went over the rear wheel wells. At first, I was going to make a larger loop over them, but I was having difficulty making a good symmetrical curve. In the end, I just followed the slight indented curve that is in the fender already. Even following that was kind of a pain in the a**
Here it is after the paint was all dried and the prep work stripped off. I think it came out pretty decent for never having done anything like this before
You'll notice that I painted the entire front fender. My reasoning behind that was that when I do end up replacing the drivers side, I would be very hard pressed to find one in a matching color, so Ill just paint over all of it and not have to worry about the whole mess in the end.
I was a little crooked on the right side, going up from the toyota emblem
Here is how the hood turned out. Ive got overspray like its, nobody's business on there, but Im going to be taking a clay bar to it in order to get all that off and make it look all purdy
Here is a shot of the passenger side. It gives a good look at what my little misfit is going to look like when its whole again
all in all, I think this came out pretty decent for a beginner job. The paint I used was Rustoleum Bed Liner that came in a regular rattle can. I used 2 full cans to do this, but could definitley use another to get really really good coverage. For 8 bucks a can, this was a quick, cheap and easy thing to do. It looks great, the texture is really good and it was a breeze to do. Most definitely would recommend this to someone who wants something to make them stand out and be a little different or unique out on the trail. And it does a pretty good job of keeping those little rocks from coming up and chipping the hell out of your paint. Lets be honest though, if your running trails, how worried are you about your paint?
07-17-2012, 07:34 PM
#3
Registered User
Thread Starter
Join Date: Apr 2009
Posts: 49
Likes: 0
Received 0 Likes
on
0 Posts
Got one more quick little thing for tonight. Remember how I said I was visited by the dairy fairy and she gifted me with a wonderous strawberry milkshake for my engine and transmission? Well after about 6 months or so of sitting out in the driveway and doing nothing, I was finally able to get enough scratch together to buy a replacement tranny. Got an awesome deal off of ebay for it. Only paid $300 total ($100 shipping).
It came in today and I couldnt be more excited!! Im going to be away for training for the next few weeks, but when I get back, this is the first thing on my "to-do" list!!

ooo shiny!!


If she operates half as good as she looks, Ill be in business in no time! Its second hand, obviously, and has about 150k on it, which is just a little less than what mine had. Im not worried about it though, because before I had the milkshake incident, the old one was running strong and steady. In order to prevent another milkshake, Ive got a remote transmission cooler thats waiting to be plumbed in, so that will totally remove the transmission fluid from going into the radiator
Keep your eye out for updates!! Ive got a set of Trail gear rock sliders sitting in my basement waiting to be welded on, Im going to be locking up the rear, doing a rear disc brake conversion, front and rear bumpers and a hydro winch that Im planning on setting up a dedicated pump and resvoir for. Let me know what you guys think, and if you have any tips, tricks, hints, opinions, bi**hes, complaints, let me know!
It came in today and I couldnt be more excited!! Im going to be away for training for the next few weeks, but when I get back, this is the first thing on my "to-do" list!!
ooo shiny!!
If she operates half as good as she looks, Ill be in business in no time! Its second hand, obviously, and has about 150k on it, which is just a little less than what mine had. Im not worried about it though, because before I had the milkshake incident, the old one was running strong and steady. In order to prevent another milkshake, Ive got a remote transmission cooler thats waiting to be plumbed in, so that will totally remove the transmission fluid from going into the radiator
Keep your eye out for updates!! Ive got a set of Trail gear rock sliders sitting in my basement waiting to be welded on, Im going to be locking up the rear, doing a rear disc brake conversion, front and rear bumpers and a hydro winch that Im planning on setting up a dedicated pump and resvoir for. Let me know what you guys think, and if you have any tips, tricks, hints, opinions, bi**hes, complaints, let me know!
09-23-2012, 10:59 AM
#5
Registered User
Thread Starter
Join Date: Apr 2009
Posts: 49
Likes: 0
Received 0 Likes
on
0 Posts
Not quite yet. I've been working 13 hours a day this summer and I've had my daughter on the weekends, so time is at a premium for me right now. I do my best to fit time for it in and I've got it ready to drop, but I want to have it finished before it gets too much cooler, so I think I'm gonna give in and take it to a shop *hangs head in shame*. I've got plenty of other little things to do on this to keep me busy until then, like the tg rock sliders, the front OME suspension and fixing up the rear suspension as well. I've also still got to replace the drivers side fender and headlight, from my accident last winter. Check back, I'll keep updating as i go along
05-01-2013, 05:23 PM
#6
Registered User
Thread Starter
Join Date: Apr 2009
Posts: 49
Likes: 0
Received 0 Likes
on
0 Posts
wow, so Its been 8 months since the last post and I can finally say that the transmission is finally in and the ole girl is just about ready for inspection. I unfortunately didnt get any pictures of the process, but after lots of busted knuckles, more than a few choices swears and some nasty name calling, we are finally rolling again. After I got the tranny all buttoned up, I went thru and gave it a tune up as well. Im now running royal purple filters and oil, new NGK Iridium IX plugs and new NGK wires and went crazy and pulled the trigger on an Optima red top battery. Went ahead and replaced the headlights while I was at it too. The next project on the chopping block is OME suspension, which Ive got and are just waiting to be installed, then rear disc brake conversion and lockers. Pictures and updates are definitely forthcoming!
05-06-2013, 05:01 PM
#7
Registered User
Thread Starter
Join Date: Apr 2009
Posts: 49
Likes: 0
Received 0 Likes
on
0 Posts
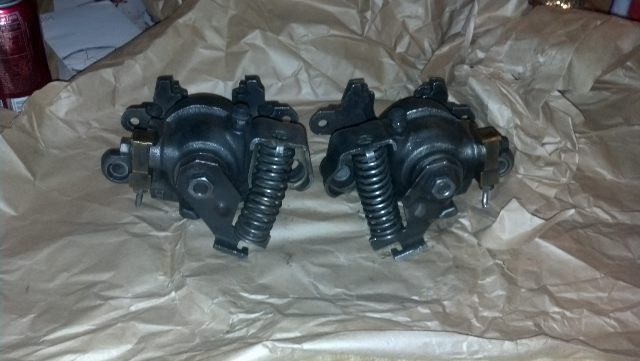
While driving to and from work today, i noticed the brakes are really soft, so i bumped up my plans for the rear disc brake conversation a little early, since i would have to do some brake work anyway for inspection. I'm going to be using sky manufacturing's brackets, rotors and lines. Since its required in the state of NH to have a mechanical e-brake, I've sourced a pair of '79 El Dorado rear calipers (pictured here, they arrived in the mail today) with the e-brake attachments. I'll add photos as the parts come in and the build progresses

Trending Topics

Thread
Thread Starter
Forum
Replies
Last Post
RedRunner_87
95.5-2004 Tacomas & 96-2002 4Runners (Build-Up Section)
84
06-01-2021 01:51 PM


