Yet Another Camper Build w/pics
 11-02-2005, 01:06 PM
#1
Registered User
Thread Starter
Join Date: Sep 2005
Location: Madison, WI
Posts: 249
Likes: 0
Received 0 Likes
on
0 Posts
I'm not done but I'm close enough to have photos to show what's going on. This project took me longer than I expected as I am making something straight and true from a bed that is anything but; compound curves suck. If I had the ability to fabricate in steel this project would have been much easier as I would have welded a metal frame directly to the bed then covered it with plywood instead of fitting a wood frame around everything.
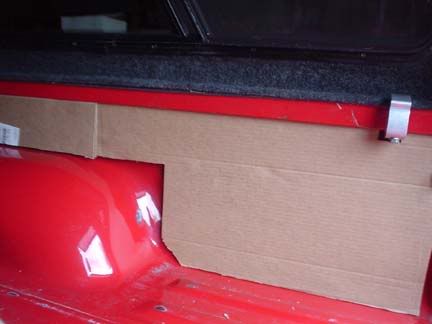
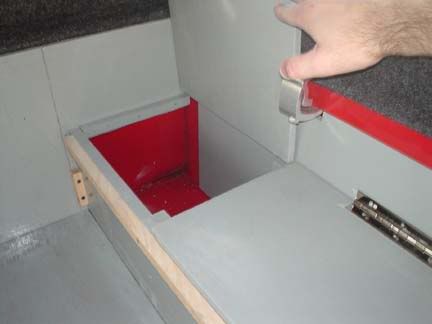
This was the hardest piece to fit so I mocked it with cardboard. It's under the bed rail and snug with the wheel well, topper clamps, tie-down points and bed corners.
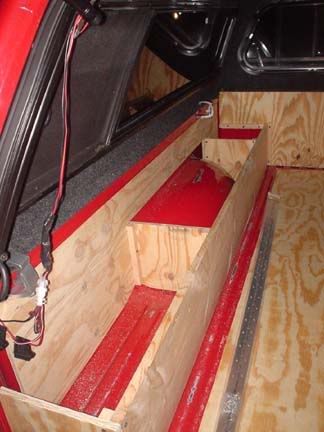
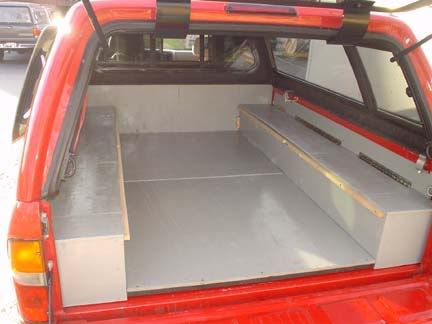
My tool boxes being framed up. Everything except the center rail is 1/2" plywood.
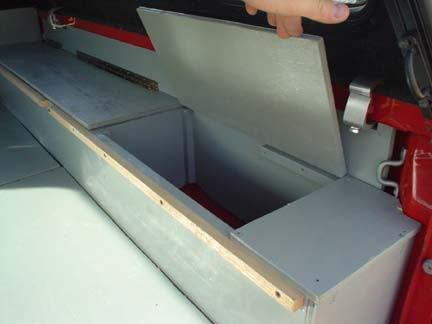
Sealed everything with Battleship Gray deck and patio paint. I often have wet paddling gear I throw in back so I don't want anything rotting. Here are my three compartments for stuff.
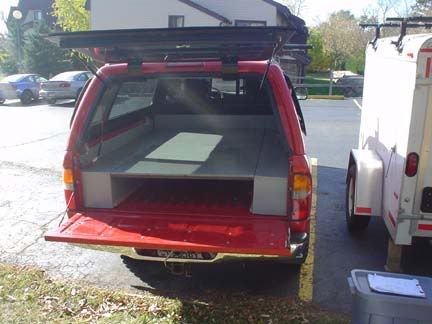
Then the best part, I can have a level platform for sleeping;
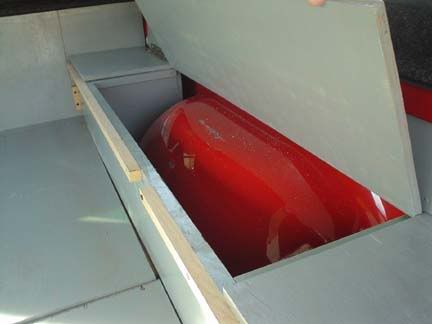
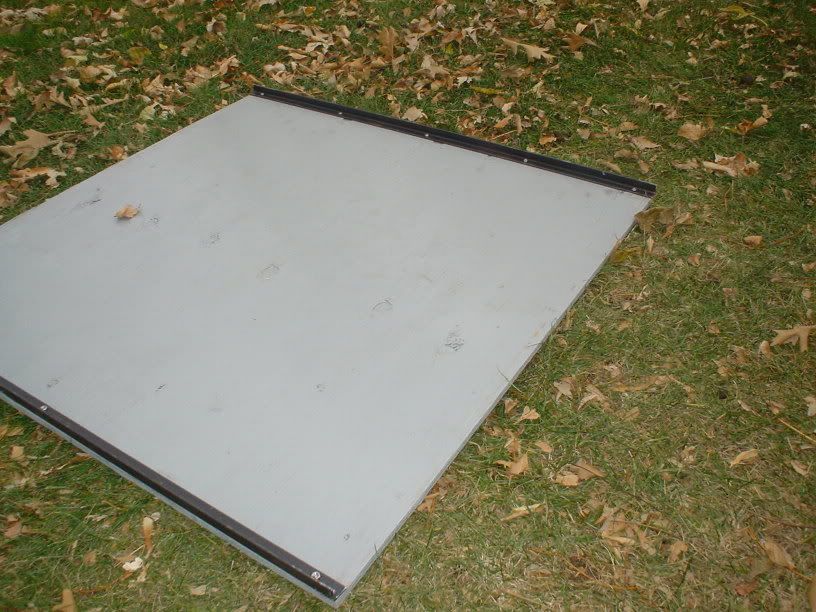
Look at that span, I used steel angle to prevent the plywood from sagging or breaking. From the bed to the bottom of the angle measures 9" and the inside width measures 36".
Here is the platform at its lower setting allowing me maximum head room for solo trips or for typical daily needs.
I only have a few more things to complete. One of which is a piece on the tailgate for protection and as a kitchen platform. Then the obvious thing that I am still waiting on is indoor/outdoor carpet. It's ordered, just waiting for it to arrive. Essentially every surface you see except inside the toolboxes will be carpeted.
Being the geek that I am, I'm looking into a flip down screen for movies and speakers placed somewhere in the back. It'll be tits!
I'll have carpeted pics asap.
This was the hardest piece to fit so I mocked it with cardboard. It's under the bed rail and snug with the wheel well, topper clamps, tie-down points and bed corners.
My tool boxes being framed up. Everything except the center rail is 1/2" plywood.
Sealed everything with Battleship Gray deck and patio paint. I often have wet paddling gear I throw in back so I don't want anything rotting. Here are my three compartments for stuff.
Then the best part, I can have a level platform for sleeping;
Look at that span, I used steel angle to prevent the plywood from sagging or breaking. From the bed to the bottom of the angle measures 9" and the inside width measures 36".
Here is the platform at its lower setting allowing me maximum head room for solo trips or for typical daily needs.
I only have a few more things to complete. One of which is a piece on the tailgate for protection and as a kitchen platform. Then the obvious thing that I am still waiting on is indoor/outdoor carpet. It's ordered, just waiting for it to arrive. Essentially every surface you see except inside the toolboxes will be carpeted.
Being the geek that I am, I'm looking into a flip down screen for movies and speakers placed somewhere in the back. It'll be tits!
I'll have carpeted pics asap.


 did you write down dimensions?
11-02-2005, 02:05 PM
did you write down dimensions?
11-02-2005, 02:05 PM
#5
Registered User
Thread Starter
Join Date: Sep 2005
Location: Madison, WI
Posts: 249
Likes: 0
Received 0 Likes
on
0 Posts
Nothing is made this pretty without proper prior planning. I have several sheets of schematics however I fudged a few things as I discovered problems. Everything can be cut from two sheets of plywood. Add two 48� piano hinges, 12� of steel angle and my cost was around $80. That doesn�t include the screws and bolts which I had on hand, nor the deck paint, which I also had from a previous project. I was hoping to keep this under $100 but the carpet is an additional $90. Do it right or don�t do it at all.
11-02-2005, 03:17 PM
#6
Registered User
Join Date: Oct 2004
Location: Wyoming
Posts: 280
Likes: 0
Received 0 Likes
on
0 Posts
Nice job!
Did you attach the toolboxes to the floor or side of the truck? And I'm assuming both sides have hinged access doors? Can't quite tell on the drivers side...
Looking forward to seeing the rest!
Did you attach the toolboxes to the floor or side of the truck? And I'm assuming both sides have hinged access doors? Can't quite tell on the drivers side...
Looking forward to seeing the rest!
11-02-2005, 03:27 PM
#7
Registered User
Thread Starter
Join Date: Sep 2005
Location: Madison, WI
Posts: 249
Likes: 0
Received 0 Likes
on
0 Posts
Hadn't installed the hinges at the time of the photo but yes, six doors in total.
As for attachment points, they're not. The fit is so tight I didn't feel the need, however I probably will in the near future. I'll probably use angle brakets to secure the boxes to the floor.
As for attachment points, they're not. The fit is so tight I didn't feel the need, however I probably will in the near future. I'll probably use angle brakets to secure the boxes to the floor.
Trending Topics
11-02-2005, 05:25 PM
#8
Registered User
Join Date: Aug 2004
Location: Sammamish, WA
Posts: 1,385
Likes: 0
Received 0 Likes
on
0 Posts
Very nice! I especially like how you can lower/raise the center floorboard as needed, that's a thoughtful touch. Does the rear of your taco sag now? How much weight did the whole thing add?
11-02-2005, 05:38 PM
#9
Registered User
Join Date: Mar 2003
Location: ELN
Posts: 1,647
Likes: 0
Received 0 Likes
on
0 Posts
Originally Posted by Randomness
Very nice! I especially like how you can lower/raise the center floorboard as needed, that's a thoughtful touch. Does the rear of your taco sag now? How much weight did the whole thing add?
11-02-2005, 05:54 PM
#10
Registered User
Thread Starter
Join Date: Sep 2005
Location: Madison, WI
Posts: 249
Likes: 0
Received 0 Likes
on
0 Posts
No, my truck does not ride any lower. I live in a snowy area and will be adding weight in a month for better traction anyway.
I have no idea how much weight I added. I used 4 ply for most of everything except for the centre span of which I utilized 7 ply. That stuff is expensive. I would doubt that it is more than 150 lbs. For my day job I sell boats. I tell people the difference between a $3000 fibreglass kayak and a $3600 kevlar kayak is $600 and 5 pounds. Take two water bottles with you and wham, you just ate away your weight savings. If a truck can't handle an extra 200 pounds then you might as well sell it for scrap.
I have no idea how much weight I added. I used 4 ply for most of everything except for the centre span of which I utilized 7 ply. That stuff is expensive. I would doubt that it is more than 150 lbs. For my day job I sell boats. I tell people the difference between a $3000 fibreglass kayak and a $3600 kevlar kayak is $600 and 5 pounds. Take two water bottles with you and wham, you just ate away your weight savings. If a truck can't handle an extra 200 pounds then you might as well sell it for scrap.
 11-03-2005, 03:46 PM
#12
Registered User
Thread Starter
Join Date: Sep 2005
Location: Madison, WI
Posts: 249
Likes: 0
Received 0 Likes
on
0 Posts
Would you believe my luck!?! I wanted to build this with steel but knew no one with a welder. Today, two days after I finish I find out that my boss needs help welding display racks for work. "You have a welder!" Darn and other four letter words for 400 Trebek. I knew he was into black smithing but now I guess he is my go to guy for anything metal since he just gave me open reign on his shop.
12-07-2005, 11:08 AM
#13
Registered User
Thread Starter
Join Date: Sep 2005
Location: Madison, WI
Posts: 249
Likes: 0
Received 0 Likes
on
0 Posts
It finally came
So after six weeks, the carpet I ordered finally came. So much for promised deliver in 7 days. That's the first and last time I'll be shopping at the Home Depot. The stuff looks good but it's way too cold to install it. Since I started this project I started seeing a girl with a garage. Hopfully things go well so I'll have an indoor work space. Oh, and she's pretty snazzy dame too.
nermal
nermal
12-07-2005, 01:21 PM
#14
Fits nice and very well thought-out; good work! Add a power inverter back there so you can run power accessories and some additional overhead lighting might be nice...
I'm a seakayaker too. Got any pics of the truck and trailer loaded for a trip?
I'm a seakayaker too. Got any pics of the truck and trailer loaded for a trip?
Last edited by paddlenbike; 12-07-2005 at 01:22 PM.
12-07-2005, 06:50 PM
#16
Registered User
Thread Starter
Join Date: Sep 2005
Location: Madison, WI
Posts: 249
Likes: 0
Received 0 Likes
on
0 Posts
paddlenbike,
Sorry, no pics of my trailer but you can see it off to one side of my truck in some of the photos. It's more for moving than for trips. Last trip of the season was a solo trip on Lake Superior. Couldn't decided what boat I wanted so I took two.
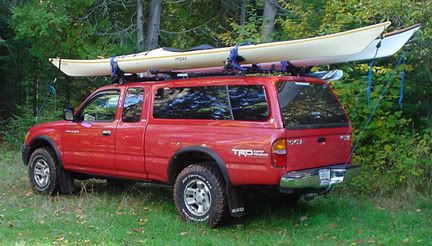
Sorry, no pics of my trailer but you can see it off to one side of my truck in some of the photos. It's more for moving than for trips. Last trip of the season was a solo trip on Lake Superior. Couldn't decided what boat I wanted so I took two.
12-07-2005, 06:53 PM
#17
Guest

Join Date: Dec 2002
Posts: 4,697
Likes: 0
Received 0 Likes
on
0 Posts
Very nice looking man! Much like my old set up was. Haha, we've got basically the same truck though yours is red, same canopy, and even the yotatech sticker is in the same place 
Just wait till you get to use it!
Just wait till you get to use it!
12-07-2005, 06:56 PM
#18
Banned
You are going to want some support for that platform, it will start bending and sagging with your weight on it. I have a similar set up for my dogs and the wood was flexing as we drove, so i add some 2x4 braces.
12-07-2005, 08:10 PM
#19
Registered User
Thread Starter
Join Date: Sep 2005
Location: Madison, WI
Posts: 249
Likes: 0
Received 0 Likes
on
0 Posts
phorunninduke,
The span is reinforced with angle iron. It's doing a pretty good job of keeping things from flexing. I have enough left over to add a third piece to each panel. Here's a pic:
nermal
The span is reinforced with angle iron. It's doing a pretty good job of keeping things from flexing. I have enough left over to add a third piece to each panel. Here's a pic:
nermal
12-07-2005, 09:21 PM
#20
Contributing Member
Hey, that looks like my panels for my "camper." I bolted aluminum "L" channel to the backside of the lip along the inside rail of the bed. It sticks out far enough that I can lay panels of plywood on the lip for the sleeping surface. They're reinforced with aluminum channel like you've done it. I ended up with minimal headroom. But, I built it for my solo trip through Death Valley. So, it worked just fine and gave me a lot of storage space below the sleeping area.
Nice work nermalgod! Looks great!
Nice work nermalgod! Looks great!


