Time to show off the new toys
 07-27-2008, 03:26 PM
#1
Registered User
Thread Starter
Join Date: Mar 2005
Location: New Brunswick, Canada
Posts: 1,756
Likes: 0
Received 7 Likes
on
6 Posts
2002 4Runner Buildup Thread
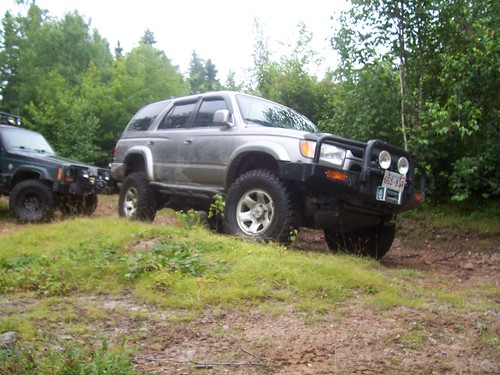
Just thought I'd post up to show a bit of the buildup on my '02 4Runner. I've recently installed a TJM T15 bumper with a Warn M8000 winch, some 4xInnovation sliders with kickouts (with DIY bolt on brackets for easy slider removal), and my most recent mod, the Sonoran Steel system #1.2 lift.
Soon to come is a dual band amateur radio (Yaesu FT-7800R) with a Larsen NMO 2/70B antenna.
Here is the link to some pictures of my buildup.
Soon to come is a dual band amateur radio (Yaesu FT-7800R) with a Larsen NMO 2/70B antenna.
Here is the link to some pictures of my buildup.
Last edited by GSGALLANT; 08-12-2008 at 05:24 PM.

 07-31-2008, 04:12 AM
#5
Registered User
Thread Starter
Join Date: Mar 2005
Location: New Brunswick, Canada
Posts: 1,756
Likes: 0
Received 7 Likes
on
6 Posts
Well, I got the alignment done after the install of my Sonoran Steel System 1.2 lift, and I must say I'm pleased with the lift in general. My local Toyota alignment specialist was not able to get the caster quite in spec without pushing the camber out of spec, so he chose to leave the camber in spec (since out of spec camber would cause un-even tire wear). Caster is slightly out of spec, but will get better when the suspension on the rear of the 4Runner settles down a bit.
The ride is quite good, although the steering seems a bit touchy now. Could be a combination of a few things... Brand new stiffer sidewall tires, brand new poly steering rack bushings, caster being out a bit, maybe? All of the above were done at the same time, so it's tough to say. It's not what I would define as problematic... just something to get used to.
General comments about the Sonoran Steel system 1.2 lift:
1. The install was really easy. Every component fit in like it should. Total install time for front and rear was 6 hours.
2. I set the front at 2" of lift (I have a TJM bumper and Warn winch, but no aftermarket heavy skidplates yet.) The front ended up being 3-1/8" higher than when I started (measured at the front fenders). The 2" of lift setting is designed to be 2" higher than a '99 4Runner (which sits taller stock than my 2002).
3. The rear end is sitting 4.5" taller than when I started (measured at the rear fenders). That will settle some in the next couple of months.
4. There is quite a bit more rear-end body roll now then there was with the stock suspension. That may decrease a bit when the rear suspension settles. I may be able to lessen the body roll by tightening the rear swaybar endlinks down some more, but I didn't want to risk breaking them due to the extra flex of the rear, so I left them with the bushings "snug".
5. My rear driveshaft rubs a bit on the gas tank skid at full stuff of the rear driver side wheel. A bit of "zip cut & large hammer clearancing", as well as moving my gas tank 1/4" towards the driver's side should fix that (I had previously moved the rear of my gas tank 1/2" towards the passenger side to make room to install the nut on the bolt that holds the rear-most leg of my sliders on the frame, but there is room to go back 1/4".
6. There was no emergency brake cable bracket extension piece included with the lift kit, so I had to make one. This was an easy fix, but that piece probably should be included with the kit because there is no way that I could have bolted the emergency brake cable bracket back to its stock location on the rear axle after the lift.
And hopper... the details about the lift can be found here.
Trending Topics
 08-05-2008, 06:22 AM
#9
Registered User
Thread Starter
Join Date: Mar 2005
Location: New Brunswick, Canada
Posts: 1,756
Likes: 0
Received 7 Likes
on
6 Posts
I went on a shakedown run of the new and improved 4Runner this weekend, and I must say everything performed flawlessly. We did the same trail that we did previously when the 4Runner was stock. This trail has lots of rocky sections in which I had no choice but to drag the 4Runner across when it was stock. I had gotten hung up quite a few times on the gas tank skid and cross members and rear axle the last time around.
This time, with the new lift and tires (Firestone Destination MT 265/75/16), the drive through was quite easy in comparison. The articulation was crazy. There are some spots that I was scared to tip over last time, but this time, all four tires stayed on the ground, and the cab was still sitting level in the same obstacles. I'll post some pics of the run when I get them off the camera.
I also just about finished the installation of my Yaesu FT-7800R Ham radio. It turned into a pretty clean install with the main radio mounted under the passenger seat and the detachable faceplate mounted up above the rear-view mirror. I'll link up to the writeup with pictures as soon as I get it ready.
08-05-2008, 04:54 PM
#10
Registered User
Thread Starter
Join Date: Mar 2005
Location: New Brunswick, Canada
Posts: 1,756
Likes: 0
Received 7 Likes
on
6 Posts
I thought I'd post up the before and after lift height numbers for my 4Runner, since these numbers seem to hard to come by. All values are measured from the floor.
Front passenger fender lip:
Before = 33"
After = 36-1/8"
Front driver fender lip:
Before = 32-7/8"
After = 36"
Rear passenger fender lip:
Before = 33-7/8"
After = 38-3/8"
Rear driver fender lip:
Before = 34-1/4"
After = 38-3/4"
Bottom edge of trailer hitch:
Before = 17"
After = 22"
Front passenger fender lip:
Before = 33"
After = 36-1/8"
Front driver fender lip:
Before = 32-7/8"
After = 36"
Rear passenger fender lip:
Before = 33-7/8"
After = 38-3/8"
Rear driver fender lip:
Before = 34-1/4"
After = 38-3/4"
Bottom edge of trailer hitch:
Before = 17"
After = 22"
08-05-2008, 05:11 PM
#12
Contributing Member
looks good but I think with a more agressive tire it would look even better that said good job on everything but be careful of the radio head unit up there may come back to bite you one day.
08-05-2008, 06:15 PM
#13
Registered User
Thread Starter
Join Date: Mar 2005
Location: New Brunswick, Canada
Posts: 1,756
Likes: 0
Received 7 Likes
on
6 Posts
Please elaborate on what you mean by the radio head unit coming back to bite me because of where it's mounted.
08-12-2008, 05:30 PM
#14
Registered User
Thread Starter
Join Date: Mar 2005
Location: New Brunswick, Canada
Posts: 1,756
Likes: 0
Received 7 Likes
on
6 Posts
I finished installing the locking master kill switch, the "armed" indicating lamp and the in cab winch control switch for my Warn M8000 winch. I attached the wiring diagram that I made up in a new thread here.
Last edited by GSGALLANT; 08-13-2008 at 05:36 AM.

Thread
Thread Starter
Forum
Replies
Last Post
MMA_Alex
86-95 Trucks & 4Runners (Build-Up Section)
25
04-18-2017 05:07 AM
icentropy
86-95 Trucks & 4Runners
4
07-09-2015 02:12 PM


