
 04-15-2016, 09:09 AM
Last edit by: IB Advertising
See related guides and technical advice from our community experts:
Browse all: Toyota 4Runner Engine Guides
- Toyota 4Runner 1996-2002: How to Replace Valve Cover Gaskets
Step by step instructions for do-it-yourself repairs.
Browse all: Toyota 4Runner Engine Guides

Replacing valve cover gasket
11-23-2009, 10:16 PM
#21
Registered User

Join Date: Aug 2008
Location: Corpus Christi, TX
Posts: 56
Likes: 0
Received 0 Likes
on
0 Posts
1. Where is the load proportioning valve on my rig(97, 3.4, 2wd)? A pic would be helpful too.
We don't have one, only the Tacomas.
2. It looked like the hawk pads had shims attached to it already, am i right?
Looks like it from the photo
...There is also a little piece of metal attached to the brake pad that I broke off, i didn't bother to put it back on. I'm guessing thats the metal that rubs to the rotor when there is no pad left to tell you that you need to replace your pads.
Was it a small 90* bent piece of metal held on by a screw or rivet at the end of the pad? If so, then thats exactly what it was.
 11-23-2009, 10:59 PM
#22
Registered User

Join Date: Jan 2004
Posts: 234
Likes: 0
Received 0 Likes
on
0 Posts
Replacing the valve cover gasket isn't as hard as it looks but it does take some time to get to it. The passenger side is the easiest but the driver side will take some time to fight the wiring harnesses and other stuff that is in the way.
Heres a couple of pics from my project:
https://www.yotatech.com/forums/f2/5...beware-149594/
Heres a couple of pics from my project:
https://www.yotatech.com/forums/f2/5...beware-149594/
12-14-2009, 12:00 PM
#24
Registered User
Thread Starter
Join Date: Sep 2009
Location: Sunny San Diego
Posts: 129
Likes: 0
Received 0 Likes
on
0 Posts
Update: parts quote
so i've decided to replace my valve cover gasket bcause it's still leaking in the back (near the firewall). I leaks really bad especially after a long drive.
Here is the quote for the parts:
(2) valve cover gaskets = $44.30
(6) Spark plug gaskets = $17.88
(16) "crush" washer = $14.08
(2) air intake plenum gaskets = $23.36
this is with a 15% discount.
stay tuned folks, i will be tackling this job soon!
Here is the quote for the parts:
(2) valve cover gaskets = $44.30
(6) Spark plug gaskets = $17.88
(16) "crush" washer = $14.08
(2) air intake plenum gaskets = $23.36
this is with a 15% discount.
stay tuned folks, i will be tackling this job soon!
 12-14-2009, 08:02 PM
#26
Registered User
Thread Starter
Join Date: Sep 2009
Location: Sunny San Diego
Posts: 129
Likes: 0
Received 0 Likes
on
0 Posts
The Culprits
all leaks are coming from the head of the rotating part..
I think i need to buy the gaskets for those too?
these are the part nos i have so far:
(2) valve cover gaskets/11213-2020/$44.30
(6) sprkg plug seals/11193-70010/$17.88
(16) crush washers/90210-05007/$14.08
(2) air intake plenum gasket/17176-62040/$23.26
I think i need to buy the gaskets for those too?
these are the part nos i have so far:
(2) valve cover gaskets/11213-2020/$44.30
(6) sprkg plug seals/11193-70010/$17.88
(16) crush washers/90210-05007/$14.08
(2) air intake plenum gasket/17176-62040/$23.26
Last edited by logsurfer; 12-14-2009 at 08:06 PM.
 12-15-2009, 08:18 PM
#28
Registered User
iTrader: (1)

Join Date: Feb 2004
Location: Miami, Florida
Posts: 120
Likes: 0
Received 0 Likes
on
0 Posts
I changed the VCG on my 4runner this past summer to cure the oil leak coming from the back of the valve cover, primarily the passenger side, similar to yours. Well, it is still leaking, so this coming weekend I will replace them again, but this time I bought the Toyota brand FIPG (form in place gasket) and will also be replacing the half moons and some other parts I didn't change last time. Hopefully it cures the problem.
01-19-2010, 03:35 PM
#29
Registered User
Thread Starter
Join Date: Sep 2009
Location: Sunny San Diego
Posts: 129
Likes: 0
Received 0 Likes
on
0 Posts
Update: Work in progress
So I'm in the process of replacing my valve cover gaskets but there is a roadblock.
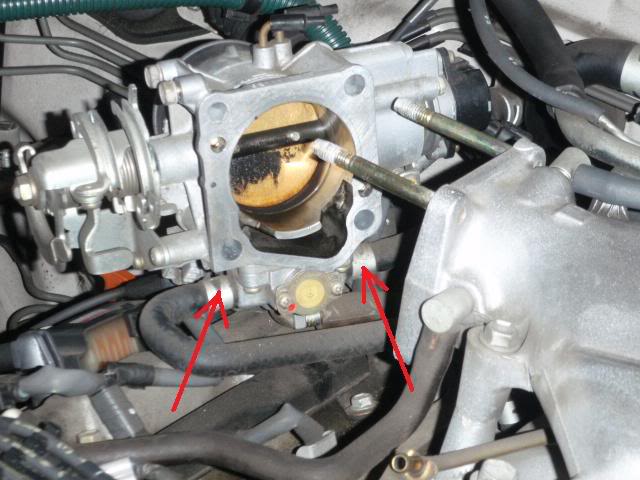
I can't get the 2 coolant hoses off the throttle body. I've already removed the clamps
but i really cant get it off,and I've read somewhere here to undo the (4) screws but can't get them to turn and I'm afraid i might strip it.
I know a lot of guys have dealt with this.. Can you give me some advise on how to remove these suckers.
P.s. dnt worry i'm taking pictures
01-20-2010, 10:43 AM
#30
Registered User
Join Date: Mar 2009
Location: SLC, UT
Posts: 389
Likes: 0
Received 0 Likes
on
0 Posts
Sometimes it is easy to just twist the hose to break it loose off the nipple and then it should pull right off. Make sure you remove the clamp far enough down because in this pic they are still on tight. If you use a pair of pliars or something you may put a hole in the hose.
01-20-2010, 12:46 PM
#31
Registered User
Thread Starter
Join Date: Sep 2009
Location: Sunny San Diego
Posts: 129
Likes: 0
Received 0 Likes
on
0 Posts
stir_fry,
Here is the pic of where my leak is coming from
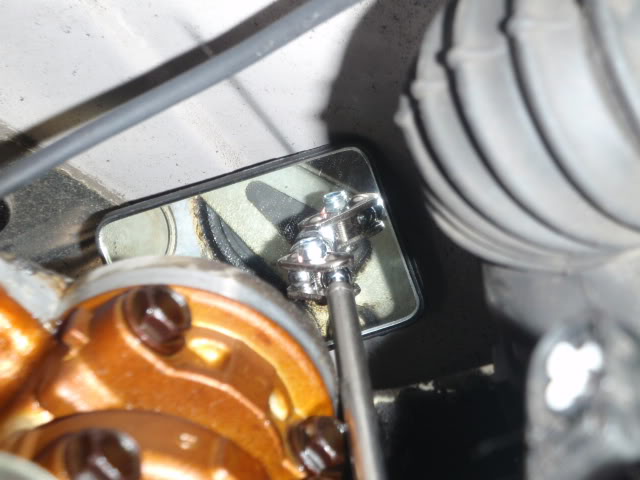
oil leaks out below that circular rubber cap.
how do i remove that circular rubber thing?
and a picture of my 110k engine

Here is the pic of where my leak is coming from
oil leaks out below that circular rubber cap.
how do i remove that circular rubber thing?
and a picture of my 110k engine
01-20-2010, 02:26 PM
#32
Registered User
Join Date: Mar 2009
Location: SLC, UT
Posts: 389
Likes: 0
Received 0 Likes
on
0 Posts
You don't remove the circular cap. That stays there. There should be some silacone left over in the right angle where the cam goes over the head. You need to remove the silacone only. After you get it clean, you will put some FIPG or HondaBond where the right angle is. You will also put some where the upside down semi-circular caps go where the other cam (toward the outside of the engine) is. You will need to scrape off all the old silacone. I did it with my fingernail, you can carefully use a razor blade but don't use a screwdriver or you can scratch the head. Don't remove the semi-circular caps. So that is 4 total places where you need to put silacone on each END of each head.
They usually leak there because of the right angle. It won't be a problem with a little bit of silacone to seal the gap.
Once you put on the silacone, you only have about 2 minutes to get the cover back on and bolted down at least somewhat. I used an inch-pound wrench to 53 in-lbs. I alternated tightening bolts to get the cover to go down as flat as possible. 53 in-lbs is the FSM torque spec. Let me see if I can circle where you need to put the FIPG.
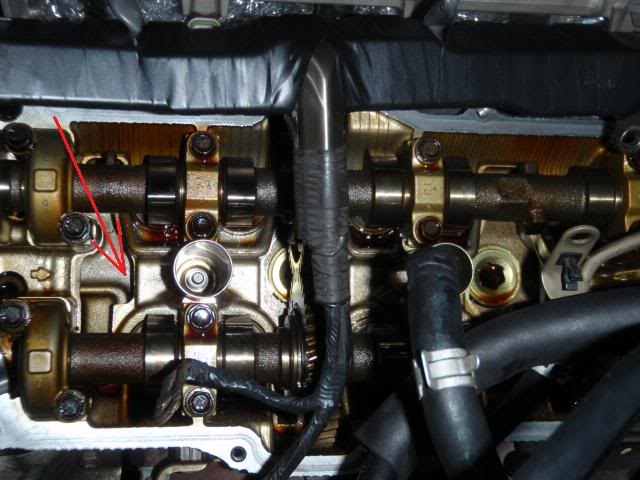
Here you go:
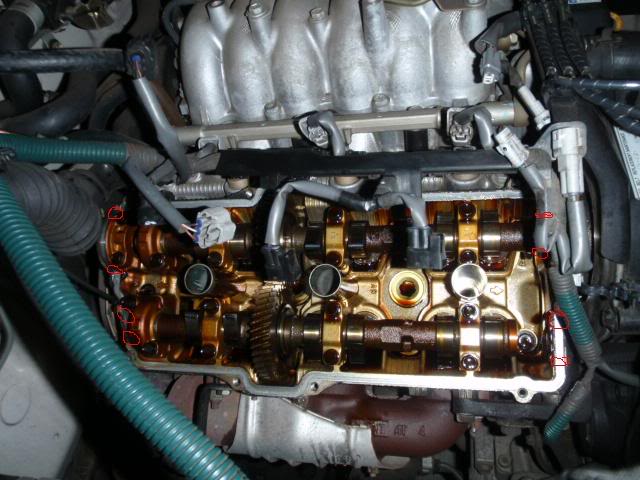
See the RED circles?
Here is the right angle I am talking about (red circles indicate where you should put the FIPG):
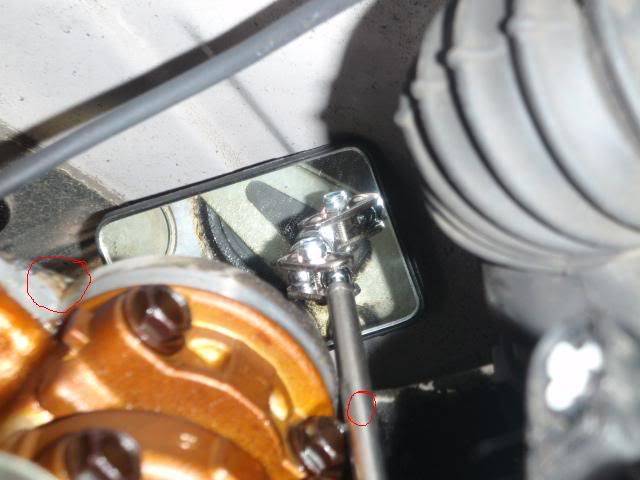
Right side circle is UNDER the silver bar.
BTW, what is that silver bar? I don't recognize it.
They usually leak there because of the right angle. It won't be a problem with a little bit of silacone to seal the gap.
Once you put on the silacone, you only have about 2 minutes to get the cover back on and bolted down at least somewhat. I used an inch-pound wrench to 53 in-lbs. I alternated tightening bolts to get the cover to go down as flat as possible. 53 in-lbs is the FSM torque spec. Let me see if I can circle where you need to put the FIPG.
Here you go:
See the RED circles?
Here is the right angle I am talking about (red circles indicate where you should put the FIPG):
Right side circle is UNDER the silver bar.
BTW, what is that silver bar? I don't recognize it.
Last edited by stir_fry_boy; 01-20-2010 at 05:26 PM.
01-20-2010, 02:53 PM
#33
Registered User
Thread Starter
Join Date: Sep 2009
Location: Sunny San Diego
Posts: 129
Likes: 0
Received 0 Likes
on
0 Posts
gotcha stir fry! it makes sense now, the leak is coming from that right angle and goes down to the rubber circular cap. at first glance you would think that the oil is coming below the housing cap. btw, the silver bar on the left is a ground wire, it grounds the engine into the body of the t4r. If you're asking about the bar on the right, its the arm of my mirror tool.
Thank you very much!
Thank you very much!
01-20-2010, 05:05 PM
#34
Registered User
Join Date: Mar 2009
Location: SLC, UT
Posts: 389
Likes: 0
Received 0 Likes
on
0 Posts
No prob! You need to make sure all the silicone comes off of the flat surface on the head (i.e. anywhere where the valve cover meets the head) especially in the right angles where you are going to put some new FIPG. In other words, the surfaces that touch any part of the valve cover gasket must be free of debris, oil and silicone or else when you put the new FIPG on, it will not seal and obviously leak. Then you put the FIPG on where I showed you, then the valve cover (with the valve cover gasket installed into the valve cover). If the valve cover gasket doesn't stay good into the groove, you can use some Vaseline to hold it in place. I didn't have any trouble with mine staying put without Vaseline. If the valve cover gasket folds over itself when you put it on, it will leak like crazy.
HA! I didn't know what your mirror was when I first looked at your pic.
Did you replace your spark plug tube seals? Those are a royal PITA! I had to ruin my old ones in order to get them out.
HA! I didn't know what your mirror was when I first looked at your pic.
Did you replace your spark plug tube seals? Those are a royal PITA! I had to ruin my old ones in order to get them out.
Last edited by stir_fry_boy; 01-20-2010 at 05:30 PM.
01-20-2010, 08:53 PM
#35
Registered User
Thread Starter
Join Date: Sep 2009
Location: Sunny San Diego
Posts: 129
Likes: 0
Received 0 Likes
on
0 Posts

Last edited by logsurfer; 01-20-2010 at 08:59 PM.
01-21-2010, 05:24 AM
#36
Registered User
Join Date: Mar 2009
Location: SLC, UT
Posts: 389
Likes: 0
Received 0 Likes
on
0 Posts
How did he do it? It took me about 10 minutes to remove all 3. I used a hammer, a small flat head screwdriver and a pair of pliars.
01-21-2010, 10:48 AM
#37
Contributing Member
Join Date: May 2002
Location: Kirkland-ish, WA
Posts: 185
Likes: 0
Received 0 Likes
on
0 Posts
01-21-2010, 07:09 PM
#38
Registered User
Thread Starter
Join Date: Sep 2009
Location: Sunny San Diego
Posts: 129
Likes: 0
Received 0 Likes
on
0 Posts
Sorry guys for the late reply, it's been a long day
He removed the spark plug seals using a (-) screw driver and a rubber mallet:
angle the screw driver towards the hole and give it some love taps with a rubber mallet.
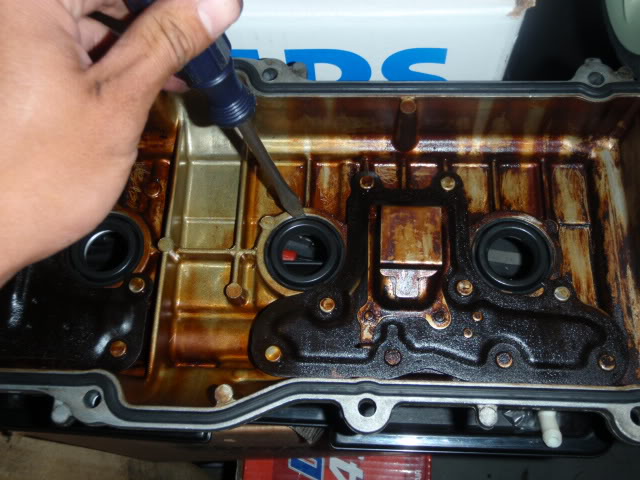
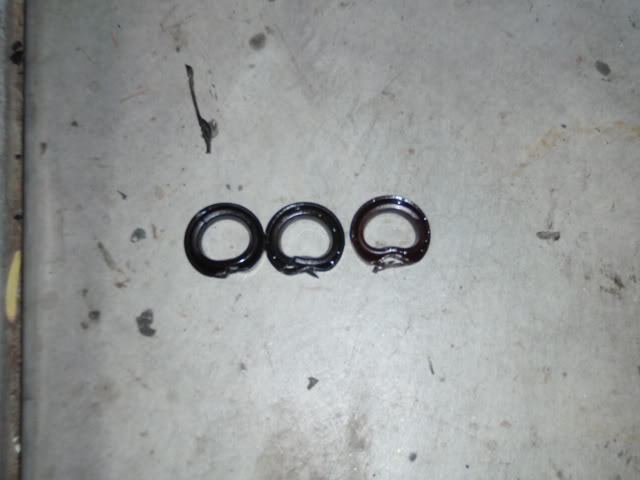
your old seals should look like this after removal:
Update:
While I was trying to clean the mating surfaces, a piece of plastic fell into this crevice and I can't get it out
He removed the spark plug seals using a (-) screw driver and a rubber mallet:
angle the screw driver towards the hole and give it some love taps with a rubber mallet.
your old seals should look like this after removal:
Update:
While I was trying to clean the mating surfaces, a piece of plastic fell into this crevice and I can't get it out


