Refreshing entire front suspension
 01-09-2010, 05:57 AM
#1
Contributing Member
Thread Starter

Refreshing entire front suspension
I purchased my 4Runner new in June 2001, with 2 miles on the clock. I'm now at 188,000+ miles and have decided to bite the bullet and put some effort (and $) into the front suspension. Why? Because it's making disturbing noises when going over pavement irregularities, speed bumps, etc. This all started just a few months ago and has quickly become more noticeable. I ruled out the steering rack and tie rods, as I replaced the entire assembly, hub to hub, three years ago.
So, after reading more threads than my mind can handle, I swallowed hard and placed the following order with ToyotaPartSales.com this morning:

I will report back once I start tearing the front end apart.
Andreas
So, after reading more threads than my mind can handle, I swallowed hard and placed the following order with ToyotaPartSales.com this morning:
I will report back once I start tearing the front end apart.
Andreas
Last edited by aowRS; 01-09-2010 at 10:25 AM.
 01-09-2010, 06:32 AM
#2
Contributing Member
Yep I just did this last week! Was having the same problems. Fixed everything, except for the fact I may have not tightened the top nut on one of my struts down completely. (I would turn it if I had access, but not with my lift).
.
Don't even try to do the bushings yourself unless you've got a press and a lot of know-how. I've heard they are a royal PIA. Best just to bring the lower A-arms and bushings to a good shop, while you tackle the other stuff.
.
Don't even try to do the bushings yourself unless you've got a press and a lot of know-how. I've heard they are a royal PIA. Best just to bring the lower A-arms and bushings to a good shop, while you tackle the other stuff.
01-09-2010, 07:03 AM
#3
Contributing Member
Thread Starter
I ordered the complete LC arms with balljoints. So no bushing crap to deal with.

Andreas
Last edited by aowRS; 01-09-2010 at 07:05 AM.

 01-09-2010, 10:26 AM
#6
Contributing Member
Thread Starter
01-13-2010, 09:23 AM
#7
Contributing Member
Thread Starter
This fiesta could start as early as next week - I called and was told the whole batch was shipping today.
This should be fun.....
Andreas
This should be fun.....
Andreas
Trending Topics
01-16-2010, 10:57 PM
#8
Contributing Member
Thread Starter
UPDATE: Holy Hell!!! I just came in from the garage after killing myself since about 1pm on Saturday. The box of parts came in Saturday morning, so I decided to get a start on this job. Well, one thing led to another, and I just decided to push through. It's all done, but so am I. I will be one sore SOB later today......
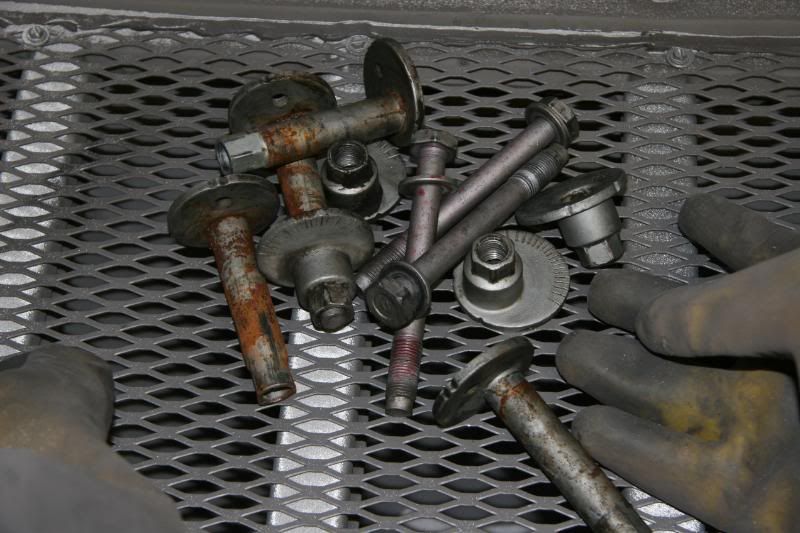
I replaced: both lower control arms, both lower ball joints, both upper ball joints, and all camber/caster bolts (all new Toyota part$).
I'll take a few pics of the finished product when/if I wake up.
But for now, this phase is complete. Again, Holy Hell.
Andreas
I replaced: both lower control arms, both lower ball joints, both upper ball joints, and all camber/caster bolts (all new Toyota part$).
I'll take a few pics of the finished product when/if I wake up.
But for now, this phase is complete. Again, Holy Hell.
Andreas
01-17-2010, 12:50 PM
#10
Contributing Member
Thread Starter
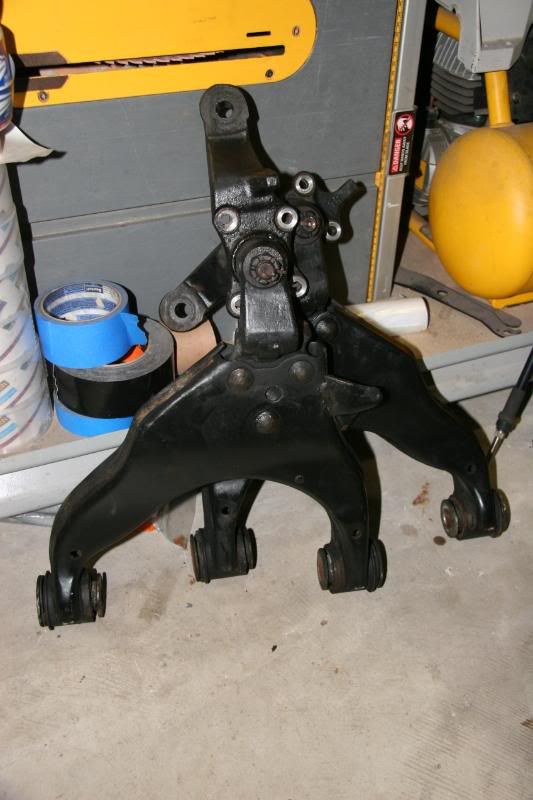
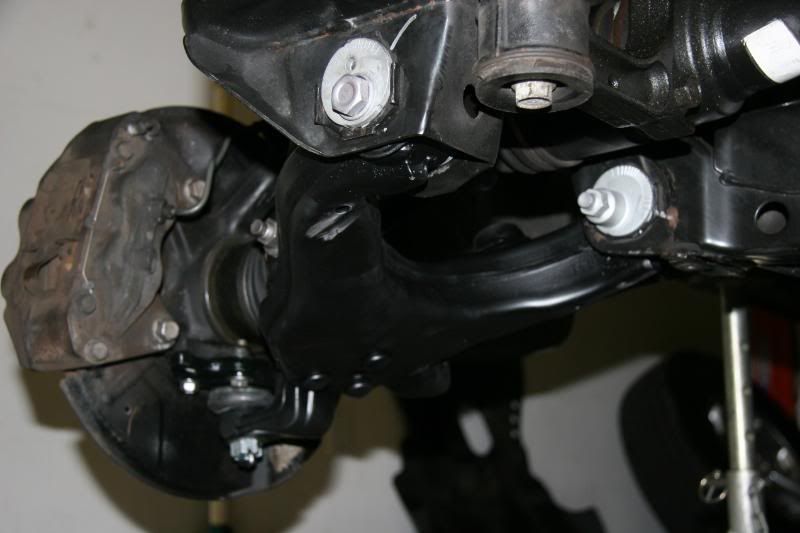
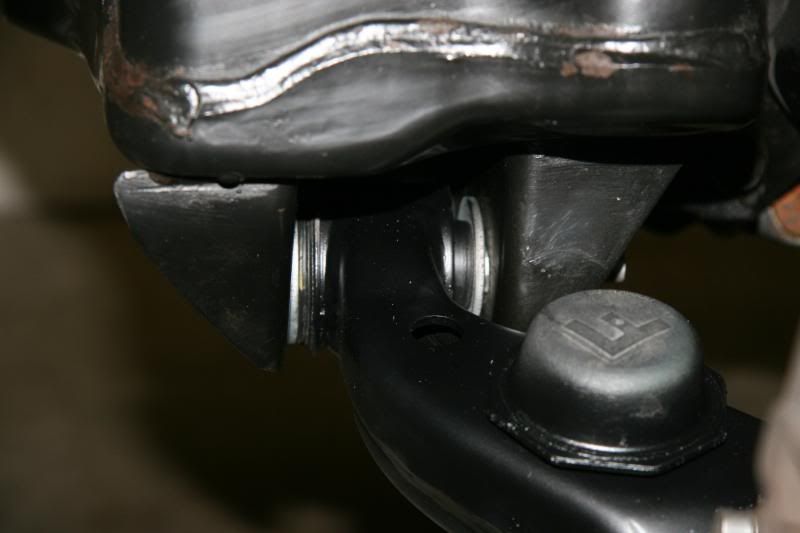
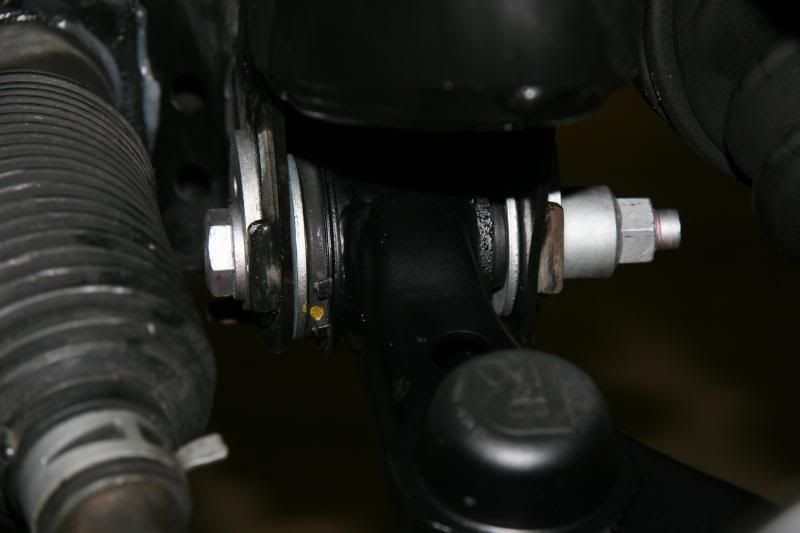
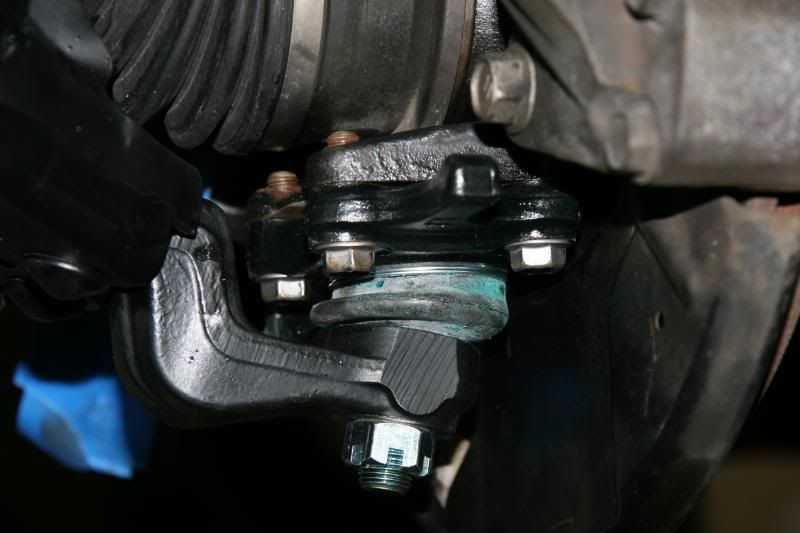
I didn't take any pictures during the process, as I was far too filthy and far too in the zone to worry about pics...
Here are some pics of the aftermath. The only casualty was the driver's side outer tie rod, where I mangled the threads a bit too much. I'll have a new one tomorrow morning.
Andreas
Here are some pics of the aftermath. The only casualty was the driver's side outer tie rod, where I mangled the threads a bit too much. I'll have a new one tomorrow morning.
Andreas
Last edited by aowRS; 01-17-2010 at 12:52 PM.
01-18-2010, 06:04 AM
#11

Hey guys ,
A few quick questions regarding your LCA install.
1- So the rack just gets unbolted and moved back to get the
adjustment bolts out?
2- How did you Reset the bolts when you got the arms back in?
Or did you mark them and just reinstall in the same spot?
3- best method to break the lower ball joint with tearing out the
grease boot with a fork?
Thanks, Pretty cool that a few of us are doing this a t the same time!
01-18-2010, 06:20 AM
#12
Contributing Member
For me:
1) Yes
2) You can move around the adjustment cams pretty easily if you grease them before sliding them in. I just reset them back to where they were, but, you will need to get an alignment for sure afterwards
3)I used a ball joint puller. Cheap on from NAPA cost me $20 a few years back and its worked great. (The ratchet style).
01-18-2010, 06:57 AM
#13
Contributing Member
Thread Starter
Sharrack,
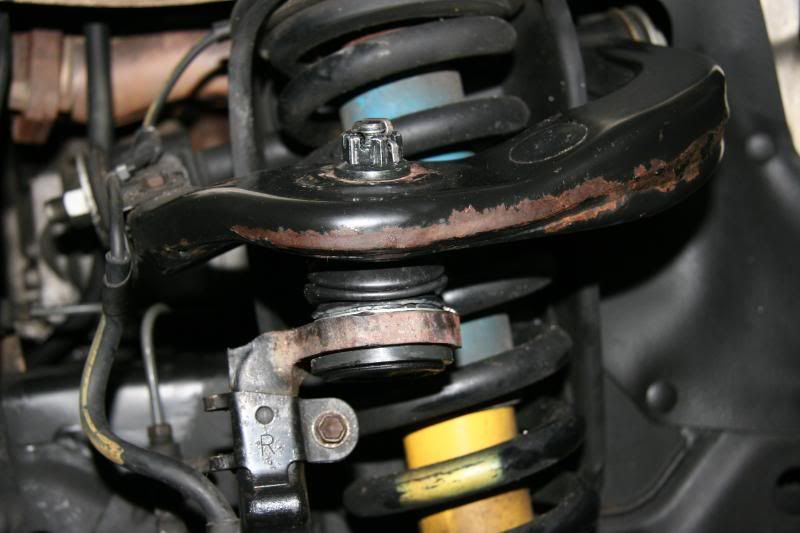
I did this solo, so keeping the rack from flopping completely out of the mounts while yanking the rearward camber bolt was fun. And just as fun when I put the new adjuster & bolt in.
Once you pull the long rack bolt on the left side, the two 'clamp' bolts on the right, and the 19mm vertical bolt, the rack will still be restrained by the pressure & return lines. I only moved the rack enough to get the camber bolts in & out.
Two of my camber adjusters were completely seized inside of the bushing bore. It took ferocious pounding and constant cursing to extract these. I'm glad I spent the money for all new hardware.
If you decide to do the upper ball joints, be aware that getting the old ball joint out of the upright is a massive pain in the ass. Putting the new one in was easy once I decided to heat the cast iron upright with a torch for 3 or 4 minutes. Popped right in and the upright shrunk in seconds.
Andreas
Last edited by aowRS; 01-19-2010 at 04:43 PM.
01-18-2010, 08:18 AM
#14
Good idea on the puller for the ball joints.
I used a fork last time and it did not work.
too much pounding.
do those 4 lower ball joint bolts come out without pulling the axle away from the rotor Strut assembly?
Also.......did you pull the steering wheel shaft from the rack to move it?
thanks guys.........nothing like getting all this info BEFORE tearing it up and running to the computer in a panic.
This is by far , the best forum with the best people .
Kenny S>
Last edited by sharrack; 01-18-2010 at 10:52 AM.
01-18-2010, 11:58 AM
#15
Contributing Member
Thread Starter
do those 4 lower ball joint bolts come out without pulling the axle away from the rotor Strut assembly?
Yes - 14mm.
Also.......did you pull the steering wheel shaft from the rack to move it?
No, there is enough play in the lines to allow the rack to move sufficiently to pull the camber bolts.
This is by far , the best forum with the best people.
Yep!
Yes - 14mm.
Also.......did you pull the steering wheel shaft from the rack to move it?
No, there is enough play in the lines to allow the rack to move sufficiently to pull the camber bolts.
This is by far , the best forum with the best people.
Yep!
Also, I wanted to report that I took the truck for a short shake down cruise - it is completely quiet and solid. Not a hint of clunking, clanking, etc. I hope to get it in for an alignment this week.
As a good friend of mine would say, "Tight like prom night!"
Andreas
Last edited by aowRS; 01-18-2010 at 12:05 PM.
01-19-2010, 05:27 AM
#16
Hey Guys,
Has anyone tried to heat the area around the bushings , then press them out and in?
Much like the way they build custom 2pc car rims?
Expansion.......pop out and in .....let cool?
Kenny S>
Has anyone tried to heat the area around the bushings , then press them out and in?
Much like the way they build custom 2pc car rims?
Expansion.......pop out and in .....let cool?
Kenny S>
01-19-2010, 06:47 AM
#17
Contributing Member
I've heard too many horror stories about doing the bushings yourself. Do you have a press?! For pulling them out I could see that working, but you would think the rubber would start melting at some point.
01-19-2010, 06:48 AM
#18
Contributing Member
Also, I bought this a few years back to remove the upper ball joints. It made it a lot easier
http://eastsidecustomtruck.com/i-237...tal-chaos.html
http://eastsidecustomtruck.com/i-237...tal-chaos.html
01-21-2010, 06:32 AM
#19
Contributing Member
Thread Starter
I had the truck aligned yesterday morning. I rides and drives as it did in 2001. Solid, utterly quiet, and not a hint of noise from the front end. Completely transformed.
Andreas
Andreas
02-02-2010, 11:29 AM
#20
Registered User
Join Date: Sep 2009
Location: chile, southern
Posts: 23
Likes: 0
Received 0 Likes
on
0 Posts


Thread
Thread Starter
Forum
Replies
Last Post
GreatLakesGuy
The Classifieds GraveYard
8
09-04-2015 09:27 AM
coffey50
Offroad Tech
17
07-28-2015 10:55 AM
Vargntucson
95.5-2004 Tacomas & 96-2002 4Runners
0
07-04-2015 12:15 PM


