Operation: Re-build The PATYWGN!
 01-20-2013, 05:08 PM
#1
Operation: Re-build The PATYWGN!
First off, insurance companies are basically organized crime! Secondly, I hope Farm Bureau insurance goes out of business for their despicable business practices. Long story, and I don't want to burst any blood vessels from the high blood pressure it gives me to think about what I've been dealing with for the last two months.
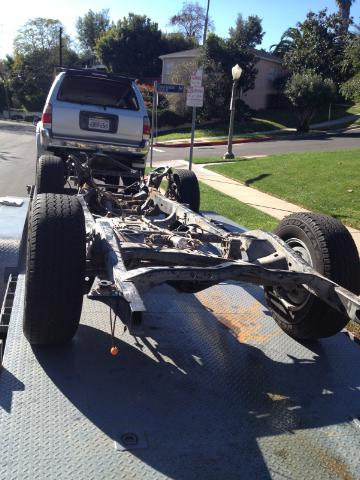
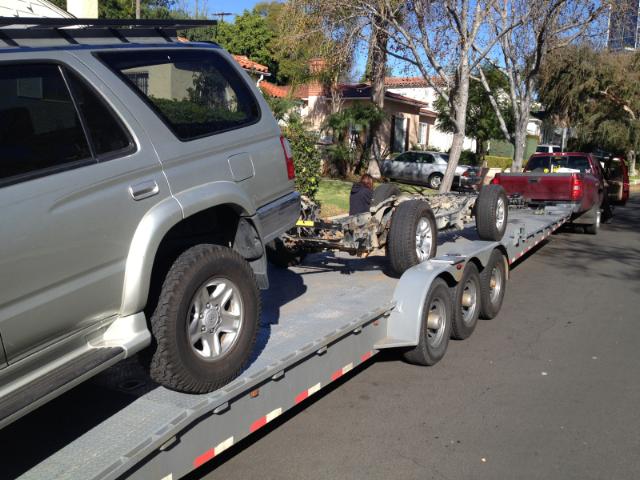
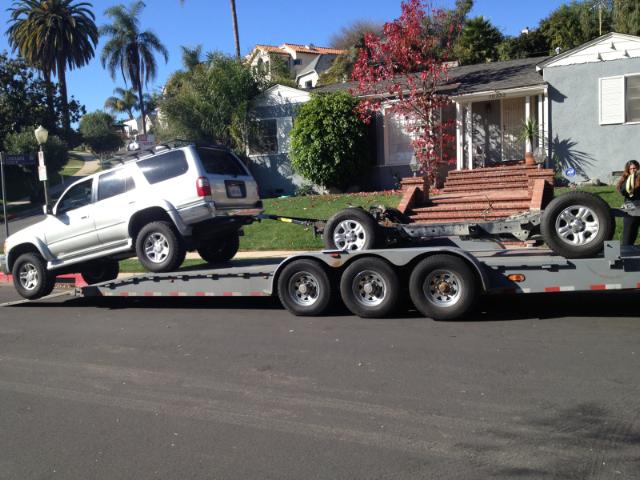
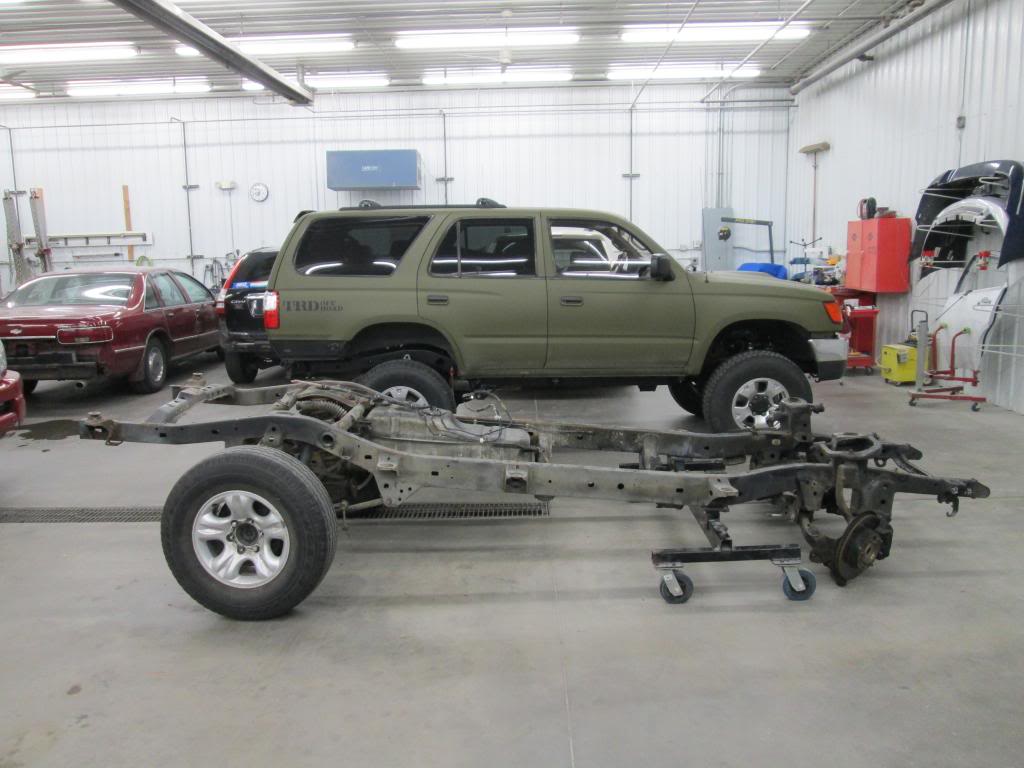
However, I want to give a HUMONGOUS "Thank You" to Yotatech member j-man for being what I can only describe as "saintly" in his generosity to me. Jared rolled his '99 4runner and had a frame he wanted to get rid of, I needed a frame for my rebuild and he GAVE the frame to me. Yes, you read that correctly, FREE, FREE, FREE!!! The only problem was, the frame was in Los Angeles and I am in Iowa. After getting jerked around for a couple weeks by one transport company, I hooked up with 2BrothersTransport on uShip.com and the frame was picked up. 2BrothersTransport picked up the frame at probably the worst time of the year: Christmas & New Years, but they got the frame picked up, delivered on time, kept in touch throughout, and came in on budget. Jared, being the extremely awesome person he is, helped them load the frame:
How awesome is that? Not only did Jared give me the frame, but I got a rear axle, fuel tank, front drive shaft, steering rack, front upper and lower control arms, CV Axles, brakes, and 4 tires and alloy wheels! ALL FREE!!!! Oh yeah, all rear control arms and an adjustable pan hard bar too. My God, it doesn't seem possible that I fell into this but I did and I can't stop singing Jared's praises. The kindness Jared has shown me is something that I thought was lost in the world today. It made me re-think things and knowing there are people out there like Jared I am given hope for the human species. I'm just blown away by his kindness.
Well, the chassis arrived and I got to work on it. First I bought some degreaser and scrubbed the living crap out of it. Not to say it was filthy, the frame is straight, clean, and rust free. Something like that in Iowa is like gold. I haven't seen a cleaner chassis outside of Barrett Jackson or Hot Rod TV, let alone right in front of my eyes! So after some scrubbing, I dried it off with the compressed air at the shop I work at. After it was bone dry a friend and I got to work tearing it down to the bare frame. We put it up on jack stands and I took some grease and wax remover and some red scotch brite pads and did a scuff and clean job on it over about a 2 hour period. Every nook and cranny. Then went back over it with a lighter paint prep cleaner, then another air dry. Once that was all done, I hit any spots of bare metal or areas I cleaned up a little with the rust buster with some etch primer. I bought some Eastwood Internal Frame Coating and their nifty hose and nozzle sprayers and coated the frame rails and all cross members. The funny thing is, this stuff has a natural olive drab color to it, so it suits the theme of the PATYWGN very well.
Everything on the inside is now converted and protected. I then mixed up some Eastwood Epoxy Primer and gave it two good coats.
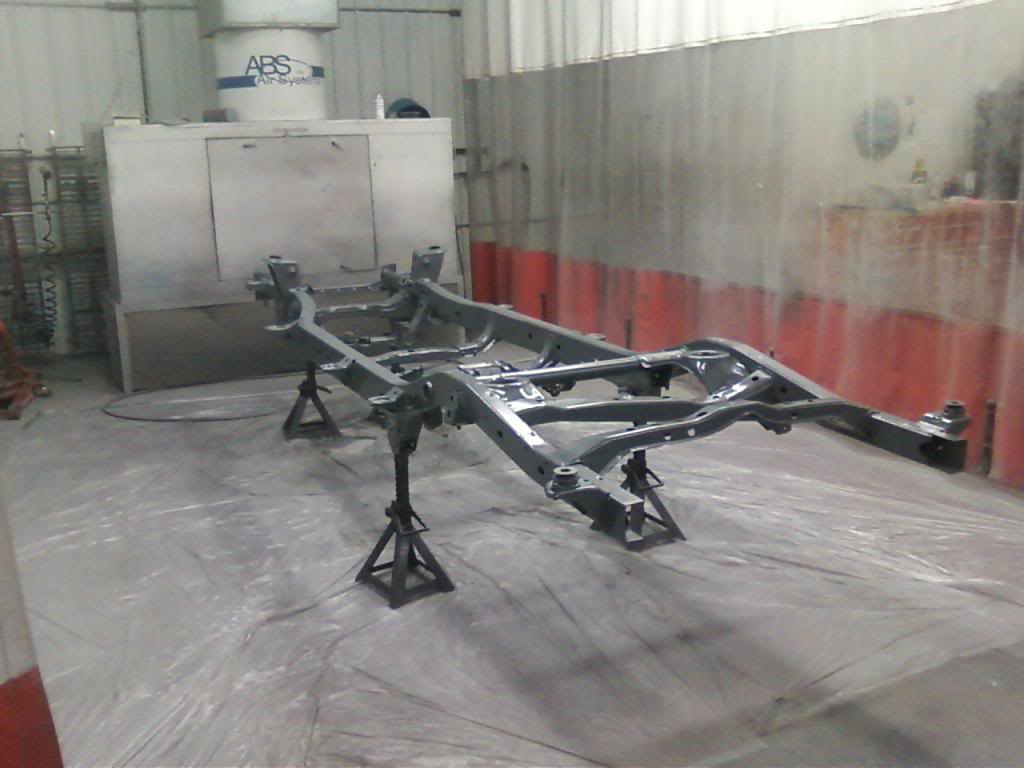
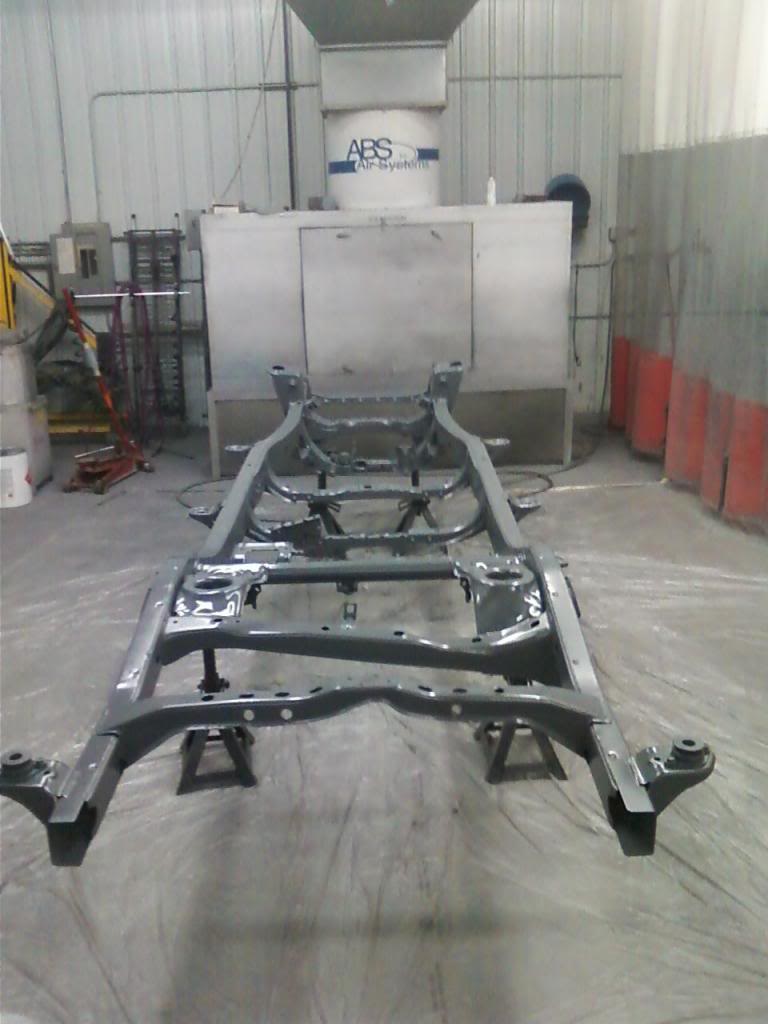
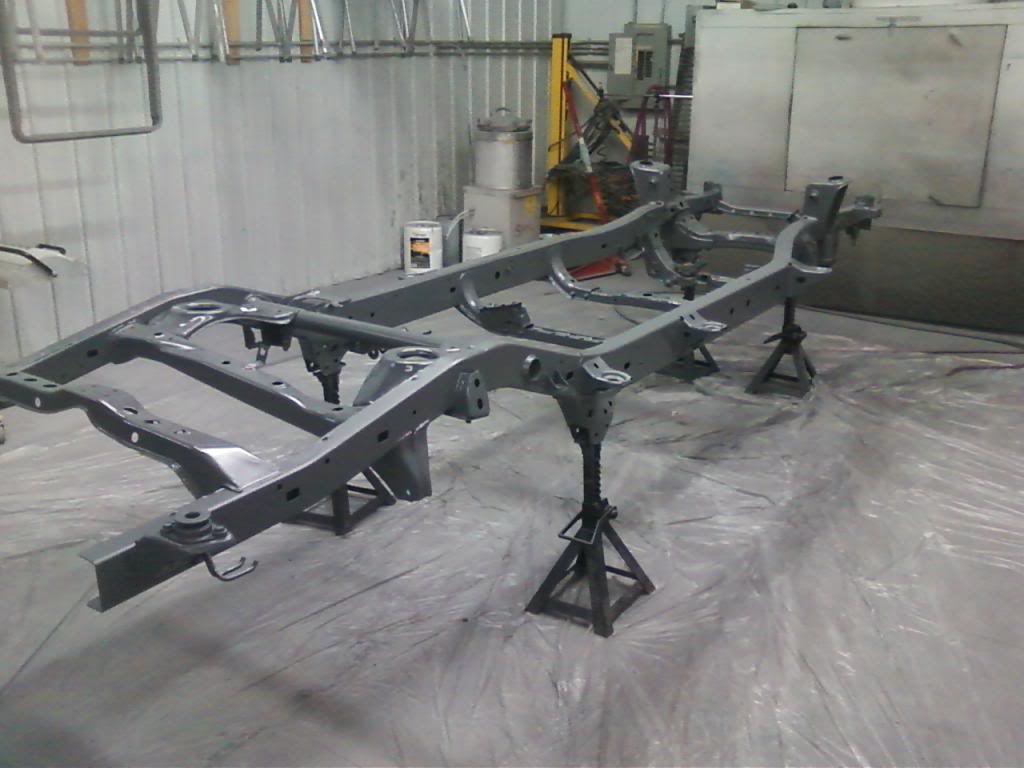
After an hour flash off as the instructions indicated I mixed up some Eastwood 2 part Ceramic Chassis Black paint and shot 2 coats on top of the primer. This stuff like the factory coating, a nice satin black and it's thick as the primer so the outside is sealed up and protected for years to come, crossing my fingers for a couple decades!

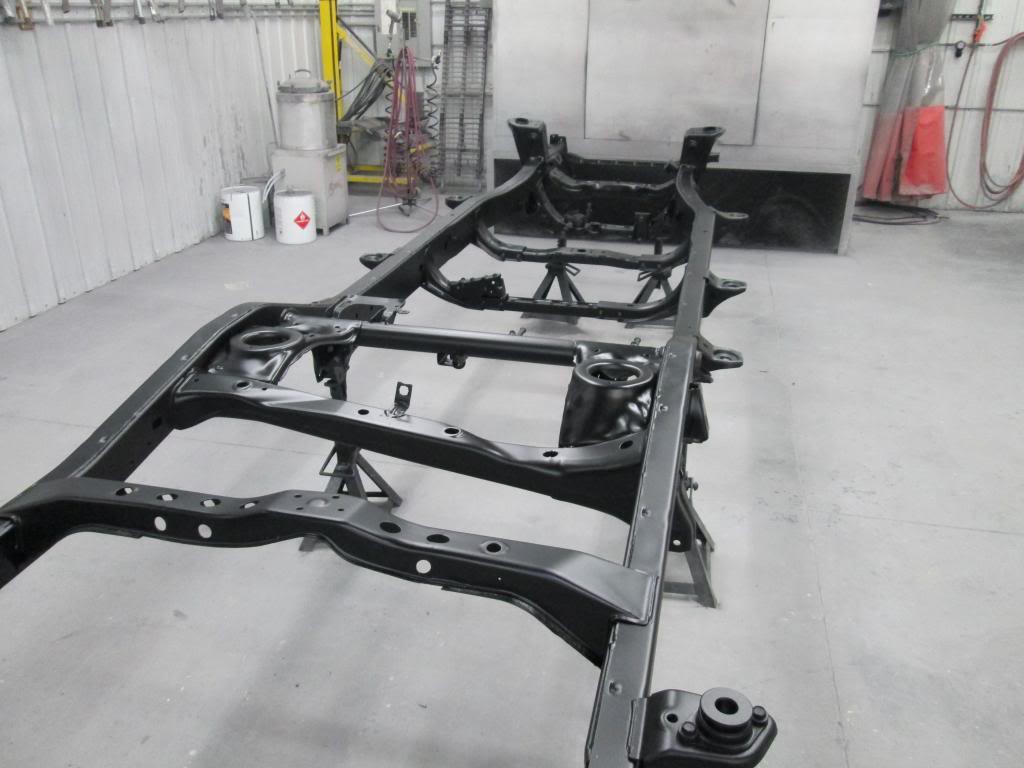
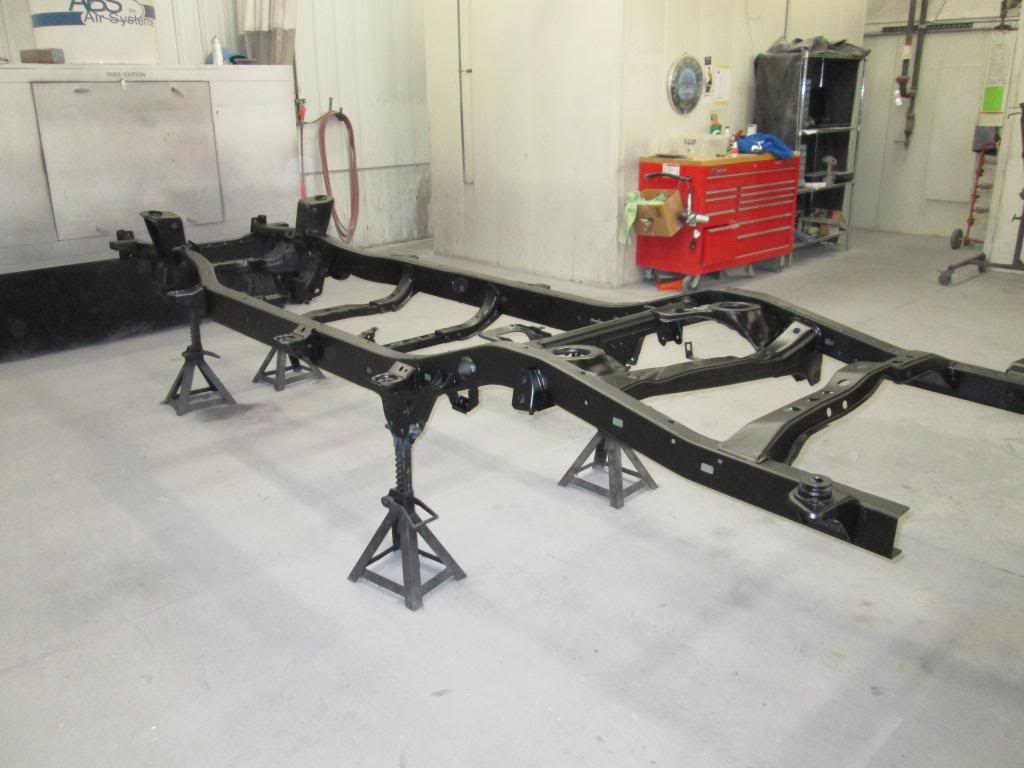
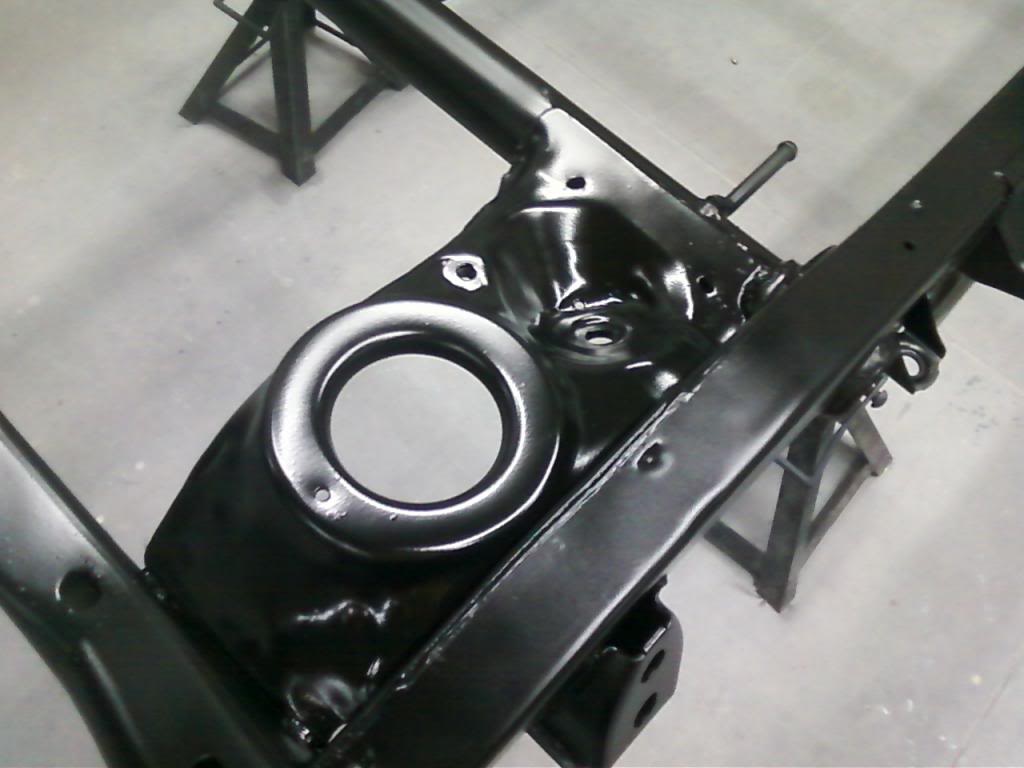
Look at that! Have you ever seen anything more beautiful?
I'm hoping next weekend we can start swapping everything over from my old frame to the new one, swap the engine over, drop the body on it, and I might be driving the old girl to work next Monday!!!!
I do have some upgrades to do while everything is out. I bought all OEM components for a timing belt service, including a new radiator. I also got OEM engine and transmission mounts to keep everything nice and fresh for years to come. I'll be doing front and rear brakes as well. I got some silicone hoses and rear end links from WabFab. I bought some Light Racing front upper control arms from Fat Bob's. I'm getting new rear shocks and coils from Steve at Sonoran Steel that will keep me level after I build the new rear bumper. I also ordered new adjustable rear upper and lower control arms from Stanley at TheToyOutfitters.com .
I'll say that the Raptor bedliner I sprayed on the rear body panel of the 4runner held up really well in the collision, two little chips and that's it. So, I bought more Olive Drab paint and the tintable Raptor that I'll be spraying the lower doors and rockers with. This will help with any little rock chips and potential corrosion over the years.
Depending on the money I have left over I'll probably be getting my Pro Comp 98s and some DuraTrac tires. I haven't decided on size yet. After that, it's bumper build time!!! Since I work in a body shop I get all kinds of freebies. Last year we had tons of new F150s come in with rear bumper damage, and the hitches get scratched or hitch wiring brackets mangled. Those typically don't get fixed, they get replaced so I have two 2" receivers that will be the starting point of my front and rear bumper builds. Can't beat FREE!
So, that's where I am for now, more pics and long winded commentary to follow as news happens.
Once again, thanks Jared!
However, I want to give a HUMONGOUS "Thank You" to Yotatech member j-man for being what I can only describe as "saintly" in his generosity to me. Jared rolled his '99 4runner and had a frame he wanted to get rid of, I needed a frame for my rebuild and he GAVE the frame to me. Yes, you read that correctly, FREE, FREE, FREE!!! The only problem was, the frame was in Los Angeles and I am in Iowa. After getting jerked around for a couple weeks by one transport company, I hooked up with 2BrothersTransport on uShip.com and the frame was picked up. 2BrothersTransport picked up the frame at probably the worst time of the year: Christmas & New Years, but they got the frame picked up, delivered on time, kept in touch throughout, and came in on budget. Jared, being the extremely awesome person he is, helped them load the frame:
How awesome is that? Not only did Jared give me the frame, but I got a rear axle, fuel tank, front drive shaft, steering rack, front upper and lower control arms, CV Axles, brakes, and 4 tires and alloy wheels! ALL FREE!!!! Oh yeah, all rear control arms and an adjustable pan hard bar too. My God, it doesn't seem possible that I fell into this but I did and I can't stop singing Jared's praises. The kindness Jared has shown me is something that I thought was lost in the world today. It made me re-think things and knowing there are people out there like Jared I am given hope for the human species. I'm just blown away by his kindness.
Well, the chassis arrived and I got to work on it. First I bought some degreaser and scrubbed the living crap out of it. Not to say it was filthy, the frame is straight, clean, and rust free. Something like that in Iowa is like gold. I haven't seen a cleaner chassis outside of Barrett Jackson or Hot Rod TV, let alone right in front of my eyes! So after some scrubbing, I dried it off with the compressed air at the shop I work at. After it was bone dry a friend and I got to work tearing it down to the bare frame. We put it up on jack stands and I took some grease and wax remover and some red scotch brite pads and did a scuff and clean job on it over about a 2 hour period. Every nook and cranny. Then went back over it with a lighter paint prep cleaner, then another air dry. Once that was all done, I hit any spots of bare metal or areas I cleaned up a little with the rust buster with some etch primer. I bought some Eastwood Internal Frame Coating and their nifty hose and nozzle sprayers and coated the frame rails and all cross members. The funny thing is, this stuff has a natural olive drab color to it, so it suits the theme of the PATYWGN very well.
Everything on the inside is now converted and protected. I then mixed up some Eastwood Epoxy Primer and gave it two good coats.
After an hour flash off as the instructions indicated I mixed up some Eastwood 2 part Ceramic Chassis Black paint and shot 2 coats on top of the primer. This stuff like the factory coating, a nice satin black and it's thick as the primer so the outside is sealed up and protected for years to come, crossing my fingers for a couple decades!
Look at that! Have you ever seen anything more beautiful?
I'm hoping next weekend we can start swapping everything over from my old frame to the new one, swap the engine over, drop the body on it, and I might be driving the old girl to work next Monday!!!!
I do have some upgrades to do while everything is out. I bought all OEM components for a timing belt service, including a new radiator. I also got OEM engine and transmission mounts to keep everything nice and fresh for years to come. I'll be doing front and rear brakes as well. I got some silicone hoses and rear end links from WabFab. I bought some Light Racing front upper control arms from Fat Bob's. I'm getting new rear shocks and coils from Steve at Sonoran Steel that will keep me level after I build the new rear bumper. I also ordered new adjustable rear upper and lower control arms from Stanley at TheToyOutfitters.com .
I'll say that the Raptor bedliner I sprayed on the rear body panel of the 4runner held up really well in the collision, two little chips and that's it. So, I bought more Olive Drab paint and the tintable Raptor that I'll be spraying the lower doors and rockers with. This will help with any little rock chips and potential corrosion over the years.
Depending on the money I have left over I'll probably be getting my Pro Comp 98s and some DuraTrac tires. I haven't decided on size yet. After that, it's bumper build time!!! Since I work in a body shop I get all kinds of freebies. Last year we had tons of new F150s come in with rear bumper damage, and the hitches get scratched or hitch wiring brackets mangled. Those typically don't get fixed, they get replaced so I have two 2" receivers that will be the starting point of my front and rear bumper builds. Can't beat FREE!
So, that's where I am for now, more pics and long winded commentary to follow as news happens.
Once again, thanks Jared!
 01-20-2013, 05:24 PM
#2
I caught the end of your buildup thread today and was wondering when this rebuild thread would pop up. I'm glad I stayed tuned!
That frame is a thing of beauty! What an awesome feeling it is to have everything so clean all the way down to the frame. And, it sounds like you've got a heaping pile of OEM goodies to go on. I'm jealous!
That's pretty awesome j-man helped you out like that. It's nice to get an occasional reassurance that all hope in humanity isn't lost. Hopefully you can pay it forward at some point. As your threads always are, I'm sure this will be exciting. Best of luck with the upcoming work! Subscribed!
Last edited by 98SR54RUNNER; 01-21-2013 at 07:38 AM.
 very nice!!


Trending Topics
02-01-2013, 05:32 PM
#11
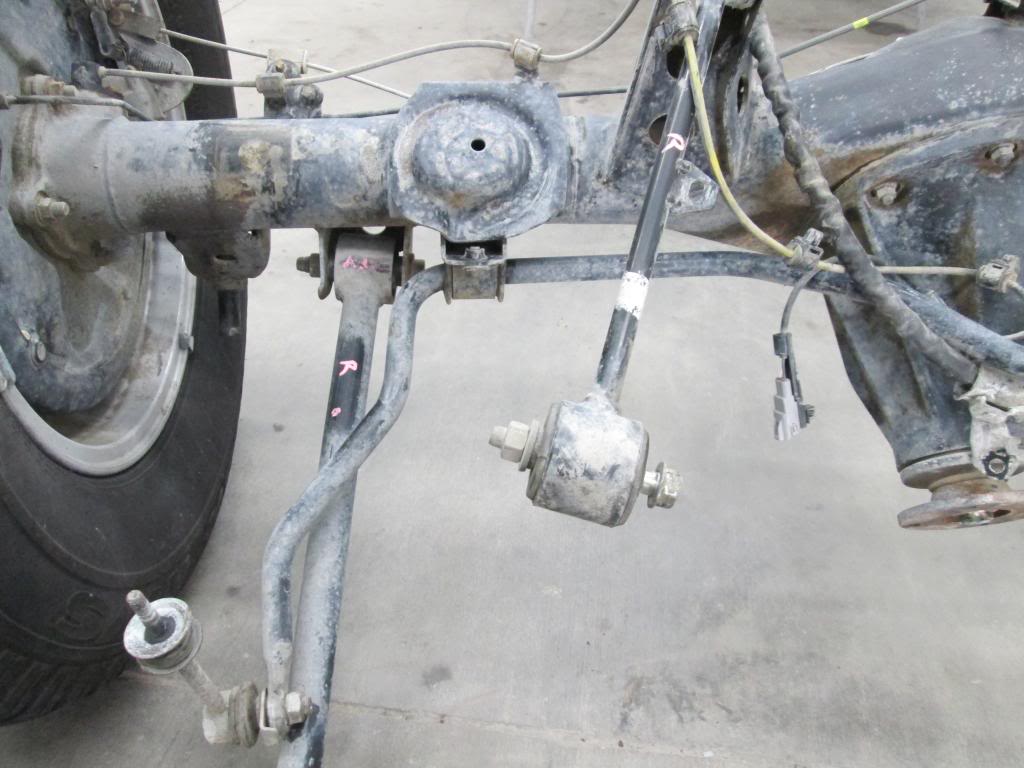
I haven't had much time to work on it, things are going slower than I had hoped. I'm waiting on the rear control arms which were supposed to be done 2 weeks ago, and have been promised maybe sometime next week or the following week. I'll have to put the stock ones on for now and change them out later. I have the 4runner stuffed with parts right now waiting for the big swap. I cleaned up the stock front lower control arms, front spindles, panhard bar, and rear axle last week and put some nice rust inhibiting single stage paint on everything. Looks brand new, I hope it lasts.
Big news today, ordered some Pro Comp 98 steelies (will have to paint them flat black when they arrive as they are powder coated gloss) and some 285 70 17 Goodyear Duratrac tires. I went with 17"s for the bigger look so the wheels wouldn't look puny against the jacked up 4runner, but also because I bought the 231mm front brakes and didn't want any issues with rubbing my 16" wheels.
All other parts are here, just need time to start assembling stuff on the frame which now has about 2 feet of fresh drifted snow on it. I'll try to get some stuff accomplished this weekend, maybe I'll have help with the swap next weekend.
Bumpers might have to wait until spring though.
Big news today, ordered some Pro Comp 98 steelies (will have to paint them flat black when they arrive as they are powder coated gloss) and some 285 70 17 Goodyear Duratrac tires. I went with 17"s for the bigger look so the wheels wouldn't look puny against the jacked up 4runner, but also because I bought the 231mm front brakes and didn't want any issues with rubbing my 16" wheels.
All other parts are here, just need time to start assembling stuff on the frame which now has about 2 feet of fresh drifted snow on it.
I'll try to get some stuff accomplished this weekend, maybe I'll have help with the swap next weekend. Bumpers might have to wait until spring though.
02-10-2013, 06:29 PM
#12
PROGRESS!!!
So the last couple weeks I've been cleaning and painting parts, waiting on other parts to arrive, and prepping for the big swap over. This weekend all the stars and planets were aligned and things got done. Here are some shots of what I've been doing the last couple weeks...
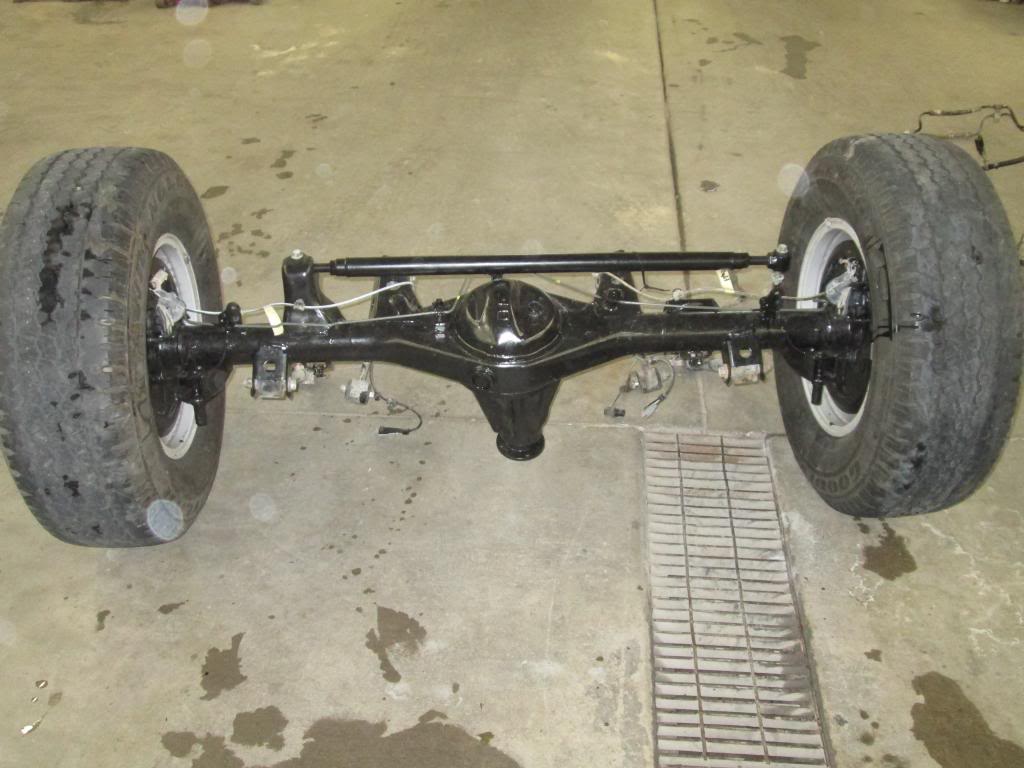
Rear axle somewhat cleaned up before I disassembled it and painted it.

Rear Axle all cleaned up and painted, reassembled.
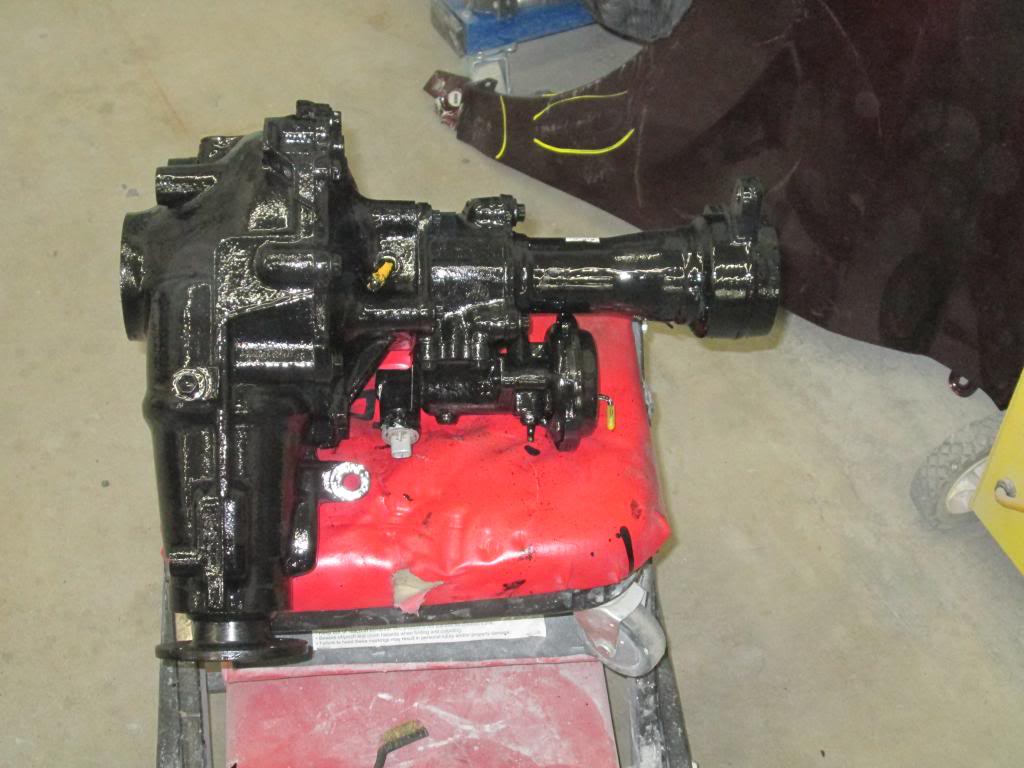
Front differential cleaned and painted.
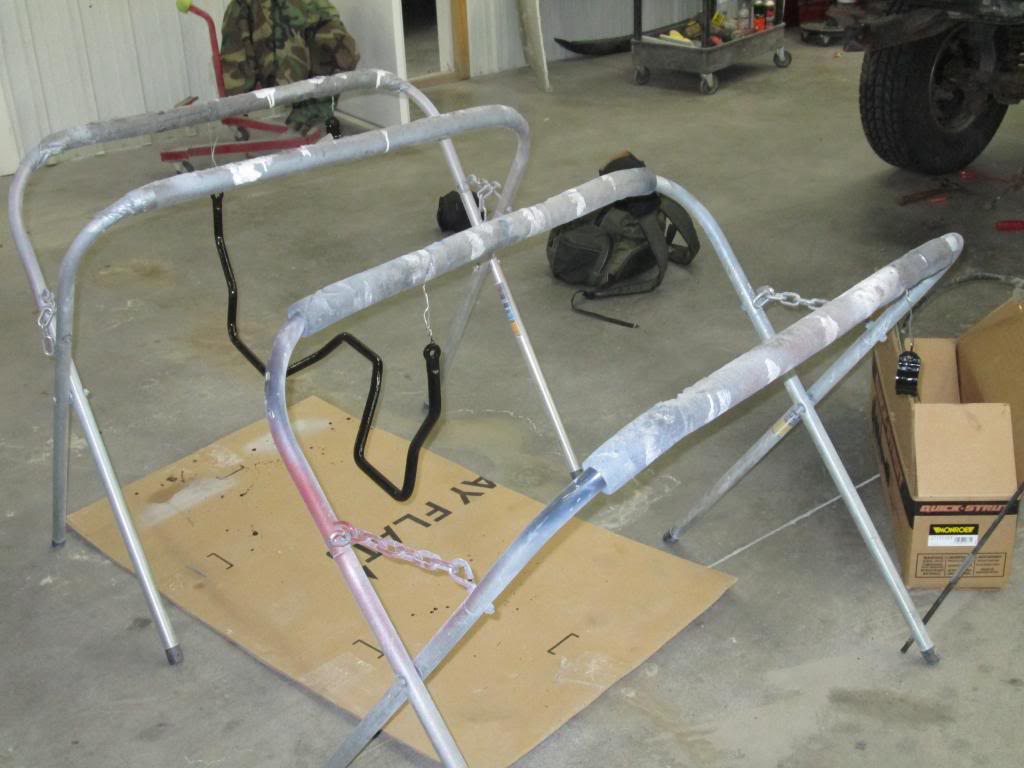
Various parts hung up and painted.
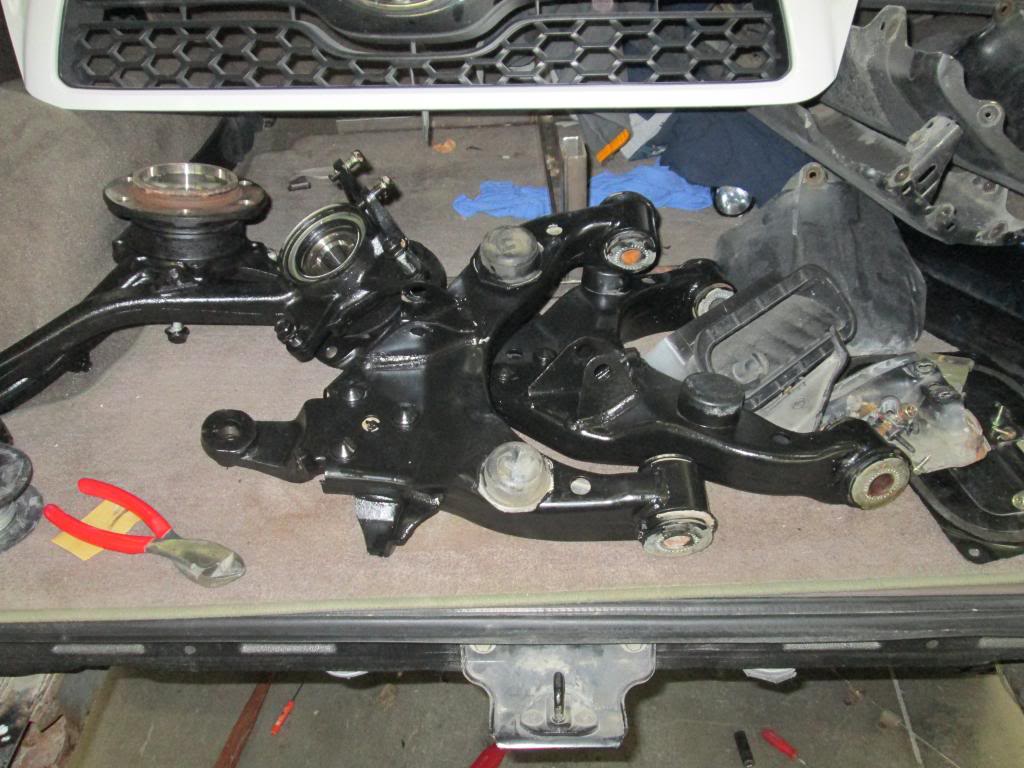
Front lower control arms and front spindles cleaned and painted.
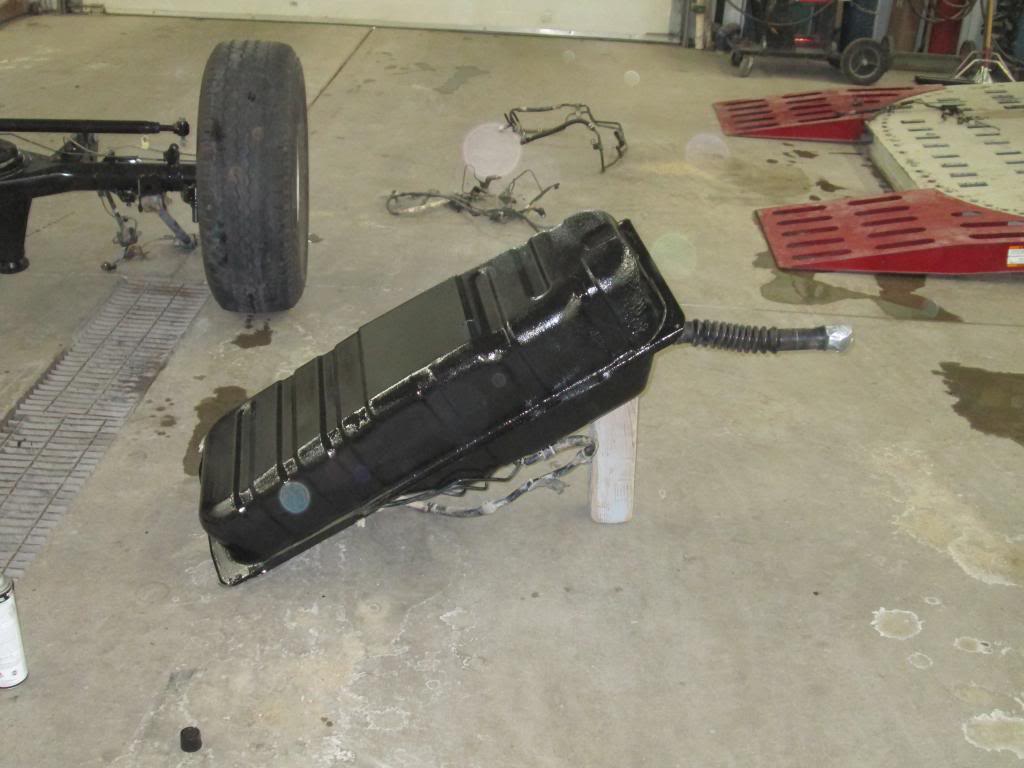
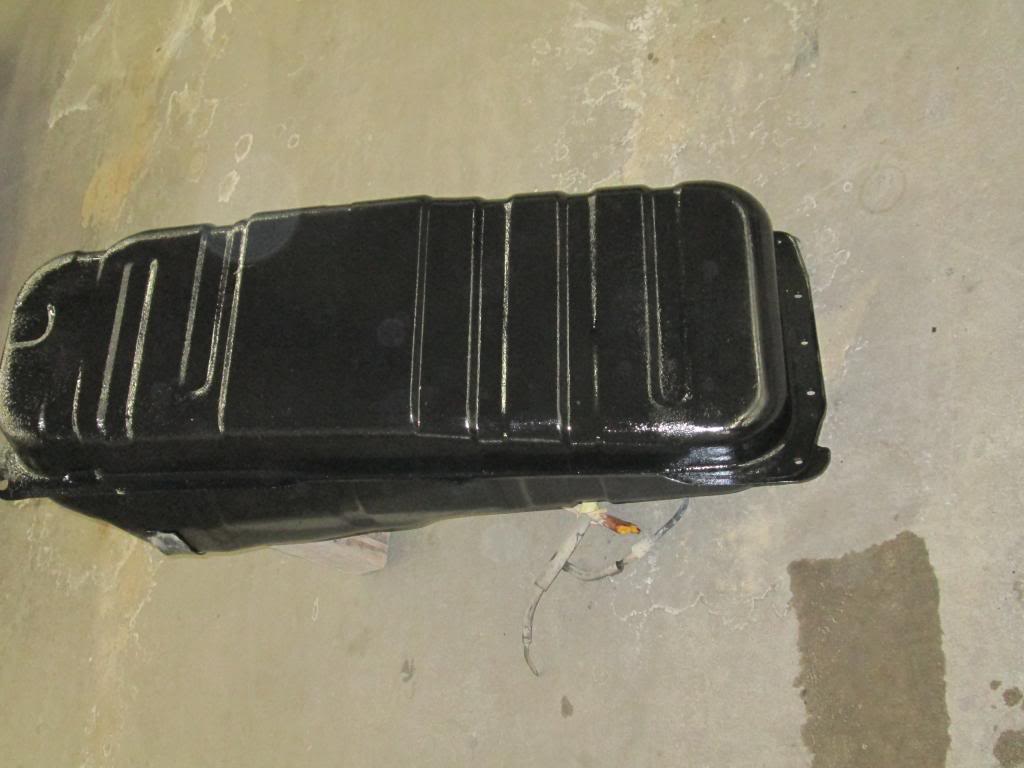
Gas tank cleaned up and painted, not that it needed it but I added a couple layers of protection from the elements.
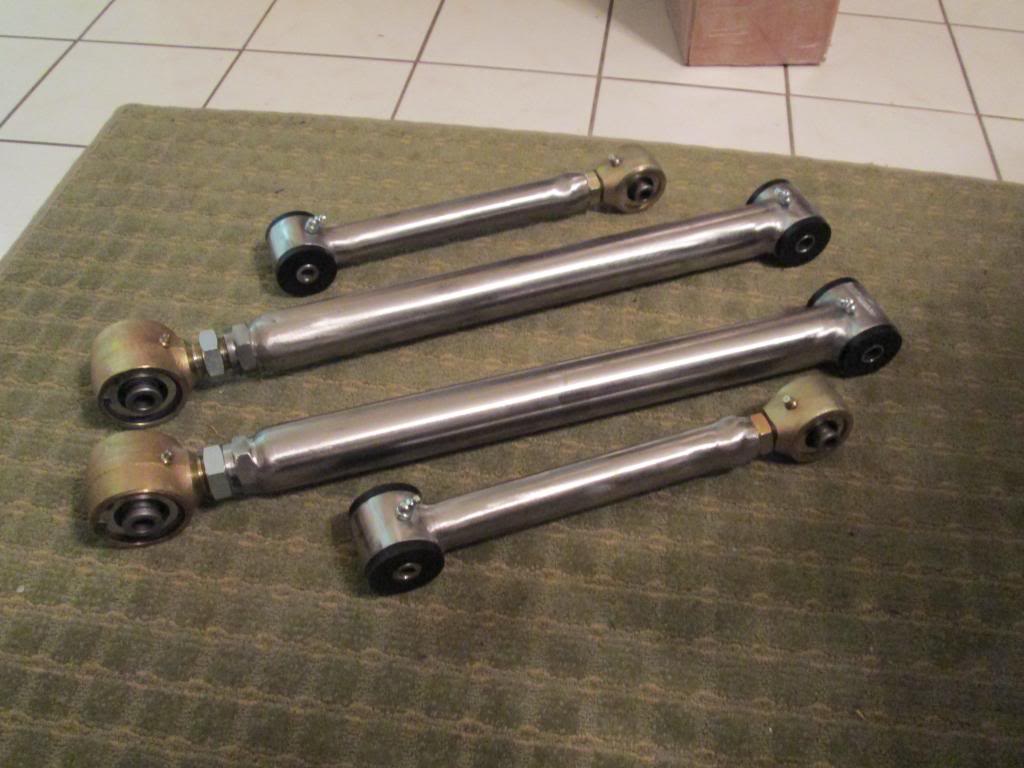
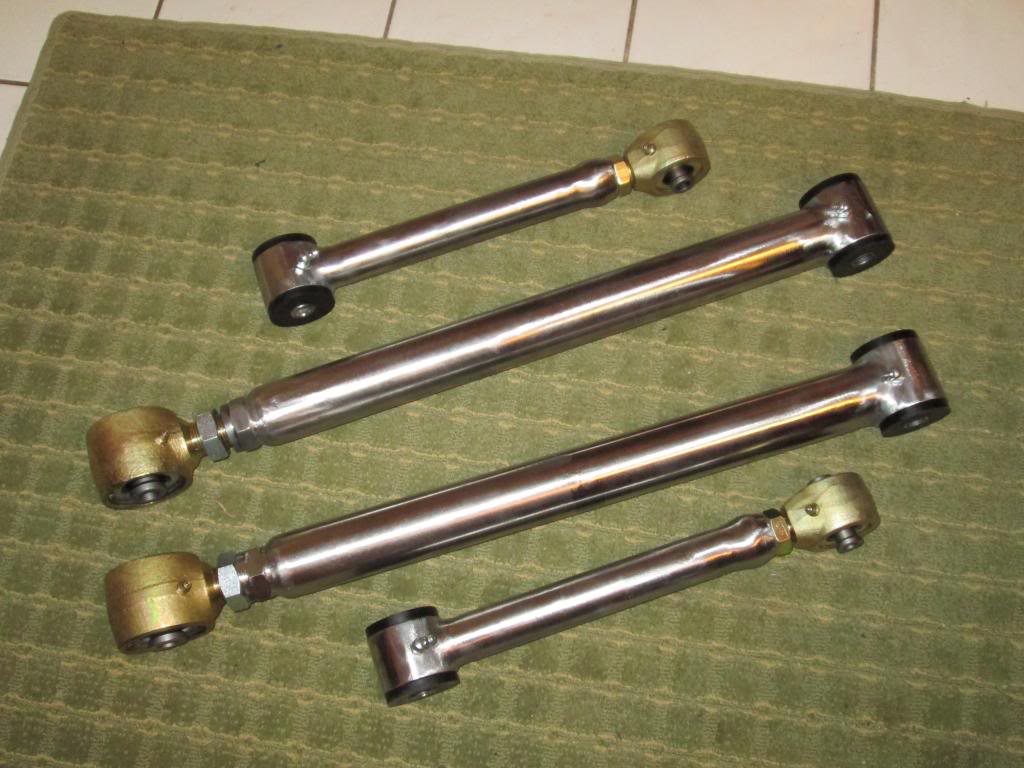
New upper and lower rear control arms from The ToyOutfitters. I was in a time crunch so I had these shipped unpainted and I went ahead and painted them yesterday before installing them.
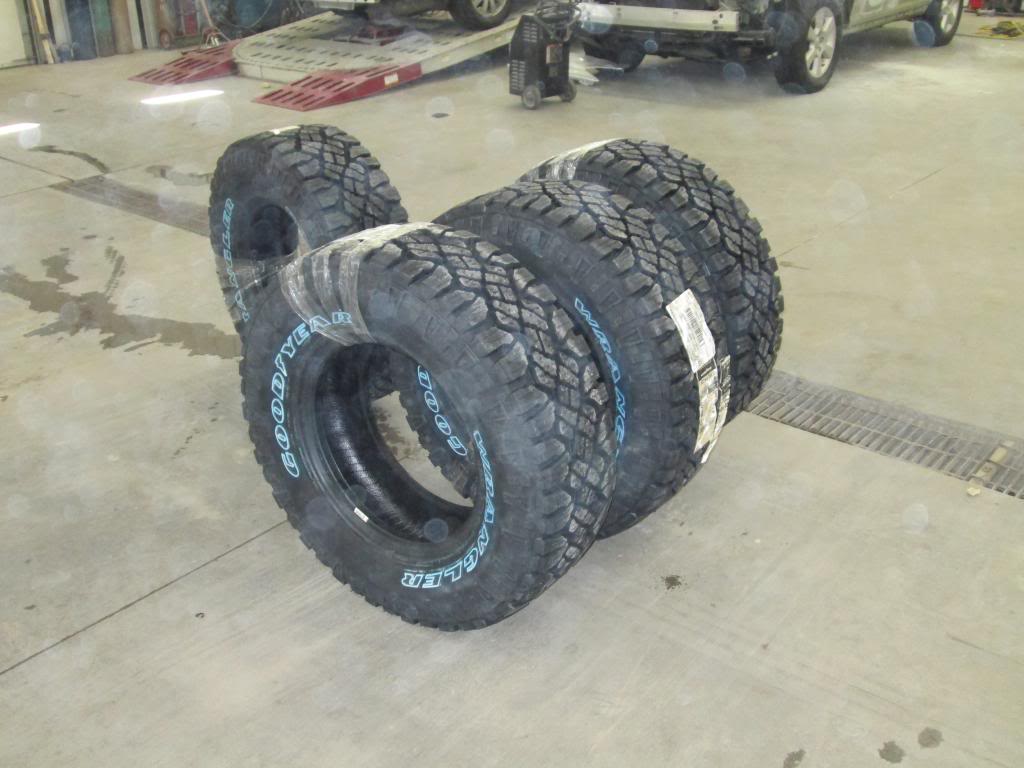
Tires arrived, 285 70 17 DuraTracs. These are beastly! Still waiting on the ProComps to arrive, maybe tomorrow.
Now... On to the swap!
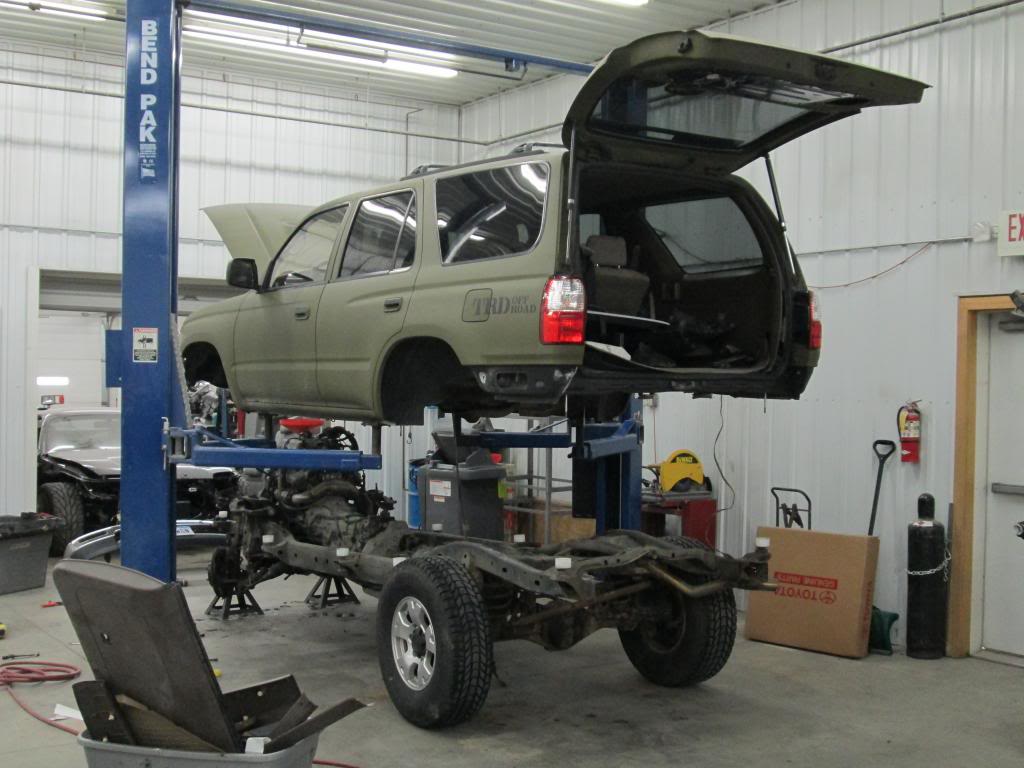
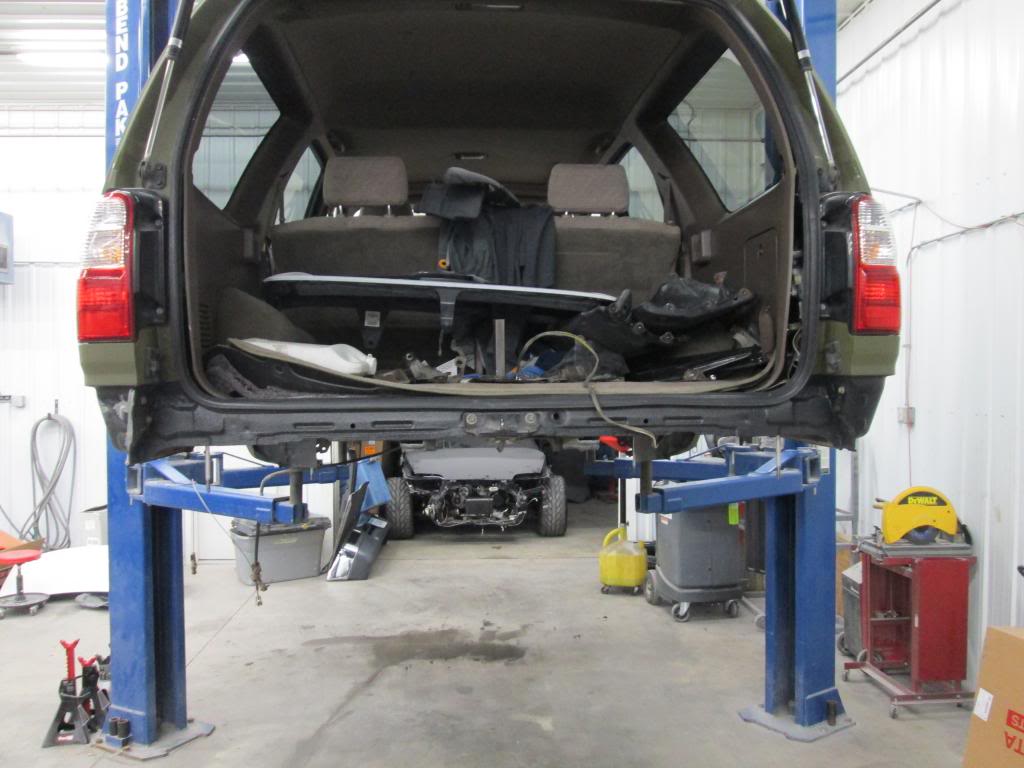
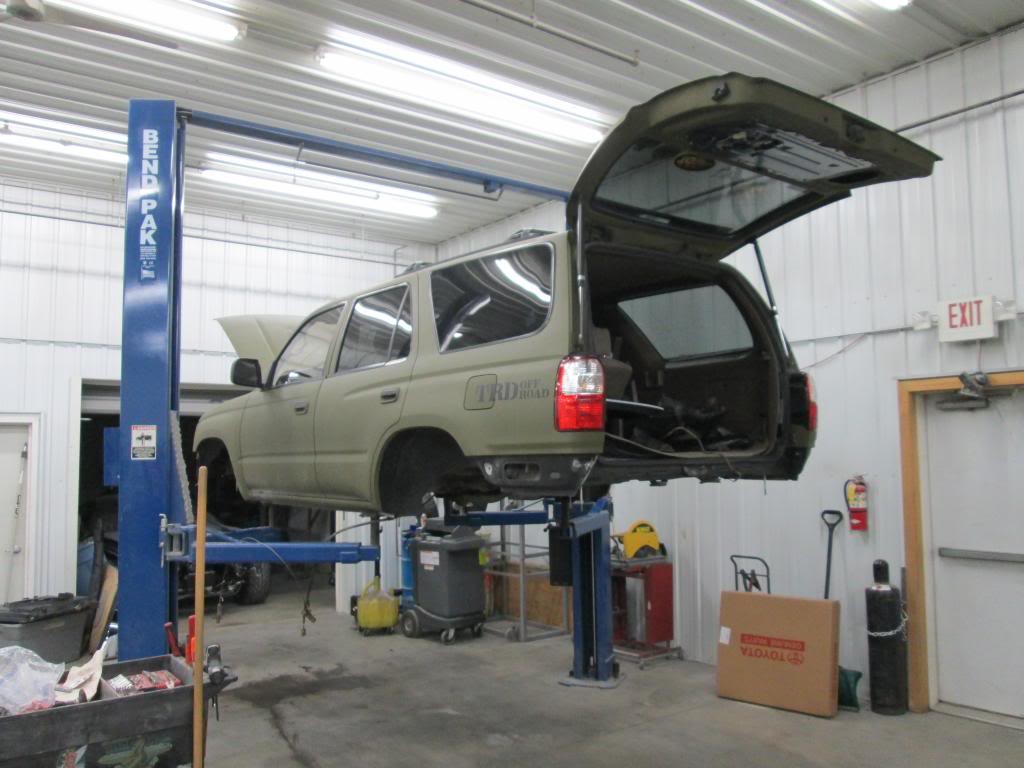
Body lifted off of the frame.
Looks like one hell of a body lift!!!
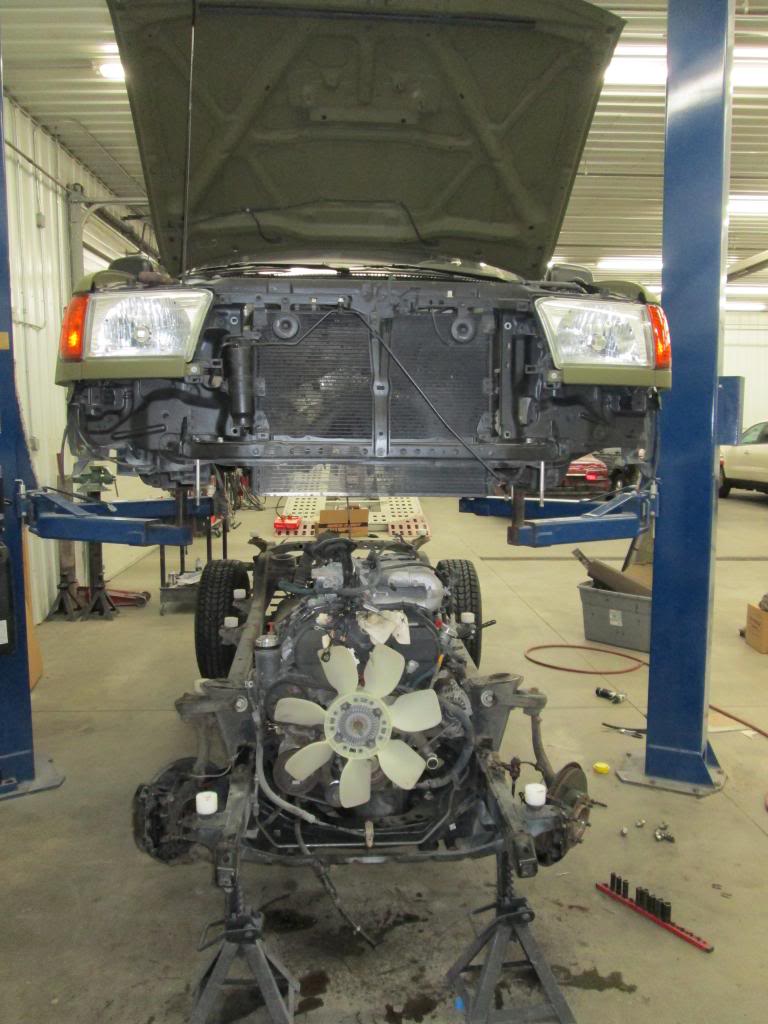
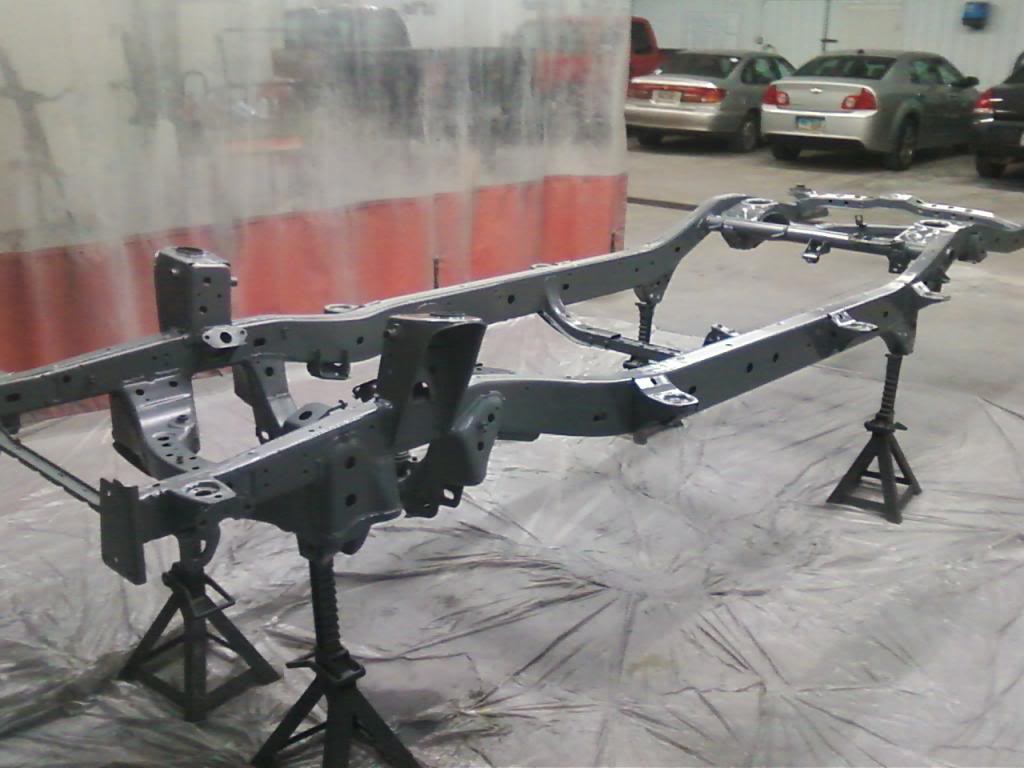
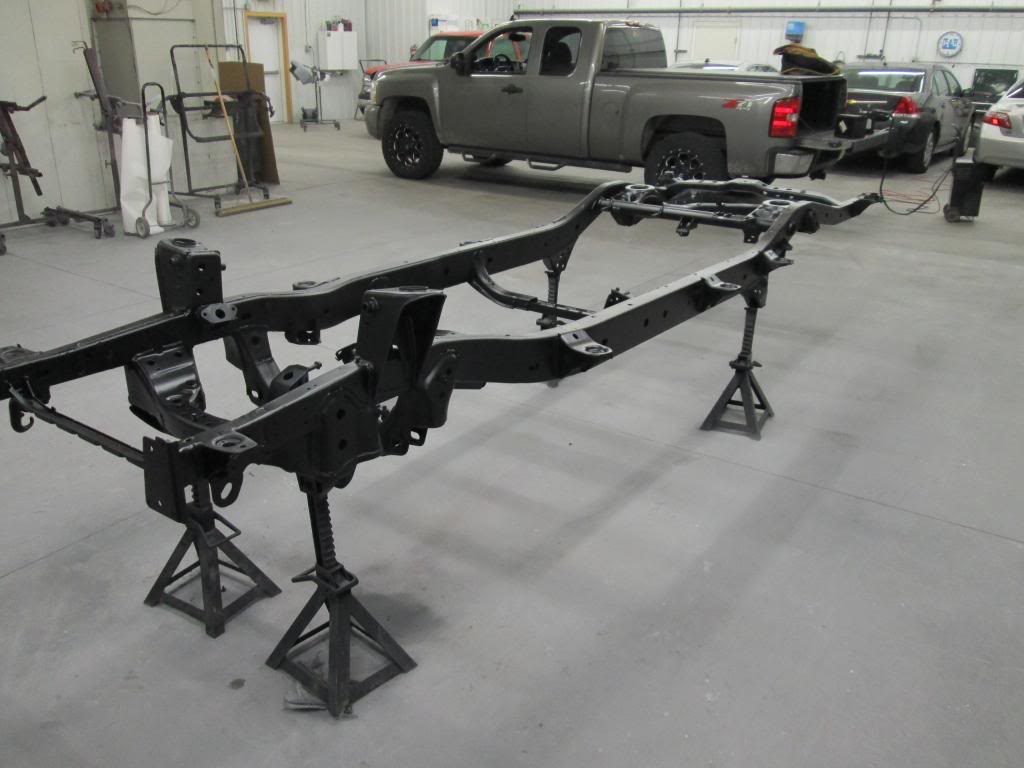
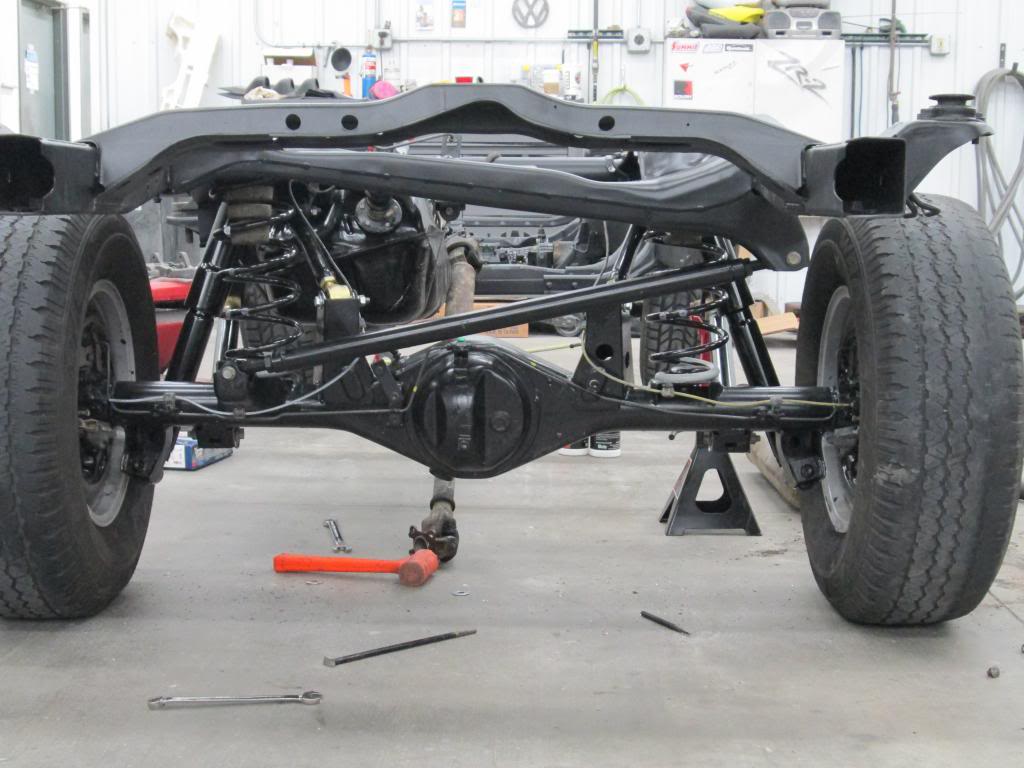
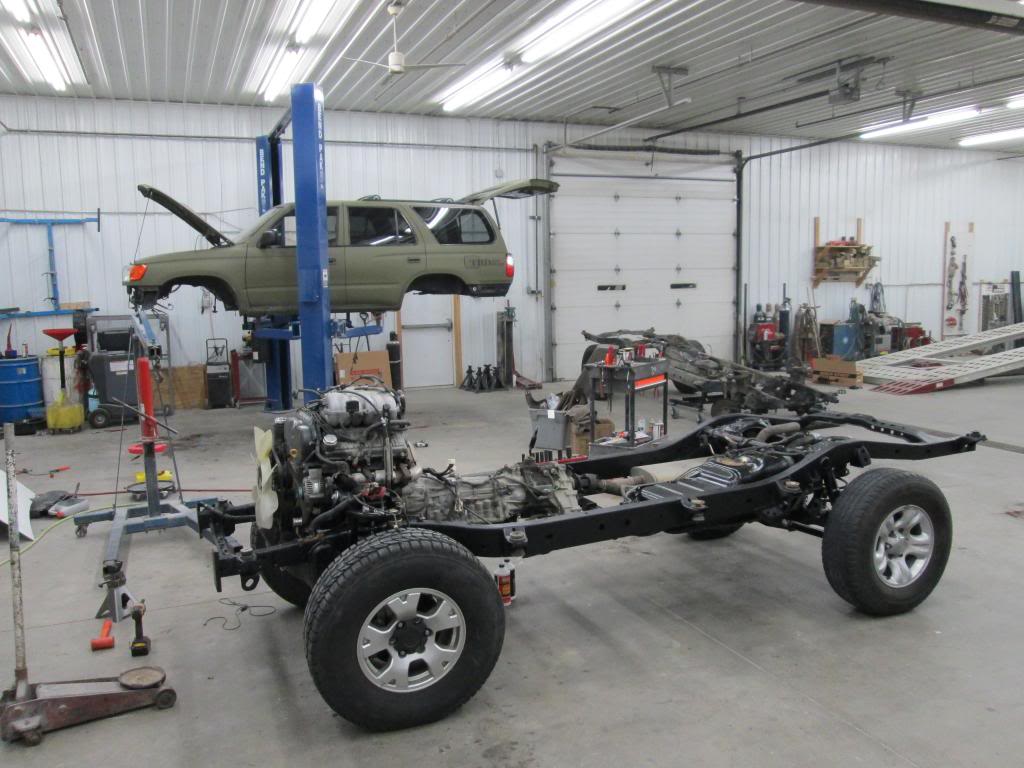
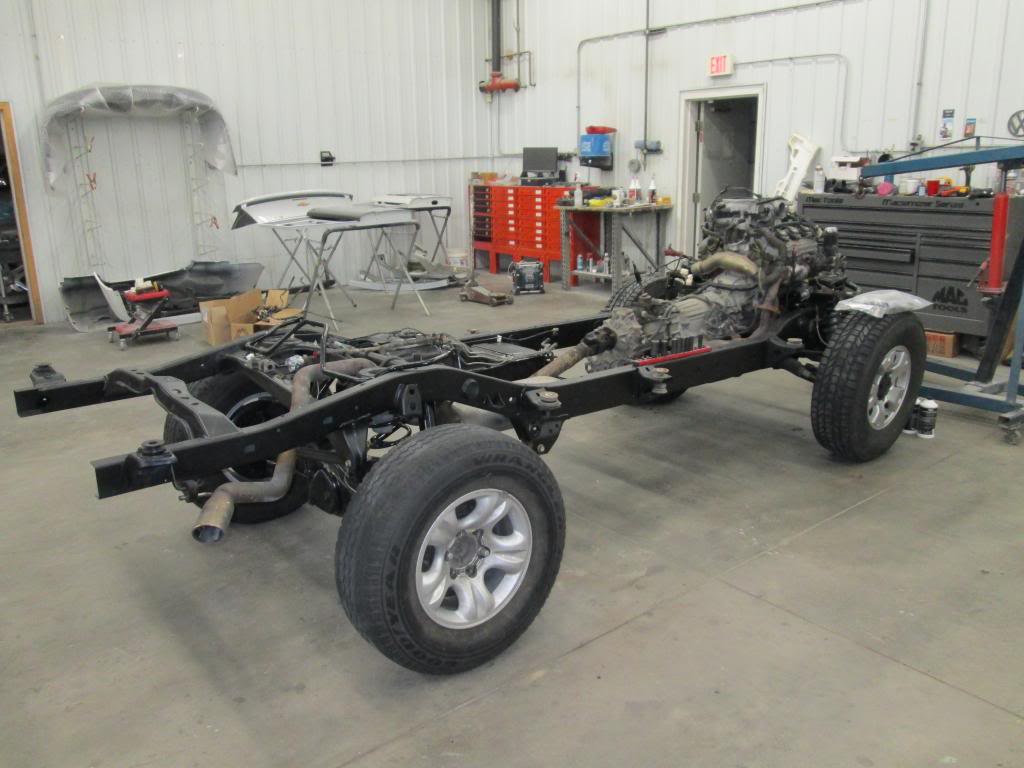
Old frame assembly rolled somewhat next to the new frame that we partially assembled with the new parts I had on hand.
New frame partially assembled.
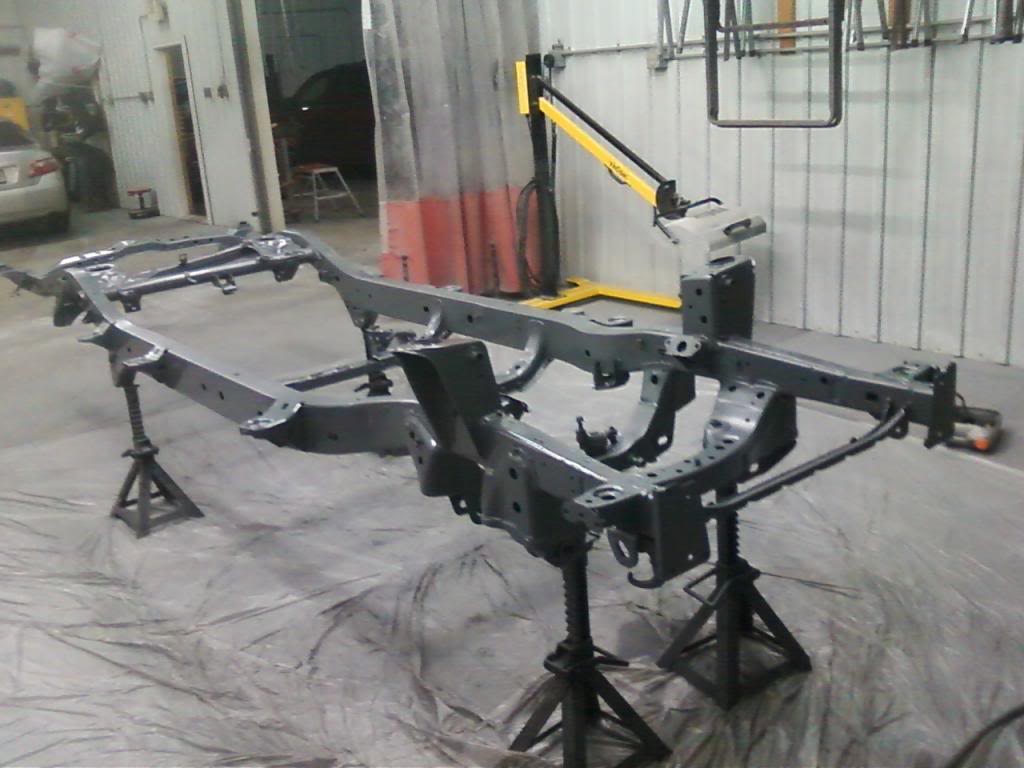
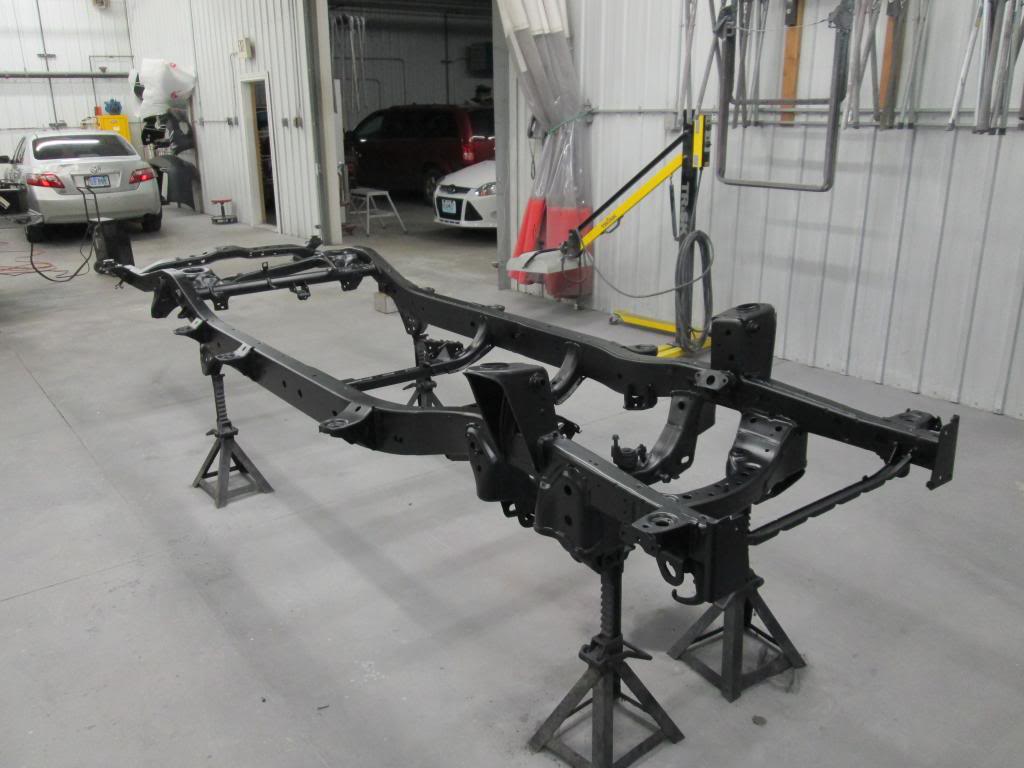
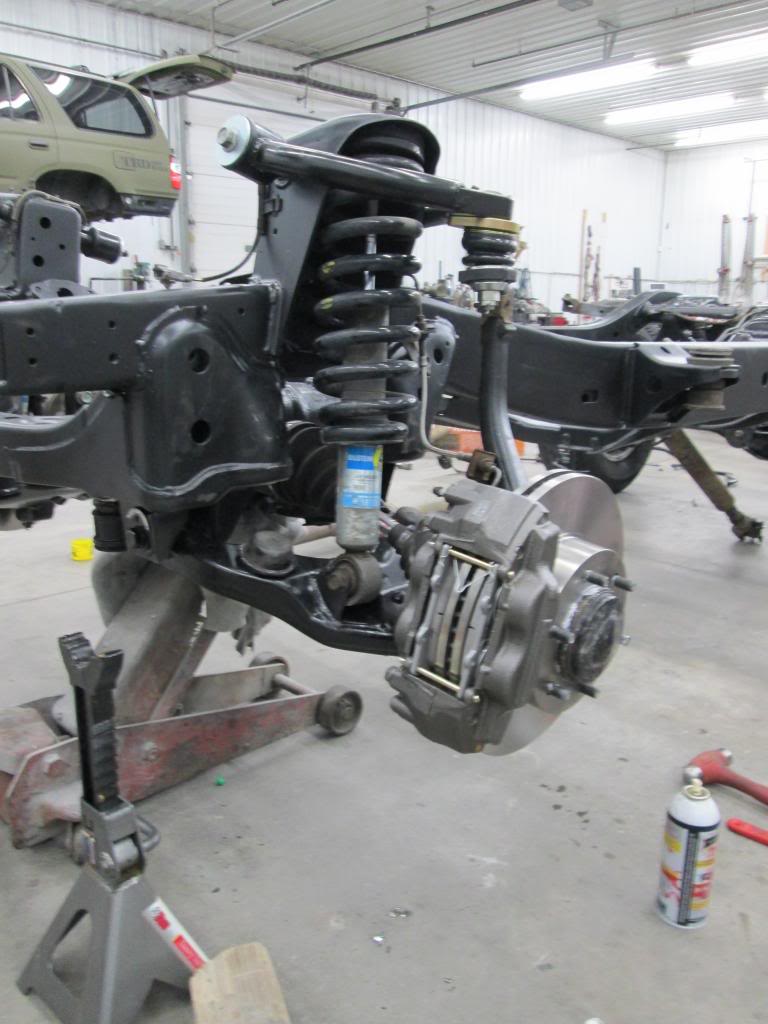
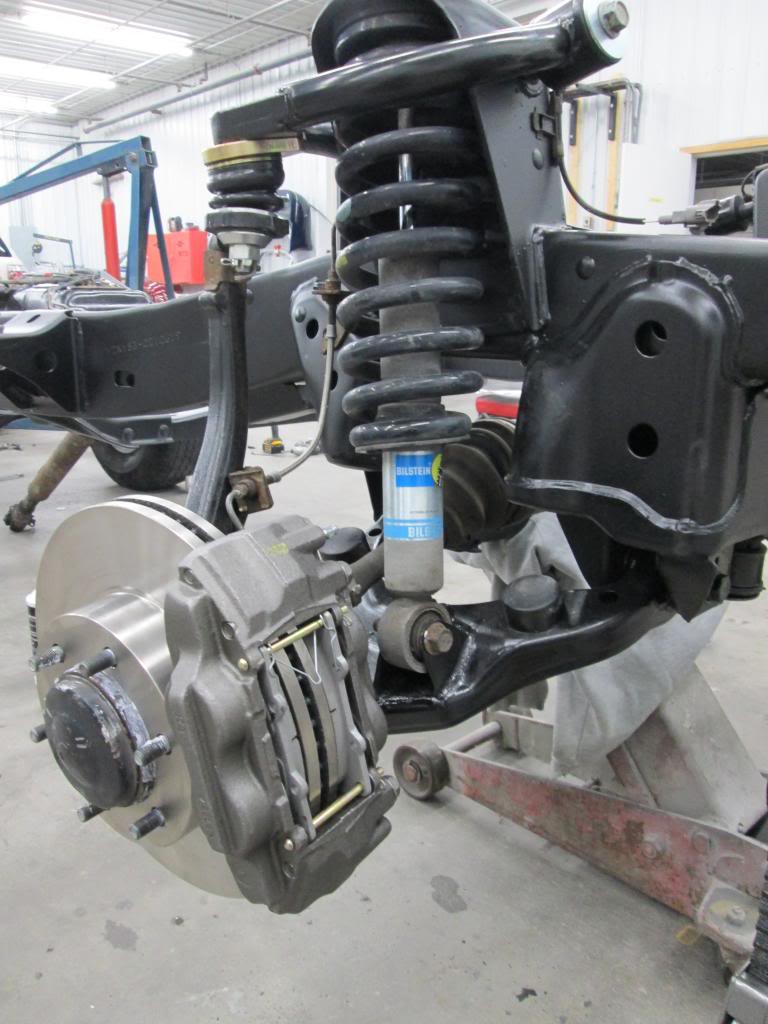
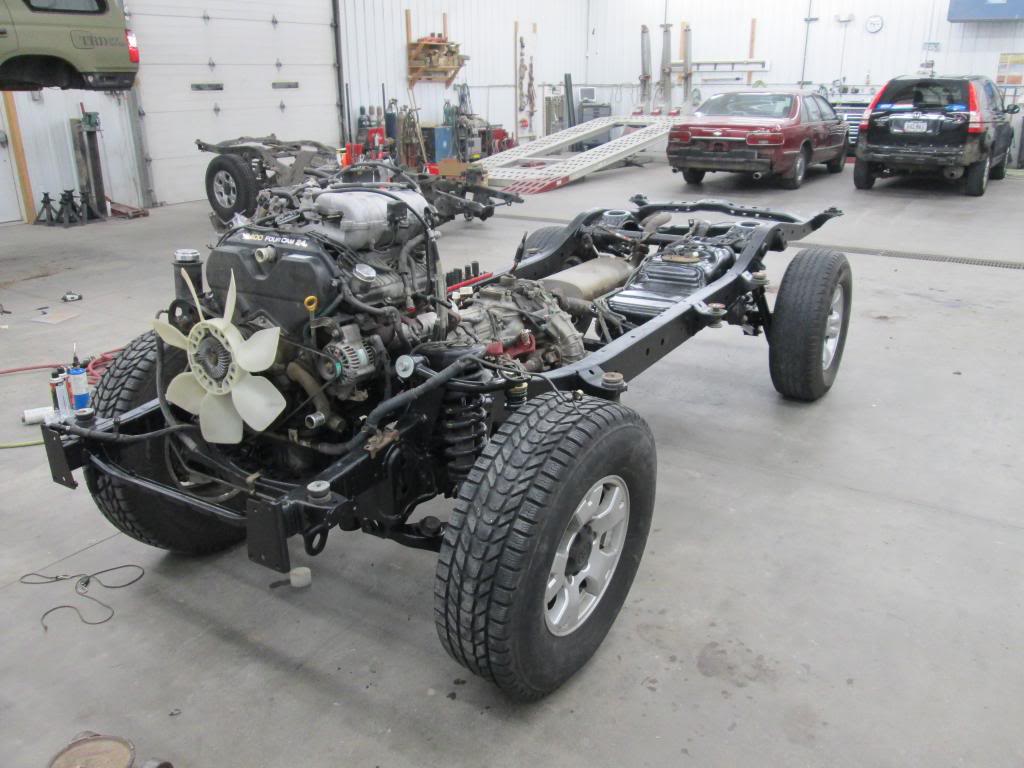
Old Bilstiens (bought last year) assembled with the new upper control arm, refinished spindle and lower control arm on the new frame.
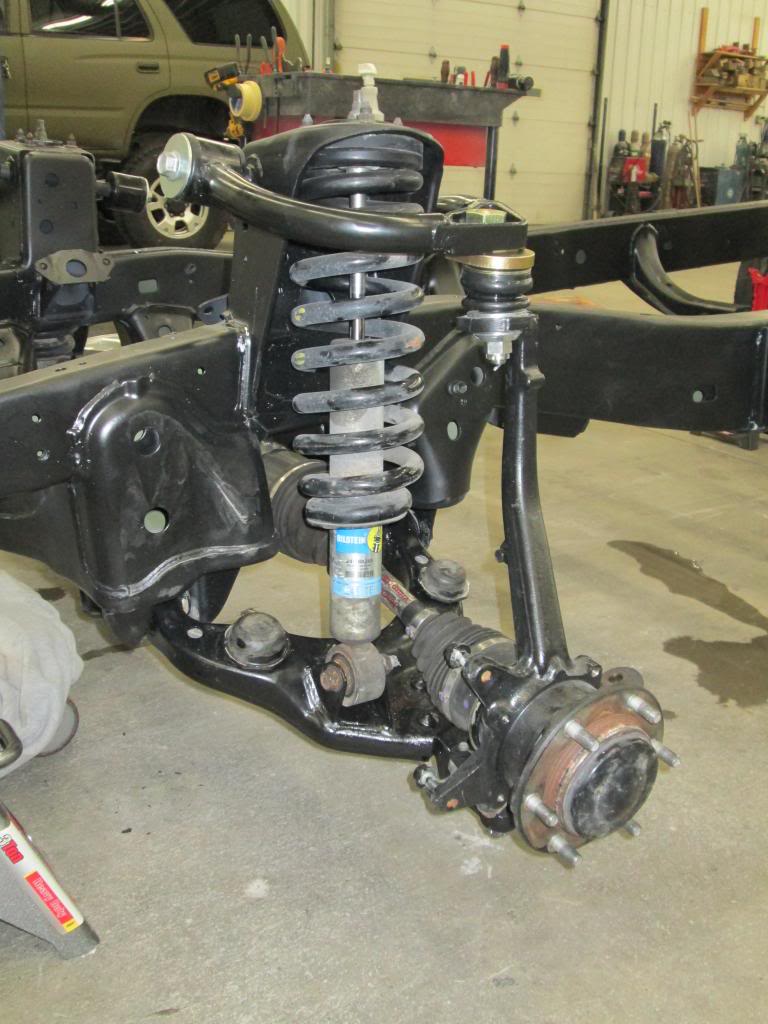
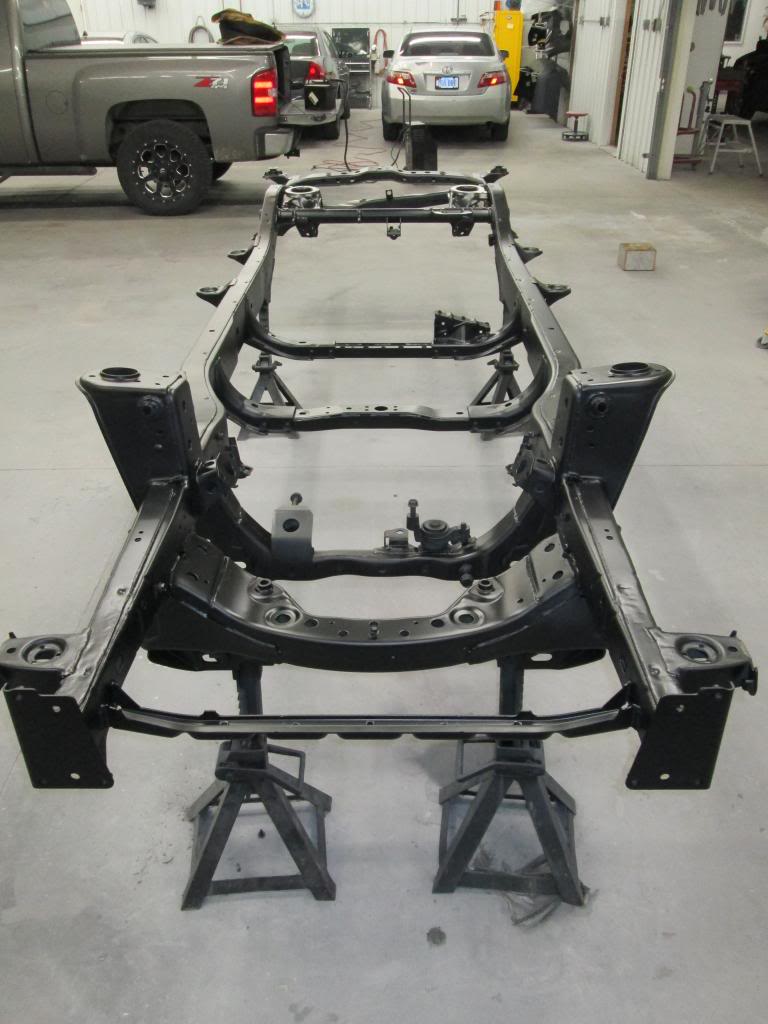
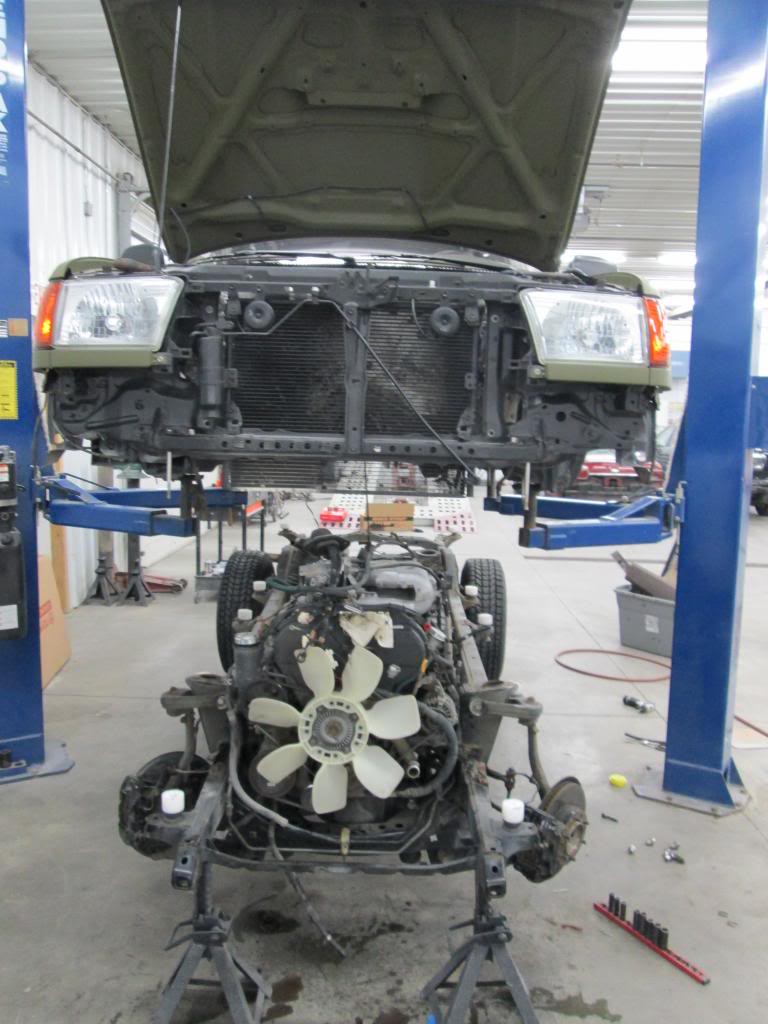
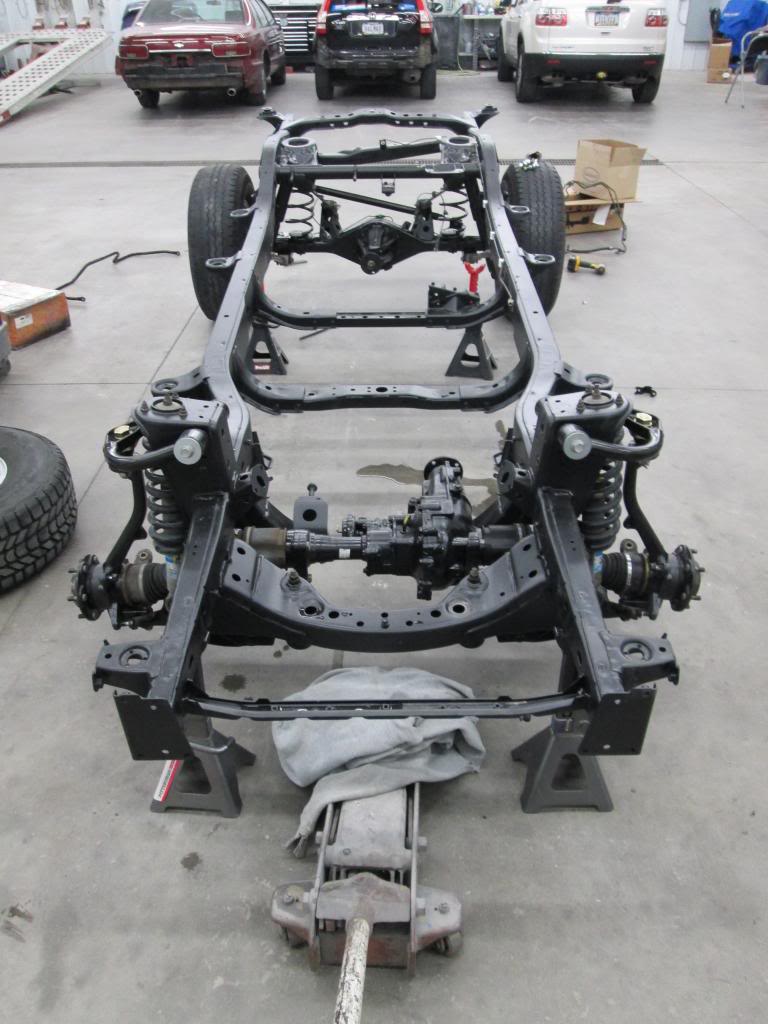
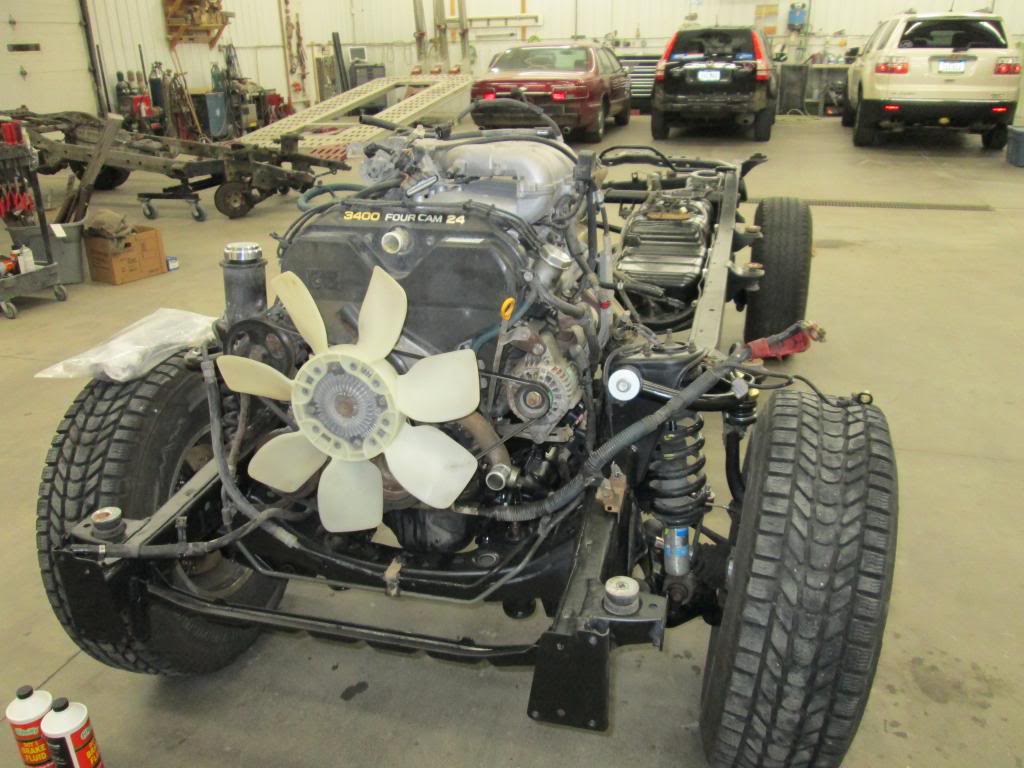
Front diff, axles, front suspension all installed.

Some shots of the rear setup. New upper and lower control arms from The ToyOutfitters and new springs and rear shocks from Sonoran Steel to upgrade my lift to the 1.2 setup in the rear.
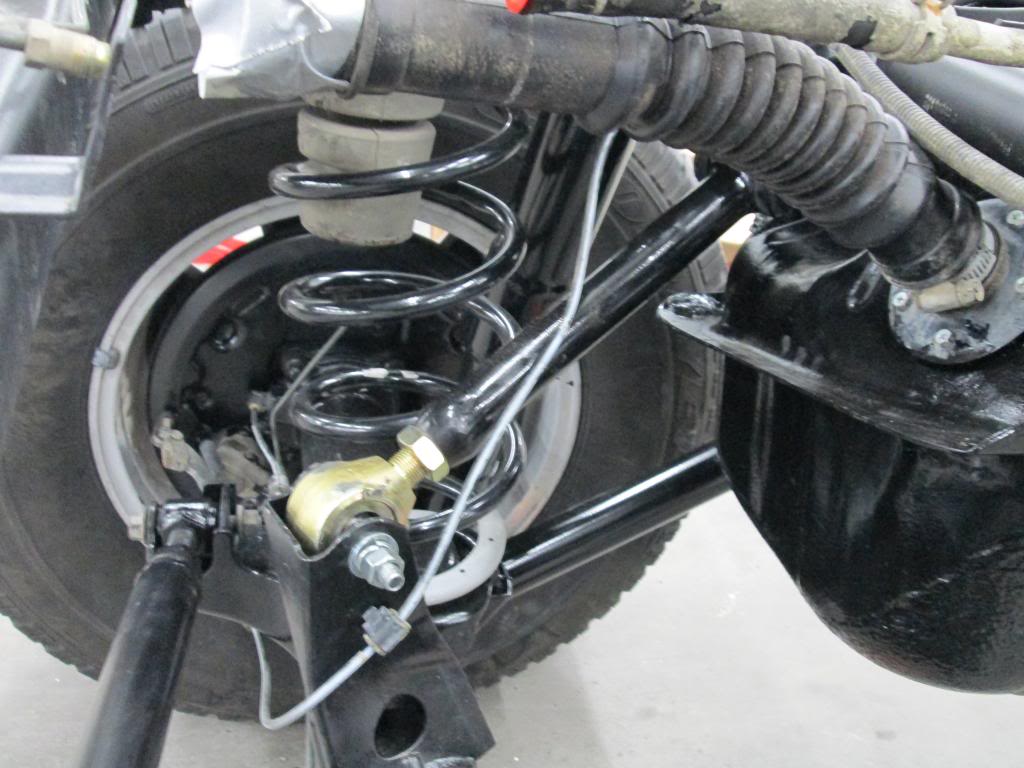
And a shot with the drive shaft laying there. I popped a grease cap on the rear u joint during the accident so before I get on the road I'm going to have it rebuilt by a local drive line company. It won't look that hideous in a few days, plus it won't sling grease everywhere once it's fixed!
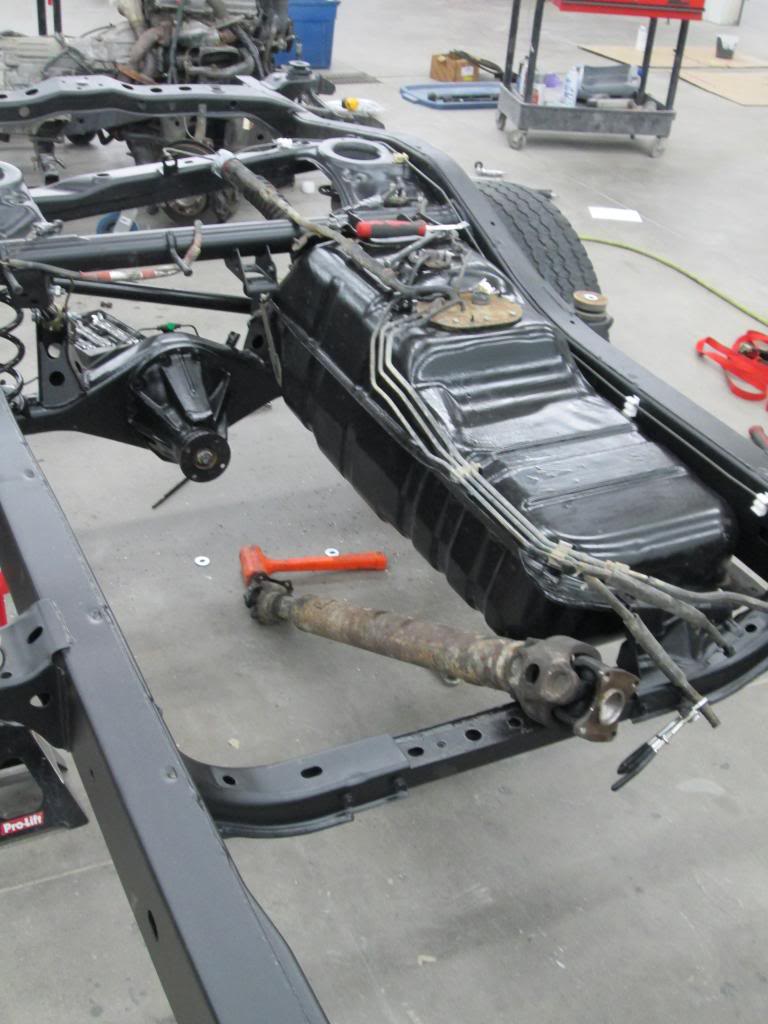
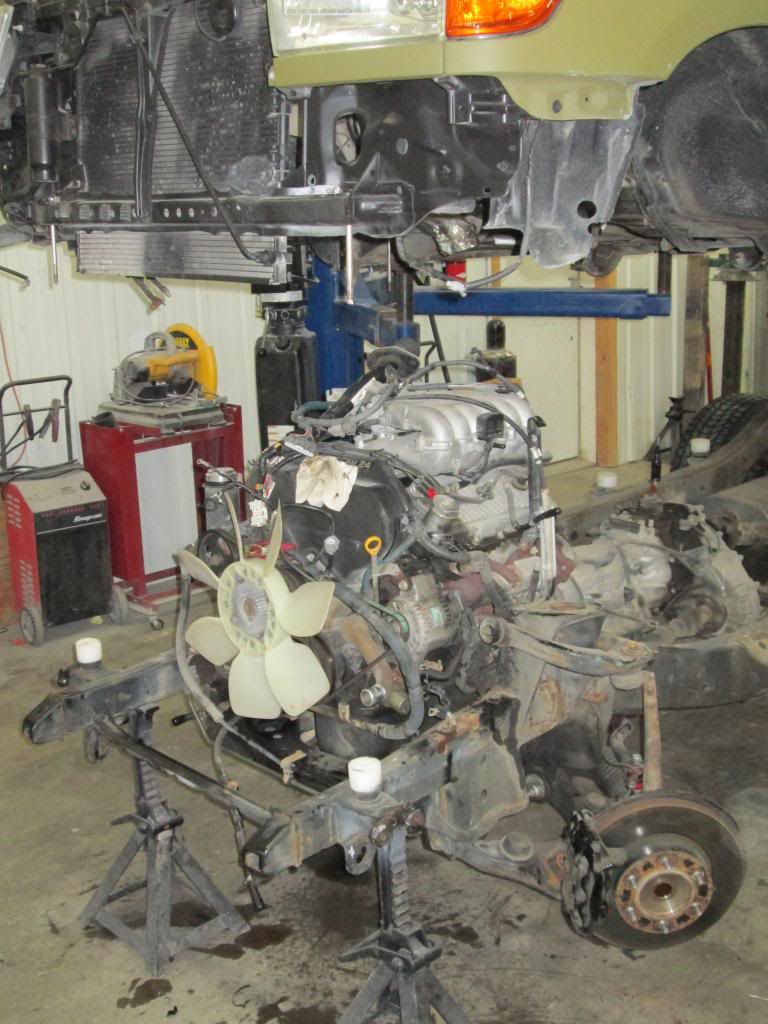
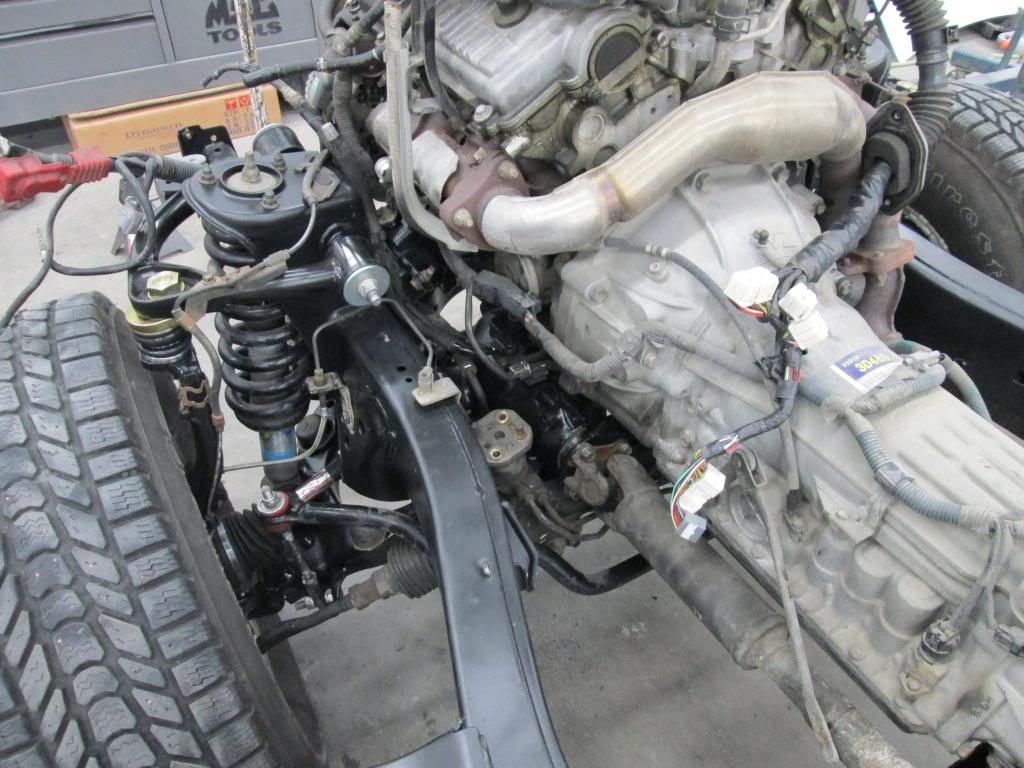
Upgraded the brakes from the 199mm setup to the 231mm stuff. Got new Brembo rotors, reman 13WL calipers from O'reilly, I bought some Hawk pads but they were wrong so I went with a set of ThermoQuiet pads instead. Got my old stainless brake lines, and another shot of those lovely Light Racing upper control arms.
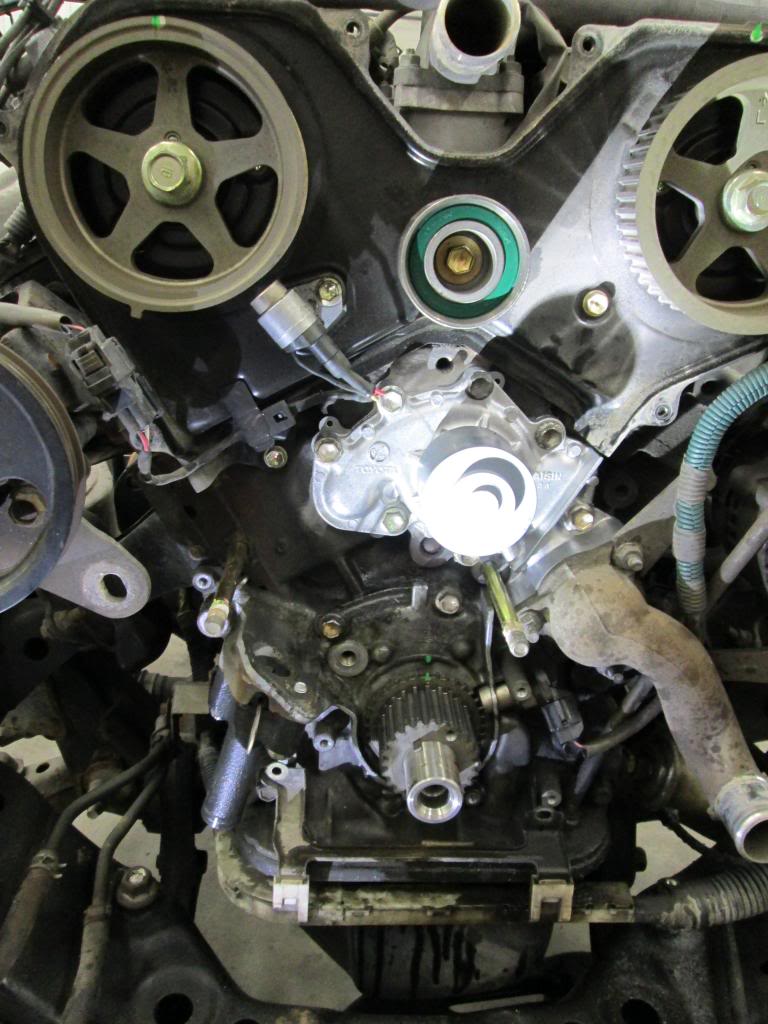
While the 4runner was accessible my very good friend and mechanic extraordinaire did my timing belt service. I got all OEM parts including a new timing belt, tensioner, idlers, waterpump, gaskets, thermostat, crank bolt, radiator, and new drive belts. Also while I had things out I put new engine motor mounts and a new transmission mount on.
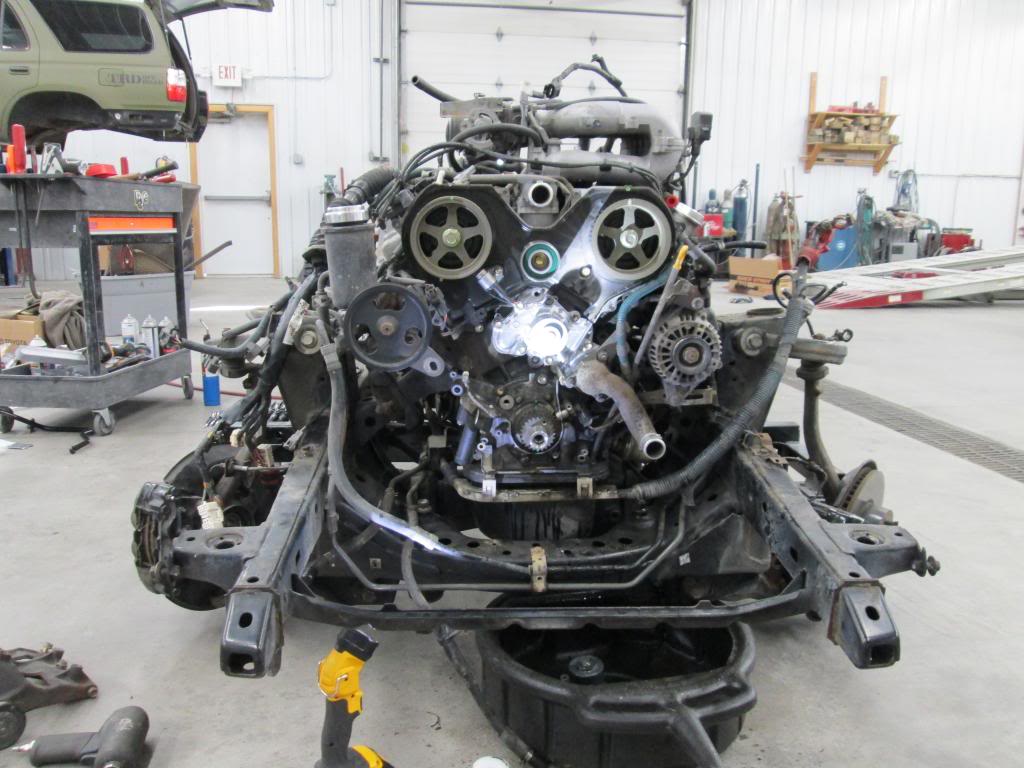
Next it was time to drop that engine, trans, and transfer case on the new frame.
That was a bit of a nail biter with all that weight dangling so high up in the air. We had many other chains to hold the weight should something have failed but it's still a little butt-puckery standing next to something that could crush you in a split second.
As you can see in that previous picture, my 2006 Tacoma wheels fit over the 231mm brake upgrade with no problems whatsoever. So, if you're interested in doing the bigger upgrade but aren't sure if it will work with these wheels, rest assured everything fits without modification.
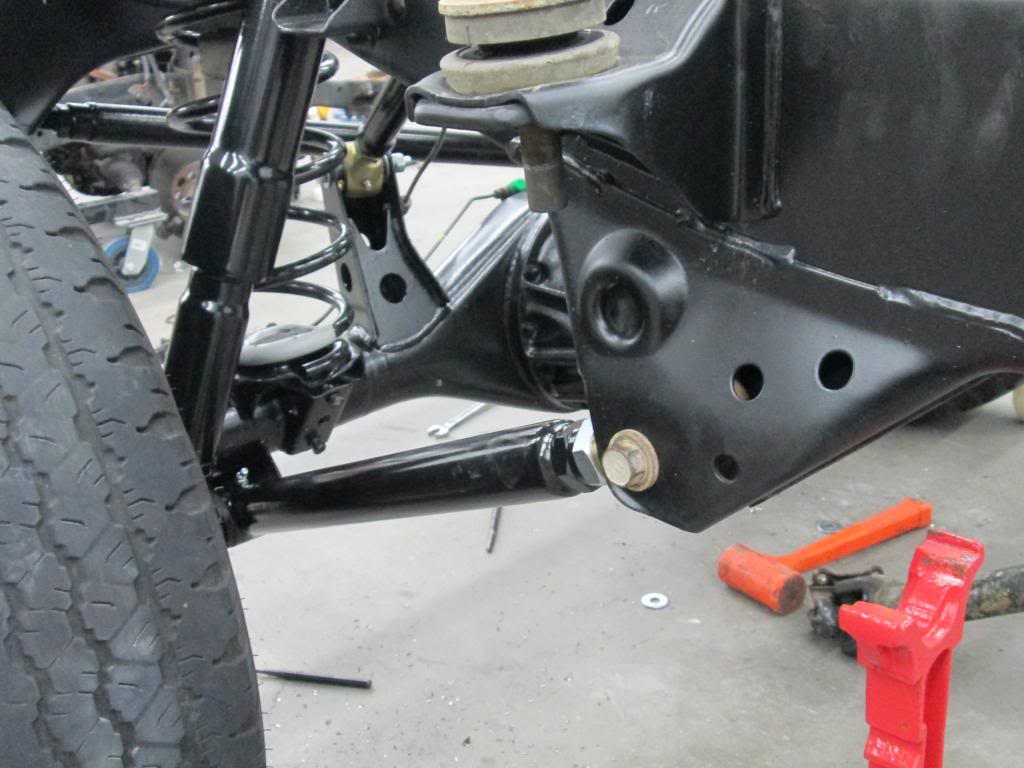
Awww, ain't that purdy?
This was the last picture I took before I called it quits at 10pm after working for 14 hours straight. The rest would have to be done on Sunday.
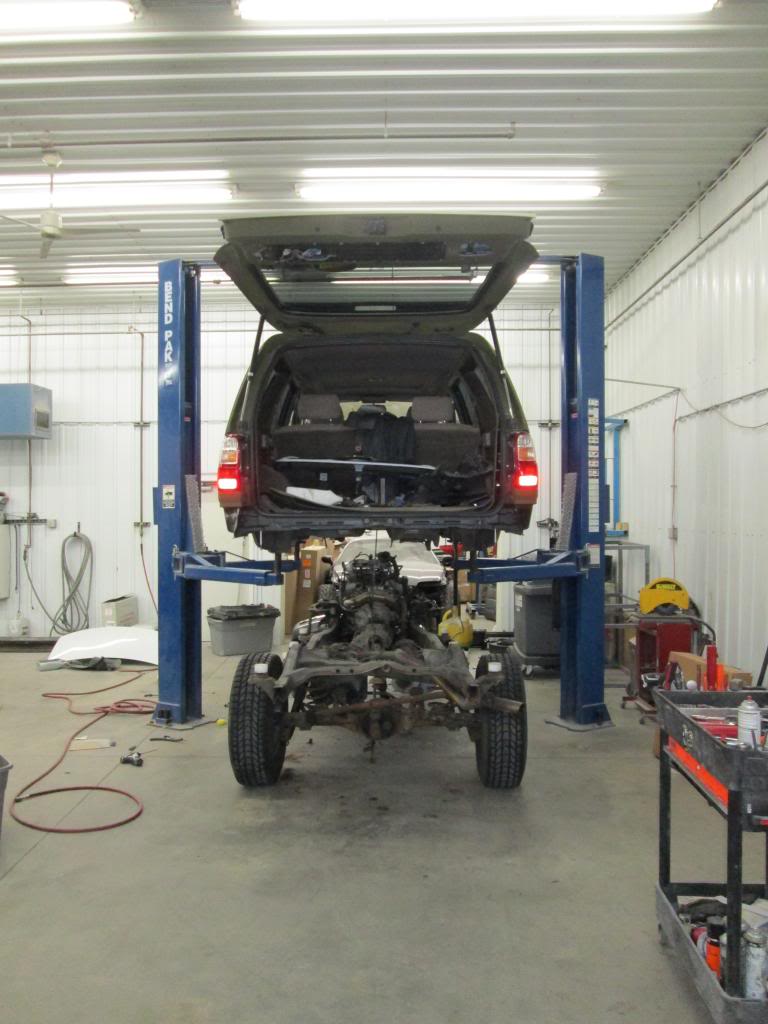
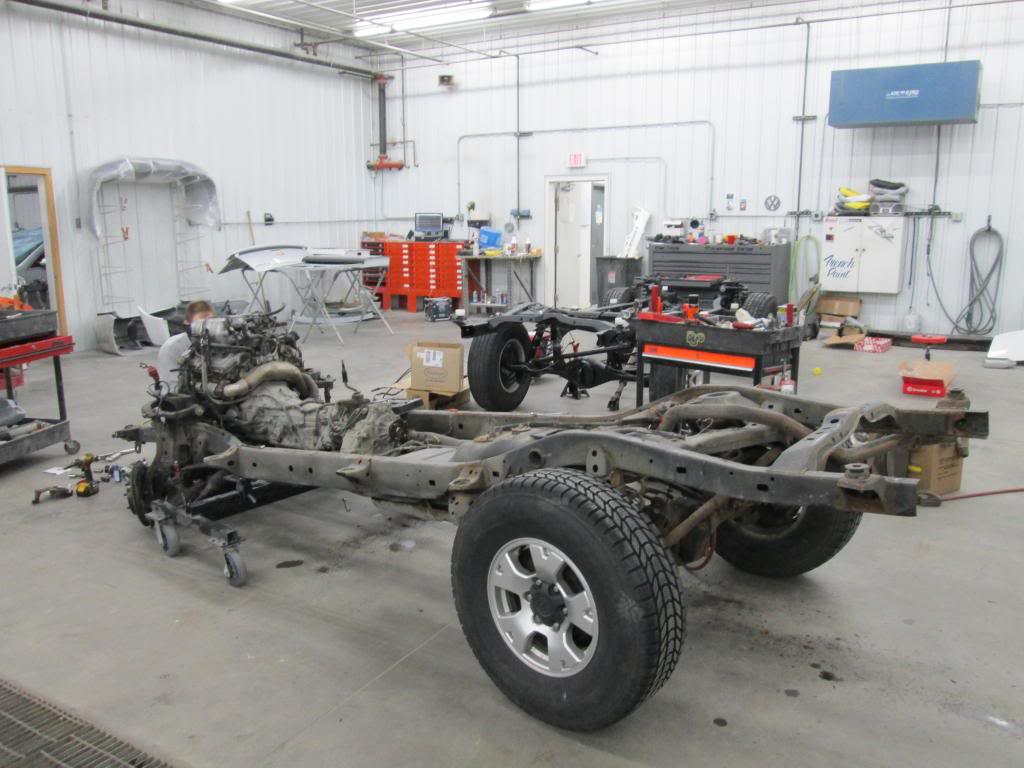
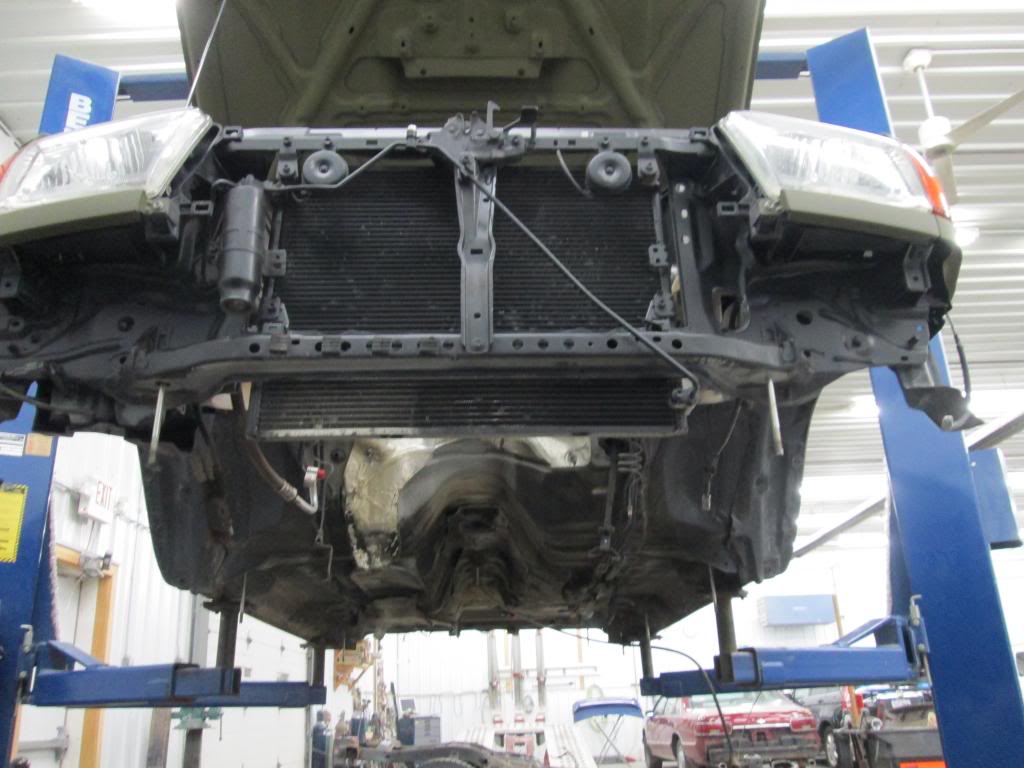
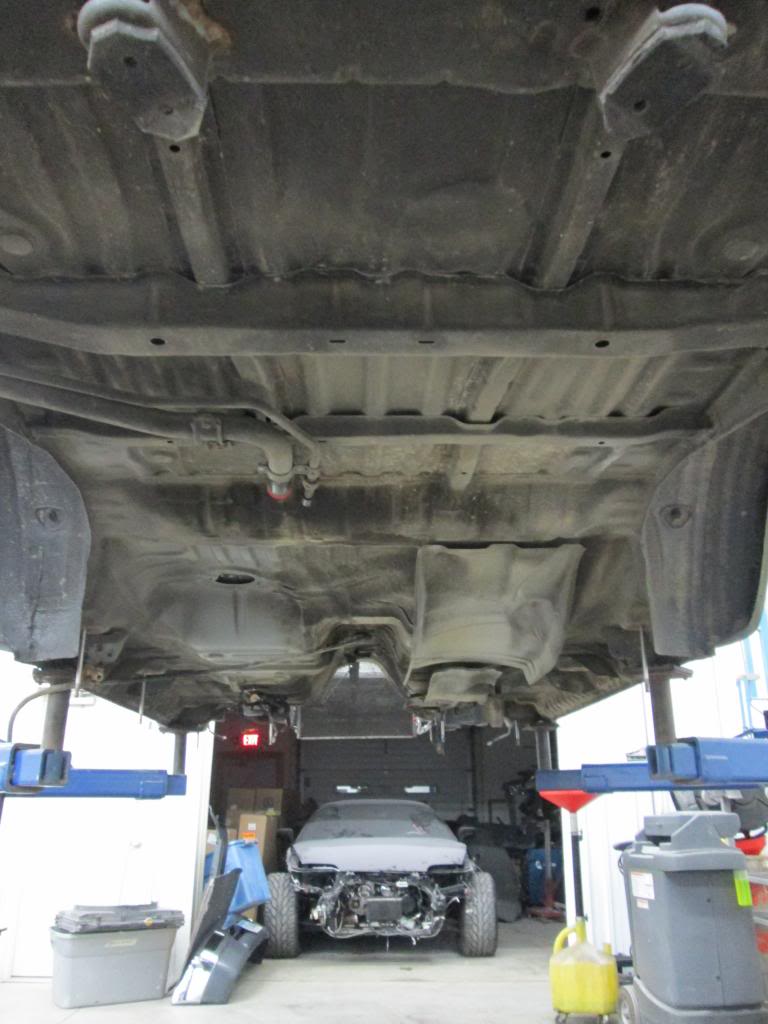
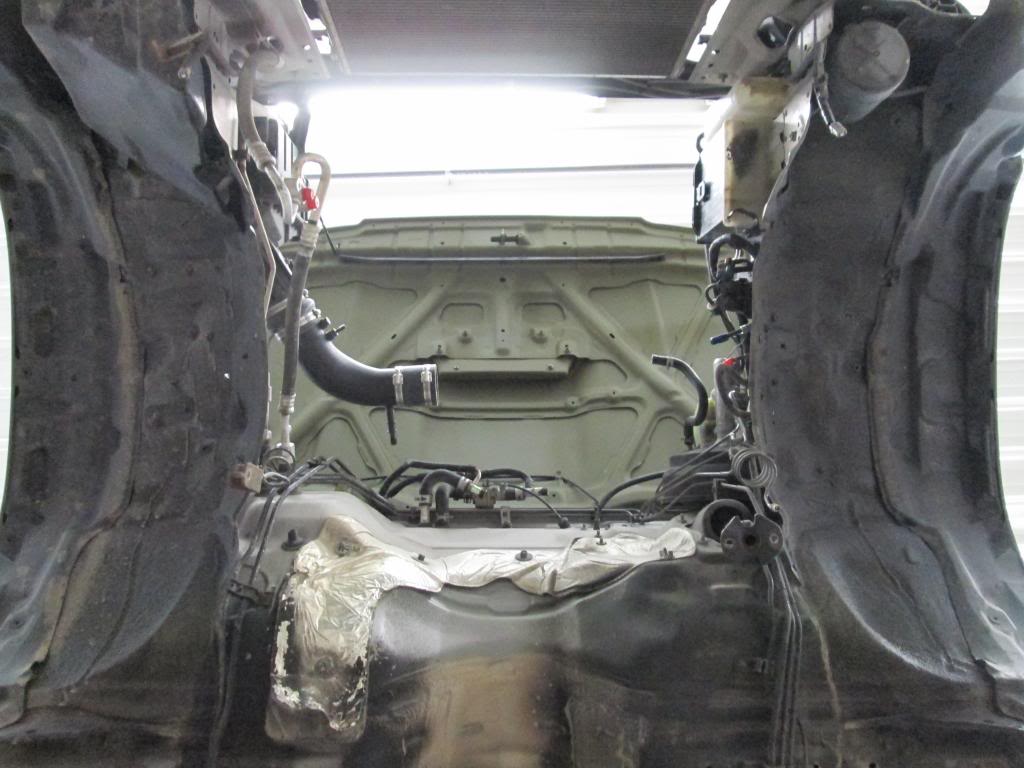
Ever wondered what it would be like to walk under a 3rd gen body, nothing else? Enjoy.
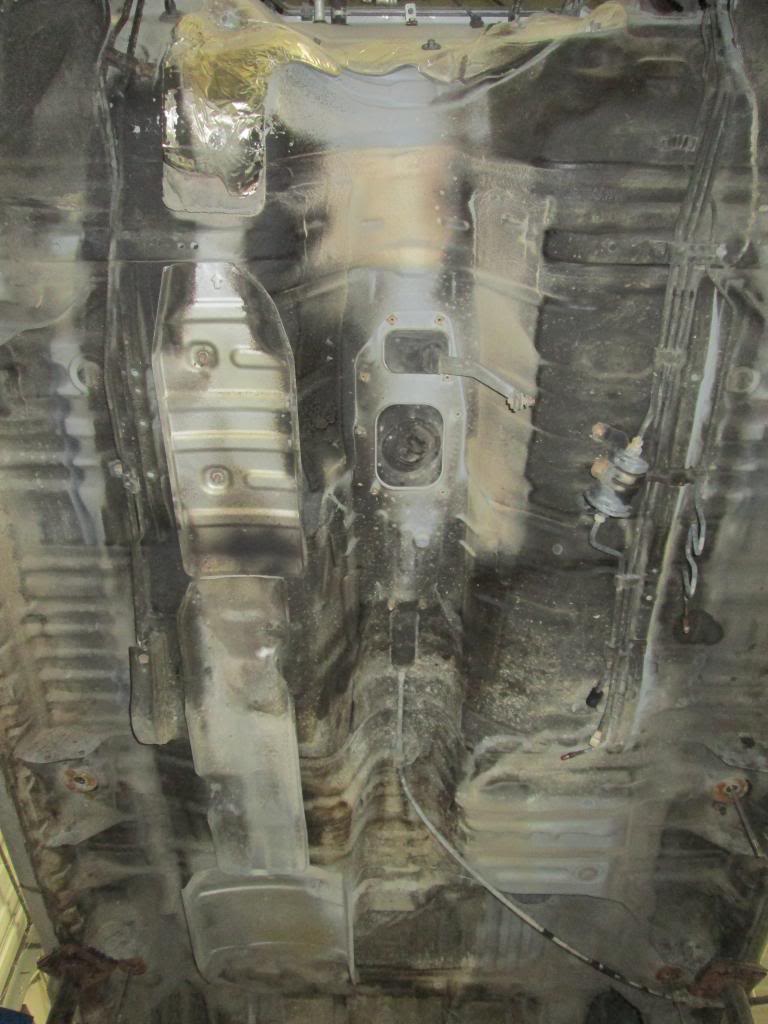
Not bad for a '98 that has seen 15 winters in Iowa! A couple small patches that I'll fix up but nothing scaly or rusted through, simple fixes and not many at all!
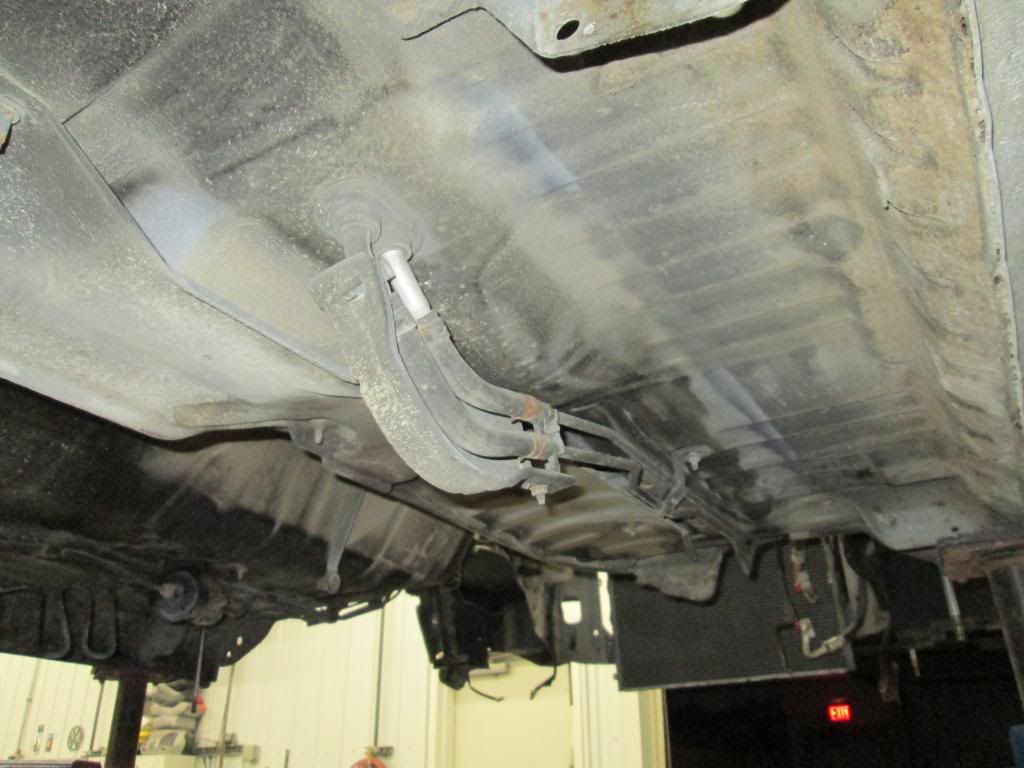
That's not rust, it's mud.
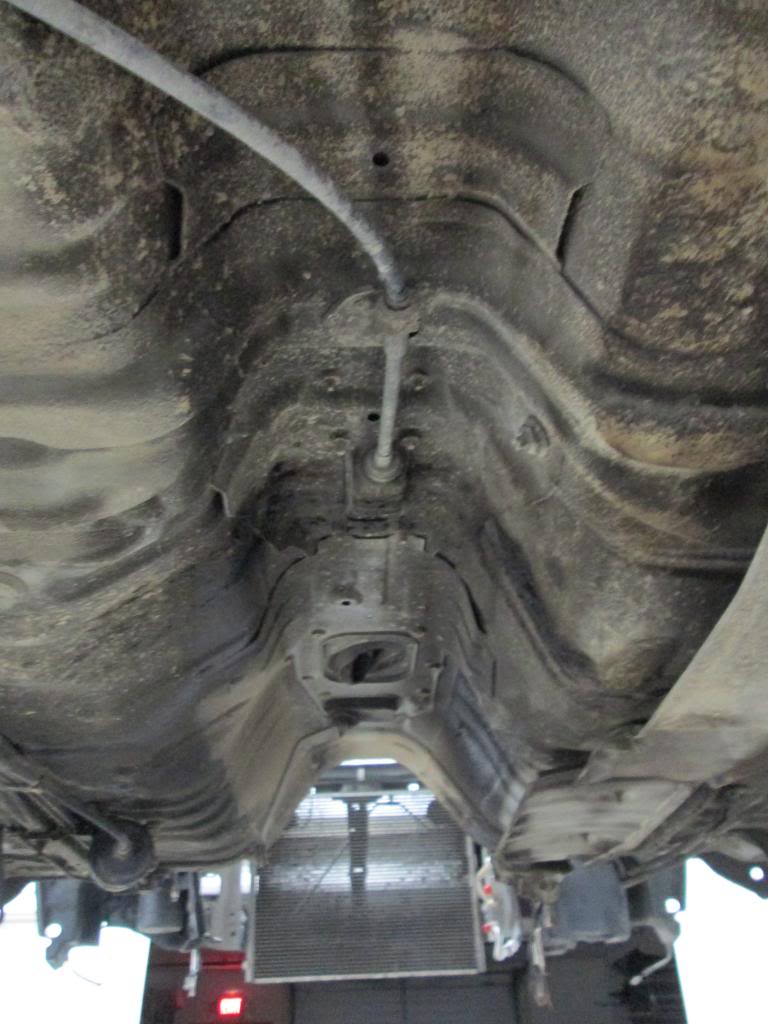
Looking up through the engine bay, that's a weird perspective.
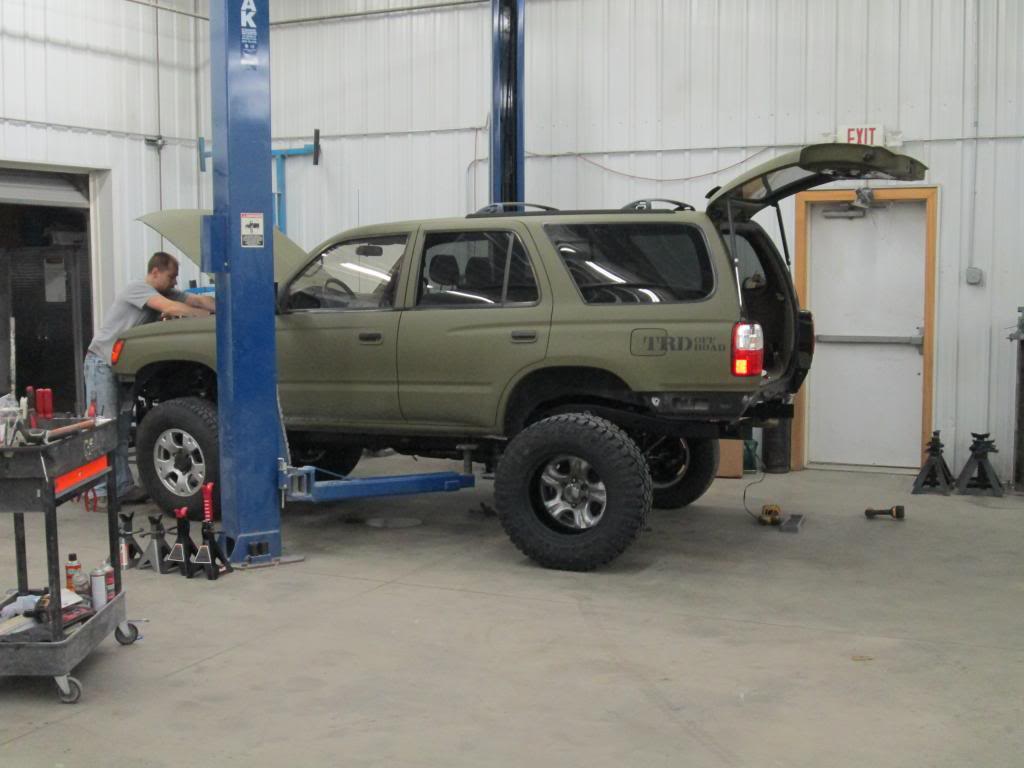
OK, now with the body and chassis mated once again! Re-connecting all fuel lines, brake lines, electrical, vacuum, steering and shift linkage, radiator and trans hoses, and a/c lines.
And yes, that's one of my DuraTracs rolled in front of the rear wheel to get a preview of what's to come!
We bled the brakes, flushed and filled with Toyota coolant, charged the A/C up, and changed out the front and rear differential fluid. Turned the key, everything started up, no dash lights, brakes work, and I took it for a little test drive in the parking lot. All is right in Toyota Land. It needs an alignment SOOOO bad as you can probably see in the pictures.
Here she is all tucked in and ready for bed tonight after a long weekend of surgery. Sitting next to the old frame assembly.
I'm going to get some better pics of the frame carnage now that the body is off. Good Lord that frame was a ticking time bomb! Seems birds were making nests inside the frame rails, which probably trapped more moisture and accelerated the rust from the inside out. The massive hit during the accident didn't help but I'm sure the frame buckled where it did because it was super weak from corrosion at those places. I was pulling bird nests and huge chunks of rust out of the hole where the frame buckled on the left side. Freakin' birds!
So, until the next set of "Glam Shots" are up I'd just like to thank a few more people. Jared who donated the frame and all kinds of goodies that made this swap SOOO much better and easy. My boss who has allowed me to work on my project after work and on weekends the last two months. And my good friend and co-worker Sam whom without his skill and generosity with his time helping me with this swap, I would probably be driving a base model Corolla or a Craigslist jalopy and not my most favorite off-road beast... The PATYWGN!!!!!
PS - I warned you I was longwinded!! At least the pics help.
So the last couple weeks I've been cleaning and painting parts, waiting on other parts to arrive, and prepping for the big swap over. This weekend all the stars and planets were aligned and things got done. Here are some shots of what I've been doing the last couple weeks...
Rear axle somewhat cleaned up before I disassembled it and painted it.
Rear Axle all cleaned up and painted, reassembled.
Front differential cleaned and painted.
Various parts hung up and painted.
Front lower control arms and front spindles cleaned and painted.
Gas tank cleaned up and painted, not that it needed it but I added a couple layers of protection from the elements.
New upper and lower rear control arms from The ToyOutfitters. I was in a time crunch so I had these shipped unpainted and I went ahead and painted them yesterday before installing them.
Tires arrived, 285 70 17 DuraTracs. These are beastly! Still waiting on the ProComps to arrive, maybe tomorrow.
Now... On to the swap!
Body lifted off of the frame.
Looks like one hell of a body lift!!!
Old frame assembly rolled somewhat next to the new frame that we partially assembled with the new parts I had on hand.
New frame partially assembled.
Old Bilstiens (bought last year) assembled with the new upper control arm, refinished spindle and lower control arm on the new frame.
Front diff, axles, front suspension all installed.
Some shots of the rear setup. New upper and lower control arms from The ToyOutfitters and new springs and rear shocks from Sonoran Steel to upgrade my lift to the 1.2 setup in the rear.
And a shot with the drive shaft laying there. I popped a grease cap on the rear u joint during the accident so before I get on the road I'm going to have it rebuilt by a local drive line company. It won't look that hideous in a few days, plus it won't sling grease everywhere once it's fixed!
Upgraded the brakes from the 199mm setup to the 231mm stuff. Got new Brembo rotors, reman 13WL calipers from O'reilly, I bought some Hawk pads but they were wrong so I went with a set of ThermoQuiet pads instead. Got my old stainless brake lines, and another shot of those lovely Light Racing upper control arms.
While the 4runner was accessible my very good friend and mechanic extraordinaire did my timing belt service. I got all OEM parts including a new timing belt, tensioner, idlers, waterpump, gaskets, thermostat, crank bolt, radiator, and new drive belts. Also while I had things out I put new engine motor mounts and a new transmission mount on.
Next it was time to drop that engine, trans, and transfer case on the new frame.
That was a bit of a nail biter with all that weight dangling so high up in the air. We had many other chains to hold the weight should something have failed but it's still a little butt-puckery standing next to something that could crush you in a split second.
As you can see in that previous picture, my 2006 Tacoma wheels fit over the 231mm brake upgrade with no problems whatsoever. So, if you're interested in doing the bigger upgrade but aren't sure if it will work with these wheels, rest assured everything fits without modification.
Awww, ain't that purdy?
This was the last picture I took before I called it quits at 10pm after working for 14 hours straight. The rest would have to be done on Sunday.
Ever wondered what it would be like to walk under a 3rd gen body, nothing else? Enjoy.
Not bad for a '98 that has seen 15 winters in Iowa! A couple small patches that I'll fix up but nothing scaly or rusted through, simple fixes and not many at all!
That's not rust, it's mud.
Looking up through the engine bay, that's a weird perspective.
OK, now with the body and chassis mated once again! Re-connecting all fuel lines, brake lines, electrical, vacuum, steering and shift linkage, radiator and trans hoses, and a/c lines.
And yes, that's one of my DuraTracs rolled in front of the rear wheel to get a preview of what's to come!
We bled the brakes, flushed and filled with Toyota coolant, charged the A/C up, and changed out the front and rear differential fluid. Turned the key, everything started up, no dash lights, brakes work, and I took it for a little test drive in the parking lot. All is right in Toyota Land. It needs an alignment SOOOO bad as you can probably see in the pictures.
Here she is all tucked in and ready for bed tonight after a long weekend of surgery. Sitting next to the old frame assembly.
I'm going to get some better pics of the frame carnage now that the body is off. Good Lord that frame was a ticking time bomb! Seems birds were making nests inside the frame rails, which probably trapped more moisture and accelerated the rust from the inside out. The massive hit during the accident didn't help but I'm sure the frame buckled where it did because it was super weak from corrosion at those places. I was pulling bird nests and huge chunks of rust out of the hole where the frame buckled on the left side. Freakin' birds!
So, until the next set of "Glam Shots" are up I'd just like to thank a few more people. Jared who donated the frame and all kinds of goodies that made this swap SOOO much better and easy. My boss who has allowed me to work on my project after work and on weekends the last two months. And my good friend and co-worker Sam whom without his skill and generosity with his time helping me with this swap, I would probably be driving a base model Corolla or a Craigslist jalopy and not my most favorite off-road beast... The PATYWGN!!!!!
PS - I warned you I was longwinded!!
At least the pics help.
The following users liked this post:
Road Bull (02-17-2020)
02-10-2013, 06:54 PM
#14
Registered User
WOW!!! words can not explain how jealous I am!!!! this thing is one of my favorit yotas!!!! of course beside mine, but i wish i had the time,money,and resources to so this!!!
02-10-2013, 07:09 PM
#15
Registered User
iTrader: (1)
Join Date: Oct 2011
Location: VA
Posts: 599
Likes: 0
Received 0 Likes
on
0 Posts
You can ship one to VA for me haha that thing is sick, no doubt with all the extra rust protection we will see this thing in another 20 years! and will probably still be drooling! Keep up the awesome work.
02-10-2013, 07:25 PM
#16
Registered User

Wow! You've made great progress! That's awesome that your buddy was nice enough to give you so much stuff! Thank God there are still decent people in this world! 
02-11-2013, 07:26 AM
#17
awesome!! just thought that you might like to install a breather for the tranny and transfer case while the body was not on the frame. anyway, it can be done with the body on, just not as easy though
wish i had a workshop that big and complete with all the staff, tools, and equipment!
wish i had a workshop that big and complete with all the staff, tools, and equipment!
02-11-2013, 04:38 PM
#18
Registered User
What you've done looks great. I've spent the winter doing a frame on resto and what a PITA. I'm jealous of the space you have to work on that.
I know you mentioned you did the epoxy on the frame, but it looks like you did something different for the axle, diff...etc. It looks to shine quite a bit. I'm using POR15 on mine which leaves quite a shine. I'm wondering what you did. I think we have just about the same crappy weather and road treatments so I'm interested.
I know you mentioned you did the epoxy on the frame, but it looks like you did something different for the axle, diff...etc. It looks to shine quite a bit. I'm using POR15 on mine which leaves quite a shine. I'm wondering what you did. I think we have just about the same crappy weather and road treatments so I'm interested.


