
 03-30-2016, 11:54 AM
Last edit by: IB Advertising
See related guides and technical advice from our community experts:
- Toyota Tacoma How to Replace Timing Belt and Water Pump<br>Step by step intructions for do-it-yourself repairs.

New Timing Belt Water-Pump 5vz-fe 3.4L Write-up for Review
 01-18-2015, 05:37 PM
#42

Nice write up.
How many miles were on your runner when you did it?.
Everything looks very clean!
My runner has 205,000 on it and i'm not doing it until its time.
I'll check the belt for cracks though.
How many miles were on your runner when you did it?.
Everything looks very clean!
My runner has 205,000 on it and i'm not doing it until its time.
I'll check the belt for cracks though.
01-19-2015, 12:15 PM
#43
Registered User
Join Date: Feb 2010
Location: Outer Banks, NC
Posts: 570
Likes: 0
Received 0 Likes
on
0 Posts
If OP (skjos) doesn't mind I am going to add two pics I took to replace the crank seal while replacing my timing belt/H20 pump along with the idlers, tensioner (mine was maxed out after 16 years) and fan bracket.
Take the Lisle 58430 seal puller, position it as in the photo, and wedge it out:
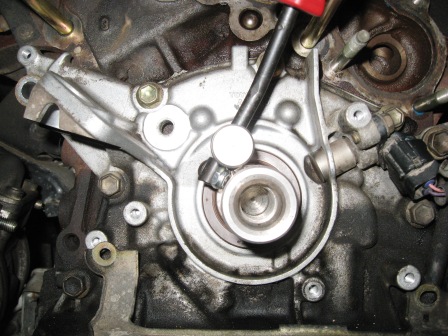
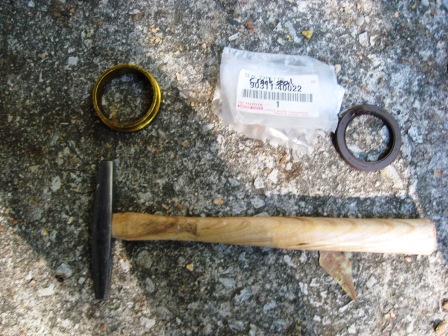
The old seal should easily be pried out. Then i used a small 5oz tack hammer, put some grease in the inner lip and outside part of the new seal and then used a shaft collar the size of the diameter of the seal and tapped it in. A piece of PVC the correct diameter should work to help guide it in. Freezing it for an hour beforehand would probably help as well. No leaks in 6 months:

Take the Lisle 58430 seal puller, position it as in the photo, and wedge it out:
The old seal should easily be pried out. Then i used a small 5oz tack hammer, put some grease in the inner lip and outside part of the new seal and then used a shaft collar the size of the diameter of the seal and tapped it in. A piece of PVC the correct diameter should work to help guide it in. Freezing it for an hour beforehand would probably help as well. No leaks in 6 months:
 04-08-2015, 09:48 AM
#45
Registered User

Join Date: Oct 2013
Posts: 1
Likes: 0
Received 0 Likes
on
0 Posts
I just had some fun with my local dealer looking for a 5vz-fe crank pulley bolt. The parts guy told me the techs never use new bolts and somehow get the belt off without removing the crank pulley.... ???? I've never replaced the timing belt on my truck but have ordered up all the OEM parts (ebay) for much less than the dealer or any parts store locally. I've had the belt replaced twice (by the dealer once under warranty) and supposedly ALL the moving parts replaced this last time (about 13K miles back) but it is making that tell tale rattle from a failed tensioner/idler yet again. I am wondering if the dealer ever really did all the work they charged me for. Now before I get started, I am curious about how the techs at the dealership might actually manage to get the belt off without removing the crank pulley .... honey I shrunk the timing belt and squeezed it off from behind the lower cover? Is there enough of a gap to accomplish this?
Anyone else heard of this before and has anyone had issues with getting a new crank pulley bolt from the dealer? Really?
Anyone else heard of this before and has anyone had issues with getting a new crank pulley bolt from the dealer? Really?
04-08-2015, 04:37 PM
#46
Contributing Member
Join Date: Nov 2010
Location: Columbia River Gorge, Oregon...east side
Posts: 5,125
Likes: 0
Received 2 Likes
on
2 Posts
I've never had a problem getting the crank pulley bolt from the local dealer....generally needs to be ordered in. No problem getting it from the online Toyota part dealers either.
Hmmmmm....can't see how they could possibly do the TB job on the 5vz-fe without removing the crank bolt if the lower timing belt cover is in place.
Hmmmmm....can't see how they could possibly do the TB job on the 5vz-fe without removing the crank bolt if the lower timing belt cover is in place.
Last edited by rworegon; 04-08-2015 at 04:38 PM.
07-12-2015, 06:19 PM
#47
Registered User
Join Date: May 2015
Location: Colorado
Posts: 11
Likes: 0
Received 0 Likes
on
0 Posts
So I got it all apart and the tensioner bolt hole was stripped out with the tensioner flopping around. I don't know how I didn't suffer a catastrophic failure. Had to helicoil the hole. hope it holds up.
07-30-2015, 01:35 PM
#48
Contributing Member

skjos,
Incredible writeup. I'm due for my second timing belt replacement (plus everything) soon and will do it myself after glancing at your guide.
I've owned the truck since new and had the first TB job done by the dealer at 171,000 miles. I'm now at 334,400 miles - by my calculations I'm about 6,000 miles away...
Andreas
03-23-2016, 06:45 PM
#51
Contributing Member
Join Date: Nov 2010
Location: Columbia River Gorge, Oregon...east side
Posts: 5,125
Likes: 0
Received 2 Likes
on
2 Posts
Link to write-up in post #1 just opened fine for me.
Here it is:
Timing Belt and Water-Pump Replacement
By skjos
2002 4runner SR5 4WD, 3.4L 5VZ-FE Engine
Date: 01/14/12
Parts
Part NamePart NumberToyota CostOEM ManufacturerOEM CostTiming Belt13568-69095$39Mitsuboshi$30Crankshaft Pulley Bolt90119-16006*$5Idler Roller13505-62070$95 (optional @ 90K)NSK$31Tensioner Roller13503-62040$71 (optional @ 90K)Koyo$36Front Crankshaft Seal90311-40022$6 (optional)Front Camshaft Seals90311-38051$9 (optional)Hydraulic Tensioner13540-62021$33 (optional @ 90K)Water-Pump (w/gasket)16100-69398-83$95AISIN$52Thermostat90916-03075$16KuzehThermostat Gasket16325-62010$5 (comes with water pump)AC Compressor Belt99364-20870-78$17Bando/Mitsuboshi$9Alternator Belt90080-91090-83$12Bando/MitsuboshiPower Steering Belt90080-91126-83$10Bando/MitsuboshiRadiator Hose Upper16571-62070$13 (optional)Radiator Hose Lower16572-62090$13 (optional)Toyota Red Coolant00272-1LLAC-01$22 (per gallon)Timing Cover Gasket11329-20010$5Dipstick Tube O-ring96721-19010$2
*1996-1998 P/N: 90105-16031
Tools and Materials
Jack
Jack stands or Ramps
Ratchet
Metric socket set (6pt)
Various socket extensions
Bucket
2.5feet � fuel line (for draining coolant)
Pliers / Channel locks / Needle nose
Shop rags
Plastic bags
Rubber bands
Knife / Box cutter
Metric wrenches
14mm stubby ratcheting wrench
Plug (for dipstick hole)
Breaker bar (� drive)
19mm socket (6pt - � drive)
Crank pulley wrench (OTC 4754 - $35)
White paint pen or Nail polish
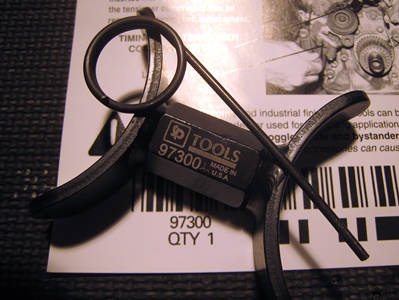
Tensioner tool with pin (Schley SCH97300 - $47)
Seal puller (optional)
Flat head screwdriver (to pry off water-pump)
Gasket scraper or Razor blades
Oil-free non-residue cleaner (acetone)
Loctite (blue)
10mm allen socket
Torque wrench (in/lb)
Torque wrench (ft/lb)
Torque wrench (250ft/lb - � drive)
Belt tension gauge (OTC 6673, Borroughs BT-33-73F)
6 inch scale (for measuring belt tension without gauge)
Fluid measuring cup
Distilled water
Links
4x4wire.com Timing Belt Write-Up
nwtoys.com 5vz-fe Timing Belt Write-Up (tons of pictures)
ncttora.com Online Service Manuals
Summary
The following steps document the procedure I used to replace my timing belt and water-pump. I'm sure there are quicker ways to perform this task, but this method should get the job done.
Please follow these steps at your own risk, I am not liable for any damage you may do to yourself or your vehicle. It sucks that I have to say that, but I need to cover my hide.
Disassembly
Step 1: Jack-up the vehicle for clearance
Jack-up the front of the vehicle; you will need access from above and below to do this job. You don’t want to go too high because most of the work is done from above, I would say the perfect height would allow your breaker bar and a 250ft/lb torque wrench to clear the ground when loosening/tightening the crankshaft pulley bolt. I just drove onto ramps and then jacked-up the rear end to make it level.
Step 2: Remove the skid plate(s)
Remove the (4) bolts holding on the aft skid plate, then remove the (4) bolts on the front skid plate.
Step 3: Drain the engine coolant
Drain the coolant from the radiator valve and the engine block valve. The engine block drain bolt can be reached by unbuttoning the wheel-well skirt on the passenger side of the vehicle and using a couple of long socket extensions. I installed a 1/4” fuel line to the drain port (from underneath) and then loosened the bolt to drain the coolant into a bucket (note the bolt does not need to be removed, just loosened). Once drained close the radiator drain valve and tighten the engine block drain bolt (19ft/lb). You may as well drain out the coolant from the expansion tank.
Note: You probably don’t need to drain the engine block to do the timing belt, but now's a good time to flush all the coolant.
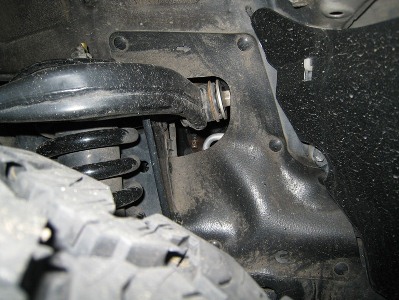
 Drain Port from Wheel-wellDrain Port and Bolt CloseupStep 4: Remove the upper and lower radiator hoses
Mark what side of the hose goes to the radiator, they will fit on backwards, and then remove the hoses. My upper hose was tough to remove from the engine, so I ended up cutting it off, making sure not to cut deep enough to scratch the port. After the hoses have been removed, cover the ports by rubber banding a plastic bag around the hole or by shoving a shop rag in there. Replace the hoses if they are cracked or are no longer pliable.
Step 5: Remove the fan shroud
From underneath the vehicle remove the transmission hose that is clipped to the fan shroud. Now disconnect the lower piece of the fan shroud, it is only held on by two metallic clips and a couple plastic tabs. Then remove the (4) bolts that hold the fan shroud to the radiator, and lift the shroud out of the engine compartment. Tape a piece of cardboard over the exposed radiator to prevent damage during subsequent steps.
Option: The radiator can also be removed at this point to prevent damage and provide more clearance.
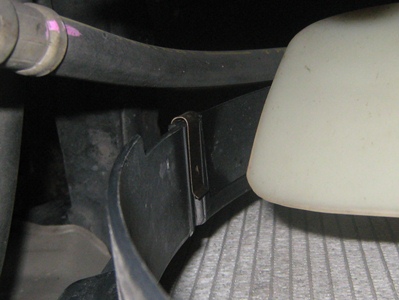
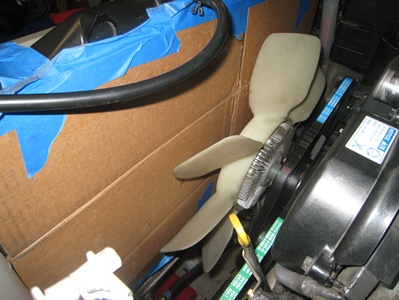 Fan Shroud ClipCardboard ProtectionStep 6: Remove the fan (w/fluid coupling)
Loosen the bolts holding the fan and fan pulleys. With the drive belts still connected you should be able loosen these with out the fan shaft moving on you. Remove the fan, and then temporarily reinstall the nuts to keep the pulleys in place.
Step 7: Remove drive belts
Now there is a little more room to work. If you are replacing the drive belts go ahead and cut the old ones off. If you are reusing the drive belts then they will need to be loosened to be removed.
Step 8: Power steering belt removal
Loosen the pivot bolt. You can get a socket on it through the gaps in the pulley, if the pulley isn’t aligned, just torque the pulley nut clockwise (so you don’t loosen the pulley bolt. The pulley should slide in the belt; if it doesn’t you can always just turn the crank bolt. (the timing marks will be aligned later). Loosen the tension lock nut. Now loosen the tension on the belt by turning the adjustment bolt counterclockwise until the belt can be removed. This bolt can be reached from the front just underneath the pump with a wrench. There is not a lot of room, so the use of a ratcheting stubby wrench is most beneficial.
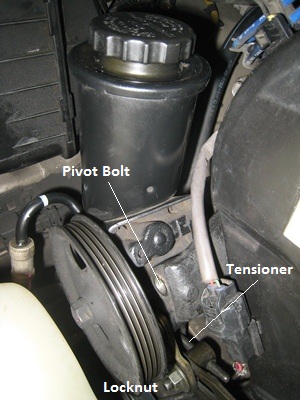 Power SteeringStep 9: AC compressor belt removal
Loosen the AC adjuster pulley bolt. Turn the tensioner bolt counterclockwise until the belt can be removed.
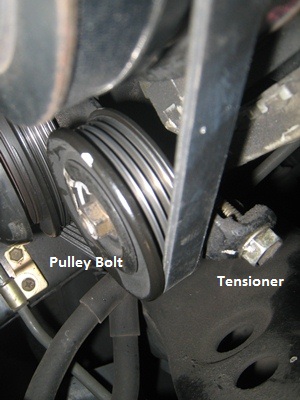 AC BeltStep 10: Alternator belt removal
Loosen the pivot bolt. Loosen the tension lock nut. Turn the tensioner bolt counterclockwise until the belt can be removed.
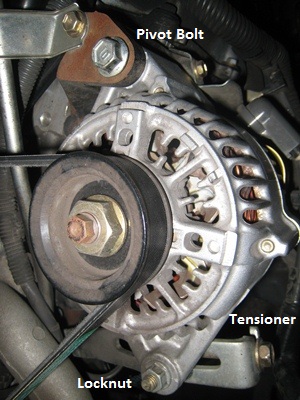 AltenatorStep 11: Remove drive belt pulleys
Now that the drive belts are removed the fan nuts that hold on the center drive belt pulleys can be removed. These parts look like one piece, but they are actually two.
Step 12: Remove the dipstick tube
Remove the dipstick. Remove the bolt holding the dipstick tube, and then wiggle the tube back and forth until it comes out of the pan. I’m not sure this has to be removed, but it might make removing the timing belt covers easier. If you do remove it make sure the hole that goes into the oil pan is covered (rubber stopper). Coolant will drain onto this area when the water-pump is removed.
Step 13: Remove the upper timing belt cover
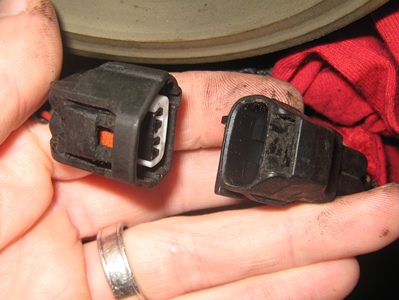
Remove (4) wire clips from along the top of the cover that are supporting the spark plug wires. Disconnect the camshaft positioning sensor and remove the connector from the cover. This was a little difficult, my connector was covered in crap so it was hard to tell how it was suppose to come apart, I've attached a picture to help. Also, twisting this thing out of the cover was not easy, I’m not sure of the proper method, but I’m guessing you turn it 90 degrees clockwise and pull it partially out of the cover, then turn it back 90 degrees to completely remove it. Once disconnected, cover the connections to prevent them from being contaminated.
Remove the (6) bolts holding the cover, and pull the cover off. When I removed my cover the cover-gasket (foam tape) was ripped. This would be a good part to order before you start.
Note: it may be easier to remove the camshaft sensor from the cover by removing the cover first and then reaching in on the back side with needle nose pliers to remove the connector.
 Camshaft Sensor ConnectorBackside of ConnectorStep 14: Remove the fan bracket
To remove the fan bracket you first have to get the power steering tensioner bracket out of the way. Remove the power steering pivot bolt and the tensioner bracket nut common to the fan bracket. Move the power steering unit out of the pivot bolt mount and then work the tensioner bracket off the water-pump bracket. Just set the power steering unit with the tensioner bracket attached to it onto the ac compressor. Now remove the remaining nut and bolt common to the fan bracket.
Option: It may be possible to remove the power steering tensioner bracket by only removing the tensioner lock nut and the tensioner bracket nut common to the fan bracket, leaving the power steering pivot bolt connected.
 Fan Bracket HousingStep 15: Remove the crankshaft pulley
From underneath the vehicle, insert the prongs of the crank pulley wrench into the corresponding holes in the pulley, then wedge the handle of the wrench against the bottom of the driver’s side frame. Now loosen the crankshaft pulley bolt with a breaker bar and remove the pulley. While doing this my crank pulley wrench wanted to twist out of the holes in the pulley. To remedy this I drilled a 1” hole in a short (6”) section of 2x4 and put my socket (with extension) through the hole. When the crank pulley wrench wanted to twist out it would hit the 2x4 which was being held in place by the shaft of my breaker bar.
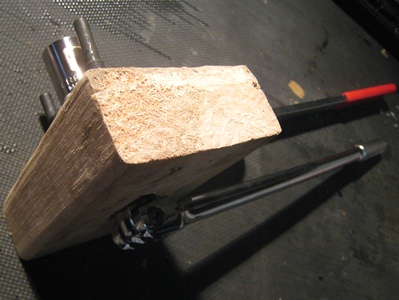 Pulley Wrench with 2x4Step 16: Remove starter wire bracket bolts
The starter wire bracket may get in the way of removing the lower timing belt cover. Remove the two bolts and let the bracket dangle.
Step 17: Remove the lower timing belt cover
Remove the (4) bolts holding on the lower cover and pull the cover off.
Step 18: Remove the timing belt guide
This is the washer on the crankshaft, while removing it note that the rounded side goes against the timing belt.
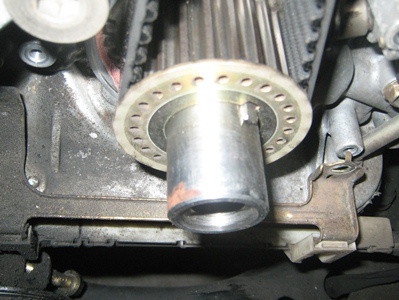 Timing Belt GuideStep 19: Align the crankshaft and camshaft pulleys
Temporarily re-install the crankshaft pulley bolt to rotate the crankshaft to the proper position. Turn the crankshaft (clockwise) until it aligns with the mark behind it, and the two camshaft pulleys align with the marks behind them. If the camshaft pulleys are not aligned, turn the crankshaft one more revolution to align them. Remove the crankshaft pulley bolt.
When I did this my bolt would always get torqued to the point where I could not loosen it without moving the timing marks. My work around was to install some shim material between the bolt washer and the face of the crankshaft, then once the timing marks lined up I chipped out the shim and removed the bolt. This sucked and I would not recommend it, I hope someone has a better method.
Note: A better method may be to hold the camshaft pulley with the crank pulley wrench while you loosen the crankshaft bolt.
Step 20: Mark the old timing belt and remove it
Mark the belt at the crankshaft and camshaft pulleys with a paint pen or nail polish. These marks can be used to verify the marks on your new belt are in the proper position. The belt can then be cut off, or if you want to keep the belt intact, the idler roller can be removed (see step 22 or 30) and the belt can be taken off.
Step 21: Compress the timing belt tensioner
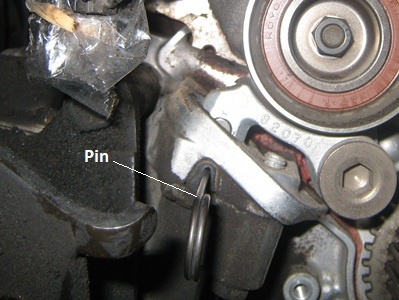
Install the tensioner tool between the water-pump pulley and the tensioner roller. Turn the hex surface on the tool to compress the tensioner until the pin can be installed through hole in the tensioner. This should be done slowly, like one turn per every five seconds to prevent damage to the tensioner. The pin hole is in a little rubber dust seal; make sure you get the pin all the way through the tensioner before you remove the tool. Tensioner Tool Instructions
 Tensioner ToolTensioner Pin InstalledStep 22: Remove the idler and tensioner rollers
This step is optional, I replaced these rollers for good measure, but it probably doesn’t need to be done if they rotate freely and there is no perceived roughness. To remove the idler roller, unscrew the bolt from the center of the roller; to remove the tensioner roller, unscrew the 10mm allen mounting bolt.
Note: The idler roller will be removed to install the timing belt in step 30.
Step 23: Remove the thermostat housing
Verify the hole from where the dipstick tube was pulled from is covered to prevent coolant from falling into the oil pan. Remove the (3) nuts that hold the thermostat housing to the water-pump.
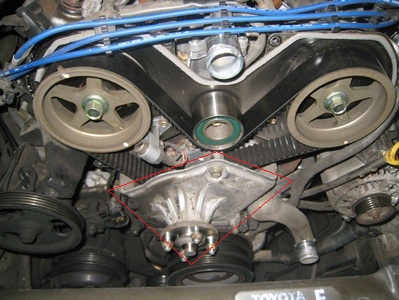
Step 24: Remove the water-pump
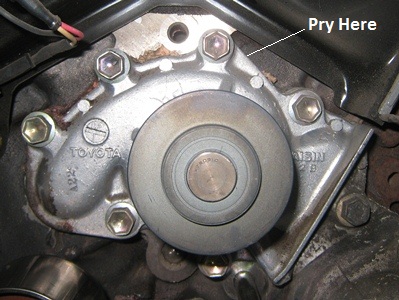
Disconnect the oil cooler hose (to the right of the thermostat), then remove the (7) bolts that hold the water-pump to the engine, now pry off the water-pump. To get the pump off without damaging the mating surfaces, pry on the area of the water-pump that extends beyond the mating surfaces at approximately the 1 o’clock position.
 Water-PumpStep 25: Clean the water-pump mating surfaces
Using a gasket scraper or razor blade, clean the water-pump mating surface on the engine side. Once the surface is clean do a final wipe down with an oil-free non-residue cleaner (I used acetone). Also wipe down the mating surface of the new water-pump.
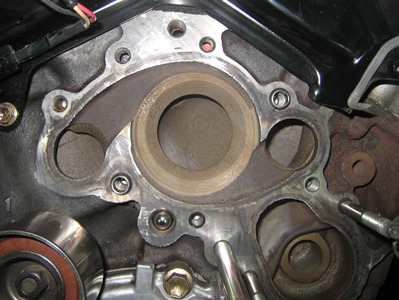 Water-Pump Interface
Installation
Step 26: Install the new water-pump and gasket
Locate the water-pump gasket to the engine surface; there are some protruding alignment dowels that you can hang it on. Then align the water-pump to the hole pattern and install the (7) bolts (14ft/lb). Reconnect the oil cooler hose.
Note: The new water-pumps come with a metal/rubber gasket and no sealant groove, so no FIPG is required. From what I’ve heard, the Toyota mechanics where having problems with installing too much FIPG and damaging engines, so Toyota switched to a gasket to solve this issue.
Step 27: Install the thermostat, gasket, and housing
Locate the gasket around the edge of the thermostat and place the thermostat into the water-pump. Make sure to orientate the thermostat with the jiggle valve downward. Then locate the thermostat housing to the water-pump and install the (3) nuts (14ft/lb).
Note: My new water-pump included the thermostat gasket; you may not need to purchase a separate one.
Step 28: Perform inspections and cleaning
Prior to installing the timing belt, the new belt should be inspected for any discrepancies, the camshaft and crankshaft seals should be inspected for leaks (look for oil behind the timing cover backing plate), and the idler & tensioner roller should be inspected to verify they rotate freely without any roughness. Clean the area as much as possible, the belt is not supposed to be contaminated with any oil or coolant.
Step 29: Install the new tensioner roller
If you removed the tensioner roller reinstall it now (26ft/lb). When I removed my bolt it looked like it had loctite on it, so when I reinstalled the bolt I applied blue loctite.
Step 30: Remove the idler roller
The idler roller needs to be removed to get enough slack in the timing belt to install it. To remove the roller, unscrew the bolt from the center. This may have already been done in step 20 or 22.
Step 31: Install the timing belt and idler roller
Verify all timing marks are still aligned, and then install the new belt. I first lined up the RH camshaft belt mark, then I lined up the crank belt mark, and then pulled the belt tight and lined up the LH camshaft belt mark. I then pressed down the belt between the two camshaft pulleys with the idler roller and bolted the roller to the engine (30ft/lb).
Step 32: Remove the tensioner pin
Remove the tool pin that was used to hold the tensioner in the compressed position. Verify the belt timing marks have not moved relative to the timing marks on the pulleys.
Step 33: Install the timing belt guide
Align the slot on the guide with the slot on the crankshaft; ensure the rounded side is facing the timing belt.
Step 34: Install the lower timing belt cover
Re-locate the lower timing belt cover and install the (4) bolts (80in/lb).
Step 35: Install starter wire bracket bolts
Reposition the starter wire bracket and install the (2) bolts (69in/lb).
Step 36: Install the crankshaft pulley
Align the slot on the pulley with the slot on the crankshaft, and install a new crankshaft pulley bolt (217ft/lb).
Prior to putting the final torque on the bolt you can turn the crankshaft clockwise using the bolt to check the timing. After two clockwise revolutions of the crankshaft all of the pulleys should be realigned with the timing marks. Note that the belt marks will no longer be aligned with the pulley marks, this is normal.
Now for the final torque: from underneath the vehicle, insert the prongs of the crank pulley wrench into the corresponding holes in the pulley, then wedge the handle of the wrench against the bottom of the passenger side frame. Then tighten the crankshaft pulley bolt with a torque wrench. Similar to when removing the bolt, my crank pulley wrench wanted to twist out of the holes in the pulley; I used the 2x4 method described in step 15 to remedy this.
Note: I snapped my �-3/8 socket adapter while torqueing this bolt, use a � drive socket.
Step 37: Install the fan bracket and the power steering bracket
Relocate the fan bracket and install the bolt and nut to hold it on (don’t torque them on yet). Relocate the power steering tensioner bracket to the fan bracket and install the nut common to the fan bracket, also install the power steering pivot bolt loose (if you used the option in step 14, the pivot bolt was never removed). Torque the fan bracket bolt and (2) nuts to (38ft/lb), leave the power steering pivot bolt loose.
Note: 38ft/lb seems a little high, but based on the bolt type I believe this is what it should be, it is supporting the fan pulleys and the fan after all.
Step 38: Install the upper timing belt cover
If the upper cover gasket (foam tape) is cracked or torn, replace it with a new gasket. Thoroughly scrape the old gasket off the cover and the engine and then tape the new gasket onto the cover. Relocate the upper timing belt cover and install the (6) bolts (80in/lb). Reconnect the (4) spark plug wire clips to the top of the cover, rejoin the camshaft positioning sensor, and reconnect it to the cover.
Step 39: Install the dipstick tube and dipstick
Replace the o-ring at the bottom of the dipstick tube and coat it with clean engine oil. Then snake the tube back into the oil pan and install the bolt common to the alternator mount (71in/lb).
Step 40: Install the drive belt pulleys and fan (w/fluid coupling)
Relocate the fan belt pulleys and the fan to the fan bracket and install the nuts (48in/lb). I couldn’t reach the bolts with a torque wrench so I used a 10mm/12mm flare nut wrench, I put the 12mm side on the nut and the 10mm size onto a 10mm allen socket on my torque wrench, I reduced the torque as required when using an extension.
Note: This torque seems low.
Step 41: Install the alternator belt
Work the belt around the fan and then around the appropriate pulleys. The tensioner on the alternator will likely need to be loosened to get the belt on (if you cut the belts off, you will need to loosen the pivot bolt and the tensioner locknut). Once the belt is on, turn the tensioner bolt clockwise to tighten the belt. The belt should be tightened until the deflection is between � and � inch as measured at the midpoint between the alternator and fan pulley, measure deflection in one direction only. A better way to check tension would be with a belt tensioner tool, and I have heard you can check tension by turning the pulley nut (clockwise) with a torque wrench to make sure the pulley doesn’t slip in the belt at 14 ft/lb. Once the belt is at the appropriate tension, tighten the pivot bolt (38ft/lb) and the tension locknut (25ft/lb).
Belt Tension: New 160 +/-20lbf, Used 100 +/-20lbf
Belt Tension Gauge Instructions
 Belt Tension GaugeStep 42: Install the AC compressor belt
Work the belt around the appropriate pulleys. The tensioner on the AC adjustment pulley will likely need to be loosened to get the belt on (if you cut the belts off, you will need to loosen the pulley bolt). Once the belt is on, tighten the pulley bolt to 22in/lb, then turn the tensioner bolt clockwise to tighten the belt. Because the span between the crank pulley and the adjustable pulley is about 6 inches, the deflection should be 1/4" inch. I don’t think the torque wrench method would work here because the AC pulley engages the belt over such a small area. Once the belt is at the appropriate tension, tighten the pulley bolt (29ft/lb).
Belt Tension: New 160 +/-25lbf, Used 100 +/-25lbf
Step 43: Install the power steering belt
Work the belt around the fan and then around the appropriate pulleys. The tensioner on the power steering will likely need to be loosened to get the belt on. Once the belt is on, turn the tensioner bolt clockwise to tighten the belt. The belt should be tightened until the deflection is between � and � inch (for the power steering belt it is probably better to get it close to � inch) as measured at the midpoint between the power steering and fan pulley. You can also use the torque wrench method here. Once the belt is at the appropriate tension, tighten the pivot bolt (32ft/lb) and the tension locknut (32ft/lb).
Belt Tension: New 135-180lbf, Used 85-120lbf
Step 44: Install the fan shroud
Remove the cardboard that was being used to protect the radiator and locate the fan shroud to the radiator. Install the (4) bolts that hold the shroud to the radiator (69in/lb). Reconnect the lower piece of the fan shroud (two metallic clips and a couple plastic tabs). Re-clip the transmission hose to the fan shroud.
Note: This torque seem high.
Step 45: Install the upper and lower radiator hoses
Clean the radiator hose ports on the engine and radiator side. Install the hoses using marks you put on in step 4. If you have new hoses, the engine side is marked with a yellow stripe and the radiator side is marked with a white stripe. With new hoses, make sure to move the clamps from the old hoses onto the new hoses and clock them so that you can expand them with pliers when the hoses are put on.
Note: Wetting the inside of the hose with distilled water may help with slipping them onto the ports.
Step 46: Fill the engine with coolant
The coolant capacity is 8.5 quarts with no rear heater, or 9.5 quarts with a rear heater. Fill half the capacity with coolant (Toyota red) and then fill the remaining capacity with distilled water. The water-pump will mix it up for you. Fill the expansion tank with 50/50 coolant/distilled water.
Step 47: Start the vehicle and inspect
Take one last look at the engine bay and make sure everything is installed, also verify no tools are sitting where they shouldn’t. Start the vehicle and look for leaks and listen for discrepant noises.
Step 48: Install the skid plate(s)
Locate the front skid plate and install the (4) bolts (22ft/lb). Locate the aft skid plate and install the bolts (22ft/lb).
Note: This torque seems high, I installed mine at 10ft/lb.
Step 49: Lower the vehicle from the jack stands and road test
Take the vehicle out for a short spin and verify there are no performance problems and listen for discrepant noises.
Step 50: Recheck coolant level and drive belt tension
Add additional distilled water to the radiator and/or the expansion tank if required.
Recheck belt tension and tighted if required.
I hope this helps to provide insight into the timing belt and water-pump replacement process. I would like to thank 4x4wire.com (and the Toyota Service Manual) for providing a baseline process from which to work from. It also helps to know that if I have any questions I can always count on yotatech.com for the answers.
Here it is:
Timing Belt and Water-Pump Replacement
By skjos
2002 4runner SR5 4WD, 3.4L 5VZ-FE Engine
Date: 01/14/12
Parts
Part NamePart NumberToyota CostOEM ManufacturerOEM CostTiming Belt13568-69095$39Mitsuboshi$30Crankshaft Pulley Bolt90119-16006*$5Idler Roller13505-62070$95 (optional @ 90K)NSK$31Tensioner Roller13503-62040$71 (optional @ 90K)Koyo$36Front Crankshaft Seal90311-40022$6 (optional)Front Camshaft Seals90311-38051$9 (optional)Hydraulic Tensioner13540-62021$33 (optional @ 90K)Water-Pump (w/gasket)16100-69398-83$95AISIN$52Thermostat90916-03075$16KuzehThermostat Gasket16325-62010$5 (comes with water pump)AC Compressor Belt99364-20870-78$17Bando/Mitsuboshi$9Alternator Belt90080-91090-83$12Bando/MitsuboshiPower Steering Belt90080-91126-83$10Bando/MitsuboshiRadiator Hose Upper16571-62070$13 (optional)Radiator Hose Lower16572-62090$13 (optional)Toyota Red Coolant00272-1LLAC-01$22 (per gallon)Timing Cover Gasket11329-20010$5Dipstick Tube O-ring96721-19010$2
*1996-1998 P/N: 90105-16031
Tools and Materials
Jack
Jack stands or Ramps
Ratchet
Metric socket set (6pt)
Various socket extensions
Bucket
2.5feet � fuel line (for draining coolant)
Pliers / Channel locks / Needle nose
Shop rags
Plastic bags
Rubber bands
Knife / Box cutter
Metric wrenches
14mm stubby ratcheting wrench
Plug (for dipstick hole)
Breaker bar (� drive)
19mm socket (6pt - � drive)
Crank pulley wrench (OTC 4754 - $35)
White paint pen or Nail polish
Tensioner tool with pin (Schley SCH97300 - $47)
Seal puller (optional)
Flat head screwdriver (to pry off water-pump)
Gasket scraper or Razor blades
Oil-free non-residue cleaner (acetone)
Loctite (blue)
10mm allen socket
Torque wrench (in/lb)
Torque wrench (ft/lb)
Torque wrench (250ft/lb - � drive)
Belt tension gauge (OTC 6673, Borroughs BT-33-73F)
6 inch scale (for measuring belt tension without gauge)
Fluid measuring cup
Distilled water
Links
4x4wire.com Timing Belt Write-Up
nwtoys.com 5vz-fe Timing Belt Write-Up (tons of pictures)
ncttora.com Online Service Manuals
Summary
The following steps document the procedure I used to replace my timing belt and water-pump. I'm sure there are quicker ways to perform this task, but this method should get the job done.
Please follow these steps at your own risk, I am not liable for any damage you may do to yourself or your vehicle. It sucks that I have to say that, but I need to cover my hide.
Disassembly
Step 1: Jack-up the vehicle for clearance
Jack-up the front of the vehicle; you will need access from above and below to do this job. You don’t want to go too high because most of the work is done from above, I would say the perfect height would allow your breaker bar and a 250ft/lb torque wrench to clear the ground when loosening/tightening the crankshaft pulley bolt. I just drove onto ramps and then jacked-up the rear end to make it level.
Step 2: Remove the skid plate(s)
Remove the (4) bolts holding on the aft skid plate, then remove the (4) bolts on the front skid plate.
Step 3: Drain the engine coolant
Drain the coolant from the radiator valve and the engine block valve. The engine block drain bolt can be reached by unbuttoning the wheel-well skirt on the passenger side of the vehicle and using a couple of long socket extensions. I installed a 1/4” fuel line to the drain port (from underneath) and then loosened the bolt to drain the coolant into a bucket (note the bolt does not need to be removed, just loosened). Once drained close the radiator drain valve and tighten the engine block drain bolt (19ft/lb). You may as well drain out the coolant from the expansion tank.
Note: You probably don’t need to drain the engine block to do the timing belt, but now's a good time to flush all the coolant.
Drain Port from Wheel-wellDrain Port and Bolt CloseupStep 4: Remove the upper and lower radiator hosesMark what side of the hose goes to the radiator, they will fit on backwards, and then remove the hoses. My upper hose was tough to remove from the engine, so I ended up cutting it off, making sure not to cut deep enough to scratch the port. After the hoses have been removed, cover the ports by rubber banding a plastic bag around the hole or by shoving a shop rag in there. Replace the hoses if they are cracked or are no longer pliable.
Step 5: Remove the fan shroud
From underneath the vehicle remove the transmission hose that is clipped to the fan shroud. Now disconnect the lower piece of the fan shroud, it is only held on by two metallic clips and a couple plastic tabs. Then remove the (4) bolts that hold the fan shroud to the radiator, and lift the shroud out of the engine compartment. Tape a piece of cardboard over the exposed radiator to prevent damage during subsequent steps.
Option: The radiator can also be removed at this point to prevent damage and provide more clearance.
Fan Shroud ClipCardboard ProtectionStep 6: Remove the fan (w/fluid coupling)Loosen the bolts holding the fan and fan pulleys. With the drive belts still connected you should be able loosen these with out the fan shaft moving on you. Remove the fan, and then temporarily reinstall the nuts to keep the pulleys in place.
Step 7: Remove drive belts
Now there is a little more room to work. If you are replacing the drive belts go ahead and cut the old ones off. If you are reusing the drive belts then they will need to be loosened to be removed.
Step 8: Power steering belt removal
Loosen the pivot bolt. You can get a socket on it through the gaps in the pulley, if the pulley isn’t aligned, just torque the pulley nut clockwise (so you don’t loosen the pulley bolt. The pulley should slide in the belt; if it doesn’t you can always just turn the crank bolt. (the timing marks will be aligned later). Loosen the tension lock nut. Now loosen the tension on the belt by turning the adjustment bolt counterclockwise until the belt can be removed. This bolt can be reached from the front just underneath the pump with a wrench. There is not a lot of room, so the use of a ratcheting stubby wrench is most beneficial.
Power SteeringStep 9: AC compressor belt removalLoosen the AC adjuster pulley bolt. Turn the tensioner bolt counterclockwise until the belt can be removed.
AC BeltStep 10: Alternator belt removalLoosen the pivot bolt. Loosen the tension lock nut. Turn the tensioner bolt counterclockwise until the belt can be removed.
AltenatorStep 11: Remove drive belt pulleysNow that the drive belts are removed the fan nuts that hold on the center drive belt pulleys can be removed. These parts look like one piece, but they are actually two.
Step 12: Remove the dipstick tube
Remove the dipstick. Remove the bolt holding the dipstick tube, and then wiggle the tube back and forth until it comes out of the pan. I’m not sure this has to be removed, but it might make removing the timing belt covers easier. If you do remove it make sure the hole that goes into the oil pan is covered (rubber stopper). Coolant will drain onto this area when the water-pump is removed.
Step 13: Remove the upper timing belt cover
Remove (4) wire clips from along the top of the cover that are supporting the spark plug wires. Disconnect the camshaft positioning sensor and remove the connector from the cover. This was a little difficult, my connector was covered in crap so it was hard to tell how it was suppose to come apart, I've attached a picture to help. Also, twisting this thing out of the cover was not easy, I’m not sure of the proper method, but I’m guessing you turn it 90 degrees clockwise and pull it partially out of the cover, then turn it back 90 degrees to completely remove it. Once disconnected, cover the connections to prevent them from being contaminated.
Remove the (6) bolts holding the cover, and pull the cover off. When I removed my cover the cover-gasket (foam tape) was ripped. This would be a good part to order before you start.
Note: it may be easier to remove the camshaft sensor from the cover by removing the cover first and then reaching in on the back side with needle nose pliers to remove the connector.
Camshaft Sensor ConnectorBackside of ConnectorStep 14: Remove the fan bracketTo remove the fan bracket you first have to get the power steering tensioner bracket out of the way. Remove the power steering pivot bolt and the tensioner bracket nut common to the fan bracket. Move the power steering unit out of the pivot bolt mount and then work the tensioner bracket off the water-pump bracket. Just set the power steering unit with the tensioner bracket attached to it onto the ac compressor. Now remove the remaining nut and bolt common to the fan bracket.
Option: It may be possible to remove the power steering tensioner bracket by only removing the tensioner lock nut and the tensioner bracket nut common to the fan bracket, leaving the power steering pivot bolt connected.
Fan Bracket HousingStep 15: Remove the crankshaft pulleyFrom underneath the vehicle, insert the prongs of the crank pulley wrench into the corresponding holes in the pulley, then wedge the handle of the wrench against the bottom of the driver’s side frame. Now loosen the crankshaft pulley bolt with a breaker bar and remove the pulley. While doing this my crank pulley wrench wanted to twist out of the holes in the pulley. To remedy this I drilled a 1” hole in a short (6”) section of 2x4 and put my socket (with extension) through the hole. When the crank pulley wrench wanted to twist out it would hit the 2x4 which was being held in place by the shaft of my breaker bar.
Pulley Wrench with 2x4Step 16: Remove starter wire bracket boltsThe starter wire bracket may get in the way of removing the lower timing belt cover. Remove the two bolts and let the bracket dangle.
Step 17: Remove the lower timing belt cover
Remove the (4) bolts holding on the lower cover and pull the cover off.
Step 18: Remove the timing belt guide
This is the washer on the crankshaft, while removing it note that the rounded side goes against the timing belt.
Timing Belt GuideStep 19: Align the crankshaft and camshaft pulleysTemporarily re-install the crankshaft pulley bolt to rotate the crankshaft to the proper position. Turn the crankshaft (clockwise) until it aligns with the mark behind it, and the two camshaft pulleys align with the marks behind them. If the camshaft pulleys are not aligned, turn the crankshaft one more revolution to align them. Remove the crankshaft pulley bolt.
When I did this my bolt would always get torqued to the point where I could not loosen it without moving the timing marks. My work around was to install some shim material between the bolt washer and the face of the crankshaft, then once the timing marks lined up I chipped out the shim and removed the bolt. This sucked and I would not recommend it, I hope someone has a better method.
Note: A better method may be to hold the camshaft pulley with the crank pulley wrench while you loosen the crankshaft bolt.
Step 20: Mark the old timing belt and remove it
Mark the belt at the crankshaft and camshaft pulleys with a paint pen or nail polish. These marks can be used to verify the marks on your new belt are in the proper position. The belt can then be cut off, or if you want to keep the belt intact, the idler roller can be removed (see step 22 or 30) and the belt can be taken off.
Step 21: Compress the timing belt tensioner
Install the tensioner tool between the water-pump pulley and the tensioner roller. Turn the hex surface on the tool to compress the tensioner until the pin can be installed through hole in the tensioner. This should be done slowly, like one turn per every five seconds to prevent damage to the tensioner. The pin hole is in a little rubber dust seal; make sure you get the pin all the way through the tensioner before you remove the tool. Tensioner Tool Instructions
Tensioner ToolTensioner Pin InstalledStep 22: Remove the idler and tensioner rollersThis step is optional, I replaced these rollers for good measure, but it probably doesn’t need to be done if they rotate freely and there is no perceived roughness. To remove the idler roller, unscrew the bolt from the center of the roller; to remove the tensioner roller, unscrew the 10mm allen mounting bolt.
Note: The idler roller will be removed to install the timing belt in step 30.
Step 23: Remove the thermostat housing
Verify the hole from where the dipstick tube was pulled from is covered to prevent coolant from falling into the oil pan. Remove the (3) nuts that hold the thermostat housing to the water-pump.
Step 24: Remove the water-pump
Disconnect the oil cooler hose (to the right of the thermostat), then remove the (7) bolts that hold the water-pump to the engine, now pry off the water-pump. To get the pump off without damaging the mating surfaces, pry on the area of the water-pump that extends beyond the mating surfaces at approximately the 1 o’clock position.
Water-PumpStep 25: Clean the water-pump mating surfacesUsing a gasket scraper or razor blade, clean the water-pump mating surface on the engine side. Once the surface is clean do a final wipe down with an oil-free non-residue cleaner (I used acetone). Also wipe down the mating surface of the new water-pump.
Water-Pump InterfaceInstallation
Step 26: Install the new water-pump and gasket
Locate the water-pump gasket to the engine surface; there are some protruding alignment dowels that you can hang it on. Then align the water-pump to the hole pattern and install the (7) bolts (14ft/lb). Reconnect the oil cooler hose.
Note: The new water-pumps come with a metal/rubber gasket and no sealant groove, so no FIPG is required. From what I’ve heard, the Toyota mechanics where having problems with installing too much FIPG and damaging engines, so Toyota switched to a gasket to solve this issue.
Step 27: Install the thermostat, gasket, and housing
Locate the gasket around the edge of the thermostat and place the thermostat into the water-pump. Make sure to orientate the thermostat with the jiggle valve downward. Then locate the thermostat housing to the water-pump and install the (3) nuts (14ft/lb).
Note: My new water-pump included the thermostat gasket; you may not need to purchase a separate one.
Step 28: Perform inspections and cleaning
Prior to installing the timing belt, the new belt should be inspected for any discrepancies, the camshaft and crankshaft seals should be inspected for leaks (look for oil behind the timing cover backing plate), and the idler & tensioner roller should be inspected to verify they rotate freely without any roughness. Clean the area as much as possible, the belt is not supposed to be contaminated with any oil or coolant.
Step 29: Install the new tensioner roller
If you removed the tensioner roller reinstall it now (26ft/lb). When I removed my bolt it looked like it had loctite on it, so when I reinstalled the bolt I applied blue loctite.
Step 30: Remove the idler roller
The idler roller needs to be removed to get enough slack in the timing belt to install it. To remove the roller, unscrew the bolt from the center. This may have already been done in step 20 or 22.
Step 31: Install the timing belt and idler roller
Verify all timing marks are still aligned, and then install the new belt. I first lined up the RH camshaft belt mark, then I lined up the crank belt mark, and then pulled the belt tight and lined up the LH camshaft belt mark. I then pressed down the belt between the two camshaft pulleys with the idler roller and bolted the roller to the engine (30ft/lb).
Step 32: Remove the tensioner pin
Remove the tool pin that was used to hold the tensioner in the compressed position. Verify the belt timing marks have not moved relative to the timing marks on the pulleys.
Step 33: Install the timing belt guide
Align the slot on the guide with the slot on the crankshaft; ensure the rounded side is facing the timing belt.
Step 34: Install the lower timing belt cover
Re-locate the lower timing belt cover and install the (4) bolts (80in/lb).
Step 35: Install starter wire bracket bolts
Reposition the starter wire bracket and install the (2) bolts (69in/lb).
Step 36: Install the crankshaft pulley
Align the slot on the pulley with the slot on the crankshaft, and install a new crankshaft pulley bolt (217ft/lb).
Prior to putting the final torque on the bolt you can turn the crankshaft clockwise using the bolt to check the timing. After two clockwise revolutions of the crankshaft all of the pulleys should be realigned with the timing marks. Note that the belt marks will no longer be aligned with the pulley marks, this is normal.
Now for the final torque: from underneath the vehicle, insert the prongs of the crank pulley wrench into the corresponding holes in the pulley, then wedge the handle of the wrench against the bottom of the passenger side frame. Then tighten the crankshaft pulley bolt with a torque wrench. Similar to when removing the bolt, my crank pulley wrench wanted to twist out of the holes in the pulley; I used the 2x4 method described in step 15 to remedy this.
Note: I snapped my �-3/8 socket adapter while torqueing this bolt, use a � drive socket.
Step 37: Install the fan bracket and the power steering bracket
Relocate the fan bracket and install the bolt and nut to hold it on (don’t torque them on yet). Relocate the power steering tensioner bracket to the fan bracket and install the nut common to the fan bracket, also install the power steering pivot bolt loose (if you used the option in step 14, the pivot bolt was never removed). Torque the fan bracket bolt and (2) nuts to (38ft/lb), leave the power steering pivot bolt loose.
Note: 38ft/lb seems a little high, but based on the bolt type I believe this is what it should be, it is supporting the fan pulleys and the fan after all.
Step 38: Install the upper timing belt cover
If the upper cover gasket (foam tape) is cracked or torn, replace it with a new gasket. Thoroughly scrape the old gasket off the cover and the engine and then tape the new gasket onto the cover. Relocate the upper timing belt cover and install the (6) bolts (80in/lb). Reconnect the (4) spark plug wire clips to the top of the cover, rejoin the camshaft positioning sensor, and reconnect it to the cover.
Step 39: Install the dipstick tube and dipstick
Replace the o-ring at the bottom of the dipstick tube and coat it with clean engine oil. Then snake the tube back into the oil pan and install the bolt common to the alternator mount (71in/lb).
Step 40: Install the drive belt pulleys and fan (w/fluid coupling)
Relocate the fan belt pulleys and the fan to the fan bracket and install the nuts (48in/lb). I couldn’t reach the bolts with a torque wrench so I used a 10mm/12mm flare nut wrench, I put the 12mm side on the nut and the 10mm size onto a 10mm allen socket on my torque wrench, I reduced the torque as required when using an extension.
Note: This torque seems low.
Step 41: Install the alternator belt
Work the belt around the fan and then around the appropriate pulleys. The tensioner on the alternator will likely need to be loosened to get the belt on (if you cut the belts off, you will need to loosen the pivot bolt and the tensioner locknut). Once the belt is on, turn the tensioner bolt clockwise to tighten the belt. The belt should be tightened until the deflection is between � and � inch as measured at the midpoint between the alternator and fan pulley, measure deflection in one direction only. A better way to check tension would be with a belt tensioner tool, and I have heard you can check tension by turning the pulley nut (clockwise) with a torque wrench to make sure the pulley doesn’t slip in the belt at 14 ft/lb. Once the belt is at the appropriate tension, tighten the pivot bolt (38ft/lb) and the tension locknut (25ft/lb).
Belt Tension: New 160 +/-20lbf, Used 100 +/-20lbf
Belt Tension Gauge Instructions
Belt Tension GaugeStep 42: Install the AC compressor beltWork the belt around the appropriate pulleys. The tensioner on the AC adjustment pulley will likely need to be loosened to get the belt on (if you cut the belts off, you will need to loosen the pulley bolt). Once the belt is on, tighten the pulley bolt to 22in/lb, then turn the tensioner bolt clockwise to tighten the belt. Because the span between the crank pulley and the adjustable pulley is about 6 inches, the deflection should be 1/4" inch. I don’t think the torque wrench method would work here because the AC pulley engages the belt over such a small area. Once the belt is at the appropriate tension, tighten the pulley bolt (29ft/lb).
Belt Tension: New 160 +/-25lbf, Used 100 +/-25lbf
Step 43: Install the power steering belt
Work the belt around the fan and then around the appropriate pulleys. The tensioner on the power steering will likely need to be loosened to get the belt on. Once the belt is on, turn the tensioner bolt clockwise to tighten the belt. The belt should be tightened until the deflection is between � and � inch (for the power steering belt it is probably better to get it close to � inch) as measured at the midpoint between the power steering and fan pulley. You can also use the torque wrench method here. Once the belt is at the appropriate tension, tighten the pivot bolt (32ft/lb) and the tension locknut (32ft/lb).
Belt Tension: New 135-180lbf, Used 85-120lbf
Step 44: Install the fan shroud
Remove the cardboard that was being used to protect the radiator and locate the fan shroud to the radiator. Install the (4) bolts that hold the shroud to the radiator (69in/lb). Reconnect the lower piece of the fan shroud (two metallic clips and a couple plastic tabs). Re-clip the transmission hose to the fan shroud.
Note: This torque seem high.
Step 45: Install the upper and lower radiator hoses
Clean the radiator hose ports on the engine and radiator side. Install the hoses using marks you put on in step 4. If you have new hoses, the engine side is marked with a yellow stripe and the radiator side is marked with a white stripe. With new hoses, make sure to move the clamps from the old hoses onto the new hoses and clock them so that you can expand them with pliers when the hoses are put on.
Note: Wetting the inside of the hose with distilled water may help with slipping them onto the ports.
Step 46: Fill the engine with coolant
The coolant capacity is 8.5 quarts with no rear heater, or 9.5 quarts with a rear heater. Fill half the capacity with coolant (Toyota red) and then fill the remaining capacity with distilled water. The water-pump will mix it up for you. Fill the expansion tank with 50/50 coolant/distilled water.
Step 47: Start the vehicle and inspect
Take one last look at the engine bay and make sure everything is installed, also verify no tools are sitting where they shouldn’t. Start the vehicle and look for leaks and listen for discrepant noises.
Step 48: Install the skid plate(s)
Locate the front skid plate and install the (4) bolts (22ft/lb). Locate the aft skid plate and install the bolts (22ft/lb).
Note: This torque seems high, I installed mine at 10ft/lb.
Step 49: Lower the vehicle from the jack stands and road test
Take the vehicle out for a short spin and verify there are no performance problems and listen for discrepant noises.
Step 50: Recheck coolant level and drive belt tension
Add additional distilled water to the radiator and/or the expansion tank if required.
Recheck belt tension and tighted if required.
I hope this helps to provide insight into the timing belt and water-pump replacement process. I would like to thank 4x4wire.com (and the Toyota Service Manual) for providing a baseline process from which to work from. It also helps to know that if I have any questions I can always count on yotatech.com for the answers.
Last edited by rworegon; 03-23-2016 at 06:51 PM.
08-10-2016, 06:02 AM
#53
Registered User

Join Date: Jun 2006
Posts: 69
Likes: 0
Received 0 Likes
on
0 Posts
When I replaced the water pump and timing belt on my 1998 Tacoma 3.4L engine I had to remove the AC pump and the bracket that holds it to the block. Then I had to tie the AC pump up high out of the way to gain clearance to one of the tensioner mounting bolts (can't recall which one right now). OTHERWISE IT WAS IMPOSSIBLE TO REMOVE THE TENSIONER ASSEMBLY FROM THIS ENGINE!Other folks have also had this problem. You may want to add this step to your discussion. I cannot speak for anything other than a 1998 3.4L engine.
Detaching and reattaching that bracket took me about 2 hours total and an assortment of wrenches and sockets, and a fresh start the next morning to reattach it to the block.
Detaching and reattaching that bracket took me about 2 hours total and an assortment of wrenches and sockets, and a fresh start the next morning to reattach it to the block.
10-12-2016, 12:04 AM
#54
Registered User
Pip, from what I remember, the tensioner tool eliminates the need to disassemble the timing belt tensioner and the a/c assembly.
I did not have that lucky tool so I did the same thing you did. Fun stuff, practicing contortion skills and blindly attaching bolts/sockets by feel.
I did not have that lucky tool so I did the same thing you did. Fun stuff, practicing contortion skills and blindly attaching bolts/sockets by feel.
10-14-2016, 05:27 PM
#55
Registered User
Join Date: Jun 2006
Posts: 69
Likes: 0
Received 0 Likes
on
0 Posts
That's right. I replaced my tensioner, so I had to remove the old one. If I wanted to reuse it after removing it, then I would have to find a way to compress it, and that's where the tool comes in.
I played around with the old tensioner and found that I could compress it using a 4-inch vice. However, I had to tighten the vice v-e-r-y slowly before I could get the retaining pin installed (to keep the tensioner compressed when I stored it).
Regarding the AC bracket, I did manage to remove and reinstall it WITHOUT skinning my knuckles
Last edited by Pipsisiwah; 10-14-2016 at 05:37 PM.
02-28-2018, 05:47 PM
#56
Registered User
Well I'm committed. 230,000 miles, last time this job was done was at the first 60,000 mile interval. I just ordered the parts from the first link in post #13 (guess I'm willing to pay for the Toyota badging..), and the price is currently $285. I mean come on Link
It'll take me awhile...this is a bigger job than I've done on this new of a vehicle, but I'm going to be house sitting for a friend in July for a week who has a garage and spare vehicle I can drive while mine is down, so I can take my time and do it fairly stress-free.
Thanks for the write-up, I'll be using it soon!
LinkIt'll take me awhile...this is a bigger job than I've done on this new of a vehicle, but I'm going to be house sitting for a friend in July for a week who has a garage and spare vehicle I can drive while mine is down, so I can take my time and do it fairly stress-free.
Thanks for the write-up, I'll be using it soon!
Last edited by 83; 02-28-2018 at 05:48 PM.
02-28-2018, 05:58 PM
#57
Registered User
What's the consensus on replacing the tensioners? Is it the right thing to do at 230,000 miles? Trying to decide whether to order new tensioners or the tensioner tool...
06-18-2018, 05:47 AM
#58
Registered User

Join Date: Oct 2007
Location: raleigh,nc
Posts: 302
Likes: 0
Received 0 Likes
on
0 Posts
Well I'm committed. 230,000 miles, last time this job was done was at the first 60,000 mile interval. I just ordered the parts from the first link in post #13 (guess I'm willing to pay for the Toyota badging..), and the price is currently $285. I mean come on Link
It'll take me awhile...this is a bigger job than I've done on this new of a vehicle, but I'm going to be house sitting for a friend in July for a week who has a garage and spare vehicle I can drive while mine is down, so I can take my time and do it fairly stress-free.
Thanks for the write-up, I'll be using it soon!
LinkIt'll take me awhile...this is a bigger job than I've done on this new of a vehicle, but I'm going to be house sitting for a friend in July for a week who has a garage and spare vehicle I can drive while mine is down, so I can take my time and do it fairly stress-free.
Thanks for the write-up, I'll be using it soon!
-crankshaft pulley bolt
-dipstick tube o ring
-timing cover gasket
are these parts 100% necessary?
07-14-2018, 07:09 AM
#60
Registered User
Well I ended up paying someone. Moment of weakness. He installed my parts. 240,000 miles, he said the water pump was original. Belts had been replaced at around 100,000 and I assumed they did the pump, but according to the mechanic, nope. It was leaking a bit but the belts looked fine. No oil leaks. I said "well it's probably the last timing belt/water pump job this truck will have" and he sort of looked at me, so I said "or not?". He says he's got two other customers with 3.4s who are the original owners and keep up on maintenance, and both are over 400,000 miles. Pretty cool.


